
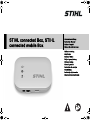
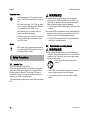
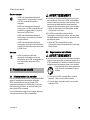
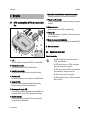
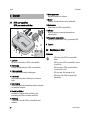
STIHL connected Box, STIHL
connected mobile Box
Gebrauchsanleitung
Instruction Manual
Notice d’emploi
Manual de instrucciones
Skötselanvisning
Käyttöohje
Istruzioni d’uso
Betjeningsvejledning
Bruksanvisning
Návod k použití
Instruções de serviço
Handleiding
Instrukcja użytkowania
Eksploatavimo instrukcija

D Gebrauchsanleitung
1 - 9
G Instruction Manual
10 - 18
F Notice d’emploi
19 - 29
E Manual de instrucciones
30 - 39
S Skötselanvisning
40 - 48
f Käyttöohje
49 - 57
I Istruzioni d’uso
58 - 67
d Betjeningsvejledning
68 - 76
N Bruksanvisning
77 - 85
c Návod k použití
86 - 94
P Instruções de serviço
95 - 104
n Handleiding
105 - 113
p Instrukcja użytkowania
114 - 122
l Eksploatavimo instrukcija
123 - 131

Original-GebrauchsanleitungGedruckt auf chlorfrei gebleichtem Papier.
Druckfarben enthalten pflanzliche Öle, Papier ist recycelbar.
© ANDREAS STIHL AG & Co. KG 2021
0458-199-9921-A. VA2.D21.
0000009206_003_D
0458-199-9921-A
deutsch
1
Diese Gebrauchsanleitung ist urheberrechtlich geschützt. Alle Rechte bleiben vorbehalten, besonders das Recht der Verviel-
fältigung, Übersetzung und der Verarbeitung mit elektronischen Systemen.
Inhaltsverzeichnis
WICHTIG! VOR GEBRAUCH LESEN UND
AUFBEWAHREN.
Weitere Informationen zur STIHL connected Box, STIHL
connected, kompatiblen Produkten und FAQs sind unter
https://connect.stihl.com/ oder bei einem STIHL
Fachhändler verfügbar.
Die Bluetooth
®
-Wortmarke und die -Bildzeichen (Logos)
sind eingetragene Warenzeichen und Eigentum der
Bluetooth SIG, Inc. Jegliche Verwendung dieser
Wortmarke/Bildzeichen durch STIHL erfolgt unter Lizenz.
„QR-Code“ ist eine registrierte Wortmarke von DENSO
WAVE INCORPORATED.
Die STIHL connected Box ist mit einer Bluetooth
®
-
Funkschnittstelle, Funknetzwerk-Schnittstelle und die
STIHL connected mobile Box zusätzlich mit einer Mobilfunk-
Schnittstelle ausgestattet. Lokale Betriebseinschränkungen
(zum Beispiel in Flugzeugen oder Krankenhäusern) müssen
beachtet werden.
1 Einleitende Erläuterungen
. . . . . . . . . . . . . . . . . . . . . . . . . . .
1
2 Übersicht
. . . . . . . . . . . . . . . . . . . . . . . . . . . . . . . . . . . . . . . . . . . .
2
2.1 STIHL connected Box, STIHL connected mobile
Box
. . . . . . . . . . . . . . . . . . . . . . . . . . . . . . . . . . . . . . . . . . . . . . . . .
2
2.2 Bedeutung der LEDs
. . . . . . . . . . . . . . . . . . . . . . . . . . . . . . . .
2
3 Sicherheitshinweise
. . . . . . . . . . . . . . . . . . . . . . . . . . . . . . . . .
3
3.1 Bestimmungsgemäße Verwendung
. . . . . . . . . . . . . . . . . .
3
3.2 Anforderungen an den Benutzer
. . . . . . . . . . . . . . . . . . . . .
3
3.3 Umgebung
. . . . . . . . . . . . . . . . . . . . . . . . . . . . . . . . . . . . . . . . . .
4
3.4 Sicherheitsgerechter Zustand
. . . . . . . . . . . . . . . . . . . . . . .
4
3.5 Elektrisch anschließen
. . . . . . . . . . . . . . . . . . . . . . . . . . . . . .
4
3.6 Reinigen, Warten und Reparieren
. . . . . . . . . . . . . . . . . . .
5
4 STIHL connected Box einsatzbereit machen
. . . . . . . . .
6
4.1 STIHL connected Box einsatzbereit machen
. . . . . . . . .
6
4.2 STIHL connected Box einrichten
. . . . . . . . . . . . . . . . . . . . .
6
4.3 Einstellungen ändern
. . . . . . . . . . . . . . . . . . . . . . . . . . . . . . . .
7
4.4 STIHL connected Box montieren
. . . . . . . . . . . . . . . . . . . .
7
5 Störungen beheben
. . . . . . . . . . . . . . . . . . . . . . . . . . . . . . . . .
8
5.1 Produktunterstützung und Hilfe zur Anwendung
. . . . .
8
5.2 STIHL connected Box zurücksetzen
. . . . . . . . . . . . . . . . .
8
6 Technische Daten
. . . . . . . . . . . . . . . . . . . . . . . . . . . . . . . . . . .
8
6.1 STIHL connected Box,
STIHL connected mobile Box
. . . . . . . . . . . . . . . . . . . . . . . .
8
6.2 Netzteil
. . . . . . . . . . . . . . . . . . . . . . . . . . . . . . . . . . . . . . . . . . . . . .
9
6.3 REACH
. . . . . . . . . . . . . . . . . . . . . . . . . . . . . . . . . . . . . . . . . . . . .
9
7 Ersatzteile und Zubehör
. . . . . . . . . . . . . . . . . . . . . . . . . . . . .
9
7.1 Ersatzteile und Zubehör
. . . . . . . . . . . . . . . . . . . . . . . . . . . . .
9
8 EU-Konformitätserklärung
. . . . . . . . . . . . . . . . . . . . . . . . . . .
9
8.1 STIHL connected Box,
STIHL connected mobile Box
. . . . . . . . . . . . . . . . . . . . . . . .
9
1 Einleitende Erläuterungen
Folgende Informationen und
Sicherheitshinweise lesen und beachten.
Unsachgemäße Verwendung kann zu schweren
Verletzungen führen.
Alle Sicherheitshinweise in der
Gebrauchsanleitung lesen und befolgen. Auch
die Gebrauchsanleitungen der STIHL Smart
Connectoren und der verwendeten STIHL
Produkte beachten.

0458-199-9921-A
2
deutsch
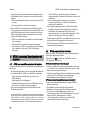
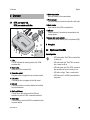
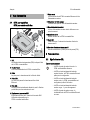
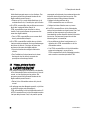
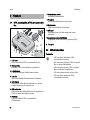
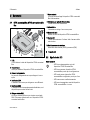
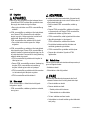
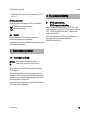
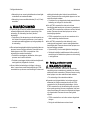
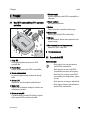
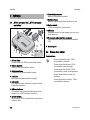
2 Übersicht
2.1 STIHL connected Box, STIHL connected mobile
Box
1LEDs
Die LEDs zeigen den Status der STIHL connected Box
an.
2 Reset-Taster
Dient zum Zurücksetzen der STIHL connected Box.
3 Anschlussbuchse
Die Anschlussbuchse nimmt den Stecker vom Kabel auf.
4 LAN-Buchse
Die LAN-Buchse dient zum Anschließen eines
Ethernetkabels.
5 USB-Anschluss
Der USB-Anschluss ist aktuell deaktiviert und bietet
Möglichkeiten für zukünftige Erweiterungen.
6 Steckplatz für SIM-Karte
Der Steckplatz für SIM-Karte nimmt eine SIM-Karte auf.
Nur mit der STIHL connected mobile Box nutzbar.
7 Rundstecker
Der Rundstecker verbindet die STIHL connected Box mit
dem Netzteil.
8 Netzstecker-Adapter
Elektrische Kontakte des Netzteils.
9 Netzteil
Das Netzteil verbindet das Kabel mit einer Steckdose.
10 Serialnummer
Serialnummer der STIHL connected Box.
11 QR-Code
Code zum Einscannen. Enthält die Zugangsdaten des
Funknetzwerks.
12 Zugangsdaten Funknetzwerk
Name des Funknetzwerks (SSID) und Passwort (PW).
# Leistungsschild
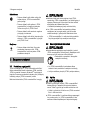
2.2 Bedeutung der LEDs
Betriebsstatus
2 Übersicht
XXXXXXXXXX
1
12
2
6
8
9
#
5
3
4
10
7
SSID:
PW:
11
scb.01C8
wIZAOYzB
0000097526_002
– LED blinkt weiß: Die STIHL connected Box
startet.
– LED leuchtet weiß: Die STIHL connected Box
ist bereit zur Einrichtung.
– LED leuchtet grün: Die STIHL connected Box
ist eingerichtet und betriebsbereit.
– LED leuchtet rot: Es besteht eine Störung.
– LED blinkt rot: Die STIHL connected Box wird
zurückgesetzt.

0458-199-9921-A
3
deutsch
3 Sicherheitshinweise
Verbindungsstatus
Update
3.1 Bestimmungsgemäße Verwendung
Die STIHL connected Box und die STIHL connected mobile
Box dienen zum automatischen Erfassen von STIHL
connected Daten von kompatiblen STIHL Produkten auf
Basis der Bluetooth
®
-Technologie. Die Daten werden in das
hinterlegte Benutzerkonto im STIHL connected Portal über
eine Internetverbindung übertragen.
Das Netzteil versorgt die STIHL connected Box mit Energie.
WARNUNG
■ Netzteile oder Netzgeräte, die nicht von STIHL für die
STIHL connected Box freigegeben sind, können Brände
und Explosionen auslösen. Personen können schwer
verletzt oder getötet werden und Sachschaden kann
entstehen.
► Das beiliegende original Netzteil verwenden.
■ Falls die STIHL connected Box oder das Netzteil nicht
bestimmungsgemäß verwendet werden, können
Personen schwer verletzt werden und Sachschaden kann
entstehen.
► STIHL connected Box und Netzteil so verwenden, wie
es in dieser Gebrauchsanleitung beschrieben ist.
3.2 Anforderungen an den Benutzer
WARNUNG
■ Benutzer ohne eine Unterweisung können die Gefahren
der STIHL connected Box nicht erkennen oder nicht
einschätzen. Der Benutzer oder andere Personen können
schwer verletzt oder getötet werden.
► Falls die STIHL connected Box an eine andere Person
weitergegeben wird: Gebrauchsanleitung mitgeben.
► Falls Unklarheiten bestehen: Einen STIHL Fachhändler
aufsuchen.
– LED leuchtet weiß: Das Funknetzwerk ist
aktiv. Die STIHL connected Box kann
eingerichtet werden.
– LED leuchtet gelb: Die STIHL connected Box
ist mit dem Internet verbunden. Es besteht
aber keine Verbindung zur STIHL Cloud.
– LED leuchtet rot: Es kann keine Verbindung
zum Internet hergestellt werden.
– LED leuchtet grün: Die Internetverbindung ist
aktiv und die STIHL connected Box ist mit der
STIHL Cloud verbunden.
– LED blinkt grün: Es werden aktuell Daten zur
Aktualisierung der STIHL connected Box oder
zur Aktualisierung der verbundenen STIHL
Produkte übertragen.
3 Sicherheitshinweise
► Gebrauchsanleitung lesen, verstehen und
aufbewahren.

0458-199-9921-A
4
deutsch
3 Sicherheitshinweise
3.3 Umgebung
WARNUNG
■ Kinder und Tiere können die Gefahren der STIHL
connected Box und des elektrischen Stroms nicht
erkennen und nicht einschätzen. Kinder und Tiere können
schwer verletzt oder getötet werden.
► Kinder und Tiere von der STIHL connected Box und
dem Netzteil fernhalten.
■ Die STIHL connected Box und das Netzteil sind nicht
wassergeschützt. Falls die STIHL connected Box oder
das Netzteil im Regen oder in feuchter Umgebung
betrieben werden, kann es zu einem elektrischen Schlag
kommen. Der Benutzer kann verletzt werden und die
STIHL connected Box oder das Netzteil können
beschädigt werden.
► Nicht im Regen und nicht in feuchter Umgebung
betreiben.
■ Die STIHL connected Box und das Netzteil sind nicht
gegen alle Umgebungseinflüsse geschützt. Falls die
STIHL connected Box und das Netzteil bestimmten
Umgebungseinflüssen ausgesetzt sind, können diese in
Brand geraten oder explodieren. Personen können
schwer verletzt werden und Sachschaden kann
entstehen.
► STIHL connected Box und Netzteil in einem
geschlossenen und trockenen Raum betreiben.
► Falls die STIHL connected Box im Fahrzeug eingebaut
und betrieben wird: STIHL connected Box in
geschlossenen und trockenen Bereichen im Fahrzeug
einbauen und betreiben.
► STIHL connected Box und Netzteil nicht in einer leicht
brennbaren und nicht in einer explosiven Umgebung
betreiben.
► STIHL connected Box nicht abdecken.
3.4 Sicherheitsgerechter Zustand
Die STIHL connected Box ist im sicherheitsgerechten
Zustand, falls folgende Bedingungen erfüllt sind:
– Die STIHL connected Box, das Netzteil und Kabel sind
unbeschädigt, sauber und trocken.
WARNUNG
■ In einem nicht sicherheitsgerechten Zustand können
Bauteile nicht mehr richtig funktionieren und
Sicherheitseinrichtungen außer Kraft gesetzt werden.
Personen können schwer verletzt oder getötet werden.
► Eine unbeschädigte STIHL connected Box, Netzteil und
Kabel verwenden.
► Falls die STIHL connected Box, das Netzteil oder Kabel
verschmutzt oder nass ist: STIHL connected Box,
Netzteil oder Kabel reinigen und trocknen lassen.
► STIHL connected Box, Netzteil und Kabel nicht
verändern.
► Gegenstände nicht in die Öffnungen der STIHL
connected Box des Netzteils oder Kabels stecken.
► Elektrische Kontakte nicht mit metallischen
Gegenständen verbinden und kurzschließen.
► STIHL connected Box und Netzteil nicht öffnen.
► Falls Unklarheiten bestehen: Einen STIHL Fachhändler
aufsuchen.
3.5 Elektrisch anschließen
Kontakt mit stromführenden Bauteilen kann durch folgende
Ursachen entstehen:
– Das Netzteil ist beschädigt.
– Die Steckdose ist nicht richtig installiert.

0458-199-9921-A
5
deutsch
3 Sicherheitshinweise
GEFAHR
■ Kontakt mit stromführenden Bauteilen kann zu einem
Stromschlag führen. Der Benutzer kann schwer verletzt
oder getötet werden.
► Sicherstellen, dass das Netzteil unbeschädigt ist.
► Falls das Netzteil beschädigt ist:
– Beschädigte Stelle nicht berühren.
– Netzteil aus der Steckdose ziehen.
► Netzteil mit trockenen Händen anfassen.
► Netzteil in eine richtig installierte und abgesicherte
Steckdose mit Schutzkontakt stecken.
► Netzteil über einen Fehlerstrom-Schutzschalter (30 mA,
30 ms) anschließen.
WARNUNG
■ Während des Betriebs kann eine falsche Netzspannung
oder eine falsche Netzfrequenz zu einer Überspannung im
Netzteil führen. Das Netzteil kann beschädigt werden.
► Sicherstellen, dass die Netzspannung und die
Netzfrequenz des Stromnetzes oder des
Spannungswandlers in einem Fahrzeug mit den
Angaben auf dem Leistungsschild des Netzteils
übereinstimmen.
■ Ein falsch verlegtes Kabel kann beschädigt werden und
Personen können darüber stolpern. Personen können
verletzt werden und die STIHL connected Box oder das
Netzteil kann beschädigt werden.
► Kabel so verlegen und kennzeichnen, dass Personen
nicht stolpern können.
► Kabel so verlegen, dass es nicht beschädigt, geknickt
oder gequetscht wird oder scheuert.
■ Falls elektrische Leitungen und Rohre in der Wand
verlaufen, können diese beschädigt werden, wenn die
STIHL connected Box an der Wand montiert wird. Kontakt
mit elektrischen Leitungen kann zu einem Stromschlag
führen. Personen können schwer verletzt werden und
Sachschaden kann entstehen.
► Sicherstellen, dass an der vorgesehenen Stelle keine
elektrische Leitungen und Rohre in der Wand verlaufen.
■ Falls die STIHL connected Box nicht wie in dieser
Gebrauchsanleitung beschrieben an der Wand montiert
ist, kann die STIHL connected Box herunterfallen oder zu
heiß werden. Personen können verletzt werden und
Sachschaden kann entstehen.
► STIHL connected Box so an eine Wand montieren, wie
es in dieser Gebrauchsanleitung beschrieben ist.
■ Falls die STIHL connected Box nicht fachgerecht in ein
Fahrzeug eingebaut wird, können Fahrzeugteile
beschädigt werden. Personen können verletzt werden und
Sachschaden kann entstehen.
► Aufbaurichtlinie des Fahrzeugherstellers beachten.
► Geltende nationale Installationsvorschriften werden
beim Anschluss an das Fahrzeugversorgungsnetz
eingehalten.
3.6 Reinigen, Warten und Reparieren
WARNUNG
■ Falls während der Reinigung, Wartung oder Reparatur
das Netzteil in eine Steckdose eingesteckt ist, kann es zu
einem elektrischen Schlag kommen. Personen können
schwer verletzt werden und Sachschaden kann
entstehen.
► Netzteil aus der Steckdose ziehen.
■ Scharfe Reinigungsmittel, das Reinigen mit einem
Wasserstrahl oder spitzen Gegenständen können die
STIHL connected Box oder das Netzteil beschädigen.
Falls die STIHL connected Box oder das Netzteil nicht
richtig gereinigt werden, können Bauteile nicht mehr

0458-199-9921-A
6
deutsch
4 STIHL connected Box einsatzbereit machen
richtig funktionieren und Sicherheitseinrichtungen außer
Kraft gesetzt werden. Personen können schwer verletzt
werden.
► STIHL connected Box außen mit einem trockenen Tuch
reinigen.
► Lüftungsschlitze mit einem Pinsel reinigen.
■ Falls die STIHL connected Box oder das Netzteil nicht
richtig gewartet oder repariert wird, können Bauteile nicht
mehr richtig funktionieren und Sicherheitseinrichtungen
außer Kraft gesetzt werden. Personen können schwer
verletzt oder getötet werden.
► STIHL connected Box und Netzteil nicht selbst warten
oder reparieren.
► Falls die STIHL connected Box oder das Netzteil
beschädigt ist: STIHL connected Box oder das Netzteil
nicht verwenden und einen STIHL Fachhändler
aufsuchen.
4.1 STIHL connected Box einsatzbereit machen
Vor der Inbetriebnahme müssen folgende Voraussetzungen
erfüllt sein:
– Ein Internetzugang über eine der folgende Möglichkeiten
ist in Reichweite der STIHL connected Box vorhanden:
– Verbindung über LAN-Buchse (Anschluss über
Ethernetkabel)
– Verbindung über Funknetzwerk
– Mobiler Internetzugang
1
über eine SIM-Karte (nur mit
der STIHL connected mobile Box möglich)
– Falls der Internetzugang über die LAN-Buchse oder
Funknetzwerk erfolgt:
– Die IP-Adressen vom Router müssen dynamisch
vergeben werden. Statische IP-Adressen werden nicht
unterstützt.
– Die Funknetzwerk-Verbindung muss mit einem
Passwort geschützt sein. Offene Funknetzwerke
werden nicht unterstützt.
– Falls der Internetzugang über eine SIM-Karte erfolgt:
– Die SIM-Karte muss durch eine PIN geschützt sein.
SIM-Karten mit deaktivierter PIN können nicht
verwendet werden. Falls keine PIN eingestellt ist: Mit
Hilfe eines Smartphones eine PIN vergeben.
– Der Benutzer ist im STIHL connected Portal registriert und
die persönlichen Zugangsdaten sind bekannt.
– Die Serialnummer der STIHL connected Box auf dem
Leistungsschild ist bekannt.
4.2 STIHL connected Box einrichten
Bevor die STIHL connected Box verwendet werden kann,
muss diese konfiguriert werden.
Dieses Symbol verweist auf die Grafiken auf der
Innenseite der Verpackung.
STIHL connected Box vorbereiten 1
► Falls ein mobiler Internetzugang verwendet werden soll
(nur mit der STIHL connected mobile Box nutzbar): SIM-
Karte in den Steckplatz einsetzen.
► Falls der Internetzugang über die LAN-Buchse hergestellt
werden soll: Ein ans Internet angeschlossenes
Ethernetkabel in die LAN-Buchse einstecken.
STIHL connected Box elektrisch anschließen 2
► Kabel und passenden Netzstecker-Adapter mit dem
Netzteil verbinden.
► Rundstecker in die Anschlussbuchse stecken.
► Netzteil in eine gut zugängliche Steckdose stecken.
Die STIHL connected Box startet und baut ein
Funknetzwerk auf. Die LED „Betriebsstatus“ blinkt weiß.
Sobald die LED „Betriebsstatus“ und LED
„Verbindungsstatus“ weiß leuchten ist die STIHL
connected Box bereit zur Einrichtung.
4 STIHL connected Box einsatzbereit
machen
1
Durch den Download von Daten über einen mobilen Internetzugang
können aufgrund der anfallenden Datenmenge Kosten entstehen.
Beim Betrieb der STIHL connected mobile Box besteht die
Internetverbindung dauerhaft. Erkundigen Sie sich vorab bei ihrem
Vertragspartner über ihren Tarif und entsprechende Gebühren.

0458-199-9921-A
7
deutsch
4 STIHL connected Box einsatzbereit machen
Verbindung mit dem Funknetzwerk der STIHL connected
Box herstellen 3
► QR-Code auf dem Leistungsschild mit einem Smartphone
scannen.
Die Verbindung mit dem Funknetzwerk der STIHL
connected Box wird automatisch hergestellt.
► Alternativ manuell mit dem Funknetzwerk der STIHL
connected Box verbinden.
Die Zugangsdaten sind auf dem Leistungsschild
angegeben.
► Falls sich die Konfigurationsseite im Internetbrowser
nicht automatisch öffnet: Konfigurationsseite über
http://stihl.connectedbox:80 in der Adresszeile des
Internetbrowsers aufrufen.
Internetzugang über die Konfigurationsseite
einrichten 4
► Den Anweisungen auf der Konfigurationsseite folgen und
den Internetzugang einrichten.
Sobald die STIHL connected Box mit dem Internet
verbunden ist, wird auf Updates geprüft und neu gestartet.
Verbindung mit dem Funknetzwerk der STIHL connected
Box erneut herstellen 5
Sobald die LED „Betriebsstatus“ und LED
„Verbindungsstatus“ wieder weiß leuchten:
► QR-Code erneut mit einem Smartphone scannen.
► Alternativ manuell mit dem Funknetzwerk der STIHL
connected Box verbinden.
► Falls sich die Konfigurationsseite im Internetbrowser
nicht automatisch öffnet: Konfigurationsseite über
http://stihl.connectedbox:80 in der Adresszeile des
Internetbrowsers aufrufen.
STIHL connected Benutzerkonto hinterlegen 6
► Den Anweisungen auf der Konfigurationsseite folgen und
das STIHL connected Benutzerkonto hinterlegen.
► Einrichtung der STIHL connected Box abschließen.
Sobald die LED „Betriebsstatus“ und LED
„Verbindungsstatus“ grün leuchten ist die Einrichtung der
STIHL connected Box abgeschlossen.
STIHL connected Box im STIHL connected Portal
hinzufügen 7
► STIHL connected Portal unter https://connect.stihl.com/
aufrufen, mit den persönlichen Zugangsdaten anmelden
und die STIHL connected Box hinzufügen.
4.3 Einstellungen ändern
Die Konfigurationsseite der STIHL connected Box kann
auch nachträglich aufgerufen werden um beispielsweise das
Funknetzwerk oder die Art des Internetzugangs zu ändern.
► Reset-Taster kurz drücken.
Das Funknetzwerk der STIHL connected Box wird
aufgebaut. Sobald die LED „Betriebsstatus“ und LED
„Verbindungsstatus“ weiß leuchten ist die STIHL
connected Box bereit zur Einrichtung.
► QR-Code mit einem Smartphone scannen.
Die Verbindung mit dem Funknetzwerk der STIHL
connected Box wird automatisch hergestellt.
► Alternativ manuell mit dem Funknetzwerk der STIHL
connected Box verbinden.
Die Zugangsdaten sind auf dem Leistungsschild
angegeben.
► Falls sich die Konfigurationsseite im Internetbrowser
nicht automatisch öffnet: Konfigurationsseite über
http://stihl.connectedbox:80 in der Adresszeile des
Internetbrowsers aufrufen.
► Einstellungen durchführen und abschließen.
Die STIHL connected Box geht wieder in den
Betriebsmodus.
4.4 STIHL connected Box montieren
► Netzstecker aus der Steckdose ziehen.
► Einen Ort auswählen, der sich in Funkreichweite der
kompatiblen STIHL Produkte befindet.
STIHL connected Box an eine Wand montieren
► STIHL connected Box so an eine Wand montieren, dass
folgende Bedingungen erfüllt sind:

0458-199-9921-A
8
deutsch
5 Störungen beheben
– Die STIHL connected Box wird mit zwei Schrauben an
die Wand montiert.
– Geeignetes Befestigungsmaterial für die
Beschaffenheit der Wand wird verwendet.
– Die STIHL connected Box ist waagrecht und die
Anschlüsse zeigen nach unten.
– Folgende Maße sind eingehalten:
– Abstand um die STIHL connected Box zu anderen
Gegenständen und Flächen = mindestens 100 mm
– Abstand der Bohrlöcher = 100 mm
– Durchmesser des Schraubenkopfs = 6,5 mm
– Durchmesser des Schraubenschafts = 3 mm
– Abstand der Unterseite des Schraubenkopfs zur
Wand = 2 mm
► Vor dem Einhängen der STIHL connected Box prüfen,
dass die Schrauben fest in der Wand montiert sind.
STIHL connected Box an einer Hutschiene montieren
► STIHL connected Box an einer Hutschiene mit 35 mm
Breite und 1,5 mm Materialstärke befestigen.
STIHL connected Box in ein Fahrzeug einbauen
► STIHL connected Box an einer Hutschiene mit 35 mm
Breite und 1,5 mm Materialstärke befestigen.
► Zusätzlich folgende Punkte beachten:
– Aufbaurichtlinie des Fahrzeugherstellers.
– Netzspannung und Netzfrequenz der
Fahrzeugsteckdose stimmen mit den Angaben auf dem
Leistungsschild der STIHL connected Box überein.
5.1 Produktunterstützung und Hilfe zur Anwendung
Produktunterstützung und Hilfe zur Anwendung sind bei
einem STIHL Fachhändler erhältlich.
Kontaktmöglichkeiten und weitere Informationen sind unter
https://support.stihl.com/ oder https://www.stihl.com/ zu
finden.
5.2 STIHL connected Box zurücksetzen
► Reset-Taster drücken und 5 Sekunden lang gedrückt
halten.
Die LED „Betriebsstatus“ blinkt rot und alle Einstellungen
werden zurückgesetzt. Die STIHL connected Box startet
anschließend neu.
6.1 STIHL connected Box,
STIHL connected mobile Box
Technische Daten
– Eingangsspannung: 5 V d.c.
– Nennleistung: 10 W
– elektrische Schutzart: IP21 (Geschützt gegen feste
Fremdkörper mit Durchmesser ≥ 12,5 mm; Schutz gegen
Tropfwasser)
– Zulässiger Temperaturbereich für Verwendung und
Aufbewahrung: - 20 °C bis + 60 °C
Bluetooth
®
– Datenverbindung: Bluetooth
®
5.0
– Frequenzband: ISM-Band 2,4 GHz
– Abgestrahlte maximale Sendeleistung: 100 mW
– Empfangsradius: ca. 10 m. Die Signalstärke ist abhängig
von den Umgebungsbedingungen. Die Reichweite kann je
nach äußeren Bedingungen stark variieren. Innerhalb von
geschlossenen Räumen und durch metallische Barrieren
(zum Beispiel Wände, Regale, Koffer) kann die
Reichweite deutlich geringer sein.
– Erfassung der STIHL connected Daten in Reichweite:
permanent
– Übertragung der erfassten Daten über die
Internetverbindung in das STIHL connected Portal: alle
5 Minuten
5 Störungen beheben
6 Technische Daten

0458-199-9921-A
9
deutsch
7 Ersatzteile und Zubehör
Funknetzwerk
– Netzwerk-Standard: IEEE 802.11b/g/n
– Frequenzband: 2,4 GHz
– Abgestrahlte maximale Sendeleistung: 100 mW
Mobiler Internetzugang (STIHL connected mobile Box)
– Format der SIM-Karte: Mini-SIM
– Frequenzbänder
– LTE-FDD: B1, B3, B7, B8, B20, B28
– LTE-TDD: B38
– UMTS, HSDPA, HSPA+: B1, B2, B4, B5, B6, B8, B19
– GSM, GPRS, EDGE: 850 MHz, 900 MHz, 1800 MHz,
1900 MHz
– Abgestrahlte maximale Sendeleistung: 2 W
– Durchschnittlich anfallende Datenmengen pro Monat:
siehe FAQ unter https://support.stihl.com/
6.2 Netzteil
– Nennspannung: 230 V a.c., 50 Hz
– Nennleistung: 10 W
– Ausgangsspannung: 5 V d.c.
– Zulässiger Temperaturbereich für Verwendung und
Aufbewahrung: - 20 °C bis + 60 °C
Symbole auf dem Produkt
Folgende Symbole können auf der STIHL connected Box
sein:
6.3 REACH
REACH bezeichnet eine EG-Verordnung zur Registrierung,
Bewertung und Zulassung von Chemikalien.
Informationen zur Erfüllung der REACH Verordnung sind
unter www.stihl.com/reach angegeben.
7.1 Ersatzteile und Zubehör
STIHL empfiehlt, original STIHL Ersatzteile und original
STIHL Zubehör zu verwenden.
Ersatzteile und Zubehör anderer Hersteller können durch
STIHL hinsichtlich Zuverlässigkeit, Sicherheit und Eignung
trotz laufender Marktbeobachtung nicht beurteilt werden und
STIHL kann für deren Einsatz auch nicht einstehen.
Original STIHL Ersatzteile und original STIHL Zubehör sind
bei einem STIHL Fachhändler erhältlich.
8.1 STIHL connected Box,
STIHL connected mobile Box
Hiermit erklärt ANDREAS STIHL AG & Co. KG, dass der
Funkanlagentyp CE02 - STIHL connected Box und CE02 -
STIHL connected mobile Box der Richtlinie 2014/53/EU
entspricht.
Der vollständige Text der EU-Konformitätserklärung ist
unter der folgenden Internetadresse verfügbar:
www.stihl.com/conformity
Produkt nicht mit dem Hausmüll entsorgen.
7 Ersatzteile und Zubehör
Diese Symbole kennzeichnen original STIHL
Ersatzteile und original STIHL Zubehör.
8 EU-Konformitätserklärung

Translation of Original Instruction
Manual
Printed on chlorine-free paper
Printing inks contain vegetable oils, paper can be recycled.
© ANDREAS STIHL AG & Co. KG 2021
0458-199-9921-A. VA2.D21.
0000009206_003_GB
0458-199-9921-A
English
10
This instruction manual is protected by copyright. All rights reserved, especially the rights to reproduce, translate and process
with electronic systems.
Contents
IMPORTANT! READ BEFORE USING AND KEEP IN A
SAFE PLACE FOR REFERENCE.
For further information on the STIHL connected Hub, STIHL
connected, compatible products and FAQs visit
https://connect.stihl.com/ or contact a STIHL dealer.
The Bluetooth
®
word mark and logos are registered
trademarks owned by Bluetooth SIG, Inc. These word
mark/logos are used by STIHL under license.
"QR-Code" is a registered word mark of DENSO WAVE
INCORPORATED.
The STIHL connected Hub is equipped with a Bluetooth
®
radio interface, radio network interface, and the
STIHL connected mobile Hub additionally with a mobile
network interface. Local operating restrictions (in aircraft or
hospitals, for example) must be observed.
1 Explanatory Note
. . . . . . . . . . . . . . . . . . . . . . . . . . . . . . . . . . .
10
2 Overview
. . . . . . . . . . . . . . . . . . . . . . . . . . . . . . . . . . . . . . . . . . .
11
2.1 STIHL connected Hub,
STIHL connected mobile Hub
. . . . . . . . . . . . . . . . . . . . . .
11
2.2 Significance of the LEDs
. . . . . . . . . . . . . . . . . . . . . . . . . . .
11
3 Safety Precautions
. . . . . . . . . . . . . . . . . . . . . . . . . . . . . . . . .
12
3.1 Intended Use
. . . . . . . . . . . . . . . . . . . . . . . . . . . . . . . . . . . . . . .
12
3.2 Requirements concerning the user
. . . . . . . . . . . . . . . . .
12
3.3 Environment
. . . . . . . . . . . . . . . . . . . . . . . . . . . . . . . . . . . . . . .
13
3.4 Safe condition
. . . . . . . . . . . . . . . . . . . . . . . . . . . . . . . . . . . . . .
13
3.5 Connecting to the power supply
. . . . . . . . . . . . . . . . . . . .
13
3.6 Cleaning, Maintenance and Repair
. . . . . . . . . . . . . . . . .
14
4 Preparing the STIHL connected Box for
Operation
. . . . . . . . . . . . . . . . . . . . . . . . . . . . . . . . . . . . . . . . . .
15
4.1 Preparing the STIHL connected Hub for
Operation
. . . . . . . . . . . . . . . . . . . . . . . . . . . . . . . . . . . . . . . . . .
15
4.2 Setting up the STIHL connected Hub
. . . . . . . . . . . . . . .
15
4.3 Changing the Settings
. . . . . . . . . . . . . . . . . . . . . . . . . . . . . .
16
4.4 Mounting the STIHL connected Hub
. . . . . . . . . . . . . . . .
16
5 Troubleshooting
. . . . . . . . . . . . . . . . . . . . . . . . . . . . . . . . . . . .
17
5.1 Product Support and Assistance on Use
. . . . . . . . . . . .
17
5.2 Resetting the STIHL connected Hub
. . . . . . . . . . . . . . . .
17
6 Specifications
. . . . . . . . . . . . . . . . . . . . . . . . . . . . . . . . . . . . . .
17
6.1 STIHL connected Hub,
STIHL connected mobile Hub
. . . . . . . . . . . . . . . . . . . . . .
17
6.2 Power Adapter
. . . . . . . . . . . . . . . . . . . . . . . . . . . . . . . . . . . . .
18
6.3 REACH
. . . . . . . . . . . . . . . . . . . . . . . . . . . . . . . . . . . . . . . . . . . .
18
7 Spare Parts and Accessories
. . . . . . . . . . . . . . . . . . . . . . .
18
7.1 Spare parts and accessories
. . . . . . . . . . . . . . . . . . . . . . .
18
8 EC Declaration of Conformity
. . . . . . . . . . . . . . . . . . . . . . .
18
8.1 STIHL connected Box,
STIHL connected mobile Box
. . . . . . . . . . . . . . . . . . . . . . .
18
1 Explanatory Note
Read and observe the following information and
safety instructions. Improper use can result in
serious injuries.
Read and observe all safety precautions in the
User Manual. Also observe the User Manuals of
the STIHL Smart Connectors and the STIHL
products you are using.

0458-199-9921-A
11
English
2 Overview
2.1 STIHL connected Hub,
STIHL connected mobile Hub
1LEDs
The LED indicates the operating status of the STIHL
connected Hub.
2 Reset button
Resets the STIHL connected Hub.
3 Connection socket
The power cable is plugged into the connection socket.
4 LAN socket
The Ethernet cable is plugged into the LAN socket.
5 USB port
The USB connection is currently disabled but available
for future extensions.
6 Slot for a SIM card
The slot for the SIM card receives the SIM card.
Available only with the STIHL connected mobile Hub.
7 Round plug
The round plug connects the STIHL connected Hub with
the power adapter.
8 Mains plug adapter
Electrical contacts of the power adapter.
9 Power adapter
The power adapter connects the cable with a wall outlet.
10 Serial number
Serial number of the STIHL connected Hub.
11 QR code
Code for scanning. Comprises the access data for the
remote network.
12 Access data remote network
Name of the remote network (SSID) and password (PW).
# Rating plate
2.2 Significance of the LEDs
Operating status
2Overview
XXXXXXXXXX
1
12
2
6
8
9
#
5
3
4
10
7
SSID:
PW:
11
scb.01C8
wIZAOYzB
0000097526_002
– LED flashes white: The STIHL connected Hub
is starting up.
– LED emits white light: The STIHL connected
Hub is ready for set-up.
– LED emits green light: The STIHL connected
Hub has been set up and is ready for use.
– LED emits red light: There is a malfunction.
– LED flashes red: The STIHL connected Hub is
being reset.

0458-199-9921-A
12
English
3 Safety Precautions
Connection status
Update
3.1 Intended Use
The STIHL connected Hub and the
STIHL connected mobile Hub are intended for automatic
collection of STIHL connected data of compatible STIHL
products based on Bluetooth
®
technology. The data is
transferred via Internet connection into the user account
created in the STIHL connected portal.
The power adapted supplies power to the STIHL connected
Hub.
WARNING
■ Charging cables or power supply units not explicitly
approved for the STIHL connected Hub by STIHL may
cause a fire or explosion. Persons may be seriously or
fatally injured and property may be damaged.
► Use the original STIHL power adapter comprised in the
delivery.
■ Using the STIHL connected Hub or the power adapter for
purposes for which they are not designed may result in
serious or fatal injuries and damage to property.
► Use the STIHL connected Hub and power adapter as
described in this User Manual.
3.2 Requirements concerning the user
WARNING
■ Users without adequate training or instruction cannot
recognize or assess the risks involved in using the STIHL
connected Hub. The user or other persons may sustain
serious or fatal injuries.
► If the STIHL connected Hub is passed on to another
person: Always give them the User Manual.
► If you have any doubts, be sure to consult a STIHL
dealer.
– LED emits white light: The remote network is
active. The STIHL connected Hub can be set
up.
– LED emits yellow light: The STIHL connected
Hub is connected with the Internet. But there
is no connection to the STIHL cloud.
– LED emits red light: Connection with the
Internet cannot be established.
– LED emits green light: The STIHL connected
Hub is connected with the Internet and with
the STIHL cloud.
– LED flashes green: Ongoing data transfer for
an update of the STIHL connected Hub or the
connected STIHL products.
3 Safety Precautions
► Read, understand and keep the User
Manual.

0458-199-9921-A
13
English
3 Safety Precautions
3.3 Environment
WARNING
■ Children and animals are not aware of and cannot assess
the dangers of the STIHL connected Hub or electric
current. Children and animals can be seriously injured or
killed.
► Keep children and animals away from the STIHL
connected Hub and the power adapter.
■ The STIHL connected Hub and the power adapter are not
waterproof. If the STIHL connected Hub or the power
adapter are operated in the rain or in a damp environment,
an electric shock may occur. The user may be injured and
the STIHL connected Hub or power adapter may be
damaged.
► Do not operate it in the rain or in a damp environment.
■ The STIHL connected Hub and the power adapter are not
protected against all ambient conditions. If the STIHL
connected Hub and the power adapter are exposed to
certain ambient conditions, they may catch fire or explode.
This may result in serious injury to people and damage to
property.
► Operate the STIHL connected Hub and power adapter
in a dry place, indoors only.
► If the STIHL connected Hub is installed and operated in
a vehicle: Install and operate the STIHL connected Hub
in a closed and dry area in the vehicle.
► Do not operate the STIHL connected Hub and power
adapter in a flammable environment or in an explosive
environment.
► Do not cover the STIHL connected Hub.
3.4 Safe condition
The STIHL connected Hub is in a safe condition if the
following points are observed:
– The STIHL connected Hub, power adapter and cable are
free of damage, clean and dry.
WARNING
■ If not in safe condition, components may no longer
operate correctly and safety devices may be disabled.
This may result in serous or fatal injury to people.
► Use a STIHL connected Hub, power adapter and cable
which are free of damage.
► If the STIHL connected Hub, power adapter or cable are
dirty or wet: Clean the STIHL connected Hub, power
adapter or cable and allow to dry.
► Do not change the STIHL connected Hub, power
adapter and cable.
► Do not insert objects into the opening of the STIHL
connected Hub, power adapter or cable.
► Never bridge the contacts with metallic objects (short
circuit).
► Do not open the STIHL connected Hub and the power
adapter.
► If you have any doubts, be sure to consult a STIHL
dealer.
3.5 Connecting to the power supply
Contact with live components may occur for the following
reasons:
– The power adapter is damaged.
– The socket is not properly installed.
DANGER
■ Contact with live parts may result in electric shock. This
may result in serious or fatal injury to the user.
► Check that power adapter is undamaged.
► If the power adapter is damaged:
– Do not touch the damaged area.
– Disconnect the power adapter from the power supply.
► Be sure your hands are dry before touching the power
adapter.

0458-199-9921-A
14
English
3 Safety Precautions
► Insert the power adapter in a properly installed and
fused wall outlet.
► Install the power adapter with a ground fault circuit
interrupter (30 mA, 30 ms).
WARNING
■ Overvoltage can occur in the power adapter if the line
voltage or frequency are incorrect during operation. The
power adapter may be damaged.
► Make sure that the mains voltage and the mains
frequency of the power supply or the voltage
transformer in a vehicle match the data on the rating
plate of the power adapter.
■ A carelessly laid cable may be damaged and cause others
to trip or fall. People may be injured and the STIHL
connected Hub or power adapter may be damaged.
► Position and mark cables so they do not represent a trip
hazard.
► Route the cable so that it will not be damaged, kinked or
crushed, or chafed.
■ If wiring and pipes are laid in the wall, they may be
damaged if the STIHL connected Hub is mounted on the
wall. Contact with wiring can result in electric shock. This
may result in serious injury to people and damage to
property.
► Make sure there is no wiring or pipes in the wall at the
proposed mounting site.
■ If the STIHL connected Hub is not mounted on the wall as
described in this User Manual, the STIHL connected Hub
may move, fall down, or overheat. Persons may be injured
or property damaged.
► Mount the STIHL connected Hub on the wall as
described in this User Manual.
■ If the STIHL connected Hub has not been professionally
installed in the vehicle, vehicle components may be
damaged. Persons may be injured or property damaged.
► Observe the vehicle manufacturer's mounting
instructions.
► Applicable national installation regulations are
observed when connecting the charger to the vehicle
supply system.
3.6 Cleaning, Maintenance and Repair
WARNING
■ There is a risk of an electric shock if the power adapter is
not removed from the wall outlet during cleaning,
maintenance or repair operations. This may result in
serious injury to people and damage to property.
► Disconnect the power adapter from the power supply.
■ Aggressive cleaning agents, cleaning with a jet of water or
pointed objects can damage the STIHL connected Hub or
the power adapter. If the STIHL connected Hub or the
power adapter are not cleaned correctly, components may
no longer function properly or safety devices may be
rendered inoperative. They may cause serious injury to
persons.
► Clean the outside of the STIHL connected Hub with a
dry cloth.
► Clean vents with a paintbrush.

0458-199-9921-A
15
English
4 Preparing the STIHL connected Box for Operation
■ If the STIHL connected Hub or the power adapter are not
serviced or repaired correctly, components may no longer
function properly or safety devices may be rendered
inoperative. This may result in serous or fatal injury to
people.
► Do not attempt to service or repair the STIHL connected
Hub and the power adapter.
► If the STIHL connected Hub or power adapter has a
malfunction or is damaged: Do not use the STIHL
connected Hub and contact your STIHL dealer.
4.1 Preparing the STIHL connected Hub for
Operation
The following steps must be performed before starting up:
– Internet access is available within the range of the STIHL
connected Hub via one of the following:
– Connection via LAN socket (connection via Ethernet
cable)
– Connection via remote network
– Mobile Internet access
1
via a SIM card (available only
with the STIHL connected mobile Hub)
– For Internet access via LAN socket or remote network:
– The IP addresses from the router must be assigned
dynamically. Static IP addresses are not supported.
– The remote network connection must be password
protected. Open remote networks are not supported.
– For Internet access is via SIM card:
– The SIM card must be PIN protected. SIM cards with
PIN deactivation cannot be used. If no PIN is set: Assign
a PIN via smartphone.
– The user is registered in the STIHL connected portal, his
or her personal access data is known.
– The serial number of the STIHL connected Hub on the
rating plate is known.
4.2 Setting up the STIHL connected Hub
Before you can use the STIHL connected Hub, it must be
configured.
This icon refers to the graphs on the inside of the
package.
Preparing the STIHL connected Hub 1
► If you wish to use a mobile Internet access (available with
the STIHL connected mobile Hub only): Put the SIM card
into the slot.
► If you wish to connect to the Internet via the LAN socket:
Plug an Ethernet cable connected to the Internet into the
LAN socket.
Electric connection of the STIHL connected Hub 2
► Connect the cable and the matching mains plug adapter
with the power adapter.
► Insert the round plug into the socket.
► Insert the power adapter in a convenient wall outlet.
The STIHL connected Hub starts up and establishes a
remote network connection. The "Operating status" LED
flashes white. As soon as the "operating status" and the
"connection status" LEDs emit white light, the STIHL
connected Hub is ready for setup.
Establishing a connection with the remote network of the
STIHL connected Hub 3
► Scan the QR code on the rating plate with your
smartphone.
The connection to the remote network of the STIHL
connected Hub is established automatically.
► As a alternative, manually establish a connection with the
remote network of the STIHL connected Hub.
The access data is indicated on the rating plate.
4 Preparing the STIHL connected Box
for Operation
1
Charges may be incurred from the download of data via a mobile
Internet access due to the amount of data involved. The STIHL
connected mobile Hub requires a permanent connection to the
Internet while it is running. Before using it, ask your provider for the
respective costs and charges.

0458-199-9921-A
16
English
4 Preparing the STIHL connected Box for Operation
► If the configuration page in the Internet browser does not
open automatically: Scan the code shown on the package,
or call up the configuration page in the address bar of the
Internet browser: http://stihl.connectedbox:80.
Setting up Internet access via the configuration page 4
► Follow the instructions on the configuration page and set
up the Internet access.
As soon as the STIHL connected Hub is connected with
the Internet, the system checks for updates and does a
restart.
Re-establishing the connection with the remote network of
the STIHL connected Hub 5
As soon as the "operating status" and "connection status"
LEDs emit white light again:
► Scan the QR code once more with your smartphone.
► As a alternative, manually establish a connection with the
remote network of the STIHL connected Hub.
► If the configuration page in the Internet browser does not
open automatically: Scan the code shown on the package,
or call up the configuration page in the address bar of the
Internet browser: http://stihl.connectedbox:80.
Establishing a STIHL connected user account 6
► Follow the instructions on the configuration page and
establish the STIHL connection user account.
► Finish the setup of the STIHL connected Hub.
As soon as the "operating status" and the "connection
status" LEDs emit green light, the setup of the STIHL
connected Hub is completed.
Adding the STIHL connected Hub to the STIHL connected
portal 7
► Call up the STIHL connected portal at
https://connect.stihl.com, log in with your personal access
data and add the STIHL connected Hub.
4.3 Changing the Settings
The configuration page of the STIHL connected Hub can
also be called up at a later time to change for example the
radio network of the type of Internet access.
► Briefly press the Reset button.
The radio network of the STIHL connected Hub is
established. As soon as the "operating status" and the
"connection status" LEDs emit white light, the STIHL
connected Hub is ready for setup.
► Scan the QR code with your smartphone.
The connection to the remote network of the STIHL
connected Hub is established automatically.
► As a alternative, manually establish a connection with the
remote network of the STIHL connected Hub.
The access data is indicated on the rating plate.
► If the configuration page in the Internet browser does not
open automatically: Scan the code shown on the package,
or call up the configuration page in the address bar of the
Internet browser: http://stihl.connectedbox:80.
► Make the settings and confirm to complete.
The STIHL connected Hub returns to operating mode.
4.4 Mounting the STIHL connected Hub
► Disconnect the mains plug from the power supply.
► Select a location within radio range of the compatible
STIHL products.
Mounting the STIHL connected Hub on a wall
► Check the following points when mounting the STIHL
connected Hub on a wall:
– The STIHL connected Hub is mounted on the wall with
two screws.
– Mounting material suitable for the nature of the wall is
used.
– The STIHL connected Hub is horizontal, the connectors
face down.
– The following dimensions are observed:
– Distance between all sides of the STIHL connected
Hub to other objects and surfaces min. 100 mm
– Distance of the bare holes = 100 mm
– Diameter of the screw head = 6.5 mm
– Diameter of the screw shaft = 3 mm
– Distance of the screw head bottom to the wall = 2 mm

0458-199-9921-A
17
English
5 Troubleshooting
► Before hanging the STIHL connected box, check that the
screws are firmly mounted in the wall.
Mounting the STIHL connected Hub to a cap rail
► Attach the STIHL connected box to a cap rail with a width
of 35 mm and a material thickness of 1.5 mm.
Installing the STIHL connected Hub in a vehicle
► Attach the STIHL connected box to a cap rail with a width
of 35 mm and a material thickness of 1.5 mm.
► In addition, the following points should be noted:
– Vehicle manufacturer's mounting instructions.
– Make sure the line voltage and frequency of the socket
in the vehicle agree with the data on the rating plate of
the STIHL connected Hub.
5.1 Product Support and Assistance on Use
Product support and assistance on use are available from
STIHL servicing dealers.
For contacts and other information visit
https://support.stihl.com/ or https://www.stihl.com/.
5.2 Resetting the STIHL connected Hub
► Press the Reset button and hold for about 5 seconds.
The "operating status" LED flashes red, and all settings
are reset. The STIHL connected Hub restarts after that.
6.1 STIHL connected Hub,
STIHL connected mobile Hub
Specifications
– Input voltage: 5 V d.c.
– Power rating: 10 W
– Degree of electrical protection: IP21 (protection against
solid foreign matter with a diameter ≥ 12.5 mm;
protection against dripping water)
– Permissible temperature range for operation and storage:
-20 °C up to +60 °C
Bluetooth
®
– Data link: Bluetooth
®
5.0
– Frequency band: ISM band 2.4 GHz
– Maximum RF power transmitted: 100 mW
– Reception range: approx. 10 m. The signal strength
depends on the ambient conditions. Signal range can vary
greatly depending on local conditions. The range may be
perceptibly reduced inside enclosed rooms and through
metal barriers (such as walls, shelves or cases).
– Capture of STIHL connected data in the range: permanent
– Transfer of the captured data via the Internet connection
to the STIHL connected portal: every 5 minutes
Radio network
– Network standard: IEEE 802.11b/g/n
– Frequency band: 2.4 GHz
– Maximum RF power transmitted: 100 mW
5 Troubleshooting
6 Specifications

0458-199-9921-A
18
English
7 Spare Parts and Accessories
Mobile Internet access (STIHL connected mobile Hub)
– Format of the SIM card: Mini-SIM
– Frequency bands
– LTE-FDD: B1, B3, B7, B8, B20, B28
– LTE-TDD: B38
– UMTS, HSDPA, HSPA+: B1, B2, B4, B5, B6, B8, B19
– GSM, GPRS, EDGE: 850 MHz, 900 MHz, 1800 MHz,
1900 MHz
– Radiated maximum transmission power: 2 W
– Average data volume per month: see FAQs under
https://support.stihl.com/
6.2 Power Adapter
– Rated voltage: 230 V a.c., 50 Hz
– Power rating: 10 W
– Output voltage: 5 V d.c.
– Permissible temperature range for operation and storage:
-20 °C up to +60 °C
Symbols on the product
The following symbols may appear on the STIHL connected
box:
6.3 REACH
REACH is an EC regulation and stands for the Registration,
Evaluation, Authorisation and Restriction of Chemical
substances.
For information on compliance with the REACH regulation
see www.stihl.com/reach.
7.1 Spare parts and accessories
STIHL recommends the use of original STIHL spare parts
and accessories.
Despite ongoing market observation, STIHL is unable to
judge the reliability, safety and suitability of other
manufacturers' spare parts and accessories; accordingly,
STIHL cannot warrant for the use of those parts.
Original STIHL spare parts and original STIHL accessories
are available from STIHL dealers.
8.1 STIHL connected Box,
STIHL connected mobile Box
ANDREAS STIHL AG & Co. KG herewith declares that the
radio communication unit type CE02 - STIHL connected box
und CE02 - STIHL connected mobile box complies with
Directive 2014/53/EU.
For the full text of the EU Declaration of Conformity, refer to
the following web address: www.stihl.com/conformity
Do not dispose of the product with domestic waste.
7 Spare Parts and Accessories
These symbols indicate original STIHL spare
parts and original STIHL accessories.
8 EC Declaration of Conformity
A página está carregando...
A página está carregando...
A página está carregando...
A página está carregando...
A página está carregando...
A página está carregando...
A página está carregando...
A página está carregando...
A página está carregando...
A página está carregando...
A página está carregando...
A página está carregando...
A página está carregando...
A página está carregando...
A página está carregando...
A página está carregando...
A página está carregando...
A página está carregando...
A página está carregando...
A página está carregando...
A página está carregando...
A página está carregando...
A página está carregando...
A página está carregando...
A página está carregando...
A página está carregando...
A página está carregando...
A página está carregando...
A página está carregando...
A página está carregando...
A página está carregando...
A página está carregando...
A página está carregando...
A página está carregando...
A página está carregando...
A página está carregando...
A página está carregando...
A página está carregando...
A página está carregando...
A página está carregando...
A página está carregando...
A página está carregando...
A página está carregando...
A página está carregando...
A página está carregando...
A página está carregando...
A página está carregando...
A página está carregando...
A página está carregando...
A página está carregando...
A página está carregando...
A página está carregando...
A página está carregando...
A página está carregando...
A página está carregando...
A página está carregando...
A página está carregando...
A página está carregando...
A página está carregando...
A página está carregando...
A página está carregando...
A página está carregando...
A página está carregando...
A página está carregando...
A página está carregando...
A página está carregando...
A página está carregando...
A página está carregando...
A página está carregando...
A página está carregando...
A página está carregando...
A página está carregando...
A página está carregando...
A página está carregando...
A página está carregando...
A página está carregando...
A página está carregando...
A página está carregando...
A página está carregando...
A página está carregando...
A página está carregando...
A página está carregando...
A página está carregando...
A página está carregando...
A página está carregando...
A página está carregando...
A página está carregando...
A página está carregando...
A página está carregando...
A página está carregando...
A página está carregando...
A página está carregando...
A página está carregando...
A página está carregando...
A página está carregando...
A página está carregando...
A página está carregando...
A página está carregando...
A página está carregando...
A página está carregando...
A página está carregando...
A página está carregando...
A página está carregando...
A página está carregando...
A página está carregando...
A página está carregando...
A página está carregando...
A página está carregando...
A página está carregando...
A página está carregando...
A página está carregando...
A página está carregando...
A página está carregando...
A página está carregando...
A página está carregando...
A página está carregando...
-
 1
1
-
 2
2
-
 3
3
-
 4
4
-
 5
5
-
 6
6
-
 7
7
-
 8
8
-
 9
9
-
 10
10
-
 11
11
-
 12
12
-
 13
13
-
 14
14
-
 15
15
-
 16
16
-
 17
17
-
 18
18
-
 19
19
-
 20
20
-
 21
21
-
 22
22
-
 23
23
-
 24
24
-
 25
25
-
 26
26
-
 27
27
-
 28
28
-
 29
29
-
 30
30
-
 31
31
-
 32
32
-
 33
33
-
 34
34
-
 35
35
-
 36
36
-
 37
37
-
 38
38
-
 39
39
-
 40
40
-
 41
41
-
 42
42
-
 43
43
-
 44
44
-
 45
45
-
 46
46
-
 47
47
-
 48
48
-
 49
49
-
 50
50
-
 51
51
-
 52
52
-
 53
53
-
 54
54
-
 55
55
-
 56
56
-
 57
57
-
 58
58
-
 59
59
-
 60
60
-
 61
61
-
 62
62
-
 63
63
-
 64
64
-
 65
65
-
 66
66
-
 67
67
-
 68
68
-
 69
69
-
 70
70
-
 71
71
-
 72
72
-
 73
73
-
 74
74
-
 75
75
-
 76
76
-
 77
77
-
 78
78
-
 79
79
-
 80
80
-
 81
81
-
 82
82
-
 83
83
-
 84
84
-
 85
85
-
 86
86
-
 87
87
-
 88
88
-
 89
89
-
 90
90
-
 91
91
-
 92
92
-
 93
93
-
 94
94
-
 95
95
-
 96
96
-
 97
97
-
 98
98
-
 99
99
-
 100
100
-
 101
101
-
 102
102
-
 103
103
-
 104
104
-
 105
105
-
 106
106
-
 107
107
-
 108
108
-
 109
109
-
 110
110
-
 111
111
-
 112
112
-
 113
113
-
 114
114
-
 115
115
-
 116
116
-
 117
117
-
 118
118
-
 119
119
-
 120
120
-
 121
121
-
 122
122
-
 123
123
-
 124
124
-
 125
125
-
 126
126
-
 127
127
-
 128
128
-
 129
129
-
 130
130
-
 131
131
-
 132
132
-
 133
133
-
 134
134
-
 135
135
-
 136
136


STIHL connected Box, connected mobile Box Manual do usuário
- Tipo
- Manual do usuário
- Este manual também é adequado para
em outras línguas
- español: STIHL connected Box, connected mobile Box Manual de usuario
- français: STIHL connected Box, connected mobile Box Manuel utilisateur
- italiano: STIHL connected Box, connected mobile Box Manuale utente
- English: STIHL connected Box, connected mobile Box User manual
- Nederlands: STIHL connected Box, connected mobile Box Handleiding
- Deutsch: STIHL connected Box, connected mobile Box Benutzerhandbuch
- dansk: STIHL connected Box, connected mobile Box Brugermanual
- čeština: STIHL connected Box, connected mobile Box Uživatelský manuál
- svenska: STIHL connected Box, connected mobile Box Användarmanual
- polski: STIHL connected Box, connected mobile Box Instrukcja obsługi
- suomi: STIHL connected Box, connected mobile Box Ohjekirja
Artigos relacionados
-
STIHL AR 2000 L, 3000 L Manual do proprietário
-
-
-
-
-
-
-
STIHL ADG 2 Manual do proprietário
-
-