Philips CEM5100X/78 Guia rápido
- Categoria
- Alto-falantes portáteis
- Tipo
- Guia rápido

Register your product and get support at
CEM5100
© 2011 Koninklijke Philips Electronics N.V.
All rights reserved.
CEM5100X_78_QSG_V1.0
EN Quick start guide
PT-BR Guia de início rápido
Á Quick start guide
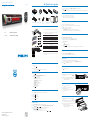
What’s in the box
Connect wires: ISO male connectors
Main unit
(with a sleeve)
ISO male connector
Remote
control
Screw
x 1 pc
Rubber cushion Disassembly tools
x 2 pcs
Front panel Trim plate
User manual
Carrying case
Quick start guide
1 Connect the supplied male connector to the unit.
2 Check the car’s wiring carefully and connect them
to the supplied male connector.
1 Green/black strip Left speaker (Rear)
2 White/black strip Left speaker (Front)
3 Gray/black strip Right speaker (Front)
4 Purple/black strip Right speaker (Rear)
e Red Ignition key +12V DC when
ON/ACC
f Blue Motor/electric antenna relay
control lead
g Blue/white
hBlack Ground
i Yellow To the +12V car battery
which is energized at all times
3
applicable.
f
g
h
i
Turn on
press
.
press and hold
until the unit is turned off.
Select country/region
1 Press to turn the unit on.
» [SELECT OPERATING REGION] is displayed.
2 Rotate to select an option:
[USA] (United States)
[LATIN] (Latin America)
[EUROPE] (Western Europe)
[RUS] (Russia)
[M-EAST] (Middle East)
[ASIA]
[JAP] (Japan)
[AUST] (Australia)
3 Press
Set clock
1
Press MENU
2 Rotate to set hour.
3 Press
4 Rotate to set minute.
5 Press
Listen to radio
1
Press SOURCE repeatedly to select radio mode.
2 Press / repeatedly to select band: [FM1][FM2][FM3][AM1][AM2] .
3 Press and hold or
4 Press or to tune to a radio station manually.
» The radio station is broadcast.
or .
Store stations automatically
1 DBB until [STORE - - -] is displayed.
2 Press
» The six strongest stations of the selected band are saved in the preset channel automatically.
Store stations manually
1 Tune to a station that you want to store.
2 Press a numeric button for three seconds.
» The station is saved in the selected channel.
Pairing bluetooth devices
1
Turn on bluetooth function on your device.
2 Search for other bluetooth devices that can pair with your device.
3 Select “Philips” in the pairing list.
4 Enter default password “0000”.
» [PAIR OK] is displayed on the panel if pairing is successful.
» The paired device connect to the car audio system automatically.
Make a call
To make call through the mobile phone.
1 Use the Mobile Phone to dial and make an outgoing call.
2 [CALLING] is displayed.
To redial number.
1 Press .
» [REDIAL] is displayed.
2 Press / again.
» [CALLING] is displayed and the unit starts dialing the number dialed last time.
Call transfer
Press and hold until [TRANSFER] is displayed.
» Voice transfers from loudspeaker to mobile phone.
Receive call
1
[PHONE IN] is displayed.
2 Press to answer/accept the call.
Terminate call
Press to terminate call.
Play from USB
1
Slide the USB socket cover marked to
the left.
2 Insert the USB device into the USB socket.
» The unit starts playing from the USB
device automatically.
Insert a card
1
Press to release the panel.
2 Insert the card into the card slot.
3 Close the front panel.
» The unit starts playing from the card
automatically.
Play from iPod/iPhone
1
Slide the USB socket cover marked to
the left.
2 Insert USB adaptor on one end of iPod/iPhone
cable to the USB socket on the main unit.
3 Insert the other end of the iPod/iPhone cable
to the iPod/iPhone socket.
» The unit starts playing from the USB
device automatically.

Ligar
pressione
.
Mantenha pressionado
até desligar o aparelho.
Selecionar país/região
1 Pressione para ligar o aparelho.
» [SELECT OPERATING REGION] é exibido.
2 Gire para selecionar uma opção:
[USA] (Estados Unidos)
[LATIN] (América Latina)
[EUROPE] (Europa Ocidental)
[RUS] (Rússia)
[M-EAST] (Oriente Médio)
[ASIA]
[JAP] (Japão)
[AUST]
3 Pressione
Ajustar o relógio
1
MENU até que a hora atual seja exibida.
2 Gire para ajustar a hora.
3 Pressione
4 Gire para ajustar os minutos.
5 Pressione
Ouvir rádio
1
Pressione SOURCE
2 Pressione / [FM1][FM2][FM3][AM1] ou
[AM2] .
3 Pressione e segure ou
4 Pressione ou
»
ou .
Armazenar estações automaticamente
1 DBB até que [STORE - - -] (Armazenamento) seja
exibido.
2 Pressione
»
pré-sintonizados.
Armazenar estações manualmente
1
2
» A estação é salva no canal selecionado.
Emparelhar dispositivos Bluetooth
1
Ative a função Bluetooth no seu dispositivo.
2 Pesquise outros dispositivos Bluetooth que possam ser emparelhados com o seu dispositivo.
3 Selecione “Philips” na lista de emparelhamento.
4 Insira a senha padrão “0000”.
» [PAIR OK]
sucedido.
»
Fazer uma chamada
Para fazer a chamada pelo telefone celular.
1 Use o telefone celular para discar e fazer uma chamada.
2 [CALLING]
Para rediscar o número.
1 Pressione .
» [REDIAL] é exibido.
2 Pressione / novamente.
» [CALLING] (Chamando) é exibido e o aparelho começa a discar o número discado por
último.
Transferência de chamada
Pressione e segure
até que [TRANSFER] (Transferir) seja exibido.
»
Atender a uma chamada
1
[PHONE IN]
2 Pressione para atender/aceitar a chamada.
Encerra uma chamada
Pressione para encerrar uma chamada.
Reproduzir a partir de um dispositivo USB
1
Deslize a tampa da entrada USB com o
símbolo
para a esquerda.
2 Insira o dispositivo USB na entrada USB.
» O aparelho inicia automaticamente a
reprodução do dispositivo USB.
Inserir um cartão
1
Pressione para liberar o painel.
2 Insira o cartão no slot de cartão.
3 Feche o painel frontal.
» O aparelho inicia automaticamente a
reprodução do cartão.
Reproduzir conteúdo do iPod/iPhone
1
Deslize a tampa da entrada USB com o
símbolo
para a esquerda.
2 Insira o adaptador USB localizado em uma
das extremidades do cabo do iPod/iPhone
na entrada USB da unidade principal.
3 Insira a outra extremidade do cabo do
iPod/iPhone na entrada do iPod/iPhone.
» O aparelho inicia automaticamente a
reprodução do dispositivo USB.
Á Guia de início ápido
Conteúdo da caixa
Unidade principal
Conector macho ISO
Controle
remoto
1 parafusoSuporte de
borracha
2 ferramentas de
desmontagem
Painel frontal Moldura
Manual do
usuário
Estojo para
transporte
Guia para início
rápidoe
1 Insira o conector macho fornecido no aparelho.
2
conecte-a ao conector macho fornecido.
1 Faixa verde/preta Alto-falante esquerdo
(traseiro)
2 Faixa branca/
preta
Alto-falante esquerdo
(frontal)
3 Faixa cinza/preta Alto-falante direito (frontal)
4 Faixa roxa/preta Alto-falante direito (traseiro)
e Vrm Chave de ignição +12 V DC
na posição ON/ACC
f Azul Fio de controle do relé da
g Azul/branco Fio de controle do relé do
h Preto Aterramento
i Amarelo Para bateria de carro de +12
V ativada ininterruptamente
3
f
g
h
i
a
b
c
d
e
f
183mm
53mm
-
 1
1
-
 2
2


Philips CEM5100X/78 Guia rápido
- Categoria
- Alto-falantes portáteis
- Tipo
- Guia rápido
em outras línguas
Artigos relacionados
-
Philips CEM2100X/78 Guia rápido
-
Philips CarStudio CEM3100 Guia rápido
-
-
-
Philips CE131/00 Guia rápido
-
-
-
Philips CEM250X/78 Guia rápido
-
-