
DOC012.97.90327
LOC 100
06/2011, Edition 2
Basic User Manual en
Manuel d'utilisation de base fr
Manual do utilizador básico pt

English...............................................................................................................................................3
Français........................................................................................................................................... 15
Português ........................................................................................................................................ 27

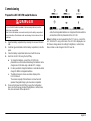
English 3
English
Specifications
Subject to change without notice.
Performance specifications
Display 128 x 64 pixels
Input 3 touch keys
Power supply 2 rechargeable AA Ni-MH batteries (included within the scope of delivery)
Operating hours 1000 work cycles, approx. 2 months
Charging time required for full
charge
18 hours
Interface Mini USB
Real-time clock Accuracy 1 second/tag
Size 65 x 22 x 120 mm
Weight 166 g

English 4
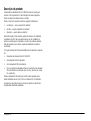
Safety information
Please read this entire manual before unpacking, setting up, or
operating this equipment. Pay attention to all danger and warning
statements. Failure to do so could result in serious injury to the operator
or damage to the instrument.
To make sure that the protection provided by this instrument is not
impaired, do not use or install this instrument in any manner other than
that specified in these operating instructions.
Note: Information that supplements points in the main text.
Warning signs
Read all labels and tags attached to the instrument. Failure to do so may
result in personal injury or damage to the instrument. If noted on the
instrument, corresponding symbols will be included in the relevant safety
information in the user manual.
RFID module
RFID technology is a radio application. Radio applications are subject to
national conditions of authorization. The use of the LOC 100 is currently
permitted in the following countries: EU. The manufacturer advises that
the use of the LOC 100 outside of the above-mentioned regions may
contravene national laws. The manufacturer reserves the right also to
obtain authorization in other countries. In case of doubt, please contact
the distributor.
The LOC 100 contains an RFID module to receive and transmit
information and data. The RFID module operates with a frequency of
13.56 MHz.
DANGER
Indicates a potentially or imminently hazardous situation that, if not avoided,
results in death or serious injury.
WARNING
Indicates a potentially or imminently hazardous situation that, if not avoided, may
result in death or serious injury.
CAUTION
Indicates a potentially hazardous situation that may result in minor or moderate
injury.
NOTICE
Indicates a situation that, if not avoided, could result in damage to the instrument.
Information that requires special emphasis.
This symbol may be noted on the instrument and refers to
operational and/or safety information in the user manual.
Electrical equipment marked with this symbol may not be disposed of
via European domestic or public disposal systems after 12 August
2005. In accordance with current regulations (EU Directive 2002/96/
EC), users within the EU must now return old electrical equipment to
the manufacturer for disposal The user bears no costs for this
process.
Note: Please contact the manufacturer or supplier for
instructions on how to return end-of-life equipment,
manufacturer-supplied electrical accessories and all auxiliary
items for proper disposal or recycling.
English 5
Certification
FCC ID: YCB - LOC100
IC ID: 5879A - LOC100
This device complies with Part 15 of the FCC rules and Industry Canada
license exempt RSS standard(s).
Operation is subject to the following two conditions:
1. this device may not cause interference, and
2. this device must accept any interference, including interference that
may cause undesired operation of the device."
Le présent appareil est conforme aux CNR d'Industrie Canada
applicables aux appareils radio exempts de licence.
L'exploitation est autorisée aux deux conditions suivantes :
1. l'appareil nedoit pas produire de brouillage, et
2. l'utilisateur de l'appareil doit accepter tout brouillage radioélectrique
subi, même si le brouillage est susceptible d'en compromettre le
fonctionnement."
Changes or modifications to this equipment not expressly approved by
the party responsible for compliance could void the user's authority to
operate the equipment.
This equipment has been tested and found to comply with the limits for a
Class A digital device, pursuant to Part 15 of the FCC rules. These limits
are designed to provide reasonable protection against harmful
interference when the equipment is operated in a commercial
environment. This equipment generates, uses and can radiate radio
frequency energy and, if not installed and used in accordance with the
instruction manual, may cause harmful interference to radio
communications. Operation of this equipment in a residential area is
likely to cause harmful interference, in which case the user will be
required to correct the interference at their expense. The following
techniques can be used to reduce interference problems:
1. Disconnect the equipment from its power source to verify that it is
or is not the source of the interference.
2. If the equipment is connected to the same outlet as the device
experiencing interference, connect the equipment to a different
outlet.
3. Move the equipment away from the device receiving the
interference.
4. Reposition the receiving antenna for the device receiving the
interference.
5. Try combinations of the above.
Batteries
Scope of delivery
The LOC 100 scope of delivery comprises the following items:
• LOC 100 RFID read/write device
• USB cable
• Two AA NiMH batteries
• LOC 100 user manual
Note: If any of these items are missing or damaged, please contact the
manufacturer or the responsible sales representative immediately.
DANGER
Risk of fire and explosion.
Only use the NiMH rechargeable batteries provided in the measuring instrument
and make sure that the batteries are correctly inserted into the battery
compartment. Incorrect insertion of the batteries could cause damage to the
instrument, fire or explosions.
Do not use other types of batteries under any circumstances. The use of other
types of batteries could cause damage to the instrument, fire or explosions.

English 6
Product description
The LOC 100 RFID read/write device can be used to write the operator
ID and location ID onto a sample bottle label together with the time and
date.
Every sample bottle then clearly has the following information assigned
to it:
• Location — where was the sample taken?
• Time — when was the sample taken?
• Operator — who took the sample?
This information (sample ID) can then be read by an RFID-compatible
photometer so that it can be saved together with the test results. This
allows the sample location, sample time and the operator to be
documented consistently.
The RFID starter set for sample identification comprises:
• The LOC 100 RFID read/write device
• Two operator RFID tags
• Five location RFID tags
• Five sets of sample bottle labels with sample RFID tags, in red (3
x),
blue (3
x), yellow (3x), green (3x) and black (3x).
All RFID tags can be written and read out as many times as required
using the LOC 100 or the RFID module in the photometer.
The following describes the writing and reading process of the individual
components in detail.

English 7
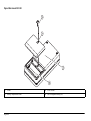
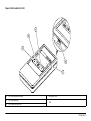
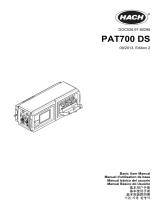
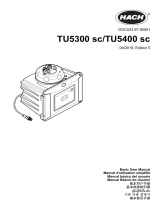
Figure 1 Front view of LOC 100
1. Left key (Read) 4. Mini-USB port
2. On/Off key
5. Display
3. Right key (Write)

English 8
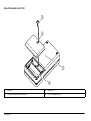
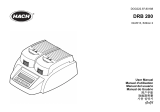
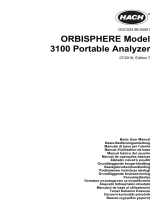
Figure 2 Rear view of LOC 100
1. Screw 3. RFID module
2. Battery compartment cover 4. AA rechargeable battery (2
x)

English 9
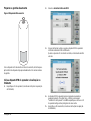
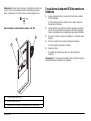
Commissioning
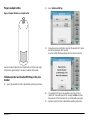
Prepare the LOC 100 RFID read/write device
1. Open the battery compartment by releasing the screw on the back
side.
2. Insert two type AA batteries into the battery compartment; note the
poles.
3. Close the battery compartment and secure it with the screw.
4. Switch on the LOC 100 using the On/Off key.
a. To charge the batteries, connect the LOC 100 to the
photometer via a USB cable. Alternatively, the batteries can be
charged via a USB cable using a standard PC or laptop.
b. It is also possible to charge the batteries in a standard external
charger for NiMH rechargeable batteries.
c. The battery charge is shown via a status display on the
LOC 100 screen.
The nominal capacity of the batteries is not reached until
repeated charge/discharge cycles have been completed.
5. Press and hold down the On/Off key to open the Configuration
menu. Use the three keys to adjust the brightness, contrast, date,
time, tone and reader of the operator ID.
Note: If the LOC 100 is connected to the photometer via a USB
cable, the rechargeable batteries are charged and the date and time
are transferred from the photometer to the LOC 100.
Note: All settings can also be made from the PC. To do so, connect the
LOC 100 to the PC using a USB cable. The LOC 100 is displayed as an
RFID mass storage device; the settings for brightness, contrast, date,
time and tone can be changed in the RFID.exe. file.
DANGER
Risk of fire and explosion.
Only use the NiMH batteries provided in the measuring instrument; no other
battery types are permitted.
Make sure that the batteries are inserted correctly into the battery compartment.
Incorrect insertion of the batteries could cause damage to the instrument, fire or
explosions.
English 10
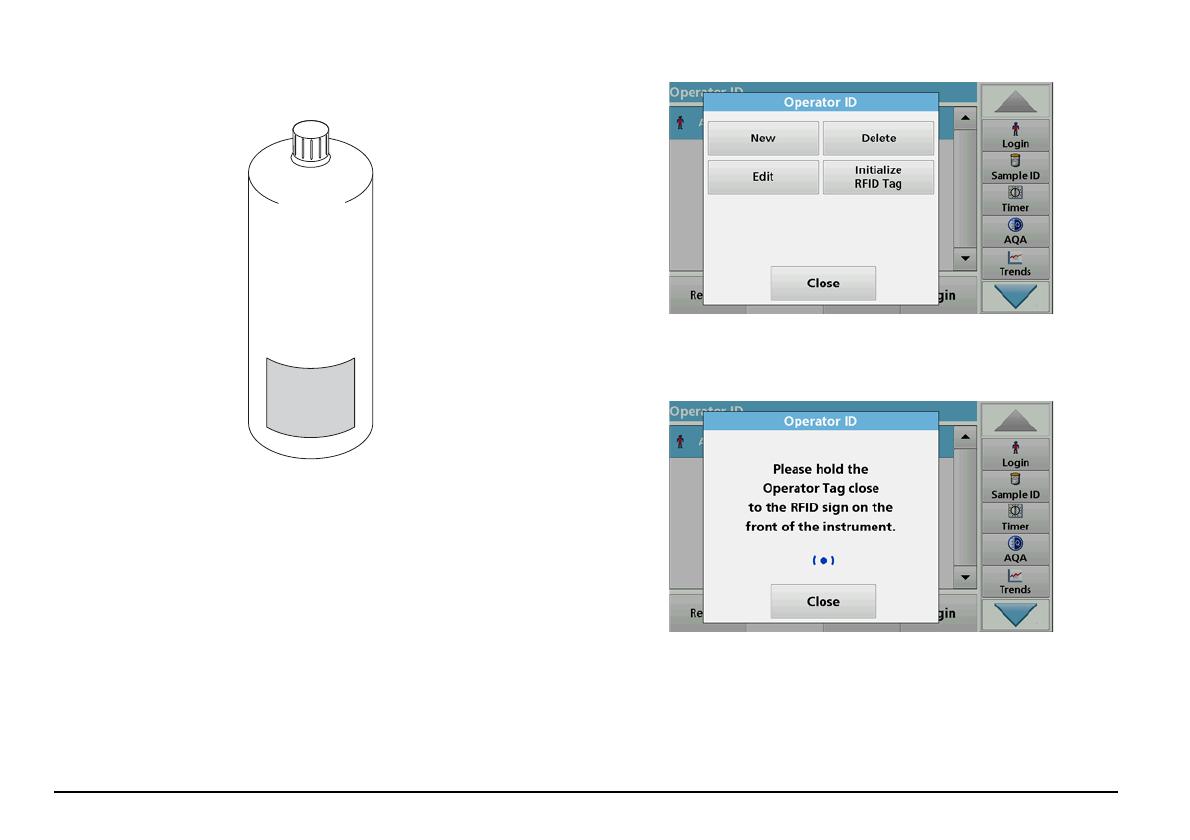
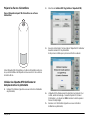
Prepare sample bottles
Figure 3 Sample ID label on a sample bottle
Glue the sample ID label onto the sample bottle so that the lower edge
of the label is approximately 2 cm above the bottom of the bottle.
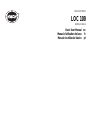
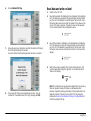
Initialize operator and location RFID tag on the pho-
tometer
1. Specify the operator ID (refer to photometer operating instructions).
2. Select Initialize RFID Tag.
3. Follow the onscreen instructions and hold the operator RFID tag in
front of the photometer RFID module.
A sound confirms that the writing process has been successful.
4. The operator RFID tag can be rewritten at any time. To do so,
confirm the "Overwrite Operator ID" message with OK and enter
the password, if the old operator ID is protected with a password.
5. Specify a sample ID (refer to photometer operating instructions).

English 11
6. Press Initialize RFID Tag.
7. Follow the onscreen instructions and hold the location RFID tag in
front of the photometer RFID module.
A sound confirms that the writing process has been successful.
8. The location RFID tag can be rewritten at any time. To do so,
confirm the "Overwrite location RFID tag" message with OK.
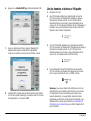
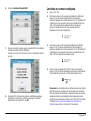
Read data and write on label
1. Switch on the LOC 100.
2. Read in the operator ID initialized on the photometer by holding the
LOC 100 above the operator RFID tag and briefly pressing the left
key. The LOC 100 attempts to read the tag for five seconds. Once
the tag has been read successfully, the operator ID is shown on the
screen. (This step is optional. The option to read out the operator
ID can be deactivated in the Configuration menu).
3. Read in the sample ID initialized on the photometer by holding the
LOC 100 above the location RFID tag and briefly pressing the left
key. The LOC 100 attempts to read the tag for five seconds. Once
the tag has been read successfully, the location ID is shown in the
display.
4. Write on the empty sample RFID ID tag by holding the LOC 100
over the label and pressing the right key. A successful transfer is
shown in the display.
Note: This method can be used to write sample RFID tags as many
times as required. Sample RFID tags are dishwasher-proof.
However, repeated cleaning, particularly at high temperatures, can
impair the function of the tag. Read out the RFID tag using the
photometer (Read out the sample RFID tag on the photometer) to
check the sample RFID tag.

English 12
Note: One long tone indicates that the tag has been read or written
successfully. An error, e. g. because the distance from the tag is too
great, is indicated by five short tones and an error message.
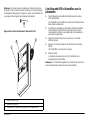
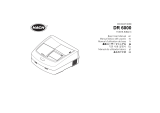
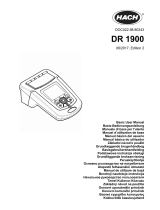
Figure 4 Read and write data using the LOC 100
Read out the sample RFID tag on the
photometer
1. Hold the sample bottle label in front of the photometer RFID
module.
The sample ID is read in and displayed as a button on the toolbar in
the photometer
2. To determine the sample parameters, prepare the sample in
accordance with the process specification for the relevant tests.
Insert the prepared cell into the photometer cell compartment.
3. This action will start the measurement process and the results will
be displayed.
4. Press the Sample ID key in the toolbar.
The read-in sample ID is assigned to the measurement.
5. Remove the cell.
The measurement result is saved with the sample ID in the
photometer.
Note: The sample ID will be shown as a key in the toolbar until the
photometer is switched off.
1. Left key (Read)
2. Right key (Write)
3. Operator RFID tag or location RFID tag

English 13
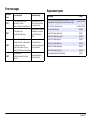
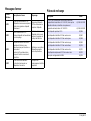
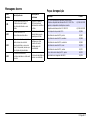
Error messages
Displayed
errors
Error description Troubleshooting
E-01
RFID communication error:
Tag sends no answer.
Distance too great or tag defective.
Position the RFID tag
closer to the instrument
or replace the tag.
E-02
RFID collision error:
Several tags within range.
Remove all tags from the
reading area, except the
one that needs to be
read.
E-03
Unknown or incorrect tag:
Attempts to write on a tag intended
for reading or vice versa.
Reads in the operator ID, even
though this function was deactivated.
Check whether the
correct tag is being used
for the procedure.
E-04
Data format error:
The data structure on the tag is
incorrect.
Tag is damaged and
must be replaced.
Replacement parts
Description Cat. no.
RFID set for sample identification, including LOC 100 RFID
read/write device and operator, sample and location tags
LQV156.99.10002
LOC 100 RFID read/write device LQV156.99.20002
Two RFID operator tags LZQ086
Three RFID sample tags, black LZQ067
Three RFID sample tags, yellow LZQ068
Three RFID sample tags, red LZQ069
Three RFID sample tags, blue LZQ070
Three RFID sample tags, green LZQ071
Five RFID location tags, black LZQ072
Two rechargeable AA Ni-MH batteries LZQ073

English 14

Français 15
Français
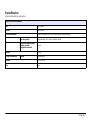
Caractéristiques
Sujet à changements sans préavis.
Caractéristiques de performance
Ecran 128 x 64 pixels
Entrée 3 boutons tactiles
Alimentation 2 piles rechargeables AA Ni-MH (incluses dans la livraison)
Heures de fonctionnement 1 000 cycles de fonctionnement, env. 2 mois
Temps nécessaire pour une
charge complète
18 heures
Interface Mini USB
Horloge Précision 1 seconde/étiquette
Dimensions 65 x 22 x 120 mm
Poids 166 g

Français 16
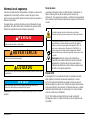
Consignes de sécurité
Lisez la totalité du manuel avant de déballer, configurer ou utiliser cet
appareil. Prêtez attention à toutes les consignes de danger et aux
avertissements. Le non-respect de cette procédure peut conduire à des
blessures graves de l'utilisateur ou à des dégâts matériels.
Pour vous assurer que la protection fournie par cet appareil n'est pas
affectée, n'utilisez pas ou n'installez pas cet appareil d'une autre façon
que celle décrite dans ces instructions d'utilisation.
Remarque : informations supplémentaires pour l'utilisateur.
Symboles d'avertissement
Lire toutes les étiquettes et tous les repères apposés sur l’instrument. Le
non-respect de cet avertissement pourrait causer des blessures à
l'utilisateur ou endommager l'appareil. Les symboles présents sur
l'instrument sont expliqués dans la section relative aux informations de
sécurité correspondante du manuel d'utilisation.
Module RFID
La technologie RFID est une application radio. Les applications radio
sont soumises à des autorisations nationales. L'utilisation du LOC 100
est actuellement autorisée dans les pays suivants : UE. Le fabricant
signale que l'utilisation du LOC 100 en dehors des pays indiqués ci-
dessus peut constituer une infraction aux lois nationales. Le fabricant se
réserve le droit d'obtenir une autorisation dans d'autres pays. En cas de
doute, veuillez contacter le distributeur.
Le LOC 100 contient un module RFID permettant de recevoir et de
transmettre des informations et des données. Le module RFID
fonctionne à une fréquence de 13,56 MHz.
DANGER
Indique une situation de danger potentiel ou imminent qui, si elle n'est pas évitée,
peut entraîner la mort ou des blessures graves.
AVERTISSEMENT
Signale une situation potentiellement dangereuse ou un danger imminent qui peut
entraîner des blessures graves ou mortelles si elle n'est pas évitée.
ATTENTION
Signale une situation potentiellement dangereuse qui peut provoquer des
blessures légères à modérées.
AVIS
Indique une situation qui, si elle n'est pas évitée, peut provoquer des dommages
à l'appareil. Informations nécessitant une mise en avant particulière.
Ce symbole peut être présent sur l'instrument et renvoie aux
informations de fonctionnement ou de sécurité du manuel
d'utilisation.
Il est interdit de mettre au rebut l'équipement électrique portant ce
symbole dans les réseaux de collecte des déchets ménagers et les
décharges publiques européennes depuis le 12 août 2005.
Conformément à la réglementation en vigueur (directive européenne
2002/96/CE), les utilisateurs au sein de l'UE doivent désormais
retourner leurs anciens équipements électriques au fabricant pour
qu'il les mette au rebut. L'utilisateur ne supporte aucun coût lié à ce
processus.
Remarque : Pour le retour à des fins de recyclage, veuillez
contactez le fabricant ou le fournisseur afin de savoir
comment retourner le matériel, les accessoires électriques
fournis par le fabricant et tous les accessoires auxiliaires en
fin de vie, afin qu'ils soient traités correctement.

Français 17
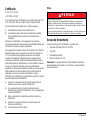
Certification
ID FCC : YCB - LOC 100
ID IC : 5879A - LOC 100
Ce dispositif est conforme à la partie 15 des réglementations FCC et aux
normes CNR d'Industrie Canada relatives aux appareils exempts de
licence.
Le fonctionnement est soumis aux deux conditions suivantes :
1. ce dispositif n'est pas susceptible d'entraîner des interférences et
2. ce dispositif doit tolérer toute interférence reçue, y compris les
interférences qui peuvent entraîner un fonctionnement non
souhaité du dispositif.
Les modifications apportées à cet équipement qui n’ont pas été
expressément approuvées par le responsable de la conformité
pourraient annuler l’autorité dont l’utilisateur dispose pour utiliser cet
équipement.
Cet équipement a été testé et déclaré conforme aux limites définies pour
les appareils numériques de classe A, conformément à la section 15 de
la réglementation FCC. Ces limites sont conçues pour fournir une
protection suffisante contre les interférences dommageables lorsque
l'équipement est utilisé dans un environnement commercial. Cet
équipement génère, utilise et peut irradier l'énergie des fréquences radio
et, s'il n'est pas installé ou utilisé conformément au mode d'emploi, il
peut entraîner des interférences dangereuses pour les communications
radio. Le fonctionnement de cet équipement dans une zone résidentielle
risque de causer des interférences nuisibles, dans ce cas l'utilisateur
doit corriger les interférences à ses frais Les techniques ci-dessous
peuvent permettre de réduire les problèmes d'interférences :
1. Débrancher l'équipement de la prise de courant pour vérifier s'il est
ou non la source des interférences.
2. Si l'équipement est branché sur le même circuit de prises que
l'appareil qui subit des interférences, branchez l'équipement sur un
circuit différent.
3. Éloigner l'équipement du dispositif qui reçoit l'interférence.
4. Repositionnez l'antenne de réception de l'appareil recevant
l'interférence.
5. Essayez de combiner les différentes options proposées ci-dessus.
Piles
Contenu de la livraison
Le colis du LOC 100 comprend les éléments suivants :
• L'appareil de lecture/écriture LOC 100 RFID
• Câble USB
• Deux piles AA NiMH
• Le manuel d'utilisation du LOC 100
Remarque : Si l'un des éléments manque ou est endommagé, veuillez
contacter immédiatement le fabricant ou le responsable commercial.
DANGER
Risque d'incendie ou d'explosion.
Insérez uniquement les piles rechargeables NiMH fournies avec l'instrument de
mesure et assurez-vous qu'elles sont correctement installées dans le
compartiment prévu à cet effet. Si elles ne sont pas correctement insérées, les
piles peuvent endommager l'instrument, voire provoquer un incendie ou des
explosions.
N'utilisez jamais un autre type de piles. L'utilisation de tout autre type de piles
peut endommager l'instrument, voire provoquer un incendie ou des explosions.

Français 18
Description du produit
L'appareil de lecture/écriture LOC 100 RFID peut être utilisé pour
inscrire l'identifiant de l'utilisateur, l'identifiant de l'emplacement, l'heure
et la date sur l'étiquette d'un flacon d'échantillon.
Ainsi, chaque flacon d'échantillon comporte des informations claires la
concernant :
• Emplacement — où l'échantillon a-t-il été prélevé ?
• Date et heure — quand l'échantillon a-t-il été prélevé ?
• Utilisateur — par qui l'échantillon a-t-il été prélevé ?
Ces informations (ID d'échantillon) peuvent ensuite être lues par un
photomètre compatible RFID pour être enregistrées avec les résultats
de test. Cela permet de connaître exactement l'emplacement de
l'échantillon, la date et l'heure auxquelles il a été prélevé ainsi que
l'utilisateur qui a procédé au prélèvement.
Le kit de démarrage RFID pour l'identification d'échantillon comprend :
• L'appareil de lecture/écriture LOC 100 RFID
• Deux étiquettess RFID utilisateur
• Cinq étiquettes RFID d'emplacement
• Cinq jeux d'étiquettes pour flacon d'échantillon avec étiquettes
RFID d'échantillon, de couleur rouge (3
x), bleu (3x), jaune (3x), vert
(3
x) et noir (3x).
Toutes les étiquettes RFID peuvent être écrites et lues autant de fois
que nécessaire à l'aide de l'appareil LOC 100 ou à l'aide du module
RFID du photomètre.
Vous trouverez ci-dessous la description des processus d'écriture et de
lecture des composants individuels en détails.

Français 19
Figure 1 Vue avant du LOC 100
1. Bouton gauche (Lire) 4. Port mini USB
2. Bouton Marche/Arrêt
5. Ecran
3. Touche droite (Ecrire)

Français 20
Figure 2 Vue arrière du LOC 100
1. Vis 3. Module RFID
2. Cache du compartiment à piles 4. Pile rechargeable AA (
x2)
A página está carregando ...
A página está carregando ...
A página está carregando ...
A página está carregando ...
A página está carregando ...
A página está carregando ...
A página está carregando ...
A página está carregando ...
A página está carregando ...
A página está carregando ...
A página está carregando ...
A página está carregando ...
A página está carregando ...
A página está carregando ...
A página está carregando ...
A página está carregando ...
A página está carregando ...
A página está carregando ...
A página está carregando ...
-
 1
1
-
 2
2
-
 3
3
-
 4
4
-
 5
5
-
 6
6
-
 7
7
-
 8
8
-
 9
9
-
 10
10
-
 11
11
-
 12
12
-
 13
13
-
 14
14
-
 15
15
-
 16
16
-
 17
17
-
 18
18
-
 19
19
-
 20
20
-
 21
21
-
 22
22
-
 23
23
-
 24
24
-
 25
25
-
 26
26
-
 27
27
-
 28
28
-
 29
29
-
 30
30
-
 31
31
-
 32
32
-
 33
33
-
 34
34
-
 35
35
-
 36
36
-
 37
37
-
 38
38
-
 39
39


em outros idiomas
- français: Hach LANGE LOC 100
- English: Hach LANGE LOC 100
Artigos relacionados
-
 Hach TU5200 Basic User Manual
-
 Hach DR 1900 Basic User Manual
-
 Hach PAT700 DS Basic User Manual
-
Hach DR 3900 Basic User Manual
-
 Hach DRB 200 Manual do usuário
-
 Hach DR 6000 Basic User Manual
-
 Hach TU5400 sc Basic User Manual
-
 Hach Lange ORBISPHERE 3100 Basic User Manual
-
-
 Hach DR 1900 Basic User Manual


