
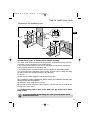
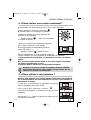
Le guide d’utilisation de votre four
Using your oven
Bedienungsanleitung Ihres Backofens
Gebruiksaanwijzing van uw oven
Betjeningsvejledning til ovnen
Instrucciones de uso de su horno
O guia de utilização do seu forno
DOP330*
DOP340*
FR
GB
DE
NL
DK
ES
PT
99625014_ML_A OK.qxd 22/07/03 13:43 Page 1

2
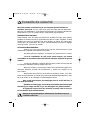
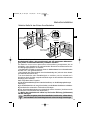
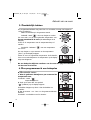
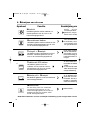
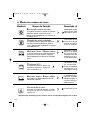
Tout au long de la notice,
vous signale les consignes de sécurité,
vous signale les conseils et les astuces
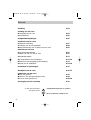
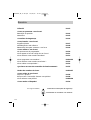
Edito P.3
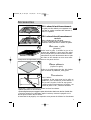
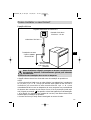
Comment se présente votre four ?
Descriptif de l’appareil P.4
Accessoires P.5
Conseils de sécurité P.6
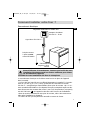
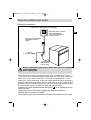
Comment installer votre four ?
Raccordement électrique P.7
Changement du câble d’alimentation P.8
Dimensions utiles pour encastrer votre four P.9
Comment utiliser votre four ?
Le détail de votre programmateur P.10
Comment mettre à l’heure l’horloge du four ? P.11
Comment faire une cuisson immédiate ? P.12
Comment programmer une cuisson ? P.12-13
Comment faire une cuisson Economique ? P.14
Comment utiliser le minuteur ? P.14
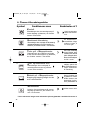
Que faire en cas d’anomalies de fonctionnement P.15
Modes de cuisson du four P.16-17
Comment entretenir votre four ?
Qu’est-ce qu’une pyrolyse ? P.18
Dans quel cas faut-il effectuer une pyrolyse ? P.18
Comment faire une pyrolyse ? P.18-19
Comment changer l’ampoule ? P.19
Qui contacter
?
P.20
Sommaire
99625014_ML_A OK.qxd 22/07/03 13:43 Page 2
A página está carregando...

4
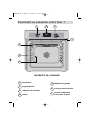
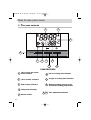
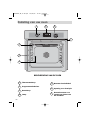
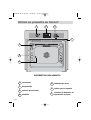
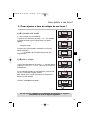
C
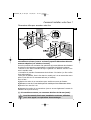
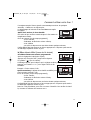
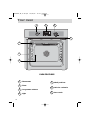
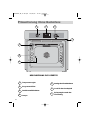
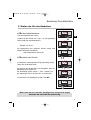
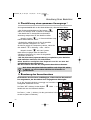
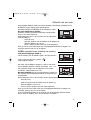
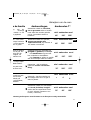
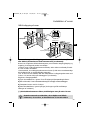
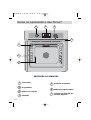
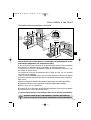
omment se présente votre four ?
1
3
5
ECO
SET
1
2 3
4
5
7
6
1
2
5
6
7
3
4
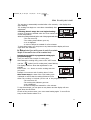
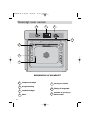
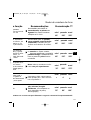
Thermostat
Programmateur
Sélecteur de fonctions
Lampe
Indicateur de gradin
Trou pour tourne broche
Contact de détection
d’ouverture de porte
DESCRIPTIF DE L’APPAREIL
99625014_ML_A OK.qxd 22/07/03 13:43 Page 4
A página está carregando...
A página está carregando...
A página está carregando...
A página está carregando...
A página está carregando...

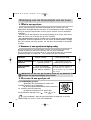
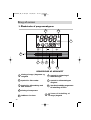
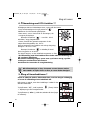
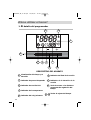
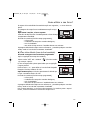
10
SET
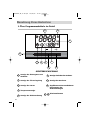
Comment utiliser votre four ?
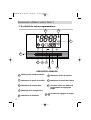
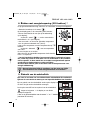
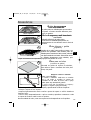
1. L
e détail de votre programmateur
1
6
7
3
5
4
8
9
10
2
1
3
4
5
6
7
10
8
2
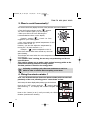
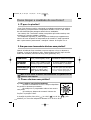
Affichage des temps et durées
Indicateur de porte verrouillée
Indicateur de cuisson ECO
Affichage de la température
Indicateur du minuteur
Indicateur de fin de cuisson
Indicateur de durée de cuisson
Touche d’accès aux différents
programmes de réglage du
temps
Touches de réglages du temps
DESCRIPTIF APPAREIL
9
99625014_ML_A OK.qxd 22/07/03 13:43 Page 10
A página está carregando...
A página está carregando...
A página está carregando...
A página está carregando...
A página está carregando...
A página está carregando...

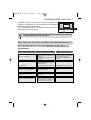
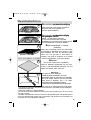
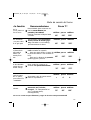
17
FR
chaleur asso-
de chaleur en
haleur tournante
e gril pour dorer.
d.
Recommandé pour faire lever les
pâtes à pain, à brioche, kou-
glof...en ne dépassant pas 40°C
(chauffe-assiettes, décongélation).
e la fonction
ément à la norme européenne EN 50304 et selon la directive Européenne 2002/40/CE.
Recommandé pour les quiches,
tourtes, tarte aux fruits juteux,
posés dans un plat en terre de pré-
ference
Recommandé pour toutes les
volailles ou rôtis au tourne-broche.
Pour saisir et cuire à coeur gigot,
côtes de boeuf.
Pour garder leur fondant aux
pavés de poissons.
Important : laissez la porte entrou-
verte en puissance 4
Recommandations
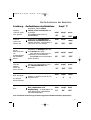
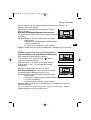
Modes de cuisson du four
n température.
uvent être
oid.
Recommandé pour garder le moel-
leux des viandes blanches,
poissons, légumes
Pour les cuissons multiples jusqu’à
3 niveaux.
rmet de faire un
ut en conservant
isson.
st utilisé pour
gétique.
Nota : toutes les cuissons se font
sans préchauffage.
e l’effet de la tur-
e gril fait rayon-
ur l’aliment et le
crée par la turbi-
ffet
vre toute la sur-
ple, il montrera
ité pour de plus
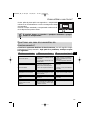
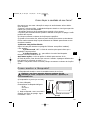
Préco T°
mini
préco
maxi
40°
180°
250°
mini
préco
maxi
40°
200°
250°
1
mini
préco
maxi
35°
80°
100°
mini
préco
maxi
4
4
mini
préco
maxi
40°
195°
250°
mini
préco
maxi
35°
200°
275°
99625014_ML_A OK.qxd 22/07/03 13:44 Page 17
A página está carregando...
A página está carregando...
A página está carregando...

21
GB
99625014_ML_A OK.qxd 22/07/03 13:44 Page 21

22
Throughout this manual,
indicates safety recommendations,
indicates advice to help you make the
best use of your oven
Introduction P.23
Your oven
How it works P.24
Accessories P.25
Safety recommendations P.26
How to install your oven
Electrical connections P.27
Changing cables P.28
Dimensions for installation use P.29
How to use your oven
The oven controls P.30
How to set the clock P.31
How to cook straightaway P.32
How to programme the cooking P.32-33
How to cook Economically P.34
How to use the minute minder P.34-35
Troubleshooting P.35
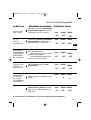
Cooking methods P.36-37
Cleaning the oven cavity
Pyrolysis explained P.38
When to clean by pyrolysis P.38
How to use the pyrolysis program P.38-39
Changing the bulb P.39
Contents
99625014_ML_A OK.qxd 22/07/03 13:44 Page 22
A página está carregando...

24
Your oven
1
3
5
ECO
SET
1
2 3
4
5
7
6
1
2
5
6
7
3
4
Thermostat
Timer
Programme selector
Light
Shelf positions
Hole for rotisserie
Door catch
OVEN FEATURES
99625014_ML_A OK.qxd 22/07/03 13:44 Page 24
A página está carregando...
A página está carregando...
A página está carregando...
A página está carregando...
A página está carregando...

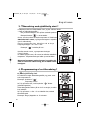
30
SET
How to use your oven
1. The oven controls
1
6
7
3
5
4
8
9
10
2
1
3
4
5
6
7
10
8
2
Time of day and power-
clean duration
"Door locked" indicator
ECO cooking indicator
Temperature display
Minute minder
End of cooking time indicator
Length of cooking time indicator
Button providing access to the
various time setting programmes
Time adjustment buttons
OVEN FEATURES
9
99625014_ML_A OK.qxd 22/07/03 13:44 Page 30

31
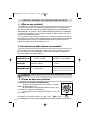
GB
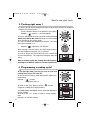
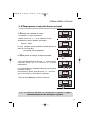
How to use your oven
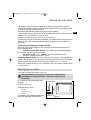
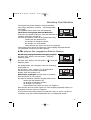
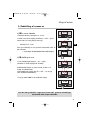
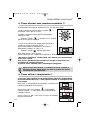
a) When the oven is first switched
on at the mains
• The display flashes to 12h00.
• Press on the + and - buttons until the correct time is
shown (Keeping a finger on the button, rather than
tapping it, is quicker).
The example shows:12.30
Registration of the amended time is automatic after a few
seconds.
-> the display no longer flashes
b) Altering the clock
• Press on both + and - buttons together for a few
seconds until the display flashes.
The time display flashes and you can alter the time.
Press on both + and - buttons together to obtain the
correct time (back or forwards).
• Confirm the time by pressing SET.
SET
2.
How to set the clock
If you forget to confirm the time by pressing button SET,
the oven will do it automatically after a few seconds.
SET
SET
SET
SET
SET
99625014_ML_A OK.qxd 22/07/03 13:44 Page 31
A página está carregando...
A página está carregando...
A página está carregando...
A página está carregando...
A página está carregando...
A página está carregando...
A página está carregando...
A página está carregando...

40
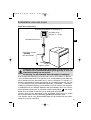
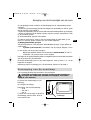
Copy here the details that are on your oven manufacturer's plate:
MADE IN FRANCE
220 - 240V ~ 50 Hz
BRANDT APPLIANCES SAS
7 rue Henri Becquerel
92500 RUEIL MALMAISON
De Dietrich
99625014_ML_A OK.qxd 22/07/03 13:45 Page 40

41
DE
99625014_ML_A OK.qxd 22/07/03 13:45 Page 41

42
In der Gebrauchsanweisung
geben Ihnen die Zeichen,
Sicherheitshinweise und,
Ratschläge und Tips.
Vorwort S.43
Präsentierung Ihres Backofens
Beschreibung des Gerätes S.44
Zubehör S.45
Sicherheitshinweise S.46
Backofeninstallation
Stromanschluss S.47
Austausch des Stromzuführungskabels S.48
Nützliche Maße für den Einbau Ihres Backofens S.49
Benutzung Ihres Backofens
Ihre Programmschaltuhr im Detail S.50
Stellen der Uhr des Backofens S.51
Starten eines sofortigen Garens S.52
Programmierung eines Garvorgangs S.52-53
Durchführung eines sparsamen Garvorgangs S.54
Benutzung des Kurzzeitweckers S.54
Was bei Betriebsanomalien tun S.55
Die Garfunktionen des Backofens S.56-57
Reinigung des Garraums Ihres Backofens
Was ist eine Pyrolyse S.58
Wann muss eine Pyrolyse durchgeführt werden S.58
Wie wird eine pyrolyse durchgeführt S.58-59
Wie wird eine lampe ausgewechselt S.59
Inhalt
99625014_ML_A OK.qxd 22/07/03 13:45 Page 42
A página está carregando...

44
Präsentierung Ihres Backofens
1
3
5
ECO
SET
1
2 3
4
5
7
6
1
2
5
6
7
3
4
Temperaturregler
Programmwähler
Funktionswählschalter
Lampe
Anzeige der Einschubebene
Loch für den Drehspieß
Erfassungskontakt der
Türöffnung
BESCHREIBUNG DES GERÄTES
99625014_ML_A OK.qxd 22/07/03 13:45 Page 44
A página está carregando...
A página está carregando...
A página está carregando...
A página está carregando...
A página está carregando...

50
SET
Benutzung Ihres Backofens
1. I
hre Programmschaltuhr im Detail
1
6
7
3
5
4
8
9
10
2
1
3
4
5
6
7
10
8
2
Anzeige der Zeitangaben und
Gardauer
Anzeige der Türverriegelung
Anzeige Eco-Garen
Temperaturanzeige
Anzeige der Zeitberechnung
Anzeige des Endes der Gardauer
Anzeige der Gardauer
Zugrifftaste zu den verschiedenen
Programmen der
Zeiteinstellungen
Zeiteinstelltasten
GERÄTEBESCHREIBUNG
9
99625014_ML_A OK.qxd 22/07/03 13:45 Page 50

51
DE
Benutzung Ihres Backofens
a) Bei der Inbetriebnahme
• Die Anzeige blinkt auf 12h00.
• Stellen Sie die Uhrzeit mit + oder - ein (bei gedrückter
Taste erfolgt ein Schnelldurchlauf).
Beispiel: 12.30 Uhr.
Die Registrierung der justierten Uhrzeit erfolgt nach
einigen Sekunden automatisch.
-> die Anzeige blinkt nicht mehr
b) Korrektur der Uhrzeit
• Drücken Sie einige Sekunden lang gleichzeitig auf die
Tasten bis die Anzeige blinkt.
Die Anzeige der Uhrzeit blinkt, um anzugeben, dass die
Einstellung jetzt möglich ist.
Zur Einstellung auf die Tasten + oder - drücken, um
die angezeigte Zeit zu erhöhen oder zu vermindern.
• Drücken Sie zum Bestätigen auf die Taste SET.
SET
2. Stellen der Uhr des Backofens
Wenn nicht mit der Taste SET, bestätigt wird, erfolgt nach einigen
Sekunden die automatische Speicherung.
SET
SET
SET
SET
SET
99625014_ML_A OK.qxd 22/07/03 13:45 Page 51
A página está carregando...
A página está carregando...
A página está carregando...
A página está carregando...
A página está carregando...

57
DE
rbeitende
ke Hitze von
ufthitze und
warm.
Empfohlen, um das Aufgehen von
Brot-, Napfkuchen- und
Kugelhopfteig ... zu begünstigen. 40°
nicht überschreiten (Telleraufwärm-
oder Auftautemperatur).
chreibung
ür die schriftliche Auszeichnung auf dem energetischen Etikett benutzte(n) Sequenz(en).
Empfohlen für Speckkuchen,
Pasteten und Obstkuchen mit
saftigen Früchten, vorzugsweise in
einer Form aus Ton backen.
Empfohlen für Geflügel jeder Art,
sowie Braten am Spieß
Zum Anbraten und Braten von
Lammkeulen, Rinderkoteletts.
Damit Fisch sein schmelzendes
Fleisch bewahrt.
Wichtig: in Stellung 4 muß die Tür
angelehnt sein.
Garfunktionen des Backofens
Die Garfunktionen des Backofens
uranstieg.
n können direkt
kofen gestellt
Empfohlen, damit weißes
Fleisch, Fisch und Gemüse saf-
tig bleiben.
Für vielfältiges Garen in bis zu 3
Einschubebenen.
öglicht es,
ohne die
rächtigen.
wird für das
eichnen benutzt.
Hinweis: alle Garfunktionen erfol-
gen ohne Aufwärmen des
Backofens.
niert die
urbine mit der des
t die
die Nahrungsmittel
rbine verursachte
ächt ihre
deckt die ganze
ache Grill für
enauso effizient
Empf. T°
mini
empf.
maxi
40°
180°
250°
mini
empf.
maxi
40°
200°
250°
1
mini
empf.
maxi
35°
80°
100°
mini
empf.
maxi
4
4
mini
empf.
maxi
40°
195°
250°
mini
empf.
maxi
35°
200°
275°
99625014_ML_A OK.qxd 22/07/03 13:46 Page 57
A página está carregando...
A página está carregando...

60
Notieren Sie hier die auf dem Geräteschild Ihrer Abzugshaube stehenden Angaben:
MADE IN FRANCE
220 - 240V ~ 50 Hz
BRANDT APPLIANCES SAS
7 rue Henri Becquerel
92500 RUEIL MALMAISON
De Dietrich
99625014_ML_A OK.qxd 22/07/03 13:46 Page 60

61
NL
99625014_ML_A OK.qxd 22/07/03 13:46 Page 61

62
In deze gebruikshandlei-
ding geeft symbol
veiligheidsaanwijzingen en symbool,
tips en praktische richtlijnen aan
Inleiding P.63
Indeling van uw oven
Beschrijving van de oven P.64
Oventoebehoren P.65
Veiligheidsaanwijzingen P.66
Installatie van uw oven
Elektrische aansluiting P.67
Vervanging van de voedingskabel P.68
Nuttige afmetingen voor de inbouw van uw oven P.69
Gebruik van uw oven
De programmaschakelaar P.70
Instellen van het uur van de oven P.71
Onmiddellijk bakken P.72
Hoe programmeer ik een bakcyclus P.72-73
Bakken met energiebesparing (ECO-bakken) P.74
Gebruik van de schakelklok P.74-75
Problemen en oplossingen P.75
Bakwijzen van de oven P.76-77
Onderhoud van uw oven
Wat is een pyrolyse P.78
Wanneer is een pyrolysereiniging nodig P.78
Hoe voer ik een pyrolyse uit P.78-79
Vervanging van de ovenlamp P.79
Inhoud
99625014_ML_A OK.qxd 22/07/03 13:46 Page 62
A página está carregando...
A página está carregando...
A página está carregando...
A página está carregando...
A página está carregando...
A página está carregando...
A página está carregando...
A página está carregando...
A página está carregando...
A página está carregando...
A página está carregando...
A página está carregando...
A página está carregando...
A página está carregando...
A página está carregando...
A página está carregando...
A página está carregando...
A página está carregando...
A página está carregando...
A página está carregando...
A página está carregando...
A página está carregando...
A página está carregando...
A página está carregando...
A página está carregando...
A página está carregando...
A página está carregando...
A página está carregando...
A página está carregando...
A página está carregando...
A página está carregando...
A página está carregando...
A página está carregando...
A página está carregando...
A página está carregando...
A página está carregando...
A página está carregando...
A página está carregando...
A página está carregando...
A página está carregando...
A página está carregando...
A página está carregando...
A página está carregando...
A página está carregando...
A página está carregando...
A página está carregando...
A página está carregando...
A página está carregando...
A página está carregando...
A página está carregando...
A página está carregando...
A página está carregando...
A página está carregando...
A página está carregando...
A página está carregando...
A página está carregando...
A página está carregando...
A página está carregando...
A página está carregando...
A página está carregando...
A página está carregando...
A página está carregando...
A página está carregando...
A página está carregando...
A página está carregando...
A página está carregando...
A página está carregando...
A página está carregando...
A página está carregando...
A página está carregando...
A página está carregando...
A página está carregando...
A página está carregando...
A página está carregando...
A página está carregando...
A página está carregando...
A página está carregando...
A página está carregando...
-
 1
1
-
 2
2
-
 3
3
-
 4
4
-
 5
5
-
 6
6
-
 7
7
-
 8
8
-
 9
9
-
 10
10
-
 11
11
-
 12
12
-
 13
13
-
 14
14
-
 15
15
-
 16
16
-
 17
17
-
 18
18
-
 19
19
-
 20
20
-
 21
21
-
 22
22
-
 23
23
-
 24
24
-
 25
25
-
 26
26
-
 27
27
-
 28
28
-
 29
29
-
 30
30
-
 31
31
-
 32
32
-
 33
33
-
 34
34
-
 35
35
-
 36
36
-
 37
37
-
 38
38
-
 39
39
-
 40
40
-
 41
41
-
 42
42
-
 43
43
-
 44
44
-
 45
45
-
 46
46
-
 47
47
-
 48
48
-
 49
49
-
 50
50
-
 51
51
-
 52
52
-
 53
53
-
 54
54
-
 55
55
-
 56
56
-
 57
57
-
 58
58
-
 59
59
-
 60
60
-
 61
61
-
 62
62
-
 63
63
-
 64
64
-
 65
65
-
 66
66
-
 67
67
-
 68
68
-
 69
69
-
 70
70
-
 71
71
-
 72
72
-
 73
73
-
 74
74
-
 75
75
-
 76
76
-
 77
77
-
 78
78
-
 79
79
-
 80
80
-
 81
81
-
 82
82
-
 83
83
-
 84
84
-
 85
85
-
 86
86
-
 87
87
-
 88
88
-
 89
89
-
 90
90
-
 91
91
-
 92
92
-
 93
93
-
 94
94
-
 95
95
-
 96
96
-
 97
97
-
 98
98
-
 99
99
-
 100
100
-
 101
101
-
 102
102
-
 103
103
-
 104
104
-
 105
105
-
 106
106
-
 107
107
-
 108
108
-
 109
109
-
 110
110
-
 111
111
-
 112
112
-
 113
113
-
 114
114
-
 115
115
-
 116
116
-
 117
117
-
 118
118
-
 119
119
-
 120
120
-
 121
121
-
 122
122
-
 123
123
-
 124
124
-
 125
125
-
 126
126
-
 127
127
-
 128
128
-
 129
129
-
 130
130
-
 131
131
-
 132
132
-
 133
133
-
 134
134
-
 135
135
-
 136
136
-
 137
137
-
 138
138
-
 139
139
-
 140
140


De Dietrich DOP340WE1 Manual do proprietário
- Tipo
- Manual do proprietário
em outras línguas
- español: De Dietrich DOP340WE1 El manual del propietario
- français: De Dietrich DOP340WE1 Le manuel du propriétaire
- English: De Dietrich DOP340WE1 Owner's manual
- Nederlands: De Dietrich DOP340WE1 de handleiding
- Deutsch: De Dietrich DOP340WE1 Bedienungsanleitung
- dansk: De Dietrich DOP340WE1 Brugervejledning
Artigos relacionados
-
 De Dietrich DOC310XE1 Manual do proprietário
-
 De Dietrich DOP320BE1 Manual do proprietário
-
 De Dietrich DOP320BE1 Manual do proprietário
-
 De Dietrich DOP320BE1 Manual do proprietário
-
 De Dietrich DOP320BE1 Manual do proprietário
-
De Dietrich DOP340BE1 Manual do proprietário
-
 De Dietrich DOP420BE1 Manual do proprietário
-
 De Dietrich DOP320BE1 Manual do proprietário
-
De Dietrich DOP390XH1 Manual do proprietário
-
Groupe Brandt DOD1198B Manual do proprietário


