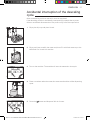
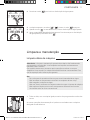
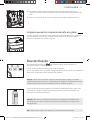
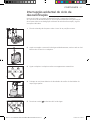
Gaggia Milano Naviglio Manual do proprietário
- Categoria
- Cafeteiras
- Tipo
- Manual do proprietário
Este manual também é adequado para

ENGLISH
PORTUGUÊS
ESPAÑOL
HD8749
NAVIGLIO
User manual
Manual de instrucciones
Manual de instruções
4219-450-01931 MANUAL GAG. NAVIGLIO HD8749 EN-ES-PT.indd 1 03/12/2018 12:33:00

2
ITALIANO
Congratulations on your purchase of a Gaggia Naviglio fully automatic
coffee machine!
This user manual applies to HD8749.
This espresso machine is suitable for preparing espresso coffee using
whole coffee beans. In this user manual you will nd all the information
you need to install, use, clean and descale your machine. This appliance
has been tested with coffee. Although it has been carefully cleaned,
there might be some coffee residual left. We guarantee however that the
appliance is absolutely new.
ENGLISH
¡Felicidades por la compra de la máquina de café superautomática
Gaggia Naviglio!
Las presentes instrucciones de uso son válidas para el modelo HD8749.
Esta máquina de café exprés ha sido diseñada para la preparación de
café exprés a partir de granos enteros. En este manual encontrará toda
la información necesaria relativa a la instalación, el uso, la limpieza y la
descalcicación de la máquina. Este aparato ha sido revisado utilizando
café; a pesar de la esmerada limpieza, es posible que pueda encontrar
algunos restos de café. De todas formas, garantizamos que esta
máquina es absolutamente nueva.
ESPAÑOL
Parabéns pela aquisição da máquina de café superautomática Gaggia
Naviglio!
As presentes instruções de uso são válidas para o modelo HD8749.
Esta máquina de café expresso é indicada para a preparação de café
expresso com a utilização de grãos inteiros. Neste manual, encontrará
todas as informações necessárias para instalar, utilizar, limpar e
descalcicar a sua máquina. Este aparelho foi testado usando cafe e
apesar da limpeza cuidadosa è possivel apresentar algum residuo de
cafe. Garantimos que esta maquina é absolutamente nova.
PORTUGUÊS
4219-450-01931 MANUAL GAG. NAVIGLIO HD8749 EN-ES-PT.indd 2 03/12/2018 12:33:01

3
19
18
9
14
20
27
30
28
3129
1 2
10 11 13
3
4
5
6
7
8
21 25
26
32
15
16
17
12
242322
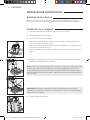
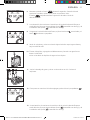
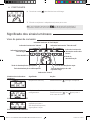
Installation / Instalación / Instalação
Product Overview / Presentación del producto / Visão geral do produto
ENGLISH ESPAÑOL PORTUGUÊS
4219-450-01931 MANUAL GAG. NAVIGLIO HD8749 EN-ES-PT.indd 3 03/12/2018 12:33:02

ENGLISH
Contents
INSTALLATION ...................................................................................................................................................................................................................................................................................................................................................................................................................................................................................................................................................................................3
Product Overview ..............................................................................................................................................................................................................................................................................................................................................................................................................................................................................................................................................................3
General Description .................................................................................................................................................................................................................................................................................................................................................................................................................................................................................................................................................5
PREPARING FOR USE ...................................................................................................................................................................................................................................................................................................................................................................................................................................................................................................................6
Machine Packaging ..................................................................................................................................................................................................................................................................................................................................................................................................................................................................................................................................................6
Machine Installation .................................................................................................................................................................................................................................................................................................................................................................................................................................................................................................................................................6
USING THE MACHINE FOR THE FIRST TIME ...........................................................................................................................................................................................................................................................................................................................8
Circuit Priming ..................................................................................................................................................................................................................................................................................................................................................................................................................................................................................................................................................................................8
Automatic Rinse/Self-Cleaning Cycle .....................................................................................................................................................................................................................................................................................................................................................................................................................................8
Manual Rinse Cycle ................................................................................................................................................................................................................................................................................................................................................................................................................................................................................................................................................9
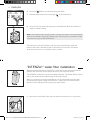
“INTENZA+” WATER FILTER INSTALLATION ...........................................................................................................................................................................................................................................................................................................................10
ADJUSTMENTS ...................................................................................................................................................................................................................................................................................................................................................................................................................................................................................................................................................................11
Gaggia Adapting System ...........................................................................................................................................................................................................................................................................................................................................................................................................................................................................................................11
Adjusting the Ceramic Coee Grinder .....................................................................................................................................................................................................................................................................................................................................................................................................................12
Adjusting the Aroma (Coee Strength) .....................................................................................................................................................................................................................................................................................................................................................................................................................12
Adjusting the Dispensing Spout ................................................................................................................................................................................................................................................................................................................................................................................................................................................................13
Adjusting the Coee Length .......................................................................................................................................................................................................................................................................................................................................................................................................................................................................................14
ESPRESSO AND COFFEE BREWING .................................................................................................................................................................................................................................................................................................................................................................................14
Espresso and Coee Brewing Using Coee Beans ......................................................................................................................................................................................................................................................................................................................................14
STEAM DISPENSING/CAPPUCCINO BREWING .............................................................................................................................................................................................................................................................................................15
HOT WATER DISPENSING .........................................................................................................................................................................................................................................................................................................................................................................................................................................................................16
CLEANING AND MAINTENANCE .........................................................................................................................................................................................................................................................................................................................................................................................................................17
Daily Cleaning of the Machine .........................................................................................................................................................................................................................................................................................................................................................................................................................................................................17
Daily Cleaning of the Water Tank .......................................................................................................................................................................................................................................................................................................................................................................................................................................................18
Daily Cleaning of the Classic Milk Frother .................................................................................................................................................................................................................................................................................................................................................................................................18
Weekly Cleaning of the Machine ..........................................................................................................................................................................................................................................................................................................................................................................................................................................................19
Weekly Cleaning of the Classic Milk Frother ..................................................................................................................................................................................................................................................................................................................................................................................19
Weekly Cleaning of the Brew Group ...................................................................................................................................................................................................................................................................................................................................................................................................................................19
Monthly Lubrication of the Brew Group ..................................................................................................................................................................................................................................................................................................................................................................................................................22
Monthly Cleaning of the Coee Bean Hopper ..........................................................................................................................................................................................................................................................................................................................................................................23
DESCALING ...............................................................................................................................................................................................................................................................................................................................................................................................................................................................................................................................................................................................23
ACCIDENTAL INTERRUPTION OF THE DESCALING CYCLE ......................................................................................................................................................................................27
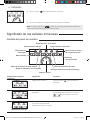
UNDERSTANDING THE DIFFERENT LIGHTS ...................................................................................................................................................................................................................................................................................................................28
Control panel display ..................................................................................................................................................................................................................................................................................................................................................................................................................................................................................................................................28
TROUBLESHOOTING ..................................................................................................................................................................................................................................................................................................................................................................................................................................................................................................................31
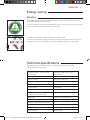
ENERGY SAVING ...................................................................................................................................................................................................................................................................................................................................................................................................................................................................................................................................................33
Stand-by ..............................................................................................................................................................................................................................................................................................................................................................................................................................................................................................................................................................................................................33
TECHNICAL SPECIFICATIONS ........................................................................................................................................................................................................................................................................................................................................................................................................................................33
4219-450-01931 MANUAL GAG. NAVIGLIO HD8749 EN-ES-PT.indd 4 03/12/2018 12:33:03

5
ENGLISH
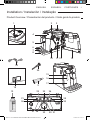
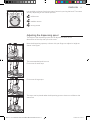
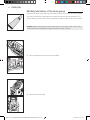
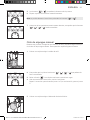
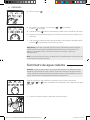
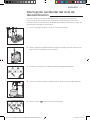
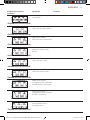
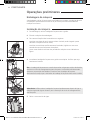
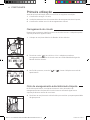
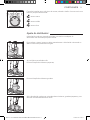
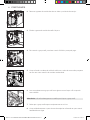
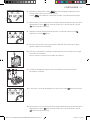
General Description
1 Coffee grinder adjustment pin 22 "Warning" light
2 Coffee bean hopper 23 "Double coffee" light
3 Coffee bean hopper lid 24 "No coffee" light
4 Control panel 25 "Coffee grounds drawer" light
5 Coffee dispensing spout 26 ON/OFF button
6 Cup holder grill 27 Hot water dispensing button
7 Full drip tray indicator 28 Espresso brew button
8 Drip tray 29 "Aroma" selector switch
9 Grease for the brew group - to be purchased
separately
30 Coffee brew button
10 Coffee grounds drawer 31 Steam dispensing button
11 Brew group 32 Descaling button
12 Coffee residues drawer
13 Service door
14 Power cord
15 Wand protective gripper
16 Classic Milk Frother (for hot water/steam wand)
17 Water tank
18 Power cord socket
19 Descaling solution - to be purchased separately
20 Coffee grinder adjustment key
21 "No water" light
4219-450-01931 MANUAL GAG. NAVIGLIO HD8749 EN-ES-PT.indd 5 03/12/2018 12:33:03

6
ENGLISH
Preparing for use
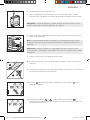
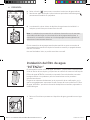
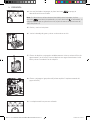
Machine packaging
The original packaging has been designed and constructed to protect the machine
during transport. We recommend keeping the packaging material for possible
future transport.
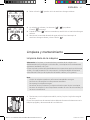
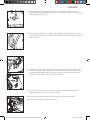
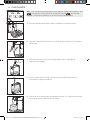
Machine installation
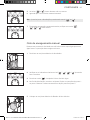
1 Remove the drip tray with grill from the packaging.
2 Remove the machine from the packaging.
3 For best use, it is recommended to:
- Choose a safe, level surface, where there will be no danger of overturning the
machine or being injured.
- Choose a location that is suciently well-lit, clean and near an easily reachable
socket.
- Allow for a minimum distance from the sides of the machine as shown in the
gure.
4 Insert the drip tray with grill into the machine. Make sure it is fully inserted.
5 Remove the water tank.
1
2
Note: The drip tray collects the water that comes out of the dispensing spout
during each rinse/self-cleaning cycle, as well as coffee that might be spilled during
beverage preparation. Empty and wash the drip tray daily and each time the full
drip tray indicator is raised.
Caution: NEVER remove the drip tray when the machine has just been turned on.
Wait a couple of minutes for the machine to carry out a rinse/self-cleaning cycle.
4219-450-01931 MANUAL GAG. NAVIGLIO HD8749 EN-ES-PT.indd 6 03/12/2018 12:33:04

7
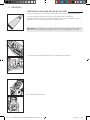
ENGLISH
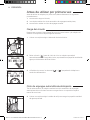
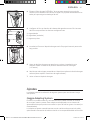
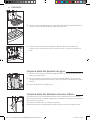
6 Rinse the water tank with fresh water.
7 Fill the water tank with fresh water up to the MAX level and reinsert it into the
machine. Make sure it is fully inserted.
8 Remove the coffee bean hopper lid and slowly pour the coffee beans into the
coffee bean hopper.
9 Put the lid on the coffee bean hopper.
10 Insert the plug into the socket on the back of the machine.
11 Insert the plug at the other end of the power cord into a wall socket with
suitable power voltage.
1
2
12 The “ ” button on the control panel ashes. Press the “ ” button to turn on
the machine.
13 The “ ” “ ” lights and the “ ” button light start ashing slowly to indicate
that the water circuit needs to be primed.
Caution: Never fill the water tank with warm, hot, sparkling water or any other
liquid, as this may cause damage to the water tank and the machine.
Note: Do not pour too many coffee beans into the coffee bean hopper as this will
reduce the grinding performance of the machine.
Caution: Only coffee beans must be put into the coffee bean hopper. Ground
coffee, instant coffee, caramelized coffee, flavoured coffee or any other object may
damage the machine.
4219-450-01931 MANUAL GAG. NAVIGLIO HD8749 EN-ES-PT.indd 7 03/12/2018 12:33:06

8
ENGLISH
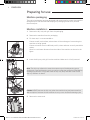
Using the machine for the rst time
When using the machine for the rst time, the following activities need to happen:
1 You need to prime the circuit.
2 The machine will perform an automatic rinse/self-cleaning cycle.
3 You need to initiate a manual rinse cycle.
Circuit priming
During this process, fresh water ows through the internal circuit of the machine
and the machine warms up. This takes a few minutes.
1 Insert a container under the Classic Milk Frother.
2 Press the “ ” button to start the cycle. The machine starts the automatic
priming of the circuit by dispensing some water through the Classic Milk
Frother.
3 When the process is complete, the“ ” and “ ” buttons will ash. The
machine is in the warm-up mode.
Automatic rinse/self-cleaning cycle
When warm-up is completed, the machine automatically performs a rinse/self-
cleaning cycle of the internal circuits with fresh water. This takes less than a
minute.
4 Place a container under the dispensing spout to catch the small amount of
dispensed water.
4219-450-01931 MANUAL GAG. NAVIGLIO HD8749 EN-ES-PT.indd 8 03/12/2018 12:33:07

9
ENGLISH
5 The “ ” and “ ” buttons ash during the entire process.
6 Wait for the cycle to nish automatically.
7
When the above steps are complete, check that the “ “, “ ”, “ ” and “ ”
buttons are lit.
Manual rinse cycle
During this process a coffee is brewed and fresh water ows through the steam/
hot water circuit. This takes a few minutes.
1 Place a container under the dispensing spout.
Note:
You can stop the dispensing process by pressing either the " " or the " "
button.
2 Check that the “ ”, “ ”, “ ” and “ ” lights are ashing steadily.
3 Press the “ ” button. The machine starts dispensing water.
4 When dispensing has nished, empty the container.
Repeat the operations from step 1 to step 3 twice, then continue with step 5.
5 Insert a container under the Classic Milk Frother.
4219-450-01931 MANUAL GAG. NAVIGLIO HD8749 EN-ES-PT.indd 9 03/12/2018 12:33:08

10
ENGLISH
6 Press the “ ” button to start dispensing hot water.
7 Dispense water until the no water light “ ” is permanently on.
8 At the end, ll the water tank again up to the MAX level. Now the machine is
ready for coffee brewing.
The automatic rinse/self-cleaning cycle also starts automatically when the
machine has been in stand-by mode or turned off for more than 15 minutes.
At the end of the cycle, it is possible to brew a coffee.
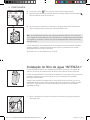
“INTENZA+” water lter installation
We recommend installing the “INTENZA+” water lter as this prevents limescale
build-up and preserves a more intense aroma to your espresso coffee.
The INTENZA+ water lter can be purchased separately. For further details, please
refer to the maintenance products page in this user manual.
Water is a crucial part of every espresso, so it is very important to always have
it professionally ltered. Using the “INTENZA+” water lter will prevent mineral
deposits from building up and improve your water quality.
1 Remove the small white lter from the water tank and store it in a dry place.
Note: If the machine has not been used for at least two weeks, it will automatically
perform an automatic rinse/self-cleaning cycle. Following this, you need to initiate
a manual rinse cycle as described above.
4219-450-01931 MANUAL GAG. NAVIGLIO HD8749 EN-ES-PT.indd 10 03/12/2018 12:33:09

11
ENGLISH
2 Remove the “INTENZA+” water lter from its packaging, immerse it vertically
(with the opening positioned upwards) in cold water and gently press the sides
so as to let the air bubbles out.
3 Set the lter according to the water hardness in your area. The settings can be
found on the lter packaging.
A = Soft water
B = Hard water (standard)
C = Very hard water
4 Insert the lter into the empty water tank. Press it down until it cannot move
any further.
5 Fill the water tank with fresh water and reinsert it into the machine. Write down
the date of the next water lter replacement (+ 2 months).
6 Dispense all the water in the tank by using the hot water function (see the “Hot
Water Dispensing” chapter).
7 Fill the water tank again.
Adjustments
The machine allows for certain adjustments so that you can brew the best tasting
coffee possible.
Gaggia Adapting System
Coffee is a natural product and its characteristics may change according to its
origin, blend and roast. The machine is equipped with a self-adjusting system
that allows the use of all types of coffee beans available on the market (not for
caramelized beans).
The machine automatically adjusts itself after brewing several cups of coffee to
optimise coffee extraction in relation to the compactness of the ground coffee.
4219-450-01931 MANUAL GAG. NAVIGLIO HD8749 EN-ES-PT.indd 11 03/12/2018 12:33:09

12
ENGLISH
1 Press and turn the grinder adjustment knob one notch at a time. You will taste
the difference after brewing 2-3 cups of coffee.
Adjusting the aroma (coee strength)
Choose your favourite coffee blend and adjust the amount of coffee to be ground
according to your personal taste.
1
2
Adjusting the ceramic coee grinder
Ceramic coffee grinders always guarantee accurate and perfect grinding and
coarseness for every coffee speciality.
This technology provides full aroma preservation, delivering the truly Italian taste in
every cup.
You can adjust the ceramic grinders to set the coffee grinding to your personal
taste.
This adjustment can be carried out by pressing and turning the grinder adjustment
knob inside the coffee bean hopper, using the appropriate key provided with the
machine.
Warning: The ceramic coffee grinder contains moving parts that may be
dangerous. Do not insert fingers or other objects. Only adjust the ceramic coffee
grinder using the grinder adjustment key.
Note: Selection must be made prior to selecting coffee.
Warning: The grinder adjustment knob inside the coffee bean hopper must be
turned only when the ceramic coffee grinder is in use.
2 The reference marks inside the coffee bean hopper indicate the grind setting.
There are 5 different grind settings to choose from, from position 1 for coarse
grind - lighter taste to position 2 for ne grind - bolder taste.
When you adjust the ceramic coffee grinder to a ner setting, your coffee will taste
stronger. For a milder coffee taste, adjust the ceramic coffee grinder to a coarser
setting.
4219-450-01931 MANUAL GAG. NAVIGLIO HD8749 EN-ES-PT.indd 12 03/12/2018 12:33:10

13
ENGLISH
It is possible to choose from three types of aroma by turning the knob. The aroma
will vary depending on the chosen position:
= mild aroma
= medium aroma
= strong aroma
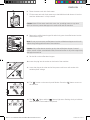
Adjusting the dispensing spout
The height of the dispensing spout can be adjusted to better t the
dimensions of the cups that you wish to use.
Move the dispensing spout up or down with your ngers to adjust its height as
shown in the gure.
The recommended positions are:
For the use of small cups.
For the use of large cups.
Two cups can be placed under the dispensing spout to brew two coffees at the
same time.
4219-450-01931 MANUAL GAG. NAVIGLIO HD8749 EN-ES-PT.indd 13 03/12/2018 12:33:11

14
ENGLISH
Adjusting the coee length
The machine allows the amount of brewed espresso coffee to be adjusted
according to your taste and the size of your cups.
Each time the “ ” or “ ” button is pressed, the machine brews a pre-set
amount of coffee. Each button may be individually programmed for a specic brew
setting.
The following procedure describes the programming of the “ ” button.
1 Place a cup under the dispensing spout.
2 Press and hold the “ ” button. The “ ” button and the “ ” light ash
during this phase. Release the button: the machine is now in programming
mode.
The machine starts brewing coffee.
3 When the desired quantity of coffee is in the cup, press the “ ” button.
Now the “ ” button is programmed; each time it is pressed, the machine will
brew the same amount of espresso that was just pre-set.
Espresso and coee brewing
Espresso and coee brewing using coee beans
Before brewing a coffee, check that both the water tank and the coffee bean
hopper are full.
1 Turn the aroma selector switch to select the desired aroma.
2 Place 1 or 2 cups under the dispensing spout.
Note: To program the “ ” coffee brew button, the same steps should be
followed. Press the “ ” button to stop brewing when the desired amount of
coffee is reached.
4219-450-01931 MANUAL GAG. NAVIGLIO HD8749 EN-ES-PT.indd 14 03/12/2018 12:33:13

15
ENGLISH
3 Press the “ ” button for an espresso and the “ ” button for a coffee.
4 To brew 1 cup of espresso or coffee, press the desired button once.
5 To brew 2 cups of espresso or coffee, press the desired button twice
consecutively. The
“ ”
light turns on.
6 After the prebrewing cycle, coffee begins to pour out of the dispensing spout.
7 Coffee brewing stops automatically when the pre-programmed level is
reached; however, it is possible to interrupt coffee brewing by pressing the
corresponding button again (“ ” espresso brew button or “ ” coffee brew
button).
Note: In this operating mode, the machine automatically grinds and doses the
proper amount of coffee. Brewing two cups of espresso requires two grinding and
brewing cycles, automatically carried out by the machine.
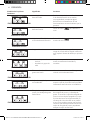
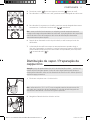
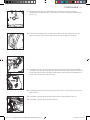
Steam dispensing / Cappuccino brewing
1 Fill 1/3 of a container with cold milk.
2 Immerse the Classic Milk Frother in milk.
Warning: Danger of burning! Dispensing may be preceded by small jets of hot
water. The steam/hot water wand may reach high temperatures: never touch it
with bare hands. Use the appropriate protective handle only.
Note: Use cold (~5°C / 41°F) milk with a protein content of at least 3% to ensure
optimum results when preparing a cappuccino. Whole milk or skimmed milk may
be used depending on individual taste.
4219-450-01931 MANUAL GAG. NAVIGLIO HD8749 EN-ES-PT.indd 15 03/12/2018 12:33:14

16
ENGLISH
6 Froth milk by gently swirling the container and moving it up and down.
7 When milk froth has the desired consistency, press the “ ” button to stop
steam dispensing.
Note: You can brew an espresso or dispense hot water straight after dispensing
steam.
Caution: After frothing milk, clean the Classic Milk Frother by dispensing a small
quantity of hot water into a container. For detailed cleaning instructions please see
the “Cleaning and Maintenance” chapter.
3 Press the “ ” button.
4 The machine warms up and the “ ” and “ ” buttons ash. The “ ”
button turns off.
5 When the “ ” button turns on again, the machine starts dispensing steam.
Hot water dispensing
Warning: Danger of burning! Dispensing may be preceded by small jets of hot
water. The steam/hot water wand may reach high temperatures: never touch it
with bare hands. Use the appropriate protective handle only.
Before dispensing hot water, check that the “ ”, “ ”, “ ” and “ ” lights are
steady on and that the water tank is full.
1 Insert a container under the Classic Milk Frother.
4219-450-01931 MANUAL GAG. NAVIGLIO HD8749 EN-ES-PT.indd 16 03/12/2018 12:33:15

17
ENGLISH
2 Press the “ ” button to start dispensing hot water.
3 The machine warms up and the “ ” and “ ” buttons ash.
The “ ” button turns off.
4 When the “ ” button turns on again, the machine starts dispensing hot
water.
5 Dispense the desired amount of hot water. To stop the hot water dispensing,
press the “ ” button.
Cleaning and maintenance
Daily cleaning of the machine
Caution: Timely cleaning and maintenance of your machine is very important
as it prolongs the life of your machine. Your machine is continuously exposed to
moisture, coffee and limescale!
The activities you need to perform and their frequency are described in detail in this
chapter. Not doing this will ultimately make your machine stop working properly. This
repair is NOT covered by your warranty!
Note:
- Use a soft, dampened cloth to clean the machine.
- Do not wash any removable part in the dishwasher.
- Do not immerse the machine in water.
- Do not use alcohol, solvents, and/or abrasive objects to clean the machine.
- Do not dry the machine and/or its components using a microwave and/or
standard oven.
1 Empty and clean the coffee grounds drawer daily with the machine turned on.
Other maintenance operations can only be carried out when the machine is turned
off and unplugged.
4219-450-01931 MANUAL GAG. NAVIGLIO HD8749 EN-ES-PT.indd 17 03/12/2018 12:33:16

18
ENGLISH
2 Empty and clean the drip tray. Perform this operation also when the full drip
tray indicator is raised.
3 Empty and clean the coffee residues drawer located on the side of the
machine. Open the service door, remove the drawer and empty the coffee
residues.
Daily cleaning of the water tank
1 Remove the small white lter or the INTENZA+ water lter (if installed) from
the water tank and wash it with fresh water.
2 Put the small white lter back or the INTENZA+ water lter (if installed) in its
housing by gently pressing and turning it at the same time.
3 Fill the water tank with fresh water.
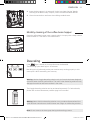
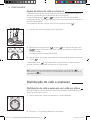
Daily cleaning of the Classic Milk Frother
It is important that you clean the Classic Milk Frother daily or after each use as it
preserves hygiene and ensures perfect milk froth consistency.
After frothing milk, you always need to:
Remove the external part of the Classic Milk Frother and wash it with fresh water.
1
2
4219-450-01931 MANUAL GAG. NAVIGLIO HD8749 EN-ES-PT.indd 18 03/12/2018 12:33:17

19
ENGLISH
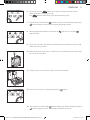
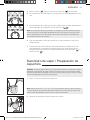
Weekly cleaning of the machine
Clean the seat of the drip tray.
2 Remove the upper part of the Classic Milk Frother from the steam/hot water
wand.
3 Wash the upper part of the Classic Milk Frother with fresh water.
4 Clean the hot water/steam wand with a wet cloth to remove milk residues.
5 Put the upper part back into the steam/hot water wand (make sure it is
completely inserted).
6 Reassemble the external part of the Classic Milk Frother.
Weekly cleaning of the Classic Milk Frother
The weekly cleaning is more thorough, since you need to disassemble all the
Classic Milk Frother parts.
The following cleaning operations are required:
1 Remove the external part of the Classic Milk Frother. Wash it with fresh water.
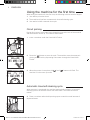
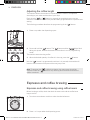
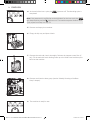
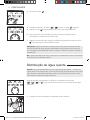
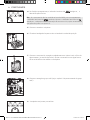
Weekly cleaning of the brew group
The brew group should be cleaned every time the coffee bean hopper is lled or at
least once a week.
1 Turn off the machine by pressing the “ ” button and remove the plug from the
socket.
4219-450-01931 MANUAL GAG. NAVIGLIO HD8749 EN-ES-PT.indd 19 03/12/2018 12:33:18

20
ENGLISH
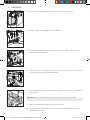
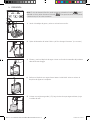
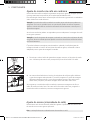
2 Remove the coffee grounds drawer. Open the service door.
4 To remove the brew group, press the «PUSH» button and pull it by the handle.
5 Thoroughly clean the coffee outlet duct with the handle of a spoon or with
another rounded kitchen utensil.
3 Remove and clean the coffee residues drawer.
6 Thoroughly wash the brew group with lukewarm water and carefully clean the
upper lter.
7 Let the brew group air-dry thoroughly.
8 Thoroughly clean the inside of the machine using a soft, dampened cloth.
Caution: Do not use detergent or soap to clean the brew group.
4219-450-01931 MANUAL GAG. NAVIGLIO HD8749 EN-ES-PT.indd 20 03/12/2018 12:33:20
A página está carregando...
A página está carregando...
A página está carregando...
A página está carregando...
A página está carregando...
A página está carregando...
A página está carregando...
A página está carregando...
A página está carregando...
A página está carregando...
A página está carregando...
A página está carregando...
A página está carregando...
A página está carregando...
A página está carregando...
A página está carregando...
A página está carregando...
A página está carregando...
A página está carregando...
A página está carregando...
A página está carregando...
A página está carregando...
A página está carregando...
A página está carregando...
A página está carregando...
A página está carregando...
A página está carregando...
A página está carregando...
A página está carregando...
A página está carregando...
A página está carregando...
A página está carregando...
A página está carregando...
A página está carregando...
A página está carregando...
A página está carregando...
A página está carregando...
A página está carregando...
A página está carregando...
A página está carregando...
A página está carregando...
A página está carregando...
A página está carregando...
A página está carregando...
A página está carregando...
A página está carregando...
A página está carregando...
A página está carregando...
A página está carregando...
A página está carregando...
A página está carregando...
A página está carregando...
A página está carregando...
A página está carregando...
A página está carregando...
A página está carregando...
A página está carregando...
A página está carregando...
A página está carregando...
A página está carregando...
A página está carregando...
A página está carregando...
A página está carregando...
A página está carregando...
A página está carregando...
A página está carregando...
A página está carregando...
A página está carregando...
A página está carregando...
A página está carregando...
A página está carregando...
A página está carregando...
A página está carregando...
A página está carregando...
A página está carregando...
A página está carregando...
-
 1
1
-
 2
2
-
 3
3
-
 4
4
-
 5
5
-
 6
6
-
 7
7
-
 8
8
-
 9
9
-
 10
10
-
 11
11
-
 12
12
-
 13
13
-
 14
14
-
 15
15
-
 16
16
-
 17
17
-
 18
18
-
 19
19
-
 20
20
-
 21
21
-
 22
22
-
 23
23
-
 24
24
-
 25
25
-
 26
26
-
 27
27
-
 28
28
-
 29
29
-
 30
30
-
 31
31
-
 32
32
-
 33
33
-
 34
34
-
 35
35
-
 36
36
-
 37
37
-
 38
38
-
 39
39
-
 40
40
-
 41
41
-
 42
42
-
 43
43
-
 44
44
-
 45
45
-
 46
46
-
 47
47
-
 48
48
-
 49
49
-
 50
50
-
 51
51
-
 52
52
-
 53
53
-
 54
54
-
 55
55
-
 56
56
-
 57
57
-
 58
58
-
 59
59
-
 60
60
-
 61
61
-
 62
62
-
 63
63
-
 64
64
-
 65
65
-
 66
66
-
 67
67
-
 68
68
-
 69
69
-
 70
70
-
 71
71
-
 72
72
-
 73
73
-
 74
74
-
 75
75
-
 76
76
-
 77
77
-
 78
78
-
 79
79
-
 80
80
-
 81
81
-
 82
82
-
 83
83
-
 84
84
-
 85
85
-
 86
86
-
 87
87
-
 88
88
-
 89
89
-
 90
90
-
 91
91
-
 92
92
-
 93
93
-
 94
94
-
 95
95
-
 96
96


Gaggia Milano Naviglio Manual do proprietário
- Categoria
- Cafeteiras
- Tipo
- Manual do proprietário
- Este manual também é adequado para
em outras línguas
Artigos relacionados

Outros documentos
-
Saeco HD8750/11 Manual do usuário
-
Philips HD8821/01 Manual do usuário
-
-
-
Gaggia Viva Deluxe Manual do proprietário
-
Saeco RI9828/41 Manual do usuário
-
-
-
-
Brandt DED700X Manual do proprietário