Electrolux EDC78550W Manual do usuário
- Categoria
- Secadoras
- Tipo
- Manual do usuário

user manual
manual de instruções
Tumble Dryer
Máquina de secar roupa
EDC78550W

Electrolux. Thinking of you.
Share more of our thinking at www.electrolux.com
CONTENTS
Important safety information 2
Environment 4
Product description 4
Control panel 5
Before first use 5
Programme chart 6
Daily use 7
Cleaning and maintenance 10
What to do if ... 13
Technical data 14
Machine settings 15
Hints for test institutes 15
Installation 16
Service 17
Subject to change without notice
IMPORTANT SAFETY INFORMATION
Important! In the interest of your safety
and to ensure the correct use, before
installing and first using the appliance,
read this user manual carefully,
including its hints and warnings. To
avoid unnecessary mistakes and
accidents, it is important to ensure that
all people using the appliance are
thoroughly familiar with its operation
and safety features. Save these
instructions and make sure that they
remain with the appliance if it is moved
or sold, so that everyone using it
through its life will be properly
informed on appliance use and safety.
General safety
• It is dangerous to alter the specifications
or attempt to modify this product in any
way.
• This appliance is not intended for use by
persons (including children) with reduced
physical, sensory or lack of experience
and knowledge, unless they have been
given supervision or instruction concern-
ing use of the appliance by a person re-
sponsible for their safety.
• Make sure that small pets do not climb in-
to the drum. To avoid this, please check
into the drum before using.
• Any objects such as coins, safety pins,
nails, screws, stones or any other hard,
sharp material can cause extensive dam-
age and must not be placed into the ma-
chine.
• In order to avoid danger of fires caused
by excessive drying, do not use appli-
ance to dry the following items: Cush-
ions, quilts and the like (these items accu-
mulate heat).
• Items such as foam rubber (latex foam),
shower caps, waterproof textiles, rubber
backed articles and clothes or pillows fit-
ted with foam rubber pads should not be
dried in the tumble dryer.
• Always unplug the appliance after use,
clean and maintenance.
• Under no circumstances should you at-
tempt to repair the machine yourself. Re-
pairs carried out by inexperienced per-
sons may cause injury or serious malfunc-
tioning. Contact your local Service Cen-
tre. Always insist on genuine spare parts.
• Items that have been soiled with substan-
ces such as cooking oil acetone, petrol,
kerosene, spot removers, turpentine, wax-
es and wax removers should be washed
in hot water with an extra amount of de-
tergent before being dried in the tumble
dryer.
• Danger of explosion: Never tumble dry
items that have been in contact with in-
flammable solvents (petrol, methylated
spirits, dry cleaning fluid and the like). As
these substance are volatile, they could
cause an explosion. Only tumble dry
items washed with water.
• Risk of fire: items that have been spot-
ted or soaked with vegetable or cooking
oil constitute a fire hazard and should not
be placed in the tumble dryer.
• If you have washed your laundry with
stain remover you must execute an extra
rinse cycle before loading your tumble dry-
er.
2 electrolux

• Please make sure that no gas lighters or
matches have accidentally been left in
pockets of garments to be loaded into ap-
pliance
Warning! Never stop a tumble dry
before the end of the drying cycle
unless all items are quickly re-
moved and spread out so that the
heat is dissipated. Risk of fire!
• Risk of electric shock! Do not spray
down the appliance with jets of water.
Installation
• This appliance is heavy. Care should be
taken when moving it.
• When unpacking the appliance, check
that it is not damaged. If in doubt, do not
use it and contact the Service Centre.
• All packaging must be removed before
use. Serious damage can occur to the
product and to property if this is not ad-
hered to. See relevant section in the user
manual.
• The final part of a tumble dryer cycle oc-
curs without heat ( cool down cycle ) to
ensure that the items are left at a temper-
ature that ensures that items will not be
damaged.
• Any electrical work required to install this
appliance should be carried out by a quali-
fied electrician or competent person.
• Care must be taken to ensure that the ap-
pliance does not stand on the electrical
supply cable.
• If the machine is situated on a carpeted
floor, please adjust the feet in order to al-
low air to circulate freely under the appli-
ance.
• After having installed the appliance,
check that it is not pressing or standing
on its electrical supply cable.
• If the tumble dryer is placed on top of a
washing machine, it is compulsory to use
the stacking kit (optional accessory).
Use
• This appliance is designed for domestic
use. It must not be used for purposes oth-
er than those for which it was designed.
• Only dry fabrics which are designed to be
machine dried. Follow the instructions on
each garment label.
• Do not dry unwashed items in the tumble
dryer.
• Do not overload the appliance. See the
relevant section in the user manual.
• Clothes which are dripping wet should
not be placed in the dryer.
• Garments which have been in contact
with volatile petroleum products should
not be machine dried. If volatile cleaning
fluids are used, care should be taken to
ensure that the fluid is removed from the
garment before placing in the machine.
• Never pull the power supply cable to re-
move the plug from the socket; always
take hold of the plug itself.
• Never use the tumble dryer if the power
supply cable, the control panel, the work-
ing surface or the base are damaged so
that the inside of the tumble dryer is ac-
cessible.
• Fabric softeners, or similar products
should be used as specified by the fabric
softener instructions.
• Caution - hot surface : Do not touch
the door light cover surface when the
light is switched on (only dryers equipped
with internal drum light).
Child safety
• This machine is not intended for use by
young children or infirm persons without
supervision.
• Children should be supervised to ensure
that they do not play with the appliance.
• The packaging components (e.g. plastic
film, polystyrene) can be dangerous to chil-
dren - danger of suffocation! Keep them
out of children’s reach.
• Keep all detergents in a safe place out of
children’s reach.
• Make sure that children or pets do not
climb into the drum.
electrolux 3

ENVIRONMENT
The symbol on the product or on its
packaging indicates that this product may
not be treated as household waste. Instead
it should be taken to the appropriate
collection point for the recycling of electrical
and electronic equipment. By ensuring this
product is disposed of correctly, you will
help prevent potential negative
consequences for the environment and
human health, which could otherwise be
caused by inappropriate waste handling of
this product. For more detailed information
about recycling of this product, please
contact your local council, your household
waste disposal service or the shop where
you purchased the product.
Old appliance
Warning!
Remove mains plug from socket when you
have no further use for the machine. Cut off
mains cable and dispose of together with
plug. Destroy loading door hook. Children
cannot then lock themselves in the machine
and put their lives at risk.
Packaging material
The packaging materials are environmental-
ly friendly and can be recycled. The plastic
components are identified by markings, e.g.
>PE<, >PS<, etc. Please dispose of the
packaging materials in the appropriate con-
tainer at the community waste disposal fa-
cilities.
Environmental tips
• In the dryer, laundry becomes fluffy and
soft. Fabric softeners are not therefore
needed when washing.
• Your dryer will function most economical-
ly if you:
– always keep the ventilation slots on the
base of the dryer unobstructed;
– use the loading volumes specified in
the programme overview;
– ensure you have good ventilation in the
installation room;
– clean the micro-fine filter and fine strain-
er after each drying cycle;
– spin the laundry well before drying.
Energy consumption depends on spin-
ning speed set in washing machine.
Higher spinning speed - lower energy
consumption.
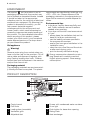
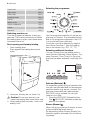
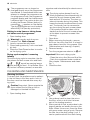
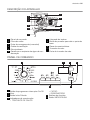
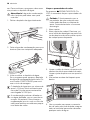
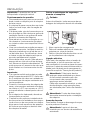
PRODUCT DESCRIPTION
1
2
4
6
8
9
11
3
5
7
10
1 Control panel
2 Fluff filters
3 Loading door (reversible)
4 Ventilation grille
5 Adjustable feet
6 Drawer with condensed water container
7 Drum light
8 Push button for base door opening
9 Rating Plate
10 Heat exchanger
4 electrolux

11 Heat exchanger door
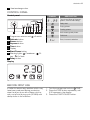
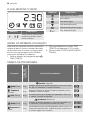
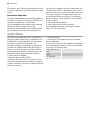
CONTROL PANEL
Control panel
1 2 3 4 5 6 7 8 9
1
Programme selector and
off switch
2
Delicate button
3 Buzzer button
4 Dryness button
5 Time button
6 Display
7 Start/Pause button
8
Warning lights:
Condenser , Fil-
ters , Full tank
9 Delay button
Display
SYMBOL DESCRIPTION
Time to end (time of time pro-
gramm, time of start delay)
Delay start
Drying phase
Cooling phase
Anti-crease guard phase
Child lock
Error, incorrect selection
BEFORE FIRST USE
In order to remove any residues which may
have been produced during production,
wipe the dryer drum with a damp cloth or
carry out a brief drying cycle (30 MIN) with
damp cloths in the machine.
1.
Turn the programme knob to
TIME .
2. Press the TIME button repeatedly until
0.30 appears in the display.
3. Press the START/PAUSE button.
electrolux 5

PROGRAMME CHART
Programme
max. load
(dry clothes)
Application/properties
Care label
Cottons (Cottons)
Extra (Extra )
8 kg
Thorough drying of thick or multi- layered fabrics, e.g. terry
towelling items, bathrobes.
Cupboard
(Cupboard)
8 kg
Thorough drying of fabrics of even thicknesses, e.g. terry
towelling items, knitwear, towels.
Iron (Iron)
8kg
For thin fabrics which are also to be ironed, e.g. knitwear,
cotton shirts.
Synthetics (Synthetics)
Extra (Extra)
3 kg
Thorough drying of thick or multi-layered fabrics, e.g. pull-
overs, bedding, table linen.
Cupboard
(Cupboard)
3 kg
For thin fabrics which are not ironed, e.g. easy care shirts,
table linen, baby clothes, socks, lingerie with bones or wires.
Iron (Iron)
3 kg
For thin fabrics which are also to be ironed, e.g. knitwear,
cotton shirts.
Special (Special)
Time (Time)
8 kg
For further drying of individual items of laundry. ( Dryness
(Dryness) function not available)
Mix (Mix)
3 kg
For drying cotton and synthetic fabrics, uses low tempera-
ture.
Easy Iron
(Easy Iron)
1 kg
(or 5
shirt
s)
Special program with anti-crease mechanism for easy care
fabrics such shirts and blouses; for minimum ironing effort.
The results depends on the type of fabric and its finish.
Place fabrics in the dryer straight after spinning; once dried,
immediately remove fabrics and place on a clothes hanger.
Jeans (Jeans)
8 kg
For leisure clothing, such as jeans, sweat-shirts, etc., of dif-
ferent material thicknesses (e.g. at the neck, cuffs and
seams).
Wool (Wool)
1 kg
For drying woollen fabrics after they have been washed, us-
ing warm air at minimum mechanical load (Follow section
“Sorting and preparing washing”). Recommendation: Re-
move fabrics immediately after drying, as no anti-crease pro-
gramme follows.
The wool drying cycle of this tumble drying machine has
been tested and approved by The Woolmark Company.
The cycle is suitable to dry knitted wool garments which are
labelled "hand wash" provided that the garments are wash-
ed in a Woolmark endorsed hand washing cycle and tum-
ble dried according to the instructions issued by the manu-
facturer. (M1022)
6 electrolux

Programme
max. load
(dry clothes)
Application/properties
Care label
Cooling
(Cooling)
8 kg
Special programme, lasting around 10 minutes, for refresh-
ing or gently cleaning textiles with commercially available
dry cleaning sets. (Only use those products which are de-
clared as suitable for the drier by the manufacturer; please
observe the manufacturer’s instructions for use.)(Buzzer
(Buzzer) function available)
Quick (Quick)
Synthetics quick
(Synthetics quick)
2 kg
For quick drying synthetics fabrics with minimum creasing.
Drying result: ready to store.
Cottons quick
(Cottons quick)
3 kg
For quick drying cotton fabrics with minimum creasing. Dry-
ing result: ready to store.
Time (Time) function available only with
Time (Time) programme.
DAILY USE
Sorting laundry
• Sort by fabric type:
–
Cotton/linen for programmes in
Cot-
tons (Cottons) programme group.
– Mixtures and synthetics for pro-
grammes in
Synthetics (Synthet-
ics ) programme group.
• Sort by care label: The care labels mean:
Drying in the tumble dryer possible in
principle
Drying at normal temperature
Drying at reduced temperature
Drying in the tumble dryer not possible
Important! Do not place in the appliance
any wet laundry which is not specified on
the care label as being suitable for tumble-
drying.
This appliance can be used for all wet laun-
dry items which are labelled as suitable for
tumble-drying.
• Do not dry new, coloured textiles togeth-
er with light-coloured laundry items. Tex-
tile colours may bleed.
• Do not dry cotton jersey and knitwear
with the
Extra (Extra) programme.
Items may shrink!
• Wool and wool-like textiles can be dried
using the
Wool (Wool) programme.
Before the drying cycle spin the woollen
textiles as well as possible (max. 1200
rpm). Only dry woollen textiles together of
similar or the same material, colour and
weight. Please dry heavy laundry items
made of wool separately.
Preparing laundry
• To avoid laundry becoming tangled:
close zips, button up duvet covers and
tie loose ties or ribbons (e.g. of aprons).
• Empty pockets. Remove metal items (pa-
per clips, safety pins, etc).
• Turn items with double-layered fabrics in-
side out (e.g. with cotton-lined anoraks,
the cotton layer should be outermost).
These fabrics will then dry better.
Important! Do not overload the appliance.
Observe max. loading volume of 8 kg.
Average laundry weights
bathrobe 1200 g
quilt cover 700 g
man’s work shirt 600 g
man’s pyjamas 500 g
sheet 500 g
tablecloth 250 g
electrolux 7

man’s shirt 200 g
night dress 200 g
pillow case 200 g
towelling towel 200 g
blouse 100 g
ladies’ briefs 100 g
men’s underpants 100 g
napkin 100 g
tea cloth 100 g
Switching machine on
Turn the programme selector to any pro-
gramme. The machine switches on. When
the loading door is open, the internal lamp
illuminates the drum.
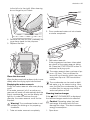
Door opening and laundry loading
1. Open loading door:
Push against the loading door (push
point)
2. Load your laundry (do not force it in).
Caution! Do not jam laundry in be-
tween the loading door and rubber seal.
3. Close loading door securely. Lock must
audibly lock.
Selecting the programme
Use the programme selector to set the pro-
gramme you require. The estimated time to
end of the programme appears in the LCD
in h:mm format (hours:minutes).
During the cycle time elapses by steps of
one minute; less than 1 hour the leading
zero is not shown (e.g. “59”, “5”, “0”).
Selecting additional functions
You can choose from the additional func-
tions Delicate (Delicate), Buzer (Buzer ), Dry-
ness (Dryness), Time (Time) (if a Time pro-
gramme has been selected), and Delay (De-
lay).
Delicate (Delicate)
For especially gentle drying of sensitive fab-
rics with the care label and for temperature-
sensitive textiles (e.g. acrylic, viscose). Pro-
gramme is executed with reduced heat.
DELICATE is only suitable for use with
loads of up to 3kg.
1. Press the DELICATE (Delicate) button.
The
DELICATE (Delicate) symbol ap-
pears in the display.
Buzzer (Buzzer)
When the drying cycle has finished, an inter-
mittent audible signal will sound.
By depressing button Buzzer (Buzzer) the
acoustic signal is switched off in the follow-
ing cases:
8 electrolux

• when selecting the programme
• when depressing the buttons
• when the programme selector dial is
turned to another position during the pro-
gramme or when you depress an option
button during the cycle
• at the end of the programme.
The corresponding light comes on
Dryness (Dryness)
Press the DRYNESS (Dryness) button re-
peatedly, to select the desired option. The
relevant light will light up. Laundry becomes
dryer from MIN to MAX. Press the DRY-
NESS (Dryness) button as many times as
necessary until the small light at the level of
residual dampness required is illuminated.
When the programme has finished the pilot
lights End is on.
Time (Time)
Use the Time (Time) button to select the pro-
gramme duration after setting the Time
programme. You can select a programme
duration from 20 min. to 3 hours in 10-mi-
nute steps.
1. Turn the programme selector to the
Time
programme.
2. Press the Time (Time) button repeatedly
until the desired programme duration is
shown in the display, e.g.
for a programme of 20 minutes.
If the programme duration is not selected,
the duration is automatically set to 10 mins.
Delay (Delay)
With the Delay (Delay) button, you can
delay the start of a programme by be-
tween 30 minutes (30') and a maxi-
mum of 20 hours (20h).
1. Select the programme and additional
functions.
2. Press the Delay (Delay) button as many
times as necessary until the required
time of the delay appears on the dis-
play, e.g.
H if the programme is
to be started in 12 hours.
If the display is showing H and
you press the button again, the time de-
lay will be cancelled. The display will
show 0 and then the duration of the se-
lected programme.
3. To activate the delay timer, press the
Start/Pause (Start/Pause) button. The
amount of time remaining until the pro-
gramme is set to start is continuously dis-
played (e.g. 15h, 14h, 13h, … 30' etc).
Setting child lock
The child lock can be set to prevent a pro-
gramme being accidentally started or a pro-
gramme in operation being accidentally
changed. The child lock function locks all
buttons and the programme selector. The
child lock can be activated or deactivated
by holding down the Buzzer (Buzzer) and
Time (Time) buttons simultaneously for 5
seconds.
– Before programme is started: Appli-
ance cannot be used
– After programme is started: Pro-
gramme in operation cannot be
changed
The icon
appears in the display to indi-
cate that the child safety device is activated.
The child safety device is not deactivated
once the programme comes to an end.
If you want to set a new programme, you
must first deactivate the child safety device.
Starting the programme
Press the Start/Pause Start/Pause button.
The programme is started. The programme
progress display shows drying progress.
The symbols for
Drying and Coling ap-
pear in the display one after the other. The
number of droplets in the dryness indicator
gradually goes down as the drying process
progresses.
Changing programme
To change a programme which has been se-
lected by mistake once the programme has
started, first turn the programme selector to
O off and then reset the programme.
electrolux 9

The programme can no longer be
changed directly once the programme
has started. If nevertheless there is an
attempt to change the programme on
the programme knob, the programme
progress display and the maintenance
indicators flash. If an option button (ex-
cluding the Buzzer (Buzzer) button) is
pressed,
appears on the display.
The drying programme is not however
affected by this (laundry protection).
Putting in extra items or taking items
out before end of programme
1. Open loading door.
Warning! Laundry and drum can
become hot. Risk of burns!
2. Load or remove laundry items.
3. Close loading securely. Lock must audi-
bly lock.
4. Press the Start/Pause button to contin-
ue the drying cycle.
Drying cycle complete / removing
laundry
Once the drying cycle is complete, the dis-
play shows the anti-crease icon and flash-
ing
as well as warning lamps:
filter and full tank . If the Buzzer (Buz-
zer) button has been pressed, an acoustic
signal sounds intermittently for about one mi-
nute.
The drying cycles (except from the
Wool programme) are automatically fol-
lowed by an anti-crease phase which
lasts around 30 minutes. The drum ro-
tates at intervals during this phase. This
keeps the laundry loose and free of crea-
ses. The laundry can be removed at
any time during the anti-crease phase.
(The laundry should be taken out to-
wards the end of the anti-crease phase
at the latest to prevent creases from
forming.)
1. Open door.
2. Before removing the laundry, remove
fluff from the micro-fine filter. It is best to
use a damp hand for this purpose. (See
“Maintenance and cleaning” chapter.)
3. Remove laundry.
4.
Turn the programme selector to
off .
Important! After each drying cycle:
- Clean the micro-fine filter and fine filter
- Drain the condensed water container
(See chapter “Maintenance and clean-
ing ”.)
5. Close the door.
CLEANING AND MAINTENANCE
Cleaning lint filters
To ensure that the appliance works perfect-
ly, the lint filters in the door and in front of
the drum must be cleaned after every dry-
ing cycle.
Caution! Important. Never operate the
dryer without the lint filter or with a
damaged or blocked lint filter.
1. Open loading door
2. Use a damp hand to clean the micro-
fine filter, which is built into the lower
part of the loading aperture.
3. After a period of time, a patina due to de-
tergent residue on laundry forms on the
filters. When this occurs, clean the filters
with warm water using a brush. Remove
the filter from the door pulling it out. It
can be positioned with the tooth facing
10 electrolux

to the left or to the right). After cleaning
do not forget to put it back.
4. Remove fluff from lint filter, preferably us-
ing a damp hand for this purpose.
5. Replace the filter.
Clean the door seal
Wipe the door seal with a damp cloth imme-
diately after the drying cycle has finished.
Emptying the water reservoir
Empty the water reservoir after every drying
cycle.
If the water reservoir is full, an active pro-
gramme will break off automatically and the
empty container
icon on the display will
light up. In order to continue the pro-
gramme, the water reservoir must first be
emptied.
Warning! The condensed water is not
suitable for drinking or for preparing
foodstuffs.
1. Take out water reservoir completely.
2. Pour condensed water out into a basin
or similar receptacle.
3. Refit water reservoir.
If the programme has been interrupted
as a result of the water reservoir being
full: Press the START/PAUSE button to
continue the drying cycle.
The water reservoir has a volume of ap-
prox. 4.5 litres. This is sufficient for
around 8 kg of laundry which has previ-
ously been spun at 1000 revolutions/
minute.
The condensate can be used as distil-
led water, e.g. for steam ironing. How-
ever first filter the condensate (e.g. with
a coffee filter) to remove any residue
and small pieces of fluff.
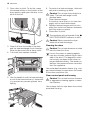
Cleaning heat exchanger
If the
HEAT EXCHANGER is displayed,
the heat exchanger needs to be cleaned.
Caution! Operating when the heat
exchanger is blocked with fluff can
damage the dryer. This also increases
energy consumption.
1. Open door.
electrolux 11

2. Open door in plinth. To do this, press
the release button on the bottom of the
door aperture and open the door in the
plinth to the left.
3. Clean fluff from the inside of the door
and the heat exchanger front chamber.
Wipe the door seal with a damp cloth.
4. Turn both lock washers inwards.
5. Use the handle to pull the heat exchang-
er out of the base and carry it horizontal-
ly to prevent any remaining water from
spilling.
6. To empty the heat exchanger, hold verti-
cally over a washing-up bowl.
Caution! Do not use sharp objects to
clean. The heat exchanger could
develop leaks.
7. Clean heat exchanger.
It is best to use a brush or to rinse thor-
oughly with a hand-held shower.
8. Replace heat exchanger and lock into
place (turn both lock washers outwards
until they snap into place).
9. Close door in plinth.
The appliance will not operate if the
HEAT EXCHANGER indicator is still lit.
Caution! Never operate the dryer
without the heat exchanger.
Cleaning the drum
Caution! Do not use abrasives or steel
wool to clean the drum.
Lime in the water or cleaning agents
may form a barely visible lining on the in-
side of the drum. The degree to which
the laundry has been dried is then no
longer detected reliably. The laundry is
damper than expected when removed
from the appliance.
Use a standard domestic cleaner (e.g. vine-
gar-based cleaner) to wipe down the inside
of the drum and drum ribs.
Clean control panel and housing
Caution! Do not use furniture cleaners
or aggressive cleaning agents to clean
the machine.
Use a damp cloth to wipe down the control
panel and housing.
12 electrolux

WHAT TO DO IF ...
Troubleshooting by yourself
If, during operation, the error code E... plus
number or letter) appears on the multi-dis-
play: Switch the appliance off and on again.
Reset programme. Press the START/
PAUSE (START/PAUSE) button. If the error
appears again, please contact the Custom-
er Care Department, stating the error code
Problem Possible cause Remedy
Dryer does not work.
Mains plug is not plugged in or
fuse is not working correctly.
Plug in at mains socket. Check
fuse in fuse box (domestic installa-
tion).
Loading door is open. Close loading door.
Have you pressed the START/
PAUSE (START/PAUSE) button?
Press the START/PAUSE (START/
PAUSE) button again.
Drying results unsatisfac-
tory.
Wrong programme selected.
Select a different programme the
next time you dry (see “Pro-
gramme overview” chapter).
Lint filters clogged. Clean lint filters.
Fluff filter clogged. Clean fluff filter.
Heat exchanger clogged with lint. Clean heat exchanger.
Overloading of laundry.
Observe recommended loading
volumes.
Ventilation slots in base area cov-
ered up.
Uncover ventilation slots in base
area.
Residue on inside surface of drum
or drum ribs.
Clean inside surface of drum and
drum ribs.
Conductance of water at installa-
tion site differs from standard set-
ting of machine.
Re-programme standard setting
for degree of drying (see ‘Program-
ming options’ chapter).
When a button is pressed
- no reaction of the ma-
chine.
Drying protection. After the start of
the programme, the option can no
longer be set.
Turn the programme knob to O
off . Set the programme again.
Drum light does not work.
Programme selector in O off posi-
tion.
Turn programme selector to any
programme.
Defective light bulb.
Replace light bulb (see next sec-
tion).
Displayed programme
time changes erratically
or stays unchanged for a
long time.
Programme time is corrected auto-
matically depending on type and
volume of laundry and level of
dampness.
Automatic process; this is not a
machine fault.
Programme inactive,
CONTAINER display illu-
minated.
Condensate tank is full.
Empty condensate tank, then start
programme with START/PAUSE
(START/PAUSE) button.
Drying cycle ends shortly
after programme starts.
ANTICREASE (ANTI-
CREASE) light is on.
Not enough washing loaded or
washing loaded is too dry for selec-
ted programme.
Select time programme or higher
drying level (e.g.
EXTRA (EX-
TRA) instead of
CUPBOARD
(CUPBOARD).
electrolux 13

Drying cycle lasts an un-
usually long time. Note:
After up to 5 hours the
drying cycle ends auto-
matically (see ‘End of dry-
ing cycle’).
Lint filter clogged. Clean lint filter.
Fluff filter clogged. Clean fluff filter.
Load volume too big. Reduce load volume.
Laundry insufficiently spun. Laundry must be adequately spun.
Particularly high room tempera-
ture. Temporary switching off of
the compressor to avoid overload.
Automatic process, there is no
fault with the appliance. If possi-
ble, lower the room temperature.
Discoloration Colour fastness of textiles.
Check colour fastness of textiles.
Only treat textiles together if they
are a similar colour.
Changing the bulb for interior lighting
Only use a special bulb which is designed
specially for dryers. The special bulb can be
obtained from your local Service Force cen-
tre.
Warning! When the appliance is
switched on, the interior lighting
switches itself off after 4 minutes when
the door is open.
Warning! Do not use standard bulbs!
These develop too much heat and may
damage the machine!
Warning! Before replacing the bulb,
disconnect the mains plug.
1. Unscrew cover above the bulb (this can
be found directly behind the loading aper-
ture, at the top; refer to “Description of
machine” section.)
2. Replace defective bulb.
3. Screw cover back down.
Check the correct positioning of o-ring gas-
ket before screwing back the door light cov-
er. Do not operate the dryer when missing o-
ring gasket on door light cover.
Warning! For safety reasons, the cover
must be screwed down tightly. If this is
not done, the dryer must not be
operated.
TECHNICAL DATA
This appliance conforms with the following EU Directives:
– 2006/95/EC dated 12.12.2006 Low Voltage Directive
– 89/336/EEC dated 03.05.1989 EMC Directive inclusive of Amending Directive
92/31/EEC
– 93/68/EEC dated 22.07.1993 CE Marking Directive
Height x width x depth 85 x 60 x 58 cm
Drum volume 108 l
Depth with loading door open 109 cm
Height can be adjusted by 1.5 cm
Weight when empty approx. 40,5 kg
Loading volume (depends on programme)
1)
max. 8 kg
Voltage 230 V
Required fuse 10 A
Total power 2350 W
Energy efficiency class
B
14 electrolux

Energy consumption (8 kg of cotton, pre-
drained at 1000 rpm)
2)
4.48 kWh
Average annual energy consumption 282 kWh
Use Domestic
Permissible ambient temperature + 5°C to + 35°C
Consumption values
The consumption values have been established under standard conditions. They may de-
viate when the machine is operated in domestic circumstances.
Programme
Energy consumption in kWh / average
drying time in min.
COTTON CUPBOARD (COTTON CUP-
BOARD)
2)
3)
4.48 / 135 (8 kg load pre-drained at 1000
rpm)
4,30 (8 kg load pre-drained at 1400 rpm)
COTTON IRON (COTTON IRON)
2)
3.8 / 108 (8 kg load pre-drained at 1000 rpm)
SYNTHETICS CUPBOARD (SYNTHETICS
CUPBOARD)
2)
1.30 / 45 (3 kg load pre-drained at 1200 rpm)
1) Different loading volume data may be needed in some countries as a result of different measuring methods.
2) in accordance with EN 61121
MACHINE SETTINGS
Setting Implementation
Buzzer permanent
on/off
The alarm is by default always off. To set permanent alarm on (off):
1. Turn the programme selector to any programme.
2. Press simultaneously the Buzzer and Dryness buttons and hold down
for approx. 5 seconds.
Water hardness
1)
1. Turn the programme selector to any programme.
2. Press simultaneously the Dryness and Start/Pause buttons and hold
down for approx. 5 seconds.
3. Press the Start/Pause button until you set desired level:
- low conductivity <300 μS/cm
- medium conductivity 300-600 μS/cm
- high conductivity >600 μS/cm
4. To memorize setting press simultaneously the Dryness and Start/Pause
buttons or turn knob to
off position
1) Water contains, a variable quantity of limestone and mineral salts of which quantities vary according to
geographical locations thus varying its conductivity values. Relevant variations of the conductivity of the water
compared to those prefixed by the factory could slightly influence the residual humidity of the laundry at the end of
the cycle. Your dryer allows you to regulate the sensitivity of the drying sensor based on conductivity values of the
water.
HINTS FOR TEST INSTITUTES
Parameters possible to checked by the
Test Institutes:
• Energy consumption (corrected with final
humidity) during the cupboard dry cotton
cycle with nominal load.
• Energy consumption (corrected with final
humidity) during the cupboard dry cotton
cycle with half load.
• Final humidity (during cupboard dry cot-
ton, iron dry cotton and cupboard dry
easy care)
• Condensation efficiency (corrected with fi-
nal humidity) during cupboard dry cotton
cycle with nominal and half load
All the cycles have to be checked in accord-
ance with EN 61121 (Tumble dryers for
electrolux 15

household use – Methods for measuring
the performance).
INSTALLATION
Appliance positioning
• It is recommended that, for your conven-
ience, the machine is positioned close to
your washing machine.
• The tumble dryer must be installed in a
clean place, where dirt does not build up.
• Air must be able to circulate freely all
round the appliance. Do not obstruct the
front ventilation grille or the air intake
grilles at the back of the machine.
• To keep vibration and noise to a mini-
mum when the dryer is in use, it should
be placed on a firm, level surface.
• Once in its permanent operating position,
check that the dryer is absolutely level
with the aid of a spirit level. If it is not,
raise or lower the feet until it is.
• The feet must never be removed. Do not
restrict the floor clearance through deep-
pile carpets, strips of wood or similar.
This might cause heat built-up which
would interfere with the operation of the
appliance.
Important!
• The hot air emitted by the tumble dryer
can reach temperatures of up to 60°C.
The appliance must therefore not be in-
stalled on floors which are not resistant to
high temperatures.
• When operating the tumble dryer, the
room temperature must not be lower
than +5°C and higher than +35°C, as it
may affect the performance of the appli-
ance.
• Should the appliance be moved, it must
be transported vertically.
• The appliance must not be installed be-
hind the lockable door, a sliding door a
door with a hinge on the opposite side to
that of the appliance in such a way that a
full opening of the dryer is restricted.
Removing transport safety packaging
Caution!
Before use all parts of the transport packag-
ing must be removed.
1. Open loading door
2. Pull off adhesive strips from inside ma-
chine on top of drum.
3. Remove foil hose and polystyrene pad-
ding from the machine.
Electrical connection
Details on mains voltage, type of current
and the fuses required should be taken
from the type plate. The type plate is fitted
near the loading aperture (see “Product de-
scription” chapter).
Connect the machine to an earthed
socket, in accordance with current wir-
ing regulations.
Warning! The manufacturer
declines any responsibility for
damage or injury through failure to
comply with the above safety
precautions.
Should the appliance power supply
cable need to be replaced, this
must be carried out by our Service
Center.
Warning! The plug must be
accessible after installing the
machine.
Door reversal
To make it easier to load or unload the laun-
dry, the door can be reversed.
Warning! The door must only be
reversed by an authorised service
engineer.
16 electrolux

Please contact your local Service Force Cen-
tre. The engineer will carry out the door re-
versal at your cost.
Special accessories
•
Stacking kit
These intermediate installation kits can
be used to arrange the dryer and a wash-
ing machine (60 cm wide, front loaded)
as a space-saving washer/dryer stack.
The washing machine is at the bottom
and the dryer is at the top.
Read carefully the instructions supplied
with the kit.
Available from your Service Force Cen-
tre or your specialist dealer
• Draining kit
Installation kit for direct draining of the con-
densed water into a basin, siphon, gully,
etc. The water reservoir then no longer
has to be drained, it must however re-
main in its intended position in the ma-
chine.
Fixed hose has to be on the suitable
height from minimum of 50 cm to maxi-
mum of 1 m from floor level and cannot
be looped. If possible shorten the drain-
ing hose.
Read carefully the instructions supplied
with the kit.
Available from your Service Force Cen-
tre or your specialist dealer
• Pedestal with the drawer
To situate the dryer at the optimal height
and have some additional space to store
(e.g. laundry).
Read carefully the instructions supplied
with the kit.
Available from your Service Force Cen-
tre or your specialist dealer
SERVICE
If there are technical faults, first check if you
can remedy the problem yourself with the
help of the operating instructions - see chap-
ter What to do if….
If you cannot remedy the problem on your
own, get in touch with the Customer Care
Department or one of our service partners.
To assist you quickly, these data are neces-
sary:
– Model description
– Product number (PNC)
– Serial number (S No. is on rating plate
stuck to the product - to find it see chapter
Product description ))
– Type of failure
– Any error messages shown by the display.
So that you have the necessary reference
numbers from your appliance at hand, we
recommend that you write them in here:
Model description: ........................................
PNC: ........................................
S No: ........................................
electrolux 17

Electrolux. Thinking of you.
Saiba mais sobre a nossa filosofia em www.electrolux.com
ÍNDICE
Informações de segurança importantes
18
Ambiente 20
Descrição do aparelho 21
Painel de comando 21
O que mostra o visor 22
Antes da primeira utilização 22
Tabela de programas 22
Utilização diária 24
Limpeza e manutenção 27
O que fazer se ... 29
Dados técnicos 31
Definições da máquina 32
Sugestões para os institutos de teste 32
Instalação 33
Assistência 34
Sujeito a alterações sem aviso prévio
INFORMAÇÕES DE SEGURANÇA IMPORTANTES
Importante Para a sua própria
segurança e para garantir uma
utilização correcta, antes de instalar e
usar o aparelho pela primeira vez, leia
atentamente este manual do utilizador,
incluindo as suas sugestões e
advertências. Para evitar erros e
acidentes desnecessários, é
importante que todas as pessoas que
utilizam o aparelho conheçam o seu
funcionamento e as características de
segurança. Guarde estas instruções e
certifique-se de que elas acompanham
o aparelho em caso de transferência
ou venda, para que todos os que
venham a usá-lo estejam devidamente
informados quanto à sua utilização e
segurança.
Segurança geral
• É perigoso alterar as especificações ou
tentar modificar o produto de qualquer for-
ma.
• Este aparelho não deve ser utilizado por
pessoas (incluindo crianças) com deficiên-
cias físicas, sensoriais ou sem experiên-
cia e conhecimentos, salvo se tiverem re-
cebido supervisão ou instruções relativas
à utilização do aparelho por uma pessoa
responsável pela sua segurança.
• Certifique-se de que os animais domésti-
cos não entram no tambor. Para o evitar,
verifique sempre o tambor antes de utili-
zar a máquina.
• Objectos como moedas, alfinetes, pre-
gos, parafusos, pedras ou quaisquer ob-
jectos duros e afiados podem provocar
danos graves e não devem ser coloca-
dos na máquina.
• Para evitar o perigo de incêndios provo-
cados por uma secagem excessiva, não
utilize o aparelho para secar os artigos se-
guintes: Almofadas, colchas e afins (es-
tas peças acumulam calor).
• Peças, como sejam a espuma de borra-
cha (espuma de látex), toucas de banho,
tecidos impermeáveis, artigos e roupa
com o avesso em borracha ou almofadas
cheias com espuma de borracha não de-
vem ser secas na máquina de secar roupa.
• Após a utilização, limpeza e manutenção,
desligue sempre a máquina.
• Em nenhuma circunstância deve tentar re-
parar a máquina. As reparações efectua-
das por pessoas sem a formação adequa-
da podem causar ferimentos ou avarias
graves. Contacte o seu Centro de Assis-
tência local. Insista sempre para que se-
jam utilizadas peças sobresselentes origi-
nais.
• Peças que tenham sido sujas com sub-
stâncias, como sejam óleo para culinária,
acetona, gasolina, querosene, tira-nó-
doas, aguarrás, ceras e removedores de
cera devem ser lavadas em água quente
com uma quantidade extra de detergente
antes de serem secas na máquina de se-
car roupa.
•
Perigo de explosão: Nunca seque pe-
ças que tenham estado em contacto
com solventes inflamáveis (gasolina, bebi-
das alcoólicas, líquido para limpeza a se-
co e afins). Como estas substâncias são
18 electrolux

voláteis, podem provocar explosões. Se-
que apenas peças lavadas em água.
• Perigo de incêndio: as peças mancha-
das ou impregnadas com óleo ou azeite
constituem um perigo de incêndio e não
devem ser colocadas na máquina de se-
car.
• Se tiver lavado a roupa com produto tira-
-nódoas, efectue um ciclo de enxagua-
mento extra antes de a colocar na máqui-
na de secar roupa.
• Certifique-se de que não foram deixados
acidentalmente isqueiros ou fósforos nos
bolsos da roupa que vai colocar na má-
quina
Advertência Nunca pare a máquina
de secar roupa antes do fim do ci-
clo de secagem, a não ser que to-
das as peças sejam rapidamente re-
tiradas e estendidas para dissipar
o calor. Perigo de incêndio!
• Perigo de choque eléctrico! Não direc-
cione jactos de água para a máquina.
Instalação
• Este aparelho é pesado. Tenha cuidado
quando o deslocar.
• Quando retirar a máquina da embala-
gem, certifique-se de que não está danifi-
cada. Se tiver dúvidas, não a utilize e con-
tacte o Centro de Assistência.
• Retire todas as embalagens antes de a
utilizar. Podem ocorrer sérios danos ma-
teriais ou na máquina se não cumprir es-
tas indicações. Consulte a secção espe-
cífica no manual do utilizador.
• A parte final do ciclo da máquina de se-
car é feita sem calor (ciclo de arrefecimen-
to) para assegurar que as peças ficam a
uma temperatura em que não serão dani-
ficadas.
• Quaisquer trabalhos eléctricos necessá-
rios para a instalação da máquina devem
ser efectuados por um electricista qualifi-
cado.
• Deve ter cuidado para que o aparelho
não fique em cima do cabo de alimenta-
ção eléctrica.
• Se a máquina estiver instalada sobre
uma alcatifa, ajuste os pés de forma que
o ar circule livremente.
• Depois de instalar a máquina, certifique-
-se de que não está apoiada sobre o ca-
bo de alimentação.
• Se colocar a máquina de secar por cima
da máquina de lavar, é obrigatório utilizar
o kit de montagem em coluna (acessório
opcional).
Utilização
• Esta máquina destina-se a uso domésti-
co. Não deve ser utilizada para fins dife-
rentes daqueles para os quais foi conce-
bida.
• Seque apenas peças de roupa concebi-
das para secar na máquina. Siga as ins-
truções nas etiquetas da roupa.
• Não utilize a máquina para secar peças
por lavar.
• Não carregue demasiado a máquina. Con-
sulte a secção específica no manual do
utilizador.
• A roupa a escorrer água não deve ser co-
locada na máquina de secar.
• As peças de roupa que tiverem estado
em contacto com produtos petrolíferos
voláteis não devem ser secas na máqui-
na. Se forem utilizados líquidos de limpe-
za voláteis, tenha o cuidado de retirar o
produto da peça de roupa antes de a co-
locar na máquina.
• Nunca puxe pelo cabo eléctrico para reti-
rar a ficha da tomada; puxe sempre pela
própria ficha.
• Não utilize a máquina de secar se o cabo
de alimentação, o painel de comando, a
superfície de trabalho ou a base estive-
rem danificados de forma que o interior
da máquina de secar esteja acessível.
• Os amaciadores ou produtos semelhan-
tes devem ser usados de acordo com as
instruções do amaciador.
•
Cuidado - superfície quente : Não to-
que na superfície de cobertura da luz da
porta enquanto a luz estiver acesa (só
em secadores equipados com luz interior
no tambor).
Segurança para crianças
• Esta máquina não deve ser utilizada por
crianças ou pessoas portadoras de defici-
ência sem vigilância.
• As crianças devem ser vigiadas para as-
segurar que não brincam com o aparelho.
electrolux 19

• Os componentes da embalagem (por ex.
película de plástico, poliestireno) podem
ser perigosos para as crianças - perigo
de asfixia! Mantenha-os fora do alcance
das crianças.
• Mantenha todos os detergentes num lo-
cal seguro e fora do alcance das crianças.
• Certifique-se de que as crianças ou ani-
mais domésticos não entram no tambor.
AMBIENTE
O símbolo no produto ou na
embalagem indica que este produto não
pode ser tratado como lixo doméstico. Em
vez disso, deve ser entregue ao centro de
recolha selectiva para a reciclagem de
equipamento eléctrico e electrónico. Ao
garantir uma eliminação adequada deste
produto, irá ajudar a evitar eventuais
consequências negativas para o meio
ambiente e para a saúde pública, que, de
outra forma, poderiam ser provocadas por
um tratamento incorrecto do produto. Para
obter informações mais pormenorizadas
sobre a reciclagem deste produto, contacte
os serviços municipalizados locais, o centro
de recolha selectiva da sua área de
residência ou o estabelecimento onde
adquiriu o produto.
Aparelho velho
Advertência
Retire a ficha da tomada quando não utili-
zar mais a máquina. Corte o cabo principal
e elimine-o juntamente com a ficha. Des-
trua o fecho da porta de carregamento. As
crianças não podem fechar-se na máquina
e colocar a sua vida em perigo.
Materiais da embalagem
Os materiais da embalagem são ecológicos
e podem ser reciclados. Os componentes
de plástico estão identificados por marcas,
por ex. >PE<, >PS<, etc. Elimine os materi-
ais da embalagem no contentor adequado
nas instalações de eliminação de resíduos
da sua zona.
Sugestões ambientais
• Na máquina de secar, a roupa fica fofa e
macia. Os amaciadores não são, por is-
so, necessários durante a lavagem.
• A sua máquina funcionará mais economi-
camente se:
– mantiver sempre as aberturas de venti-
lação na base da máquina de secar de-
sobstruídas;
– utilizar os volumes de carga especifica-
dos na vista geral dos programas;
– garantir uma boa ventilação no compar-
timento de instalação;
– limpar o filtro micro-fino e o filtro fino
após cada ciclo de secagem;
– centrifugar bem a roupa antes da seca-
gem.
O consumo de energia depende da ve-
locidade de centrifugação definida na
máquina de lavar. Velocidade de centri-
fugação mais alta - consumo de ener-
gia mais baixa.
20 electrolux
A página está carregando...
A página está carregando...
A página está carregando...
A página está carregando...
A página está carregando...
A página está carregando...
A página está carregando...
A página está carregando...
A página está carregando...
A página está carregando...
A página está carregando...
A página está carregando...
A página está carregando...
A página está carregando...
A página está carregando...
A página está carregando...
-
 1
1
-
 2
2
-
 3
3
-
 4
4
-
 5
5
-
 6
6
-
 7
7
-
 8
8
-
 9
9
-
 10
10
-
 11
11
-
 12
12
-
 13
13
-
 14
14
-
 15
15
-
 16
16
-
 17
17
-
 18
18
-
 19
19
-
 20
20
-
 21
21
-
 22
22
-
 23
23
-
 24
24
-
 25
25
-
 26
26
-
 27
27
-
 28
28
-
 29
29
-
 30
30
-
 31
31
-
 32
32
-
 33
33
-
 34
34
-
 35
35
-
 36
36


Electrolux EDC78550W Manual do usuário
- Categoria
- Secadoras
- Tipo
- Manual do usuário
em outras línguas
- English: Electrolux EDC78550W User manual
Artigos relacionados
Outros documentos
-
Aeg-Electrolux T56840L Manual do usuário
-
Hoover DX C10DCE-EGY Manual do usuário
-
Beko DV 1160 Manual do usuário
-
Teka TKS 850 C Manual do usuário
-
Candy GVS C10DE-EGY Manual do usuário
-
Teka TKS1 600 Manual do usuário
-
Teka TKS3 690 C Manual do usuário
-
-
-