Zanussi ZI9311DIS Manual do usuário
- Categoria
- Geladeira-freezers
- Tipo
- Manual do usuário

FRIDGE-FREEZER
FRIGORIFERO-
CONGELATORE
TWEEDEURS-
KOELKAST
ZI 9311 DIS
INSTRUCTION BOOKLET
LIBRETTO ISTRUZIONI
GEBRUIKSAANWIJZING
2222 209-97

2
WARNINGS
It is most important that this instruction book should be retained with the appliance for future
reference. Should the appliance be sold or transferred to another owner, or should you move house
and leave the appliance, always ensure that the book is supplied with the appliance in order that the
new owner can be acquainted with the functioning of the appliance and the relevant warnings.
If this appliance featuring magnetic door seals is to replace an older appliance having a spring lock
(latch) on the door or lid, be sure to make that spring lock unusable before you discard the old
appliance. This will prevent it from becoming a death-trap for a child.
These warnings are provided in the interest of safety.You must read them carefully before installing or
using the appliance.
General Safety
• This appliance is designed to be operated by
adults. Children should not be allowed to tamper
with the controls or play with the product.
• It is dangerous to alter the specifications or
modify this product in any way.
• Before any cleaning or maintenance work is carried
out, be sure to switch off and unplug the appliance.
• This appliance is heavy. Care should be taken
when moving it
• Ice lollies can cause frost burns if consumed
straight from the appliance.
• Take utmost care when handling your
appliance so as not to cause any damages to
the cooling unit with consequent possible
fluid leakages.
• The appliance must not be located close to
radiators or gas cookers.
• Avoid prolonged exposure of the appliance to
direct sunlight.
• There must be adequate ventilation round the
back of the appliance and any damage to the
refrigerant circuit must be avoided.
• For freezers only (except built-in models): an
ideal location is the cellar or basement.
• Do not use other electrical appliances (such
as ice cream makers) inside of refrigerating
appliances.
Service/Repair
• Any electrical work required to install this
appliance should be carried out by a qualified
electrician or competent person
• This product should be serviced by an authorized
Service Centre, and only genuine spare parts
should be used.
• Under no circumstances should you attempt to
repair the appliance yourself. Repairs carried out
by inexperienced persons may cause injury or
more serious malfunctioning. Refer to your local
Service Centre, and always insist on genuine
spare parts.
• This appliance contains hydrocarbons in its
cooling unit; maintenance and recharging must
therefore only be carried out by authorized
technicians.
Use
• The domestic refrigerators and freezers are
designed to be used specifically for the storage of
edible foodstuffs only.
• Best performance is obtained with ambient
temperature between +18°C and +43°C (class T);
+18°C and +38°C (class ST); +16°C and +32°C
(class N); +10°C and +32°C (class SN). The class
of your appliance is shown on its rating plate.
Warning: when the ambient temperature is not
included within the range indicated for the class
of this appliance, the following instructions must
be observed: when the ambient temperature
drops below the minimum level, the storage
temperature in the freezer compartment cannot
be guaranteed; therefore it is advisable to use the
food stored as soon as possible.
• Frozen food must not be re-frozen once it has
been thawed out.
• Manufacturers’ storage recommendations should
be strictly adhered to. Refer to relevant
instructions.
• The inner lining of the appliance consists of
channels through which the refrigerant passes. If
these should be punctured this would damage the
appliance beyond repair and cause food loss. DO
NOT USE SHARP INSTRUMENTS to scrape off
frost or ice. Frost may be removed by using the
scraper provided. Under no circumstances should
solid ice be forced off the liner. Solid ice should be
allowed to thaw when defrosting the appliance.

3
CONTENTS
Warnings 2
Use 4
Cleaning the interior 4
Operation 4
Temperature regulation 4
Fresh food refrigeration 4
Control panel 5
Use of the freezer - Operation 5
Temperature regulation 5
Freezing fresh food 5
Storage of frozen food 5
Thawing 5
Ice-cube production 5
Hints 6
Hints for freezing 6
Hints for storage of frozen food 6
Maintenance 7
Periodic cleaning 7
Periods of no operation 7
Interior light 7
Defrosting 7
Customer service and spare parts 8
Technical information 9
Installation 9
Location 9
Electrical connection 9
Changing the opening direction of the doors 10
Instructions for totally built-in 11
• Do not place carbonated or fizzy drinks in the
freezer as it creates pressure on the container,
which may cause it to explode, resulting in
damage to the appliance. Do not use a
mechanical device or any artificial means to
speed up the thawing process other than those
recommended by the manufacturer. Never use
metal objects for cleaning your appliance as it
may get damaged.
Installation
• During normal operation, the condenser and
compressor at the back of the appliance heat up
considerably. For safety reasons, minimum
ventilation must be as shown in the instructions.
Attention: keep ventilation openings clear of
obstruction.
• Care must be taken to ensure that the appliance
does not stand on the electrical supply cable.
Important: if the supply cord is damaged, it must
be replaced by a special cord or assembly availa-
ble from the manufacturer or its service agent.
• If the appliance is transported horizontally, it is
possible that the oil contained in the compressor
flows in the refrigerant circuit. It is advisable to
wait at least two hours before connecting the
appliance to allow the oil to flow back in the
compressor.
• There are working parts in this product which
heat up. Always ensure that there is adequate
ventilation as a failure to do this will result in
component failure and possible food loss. See
installation instructions.
• Parts which heat up should not be exposed.
Wherever possible the back of the product should
be against a wall.
Environment Protection
This appliance does not contain gasses which
could damage the ozone layer, in either its
refrigerant circuit or insulation materials.The
appliance shall not be discarded together with
the urban refuse and rubbish. Avoid damaging
the cooling unit, especially at the rear near the
heat exchanger. Information on your local
disposal sites may be obtained from municipal
authorities.The materials used on this appliance
marked by the symbol are recyclable.

4
Cleaning the interior
Before using the appliance for the first time, wash
the interior and all internal accessories with luke-
warm water and some neutral soap so as to remove
the typical smell of a brand-new product, then dry
thoroughly.
Do not use detergents or abrasive
powders, as these will damage the finish.
Operation
Insert the plug into the wall socket.
Open the refrigerator door and turn the thermostat
knob, clockwise, beyond the «O» (STOP) position.
The appliance will start to operate.
Temperature regulation
The temperature is automatically regulated and can
be increased to achieve a higher temperature
(warmer) by rotating the thermostat knob toward
lower settings or reduced (colder) rotating the knob
towards higher settings.
However, the exact setting should be chosen
keeping in mind that the temperature inside the
refrigerator depends on:
• room temperature;
• how often the door is opened;
• the quantity of food stored;
• location of appliance.
A medium setting is generally the most suitable.
Important
If the ambient temperature is high or the
appliance is fully loaded, and the appliance is
set to the lowest temperatures, it may run
continuously causing frost to form on the rear
wall. In this case the dial must be set to a higher
temperature to allow automatic defrosting and
therefore reduced energy consumption.
USE
Fresh food refrigeration
To obtain the best performance:
• do not store warm food or evaporating liquids in
the refrigerator;
• do cover or wrap the food, particularly if it has a
strong flavour.
• Position food so that air can circulate freely round
it.
Useful hints:
Meat (all types): wrap in polythene bags and place
in the wire baskets.
For safety, store in this way only one or two days
at the most.
Cooked foods, cold dishes, etc: these should be
covered and may be placed in the wire baskets.
Fruit and vegetables: these should be thoroughly
cleaned and placed in the special basket
provided.(B)
Bottles should be placed in the special basket (B)
fitted with adjustable holders for various bottle sizes.
Bananas, potatoes, onions and garlic, if not
packed, must not be kept in the refrigerator.
A
B
C

A. Pilot light
B. Thermostat knob (freezer compartment)
Use of the freezer
Operation
Insert the plug into the wall socket. The pilot light will
light up, indicating that the appliance is powered.
Turn the thermostat knob, clockwise, beyond the
«O» (STOP) position. The appliance will start to
operate.
To stop the appliance, turn the thermostat knob to
position «O».
Temperature regulation
The temperature is automatically regulated and can
be increased to achieve a higher temperature
(warmer) by rotating the thermostat knob toward
lower settings or reduced (colder) rotating the knob
towards higher settings. However, the exact setting
should be chosen keeping in mina that the
temperature inside the refrigerator depends on:
room temperature;
how often the door is opened;
the quantity of food stored;
location of appliance.
A medium setting is generally the most suitable.
To stop operation, simply turn the thermostat knob to
position «O».
Freezing fresh food
The 4-star compartment is suitable for
long term storage of commercially frozen food, and
for freezing fresh food.
To freeze fresh foods it is not necessary to change
the setting of the thermostat knob.
However, for a quicker freezing operation, turn the
thermostat knob to the coldest setting; but
remember that, in this condition, the refrigerator
compartment temeprature might drop below 0°C.
If this occurs reset thermostat knob to a warmer
setting.
To help you make the most of the freezing process,
here are some important hints:
Place the food to be frozen in the top basket of the
freezing compartment as this is the coldest part.(C).
1
2
3
4
5
6
O
AB
Important
Do not put carbonated liquids (fizzy drinks, etc.) in
the freezing compartment as they may burst.
Water ices, if consumed immediately after removal
from the freezing compartment, can possibly cause
the skin to be freeze burnt.
Remember that, once thawed, frozen food deterio-
rates rapidly.
Control panel
Thawing
Deep-frozen or frozen food, prior to being used, can
be thawed in the refrigerator compartment or at
room temperature, depending on the time available
for this operation.
Small pieces may even be cooked still frozen,
directly from the freezer: in this case, cooking will
take longer.
Ice-cube production
This appliance is equipped with one or more trays
for the production of ice-cubes. Fill these trays with
water, then put them in the freezer compartment.
Do not use metallic instruments to remove the
trays from the freezer.
Storage of frozen food
When first starting-up or after a period out of use,
before putting the products in the compartment let
the appliance run for at least two hours on the
coldest setting, then turn the thermostat knob to the
normal operating position.
To obtain the best performance from this appliance,
you should:
Important
In the event of accidental defrosting, for example
due to a power failure, if the power has been off
for longer that the value shown in the technical
characteristics chart under “rising time”, the
defrosted food must be consumed quickly or
cooked immediately and then refrozen (after
cooling).
5
40
Deze garantievoorwaarden gelden voor in Nederland gekochte en/of in gebruik zijnde producten. Indien een
product naar het buitenland wordt gebracht dient de gebruiker na te gaan of het product voldoet aan de
technische voorwaarden ( o.a. spanning, frequentie, installatievoorschriften, gassoort, klimaatomstandigheden)
in het betreffende land. Voor in het buitenland aangeschafte producten dient de gebruiker zich te vergewissen
van de bepalingen in Nederland. Noodzakelijke of gewenste aanpassingen vallen niet onder de garantie, en
kunnen niet altijd worden aangebracht.
Ook na afloop van de garantietermijn staat onze servicedienst u ter beschikking.
Adres Servicedienst:
Electrolux Service
Vennootsweg 1
2404 CG ALPHEN AAN DEN RIJN

6
Hints for freezing
To help you make the most of the freezing process,
here are some important hints:
• the maximum quantity of food which can be
frozen in 24 hrs. is shown on the rating plate;
• the freezing process takes 24 hours. No further
food to be frozen should be added during this
period;
• only freeze top quality, fresh and thoroughly
cleaned, foodstuffs;
• prepare food in small portions to enable it to be
rapidly and completely frozen and to make it
possible subsequently to thaw only the quantity
required;
• wrap up the food in aluminium foil or polythene
and make sure that the packages are airtight;
• do not allow fresh, unfrozen food to touch food
which is already frozen, thus avoiding a rise in
temperature of the latter;
• lean foods store better and longer than fatty
ones; salt reduces the storage life of food;
• water ices, if consumed immediately after
removal from the freezer compartment, can
possibly cause the skin to be freeze burnt;
• it is advisable to show the freezing-in date on
each individual pack to enable you to keep tab of
the storage time;
• the symbols on the drawers show different types of
frozen goods.
The numbers indicate storage times in months for the
appropriate types of frozen goods.Whether the
upper or lower value of the indicated storage time is
valid depends on the quality of the foods and pre-
treating before freezing;
• do not put carbonated liquids (fizzy drinks,
etc.) in the freezer compartment as they may
burst.
HINTS
Hints for storage of frozen food
To obtain the best performance from this appliance,
you should:
• make sure that the commercially frozen
foodstuffs were adequately stored by the retailer;
• be sure that frozen foodstuffs are transferred
from the foodstore to the freezer in the shortest
possible time;
• not open the door frequently or leave it open
longer than absolutely necessary.
• Once defrosted, food deteriorates rapidly and
cannot be refrozen.
• Do not exceed the storage period indicated by
the food manufacturer.
39
Garantievoorwaarden
Onze producten worden met de grootst mogelijke zorgvuldigheid geproduceerd. Desondanks kan het
voorkomen dat er een defect optreedt. Onze servicedienst zal dit op verzoek herstellen, zowel binnen als
buiten de garantietermijn. De levensduur van het product wordt daardoor niet negatief beïnvloed.
Onderstaande garantievoorwaarden zijn gestoeld op de EU Richtlijn 99/44/EG en het Burgerlijk Wetboek. De
daaruit voortvloeiende rechten blijven onverlet.
Ook de garantieverplichtingen van de verkoper naar de eindgebruiker blijven onaangetast.
Voor dit product verlenen wij garantie volgens onderstaande voorwaarden:
1. Wij verhelpen kosteloos met inachtneming van de voorwaarden 2 tot en met 15 gebreken aan het product
die zich openbaren binnen 24 maanden vanaf de datum van levering aan de eindgebruiker. In geval van
professioneel of daarmee gelijk te stellen gebruik is de garantie beperkt tot 12 maanden. Voor tweedehands
producten geldt eveneens een termijn van 12 maanden.
2. De garantieprestatie houdt in dat het product kosteloos wordt teruggebracht in de toestand die het had voor
het defect optrad. Gebrekkige onderdelen worden hersteld of vervangen. Kosteloos vervangen onderdelen
worden ons eigendom.
3. Het gebrek moet terstond gemeld worden om mogelijke verdere schade te voorkomen. De
garantieaanspraak vervalt indien het gebrek niet binnen twee maanden na vaststelling is gemeld.
4. Voor een beroep op garantie dient het aankoopbewijs met aankoop- en/of leveringsdatum te worden
overlegd. Bij ontbreken daarvan dient ander overtuigend bewijs te worden overlegd.
5. De garantie heeft geen betrekking op schade aan kwetsbare onderdelen, zoals (vitrokeramisch) glas,
kunststof, rubber, die ontstaan is door onzorgvuldig gebruik
6. De garantie heeft geen betrekking op kleine afwijkingen van de gestelde kwaliteit die voor de waarde en
deugdelijkheid van het product onbeduidend zijn.
7. De garantie geldt evenmin voor schade veroorzaakt door:
a. chemische en elektrochemische inwerking van water,
b. abnormale milieuomstandigheden in het algemeen
c. voor het product oneigenlijke bedrijfsomstandigheden
d. contact met agressieve stoffen.
8. De garantie heeft geen betrekking op gebreken door transportschade die buiten onze verantwoordelijkheid
is ontstaan, niet-vakkundige installatie of montage, verkeerd gebruik, gebrekkig onderhoud, of het niet in
acht nemen van de gebruiks- of montageaanwijzingen.
9. Het recht op garantie vervalt wanneer het defect werd veroorzaakt door herstelling of ingrepen door derden
die niet bevoegd of niet deskundig zijn, of wanneer het product voorzien werd van toebehoren of
onderdelen die niet origineel zijn en daardoor een defect veroorzaken.
10.Producten die gemakkelijk kunnen worden vervoerd dienen te worden overhandigd aan of gezonden naar
onze servicedienst. Herstelling ter plaatse kan slechts worden gevraagd voor grote of ingebouwde
producten.
11.Indien het product zodanig is ingebouwd, ondergebouwd, opgehangen of geplaatst dat de benodigde tijd
voor het in- en uitbouwen samen meer dan 30 minuten bedraagt, worden de hierdoor ontstane extra kosten
aan de gebruiker in rekening gebracht. Schade die ontstaat door abnormale in- of uitbouw komt ten laste
van de gebruiker.
12.Indien binnen de garantieperiode de herstelling van hetzelfde defect herhaaldelijk mislukt of de
herstellingkosten disproportioneel zijn wordt in overleg met de gebruiker een gelijkwaardige vervanging
geleverd. In geval van vervanging behouden we ons het recht voor om een vergoeding te rekenen naar rato
van de verstreken gebruiksperiode.
13.Herstelling onder garantie heeft geen verlenging van de garantietermijn noch aanvang van een nieuwe
garantietermijn tot gevolg.
14.Op herstellingen geven wij een garantie van 12 maanden, uitsluitend op hetzelfde gebrek.
15.Verdere of andere aanspraken, in het bijzonder vergoeding van schade ontstaan buiten het product, zijn
uitgesloten voor zover een aansprakelijkheid niet wettelijk is vastgelegd.
16.In geval van aansprakelijkheid zal een vergoeding de aankoopwaarde van het product niet overtreffen, tenzij
wettelijk anders is bepaald.

7
Replacing the bulb in the
refrigerator compartment
Remove the plug from the power socket. The bulb is
easy to change after having removed the fixing
screw and the diffuser.
Use a bulb having the same characteristics
(maximum power 15 W, Edison E 14 base fitting ).
Refit the diffuser and fully tighten the screw.
Defrosting
Frost is automatically eliminated from the evaporator
of the refrigerator compartment every time the motor
compressor stops, during normal use. The defrost
water drains out through a trough into a special
container at the back of the appliance, over the
motor compressor, where it evaporates.
It is important to periodically clean the defrost
water drain hole in the middle of the refrigerator
compartment channel to prevent the water
overflowing and dripping onto the food inside.
Use the special cleaner provided, which you will
find already inserted into the drain hole.
The freezer compartment, however, will become
progressively covered with frost. This should be
removed with the special plastic scraper provided,
whenever the thickness of the frost exceeds 4 mm.
During this operation it is not necessary to switch off
the power supply or to remove the foodstuffs.
Never use sharp metal tools to scrape off frost
from the evaporator as you could damage it.
D037
MAINTENANCE
Unplug the appliance before carrying out
any maintenance operation.
Warning
This appliance contains hydrocarbons in its cooling
unit; maintenance and recharging must therefore
only be carried out by authorized technicians.
Periodic cleaning
Clean the inside with warm water and bicarbonate of
soda.
Rinse and dry thoroughly.
Clean the condenser (black grill) and the
compressor at the back of the appliance with a
brush or a vacuum cleaner. This operation will
improve the performance of the appliance and save
electricity consumption.
Periods of non-operation
When the appliance is not in use for long periods,
take the following precautions:
remove the plug from the wall socket;
remove all food;
defrost and clean the interior and all accessories;
leave the door ajar to allow air to circulate to prevent
unpleasant smells.
D051
38
Indien de kast lateraal bevestigd wordt aan het
meubel, schroef de schroeven van het profiel(E) los
en plaats dat volgens Figuur.
D735
E
E
De deur van het apparaat en die van de kast met
een hoek van ongeveer 90° openen. IJzer (B) in
geleider (A) aanbrengen. De deuren samen
vasthouden en de gaten aangeven zoals in de
tekening. De ijzers weghalen en gaten van Ø2 mm.
boren op een afstand van 8 mm. van de buitenrand
van de deur.
Plaats het ijzer opnieuw op de geleider en bevestig
het met de bijgeleverde schroeven.
8mm
PR167
A
B
PR168
PR167/1
D
B
Voor het rechtstellen van de kastdeur kunt u gebruik
maken van de langwerpige gaten.
Tenslotte dient u te controleren of de deur van het
apparaat goed sluit.
Afdekking (D) op geleider (B) vastklikken.
Controleer na de richting van de deuren
gewijzigd te hebben, dat alle schroeven goed
vastgedraaid zitten en dat het deurrubber goed
op de sponning sluit. In een koud vertrek (in de
winter) kan het gebeuren dat dat niet het geval
is. Na enkele dagen zal het rubber zich echter
aangepast hebben. Wilt u dat bespoedi-gen, dan
kunt u het rubber warm maken met een föhn.

8
However, when the ice becomes very thick on the
inner liner, complete defrosting should be carried out
as follows:
1. pull out the plug from the wall socket or turn the
thermostat knob to the «O» setting;
2. remove any stored food, wrap it in several layers
of newspaper and put it in a cool place;
3. leave the door open, and insert the plastic
scraper in the appropriate seating at the bottom
centre, placing a basin underneath to collect the
defrost water.
4. when defrosting is completed, dry the interior
thoroughly; keep the scraper for future use;
5. turn the thermostat knob back to the required
setting or replace the plug in the power socket.
6. After two or three hours, reload the previously
removed food into the compartment.
Important:
Never use sharp metal tools to scrape off frost
from the evaporator as you could damage it.
Do not use a maechanical device or any artificial
means to speed up the thawing process other
than those recommended by the manufacturer.
A temperature rise of the frozen food packs,
during defrosting, may shorten their safe storage
life.
CUSTOMER SERVICE AND SPARE PARTS
If the appliance is not functioning properly, check
that:
• the plug is firmly in the wall socket and the mains
power switch is on;
• there is an electricity supply (find out by plugging
in another appliance);
• the thermostat knob is in the correct position.
• If there are water drops on the bottom of the
cabinet, check that the defrost water drain
opening is not obstructed (see “Defrosting”
section).
• If your appliance is still not working properly after
making the above checks, contact the nearest
service centre.
To obtain fast service, it is essential that when you
apply for it you specify the model and serial number
of your appliance which can be found on the
guarantee certificate or on the rating plate located
inside the appliance, on the bottom left-hand side.
D068
37
D726
B
Breng de afdichtstopsels (B) in de gaten in de
deklijsten aan.
Geleider (A) tegen de binnenkant van de kastdeur
aan de boven- en onderkant houden volgens de
tekening en de plaats van de buitenste gaten
aangeven. Nadat u de gaten geboord heeft de
geleider met de bijgeleverde schroeven vastzetten.
20 mm
A
50mm
PR166
PR266
A
B
C
D
Onderdelen A, B, C, D scheiden zoals u in de
tekening ziet.
PR33
C
A
Afdekking (C) op geleider (A) vastklikken.
D724
Breng, onder lichte druk, de voegafdichting tussen
apparaat en meubel aan.

9
Electrical connection
Before plugging in, ensure that the voltage and
frequency shown on the serial number plate
correspond to your domestic power supply. Voltage
can vary by ±6% of the rated voltage.
For operation with different voltages, a suitably sized
auto-transformer must be used.
The appliance must be earthed.
The power supply cable plug is provided with a
contact for this purpose.
If the domestic power supply socket is not earthed,
connect the appliance to a separate earth in
compliance with current regulations, consulting a
specialist technician.
The Manufacturer declines all responsibility if
the above safety precautions are not observed.
This appliance complies with the following
E.E.C. Directives:
- 87/308 EEC of 2/6/87 relative to radio interference
suppression.
- 73/23 EEC of 19.2.73 (Low Voltage Directive) and
subsequent modifications;
- 89/336 EEC of 3.5.89 (Electromagnetic
Compatibility Directive) and subsequent
modifications.
INSTALLATION
Location
The appliance should be installed well away from
sources of heat such as radiators, boilers, direct
sunlight etc.
For building into kitchen units follow the special “
Building-in” instructions given.
Attention
It must be possible to disconnect the appliance from
the mains power supply; the plug must therefore be
easily accessible after installation.
TECHNICAL INFORMATION
Energy Efficiency Class
A
200
70
0,86
314
4
17
Fridge Net Capacity lt.
Energy Consumption kWh/24h
Energy Consumption kWh/annuo
Freezing Capacity kg/24h
Rising Time
Freezer Net Capacity lt.
The Technical info are on the rating plate situated on the left inside the appliance.
36
Schuif het apparaat in de nis totdat de aanslaglijst
(A) met de voorkant van plafond van de kast aanlijnt.
Voor een correcte uitlijning dient men te controleren
dat de afstand tussen het apparaat en het meubel
44 mm is.
Open de deur en druk het apparaat tegen de
zijwand van de nis, aan de kant waar niet de
scharnieren zitten. Bevestig het apparaat met de vier
rneegeleverde schrm even.
Bevestig het ventilatierooster (C).
Breng, onder lichte druk, het dekseltje (D) aan.
D
C
D723
A
D023
50 mm
min.
200 cm
2
200 cm
2
min.
D567
Aanwijzingen voor de
gelategreerde inbouw
Nismaten
Hoogte (1) 1780 mm
Diepte (2) 550 mm
Breedte (3) 560 mm
Om veiligheidsredenen moet de ventilatie zodanig
zijn als aangegeven in Fig. .
Attentie: zorg ervoor dat de ventilatie openingen
tijdens gebruik niet worden afgedekt.
De nis moet tevens voorzien zijn van een
luchtkanaal met de volgende afmetningen:
diepte 50 mm
breedte 540 mm
PR01
540
50
3
2
1
44 mm

10
Instructions for totally built-in appliances
Door reversibility
B
C
A
The appliance is supplied with the right
or left door opening.To change the opening
direction of the door proceed as in the
following instructions before installing it.
1. Unscrew the upper pin and remove the spacer
2. Remove the upper door
3. Unscrew the pins (B) and the spacers (C) and
refit them on the middle hinge of the opposite
side. Snap the hinge cover (A).
4. Refit the upper door, the upper pin and the
spacer on the opposite side
5. Unscrew the lower pin and remove the spacer
and refit them on the opposite side
35
Verander de draaizin van de deuren
B
C
A
De apparatuur wordt geleverd met deuren
die naar rechts of naar links opengaan. Om
de deur naar de tegenovergestelde kant te
laten openen, dient men de volgende
handelingen te verrichten alvorens de
installatie uit te voeren.
1. Draai de bovenste stift uit en verwijder de
afstandshouder.
2. Neem de bovenste deur los.
3. Draai de stiften (B) en de afstandhouders (C) uit
en bevestig ze aan middelste scharnier van de
andere kant. Breng het dekseltje (A) aan.
4. Bevestig de bovenste deur, de bovenste stift en
de afstandhouder aan de andere kant.
5. Draai de onderste stift uit, verwijder de
afstandhouder en bevestig ze aan de andere
kant.

11
Push appliance into the housing until stop strip (A)
touches the kitchen unit.
For a correct alignment make sure that the distance
between the appliance and the cabinet is of 44 mm.
Open the door and push the appliance against the
side of the kitchen unit opposite to that of appliance
hinges.
Fasten the appliance with 4 screws provided in the
kit included with the appliance. Snap vent grille (C)
and hinge cover (D) into position.
A
D023
D
C
D723
50 mm
min.
200 cm
2
200 cm
2
min.
D567
Instructions for totally built-in
appliances
Dimensions of the recess
Height (1) 1780 mm
Depth (2) 550 mm
Width (3) 560 mm
For safety reasons, minimum ventilation must be as
shown in Fig. Attention: keep ventilation openings
clear of obstruction.
Furthermore, it is necessary that the niche is provid
with a conduct of ventilation having the following
dimensions:
depth 50 mm
width 540 mm
PR01
540
50
3
2
1
44 mm
34
Elektrische aansluiting
Overtuig u ervan dat de netspanning en de
netfrequentie, welke op het typeplaatje in de kast
staan aangegeven, overeenkomen met de netspan-
ning en de netfrequentie in uw woning. Een afwijking
op de netspanning tot plus of minus 6% is
toegestaan. Bij aansluiting op een andere spanning
dient u een geschikte transformator te gebruiken.
De steker mag alleen geplaatst worden in een
geaard stopcontact.
De kast is daarom voorzien van een speciaal drie-
aderig snoer, geschikt voor een geaard stopcontact.
Mocht het stopcontact in uw woning niet geaard zijn,
dan dient een erkend installateur het apparaat
volgens de geldende normen te aarden.
Wij wijzen u er op dat schade of letsel,
veroorzaakt door het niet voldoen aan dit
veiligheidsvoorschrift, niet onder de
verantwoordelijkheid van de fabrikant valt.
Dit apparaat voldoet aan de volgende
EEG-richtlijnen:
- 87/308 EG-richtlijnvan 2.6.87 met betrekking tot
de radio-ontstoring.
- 73/23 EG-richtlijn van 19/02/73 (Laagspanning)
en opeenvolgende wijzingen;
- 89/336 EG-richtlijn van 03/05/89 (Elektromagne-
tische compatibiliteit) en opeenvolgende
wijzingen.
INSTALLATIE
Plaats van opstelling
Plaats het apparaat uit de buurt van
warmtebronnen: centrale verwarming, kachels, felle
zonnestralen enz.
Zie voor inbouw de betreffende aanwijzingen.
TECHNISCHE GEGEVENS
Efficiency-klasse
A
200
70
0,86
314
4
17
Netto inhoud in liter van het koelgedeelte
Energieverbruik in kWh/24h
Energieverbruik in kWh/jaar
Invriescapaciteit in kg/24h
Tijd om van -18°C naar -9°C te gaan per uur
Netto inhoud in liter van het vriesgedeelte
Deze gegevens vindt u op het garantiebewijs of op het typeplaatje van het apparaat.
Attentie
Het apparaat moet
van het elektriciteitsnet
afgehaald kunnen worden; de stekker moet dus ook
na de installatie bereikbaar blijven.

12
D726
B
Apply covers (B) on joint cover lugs and into hinge
holes.
Place guide (A) on the inside part of the furniture
door, up and down as shown in the figure and mark
the position of external holes. After having drilled
holes, fix the guide with the screws supplied.
20 mm
A
50mm
PR166
Separate parts A, B, C, D as shown in the figure
PR266
A
B
C
D
PR33
C
A
Fix cover (C) on guide (A) until it clips into place.
D724
Press in the joint covers between the appliance and
the kitchen unit.
33
In het vriesvak dient u echter de rijp te verwijderen,
wanneer deze een laag van circa 4 mm vormt.
Gebruik hiervoor de meegeleverde plastic spatel.
Voor het uitvoeren van deze handeling hoeft u het
apparaat niet uit te schakelen of het vriesvak leeg te
maken. Wanneer zich een dikke laag ijs gevormd
heeft, dient u het gehele apparaat te ontdooien.
Ga als volgt te werk:
1. draai de thermostaatknop op «O» of trek de
steker uit het stopkontakt; omwikkel de
levensmiddelen met meerdere kranten en bewaar
ze op een koele plaats;
2. omwikkel de levensmiddelen met meerdere
kranten en bewaar ze op een koele plaats;
3. laat deur open staan;
4. steek de kunststof schraper in de opening onder
het diepvriesvak en plaats daar een schaaltje
onder;
5. Bewaar de schraper na het ontdooien om hem
later te gebruiken; laat de deur open staan;
6. bedenk dat, in verband met uw vloerbedekking,
mogelijk wat dooiwater van de deur kan lopen.
Maak, na het ontdooien, de binnenwanden van
het vriesvak schoon en zeem ze goed droog;
7. draai de thermostaatknop in de gewenste stand
of steek de steker weer in het stopkontakt.
8. Na twee of drie uur kunt u de diepvriesprodukten
weer terugplaatsen.
Belangrijk:
Gebruik voor het verwijderen van de rijp nooit
metalen voorwerpen; u zou uw koelkast kunnen
beschadigen.
Geen voorwerpen of metodes gebruiken om het
ontdooiproces te versnellen die niet door de
fabrikant zijn aangegeven.
Temperatuurstijging van diepvriesprodukten kan
hun houdbaarheidsduur verkorten.
STORING
Indien het apparaat niet of niet goed funkioneert,
kontroleer dan:
• of de steker goed in het stopkontakt zit;
• of de elektriciteit soms uitgevallen is;
• of de thermostaatknop op de juiste stand staat;
• en indien er water op de bodem van de koeler
ligt, of het afvoerkanaaltje soms verstopt is (zie
D068
hoofdstuk “Het ontdooien”).
Kunt u de storing niet zelf lokaliseren en
verhelpen,raadpleeg dan de dichtsbijzijnde
servicedienst.
Geef daarbij altijd het model en het typenummer
van de kast op. Deze gegevens vindt u op het
garantiebewijs of op het typeplaatje dat zich
linksonder aan de binnenzijde van het apparaat
bevindt.

13
If the appliance is fixed to the side of the kitchen
unit, simply slacken the screws in the fixing brackets
(E), move the brackets as shown in the figure and
re-tighten the screws.
D735
E
E
Open the appliance door and the furniture door at
90°. Insert the small square (B) into guide (A). Put
together the appliance door and the furniture door
and mark the holes as indicated in the figure.
Remove the squares and drill holes with ø 2 mm at 8
mm from the outer edge of the door. Place the small
square on the guide again and fix it with the screws
supplied.
8mm
PR167
A
B
PR168
PR167/1
D
B
Should the lining up of the furniture door be
necessary, use the clearance of slots.
At the end of operations, it is necessary to check if
the door of the furniture closes properly.
Fix cover (D) on guide (B) until it clips into place.
After having reversed the opening direction of
the doors check that all the screws are properly
tightened and that the magnetic seal adheres to
the cabinet. If the ambient temperature is cold
(i.e. in Winter), the gasket may not fit perfectly to
the cabinet. In that case, wait for the natural
fitting of the gasket or accelerate this process by
heating up the part involved with a normal
hairdrier.
32
D037
Vervanging van de lampjes in de
koelruimte
De stekker uit het stopcontact trekken. De schroef
losdraaien, de diffusor verwijderen en lampjes
vervangen. Lampjes gebruiken met dezelfde
kenmerken ( max. 15 W, edisonfitting E14 ). De
diffusor weer monteren door de schroeven goed
vast te draaien.
ONDERHOUD
Neem vóór iedere handeling altijd eerst de
steker uit de wandkontaktdoos.
Belangrijk
Dit apparaat bevat koolwaterstoffen in het koelcircuit;
onderhoud en bijvulling dient daarom uitsluitend
door door bevoegd personeel uitgevoerd te worden.
Periodieke reiniging
Maak, afhankelijk van de omgeving, één tot twee
keer per jaar de kondensor en de motor (beide aan
de achterkant van de kast) stofvrij met een borstel of
stofzuiger met borstel. Stof belemmert de warmte-
afgifte en verhoogt zodoende het energieverbruik.
Naar behoefte kunt u de buitenkant van de kast
lappen met lauwwarm water en een neutraal
huishoudschoonmaakmiddel, daarna afnemen met
schoon water. Het verdient aanbeveling de
buitenkant af en toe in de witte (auto-) was te zetten.
Geprolongeerd stilstand
Wij adviseren u vóór de periode dat de koelkast niet
gebruikt wordt de volgende handelingen uit te
voeren:
• neem de steker uit de wandkontaktdoos;
• verwijder alle spijzen en dranken uit de kast;
• laat de kast geheel ontdooien en maak de
binnenwanden, rekken, korven en dergelijke
goed schoon;
• laat de deuren open staan, teneinde het ontstaan
van onaangename geur te voorkomen.
Het ontdooien
Het ontdooien van de koelkast heeft automatisch
plaats elke keer dat de kompressor stopt. Het
dooiwater wordt via een afvoerkanaaltje opgevangen
in een bakje dat zich aan de achterkant van het
apparaat boven de kompressor bevindt. Hier
verdampt het water.
Wij raden u aan het gaatje in het afvoerkanaal
regelmatig schoon te maken, teneinde te
voorkomen dat het dooiwater de levensmiddelen
nat maakt. Gebruik voor het doorprikken het
staafje dat zich in het gaatje bevindt.
D051

14
Stampato su carta riciclata
AVVERTENZE E CONSIGLI IMPORTANTI
È molto importante che questo libretto istruzioni sia conservato assieme all’apparecchiatura per
qualsiasi futura consultazione. Se l’apparecchiatura dovesse essere venduta o trasferita ad un’altra
persona, assicurarsi che il libretto venga fornito assieme, in modo che il nuovo utente possa essere
messo al corrente del funzionamento della macchina e delle avvertenze relative.
Queste avvertenze sono state redatte per la Vostra sicurezza e per quella degli altri. Vi preghiamo,
dunque, di volerle leggere attentamente prima d’installare e di utilizzare l’apparecchiatura.
Sicurezza generale
•
Qualora questa apparecchiatura, munita di
chiusura magnetica, venisse usata in sostituzione
di una con chiusura a scatto, consigliamo di
rendere quest’ultima inservibile. Cio’ eviterà che i
bambini, giocando, vi rimangano intrappolati, con
grave pericolo per la loro vita.
•
Togliere la spina dalla presa di corrente prima di
procedere a qualsiasi operazione di pulizia e
manutenzione (come nel caso di sostituzione
della lampadina, sulle apparecchiature che ne
sono provviste).
•
Quest’apparecchiatura è stata progettata per
essere utilizzata da persone adulte. Fare
attenzione, quindi, che i bambini non si avvicinino
con l’intento di giocarvi.
•
È pericoloso modificare o tentare di modificare
le caratteristiche di quest’ apparecchiatura.
•
Questa apparecchiatura contiene idrocarburi nel
circuito refrigerante; pertanto la manutenzione e
la ricarica deve essere effettuata esclusivamente
da personale autorizzato dall’azienda.
•
Prestare la massima cura nella
movimentazione per non dannegiare parti del
circuito refrigerante onde evitare possibili
fuoriuscite di fluido.
•
L’apparecchiatura non deve essere collocata
nelle vicinanze di termosifoni o cucine a gas.
•
Evitate ogni esposizione prolungata
dell’apparecchiatura ai raggi solari.
•
La parte posteriore dell’apparecchiatura deve
ricevere una sufficiente circolazione d’aria e
deve essere evitato qualsiasi danno al circuito
refrigerante.
•
Solo per i congelatori (esclusi incassati): una
collocazione ottimale è la cantina.
•
Non introdurre apparecchi elettrici all’interno
dell’apparecchiatura (ad es. gelatiera)
Assistenza / Riparazioni
•
Ogni eventuale modifica che si rendesse
necessaria all’impianto elettrico domestico, per
poter installare l’apparecchiatura, dovrà essere
eseguita solo da personale abilitato.
•
Mai riparare l’apparecchiatura da soli. Le
riparazioni effettuate da persone non competenti
possono provocare dei danni. Contattare il Centro
di Assistenza più vicino ed esigere solo ricambi
originali
.
Uso
•
I frigoriferi e/o congelatori domestici sono
destinati unicamente alla conservazione e/o
congelazione degli alimenti.
•
Le migliori prestazioni si hanno con temperature
dell’ambiente comprese tra +18°C e +43°C
(Classe T); + 18°C e +38°C (Classe ST); +16°C e
+32°C (Classe N); +10°C e +32°C (Classe SN); la
classe di appartenenza é riportata sulla targa
matricola ubicata nella cella a fianco del vano
verdura.
Attenzione: al di fuori delle temperature
ambiente indicate dalla classe climatica di
appartenenza di questo prodotto, si devono
osservare le seguenti indicazioni: quando la
temperatura ambiente scende al di sotto del
valore minimo può non essere garantita la
temperatura di conservazione nel vano
congelatore; pertanto si consiglia di consumare al
più presto gli alimenti in esso contenuti .
•
In tutte le apparecchiature ci sono delle superfici
che si coprono di brina. A seconda del modello,
tale brina può essere eliminata automaticamente
(sbrinamento automatico) oppure manualmente.
Non tentare mai di togliere la brina con un
oggetto appuntito, si rischierebbe di danneggiare
irrimediabilmente l’evaporatore. Utilizzare a tale
scopo l’apposita paletta fornita con
I’apparecchiatura.
•
Non mettere mai nello scompartimento a bassa
temperatura (congelatore o conservatore) bibite
gassate: possono esplodere.
•
Non introdurre mai liquidi o alimenti caldi e non
riempire fino all’orlo i recipienti muniti di
coperchio.
•
Non usare alcun dispositivo meccanico o altro
mezzo artificiale per accelerare il processo di
sbrinamento tranne quelli qui raccomandati.
•
Non usare mai oggetti metallici per pulire
l’apparecchiatura; essa potrebbe venir
danneggiata.
31
TIPS
Tips het invriezen
Enkele belangrijke tips:
• de max. hoeveelheid levensmiddelen die u kunt
invriezen in 24 uur staat aangegeven op het
“typeplaatje”;
• het invriezen duurt 24 uur. Voeg gedurende deze
tijd geen andere in te vriezen levensmiddelen
toe;
• vries uitsluitend verse, goed schoongemaakte en
eerste kwaliteit levensmiddelen in;
• verdeel de levensmiddelen in handzame porties.
Deze vriezen sneller in en bij later gebruik hoeft u
slechts de benodigde hoeveelheid te ontdooie;
• Verpak de levensmiddelen in aluminium- of
kunststoffolie. Sluit de pakjes goed en luchtdicht
af;
• zorg ervoor dat in te vriezen pakjes niet in
aanraking komen met reeds ingevroren
produkten; de temperatuur van deze laatste zou
daardoor kunnen stijgen;
• mager voedsel is ingevroren langer houdbaar
dan vet voedsel; ook zout verkort de
houdbaarheid;
• vermijd rechtstreekse konsumptie van ijslollies uit
het vriesvak; u zou uw mondhuid kunnen
verbranden;
• schrijf de invriesdatum op de pakjes zodat u de
houdbaarheidsduur kunt kontroleren;
• de symbolen op de laden geven de diverse
soorten diepvriesproducten aan. De getallen
geven voor iedere soort diepvriesproduct de
opslagtijd in maanden aan. Of de hoogste of de
laagste waarde van de aangegeven opslagtijd
geldt, hangt af van de kwaliteit van de levens-
middelen en de behandeling voorafgaand aan het
invriezen;
• plaats geen koolzuurhoudende of
mousserende dranken in het vriesvak; de
blikjes of flessen zouden kunnen ontploffen.
Tips het diepvriesprodukten
Neem de volgende regels in acht:
• kontroleer dat de diepvrieprodukten in de winkel
op de juiste wijze bewaard worden;
• breng de diepvriesprodukten na aankoop zo snel
mogelijk over naar het vriesvak;
• open de deur altijd zo weinig en zo kort mogelijk.
• Wees heel voorzichtig bij aankoop van
diepvriesprodukten, want gedeeltelijk ontdooide
waren mag u niet opnieuw invriezen.
• Noteer de fabrikatiedatum en respekteer de
vervaldatum van de fabrikant.

15
Protezione dell’ambiente
Questa apparecchiatura non contiene, nel
circuito refrigerante e nell’isolamento, gas
refrigeranti nocivi per l’ozono. L’apparecchiatura
non deve essere smaltita con rifiuti urbani e
rottami. Deve essere evitato il danneggiamento
del circuito refrigerante, soprattutto nella parte
posteriore vicino allo scambiatore. Informazioni
sui centri di raccolta vengono forniti dall’autorità
comunale. I materiali usati in questa
apparecchiatura contrassegnati dal simbolo
sono riciclabili.
INDICE
Avvertenze e consigli importanti 14
Uso 16
Pulizia 16
Funzionamento 16
Regolazione della temperatura 16
Refrigerazione dei cibi e delle bevande 16
Pannello comandi 17
Uso del congelatore - Funzionamento 17
Regolazione della temperatura 17
Congelazione dei cibi freschi 17
Conservazione dei cibi surgelati 17
Scongelazione 17
Cubetti di ghiaccio 17
Consigli 18
Consigli per la congelazione 18
Consigli per la conservazione dei surgelati 18
Manutenzione 19
Pulizia periodica 19
Periodi di inattività 19
Lampada di illuminazione 19
Sbrinamento 19
Se qualcosa non va 20
Dati tecnici 21
Installazione 21
Posizionamento 21
Collegamento elettrico 21
Reversibilità delle porte 22
Istruzioni per l’incasso integrale 22
Centri Assistenza 25
Installazione
•
Durante il normale funzionamento il
condensatore ed il compressore, che sono posti
sul retro dell’apparecchiatura, si riscaldano
sensibilmente. Assicurarsi quindi che
l’installazione venga eseguita come da istruzioni
riportate sul libretto. Un’aerazione insufficiente
comporterà sicuramente un cattivo
funzionamento e dei danni all’apparecchiatura.
•
Assicurarsi, dopo aver installato
l’apparecchiatura, che essa non appoggi sul cavo
di alimentazione.
Importante: se il cavo di alimentazione si
danneggiasse, dovrà essere sostituito da uno
speciale cavo o assieme disponibili presso il
costruttore o il servizio di assistenza tecnica.
•
Se l’apparecchiatura viene trasportata in
posizione orizzontale è possibile che l’olio
contenuto nel compressore defluisca nel circuito
refrigerante. Lasciare l’apparecchiatura in
posizione verticale almeno 2 ore prima di
metterla in funzione per dar modo all’olio di
refluire nel compressore.
•
L’apparecchiatura non deve essere collocata
nelle vicinanze di termosifoni o cucine a gas.
•
Evitate ogni esposizione prolungata
dell’apparecchiatura ai raggi solari.
•
La parte posteriore dell’apparecchiatura deve
ricevere una sufficiente circolazione d’aria e deve
essere evitato qualsiasi danno al circuito
refrigerante.
Het bedieningspaneel van de vriezer
A. Kontrolelampje «in bedrijf»
B. Temperatnurregelaar voor het vriesgedeelte
Ingebruikname
Steek de steker in de wandcontactdoos. Het
controlelampje licht op; dit geeft aan dat het
apparaat aan staat. Druai de thermostautknop,
rechtsom uit de stand «O» (STOP-stand). De
koelkast is nu in werking.
U schakelt het apparaat uit door de thermostaatknop
op stand «O» te draaien.
Temperatuurinstelling
De temperatuur wordt automatisch geregeld en kan
verhoogd worden (minder koud) door de knop nuar
een lager cijfer te draaien of verlaugd worden
(kouder) door de knop naar een hoger cijfer te
draaien. Bij het instellen van de juiste stand dient u
er rekening mee te houden dat de temperatnur in
het apparaat afhankelijk is van:
de kamertemperatunr;
de frequentie waarmee de deuren geopend worden;
de hoeveelheid levensmiddelen in de kast;
de plaats van het apparaat.
Wij adviseren u de knop aanvankelijk op de
midden-stand te draaien.
De werking van de kast kan geheel gestopt worden
door de knop in de stand «O» te draaien.
Bewaren van diepvriesproducten
Indien u de koelkast voor het eerst in gebruik neemt
of haar weer gebruikt na een periode van stilstand,
dient u de thermostaatknop op de koudste stand te
draaien. Plaats vervolgens de diepvriesproducten na
twee uur in de kast en draai de thermostaat terug
naar de gebruikelijke stand.
Belangrijk
Als, bijvoorbeeld door stroomuitval die langer
duurt dan aangegeven wordt in de tabel
technische gegevens bij ‘tijd om van –18°C naar
–9°C te gaan per uur’ , de opgeslagen producten
onopzettelijk ontdooid worden, moeten deze
direct geconsumeerd worden of onmiddellijk
toebereid en na afkoeling opnieuw ingevroren.
Het invriezen van verse
levensmiddelen
In het -diepvriesvak kunt u verse levensmiddelen
invriezen en diepvriesproducten bewaren.
Voor het invriezen kunt u de thermostaatknop op de
gebruikelijke stand laten staan. Wilt u sneller
invriezen, dan dient u de thermostaatknop op de
koudste stand te draaien. In deze stand kan de
temperatuur in het koelvak echter beneden 0°C
dalen.
In dat geval dient u de knop op een minder koude
stand te draaien.
Het ontdooien van ingevroren
produkten
De diepvriesprodukten moet u vóór gebruik in de
koelkast of bij kamertemperatuur laten ontdooien, al
naar gelang de beschikbare tijd.
Kleine of in stukken ingevroren produkten kunnen
onmiddellijk gekookt of gebakken worden. De kook-
of baktijd zal dan natuurlijk iets langer zijn
IJslaatjes
Bij het apparaat worden 1 of meerdere ijslaatjes
voor het maken van ijsblokjes geleverd.
Vul ze met drinkwater en plaats ze in het vriesvak.
Gebruik geen metalen voorwerpen om de laatjes
los te wrikken!
30
1
2
3
4
5
6
O
AB

16
Pulizia delle parti interne
Prima dell’uso e del collegamento elettrico pulire
tutte le parti interne con acqua tiepida e sapone
neutro allo scopo di togliere il caratteristico odore di
nuovo indi asciugare accuratamente.
Non usare detersivi nè polveri abrasive
che sono dannose alle finiture.
Funzionamento
Inserire la spina nella presa di corrente. Aprire la
porta del frigorifero e ruotare in senso orario la
manopola del termostato oltre la posizione «O»
(arresto). L’apparecchiatura è in funzione.
Regolazione della temperatura
La temperatura è regolata automaticamente e può
essere aumentata (meno freddo) ruotando la
manopola verso i numeri più bassi oppure diminuita
(più freddo) ruotandola verso i numeri più alti. La
posizione corretta, comunque, va individuata
tenendo conto che la temperatura interna dipende
da questi fattori:
1. temperatura ambiente;
2. frequenza di apertura delle porte;
3. quantità di alimenti conservati;
4. collocazione dell’apparecchio.
La posizione intermedia è la più indicata.
Importante
Sulle posizioni di massimo freddo, con tempera-
tura ambiente elevata, ed una notevole quantità
di alimenti, il funzionamento può essere
continuo, con formazione di brina o ghiaccio
sulla parete posteriore della cella. In tal caso è
necessario ruotare la manopola su una posizio-
ne di minor freddo, in modo da consentire lo
sbrinamento automatico e, di conseguenza, un
minor consumo di energia elettrica.
USO
Refrigerazione dei cibi e delle bevande
Per utilizzare nel modo migliore lo scomparto
refrigerante è necessario:
non introdurre nella cella vivande calde o liquidi in
evaporazione; coprire o avvolgere gli alimenti,
specie se contengono aromi;
disporre gli alimenti in modo che l’aria possa
circolare liberamente attorno ad essi.
Alcuni consigli pratici:
A
B
C
Carne (di tutti i tipi): va avvolta on del protettivo.
Tempo massimo di conservazione : 1-2 giorni.
Cibi cotti piatti freddi, ecc. devono essere ben
coperti e possono essere disposti su qualsiasi
cesto.(A)
Frutta e verdura: ben pulite, vanno poste nel cesto
previsto. (B)
Le bottiglie vanno poste nel cesto previsto (B) con
fermabottiglie regolabile per le bottiglie di varie
misure.
Banane, patate, cipolla ed aglio, se non sono
confezionati, non vanno messi in frigorifero.
Reiniging van de binnenkant
Voor u de kast in gebruik neemt, dient u de
binnenkant met lauw water en een neutraal
schoonmaakmiddel te reinigen om de typische geur
van een nieuw apparaat weg te nemen. Droog
vervolgens de wanden goed af.
Gebruik geen schurende schoonmaak-
middelen, waarmee u de afwerkingen van
het apparaat zou kunnen beschadigen.
Ingebruikname
Steek de steker in de wandkontaktdoos. Open de
deur en draai de thermostaatknop, rechtsom uit de
stand «O» (STOP-stand). De koelkast is nu in
werking.
De werking van de kast kan geheel gestopt worden
door de knop in de stand «O» te draaien.
Temperatuurinstelling
De temperatuur wordt automatisch geregeld en kan
verhoogd worden (minder koud) door de knop naar
een lager cijfer te draaien of verlaagd worden
(kouder) door de knop naar een hoger cijfer te
draaien. Bij het instellen van de juiste stand dient u
er rekening mee te houden dat de temperatuur in
het apparaat afhankelijk is van:
• de kamertemperatuur;
• de frekwentie waarmee de deuren geopend
worden;
• de hoeveelheid levensmiddelen in de kast;
• de plaats van het apparaat.
Wij adviseren u de knop aanvankelijk op de
midden-stand te draaien.
Attentie
Het kan voorkomen dat, indien de thermostaat-
knop in de koudste stand gedraaid is, bijvoor-
beeld ten gevolge van zeer warme omgevings-
temperatuur of het snel willen koelen van grote
hoeveelheden dranken, de kompressor kontinu
loopt, waardoor automatische ontdooiing van de
koelverdamper niet plaatsvindt en zich daarop ijs
afzet. Draai, in dat geval, de thermostaatknop
naar een wat minder koude stand, zodat
automatische ontdooing kan plaatsvinden;
hierdoor spaart u tevens energie.
Koelen van levensmiddelen
Voor een optimaal gebruik van de koelruimte
adviseren wij u de volgende eenvoudige regels in
acht te nemen:
• Plaats geen warme of dampende spijzen of
dranken in de koelruimte;
• dek vooral sterk geurend voedsel af of verpak
het;
• plaats de levensmiddelen zo, dat de lucht vrij
eromheen kan cirkuleren.
Enkele praktische tips:
Vlees (alle soorten): wordt in plastic zakjes in de
lade geplaatst.
Bewaar vlees niet langer dan één of twee dagen.
Gekookt voedsel, koude schotels enz.: kunnen,
goed afgedekt, in de lade geplaatst worden.(A)
Fruit en groente: worden in de lade geplaatst na
het schoon maken.(B)
Flessen worden geplaatst in het lade (B) met
flessenklem voor verschillende maten flessen.
Bewaar niet-luchtdicht verpakte bananen,
aardappelen, uien of knoflook niet in de koelkast.
HET GEBRUIK
A
B
C
29

17
Pannello comandi
1
2
3
4
5
6
O
AB
A- Lampada spia di funzionamento
B- Manopola termostato per la regolazione della temperatura
Il congelatore è contraddistinto dal simbolo
il quale indica che esso è adatto alla congelazione di
cibi freschi e alla conservazione, a lungo termine, di
cibi congelati e surgelati.
Messa in funzione - regolazione
della temperatura
Introdurre la spina nella presa di corrente, la
lampada spia (A) si accenderà; ciò indica che
l’apparecchiatura è sotto tensione.
Ruotare la manopola (B) oltre la posizione «O».
La temperatura è regolata automaticamente e può
essere aumentata (meno freddo) ruotando la
manopola verso i numeri più bassi oppure diminuita
(più freddo) ruotandola verso i numeri più alti. La
posizione corretta, comunque, va individuata
tenendo conto che la temperatura interna dipende
da questi fattori:
la temperatura ambiente;
la frequenza di apertura delle porte;
la quantità di alimenti conservati;
la collocazione dell’apparecchio.
La posizione intermedia è la più indicata.
L’arresto del funzionamento si ottiene con l’indice
della manopola in corrispondenza del simbolo «O».
Congelazione dei cibi freschi
Lo scomparto è adatto alla congelazione di
cibi freschi e alla conservazione a lungo termine di
cibi congelati e surgelati.
Per la congelazione non è necessario variare la
posizione della manopola del termostato da quella di
normale funzionamento. Tuttavia, volendo ottenere
una congelazione più rapida, ruotare la manopola
del termostato verso la posizione di massimo freddo;
con la manopola in quest’ultima posizione, la
temperatura nello scomparto refrigerante potrebbe
scendere al di sotto di 0°C. Se ciò si verificasse
riportare la manopola del termostato in
corrispondenza di una posizione che consenta una
temperatura meno fredda.
Conservazione dei cibi surgelati
Al momento della messa in funzione o dopo un
periodo di inattività, introdurre gli alimenti
nell’apparecchio dopo averlo fatto funzionare per
almeno due ore con la manopola del termostato
sulla posizione di massimo freddo, quindi ruotare la
manopola sulla posizione di funzionamento normale.
Importante
In caso di scongelamento per cause accidentali,
ad esempio per mancanza di corrente, se il
periodo dell’interruzione é superiore al valore
riportato nella tabella dei dati tecnici sotto la
voce “tempo di risalita” sarà necessario
consumare i cibi entro breve o cucinarli subito e
ricongelarli (una volta raffreddati).
Scongelazione
Gli alimenti surgelati o congelati, prima di essere
usati, possono essere scongelati nel frigorifero o a
temperatura ambiente, a seconda del tempo
disponibile per l’operazione. I pezzi piccoli possono
essere cucinati direttamente appena tolti dal
congelatore; in questo caso, però, il tempo di cottura
sarà più lungo.
Cubetti di ghiaccio
II frigorifero è equipaggiato con una o più vaschette
per la formazione dei cubetti di ghiaccio. Dette
vaschette vanno riempite di acqua potabile e riposte
nello scomparto congelatore.
Si raccomanda di non usare utensili metallici per
staccare le vaschette.
28
INHOUD
Waarschuwingen en Belangrijke adviezen 26
Aanwijzingzn voor het wegwerpen van
verpakkingsmateriaal 28
Het gebruik 29
Reiniging van de binnenkant 29
Ingebruikname 29
Temperatuurinstelling 29
Koelen van levensmiddelen 29
Het bedieningspaneel van de vriezer 30
Ingebruikname 30
Temperatuurinstelling 30
Het invriezen van verse levensmiddelen 30
Bewaren van diepvriesprodukten 30
Het ontdooien van ingevroren produkten 30
Jslaatjes 30
Tips 31
Tips het invriezen 31
Tips het diepvriesprodukten 31
Onderhoud 32
Schoonmaken 32
Geprolongeerd stilstand 32
Vervangen van de lamp 32
Het ontdooien 32
Storingen 33
Technische Gegevens 34
Installatie 34
Plaats van opstelling 34
Elektrische aansluiting 34
Verander de draaizin van de deuren 35
Aanwijzingen voor de geintegreerde inbouw 36
Garantiebepalingen 39
AANWIJZINGZN VOOR HET WEGWERPEN VAN
VERPAKKINGSMATERIAAL
Het verpakkingsmateriaal van onze grote elektische
huishoudelijke apparaten kan met uitzondering van
houten onderdelen, gerecycled worden en dus bij
het kringloopafval worden gezet.
Wij bevelen u aan om:
• Papier, karton en golfkarton in de speciale
papierbakken te werpen.
• Plastik verpakkingsmateriaal in de speciaal
daarvoor bestemde plastic-containers te gooien.
Indien dit soort bakken in uw buurt nog niet
voorkomen mag u hat materiaal aan de
vuilnisman meegeven.
Als verpakkingsmateriaal gebruiken wij slechts
recycleerbare kunststoffen, zoals bijv.:
In de voorbeelden staatt
PE voor Polyethyleen** 02 = ^ PE-HD; 04 = ^ PE-LD
PP voor Polypropyleen
PS voor Polystyrol
PLASTIC BESTANDDELEN
Om er gemakkelijker achter te komen hoe u het
materiaal van dit apparaat moet wegwerpen en /of
recycleren zijn er op verschillende punten
herkenbare symbolen op aangebracht.
PS
SAN
ABS
02**
PE
05
PP
06
PS

18
CONSIGLI
Consigli per la congelazione
Per ottenere i massimi vantaggi dal processo di
congelazione diamo alcuni consigli importanti:
• la quantità massima di alimenti che possono
essere congelati in 24 h è riportata sulla
«targhetta matricola»;
• il processo di congelamento dura 24 ore.In
questo lasso di tempo non si dovrebbe
aggiungere altro cibo da congelare;
• congelare solo alimenti di ottima qualità, freschi e
ben puliti;
• dividere tutto in piccole parti, in modo da favorire
la rapidità della congelazione e consentire lo
scongelamento solo della quantità necessaria;
• avvolgere gli alimenti in fogli di alluminio o
politene.Gli stessi devono essere bene aderenti
ai cibi e ben chiusi;
• evitare di mettere i prodotti da congelare a
contatto di quelli già congelati; ciò eviterà
l’innalzamento della temperatura di questi ultimi;
• tenere presente che gli alimenti magri si
conservano meglio e più a lungo di quelli grassi e
che il sale riduce il tempo di conservazione;
• non consumare immediatamente i ghiaccioli
prelevati dallo scomparto congelatore possono
provocare scottature da freddo;
• è consigliabile indicare sulla confezione la data di
inizio della congelazione al fine di poter
controllare il tempo di conservazione;
• i simboli sui cassetti indicano diversi tipi di
prodotti da congelare.
Le cifre indicano il periodo di immagazzinaggio in
mesi per ciascun tipo di prodotto da congelare.
Se é valido il valore superiore oppure quello
inferiore del periodo di immagazzinaggio indicato,
dipende dalla qualità dei prodotti alimentari e dal
proprio pretrattamento prima del congelamento.
Per gli alimenti notevolmente grassi vale sempre
il valore inferiore ;
• non mettere nello scomparto congelatore
bevande gassate: possono esplodere
Consigli per la conservazione dei
surgelati
Per utilizzare nel modo migliore lo scomparto è
necessario:
• assicurarsi che i surgelati siano stati ben
conservati dal rivenditore;
• che il trasporto, dall’acquisto alla sistemazione
nello scomparto, sia breve;
• non aprire troppo frequentemente la porta dello
scomparto e non lasciarla aperta più del
necessario.
• Una volta scongelati, gli alimenti si deteriorano in
breve tempo e non possono venir ricongelati.
• Non superare il periodo di conservazione indicato
sulle confezioni dal produttore dei cibi.
27
minimum waarde daalt, wordt de
bewaartemperatuur in het vriesvak niet meer
gegarandeerd; u kunt de bewaarde
levensmiddelen dan het beste zo snel mogelijk
nuttigen.
• Volg de raadgevingen van de fabrikant op met
betrekking tot waar en hoe u spijzen en dranken
bewaart of invriest. Ontdooide diepvriesproduc-
ten mogen, om gezondheidsredenen, niet
wederom ingevroren worden.
• De vriezende binnenwanden of -vlakken in het
apparaat bevatten koelmiddel. Plaats geen
scherpe voorwerpen tegen zo’n wand of vlak en
schraap evenmin met metalen voorwerpen rijp of
ijs af. Lekkage kan het gevolg zijn, hetgeen een
onherstelbare schade aan het apparaat en bederf
van de levensmiddelen veroorzaakt.
• Plaats geen koolzuurhoudende of mousserende
dranken in het vriesvak, het vriesgedeelte of de
vriezer; de blikjes of flesjes kunnen door
bevriezing van de inhoud exploderen.
Installatie
• Overtuig u er van dat het apparaat niet op het
aansluitsnoer staat.
Belangrijk: Als de voedingskabel beschadigd
raakt, moet de kabel, eventueel met stekers,
vervangen worden; deze onderdelen zijn
verkrijgbaar bij de fabrikant of het
servicecentrum.
• De warmte welke het apparaat aan de spijzen en
dranken ontrekt, moet onbelemmerd aan de
omgeving afgestaan kunnen worden. Slechte
ventilatie onder, achter en boven het apparaat
resulteert in slechte koel-en/of vriesrestaties door
ongewild tijdelijk iutschakelen van de kompressor
of onjuiste werking van de absorptieunit .
• Plaats het apparaat met z’n achterkant zo dicht
mogelijk bij een muur. Hiermee voorkomt u
verbrandingsletsel door aanraking van hete tot
zeer hete delen.
• Afhankelijk van de wijze van transport kan olie
vanuit de compressor in het koelcircuit gevloeid
zijn. Wacht, na het plaatsen van het apparaat, ten
minste een half uur alvorens de steker in het
stopcontact te steken. Na achteroverliggend
vervoer ten minste een halve dag. Daarmee geeft
u de olie de gelegenheid in de compressor terug
te vloeien. Apparaten welke van een absorptie-
unit voorzien zijn kunnen direct in bedrijf
genomen worden. Controleer circa 24 uur na het
in bedrijf stellen of het apparaat naar behoren
werkt.
Milieubescherming
Dit apparaat bevat, zowel in het koelcircuit als in de
isolatie, geen ozononvriendelijke stoffen.
Het apparaat mag niet samen met huisvuil of
gesloopte apparaten weggegooid worden.
Afgedankte koel- en vriesapparaten moeten volgens
de plaatselijke regelingen op deskundige wijze
verwerkt worden. Informeer bij uw gemeente naar de
mogelijkheden in uw woonplaets.
Vermijd dat het koelcircuit wordt beschadigd, vooral
aan de achterkant in de buurt van de
warmtewisselaar.
De materialen in dit apparaat die voorzien zijn van
het symbool zijn geschikt voor recycling.

19
D037
Sostituzione delle lampade nello
scomparto frigo
Togliere la spina dalla presa di corrente.
La sostituzione delle lampade si effettua
agevolmente dopo aver tolto la vite di fissaggio e
quindi il diffusore.
Utilizzare lampade aventi le stesse caratteristiche
(potenza massima 15 W, attacco Edison E 14).
Rimontare il diffusore avvitando a fondo la vite.
D051
MANUTENZIONE
Staccare la spina dalla presa di corrente prima di
eseguire qualsiasi operazione.
Attenzione:
Questa apparecchiatura contiene idrocarburi nel
circuito refrigerante; pertanto la manutenzione e
la ricarica devono essere effettuate
esclusivamente da personale autorizzato
dall’azienda.
Pulizia periodica
Non usare mai oggetti metallici per pulire l’apparec-
chiatura; essa potrebbe venir danneggiata.
Pulire l’interno con acqua tiepida e bicarbonato di
soda. Risciacquare e asciugare accuratamente.
Pulire il condensatore e il motocompressore con una
spazzola o un aspirapolvere. Questa operazione
migliorerà il funzionamento con conseguente
risparmio di energia.
Periodi di inattività
Durante i periodi in cui l’apparecchiatura non è in
funzione osservare le seguenti precauzioni:
staccare la spina dalla presa di corrente; togliere
tutti gli alimenti; sbrinare e pulire l’interno e tutti gli
accessori;
lasciare le porte socchiuse per facilitare la
circolazione di aria all’interno in modo da evitare la
formazione di odori sgradevoli.
Sbrinamento
Sull’evaporatore dello scomparto refrigerante la
brina viene eliminata automaticamente ad ogni
arresto del compressore. L’acqua derivante dallo
sbrinamento, tramite un apposito convogliatore,
viene raccolta in una bacinella, posta nella parte
posteriore sopra il compressore, dove evapora.
Si raccomanda di pulire periodicamente il foro di
scarico dell’acqua di sbrinamento, posto nella
parte centrale dell’apposito convogliatore dello
scomparto frigorifero, utilizzando l’apposito
«pulitore» che si trova nel foro, per evitare che
l’acqua di sbrinamento cada sui cibi.
Nello scomparto congelante la brina deve essere
eliminata ogni qualvolta si è formato uno spessore di
4 mm circa, utilizzando l’apposita paletta
raschiabrina fornita con l’apparecchiatura.
26
WAARSCHUWINGEN EN BELANGRIJKE ADVIEZEN
Het is uiterst belangrijk dat het bij het apparaat behorende instructieboekje bewaard blijft. Zou het
apparaat door u aan iemand anders gegeven of verkocht worden, of zou het apparaat in het huis van
waaruit u verhuist achterblijven, dan dient de nieuwe gebruik(st)er over het instructieboekje en de
daarin opgenomen waarschuwingen te kunnen beschikken.
Indien dit apparaat in de plaats van een oud model met haak- of veersluiting opgesteld wordt, dan is
het raadzaam de sluiting van het oude apparaat, dat terzijde gezet wordt, onbruikbaar te maken.
Hiermee wordt voorkomen dat spelende kinderen zich erin opsluiten, hetgeen levensgevaarlijk is.
Deze waarschuwingen zijn bedoeld voor uw en andermans veiligheid. U wordt geacht ze gelezen te
hebben, alvorens u het apparaat installeert en/of in gebruik neemt.
Algemene veiligheid
•
Dit apparaat is bedoeld en gemaakt voor het
gebruik door volwassenen. Het is gevaarlijk om
kinderen het apparaat te laten bedienen of als
speelgoed te laten gebruiken.
•
Het is gevaarlijk om, in welke vorm dan ook, dit
apparaat of de eigenschappen daarvan te
veranderen.
•
Neem vóór u aan ontdooien, schoonmaak-
werkzaamheden of het verwisselen van het,
eventueel aanwezige, verlichtingslampje begint
altijd de steker uit het stopcontact.
•
Dit apparaat is zwaar. Delen van randen aan
achter- en onderkant kunnen scherp zijn. Wees
voorzichtig bij het tillen.
•
Plaats NOOIT explosieve stoffen in het apparaat,
zoals gasvullingen, benzine, ether, aceton
enzovoorts.
•
Het direct vanuit een vriesvak, vriesgedeelte of
vriezer consumeren van ijslollies en dergelijke,
kan verbranding van de mondhuid tot gevolg
hebben; wacht even.
AFDANKEN. Verwijder de deur(en) of het deksel en
knip het aansluitsnoer af, zodat, in afwachting van
wegbrengen of weghalen, spelende kinderen er zich
niet in op kunnen sluiten of aan een elektrische
schok bloot kunnen staan.
Heel goed oppassen, tijdens het verplaatsen, dat
de delen van het koelcircuit niet zodanig worden
beschadigd, dat de koelvloeistof naar buiten zou
kunnen lekken.
Plaats het apparaat niet in de nabijheid van een
centrale verwarming of een gasfornuis.
Laat het apparaat niet langdurig in direct
zonlicht staan.
Zorg dat er voldoende lucht aan de achterkant
van het apparaat kan circuleren. Vermijd schade
aan de koelkringloop.
Alléén voor diepvrieskasten (uitgezonderd
ingebouwde): het apparaat kan zeer goed in de
kelder geplaatst worden.
Plaats elektrische apparaten (bijv. ijsmachines)
nooit in de kast.
Onderhoud / Reparatie
•
Een eventueel noodzakelijke wijziging aan de
elektrische huisinstallatie of het aansluitsnoer,
ten behoeve van de installatie van dit apparaat,
mag uitsluitend door een daartoe bevoegd
persoon uitgevoerd worden. Het betreffende
stopcontact dient, ook na eventuele onder- of
inbouw, gemakkelijk bereikbaar te zijn.
Werkzaamheden welke door personen zonder de
noodzakelijke kennis uitgevoerd worden, kunnen
schade of letsel tot gevolg hebben.
•
Laat inspectie- en/of herstelwerkzaamheden
uitvoeren door de ELECTROLUX SERVICE en
laat geen andere dan originele DISTRIPARTS
onderdelen plaatsen.
• Dit apparaat bevat koolwaterstoffen in de
koudekringloop; het onderhoud en het bijvullen
dient daarom uitsluitend door door het bedrijf
aangewezen deskundig personeel uitgevoerd te
worden.
•
Tracht, in geval van storing of een defect, dit
apparaat niet zelf te repareren. Reparaties welke
door niet-deskundige personen uitgevoerd
worden, kunnen tot schade of letsel leiden.
Raadpleeg ELECTROLUX SERVICE.
Gebruik
• Huishoudelijke koel- en/of vriesapparaten zijn
uitsluitend bedoeld voor het bewaren en/of
invriezen van eet- of drinkbare producten.
• De beste resultaten worden bereikt bij een
omgevingstemperatuur tussen +18°C en +43°C
(klasse T); tussen +18°C en 38°C (klasse ST);
tussen +16°C en 32°C (klasse N); +10°C en
32°C (klasse SN); de klasse staat op het
kenplaatje vermeld.
Attentie: u dient niet alleen rekening te houden
met de omgevingstemperatuur voor dit type
product maar tevens met de volgende
aanwijzingen: wanneer de
omgevingstemperatuur onder de aangeduide
Gedrukt op kringlooppapier
-
 1
1
-
 2
2
-
 3
3
-
 4
4
-
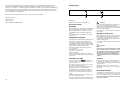 5
5
-
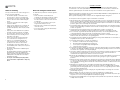 6
6
-
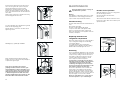 7
7
-
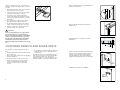 8
8
-
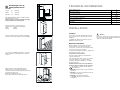 9
9
-
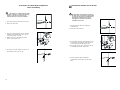 10
10
-
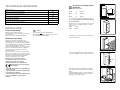 11
11
-
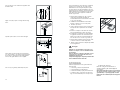 12
12
-
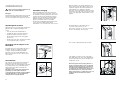 13
13
-
 14
14
-
 15
15
-
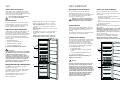 16
16
-
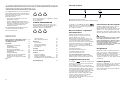 17
17
-
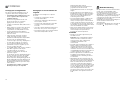 18
18
-
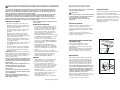 19
19


Zanussi ZI9311DIS Manual do usuário
- Categoria
- Geladeira-freezers
- Tipo
- Manual do usuário
em outras línguas
- italiano: Zanussi ZI9311DIS Manuale utente
- English: Zanussi ZI9311DIS User manual
- Nederlands: Zanussi ZI9311DIS Handleiding
Artigos relacionados
Outros documentos
-
Whirlpool AFG 5412-L/1 Guia de usuario
-
-
Electrolux EU6233I Manual do usuário
-
-
-
Teka TKI170 Manual do usuário
-
 De Dietrich DRS314JE1 Manual do proprietário
-
Brandt SB1500E Manual do proprietário
-
-
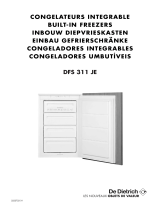 De Dietrich DFS311JE1 Manual do proprietário

