NATURE & DECOUVERTES 53156650 Instruções de operação
- Categoria
- Relógios de mesa
- Tipo
- Instruções de operação

1
HORLOGE STATION MÉTÉO
WEATHER STATION CLOCK
RELOJ ESTACIÓN METEOROLÓGICA
VOOR KLOK MET WEERSTATION
RELÓGIO E DA ESTAÇÃO METEOROLÓGICA
Réf. 53156650
Lire attentivement et conserver soigneusement ce mode d’emploi.
Please carefully read this manual and keep it in a safe place.
Lea detenidamente este manual y consérvelo en un lugar seguro.
Lees deze instructies zorgvuldig en bewaar ze op een veilige plaats.
Leia cuidadosamente este manual e guarde-o em local seguro.

2 3
INSTRUCTIONS IMPORTANTES.
À CONSERVER POUR USAGE
ULTÉRIEUR : LIRE ATTENTIVEMENT
FR
FONCTION PRINCIPALE
CONFIGUREZ VOTRE STATION MÉTÉO
MODE D'EMPLOI DES BOUTONS
1. Prévisions météo à 6 niveaux : Ensoleillé, Dégagé, Nuageux, Pluie, Neige, Foudre.
2. Achage actuel de la pression atmosphérique, Plage : 300Hpa~1200Hpa.
3. Thermomètre intérieur (0 °C - +50 °C).
4. Hygromètre intérieur (20 % - 95 %).
5. Température extérieure RF / Hygromètre.
6. Calendrier de l'année 2001 à 2099.
7. Alarme et Snooze.
8. Fonction Mémoire : 1PCS CR2032 intégré pour mémoriser l'heure lors de la mise hors tension.
Raccordez le câble d'alimentation :
• Branchez le câble micro USB / l'adaptateur CC. L’écran s'allume complètement pendant 3 secondes
puis émet un son pour indiquer que la station météo fonctionne. Elle passe alors en mode d'achage
de l'heure normal.
Réglage de l'heure :
• Appuyez longuement sur le bouton « SET » pendant au moins 2 secondes. La LED de l'heure clignote,
appuyez sur HAUT / BAS pour modifier l'heure, puis appuyez brièvement sur SET pour passer à la
configuration des minutes. Répétez les mêmes étapes pour régler l'année/le mois/le jour.
Réglage de l'alarme :
1. Appuyez brièvement sur le bouton « SET » pour configurer le mode d'alarme. Appuyez ensuite
brièvement sur HAUT / BAS pour ouvrir/fermer la fonction d'alarme. Une fois en mode alarme,
appuyez longuement sur le bouton « SET ». La LED d'alarme clignote. Appuyez brièvement sur
HAUT et BAS pour régler l'heure.
2. L'alarme sonne pendant 1 minute en continu et s'arrête si elle n'est pas suspendue ou arrêtée au
bout de 1 minute.
Réglez l'intensité lumineuse de l’écran / variateur :
Appuyez brièvement sur le bouton « BAS » pour régler la luminosité.
1 . L1 Haute luminosité,
2. L2 Luminosité moyenne,
3. L3 Luminosité plus faible,
4. ONNF. Mode luminosité automatique. La station météo a une luminosité standard de 06 h 00 à
20 h 00 = Luminosité L1. La luminosité est plus faible de 20 h 00 à 06 h 00 = Luminosité L3.
Fonction jour / nuit :
1. Allumez et éteignez votre écran en appuyant brièvement sur le bouton « MARCHE/ARRÊT ».
2. Lorsque votre écran est éteint et que vous appuyez sur le bouton Snooze, l'écran LED s'allume pen-
dant 10 secondes, puis il s'éteint automatiquement.
Appuyez brièvement sur « RESET » pour rétablir la fonction d'origine.
Fonction des boutons : 5 touches fonctionnelles :
MODE / HAUT / BAS / MARCHE / ARRÊT / Écran tactile Snooze.
3. Pour arrêter l'alarme lorsqu'elle sonne, cliquez sur l'un des boutons situés à l'arrière : SET/HAUT/
BAS
4. Pour suspendre l'alarme SNOOZE, cliquez sur le bouton tactile Snooze en haut de la station météo.
L'alarme sonne à nouveau 5 minutes plus tard. Vous pouvez suspendre autant de fois que vous le
souhaitez.
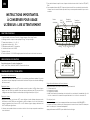
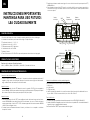
Semaine Mois Date Pression de l’air
Prévisions
météorologiques
SNOOZE
Horloge
Thermomètre et
hygromètre intérieur Thermomètre et
hygromètre exterieur
ZZ
MARCHE/ARRÊT
MICRO CC
RÉINITIALISATION
SNOOZE
BAS SET
HAUT

4 5
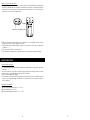
Réglez le récepteur du capteur RF :
1. Dès que l'horloge et le capteur s'allument, la station météo reçoit automatiquement la température
extérieure et l'humidité dans les 3 minutes. Pour réinitialiser le capteur en cas de dysfonctionnement,
cliquez sur le bouton rond gauche à l'arrière du capteur lorsqu'il est allumé. Une fois le capteur réini-
tialisé, il doit se reconnecter à la station météo.
Prévisions météorologiques :
1. Les prévisions météorologiques indiquent la tendance des conditions météorologiques des prochaines
24 heures.
2. La météo est divisée en 6 niveaux : ensoleillé, dégagé, nuageux, pluie, neige et foudre (les niveaux
dégagé, pluie, neige et foudre doivent s'acher avec des nuages).
3. Mise sous tension par défaut : dégagé.
4. Avertissement : les prévisions météorologiques doivent être plus précises sous ventilation naturelle.
Il peut y avoir une grande marge d'erreur dans les conditions intérieures, en particulier dans les
pièces climatisées.
Température et humidité
Plage de test de température intérieure : 0 °C - +50 °C
Plage de test d'humidité : 20 % - 95 %
Plage de test de température extérieure : -20 °C - +70 °C
2. Eacez les données du capteur externe sur la station météo : sous l'achage du mode horloge,
appuyez sur la touche « HAUT » pendant 3 secondes.
3. Si aucune donnée de la station météo du capteur n'est reçue dans les 35 minutes, la température
CH ache « --.- »
4. Portée de réception RF à moins de 30 mètres.
5. Si la température est manquante, le signal doit être reçu à nouveau puis reprendre l'achage.
Cliquez dessus pour recevoir le signal dès que possible.
+
+
-
-
AUTRES FONCTIONS

6 7
PLEASE CAREFULLY READ
THIS MANUAL AND KEEP IT
IN A SAFE PLACE
EN
MAIN FUNCTION
SET UP YOUR WEATHER STATION
BUTTONS OPERATION INSTRUCTIONS
1. 6 Levels weather forecast : Sunny, Semi-clear, Cloudy, Rain, Snow, Lightning.
2. Current Airpressure Display Range: 300Hpa~1200Hpa.
3. Indoor thermometer (0 °C - +50 °C).
4. Indoor hygrometer (20% -95%)
5. RF Outdoor Temperature / Hygrometer .
6. Calendar From Year 2001 to 2099 .
7. Alarm & Snooze.
8. Memory function: 1PCS CR2032 Built- in to memory the time when power o.
Connect the power cable:
• Plug the micro USB Cable/DC Adaptor. The LED will full display 3 seconds then will make a sound to
notice it is working. The weather station will then be into Normal Time Display Mode.
Time set up:
• Long Press on SET button for at least 2 seconds. The hour led will ash, press UP /DOWN to modify the
hour, then short press SET to move into Minute set up. Continue the same operation steps for Year /
Month/Date set up.
Alarm set up:
1. Short press on the “SET” button to set up the Alarm Mode. Then short press UP/DOWN to Open
/Close the Alarm function. Once in the alarm mode long Press the “SET” button. The Alarm LED
will ash. Short Press “UP” & DOWN to adjust the time .
2. The alarm will ring for 1 min continuously and stop if not snoozed or stopped after 1 min.
3. To stop the alarm when ringing click on one of the button behind: SET/UP/DOWN
4. To SNOOZE the alarm click on the touch snooze button on top of the weather station. The alarm
will ring again 5 minutes later. You can snooze as many times you want.
Buttons Function : 5 Functional Keys :
MODE / UP / DOWN / ON/OFF / Touch Screen Snooze.
Adjust the light intensity of LED/Dimmer:
Short Press on “DOWN” button to adjust the Brightness.
1. L1 High Brightness,
2. L2 Middle Brightness,
3. L3 Darker Brightnes,4. ONNF. Automatically Brightness mode. The weather station will have a standard
Brightness from 06:00 -- 20:00 = L1 brightness. It will be darker brightness from 20:00 --06:00 = L3
Brightness.
4. ON/OFF . Automatically Brightness mode. ,The weather station will have a standard Brightness from
06:00 -- 20:00 = L1 brightness. It will be darker brightness from 20:00 --06:00 = L3 Brightness.
Day/night function:
1. Switch on and o your screen with a short press on the “ON /OFF” button.
2. When your screen is OFF and you press the snooze button the LED screen: It will turn on the screen
for 10 seconds and then it will switch o automatically.
Short Press “RESET” to Reset the original function.
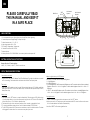
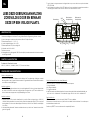
Week Month Date Airpressure
Weather Forecast SNOOZE
Time Clock
Indoor thermometer
& hygrometer Outdoor thermometer
& hygrometer
ZZ
ON/OFF
MICRO DC
RESET
SNOOZE
DOWN SET
UP

8 9
Set up RF Sensor receiver:
1. After the clock & sensor are powered on, the weather station will automatically receive the outdoor
temperature & humidity within 3 minutes. To reset the sensor in case of malfunction click on the sensor
backside left round button when powered on. Once sensor is reset it should reconnect with the
weather station.
Weather forecast:
1. Weather Forecast refer to the trend of weather condition 24 hours later from now.
2. The weather is divided into 6 levels: sunny, semi-clear, cloudy, rain, snow, and lightning (semi-clear,
rain, snow, and lightning must be displayed with clouds).
3. Power on default: semi-clear.
4. Warning :The weather forecast must be more accurate under natural ventilation. There will be a
large error in indoor conditions, especially in air-conditioned rooms.
Temperature and humidity
Indoor Temperature test range: 0°C - +50°C
Humidity test range: 20%-95%
Outdoor temperature test range: -20°C - +70°C
2. Clear data of the external sensor on the weather station: Under Clock Mode Display, Press “UP” key
3 Seconds.
3. If no data is received from on the weather station from the sensor within 35 min the CH temperature
will display “--.-»
4. RF Receive Range within 30 meters.
5. Once missing the temperature, need to receive the signal again then can resume the display.
Click it to receive the signal asap.
+
+
-
-
OTHER FUNCTIONS

10 11
ES
INSTRUCCIONES IMPORTANTES.
MANTENGA PARA USO FUTURO:
LEA CUIDADOSAMENTE
FUNCIÓN PRINCIPAL
CONFIGURE SU ESTACIÓN METEOROLÓGICA
CÓMO UTILIZAR LOS BOTONES
1. Pronóstico del tiempo a 6 niveles: soleado, despejado, nublado, lluvia, nieve, relámpagos.
2. Visualización actual de la presión atmosférica, rango: 300Hpa~1200Hpa.
3. Termómetro interior (0 °C - +50 °C).
4. Higrómetro interior (20 % - 95 %).
5. Temperatura exterior RF / Higrómetro.
6. Calendario del año 2001 al 2099.
7. Alarma y Snooze.
8. Función de memoria: 1PCS CR2032 incorporado para memorizar la hora tras el apagado.
Conecte el cable de alimentación:
• Conecte el cable micro USB/el adaptador de CC. La pantalla se ilumina completamente durante 3
segundos y luego emite un sonido para indicar que la estación meteorológica está funcionando.
Luego cambia al modo de visualización de la hora normal.
Ajuste de la hora:
• Mantenga presionado el botón SET durante al menos 2 segundos. El LED de la hora parpadea,
presione ARRIBA / ABAJO para cambiar la hora, luego presione brevemente SET para pasar al ajuste
de los minutos. Repita los mismos pasos para ajustar el año/el mes/el día.
Ajuste de la hora:
1. Presione brevemente el botón "SET" para configurar el modo de alarma. Luego presione breve-
mente ARRIBA/ABAJO para abrir/cerrar la función de alarma. Una vez en el modo de alarma,
mantenga presionado el botón "SET". El LED de alarma parpadea. Presione brevemente ARRIBA
y ABAJO para configurar la hora.
2. La alarma suena continuamente durante 1 minuto y se detiene si no se suspende o se detiene
después de 1 minuto.
Funciones de los botones: 5 teclas funcionales:
MODO / ARRIBA / ABAJO / ENCENDIDO / APAGADO / Pantalla táctil Snooze
Ajuste la intensidad luminosa de la pantalla/regulador:
Presione brevemente el botón "ABAJO" para ajustar el brillo.
1. L1 Brillo alto,
2. L2 Brillo medio,
3. L3 Brillo más bajo,
4. ONNF. Modo de brillo automático. La estación meteorológica tiene un brillo estándar de 6 a.m. a
8 p.m. = Brillo L1. El brillo es menor de 8:00 p.m. a 6:00 a.m. = Brillo L3.
Función día/noche:
1. Encienda y apague la pantalla presionando brevemente el botón "ENCENDIDO/APAGADO".
2. Cuando la pantalla esté apagada y presione el botón Snooze, la pantalla LED se encenderá durante 10
segundos y luego se apagará automáticamente.
Presione brevemente "RESET" para restaurar la función original.
Semana Meses Fecha Presión del aire
Previsiones
meteorológicas
SNOOZE
Reloj
Termómetro e
higrómetro interior Termómetro e
higrómetro exterior
ZZ
ENCENDIDO/APAGADO
MICRO CC
REINICIO
SNOOZE
ABAJO SET
ARRIBA
3. Para detener la alarma cuando suene, haga clic en uno de los botones de la parte posterior: SET/
ARRIBA/ABAJO
4. Para suspender la alarma SNOOZE, haga clic en el botón táctil Snooze en la parte superior de la
estación meteorológica. La alarma vuelve a sonar 5 minutos después. Puede suspenderla tantas
veces como quiera.

12 13
Configure el receptor del sensor de RF:
1. Tan pronto como el reloj y el sensor se encienden, la estación meteorológica recibe automáticamente
la temperatura exterior y la humedad en 3 minutos. Para restablecer el sensor en caso de mal fun-
cionamiento, haga clic en el botón redondo izquierdo en la parte posterior del sensor cuando esté
encendido. Una vez que se reinicia el sensor, debe volver a conectarse a la estación meteorológica
Previsiones meteorológicas:
1. Las previsiones meteorológicas muestran la tendencia de las condiciones meteorológicas para las
próximas 24 horas.
2. El clima se divide en 6 niveles: soleado, despejado, nublado, lluvia, nieve y relámpagos (los niveles de
despejado, lluvia, nieve y relámpagos deben mostrarse con nubes).
3. Encendido predeterminado: despejado.
4. Advertencia: las previsiones meteorológicas deben ser más precisas con ventilación natural. Puede
haber un gran margen de error en las condiciones interiores, especialmente en habitaciones con aire
acondicionado.
Temperatura y humedad
Rango de ensayo de temperatura interior: 0 ° C - +50 °C
Rango de ensayo de humedad: 20 % - 95 %
Rango de ensayo de temperatura exterior: -20 °C - +70 °C
2. Borre los datos del sensor externo en la estación meteorológica: debajo de la pantalla del modo de
reloj, presione la tecla “ARRIBA” durante 3 segundos.
3. Si no se reciben datos de la estación meteorológica del sensor en 35 minutos, la temperatura de CH
mostrará "--.-"
4. Alcance de recepción de RF a menos de 30 metros.
5. Si falta la temperatura, hay que volver a recibir la señal y reanudar la visualización.
Haga clic en él para recibir la señal lo antes posible.
+
+
-
-
OTRAS FUNCIONES

14 15
NL
LEES DEZE GEBRUIKSAANWIJZING
ZORGVULDIG DOOR EN BEWAAR
DEZE OP EEN VEILIGE PLAATS.
HOOFDFUNCTIES
CONFIGUREER UW WEERSTATION
FUNCTIES VAN DE TOETSEN
1. Weersverwachting met 6 indicaties: Zonnig, Helder, Bewolkt, Regenachtig, Sneeuw, Onweer.
2. Actuele weergave van de atmosferische druk, Bereik: 300Hpa~1200Hpa.
3. Binnenthermometer (0 °C - +50 °C).
4. Luchtvochtigheid binnen (20% - 95%).
5. Buitentemperatuur RF / luchtvochtigheid.
6. Kalender van 2001 tot 2099.
7. Wekker en snooze.
8. Geheugenfunctie: 1 geïntegreerde CR2032 om de tijd bij te houden wanneer de klok met weerstation
wordt uitgeschakeld.
Sluit de voedingskabel aan:
• Sluit de micro-USB-kabel/DC-adapter aan. Het display licht 3 seconden lang volledig op en maakt
dan een geluid om aan te geven dat het weerstation is ingeschakeld. Daarna schakelt het weerstation
over naar de normale tijdweergave.
Instellen van het uur:
• Houd de SET-toets gedurende ten minste 2 seconden ingedrukt. De led voor het uur knippert, druk
op OMHOOG/OMLAAG om het uur te wijzigen, druk vervolgens kort op SET om de minuten in te
stellen. Herhaal deze stappen om het jaar/maand/dag in te stellen.
Instellen van het uur:
1. Druk kort op de SET-toets om de alarmfunctie in te stellen. Druk vervolgens kort op OMHOOG/
OMLAAG om de alarmfunctie te openen/sluiten. Druk in de alarmmodus op de SET-toets en houd
deze ingedrukt. De led voor het alarm knippert. Druk kort op OMHOOG en OMLAAG om het tijdstip
in te stellen.
2. Het alarm klinkt gedurende 1 minuut ononderbroken en stopt als het na 1 minuut niet wordt uit-
gesteld of gestopt.
Toetsfuncties: 5 functionele toetsen:
MODUS / OMHOOG / OMLAAG / AAN / UIT / Snooze-touchknop.
Stel de lichtintensiteit van het scherm/dimmer in:
Druk kort op de toets "OMLAAG" om de helderheid aan te passen.
1. L1 Hoge helderheid;
2.L2 Matige helderheid;
3.L3 Lagere helderheid;
4. ONNF. Automatische helderheidsmodus. Het weerstation gebruikt de standaard helderheid van
06:00 tot 20:00 = Helderheid L1. De helderheid is lager van 20:00 tot 06:00 = helderheid L3.
Dag/nacht-functie:
1. Zet het scherm aan en uit door kort op de "AAN/UIT"-toets te drukken.
2. Wanneer uw scherm uit staat en u op de Snooze-toets drukt, licht het ledscherm 10 seconden op en
het schakelt dan automatisch uit.
Druk kort op "RESET" om te resetten naar de oorspronkelijke functie.
Week Maand Datum Luchtdruk
Weersverwachtingen SNOOZE
Klok
Binnenthermometer en
luchtvochtigheid binnen Buitenthermometer en
luchtvochtigheid buiten
ZZ
AAN/UIT
MICRO CC
RESER
SNOOZE
OMLAAG SET
OMHOOG
3. Om het alarm te stoppen wanneer het afgaat, drukt u op een van de toetsen op de achterkant:
SET/UP/DOWN
4. Om het alarm uit te stellen met SNOOZE, drukt u op Snooze-touchknop bovenaan het weerstation.
Het alarm gaat 5 minuten later weer af. U kunt het zo vaak uitstellen als u wilt.

16 17
Stel de ontvanger van de RF-sensor in:
1. Als de klok en de sensor zijn ingeschakeld, ontvangt het weerstation binnen 3 minuten automatisch
de buitentemperatuur en de luchtvochtigheid. Om de sensor te resetten in geval van een storing, klikt
u op de linker ronde knop op de achterkant van de sensor wanneer deze is ingeschakeld. Als de sensor
is gereset, moet de sensor opnieuw verbinding maken met het weerstation.
Weersverwachtingen:
1. De weersverwachtingen geven de weertrend voor de komende 24 uur aan.
2. Voor het weer zijn er 6 indicaties: zonnig, helder, bewolkt, regen, sneeuw en onweer (de indicaties
helder, regen, sneeuw en onweer worden met wolken weergegeven).
3. Standaard aanzetten: helder.
4. Waarschuwing: weersvoorspellingen zijn nauwkeuriger bij natuurlijke ventilatie. Het weerstation
heeft een grote foutmarge in omstandigheden binnenshuis, vooral in kamers met airconditioning.
Temperatuur en vochtigheid
Testbereik binnentemperatuur: 0 °C - +50 °C
Testbereik vochtigheid: 20% - 95%
Testbereik buitentemperatuur: -20 °C - +70 °C
2. Om de gegevens van de externe sensor op het weerstation te wissen: in de klokmodus houdt u de
"OMHOOG"-toets 3 seconden lang ingedrukt.
3. Als er binnen 35 minuten geen gegevens voor het weerstation van de sensor worden ontvangen, zal
de CH-temperatuur "--.-" weergeven
4. RF-ontvangstbereik binnen 30 meter.
5. Als de temperatuur ontbreekt, moet het signaal opnieuw worden ontvangen zodat deze weer wordt
weergegeven.
Klik erop om het signaal zo snel mogelijk te ontvangen.
+
+
-
-
ANDERE FUNCTIES

18 19
PT
INSTRUÇÕES IMPORTANTES.
MANTENHA O USO FUTURO:
LEIA CUIDADOSAMENTE
FUNÇÃO PRINCIPAL
CONFIGURE A ESTAÇÃO METEOROLÓGICA
COMO USAR OS BOTÕES
1. Previsões meteorológicas com 6 níveis: Soalheiro, limpo, nublado, chuvoso, com neve, trovoada.
2. Apresentação atual da pressão atmosférica, Intervalo: 300 hPa~1200 hPa.
3. Termómetro interno (0 °C - +50 °C).
4. Higrómetro interno (20% - 95%).
5. Temperatura exterior RF/Higrómetro.
6. Calendário de 2001 a 2099.
7. Alarme e «Snooze» (suspender).
8. Função de memória: 1PCS CR2032 integrado para memorizar a hora ao desligar.
Ligue o cabo de alimentação:
• Ligue o cabo do micro USB/adaptador CC. O ecrã ilumina-se por completo durante 3 segundos e
emite um som para indicar que a estação meteorológica está a funcionar. A seguir, muda para o
modo de visualização da hora normal.
Configuração da hora:
• Prima sem soltar o botão «SET» durante, pelo menos, 2 segundos. O LED da hora pisca, prima
«UP/DOWN» para alterar a hora e, em seguida, prima SET para mudar para a configuração dos
minutos. Repita os mesmos passos para configurar o ano, o mês e o dia.
Configuração da hora:
1. Prima o botão «SET» para configurar o modo de alarme. A seguir, prima «UP/DOWN» para abrir/
fechar a função de alarme. Uma vez no modo de alarme, prima sem soltar o botão «SET». O LED
de alarme pisca. Prima «UP» e «DOWN» para configurar a hora.
2. O alarme toca ininterruptamente durante 1 minuto e se não for suspenso ou interrompido para ao
fim de 1 minuto.
Função dos botões: 5 teclas de função:
MODO / UP (para cima) / DOWN (para baixo) /LIGAR/DESLIGAR / Ecrã tátil Snooze (suspender).
Configure a intensidade do brilho do ecrã/regulador:
Prima o botão «DOWN» para ajustar o brilho.
1. L1 Brilho elevado,
2. L2 Brilho médio,
3. L3 Brilho mais reduzido,
4. ONNF. Modo de brilho automático. A estação meteorológica tem um brilho predefinido entre as
6h e as 20h. = Brilho L1. O brilho é mais reduzido entre as 20h e as 6h. = Brilho L3.
Função dia/noite:
1. Ligue e desligue o ecrã premindo o botão «LIGAR/DESLIGAR».
2. Quando o ecrã está desligado e pressiona o botão Snooze, o ecrã LED acende-se durante 10
segundos e, em seguida, desliga-se automaticamente.
*Prima «RESET» para restaurar a função de origem.
Semana Mês Data Pressão do ar
Previsões meteorológicas SNOOZE
Relógio
Termómetro e higrómetro
interno Termómetro e higrómetro
externo
ZZ
LIGAR/DESLIGAR
MICRO CC
REINICIAR
SNOOZE
(PARA BAIXO) SET
(PARA CIMA)
3. Para desligar o alarme enquanto está a tocar, clique num dos botões na parte de trás: «SET/UP/
DOWN»
4. Para suspender o alarme SNOOZE, clique no botão de toque tátil «Snooze» na parte superior da
estação meteorológica. O alarme volta a tocar 5 minutos mais tarde. Entretanto, pode suspender
as vezes quiser.

20 21
Configure o recetor do sensor RF:
1. Assim que o relógio e o sensor se acendem, a estação meteorológica recebe automaticamente a tem-
peratura exterior e a humidade em 3 minutos. Para reiniciar o sensor em caso de mau funcionamento,
clique no botão redondo esquerdo na parte traseira do sensor quando este estiver aceso. Assim que
o sensor tiver reiniciado, deve ligar-se à estação meteorológica.
Previsões meteorológicas:
1. As previsões meteorológicas indicam a tendência das condições do tempo para as próximas 24 horas.
2. A meteorologia está dividida em 6 níveis: ensolarado, limpo, nublado, chuva, neve e trovoada (os
níveis de céu limpo, chuva, neve e trovoada devem ser apresentados com nuvens).
3. Ativação predefinida: limpo.
4. Aviso: As previsões meteorológicas devem ser mais precisas com ventilação natural. Pode haver
uma grande margem de erro nas condições de interior, sobretudo em divisões climatizadas.
Temperatura e humidade
Intervalo de temperatura no interior: 0 °C - +50 °C
Intervalo de humidade: 20% - 95%
Intervalo de temperatura no exterior: -20 °C - +70 °C
2. Elimine os dados do sensor externo na estação meteorológica: na visualização do modo de relógio,
prima a tecla «UP» durante 3 segundos.
3. Se não tiver sido recebido qualquer dado da estação meteorológica do sensor no espaço de 35
minutos, a temperatura CH apresenta «--.-»
4. Alcance de receção de RF a menos de 30 metros.
5. Se faltar a temperatura, deverá rececionar-se novamente o sinal e, em seguida, retomar a visualização
Clique neste para receber o sinal o mais rápido possível.
+
+
-
-
OUTRAS FUNÇÕES

Ce produit doit être collecté par une filière spécifique et ne doit pas être jeté dans une poubelle classique.
This product must be collected by a specialist service and must not be disposed of with household waste.
Dieses Produkt ist als Abfall einer gesonderten Verwertung zuzuführen und darf nicht über den regulären Hausmüll entsorgt werden.
Este producto debe ser recolectado por un sector específico y no debe ser lanzado en un contenedor convencional.
Este produto deve ser coletado por um setor específico e não deve ser jogado em um recipiente convencional.
Nature & Découvertes
11 rue des Etangs Gobert
78000 Versailles (France)
www.natureetdecouvertes.com
Conforme aux normes européennes.
Compliant with European standards.
Entspricht europäischen Normen.
Conforme con las normas europeas.
Em conformidade com as normas europeias.
-
 1
1
-
 2
2
-
 3
3
-
 4
4
-
 5
5
-
 6
6
-
 7
7
-
 8
8
-
 9
9
-
 10
10
-
 11
11
-
 12
12


NATURE & DECOUVERTES 53156650 Instruções de operação
- Categoria
- Relógios de mesa
- Tipo
- Instruções de operação
em outros idiomas
Outros documentos
-
Lexibook SM940 Manual do usuário
-
Lexibook SM1670 Manual do usuário
-
-
Perel WC224 Manual do usuário
-
Auriol 282650 Operation and Safety Notes
-
 Oregon Scientific BAR898HG Manual do proprietário
-
 Oregon Scientific WMH800 Manual do usuário
-

