Jump Starter User Manual


Safety Is Always the First
Priority!
6 36 64 9222 50 78
5
EN
35
FR
63
PT
91
JP
21
DE
49
IT
77
ES
6 36 64 9222 51 78
737 65 9323 51 79
10 40 68 9626 54 82
11 41 69 9737 55 83
14 45 72 10030 58 86
15 45 73 10131 59 87
16 47 74 10232 60 88
17 48 75 10333 61 89
Section 1 About V1500
Section 2 What's in the
Box?
Section 7 Specications
Section 8 FAQ
Section 9 Warranty
Section 3 Product Overview
Section 4 Recharge the
Jump Starter
Section 5 How to Jump-
Start a 12V Battery Vehicle?
Section 6 Using the V1500
as a Power Bank
CONTENTS

4
ENGLISH

5
SAFETY IS ALWAYS THE FIRST
PRIORITY!
For your safety, the safety of others, and to avoid any
damage to the product and your vehicle, carefully
READ and make sure you FULLY UNDERSTAND all
the safety instructions and messages on this manual
before operating.
ONLY use the battery clamps that come with this
product.
DO NOT use this product if the cable or the jump
starter shows any signs of damage.
DO NOT put the product under direct sunlight or in
high temperature areas.
The product contains a Lithium-Ion Battery. Please
DISPOSE OF it under local regulations at the end of its
life.
Regularly check the battery level of the product and
ENSURE that it is above 50%.

6
SECTION 1
ABOUT V1500
SECTION 2
WHAT'S IN THE BOX?
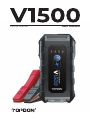
TOPDON's V1500 is a portable jump starter that
delivers 1500 peak amps for jump-starting a 12V lead-
acid battery in seconds. It supports quick and safe
starts for 12V cars, boats, motorcycles, trucks, etc., with
up to 6.5-liter gasoline or 4.0-liter diesel engines.
It also functions as a power bank to charge electronic
devices like phones and tablets, or supply power to 12V
DC devices.
V1500 Jump Starter
Battery Clamps
USB Cable
User Manual
Carrying Bag

7
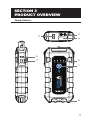
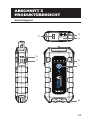
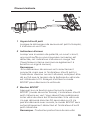
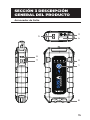
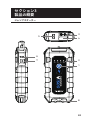
SECTION 3
PRODUCT OVERVIEW
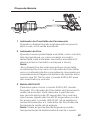
Jump Starter
2
6
3
5
1
8
7
4

8
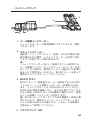
Power Button
Press the power button to power ON.
Press and hold the power button to turn on the
LED light, then press the button again to toggle
the light between Flashlight, SOS, Strobe, and OFF.
Battery Level Indicators
Indicate the charge level of the internal battery of
the jump starter. (The four indicators will ash for
around 10 seconds when an over-temperature is
detected.)
Note: Only jump-starting vehicles when the battery
level of the jump starter is above 50%.
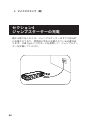
Jump-Start Socket
Temperature Detector
Temperature detection is used to detect over-
temperatures in the jump starter.
USB Type-A Output (5V3A)
USB Type-C Input/Output (PD18W)
DC Output (Max 16.8V/10A)
LED Light
1
2
3
4
5
6
7
8

9
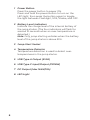
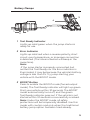
Tool Ready Indicator
Lights up solid green when the jump starter is
ready for use.
Error Indicator
Lights up solid red when a reverse polarity, short
circuit, over temperature, or improper connection
is detected. (The internal buzzer will beep in the
meantime).
Note:
-If the jump starter is properly connected, but
neither the Tool Ready nor the Error indicator is
illuminated, it may be because the vehicle's battery
voltage is less than 3V. Try jump-starting your
vehicle with the BOOST mode.
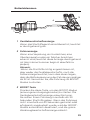
BOOST Button
Press to enable the BOOST mode (forced output
mode). The Tool Ready indicator will light up green.
Start your vehicle within 30 seconds. The BOOST
mode automatically turns off, and the green
Tool Ready indicator goes out if the vehicle is not
started within 30 seconds or successfully cranked.
Note: Under the BOOST mode, all safety
protections will be temporarily disabled. Use this
mode with caution and only when the traditional
battery jump option has been tried already.
1
2
3
Battery Clamps
1 3
4
5
2

10
Positive Clamp (Red)
Negative Clamp (Black)
4
5
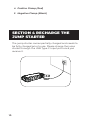
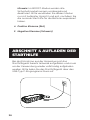
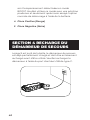
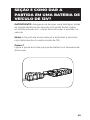
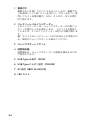
SECTION 4 RECHARGE THE
JUMP STARTER
The jump starter comes partially charged and needs to
be fully charged prior to use. Please charge the jump
starter through the USB Type-C Input port once you
receive it.

11
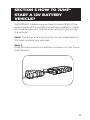
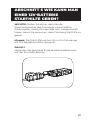
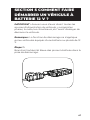
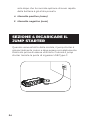
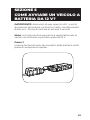
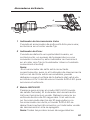
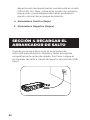
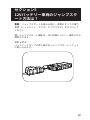
SECTION 5 HOW TO JUMP-
START A 12V BATTERY
VEHICLE?
IMPORTANT: Make sure you have turned off all of the
power loads of the vehicle, including headlights, radio,
air conditioners, etc., before attempting to jump-start
the vehicle.
Note: The jump-starting function is only applicable to
12V lead-acid battery vehicles.
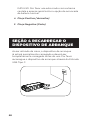
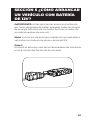
Step 1:
Plug the blue end of the battery clamps into the Jump
Start Socket.

12
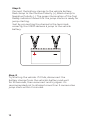
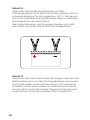
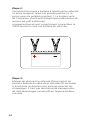
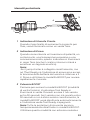
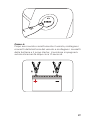
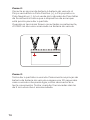
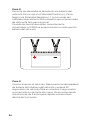
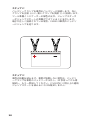
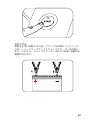
Step 2:
Connect the battery clamps to the vehicle battery.
Red clamp to the Positive Polarity (+), Black clamp to
Negative Polarity (-). The green illumination of the Tool
Ready indicator shows that the jump starter is ready for
jump-starting.
Just by connecting the clamps to the terminals
correctly, the V1500 delivers a jump to the vehicle
battery.
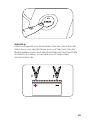
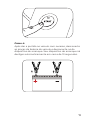
Step 3:
Try starting the vehicle. If it fails, disconnect the
battery clamps from the vehicle's battery and wait
for 20 seconds, then reconnect and try again. It's
recommended not to attempt more than 3 consecutive
jump starts within 2 minutes.

13
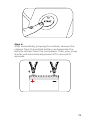
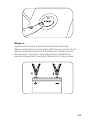
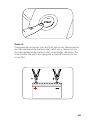
Step 4:
After successfully jumping the vehicle, remove the
clamps from the vehicle battery and separate the
battery clamps from the jump pack. Then your jump
starter will automatically power off in around 10
seconds.

14
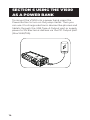
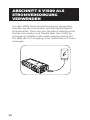
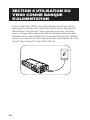
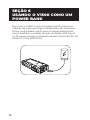
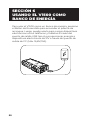
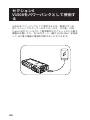
SECTION 6 USING THE V1500
AS A POWER BANK
To convert the V1500 into a power bank, press the
Power Button to turn on the jump starter. Then you
can use it to charge electronic devices like phones and
tablets through the USB Type-A Output port or supply
power to 12V electronic devices via the DC Output port
(Max 16.8V/10A).

15
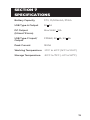
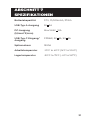
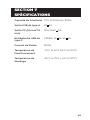
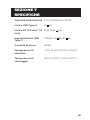
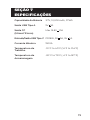
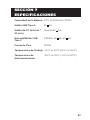
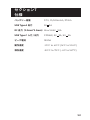
SECTION 7
SPECIFICATIONS
BatteryCapacity
USB Type-A Output
DC Output
(5.5mm*2.1mm)
USB Type-C Input/
Output
Peak Current
WorkingTemperature
StorageTemperature
3.7V, 10,000mAh, 37Wh
5V 3A
Max 16.8V 10A
PD18W, 5V 3A, 9V 2A
1500A
-10°C to 40°C (14°F to 104°F)
-20°C to 75°C (-4°F to 167°F)

16
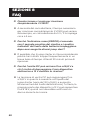
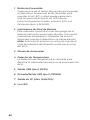
How long does it take to fully recharge the
V1500?
The time it takes to fully recharge a V1500 varies
depending on the charger used. For example, a
5V/2A charger takes approximately 4.5 hours.
Why is the red Error indicator lit up with the
buzzer beeping and the four battery level
indicators ashing after I performed several jump
starts?
It's possible that the jump starter is overheating
as you have jump-started too frequently in a short
period of time. Please try again in 20 minutes.
What is the reason for the DC output going as
high as 16.8V, and is there a risk of damaging my
12V electronic device during charging?
The DC output voltage can reach up to 16.8V as it
is consistent with that of the jump starter (ranges
from 13.2 to 16.8V, and increases as the battery level
rises). However, most 12V devices can withstand up
to 18V, so no damage should occur.
Q
A
Q
A
Q
A
SECTION 8
FAQ

17
SECTION 9
WARRANTY
TOPDON One Year Limited Warranty
TOPDON warrants to its original purchaser that the
company's products will be free from defects in
material and workmanship for 12 months from the date
of purchase (Warranty Period).
For the defects reported during the Warranty Period,
TOPDON will either repair or replace the defective part
or product according to its technical support analysis
and conrmation.
TOPDON shall not be liable for any incidental or
consequential damages arising from the device's use,
misuse, or mounting.
If there is any conict between the TOPDON warranty
policy and local laws, the local laws shall prevail.
This limited warranty is void under the following
conditions:
• Misused, disassembled, altered or repaired by
unauthorized stores or technicians.
• Careless handling and/or improper operation.
Notice: All information in this manual is based on the
latest information available at the time of publication
and no warranty can be made for its accuracy or
completeness. TOPDON reserves the right to make
changes at any time without notice.

18
SECTION 10
FCC WARNING
This device complies with Part 15 of the FCC Rules.
Operation is subject to the following two conditions:
(1) this device may not cause harmful interference, and
(2) this device must accept any interference received,
including interference that may cause undesired
operation.

19

20
DEUTSCH
A página está carregando...
A página está carregando...
A página está carregando...
A página está carregando...
A página está carregando...
A página está carregando...
A página está carregando...
A página está carregando...
A página está carregando...
A página está carregando...
A página está carregando...
A página está carregando...
A página está carregando...
A página está carregando...
A página está carregando...
A página está carregando...
A página está carregando...
A página está carregando...
A página está carregando...
A página está carregando...
A página está carregando...
A página está carregando...
A página está carregando...
A página está carregando...
A página está carregando...
A página está carregando...
A página está carregando...
A página está carregando...
A página está carregando...
A página está carregando...
A página está carregando...
A página está carregando...
A página está carregando...
A página está carregando...
A página está carregando...
A página está carregando...
A página está carregando...
A página está carregando...
A página está carregando...
A página está carregando...
A página está carregando...
A página está carregando...
A página está carregando...
A página está carregando...
A página está carregando...
A página está carregando...
A página está carregando...
A página está carregando...
A página está carregando...
A página está carregando...
A página está carregando...
A página está carregando...
A página está carregando...
A página está carregando...
A página está carregando...
A página está carregando...
A página está carregando...
A página está carregando...
A página está carregando...
A página está carregando...
A página está carregando...
A página está carregando...
A página está carregando...
A página está carregando...
A página está carregando...
A página está carregando...
A página está carregando...
A página está carregando...
A página está carregando...
A página está carregando...
A página está carregando...
A página está carregando...
A página está carregando...
A página está carregando...
A página está carregando...
A página está carregando...
A página está carregando...
A página está carregando...
A página está carregando...
A página está carregando...
A página está carregando...
A página está carregando...
A página está carregando...
A página está carregando...
-
 1
1
-
 2
2
-
 3
3
-
 4
4
-
 5
5
-
 6
6
-
 7
7
-
 8
8
-
 9
9
-
 10
10
-
 11
11
-
 12
12
-
 13
13
-
 14
14
-
 15
15
-
 16
16
-
 17
17
-
 18
18
-
 19
19
-
 20
20
-
 21
21
-
 22
22
-
 23
23
-
 24
24
-
 25
25
-
 26
26
-
 27
27
-
 28
28
-
 29
29
-
 30
30
-
 31
31
-
 32
32
-
 33
33
-
 34
34
-
 35
35
-
 36
36
-
 37
37
-
 38
38
-
 39
39
-
 40
40
-
 41
41
-
 42
42
-
 43
43
-
 44
44
-
 45
45
-
 46
46
-
 47
47
-
 48
48
-
 49
49
-
 50
50
-
 51
51
-
 52
52
-
 53
53
-
 54
54
-
 55
55
-
 56
56
-
 57
57
-
 58
58
-
 59
59
-
 60
60
-
 61
61
-
 62
62
-
 63
63
-
 64
64
-
 65
65
-
 66
66
-
 67
67
-
 68
68
-
 69
69
-
 70
70
-
 71
71
-
 72
72
-
 73
73
-
 74
74
-
 75
75
-
 76
76
-
 77
77
-
 78
78
-
 79
79
-
 80
80
-
 81
81
-
 82
82
-
 83
83
-
 84
84
-
 85
85
-
 86
86
-
 87
87
-
 88
88
-
 89
89
-
 90
90
-
 91
91
-
 92
92
-
 93
93
-
 94
94
-
 95
95
-
 96
96
-
 97
97
-
 98
98
-
 99
99
-
 100
100
-
 101
101
-
 102
102
-
 103
103
-
 104
104


em outras línguas
- español: Topdon V1500 Manual de usuario
- français: Topdon V1500 Manuel utilisateur
- italiano: Topdon V1500 Manuale utente
- Deutsch: Topdon V1500 Benutzerhandbuch
- 日本語: Topdon V1500 ユーザーマニュアル