Ohaus ST3100-B Manual do usuário
- Categoria
- Medindo, testando
- Tipo
- Manual do usuário
Este manual também é adequado para

STARTER 3100
Bench pH Meter
Instruction Manual
Manual de instrucciones
del pHmetro de mesa
STARTER 3100
STARTER 3100
PH-mètre de laboratoire
Manuel d’instructions
STARTER 3100
Medidor de pH de Bancada
Manual de Instruções


TABLE OF CONTENTS
1 INTRODUCTION ................................................................... 1
1.1 Definition of Signal Warnings and Symbols ...................................... 1
1.2 Safety Precautions ............................................................................ 2
1.3 Display and controls .......................................................................... 3
2 INSTALLATION ..................................................................... 5
2.1 Package contents .............................................................................. 5
2.2 Installing the stand-alone electrode holder ....................................... 6
2.3 Installing the power adapter .............................................................. 6
2.4 Connect the pH electrodes ................................................................ 7
2.5 Meter stand for adjusting view angle ................................................. 7
2.6 Attached quick guide ......................................................................... 7
3 SETUP ................................................................................... 8
3.1 Set temperature unit and MTC value ................................................ 8
3.2 Selecting a predefined buffer group .................................................. 8
4 STARTER 3100 OPERATION ............................................... 9
4.1 Calibration ......................................................................................... 9
4.1.1 Buffer group ................................................................................... 9
4.1.2 Performing 1-point calibration ..................................................... 10
4.1.3 Performing 2-point calibration ...................................................... 11
4.2 Sample measurement ..................................................................... 12
4.2.1 pH measurement ......................................................................... 12
4.2.2 mV measurement ........................................................................ 12
4.3 Temperature measurement ............................................................. 12
4.4 Using the memory ........................................................................... 12
4.4.1 Storing a reading ......................................................................... 12
4.4.2 Recalling from memory ............................................................... 12
4.4.3 Clearing the memory ................................................................... 13
4.5 Printing ............................................................................................ 13
5 MAINTENANCE .................................................................. 15
5.1 Error message ................................................................................. 15
5.2 Meter maintenance.......................................................................... 15
5.3 Electrode maintenance ................................................................... 16
5.4 Self-diagnosis .................................................................................. 16
5.5 Recover factory settings .................................................................. 16
6 TECHNICAL DATA .............................................................. 17
6.1 Specifications .................................................................................. 17
6.2 Compliance ..................................................................................... 18
7 BUFFER GROUP ................................................................ 19

STARTER 3100 Bench pH Meter EN-1
1 INTRODUCTION
Thank you for choosing OHAUS.
Please read the manual completely before using the STARTER 3100 bench pH meter to ensure
proper setup, operation and maintenance.
STARTER 3100 has an excellent performance/price ratio and is designed with many useful features
including a stand-alone electrode holder and a beeper for error alert. Other accessories such as
pH electrodes and buffer solutions are also available.
STARTER 3100 offers many practical features and functions such as:
Large backlit LCD with Quick Guide attached under the meter to assist with user operation
Stand-alone electrode holder for maximum flexibility
Electrode condition icon automatically showing you the health of your pH electrode
RS232 port and memory to store up to 99 measurements
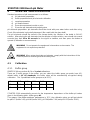
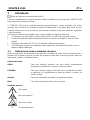
1.1 Definition of Signal Warnings and Symbols
Safety notes are marked with signal words and warning symbols. These show safety issues and
warnings. Ignoring the safety notes may lead to personal injury, damage to the instrument,
malfunctions and false results.
Signal Words
WARNING For a hazardous situation with medium risk, possibly resulting in
injuries or death if not avoided.
CAUTION For a hazardous situation with low risk, resulting in damage to the
device or the property or in loss of data, or injuries if not avoided.
Attention For important information about the product.
Note For useful information about the product
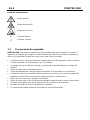
Warning Symbols
General hazard
Explosion hazard
Corrosive hazard
Alternating current
Direct current

EN-2 STARTER 3100 Bench pH Meter
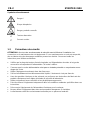
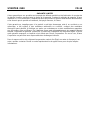
1.2 Safety Precautions
CAUTION: Read all safety warnings before installing, making connections, or servicing this
equipment. Failure to comply with these warnings could result in personal injury and/or property
damage. Retain all instructions for future reference.
Verify that the input voltage range printed on the data label and the plug type matches the
local AC power to be used.
Make sure that the power cord does not pose a potential obstacle or tripping hazard.
Use the equipment only in dry locations.
Dry off any liquid spills immediately. The instrument is not watertight.
When using chemicals and solvents, comply with the instructions of the chemical producer
and the general lab safety rules.
Use only approved accessories and peripherals.
Operate the equipment only under ambient conditions specified in these instructions.
Disconnect the equipment from the power supply when cleaning.
Do not operate the equipment in hazardous or unstable environments.
Service should only be performed by authorized personnel.

STARTER 3100 Bench pH Meter EN-3
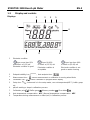
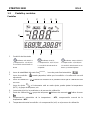
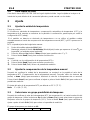
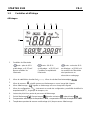
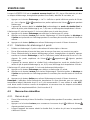
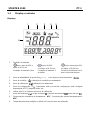
1.3 Display and controls
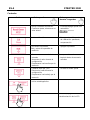
Displays
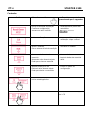
1
Electrode condition
Slope: more than 95%
and offset: ± (0-15) mV
Electrode condition is good
Slope: 90-95%
or offset: ± (15-35) mV
Electrode condition is
acceptable
Slope: less than 90%
or offset: ± (35-60) mV
Electrode condition is not
good or needs cleaning
2
Endpoint stability icon ; Auto endpoint icon
3
Measurement icon - ; means measurement or calibration is running when blinks
4
Calibration icon - ; means calibration in progress when display
5
Setup icon - ; instrument is in the setup mode, can set temperature(MTC), buffer group
etc.
6
pH/mV reading or slope in calibration process
7
Calibration point / Buffer group /Memory number / Error index
8
Auto temperature compensation - ATC ; Manual temperature compensation - MTC
9
Temperature during measurement or offset (mV) in calibration process
2
3
4
1
5
7
8
9
1
2
3
4
5
6

EN-4 STARTER 3100 Bench pH Meter
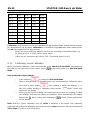
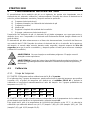
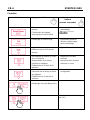
Controls
Button
Press & release
Press & hold
for 3 seconds
- Start or finish measurement
- Confirm setting, store entered
value
- Turn auto endpoint on / off
,
- Start calibration
- Recall the latest calibration
data : slope and offset
- Meter turn on
- Exit and return to measurement
screen
- Meter turn off
- Store current reading to memory
- Increase value during setting
- Scroll up through the memory
- Recall stored data
- Print current memory data
- Switch between pH and mV
- Decrease value during setting
- Scroll down through the memory
- Enter setup mode
- Start self-diagnosis
Turn on/turn off the backlight
of the LCD

STARTER 3100 Bench pH Meter EN-5
2 INSTALLATION
Carefully unpack the box.
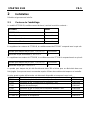
2.1 Package contents
The model ST3100-B (basic package) has the following items:
In addition to ST3100-B content, the ST3100-F package also includes the following:
In addition to ST3100-B content, the ST3100-H package also includes the following:
Each pH buffer powder should be dissolved in 250ml pure water or deionized water in a
volumetric flask.
Additional electrodes available include the following:
Model
Description
P/N
ST310
3-in-1 plastic refillable pH Electrode
83033965
ST210
2-in-1 plastic refillable pH Electrode
83033966
ST320
3-in-1 plastic gel pH Electrode(no need to fill)
83033967
ST230
2-in 1 glass muddy sample pH Electrode
83033968
STORP1
Gel plastic ORP electrode
30038555
STORP2
Refillable glass ORP electrode
30038553
STTEMP30
Temperature Electrode
83033970
ST3100-B
Units
STARTER 3100
1
Stand-alone electrode holder
1 set
In use cover
1
12V Power supply
1 set
pH Buffer Powder Set (4.01, 7.00, 10.01)
1 set
ST310 3-in-1 refillable pH electrode
1
pH Buffer Powder Set (4.01, 7.00, 10.01)
1 set
ST320 3-in-1 gel pH electrode
1

EN-6 STARTER 3100 Bench pH Meter
Buffers and Accessories:
Buffer powder set (4.01; 7.00; 10.00)
83033971
Buffer pH1.68 250ml
30100424
Buffer pH4.01 250ml
30100425
Buffer pH7.00 250ml
30100427
Buffer pH10.01 250ml
30100429
Buffer pH12.45 250ml
30100430
Electrode holder stand alone (3100/3100C)
30058733
In use cover
30058734
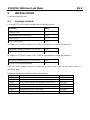
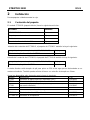
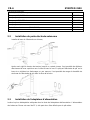
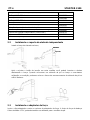
2.2 Installing the stand-alone electrode holder
Install the electrode arm on the base,
After adjusting the tension knob to some extent, you can move the upper arm up and down.
When the pH electrode is installed on the arm, the storage bottle of pH electrode fits into the
base hole.
2.3 Installing the power adapter
Insert the right adapter clip into the power adapter slot. The Ohaus balance power supply is also
12V which could also be used for the pH meter.

STARTER 3100 Bench pH Meter EN-7
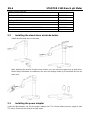
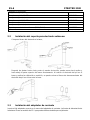
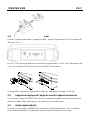
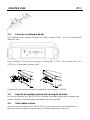
2.4 Connect the pH electrodes
There are 3 sockets for electrode. “pH” socket (BNC); “TEMP.” Socket (Cinch) and “REF” Socket
(2mm banana).
For ST310 electrode connect to the BNC and Cinch socket. For 2-in-1 pH electrode (e.g. ST210)
you only need to connect the BNC.
REF socket is for separate reference electrode. (e.g.STREF1)
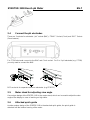
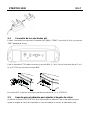
2.5 Meter stand for adjusting view angle
One unique design of the STARTER 3100 is the meter stand, which can be used to adjust the view
angle of the display in case of working on high table.
2.6 Attached quick guide
Another unique design of the STARTER 3100 is the attached quick guide, the quick guide is
attached into the bottom housing of the meter.

EN-8 STARTER 3100 Bench pH Meter
3 SETUP
3.1 Set temperature unit and MTC value
Please note:
If a temperature electrode is used, Automatic Temperature Compensation (ATC) and the sample
temperature are displayed on the screen. You may then choose to skip MTC setup (below).
If the meter does not detect a temperature electrode or one is not used, the meter automatically
switches to Manual Temperature Compensation (MTC) mode and MTC appears on the screen.
MTC can be set as follows:
Power the meter on by pressing .
Press and hold until the setup icon appears on the display and the current
temperature unit blinks (°C or °F).
Press or to switch between °C and °F.
Press to confirm your selection.
Then
Continue with MTC temperature setting by using or to adjust temperature
compensation accordingly
Press to confirm the setting
Press to return to the measurement screen.
The default MTC temperature value setting is 25°C (77°F).
Note: °C = 5/9 (°F - 32)
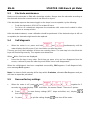
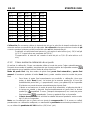
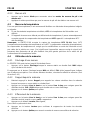
3.2 Selecting a predefined buffer group
After confirming the MTC compensation temperature value, make the buffer group selection. Use
or to select a buffer group among 3 buffer groups (4.1.1). Press to
confirm the setting or press to leave to return to the measurement screen.
The default buffer group is b1.
b1
1.68
4.01
7.00
10.01

STARTER 3100 Bench pH Meter EN-9
4 STARTER 3100 OPERATION
Standard procedure of pH measurement is as follows:
a) pH electrode preparation
b) buffer preparation and pH electrode calibration
c) sample preparation
d) pH measurement
e) Record measurement results or print
f) Rinse the pH electrode and properly store
pH electrode preparation: pH electrode should be rinsed with pure water before and after using.
Check if the electrode is physically damaged. (Be careful with the glass bulb)
The pH electrode should be stored in the storage bottle; the solution in the bottle is 3M KCl
solution. After placing the pH electrode into the sample or buffer solution, user should stir several
seconds then wait 30 to 60 seconds for the signal to stabilize, and then press the button to
operate (Calibration or measurement).
WARNING Do not operate the equipment in hazardous environments. The
equipment is not explosion protected.
WARNING When using chemicals and solvents, comply with the instructions of the
chemical producer and the general lab safety rules.
4.1 Calibration
4.1.1 Buffer group
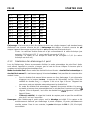
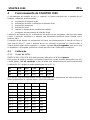
STARTER 3100 can perform 1-, 2- or 3- point calibrations.
There are 3 buffer groups in the meter, you can select the buffer group you prefer (see 4.3),
default buffer is b1 US standards; the buffer value will be automatically recognized during
calibration. The 3 predefined buffer groups are (at 25°C):
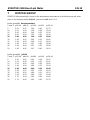
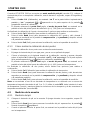
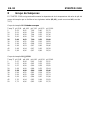
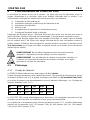
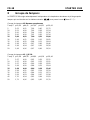
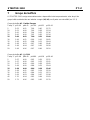
STARTER 3100 automatically corrects for the temperature dependence of the buffer pH values
given in the following table - buffer group b1.
This means, if the buffer solutions’ temperature is 15°C, the calibration value you will get should
be pH1.67 (buffer 1.68), pH4.00 (buffer 4.01), pH7.04(buffer 7.00) and pH10.12 (buffer 10.01).
b1
1.68
4.01
7.00
10.01
b2
2.00
4.01
7.00
9.21
11.00
b3
1.68
4.00
6.86
9.18
12.46

EN-10 STARTER 3100 Bench pH Meter
Calibration: pH electrodes need to be calibrated with pH standard buffer solution before a proper
pH measurement can be made. Calibration is to display the right pH value when meter receive
the mV value signal from the pH electrode.
Slope: the linear coefficient between mV and pH according to theoretical value (e.g. -
59.16mV/pH @ 25 °C which means 100% slope);
Offset: the mV value when pH value is 7.00. (Theoretical value is 0 mV);
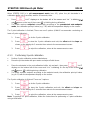
4.1.2 Performing 1-point calibration
When performing calibration, Ohaus recommends using Auto End Point Mode. After powering
the meter on, be sure the top of the screen shows to ensure the meter is in Auto End point
Mode.
Auto or Manual End point Mode:
o Press and hold to change the End Point Mode.
o When in Manual Mode, to manually reach a pH measurement or calibration value,
you need to press button- when reading is stable and displays :
then the sample reading or calibration value freezes, blinks 3 times and
freezes on the display.
o When in Auto End Point Mode, the meter determines when the reading is stable
then displays and locks the reading or calibration value automatically, the reading
freezes and blinks 3 times then disappears; blinks 3 times and freezes
on the display.
Note: With the 1-point calibration only the offset is adjusted. If the sensor was previously
calibrated with multi-point calibration the previously stored slope will remain. Otherwise theoretical
100% slope (-59.16 mV / pH) will be used.
5 °C
1.67
4.01
7.09
10.25
10 °C
1.67
4.00
7.06
10.18
15 °C
1.67
4.00
7.04
10.12
20 °C
1.68
4.00
7.02
10.06
25 °C
1.68
4.01
7.00
10.01
30 °C
1.68
4.01
6.99
9.97
35 °C
1.69
4.02
6.98
9.93
40 °C
1.69
4.03
6.97
9.89
45 °C
1.70
4.05
6.97
9.86
50 °C
1.71
4.06
6.96
9.83

STARTER 3100 Bench pH Meter EN-11
When STARTER 3100 is in pH measurement mode (see 4.2); place the pH electrode in a
calibration buffer, stir 5 seconds, wait for 30 seconds, then:
Press “Cal 1” displays on the bottom left of the screen and “Cal ” is blinking.
and appear on the top of the screen, is blinking during calibration.
The meter reaches endpoint automatically according to the preselected auto-endpoint
mode, the calibration point pH value (e.g. 7.00) with the temperature display on the screen.
The 1-point calibration is finished; There are now 3 options (OHAUS recommends conducting at
least a 2 point calibration);
1. Press to do the 2-point calibration.
2. Press to store the 1-point calibration and exit, the offset and the slope are
shown on the display for 3 seconds then return to the measurement screen.
3. Press to reject the calibration, return to the measurement screen.
4.1.3 Performing 2-point calibration
Perform 1-point calibration as described above.
Rinse the pH electrode with pure water and wipe off with tissue.
Place the electrode in the next calibration buffer, stir and wait, then press , “Cal 2”
displays on the bottom left of the screen and “Cal ” is blinking. On the top of the screen
and appear, is blinking during calibration.
The meter reaches endpoint according to the endpoint mode, the calibration point pH value
(e.g. 4.01) with the temperature display on the screen.
The 2-point calibration is finished. There are 3 options:
1. Press to do the 3-point calibration.
2. Press to store the 2-point calibration and exit, the offset and slope are
shown on the display for 3 seconds then return to the measurement screen.
3. Press to reject the calibration, return to the measurement screen.
Note: To perform a 3 point calibration, follow the instructions for performing a 2 point calibration
using a third buffer.

EN-12 STARTER 3100 Bench pH Meter
4.2 Sample measurement
4.2.1 pH measurement
Place the pH electrode in the sample. Stir for 5 seconds; wait for 30 seconds.
Press to start the pH measurement, appears on the display. is blinking during
measurement.
When meter reaches endpoint, the pH value with the temperature display on the screen.
4.2.2 mV measurement
Press to switch between pH measurement mode and mV measurement mode.
Follow the same procedure as for pH measurement to perform mV measurement.
4.3 Temperature measurement
For better accuracy, we recommend to use either a built-in or a separate temperature electrode.
If a temperature electrode is used, ATC and the sample temperature are displayed.
If the meter does not detect a temperature electrode, it automatically switches to the manual
temperature compensation mode and MTC appears. MTC temperature should be set.
Note: STARTER 3100 accepts NTC 30 kΩ temperature sensor. ATC (Auto Temperature
Compensation) or MTC (Manual Temperature Compensation), the Temperature Compensation
only corrects for the change in the output of the electrode, not for the change in the actual solution.
This means the meter corrects the signal(mV) from the electrode to get a more accurate pH value
according to the real temperature.
4.4 Using the memory
4.4.1 Storing a reading
The STARTER 3100 can store up to 99 endpoint results.
Press button when the measurement reaches endpoint. M01 indicates that one result
has been stored.
If you press when M99 is displayed, FUL displays to indicate the memory is full. To store
further data you will have to clear the memory. (See 4.4.3)
4.4.2 Recalling from memory
Press and hold to recall the stored values from memory when the current
measurement reaches endpoint.

STARTER 3100 Bench pH Meter EN-13
Press button or to scroll through the stored results. R01 to R99 indicates which
result is being displayed.
Press to exit.
4.4.3 Clearing the memory
Pressing or to scroll through the stored results until “MRCL” appears.
Press , CLr blinks;
There are now 2 options:
Press to confirm the deletion of all the stored data.
Press to return to the measurement mode without deleting the memory.
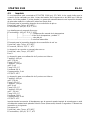
4.5 Printing
If the printer is connected to the STARTER 3100(e.g. SF-F40A, green light means connection
success; printer baud rate 9600bps; 8 data bit; none parity bit; 1 stop bit), a print-out is
automatically generated after each end pointed measurement or calibration.
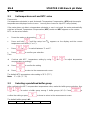
The format for the print-out following a pH measurement is:
End Point, Value, Temp., ATC/MTC
Auto EP, 4.01pH, 25.0 °C, MTC
The details for the second line are:
Auto EP, 4.01pH, 25.0 °C , MTC
| | | |---- Manual Temperature Compensation
| | |---------------- Temperature value and unit ºC
| |------------------------- pH value
|---------------------------------------- Auto End Point
The format for the print-out following a mV measurement is:
End Point, Value, Temp., ATC/MTC
Manual EP, 182mV, 23.2 °C, ATC
The print-out in case of an error message is:
End Point, Value, Temp., ATC/MTC
Error3
The print-out for a 2-point calibration is:
Buffer1: 4.01pH
mV1: 178mV
Temp.1: 25.0 °C
Buffer2: 7.00pH
mV2: 3mV
Temp.2: 25.0 °C

EN-14 STARTER 3100 Bench pH Meter
Slope: 99%
Offset: 5mV
ATC/MTC: MTC
The print-out for a 3-point calibration is:
Buffer1: 4.01pH
mV1: 178mV
Temp.1: 25.0 °C
Buffer2: 7.00pH
mV2: 0mV
Temp.2: 25.0 °C
Buffer3: 9.21pH
mV3: -130mV
Temp.3: 25.0 °C
Slope: 100%
Offset: 0mV
ATC/MTC: ATC
Printing from memory: When scrolling through the memory you can print the entry that is currently
viewed by pressing and holding (3 seconds) the . The printout format is as follows:
Recall 01:
End Point, Value, Temp., ATC/MTC
Manual EP, 4.01pH, 35.6 °C, ATC

STARTER 3100 Bench pH Meter EN-15
5 MAINTENANCE
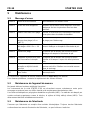
5.1 Error message
Error 0
Memory access error
Reset to factory settings
Error 1
Self-diagnosis failed
Repeat the self-diagnosis procedure and make
sure that you finish pressing all five keys within
two minutes.
Error 2
Measured values out of range
Check if the electrode is properly connected and
placed in the sample solution.
Error 3
Measured buffer temperature
out of range (<5 or >40 °C)
Keep the pH buffer temperature within the range
for calibration
Error 4
Offset out of range
offset > 60mV or < - 60 mV
Make sure the pH buffer is correct and fresh;
Clean or replace the pH electrode.
Error 5
Slope out of range
Make sure the buffer is correct and fresh; Clean
or replace the pH electrode.
Error 6
Meter cannot recognize the
buffer
Make sure the buffer is correct and fresh; check if
the buffer has not been used more than once.
Error 9
The current data set has
already been stored once
An endpoint reading can only be stored once.
Perform a new measurement to store.
Error 10
The sample temperature out
of range
Check the sample temperature, the temperature
sensor.
If an error happens, the meter will also beep 3 times to alert.
For further technical support please contact Ohaus. (US please contact 1-800-672-7722).
5.2 Meter maintenance
Never unscrew the two halves of the housing!
The STARTER 3100 series instruments do not require any maintenance other than occasional wipe
with a damp cloth and the replacement of depleted batteries.
The housing is made of acrylonitrile butadiene styrene (ABS). This material is attacked by some
organic solvents, such as toluene, xylene and methyl ethyl ketone (MEK). Any spillage should be
immediately wiped off.

EN-16 STARTER 3100 Bench pH Meter
5.3 Electrode maintenance
Make sure the electrode is filled with electrolyte solution. Always store the electrode according to
the electrode instruction manuals and do not allow it to dry out.
If the electrode response becomes sluggish or the slope is not acceptable, try the following:
o Soak the electrode in 0.1M HCl for at least 8 hours.
o For fat or oil contaminant, degrease the membrane with cotton wool soaked in either
acetone or a soap solution.
After electrode treatment, a new calibration should be performed. If the electrode slope is still not
acceptable, the electrode might need to be replaced.
5.4 Self-diagnosis
When the meter is on, press and hold and simultaneously until the
meter displays the full screen. Each icon blinks one after the other.
This way you may check whether all icons are correctly shown. The next step is to check that the
keys are functioning correctly. This requires user interaction.
When b blinks, five icons are displayed.
Press the five keys in any order. Each time you press a key an icon disappears from the
screen, continue to press the other keys until all the icons have disappeared.
When the self-diagnosis has been completed successfully, PAS appears. If self-diagnosis fails,
error message Err 1 appears.
Note: You have to finish pressing all five keys within 2 minutes, otherwise Err 1 appears and you
will have to repeat the procedure.
5.5 Recover factory settings
When the meter is off, press and hold & & together for 3
seconds, the screen displays and blinks, this means “Reset”. There are 2 options:
Press to reset factory settings (MTC, slope and offset, etc.), display
then restart the meter.
Or press to quit the setting, display then turn off the meter.

STARTER 3100 Bench pH Meter EN-17
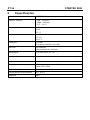
6 TECHNICAL DATA
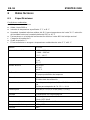
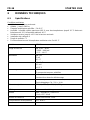
6.1 Specifications
Ambient conditions
Indoor use only
Altitude: Up to 2000 m
Specified Temperature range: 5 °C to 40 °C
Humidity: maximum relative humidity 80 % for temperatures up to 30 °C decreasing linearly to
50% relative humidity at 40 °C
Mains supply voltage fluctuations: up to ±10% of the nominal voltage
Installation category II
Pollution degree: 2
Operability is assured at ambient temperatures between 5 °C to 40 °C
Model
ST3100
Measuring range
-2.00…16.00 pH
–1999…1999 mV
-5 °C…110 °C
Resolution
0.01 pH
1 mV
0.1 °C
Error limits
± 0.01 pH
± 1 mV
± 0.5 °C
Calibration
3 points
3 predefined buffer groups
Memory
99 measurements
The last calibration data
Power supply
AC Adapter Input: 100-240V ~ X.XA 50/60 Hz
AC Adapter Output: 12V X.XA
Size/weight
220 W x 175 D x 78 H mm / 0.75 kg
Display
Liquid crystal with backlight
Input
BNC, impedance > 10e+12 Ω
Cinch, NTC 30 kΩ
Reference input
2mm banana socket
Temperature-compensation
ATC & MTC
Housing
ABS
A página está carregando...
A página está carregando...
A página está carregando...
A página está carregando...
A página está carregando...
A página está carregando...
A página está carregando...
A página está carregando...
A página está carregando...
A página está carregando...
A página está carregando...
A página está carregando...
A página está carregando...
A página está carregando...
A página está carregando...
A página está carregando...
A página está carregando...
A página está carregando...
A página está carregando...
A página está carregando...
A página está carregando...
A página está carregando...
A página está carregando...
A página está carregando...
A página está carregando...
A página está carregando...
A página está carregando...
A página está carregando...
A página está carregando...
A página está carregando...
A página está carregando...
A página está carregando...
A página está carregando...
A página está carregando...
A página está carregando...
A página está carregando...
A página está carregando...
A página está carregando...
A página está carregando...
A página está carregando...
A página está carregando...
A página está carregando...
A página está carregando...
A página está carregando...
A página está carregando...
A página está carregando...
A página está carregando...
A página está carregando...
A página está carregando...
A página está carregando...
A página está carregando...
A página está carregando...
A página está carregando...
A página está carregando...
A página está carregando...
A página está carregando...
A página está carregando...
A página está carregando...
A página está carregando...
A página está carregando...
A página está carregando...
A página está carregando...
A página está carregando...
A página está carregando...
A página está carregando...
A página está carregando...
A página está carregando...
A página está carregando...
-
 1
1
-
 2
2
-
 3
3
-
 4
4
-
 5
5
-
 6
6
-
 7
7
-
 8
8
-
 9
9
-
 10
10
-
 11
11
-
 12
12
-
 13
13
-
 14
14
-
 15
15
-
 16
16
-
 17
17
-
 18
18
-
 19
19
-
 20
20
-
 21
21
-
 22
22
-
 23
23
-
 24
24
-
 25
25
-
 26
26
-
 27
27
-
 28
28
-
 29
29
-
 30
30
-
 31
31
-
 32
32
-
 33
33
-
 34
34
-
 35
35
-
 36
36
-
 37
37
-
 38
38
-
 39
39
-
 40
40
-
 41
41
-
 42
42
-
 43
43
-
 44
44
-
 45
45
-
 46
46
-
 47
47
-
 48
48
-
 49
49
-
 50
50
-
 51
51
-
 52
52
-
 53
53
-
 54
54
-
 55
55
-
 56
56
-
 57
57
-
 58
58
-
 59
59
-
 60
60
-
 61
61
-
 62
62
-
 63
63
-
 64
64
-
 65
65
-
 66
66
-
 67
67
-
 68
68
-
 69
69
-
 70
70
-
 71
71
-
 72
72
-
 73
73
-
 74
74
-
 75
75
-
 76
76
-
 77
77
-
 78
78
-
 79
79
-
 80
80
-
 81
81
-
 82
82
-
 83
83
-
 84
84
-
 85
85
-
 86
86
-
 87
87
-
 88
88


Ohaus ST3100-B Manual do usuário
- Categoria
- Medindo, testando
- Tipo
- Manual do usuário
- Este manual também é adequado para
em outras línguas
- español: Ohaus ST3100-B Manual de usuario
- français: Ohaus ST3100-B Manuel utilisateur
- English: Ohaus ST3100-B User manual
Artigos relacionados
Outros documentos
-
Omega PHH222 Manual do proprietário
-
YSI 601204-pH1200 Manual do proprietário
-
Extech Instruments PH210 Manual do usuário
-
-
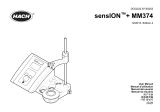 Hach sensION+ MM374 Manual do usuário
-
 Hach sensIONTM+ pH31 Manual do usuário
-
-
 Hach sensION MM340 Manual do usuário
-
 Hach sensION+ pH1 Manual do usuário
-
 Thermo Fisher Scientific Elite ORP Tester Instruções de operação


