
+LOWL
+,75(6'
-XPER
,QVWUXFWLRQVIRUXVH
*HEUDXFKVDQZHLVXQJ
0RGHGCHPSORL
,VWUX]LRQLGCXVR
*HEUXLNVDDQZLM]LQJ
0DQXDOGHLQVWUXFFLRQHV
0DQXDOGHLQVWUXo}HV
%UXJVDQYLVQLQJ
%UXNVDQYLVQLQJ
,QVWUXNFMDREVãXJL
HQ
GH
IU
LW
QO
HV
SW
GD
VY
SO
UX
DU
]K
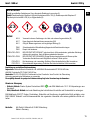
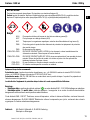
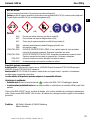
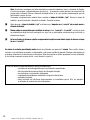
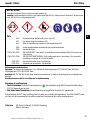
&RQWDLQVHSR[\FRQVWLWXHQWV0D\SURGXFHDQ
DOOHUJLFUHDFWLRQ$
&RQWDLQVUHDFWLRQSURGXFWELVSKHQRO$HSLFKORUK\
GULQHSR[\UHVLQ0:$UHDFWLRQSURGXFW
ELVSKHQRO)HSLFKORUK\GULQUHVLQ0:$
P;\OHQHGLDPLQH%
&DXVHVVHYHUHVNLQEXUQVDQGH\HGDPDJH%
0D\FDXVHDQDOOHUJLFVNLQUHDFWLRQ$%
7R[LFWRDTXDWLFOLIHZLWKORQJODVWLQJHIIHFWV$
% $$%
Danger
Printed: 30.07.2015 | Doc-Nr: PUB / 5241340 / 000 / 00

Hilti HIT-RE 500-SD
2
+,73URIL
+,7+<0$;86$
[
[
GULOOLQJDLG
W
JHO
W
JHO
W
FXUHLQL
7
LQVW
[
G
R
F
GULOO
O
LQVW
O
P
O
LQVW
[
[
36,DW
&)0
[
G
R
F
[
[
$
'LHVSHQVHU 'LVFDUG
0' [
%' [
0' [
(' [
7)& [
W
FXUH
W
FXUH
)
&
W
JHO
K
PLQ
PLQ
PLQ
PLQ
PLQ
PLQ
)
&
W
JHO
K
K
K
K
PLQ
PLQ
PLQ
7
PD[
7
LQVW
[
[
W
FXUHLQL
EDU
EDU
+,73URIL
+,7+<0$;86$
[
[
GULOOLQJDLG
W
JHO
W
JHO
W
FXUHLQL
7
LQVW
[
G
R
F
GULOO
O
LQVW
O
P
O
LQVW
[
[
36,DW
&)0
[
G
R
F
[
[
$
'LHVSHQVHU 'LVFDUG
0' [
%' [
0' [
(' [
7)& [
W
FXUH
W
FXUH
)
&
W
JHO
K
PLQ
PLQ
PLQ
PLQ
PLQ
PLQ
)
&
W
JHO
K
K
K
K
PLQ
PLQ
PLQ
7
PD[
7
LQVW
[
[
W
FXUHLQL
EDU
EDU
+,73URIL
+,7+<0$;86$
[
[
GULOOLQJDLG
W
JHO
W
JHO
W
FXUHLQL
7
LQVW
[
G
R
F
GULOO
O
LQVW
O
P
O
LQVW
[
[
36,DW
&)0
[
G
R
F
[
[
$
'LHVSHQVHU 'LVFDUG
0' [
%' [
0' [
(' [
7)& [
W
FXUH
W
FXUH
)
&
W
JHO
K
PLQ
PLQ
PLQ
PLQ
PLQ
PLQ
)
&
W
JHO
K
K
K
K
PLQ
PLQ
PLQ
7
PD[
7
LQVW
[
[
W
FXUHLQL
EDU
EDU
+,73URIL
+,7+<0$;86$
[
[
GULOOLQJDLG
W
JHO
W
JHO
W
FXUHLQL
7
LQVW
[
G
R
F
GULOO
O
LQVW
O
P
O
LQVW
[
[
36,DW
&)0
[
G
R
F
[
[
$
'LHVSHQVHU 'LVFDUG
0' [
%' [
0' [
(' [
7)& [
W
FXUH
W
FXUH
)
&
W
JHO
K
PLQ
PLQ
PLQ
PLQ
PLQ
PLQ
)
&
W
JHO
K
K
K
K
PLQ
PLQ
PLQ
7
PD[
7
LQVW
[
[
W
FXUHLQL
EDU
EDU
or
+,73URIL
+,7+<0$;86$
[
[
GULOOLQJDLG
W
JHO
W
JHO
W
FXUHLQL
7
LQVW
[
G
R
F
GULOO
O
LQVW
O
P
O
LQVW
[
[
36,DW
&)0
[
G
R
F
[
[
$
'LHVSHQVHU 'LVFDUG
0' [
%' [
0' [
(' [
7)& [
W
FXUH
W
FXUH
)
&
W
JHO
K
PLQ
PLQ
PLQ
PLQ
PLQ
PLQ
)
&
W
JHO
K
K
K
K
PLQ
PLQ
PLQ
7
PD[
7
LQVW
[
[
W
FXUHLQL
EDU
EDU
+,73URIL
+,7+<0$;86$
[
[
GULOOLQJDLG
W
JHO
W
JHO
W
FXUHLQL
7
LQVW
[
G
R
F
GULOO
O
LQVW
O
P
O
LQVW
[
[
36,DW
&)0
[
G
R
F
[
[
$
'LHVSHQVHU 'LVFDUG
0' [
%' [
0' [
(' [
7)& [
W
FXUH
W
FXUH
)
&
W
JHO
K
PLQ
PLQ
PLQ
PLQ
PLQ
PLQ
)
&
W
JHO
K
K
K
K
PLQ
PLQ
PLQ
7
PD[
7
LQVW
[
[
W
FXUHLQL
EDU
EDU
+,73URIL
+,7+<0$;86$
[
[
GULOOLQJDLG
W
JHO
W
JHO
W
FXUHLQL
7
LQVW
[
G
R
F
GULOO
O
LQVW
O
P
O
LQVW
[
[
36,DW
&)0
[
G
R
F
[
[
$
'LHVSHQVHU 'LVFDUG
0' [
%' [
0' [
(' [
7)& [
W
FXUH
W
FXUH
)
&
W
JHO
K
PLQ
PLQ
PLQ
PLQ
PLQ
PLQ
)
&
W
JHO
K
K
K
K
PLQ
PLQ
PLQ
7
PD[
7
LQVW
[
PO [
PO [
[
W
FXUHLQL
EDU
EDU
+
*
5˚C
10˚C
15˚C
20˚C
30˚C
40˚C
2
1
/
2
2
1
1
/
2
18
12
8
48
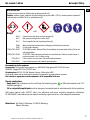
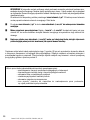
5˚C 41˚F
10˚C 50˚F
15˚C 59˚F
20˚C 68˚F
30˚C 86˚F
40˚C 104˚F
2,5
2
1,5
18
12
8
48
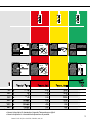
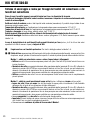
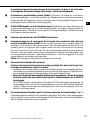
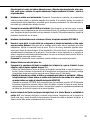
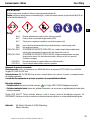
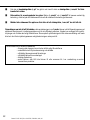
*) Please refer to technical literature (approvals, setting instructions) for detail.
+,73URIL
+,7+<0$;86$
[
[
GULOOLQJDLG
W
JHO
W
JHO
W
FXUHLQL
7
LQVW
[
G
R
F
GULOO
O
LQVW
O
P
O
LQVW
[
[
36,DW
&)0
[
G
R
F
[
[
$
'LHVSHQVHU 'LVFDUG
0' [
%' [
0' [
(' [
7)& [
W
FXUH
W
FXUH
)
&
W
JHO
K
PLQ
PLQ
PLQ
PLQ
PLQ
PLQ
)
&
W
JHO
K
K
K
K
PLQ
PLQ
PLQ
7
PD[
7
LQVW
[
[
W
FXUHLQL
EDU
EDU
+,73URIL
+,7+<0$;86$
[
[
GULOOLQJDLG
W
JHO
W
JHO
W
FXUHLQL
7
LQVW
[
G
R
F
GULOO
O
LQVW
O
P
O
LQVW
[
[
36,DW
&)0
[
G
R
F
[
[
$
'LHVSHQVHU 'LVFDUG
0' [
%' [
0' [
(' [
7)& [
W
FXUH
W
FXUH
)
&
W
JHO
K
PLQ
PLQ
PLQ
PLQ
PLQ
PLQ
)
&
W
JHO
K
K
K
K
PLQ
PLQ
PLQ
7
PD[
7
LQVW
[
[
W
FXUHLQL
EDU
EDU
+,73URIL
+,7+<0$;86$
[
[
GULOOLQJDLG
W
JHO
W
JHO
W
FXUHLQL
7
LQVW
[
G
R
F
GULOO
O
LQVW
O
P
O
LQVW
[
[
36,DW
&)0
[
G
R
F
[
[
$
'LHVSHQVHU 'LVFDUG
0' [
%' [
0' [
(' [
7)& [
W
FXUH
W
FXUH
)
&
W
JHO
K
PLQ
PLQ
PLQ
PLQ
PLQ
PLQ
)
&
W
JHO
K
K
K
K
PLQ
PLQ
PLQ
7
PD[
7
LQVW
[
[
W
FXUHLQL
EDU
EDU
+,73URIL
+,7+<0$;86$
[
[
GULOOLQJDLG
W
JHO
W
JHO
W
FXUHLQL
7
LQVW
[
G
R
F
GULOO
O
LQVW
O
P
O
LQVW
[
[
36,DW
&)0
[
G
R
F
[
[
$
'LHVSHQVHU 'LVFDUG
0' [
%' [
0' [
(' [
7)& [
W
FXUH
W
FXUH
)
&
W
JHO
K
PLQ
PLQ
PLQ
PLQ
PLQ
PLQ
)
&
W
JHO
K
K
K
K
PLQ
PLQ
PLQ
7
PD[
7
LQVW
[
[
W
FXUHLQL
EDU
EDU
Printed: 30.07.2015 | Doc-Nr: PUB / 5241340 / 000 / 00

3
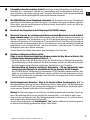
5˚C
10˚C
15˚C
20˚C
30˚C
40˚C
2
1
/
2
2
1
1
/
2
18
12
8
48
5˚C 41˚F
10˚C 50˚F
15˚C 59˚F
20˚C 68˚F
30˚C 86˚F
40˚C 104˚F
2,5
2
1,5
18
12
8
48
+,73URIL
+,7+<0$;86$
[
[
GULOOLQJDLG
W
JHO
W
JHO
W
FXUHLQL
7
LQVW
[
G
R
F
GULOO
O
LQVW
O
P
O
LQVW
[
[
36,DW
&)0
[
G
R
F
[
[
$
'LHVSHQVHU 'LVFDUG
0' [
%' [
0' [
(' [
7)& [
W
FXUH
W
FXUH
)
&
W
JHO
K
PLQ
PLQ
PLQ
PLQ
PLQ
PLQ
)
&
W
JHO
K
K
K
K
PLQ
PLQ
PLQ
7
PD[
7
LQVW
[
[
W
FXUHLQL
EDU
EDU
+,73URIL
+,7+<0$;86$
[
[
GULOOLQJDLG
W
JHO
W
JHO
W
FXUHLQL
7
LQVW
[
G
R
F
GULOO
O
LQVW
O
P
O
LQVW
[
[
36,DW
&)0
[
G
R
F
[
[
$
'LHVSHQVHU 'LVFDUG
0' [
%' [
0' [
(' [
7)& [
W
FXUH
W
FXUH
)
&
W
JHO
K
PLQ
PLQ
PLQ
PLQ
PLQ
PLQ
)
&
W
JHO
K
K
K
K
PLQ
PLQ
PLQ
7
PD[
7
LQVW
[
[
W
FXUHLQL
EDU
EDU
+,73URIL
+,7+<0$;86$
[
[
GULOOLQJDLG
W
JHO
W
JHO
W
FXUHLQL
7
LQVW
[
G
R
F
GULOO
O
LQVW
O
P
O
LQVW
[
[
36,DW
&)0
[
G
R
F
[
[
$
'LHVSHQVHU 'LVFDUG
0' [
%' [
0' [
(' [
7)& [
W
FXUH
W
FXUH
)
&
W
JHO
K
PLQ
PLQ
PLQ
PLQ
PLQ
PLQ
)
&
W
JHO
K
K
K
K
PLQ
PLQ
PLQ
7
PD[
7
LQVW
[
[
W
FXUHLQL
EDU
EDU
+,73URIL
+,7+<0$;86$
[
[
GULOOLQJDLG
W
JHO
W
JHO
W
FXUHLQL
7
LQVW
[
G
R
F
GULOO
O
LQVW
O
P
O
LQVW
[
[
36,DW
&)0
[
G
R
F
[
[
$
'LHVSHQVHU 'LVFDUG
0' [
%' [
0' [
(' [
7)& [
W
FXUH
W
FXUH
)
&
W
JHO
K
PLQ
PLQ
PLQ
PLQ
PLQ
PLQ
)
&
W
JHO
K
K
K
K
PLQ
PLQ
PLQ
7
PD[
7
LQVW
[
[
W
FXUHLQL
EDU
EDU
+,73URIL
+,7+<0$;86$
[
[
GULOOLQJDLG
W
JHO
W
JHO
W
FXUHLQL
7
LQVW
[
G
R
F
GULOO
O
LQVW
O
P
O
LQVW
[
[
36,DW
&)0
[
G
R
F
[
[
$
'LHVSHQVHU 'LVFDUG
0' [
%' [
0' [
(' [
7)& [
W
FXUH
W
FXUH
)
&
W
JHO
K
PLQ
PLQ
PLQ
PLQ
PLQ
PLQ
)
&
W
JHO
K
K
K
K
PLQ
PLQ
PLQ
7
PD[
7
LQVW
[
[
W
FXUHLQL
EDU
EDU
+,73URIL
+,7+<0$;86$
[
[
GULOOLQJDLG
W
JHO
W
JHO
W
FXUHLQL
7
LQVW
[
G
R
F
GULOO
O
LQVW
O
P
O
LQVW
[
[
36,DW
&)0
[
G
R
F
[
[
$
'LHVSHQVHU 'LVFDUG
0' [
%' [
0' [
(' [
7)& [
W
FXUH
W
FXUH
)
&
W
JHO
K
PLQ
PLQ
PLQ
PLQ
PLQ
PLQ
)
&
W
JHO
K
K
K
K
PLQ
PLQ
PLQ
7
PD[
7
LQVW
[
[
W
FXUHLQL
EDU
EDU
+,73URIL
+,7+<0$;86$
[
[
GULOOLQJDLG
W
JHO
W
JHO
W
FXUHLQL
7
LQVW
[
G
R
F
GULOO
O
LQVW
O
P
O
LQVW
[
[
36,DW
&)0
[
G
R
F
[
[
$
'LHVSHQVHU 'LVFDUG
0' [
%' [
0' [
(' [
7)& [
W
FXUH
W
FXUH
)
&
W
JHO
K
PLQ
PLQ
PLQ
PLQ
PLQ
PLQ
)
&
W
JHO
K
K
K
K
PLQ
PLQ
PLQ
7
PD[
7
LQVW
[
[
W
FXUHLQL
EDU
EDU
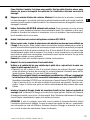
• Lineare Interpolation für dazwischen liegende Temperaturen möglich.
• Linear interpolation for intermediate temperatures is possible.
Printed: 30.07.2015 | Doc-Nr: PUB / 5241340 / 000 / 00

Hilti HIT-RE 500-SD
4
+,79 +,6 5HEDU +,7 5% +,7 6=,3
>PP@
>PP@
>PP@
>PP@
,WHP QR
,WHP QR
+,75%
+,76=
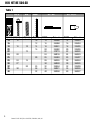
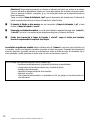
Table 1
Printed: 30.07.2015 | Doc-Nr: PUB / 5241340 / 000 / 00

5
h
d
f
h
ef
d
0
T
max
h
nom
h
1
d
h
h
l
d
o
t
fix
T
inst
Rz.HAS
h
min
=
h
0
≤20d
d
G
G
K
HI
PLQPD[
7
PD[
G
I
K
PLQ
>PP@ >PP@
>1P@
>PP@ >PP@
K
HI
0
0
K
HI
G
0
0
0
0
G
G
K
HI
7
PD[
G
I
K
PLQ
>PP@ >PP@ >1P@ >PP@ >PP@
0
0
0
0
>PP@
>PP@
G
G
K
HI
PLQPD[
K
PLQ
>PP@ >PP@ >PP@
K
HI
K
HI
G
>PP@
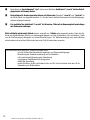
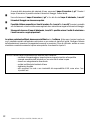
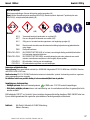
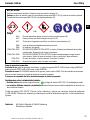
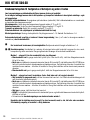
Setting Details of Hilti HIT-RE 500-SD with threaded rod
Table 2: HIT-V
Printed: 30.07.2015 | Doc-Nr: PUB / 5241340 / 000 / 00

Hilti HIT-RE 500-SD
6
G
G
K
HI
PLQPD[
7
PD[
G
I
K
PLQ
>PP@ >PP@
>1P@
>PP@ >PP@
K
HI
0
0
K
HI
G
0
0
0
0
G
G
K
HI
7
PD[
G
I
K
PLQ
>PP@ >PP@ >1P@ >PP@ >PP@
0
0
0
0
>PP@
>PP@
G
G
K
HI
PLQPD[
K
PLQ
>PP@ >PP@ >PP@
K
HI
K
HI
G
>PP@
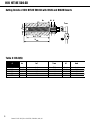
Setting Details of Hilti HIT-RE 500-SD with HIS-N and HIS-RN Inserts
Rz.HIS-N
h
ef
=
h
0
h
min
h
s
d
f
d
0
d
T
max
Table 3: HIS-R(N)
Printed: 30.07.2015 | Doc-Nr: PUB / 5241340 / 000 / 00

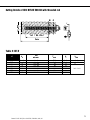
7
d
l
b
0
d
h
ef
=
h
0
h
min
≤20d
G
G
K
HI
PLQPD[
7
PD[
G
I
K
PLQ
>PP@ >PP@
>1P@
>PP@ >PP@
K
HI
0
0
K
HI
G
0
0
0
0
G
G
K
HI
7
PD[
G
I
K
PLQ
>PP@ >PP@ >1P@ >PP@ >PP@
0
0
0
0
0
>PP@
>PP@
G
G
K
HI
PLQPD[
K
PLQ
>PP@ >PP@ >PP@
K
HI
K
HI
G
>PP@
Setting Details of Hilti HIT-RE 500-SD with reinforcement bars
Table 4
Printed: 30.07.2015 | Doc-Nr: PUB / 5241340 / 000 / 00

Hilti HIT-RE 500-SD
8
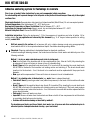
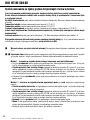
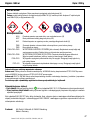
Adhesive anchoring system for fastenings in concrete
Prior to use of product follow instructions for use and recommended safety precautions.
For safe handling and to prevent damage to the foil packs on the jobsite store and transport them only in the original
cardboard box.
Check expiration date: See expiration date imprint on foilpack manifold (Month/Year). Do not use expired product.
Foil pack temperature: Must be between 5°C – 40°C during use.
Base material temperature at time of installation: Must be between 5°C – 40°C.
Instructions for transport and storage: Keep in a cool, dry and dark place between 5°C – 25°C.
Material Safety Data Sheet: Review the MSDS before use.
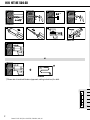
Installation instructions: Follow the pictograms 1-13 for the sequence of operations and refer to tables 1-4 for
setting details. For any application not covered by this document (e.g. “h ef” beyond values specied in setting
details), contact Hilti.
1
Drill hole normal to the surface with a hammer drill set in rotation-hammer mode using an appropriately
sized carbide drill bit to the required embedment depth. See tables describing setting details.
2
-
4
Clean hole: Cleaning method has to be decided based on borehole conditions.
Just before setting a fastening element, the borehole must be free of dust, water and debris by one of the
following methods:
Method 1 - for dry or water saturated concrete (refer to pictograms):
• Blow from the back of the borehole with oil-free compressed air (min. 6 bar at 6 m³/h) fully retracting the
air extension 2 times until return air stream is free of noticeable dust.
• Brush 2 times with the specied brush size (brush Ø ≥ bore hole Ø) by inserting the round steel brush
Hilti HIT-RB to the back of the borehole in a twisting motion and removing it. The brush should resist
insertion into the borehole - if not, the brush is too small and must be replaced with the proper brush
diameter.
• Blow again with compressed air 2 times until return air stream is free of noticeable dust.
Method 2 - for standing water in the boreholes (e.g. water ows in cleaned borehole):
• Flush hole 2 times by inserting a water hose (water-line pressure) to the back of the borehole until water
runs clear.
• Brush 2 times with the specied brush size (brush Ø ≥ borehole Ø) by inserting the round steel brush
Hilti HIT-RB to the back of the borehole with a twisting motion and removing it. The brush must produce
natural resistance as it enters the borehole - if not, the brush is too small and must be replaced with the
proper brush diameter.
• Flush again 2 times until water runs clear.
• Important! Remove all water from the borehole and blow out with oil free compressed air until borehole
is completely dried before mortar injection.
• Continue with borehole cleaning as described by method 1.
The boreholes must be dry and free of debris, dust, water, ice, oil, grease and other contaminants prior to
adhesive injection. Inadequate borehole cleaning = poor load values
Printed: 30.07.2015 | Doc-Nr: PUB / 5241340 / 000 / 00

9
5
Insert foil pack in foil pack holder. Attention! Check foil packs and foil pack holder for proper functioning
or damage - especially after they have been dropped. Dropping foil packs, also foil packs already inserted
into the foil pack holder, is likely to cause damage leading to mal function. Never use damaged foil packs
and/or damaged or unclean foil pack holders.
6
Tightly attach Hilti HIT-RE-M mixer to foil pack manifold. Attach new mixer prior to dispensing a new foil
pack (snug t). Do not modify the mixer in any way. Make sure the mixing element is in the mixer. Use
only the type of mixer supplied with the adhesive.
7
Insert foil pack holder with foil pack into HIT-dispenser P 8000 D.
8
Discard initial adhesive. The foil pack opens automatically as dispensing is initiated. The mortar initially
dispensed from the mixer must not be used for making fastenings and has to be discarded. Do this by
pulling the empty outer packaging over the mixer and holding it there to prevent mortar squirting out. Dis-
pense a quantity of approx. 65 ml (quantity corresponds to a cylindrical shape of approx. 50 mm diameter
and height of 35 mm) into the bag and dispose of this. The foilpack opens automatically as dispensing is
initiated. If a new mixer is installed onto a previously-opened foil pack, the rst trigger pulls must also be
discarded as described above. For each new foil pack a new mixer must be used.
Caution! Never remove the mixer while the foil pack system is under pressure.
9
Inject adhesive from the back of the borehole without forming air voids:
Verify if borehole conditions have changed (e.g. water in the borehole) after cleaning. If yes, repeat cleaning
according points 2 - 4.
• Inject the adhesive starting at the back of the borehole (use the extension for deep boreholes), press
the dispenser trigger in variable speed regulation mode and slowly withdraw the mixer as mortar is
dispensed.Fill holes approximately 2/3 full, or as required to ensure that the annular gap between the
fastening element and the concrete is completely lled with adhesive along the embedment length.
• Piston plug injection - is recommended for borehole depth > 250 mm. For overhead installation the
injection is only possible with aid of piston plugs Hilti HIT-SZ.
Assemble HIT-RE-M mixer, extension(s) and appropriately sized piston plug HIT-SZ. Insert piston plug to
back of the borehole and inject adhesive as described in the injection method above. During injection the
piston plug will be naturally extruded out of the borehole by the adhesive pressure.
10
Insert fastening element into borehole. Mark and set fastening element to the required embedment depth
“h ef”. Before use, verify that the fastening element is dry and free of oil and other contaminants. To ease
installation, the fastening element may be slowly twisted as they are inserted. After installing a fastening
element, the annular gap must be completely lled with adhesive.
Attention! For overhead applications take special care when inserting the fastening element. Excess ad-
hesive will be forced out of the borehole - take appropriate steps to prevent it from falling onto the installer.
Position the fastening element and secure it from moving/falling during the curing time (e.g. wedges).
Observe the gel time “t gel”, which varies according to temperature of base material. Minor adjustments
to the fastening element position may be performed during the gel time. See table.
11
Do not disturb the fastening element once the gel time “t gel” has elapsed until “t cure,ini” has passed.
en
de
fr
it
es
pt
nl
el
tk
zh
ko
ar
ms
vn
th
Printed: 30.07.2015 | Doc-Nr: PUB / 5241340 / 000 / 00

10
Hilti accepts no liability for damage or failure caused by:
- Storage and transport not in accordance with the specied conditions.
- Failure to observe the instructions for use and setting data.
- Inadequate design of the anchor points (number of anchors, loadbearing capacity / dimensions).
- Inadequate loadbearing capacity of the base material.
- Incorrect use.
- Other inuences of which Hilti is not aware or on which Hilti has no inuence, e.g. use with
products from a third party.
Partly used foil packs must be used up within one week. Leave the mixer attached to the foil pack manifold in the
dispenser and do not retract the pistons! Remove the air pressure hose and store under the recommended storage
conditions. If reused, attach a new mixer and discard the initial quantity of anchor adhesive as described by point 8.
12
Preparation work may continue for rebar applications. Between “t cure,ini” and “t cure,full” the adhesive
has a limited load bearing capacity, do not apply a torque or load on the fastening element during this time.
13
Apply load/torque after ” t cure,full” has passed, and the xture to be attached has been positioned.
Printed: 30.07.2015 | Doc-Nr: PUB / 5241340 / 000 / 00

11
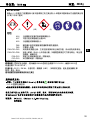
Hilti HIT-RE 500
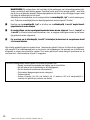
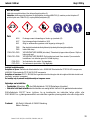
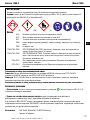
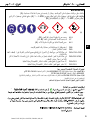
Contains epoxy constituents. May produce an allergic reaction.(A)
Contains: reaction product: bisphenol-A-(epichlorhydrin) epoxy resin MW ≤ 700 (A), reaction product: bisphenol-F
epichlorhydrin resin MW≤700 (A), m-xylenediamine,(B)
(B) (A,B) (A)
Danger
H314 Causes severe skin burns and eye damage.(B)
H317 May cause an allergic skin reaction.(A,B)
H411 Toxic to aquatic life with long lasting effects.(A)
P280 Wear protective gloves/protective clothing/eye protection/face protection.
P260 Do not breathe vapours.
P303+P361+P353 IF ON SKIN (or hair): Remove/Take off immediately all contaminated clothing. Rinse skin
with water/shower.
P305+P351+P338 IF IN EYES: Rinse cautiously with water for several minutes. Remove contact lenses, if
present and easy to do. Continue rinsing.
P333+P313 If skin irritation or rash occurs: Get medical advice/attention.
P337+P313 If eye irritation persists: Get medical advice/attention.
Recommended protective equipment:
Eye protection: Tightly sealed safety glasses e.g.: #02065449 Safety glasses PP EY-CA NCH clear;
#02065591 Goggles PP EY-HA R HC/AF clear;
Protective gloves: EN 374 / EN 388; Material of gloves: Nitrile rubber, NBR
Avoid direct contact with the chemical/ the product/ the preparation by organizational measures.
Final selection of appropriate protective equipment is in the responsibility of the user
Disposal considerations:
- Empty packs: May be disposed via the local Green Dot collecting system
or EAK waste material code 15 01
02 plastic packaging
- Full or only partially emptied packs must be disposed of as special waste in accordance with ofcial regulations.
EAK waste material code: 200127* paint, inks, adhesives and resins containing dangerous substances.
Or EAK 080409* waste adhesives and sealants containing organic solvents or other dangerous substances.
Manufacturer: Hilti GmbH, Hiltistrasse 6; D-86916 Kaufering;
Made in Germany
Net contents: 1400 ml Net weight: 2038 g
en
de
fr
it
es
pt
nl
el
tk
zh
ko
ar
ms
vn
th
Printed: 30.07.2015 | Doc-Nr: PUB / 5241340 / 000 / 00

Hilti HIT-RE 500-SD
12
Verbundmörtelsystem für Betoneisen- und Dübelbefestigungen in Beton
Vor Anwendung des Produktes diese Gebrauchsanweisung und die Sicherheitsvorschriften lesen.
Um Beschädigungen am Gebinde zu vermeiden, auch auf der Baustelle die Gebinde nur im Originalkarton lagern
und transportieren.
Haltbarkeitsdatum prüfen: siehe Aufdruck auf dem Foliengebinde (Monat/Jahr). Produkt darf nach Ablauf des Halt-
barkeitsdatums nicht mehr verwendet werden.
Gebindetemperatur: muss bei der Anwendung zwischen 5 °C – 40 °C betragen.
Untergrundtemperatur: muss bei der Anwendung zwischen 5 °C – 40 °C betragen.
Transport und Lagerung: kühl, trocken und dunkel, zwischen 5 °C – 25 °C.
Sicherheitsdatenblatt: Informationen aus dem Sicherheitsdatenblatt vor der Anwendung beachten!
Montageanweisung: Darstellung der Arbeitsschritte: siehe Piktogramme 1–13; Setzdaten: siehe Tabellen 1–4.
Bei Anwendungen, die in vorliegender Gebrauchsanweisung nicht beschrieben werden (z. B. “hef” außerhalb der in
den Setzdaten spezizierten Werte), wenden Sie sich bitte an Hilti.
Bohrloch mit Bohrhammer drehschlagend erstellen. Detaillierte Setzdaten siehe Tabellen 1–4.
Bohrlochreinigung: Unmittelbar vor dem Setzen des Betoneisens / Dübels ist das Bohrloch von Staub,
Wasser, Bohrklein und anderen Verunreinigungen zu reinigen. Die Reinigungsmethode hängt von der
Bohrlochbeschaffenheit ab:
Methode 1 – geeignet für trockenen oder wassergesättigten Beton (siehe Piktogramme):
• Bohrloch zweimal mit ölfreier Druckluft ausblasen (min. 6 bar bei 6 m³/h) bis rückströmende Luft staubfrei
ist.
• Zweimal ausbürsten mit Stahlbürste in passender Größe (Bürste Ø ≥ Bohrloch Ø), wobei die Stahlbürste
Hilti HIT-RB mit einer Drehbewegung in das Bohrloch bis zum Bohrlochgrund eingeführt und wieder her-
ausgezogen wird. Beim Einführen der Bürste in das Bohrloch sollte ein Widerstand zu spüren sein – falls
nicht, ist die Bürste zu klein und muss durch eine Bürste mit geeignetem Durchmesser ersetzt werden.
• Bohrloch erneut zweimal mit Druckluft ausblasen, bis rückströmende Luft staubfrei ist.
Methode 2 – geeignet bei stehendem Wasser in Bohrlöchern (Bsp.: Wasser ießt in gereinigtes Bohrloch):
• Bohrloch zweimal mit Wasser spülen, bis klares Wasser ausießt – hierzu Wasserschlauch bis zum
Bohrlochgrund einführen (Wasserleitungsdruck).
• Zweimal ausbürsten mit Stahlbürste in passender Größe (Bürste Ø ≥ Bohrloch Ø), wobei die Stahlbürste
Hilti HIT-RB mit einer Drehbewegung in das Bohrloch bis zum Bohrlochgrund eingeführt und wieder her-
ausgezogen wird. Beim Einführen der Bürste in das Bohrloch sollte ein Widerstand zu spüren sein – falls
nicht, ist die Bürste zu klein und muss durch eine Bürste mit geeignetem Durchmesser ersetzt werden.
• Bohrloch erneut zweimal spülen, bis klares Wasser abläuft.
• Wichtig! Vor dem Verfüllen mit Mörtel das Wasser aus dem Bohrloch entfernen und mit ölfreier Druckluft
ausblasen, bis es vollständig trocken ist.
• Danach Bohrlochreinigung wie in Methode 1 beschrieben fortsetzen.
Vor der Injektion müssen die Bohrlöcher trocken und frei sein von Bohrklein, Staub, Wasser, Eis, Öl, Fett oder
anderen Verunreinigungen. Unzureichende Bohrlochreinigung = schlechte Haltewerte
–
Printed: 30.07.2015 | Doc-Nr: PUB / 5241340 / 000 / 00

13
Foliengebinde in Kassette einschieben. Vorsicht! Kontrollieren, ob das Foliengebinde und die Kasette un-
beschädigt sind – insbesondere, nachdem sie heruntergefallen sind! Heruntergefallene Gebinde, auch
wenn sie bereits in der Kasette eingelegt waren, können zu Fehlfunktionen führen. Niemals beschädigte
Foliengebinde und/oder beschädigte oder verschmutzte Kassetten verwenden.
Hilti HIT-RE-M Mischer fest auf Foliengebinde aufschrauben. Vor Auspressen eines neuen Foliengebindes
neuen Mischer aufschrauben (auf festen Sitz achten). Den Mischer unter keinen Umständen verändern.
Sicher stellen, dass sich das Mischelement im Mischer bendet. Ausschließlich den mit dem Mörtel ge-
lieferten Mischertyp verwenden.
Kassette mit dem Foliengebinde in das HIT-Auspressgerät HIT-P 8000 D einlegen.
Mörtelvorlauf verwerfen. Der am Anfang aus dem Mischer austretende Mörtelvorlauf darf nicht für Befesti-
gungen verwendet werden. Dazu die leere Überverpackung über den Mischer streifen und festhalten, um
Spritzen zu vermeiden. Eine Vorlaufmenge von ca. 65 ml in den Beutel geben und entsorgen (entspricht
etwa einem Mörtelzylinder mit Durchmesser ca. 50 mm und Höhe 35 mm). Das Öffnen der Foliengebinde
erfolgt automatisch bei Auspressbeginn. Wird ein neuer Mischer auf ein bereits geöffnetes Foliengebinde
aufgeschraubt, muss der Vorlauf ebenfalls – wie oben beschrieben – verworfen werden. Für jedes neue
Foliengebinde einen neuen Mischer verwenden.
Vorsicht! Niemals den Mischer abschrauben, wenn das System unter Druck steht.
Das Bohrloch luftblasenfrei mit Mörtel verfüllen:
Prüfen, ob sich die Bohrlochbeschaffenheit nach Reinigung verändert hat (Bsp.: Wasser im Bohr loch). Falls
ja, Wiederholung der Reinigung gemäß den Schritten 2 – 4.
• Verfüllung des Bohrlochs vom Bohrlochgrund her (bei tiefen Bohrlöchern Verlängerung verwenden).
Volumendosierung am Gerät passend auf das Bohrlochvolumen einstellen und während der Injektion
das Gerät langsam aus dem Bohrloch zurückziehen. Das Bohrloch zu ca. 2/3 verfüllen.
• Bohrlochverfüllung mit Stauzapfen: Empfohlen für Bohrlochtiefen > 250 mm. Bohrlochverfül- lungen
senkrecht nach oben (Überkopf) sind ausschließlich mit Hilfe der Stauzapfen Hilti HIT-SZ möglich.
Den HIT-RE-M Mischer, Verlängerung(en) und passenden HIT-SZ Stauzapfen zusammenstecken. Stau-
zapfen bis zum Bohrlochgrund in das Bohrloch stecken und Mörtel wie oben beschrieben injizieren.
Während des Verfüllens wird der Stauzapfen durch den Druck des eingespritzten Mörtels automatisch
aus dem Bohrloch herausgedrückt.
Das Befestigungselement (Betoneisen / Dübel) in das Bohrloch einführen. Verankerungstiefe “h ef“ am
Befestigungselement markieren und bis zur Markierung einführen. Darauf achten, daß das Befestigungs-
element trocken und frei von Öl oder anderen Verunreinigungen ist. Nach Einführen des Befestigungsele-
mentes muss der Ringspalt vollständig mit Mörtel ausgefüllt sein.
Warnung! Bei Überkopfmontage ist beim Einführen des Befestigungselementes besondere Vorsicht ge-
boten. Überschüssiger Mörtel wird aus dem Bohrloch herausgedrückt – es ist darauf zu achten, dass
dieser nicht auf den Anwender tropft. Das Befestigungselement ausrichten und z. B. mit Keilen sichern,
damit es während der Aushärtezeit nicht herausfällt.
Je nach Untergrundtemperatur die Verarbeitungszeit “t gel“ beachten. Während der Verarbeitungszeit ist
ein Ausrichten des Befestigungselementes möglich. Siehe Tabelle.
en
de
fr
it
es
pt
nl
el
tk
zh
ko
ar
ms
vn
th
Printed: 30.07.2015 | Doc-Nr: PUB / 5241340 / 000 / 00

14
Hilti übernimmt keine Haftung für Schäden verursacht durch:
- von den Vorschriften abweichende Lagerungs- und Transportbedingungen
- Missachtung der Gebrauchsanweisung und der Setzdaten
- nicht ausreichende Bemessung der Verankerung
- ungenügende Tragfähigkeit des Untergrundes
- fehlerhafte Anwendung
- andere Einüsse, die Hilti nicht bekannt oder von Hilti nicht zu vertreten sind, wie z.B. die
Verwendung von Drittprodukten
Nach Ablauf der Verarbeitungszeit “t gel” und bis zum Ablauf der Aushärtezeit “t cure,ini” darf das Befesti-
gungselement nicht bewegt werden.
Vorbereitungen für Bewehrungsarbeiten können getroffen werden. Zwischen “t cure,ini” und “tcure,full” ist
der Mörtel jedoch nur begrenzt belastbar, d. h. es darf keine Last/kein Drehmoment auf das Befesti gungs -
element aufgebracht werden.
Erst nach Ablauf der Aushärtezeit “t cure,full” die Betoneisen /Dübel mit der Bemessungslast beaufschlagen
oder Drehmoment aufbringen.
Nicht vollständig aufgebrauchte Gebinde müssen innerhalb von 1 Woche weiterverwendet werden. Dazu das Ge-
binde mit aufgeschraubtem Mischer im Auspressgerät belassen und den Druckkolben nicht zurückfahren. Gerät
von der Druckversorgung abkoppeln und vorschriftsmäßig lagern. Vor Weiterverwendung einen neuen Mischer
aufschrauben und erneut den Mörtelvorlauf wie unter Punkt 8 beschrieben verwerfen.
Printed: 30.07.2015 | Doc-Nr: PUB / 5241340 / 000 / 00

15
Hilti HIT-RE 500
Enthält epoxidhaltige Verbindungen. Kann allergische Reaktionen hervorrufen.(A)
Enthält: Reaktionsprodukt: Bisphenol-A-Epichlorhydrinharze MW ≤ 700 (A), Reaktionsprodukt: Bisphenol-F
Epichlorhydrin-harze MW ≤700 (A); m-Xylylendiamin (B)
(B) (A,B) (A)
Gefahr
H314 Verursacht schwere Verätzungen der Haut und schwere Augenschäden.(B)
H317 Kann allergische Hautreaktionen verursachen.(A,B)
H411 Giftig für Wasserorganismen, mit langfristiger Wirkung.(A)
P280 Schutzhandschuhe/Schutzkleidung/Augenschutz/Gesichtsschutz tragen.
P260 Dampf nicht einatmen.
P303+P361+P353 BEI KONTAKT MIT DER HAUT (oder dem Haar): Alle beschmutzten, getränkten Kleidungs-
stücke sofort ausziehen. Haut mit Wasser abwaschen/duschen.
P305+P351+P338 BEI KONTAKT MIT DEN AUGEN: Einige Minuten lang behutsam mit Wasser spülen.
Vorhandene Kontaktlinsen nach Möglichkeit entfernen. Weiter spülen.
P333+P313 Bei Hautreizung oder -ausschlag: Ärztlichen Rat einholen/ärztliche Hilfe hinzuziehen.
P337+P313 Bei anhaltender Augenreizung: Ärztlichen Rat einholen/ärztliche Hilfe hinzuziehen
Empfehlung zur persönlichen Schutzausrüstung
Augenschutz: Dichtschließende Schutzbrille z.B.: #02065449 Sicherheitsbrille PP EY-CA NCH klar;
#2065591 Schutzbrille PP EY-HA R HC/AF klar;
Handschutz: EN 374 / EN 388; Ein Direktkontakt mit der Chemikalie / dem Produkt / der Zubereitung
ist durch organisatorische Maßnahmen zu vermeiden.
Die endgültige Auswahl der geeigneten Schutzausrüstung liegt in der Verantwortung des Anwenders.
Hinweis zur Entsorgung:
- Entleerte Gebinde: Duales System Deutschland DSD
oder EAK-Abfallcode: 15 01 02 Verpackungen aus
Kunststoff.
- Volle/teilentleerte Gebinde sind unter Beachtung der behördlichen Vorschriften als Sonderabfall zu entsorgen.
EAK-Abfallcode: 200127* Farben, Druckfarben, Klebstoffe und Kunstharze, die gefährliche Stoffe enthalten. oder
EAK- 080409* Klebstoff- und Dichtmassenabfälle, die organische Lösemittel oder andere gefährliche Stoffe ent-
halten
Hersteller: Hilti GmbH, Hiltistraße 6; D-86916 Kaufering;
Made in Germany
Inhalt: 1400 ml Gewicht: 2038 g
en
de
fr
it
es
pt
nl
el
tk
zh
ko
ar
ms
vn
th
Printed: 30.07.2015 | Doc-Nr: PUB / 5241340 / 000 / 00

Hilti HIT-RE 500-SD
16
Système de mortier de scellement pour ancrage de chevilles et d‘armatures dans
le béton
Avant d‘utiliser le produit, bien lire le présent mode d‘emploi ainsi que les directives de sécurité.
Pour éviter toute détérioration des cartouches, toujours stocker et transporter les cartouches dans leur carton
d‘origine, même sur le chantier!
Contrôler la date de péremption : voir la date imprimée sur la cartouche souple (mois/année). Ne plus
utiliser un produit dont la date de péremption est dépassée.
Température des cartouches: lors de l‘utilisation, elle doit être comprise entre 5 °C–40 °C.
Température du matériau support: lors de l‘utilisation, elle doit être comprise entre 5 °C–40 °C.
Transport et stockage: dans un endroit frais, au sec et à l‘abri de la lumière, à des températures comprises entre
5 °C–25 °C.
Données de sécurité: Lire attentivement la che de données de sécurité avant utilisation!
Instructions de montage: Illustration des étapes de travail: voir pictogrammes de 1 à 13; Données de pose: voir
les tableaux de 1 à 4.
En cas d‘applications non décrites dans le présent mode d‘emploi, (par ex. „hef“ hors des valeurs spéciées dans
les données de pose), veuillez vous adresser à Hilti.
Percer le trou à l‘aide d‘un marteau perforateur en mode percussion. Pour les données de pose détaillées,
voir les tableaux de 1 à 4.
Nettoyage du trou: Juste avant de placer la cheville / l‘armature pour béton, nettoyer le trou foré an
d‘éliminer poussières, eau, déblais de forage et autres salissures. La méthode de nettoyage dépend de
l‘état du trou foré:
Méthode1 – convient pour le béton sec ou saturé d’eau (voir pictogrammes):
• Soufer deux fois le trou foré avec de l’air comprimé exempt d‘huile (min. 6 bars à 6 m³/h) jusqu’à ce que
l‘air sortant soit exempt de toute poussière.
• Brosser deux fois avec une brosse métallique de taille appropriée (brosse Ø ≥ trou foré Ø), en introdu-
isant la brosse métallique Hilti HIT-RB en la tournant jusqu‘au fond du trou foré avant de la retirer. En
introduisant la brosse dans le trou foré, une certaine résistance devrait être perceptible – si tel n‘est pas
le cas, cela signie que la brosse est trop petite et qu‘elle doit être remplacée par une brosse au diamètre
approprié.
• Soufer à nouveau deux fois le trou foré avec de l’air comprimé, jusqu’à ce que l‘air sortant soit exempt
de toute poussière.
Méthode2 – convient en cas d‘eau stagnante dans les trous de perçage (ex.: de l‘eau coule dans un trou
foré nettoyé):
• Rincer deux fois le trou foré à l‘eau, jusqu‘à ce que de l‘eau claire ressorte – pour ce faire, introduire le
exible à eau jusqu‘au fond du trou (pression de conduite d‘eau).
• Brosser deux fois avec une brosse métallique d‘une taille appropriée (brosse Ø ≥ trou foré Ø), en introdu-
isant la brosse métallique Hilti HIT-RB en la tournant dans le trou foré jusqu‘au fond du trou avant de la
retirer. En introduisant la brosse dans le trou foré, une certaine résistance devrait être perceptible – si tel
n‘est pas le cas, cela signie que la brosse est trop petite et qu‘elle doit être remplacée par une brosse
au diamètre approprié.
–
Printed: 30.07.2015 | Doc-Nr: PUB / 5241340 / 000 / 00

17
• Rincer à nouveau deux fois le trou foré à l‘eau jusqu‘à ce que de l‘eau claire ressorte.
• Important! Avant de remplir de mortier, évacuer l’eau du trou foré et le soufer avec de l’air comprimé
exempt d’huile jusqu’à ce qu’il soit entièrement sec.
•Procéder ensuite au nettoyage du trou foré selon la méthode1 décrite précédemment.
Avant de procéder à l’injection, s’assurer que le trou foré est exempt de déblais de perçage, poussières,
eau, glace, huile, graisse ou autres contaminants.
Nettoyage de trous insufsant = mauvaise xation
Insérer la cartouche souple dans le porte-cartouches. Attention! Vérier que la cartouche souple et le
porte-cartouches ne sont pas endommagés – en particulier, s‘ils sont tombés! Les cartouches qui sont
tombées, même si elles avaient déjà été placées dans le porte-cartouches, risquent de provoquer des
dysfonctionnements. Ne jamais utiliser de cartouches souples endommagées ni de porte-cartouches
endommagés ou très encrassés.
Visser la buse mélangeuse Hilti HIT-RE-M fermement sur la cartouche souple. Avant d‘entamer l‘extrusion à
partir d‘une nouvelle cartouche souple, visser une nouvelle buse mélangeuse (en vériant qu‘elle est bien
en place). Ne modier la buse mélangeuse en aucun cas. S‘assurer que le bec mélangeur se trouve dans
la buse mélangeuse. Utiliser exclusivement le type de buse fourni avec le mortier.
Insérer le porte-cartouches avec la cartouche souple dans le pistolet à injecter HIT-P 8000 D.
Jeter le premier mortier extrudé. Le mortier extrudé sortant du mélangeur lors des premières pressions ne
doit pas être utilisé pour les xations. Pour ce faire, racler le suremballage vide sur l‘embout mélangeur en
le tenant pour éviter d‘extruder. Extruder une quantité de premier mortier de 65ml environ dans la poche
puis la jeter (l‘équivalent à un cylindre de mortier de 50mm de diamètre et de 35mm hauteur environ).
La cartouche s‘ouvre d‘elle-même au début de l‘extrusion. Si une nouvelle buse mélangeuse est vissée
sur une cartouche souple déjà ouverte, le premier mortier extrudé doit également être jeté, comme décrit
précédemment.Utiliser une nouvelle buse mélangeuse pour chaque cartouche souple neuve.
Attention! Ne jamais dévisser la buse mélangeuse lorsque le système est sous pression.
Remplir le trou avec le mortier sans laisser de bulles d‘air:
Vérier que l‘état du trou foré n‘a pas changé après le nettoyage (ex.: présence d‘eau dans le trou foré).
Si tel est le cas, répéter le nettoyage conformément aux étapes 2–4.
• Remplissage du trou foré à partir du fond du trou (dans le cas de trous forés profonds, utiliser une ral-
longe). Ajuster le dosage sur l‘appareil en fonction du volume du trou foré et retirer lentement l‘appareil
du trou foré pendant le remplissage. Remplir le trou foré environ aux 2/3.
• Remplissage du trou foré à l‘aide d‘embout d‘injection: recommandé pour des profondeurs de trou
foré > 250 mm. Les remplissages de trou foré à la verticale vers le haut (applications au plafond) sont
uniquement possibles si un embout d‘injection Hilti HIT-SZ est utilisé.
Assembler la buse mélangeuse HIT-RE-M, la / les rallonge(s) et l‘embout d‘injection HIT-SZ corres-
pondant. Introduire l‘embout d‘injection jusqu‘au fond du trou foré et injecter le mortier comme décrit
précédemment. Lors du remplissage, l‘embout d‘injection est automatiquement repoussé hors du trou
foré sous l‘effet de la pression du mortier injecté.
en
de
fr
it
es
pt
nl
el
tk
zh
ko
ar
ms
vn
th
Printed: 30.07.2015 | Doc-Nr: PUB / 5241340 / 000 / 00

18
Hilti rejette toute responsabilité en cas de dommages dus :
– à des conditions de stockage et de transport non conformes aux consignes
– au non-respect du mode d‘emploi et des données de pose
– à un dimensionnement insufsant de l‘ancrage
– à une capacité de charge insufsante du matériau support
– à une erreur d‘utilisation
– ou à tous autres facteurs non connus de Hilti ou indépendants de sa volonté, par exemple en
cas d‘utilisation de produits d‘autres marques
Introduire l‘élément de xation (armature pour béton / cheville) dans le trou foré. Marquer la profondeur
d‘ancrage „h ef“ sur l‘élément de xation et introduire celui-ci jusqu‘au repère. Veiller à ce que l‘élément de
xation est sec et exempt de toute trace d‘huile ou d‘autres contaminants. Après introduction de l‘élément
de xation, l‘espace annulaire doit être complètement rempli de mortier.
Avertissement! Dans le cas d‘un montage au plafond, il est recommandé de redoubler d‘attention lors de
l‘introduction de l‘élément de xation. L‘excédent de mortier est repoussé hors du trou foré – veiller alors à
ce que celui-ci ne goutte pas sur l‘opérateur. S‘assurer que l‘élément de xation est dans la bonne position
et le bloquer par ex. au moyen de cales, pour éviter qu‘il ne tombe pendant le temps de durcissement.
Observer la durée pratique d’utilisation „t gel“ qui peut varier en fonction de la température du matériau
de base. Pendant la durée pratique d’utilisation, la position de l‘élément de xation peut être corrigée au
besoin. Voir tableau.
Une fois la durée pratique d’utilisation „t gel“ écoulée et jusqu‘à la n du temps de durcissement
„t cure,ini“, l‘élément de xation ne doit pas être bougé.
Des préparatifs pour des travaux d‘armature peuvent être entrepris. Le mortier a néanmoins une capacité
de charge limitée entre les temps „t cure,ini“ et „tcure,full“, c.-à-d. qu‘aucune charge ou aucun couple de
rotation ne doit alors être appliqué sur l‘élément de xation.
Ce n‘est qu‘une fois le temps de durcissement „t cure,full“ écoulé que l‘armature pour béton / cheville peut
être soumise à la charge assignée ou au couple de rotation.
Toute cartouche entamée doit être réutilisée dans un intervalle de 1 semaine. Pour ce faire, laisser la cartouche
souple avec l‘embout mélangeur vissé dans le pistolet à injecter et ne pas faire revenir en arrière le piston de com-
pression. Désolidariser l‘alimentation en pression et stocker conformément à la réglementation. Avant réutilisation,
visser une nouvelle buse mélangeuse et jeter à nouveau le mortier extrudé lors des premières pressions comme
décrit au point 8.
Printed: 30.07.2015 | Doc-Nr: PUB / 5241340 / 000 / 00

19
Hilti HIT-RE 500
Contient des composés époxydiques. Peut produire une réaction allergique.(A)
Contient: produit de réaction: bisphénol-A-épichlorhydrine resins époxydiques MW≤700 (A), produit de réaction:
bisphénol-F-épichlorhydrine resins époxydiques MW≤ 700 (A), m-phénylenebis(methylamine) (B)
(B) (A,B) (A)
Danger
H314 Provoque des brûlures de la peau et des lésions oculaires graves.(B)
H317 Peut provoquer une allergie cutanée.(A,B)
H411 Toxique pour les organismes aquatiques, entraîne des effets néfastes à long terme.(A)
P280 Porter des gants de protection/des vêtements de protection/un équipement de protection
des yeux/du visage.
P260 Ne pas respirer les vapeurs.
P303+P361+P353 EN CAS DE CONTACT AVEC LA PEAU (ou les cheveux): enlever immédiatement les
vêtements contaminés. Rincer la peau à l‘eau/se doucher.
P305+P351+P338 EN CAS DE CONTACT AVEC LES YEUX: rincer avec précaution à l‘eau pendant plusieurs
minutes. Enlever les lentilles de contact si la victime en porte et si elles peuvent être
facilement enlevées.Continuer à rincer.
P333+P313 En cas d‘irritation ou d‘éruption cutanée: consulter un médecin.
P337+P313 Si l‘irritation oculaire persiste: consulter un médecin.
Équipement de protection recommandé :
Protection des yeux : Lunettes de protection hermétiques p. ex. : réf. 02065449 Lunettes de sécurité PP EY-CA NCH
claires ; réf. 02065591 Masque de protection PP EY-HA R HC/AF clair ;
Protection des mains : EN 374 / EN 388 Éviter un contact direct avec le produit chimique / le produit / la préparation à
l‘aide de mesures d‘organisation.
Le choix nal de l‘équipement de protection adéquat relève de la seule responsabilité de l‘utilisateur.
Recyclage :
– Emballages vides : système de collecte national
ou code déchets EAK: 15 01 02 Emballages en plastique
– Emballages pleins / à moitié vides: déchets spéciaux – les apporter à un centre de collecte des matières
dangereuses conformément aux dispositions administratives.
Code déchets EAK : 200127* Peintures, encres d‘impression, colles et résines articielles, contenant des sub-
stances dangereuses. Ou EAK- 080409* Résidus de colles et composants pour joints, contenant des solvants
organiques ou d‘autres substances dangereuses.
Fabricant: Hilti GmbH, Hiltistraße 6; D-86916 Kaufering;
Fabriqué en Allemagne
Contenu : 1400 ml Poids: 2038 g
en
de
fr
it
es
pt
nl
el
tk
zh
ko
ar
ms
vn
th
Printed: 30.07.2015 | Doc-Nr: PUB / 5241340 / 000 / 00

Hilti HIT-RE 500-SD
20
Sistema di ancoraggio a resina per fissaggi dei tondini del calcestruzzo e dei
tasselli nel calcestruzzo
Prima di usare il prodotto, leggere le presenti istruzioni per l‘uso e le disposizioni di sicurezza.
Per evitare di danneggiare il prodotto, anche in cantiere, conservare e trasportare le cartucce esclusivamente nella
scatola di cartone originale.
Vericare la data di scadenza: vedere i dati riportati sulla cartuccia (mese/anno). Il prodotto, dopo la data di sca-
denza non può più essere usato.
Temperatura della cartuccia: per l‘applicazione, la temperatura deve essere compresa tra 5 °C–40 °C.
Temperatura del materiale di base: per l‘applicazione, la temperatura deve essere compresa tra 5°C–40°C.
Trasporto e stoccaggio: in luogo fresco, asciutto e buio, tra 5 °C–25 °C.
Scheda tecnica di sicurezza: prima dell‘uso, attenersi alle informazioni sulla scheda tecnica di sicurezza!
Istruzioni di montaggio: illustrazione delle fasi di lavoro: vedere i pittogrammi 1–13; Dati di messa in opera: vedere
tabelle 1–4.
In caso di impieghi diversi da quelli descritti sulle presenti Istruzioni per l‘uso (ad es. „hef“ al di fuori dei valori
specicati tra i dati di messa in opera), rivolgersi ad Hilti.
Eseguire un foro con il martello perforatore. Per i dati in dettaglio vedere le tabelle 1–4.
Pulizia del foro: appena prima dell‘inserimento del tondino del calcestruzzo/del tassello, occorre pulire il foro
da polvere, acqua, polvere di foratura e altre impurità. Il metodo di pulizia dipende dalle condizioni del foro:
Metodo 1 – adatto per calcestruzzo a secco o saturo d‘acqua (vedere i pittogrammi):
• Sofare due volte il foro con aria compressa priva di olio (min. 6 bar a 6 m³/h) nché l‘aria di ritorno non
è priva di polvere.
• Spazzolare due volte con spazzola d‘acciaio della grandezza adatta (spazzola Ø ≥ foro Ø), inlando la
spazzola in acciaio Hilti HIT-RB con un movimento rotatorio nel foro no in fondo, per poi estrarla nuo-
vamente. Introducendo la spazzola nel foro si deve percepire una certa resistenza; in caso contrario, la
spazzola è troppo piccola e deve essere sostituita con una spazzola con diametro adatto.
• Sofare nuovamente due volte il foro con aria compressa, nché l‘aria di ritorno non è completamente
priva di polvere.
Metodo 2 – adatto in caso di persistenza di acqua nei fori (ad es.: infiltrazione d‘acqua nel foro pulito):
• Lavare due volte il foro con acqua no alla fuoriuscita di acqua pulita, introducendo il tubo essibile
dell‘acqua no in fondo al foro (pressione del tubo dell‘acqua).
• Spazzolare due volte con spazzola d‘acciaio della grandezza adatta (spazzola Ø ≥ foro Ø), inlando la
spazzola in acciaio Hilti HIT-RB con un movimento rotatorio nel foro no in fondo, per poi estrarla nuo-
vamente. Introducendo la spazzola nel foro si deve percepire una certa resistenza; in caso contrario, la
spazzola è troppo piccola e deve essere sostituita con una spazzola con diametro adatto.
• Lavare nuovamente il foro due volte no alla fuoriuscita di acqua pulita.
• Importante! Prima di iniettare la resina, rimuovere l’acqua dal foro e sofare con aria compressa priva di
olio, nché il foro non risulti completamente asciutto.
• Successivamente continuare la pulizia del foro secondo il Metodo 1.
–
Printed: 30.07.2015 | Doc-Nr: PUB / 5241340 / 000 / 00
A página está carregando...
A página está carregando...
A página está carregando...
A página está carregando...
A página está carregando...
A página está carregando...
A página está carregando...
A página está carregando...
A página está carregando...
A página está carregando...
A página está carregando...
A página está carregando...
A página está carregando...
A página está carregando...
A página está carregando...
A página está carregando...
A página está carregando...
A página está carregando...
A página está carregando...
A página está carregando...
A página está carregando...
A página está carregando...
A página está carregando...
A página está carregando...
A página está carregando...
A página está carregando...
A página está carregando...
A página está carregando...
A página está carregando...
A página está carregando...
A página está carregando...
A página está carregando...
A página está carregando...
A página está carregando...
A página está carregando...
A página está carregando...
A página está carregando...
A página está carregando...
A página está carregando...
A página está carregando...
A página está carregando...
A página está carregando...
A página está carregando...
A página está carregando...
-
 1
1
-
 2
2
-
 3
3
-
 4
4
-
 5
5
-
 6
6
-
 7
7
-
 8
8
-
 9
9
-
 10
10
-
 11
11
-
 12
12
-
 13
13
-
 14
14
-
 15
15
-
 16
16
-
 17
17
-
 18
18
-
 19
19
-
 20
20
-
 21
21
-
 22
22
-
 23
23
-
 24
24
-
 25
25
-
 26
26
-
 27
27
-
 28
28
-
 29
29
-
 30
30
-
 31
31
-
 32
32
-
 33
33
-
 34
34
-
 35
35
-
 36
36
-
 37
37
-
 38
38
-
 39
39
-
 40
40
-
 41
41
-
 42
42
-
 43
43
-
 44
44
-
 45
45
-
 46
46
-
 47
47
-
 48
48
-
 49
49
-
 50
50
-
 51
51
-
 52
52
-
 53
53
-
 54
54
-
 55
55
-
 56
56
-
 57
57
-
 58
58
-
 59
59
-
 60
60
-
 61
61
-
 62
62
-
 63
63
-
 64
64


em outras línguas
- español: Hilti HIT-RE 500SD/1400 Guía del usuario
- français: Hilti HIT-RE 500SD/1400 Mode d'emploi
- italiano: Hilti HIT-RE 500SD/1400 Guida utente
- Nederlands: Hilti HIT-RE 500SD/1400 Gebruikershandleiding
- dansk: Hilti HIT-RE 500SD/1400 Brugervejledning
- polski: Hilti HIT-RE 500SD/1400 instrukcja
Artigos relacionados
-
Hilti MD 2000 / 2500 Instruções de operação
-
-
-
-
Hilti HIT-RE 500 Guia de usuario
-
-
-
-
-