
WLL180T-P/N432
WLL180T-P/N434 (red LED)
WLL180T-P/N474 (infrared-LED)
Connection type
Cable M8 4-pin
Control output NPN/PNP
open collector 100 mA/≤ 30 V DC resistive
Load current: ≤ 100 mA
Residual voltage ≤ 1.8 V
NPN/PNP
open collector 100 mA/≤ 30 V DC resistive
Load current: ≤ 100 mA
Residual voltage ≤ 1.8 V
Power source, voltag 12 ... 24 V DC ± 10 % incl. ripple
1)
12 ... 24 V DC ± 10 % incl. ripple
1)
Consumption current ≤ 50 mA/24 V ≤ 50 mA/24 V
Response time
16 µs/70 µs/250 µs/2 ms/8 ms 16 µs/70 µs/250 µs/2 ms/8 ms
Output method Light on/Dark on switching type in the function Light on/Dark on switching type in the function
Short-circuit protection
m m
Light source
Red LED Red LED: WLL180T-P/N434
Infrared-LED: WLL180T-P/N474
Indicator light/ Display Output indicator light: Orange (Q
1
) 7-segment 8-digit display Output indicator light: Orange (Q
1
) 7-segment 8-digit display
Sensitivity setting
Teach-in/Manual adjustment Teach-in/Manual adjustment
Timer function Switch-off delay, Switch-on delay, One shot, On/Off delay, One shot delay Switch-off delay, Switch-on delay, One shot, On/Off delay, One shot delay
Timer time
0,1 ms ... 9999 ms
0,1 ms ... 9999 ms
Setting input
External input setting (Teach-in/Test/Sync) External input setting (Teach-in/Test/Sync)
Operating temperature/humidity –25 ... +55 °C/35 ... 85% RF (No freezing and no condensation)
2)
–25 ... +55 °C/35 ... 85% RF (No freezing and no condensation)
2)
Store temperature/humidity
–40 ... +70 °C/35 ... 85% RF (No freezing and no condensation)
–40 ... +70 °C/35 ... 85% RF (No freezing and no condensation)
Shock resistance
10 ... 55 Hz amplitude 1.5 mm 2 hours for each direction x, y, z 10 ... 55 Hz amplitude 1.5 mm 2 hours for each direction x, y, z
Protective category IP 50
3)
IP 50
3)
Material
PC
PC
Weight
Cable type: 71 g, M8 connector type: 25 g Cable type: 71 g, M8 connector type: 25 g
1)
12 ... 24 V DC ± 10 %, class 2 power supply
2)
Max. ambient temperature: +55 °C
3)
UL enclosure type 1
1
2
3
9.2
(0.36)
37.3 (1.47)
7.7
(0.30)
51.9 (2.04)
10.5
(0.41)
33.2 (1.31)
2 – Ø 2.38
(0.08)
- Ø
(0.09)
8
(0.31)
18.8 (0.74)
27.8 (1.09)
10
(0.39)
7
(0.28)
Ø 4.2
(0.17)
55.4 (2.18)
4.3 (0.17)
34.6 (1.36)
5.7 (0.22)
68.9 (2.71)
3
(0.12)
16.1
(0.63)
Ø 8.6
(0.34)
3.55
(0.14)
10.4
(0.41)
Ø 8.6
(0.34)
8
(0.31)
3.55 (0.14)
G WLL180T
1 Open angle approx. 180°
2 Cable: Ø 3.8 4 wire 2 m
3 M8 4-pin connector
(Dimensions: mm)
1
2
1
2
2
4
5
3
1
1 Open fiber lock lever.
2 Insert fiber into holes to stop.
3 Return fiber lock lever until it stops.
4 Fiber cable
5 Insertion sign of fiber cable
C Attaching and Removing to/from DIN rail
D Interconnection E How to use ne ber
1
2
3
1 Fine fiber
2 Cut position
3 Adapter cap
F End unit
1
2
3
4
5
6
B Base unit
1 Output Indicator (orange)
2 Select button
3 Lock lever
4 Display
5 Mode button
6 Teach-in button
--------------------------------------------------- 8020725.126Z 1219 COMAT -----------------------------------------
English
WLL180T
A Input/Output Schematic
1
3
5
7
2
6
4
1
4
2
3
1 Brown: 12 ... 24 V DC
2 Load
3 Black: Control output
4 Main circuit
5 White: External input
6 Protection circuit
7 Blue: O V
NPN
PNP
1
4
2
3
1
3
5
7
2
6
4
1
2
3
4
1 12 ... 24 V DC
2 External input
3 O V
4 Control output
BZ int49
Detailed addresses and further locations at www.sick.com
Australia
Phone +61 (3) 9457 0600
1800 33 48 02 –
tollfree
Austria
Phone +43 (0) 2236 62288-0
Belgium/Luxembourg
Phone +32 (0) 2 466 55 66
Brazil
Phone +55 11 3215-4900
Canada
Phone +1 905.771.1444
Czech Republic
Phone +420 234 719 500
Chile
Phone +56 (2) 2274 7430
China
Phone +86 20 2882 3600
Denmark
Phone +45 45 82 64 00
Finland
Phone +358-9-25 15 800
France
Phone +33 1 64 62 35 00
Germany
Phone +49 (0) 2 11 53 010
Greece
Phone +30 210 6825100
Hong Kong
Phone +852 2153 6300
Hungary
Phone +36 1 371 2680
India
Phone +91-22-6119 8900
Israel
Phone +972 97110 11
Italy
Phone +39 02 27 43 41
Japan
Phone +81 3 5309 2112
Malaysia
Phone +603-8080 7425
Mexico
Phone +52 (472) 748 9451
Netherlands
Phone +31 (0) 30 229 25 44
New Zealand
Phone +64 9 415 0459
0800 222 278 – tollfree
Norway
Phone +47 67 81 50 00
Poland
Phone +48 22 539 41 00
Romania
Phone +40 356-17 11 20
Russia
Phone +7 495 283 09 90
Singapore
Phone +65 6744 3732
Slovakia
Phone +421 482 901 201
Slovenia
Phone +386 591 78849
South Africa
Phone +27 10 060 0550
South Korea
Phone +82 2 786 6321/4
Spain
Phone +34 93 480 31 00
Sweden
Phone +46 10 110 10 00
Switzerland
Phone +41 41 619 29 39
Taiwan
Phone +886-2-2375-6288
Thailand
Phone +66 2 645 0009
Turkey
Phone +90 (216) 528 50 00
United Arab Emirates
Phone +971 (0) 4 88 65 878
United Kingdom
Phone +44 (0)17278 31121
USA
Phone +1 800.325.7425
Vietnam
Phone +65 6744 3732
SICK AG, Erwin-Sick-Strasse 1, D-79183 Waldkirch
44VC
2006/42/EC
NO
SAFETY

4. Detailed setting
(Expert mode)
EPrt C
Moves to the detailed setting menu.
TOP
A
5. Initialization setting
(Initial reset)
Reset all settings to the factory default.
(Initial reset)
rSEt no C
Select by using and fix by .
The screen returns to the top of initialization
setting.
no
Not initialize
1)
yES
Initialize
TOP
6. End of setting
End C
Returns to the normal display.
B Each part
C Installation of amplier
Attaching and removing to/from DIN rail
Attachment of sensor unit:
1 Hook the claw on the connecting side of fiber cable to the DIN
rail.
2 Then press down the hook until it locks.
Removal of sensor unit:
1 Pushing the unit to the direction of the arrow.
2 Hold up the connecting side of fiber cable and remove the unit.
D How to connect the ber cables
‒ Open fiber lock lever (see 1).
‒ Insert fiber into holes to stop. (see 2 - approximately 15 mm).
‒ Return fiber lock lever until it stops (see 3).
a
Caution
When using a proximity variant with coaxial ber arrangement,
connect the core bers or bers with white marking to the
sender. Connect the second bers to the receiver.
A
Set the displayed value on the main monitor
to „0.“
4.1 Zero-reset setting
oFSt C
Select by using and fix by .
The screen returns to the top of zero reset
setting.
off
Turn off zero reset.
1)
on
Turn on zero reset.
TOP
4.2 Display setting
Select a display method of normal main sub
monitor.
diSP dig C
Select by using and fix by .
The screen returns to the top of display setting.
dig
Displayed in numeric display.
1)
bAr
Displayed in bar display.
Pct
Displayed in percent (%)
display.
4.3 Eco mode
Activate energy saving mode.
Eco off C
Select by using and fix by .
The screen returns to the top of eco mode
setting.
off
Deactivate energy saving
mode
1)
on
Activate energy saving mode
Nominal value display is switched off after 20
sec. to activate press any button.
TOP
4.4 Reverse display
Display is reversed.
turn off C
Select by using and fix by .
The screen returns to the top of reverse display
setting.
off
Normal display
1)
on
Display upside-down
TOP
4.5 Hysteresis setting
Select hysteresis.
HyS P5 C
Select by using and fix by .
for change of numbers and to fix. The
screen returns to the top of hysteresis setting.
TOP
P 5C
Hysteresis 1 … 40% from nominal value.
4.6 Input setting
Selection of input function
InPt C
Select by using and fix by .
TOP
Input
rtch
Ext. Teach-in
1)
tESt
Test input
Sync
Synchronization
The screen returns to the top of extern input
function setting.
4.7 ASC setting
Set up ASC (Automatic Sensitivity Control).
ASc oFF C
Select by using and fix by .
Return to the top of ASC setting.
oFF
Non-use of ASC
1)
on
Automatically adjust threshold
along with the surroundings.
TOP
TIP
Automatically set threshold even after sensors
are cleaned.
C
B
E How to use ne ber
Turn adapter cap anticlockwise completely, then appropriately insert
the fiber. Be locked by turning adapter cap clockwise (see 1).
Cut the excess fiber with fiber cutter.
Adjustment
1 1-Point Teach-in
Press Teach-in button for 3 s.
Select the 1-Point Teach-in.
1Pt C
Press Teach-in button
1Pt C
123C
The threshold flashes and the display
returns to normal.
2 2-Point Teach-in
Press Teach-in button for 3 s.
Select the 2-Point Teach-in.
2Pt 1Pt C
1. Point: Press the Teach-in button.
2Pt 1Pt C
2. Point: Press the Teach-in button.
2Pt 2Pt C
123C
The threshold flashes and the display
returns to normal.
C B
4.8 Floodlight power setting Light intensitiy can be chosen from the three
levels.
SPor
¦ ¦ ¦ ¦ ¦ ¦
Select by using and fix by .
Return to the top of floodlight power setting.
¦ ¦ ¦ ¦ ¦ ¦
Set on standard
1)
¦ ¦ ¦ ¦
Set in the middle power
¦ ¦
Set in the low power
TOP
TIP
Avoid saturation of the amount of light received.
4.9 Lock Level Key-lock level
LocL L1
Select by using and fix by .
Return to the top of lock level setting.
L1
All inputs locked
L2
All inputs locked, except
external input.
TOP
4.10 End of Detail Setting
(Expert mode)
End EPrt
Returns to the top of detail setting (Expert mode).
Precautions for function setting
‒
1)
means factory default setting
‒ Hold down the operation button for approx. 0.3 s if not especially
specified.
‒ The display ashes when the setting selection is available.
Returning to normal display with one button
Pressing the button for 2 s or more in setting a function returns to
normal display (RUN mode) without using the menu point End.
Key lock
Locks all inputs according to the selected Level in 4.9. Useful to
prevent accidental operation.
Hold down the
buttons for 2 s or more simultaneously in the
RUN mode. Operate in the same way to cancel as well.
In locking
When cancelled
Loc
300
unLc
300
SAM Circuit (ASC = Automatic Sensitivity Control)
Threshold value will be automatically reset as the sensor continuously
monitors returned light. Sudden change of returned light, like
cleaning of lens, will trigger reset of the best threshold computed in
the circuit (SAM circuit).
External Teach-in
The external teach-input must be activated for > 200 ms to perform
a teach-in (ET to > 10 V ... < U
V
for PNP devices; ET to 0 V for NPN
devices).
3 Auto Teach-in
Press Teach-in button for 3 s.
Select the auto Teach-in.
Auto StrtC
Start: Press the Teach-in button
Auto StrtC
End: Press the Teach-in button
Auto StoPC
123C
The threshold flashes and the display
returns to normal.
4 Zone Teach-in
Press Teach-in button for 3 s.
Select the zone Teach-in.
ZonE C
Press the Teach-in button.
ZonE C
ZonE goodC
The threshold flashes and the display
returns to normal.
5 Teach-in transparent object
Press Teach-in button for 3 s.
gLAS C
Press the Teach-in button.
gLAS C
gLAS goodC
The threshold flashes and the display
returns to normal.
Options
F End unit
BEF-EB01-W190
‒ Specifications and equipment are subject to change without any
obligations on the part of manufacture.
‒ For further information regarding configuration menue and
Teach-in function please take note of the application manual or
www.sick.com.
1 1-Point Teach-in
+10
%
1
1 Threshold
2 2-Point Teach-in
1
1.
2.
1 Threshold
3 Auto Teach-in
4 Zone Teach-in
10 %
10 %
1
7
3
6
5
4
2
2
5 Teach-in transparent objects
1
1 Reector
1 Near
2 Threshold
3 Upper limit
4 Sensing level
5 Zone
6 Lower limit
7 Far
English
Safety Precautions
Carefully read and understand the safety precautions before
operation. The important information is provided to protect your
health and property. Do not apply any other installing or operating
procedure other than that described in these operating instructions.
> It is dangerous to wire or attach/remove the connector with the
power on. Make sure to turn o the power before operation.
> Make sure to use the product with the protective cover attached
and closed.
> Installing in the following places may result in malfunction:
1. A dusty or steamy place.
2. A place generating corrosive gas.
3. A place directly receiving scattering water or oil.
4. A place suered from heavy vibration or impact.
> The product is not designed for outdoor use.
> This product is not an explosion-proof construction. Do not
use the product under ammable, explosive gas or liquid
environment.
> Do not use the product in water.
> Do not disassemble, repair, or convert the product. Failure to do
this may cause failure, fire, or electric shock.
> Operate within the rated range.
> Keep the packing box carefully.
> No safety component in accordance with EU machine guidelines.
a
This product must not be used as a safety device to protect
human body.
A Input/Output schematic
Manual adjustment
Pressing the select button ashes the threshold. It indicates that
adjustment is possible. Adjust to any value using the select buttons.
1 Normal
300 350
Automatically returns to the normal display 5 s after
completion of the setting (no operation).
Error display in Teach-in
An error message is displayed in the event of error during adjust-
ment. Refer to the table below for readjustment.
Err1
Err2
Err3
Sensing level is too low
Sensing level is saturated
Difference of sensing level between two points is too small
Function setting
Press the mode button for 3 s.
1. Operation setting Select an operation mode.
L––d L onC
Select by using and fix by .
The screen returns to the of operation setting.
Lon
ON when light comes in.
1)
don
OFF when light is blocked.
TOP
2. Response speed setting Select a response speed.
rESP LongC
Select by using and fix by .
The screen returns to the top of response
speed setting.
High
Fastest setting 16 μs
FASt
Fast setting 70 μs
Stnd
Standard setting 250 μs
1)
Long
High accuracy 2 ms
SuPr
Super long range 8 ms
TOP
3. Timer setting Select a timer and the time.
dELy C
Select by using and fix by .
OFF moves to the top of timer setting and others
move to the timer setting.
oFF
Timer off
1)
oFdy
Off delay
ondy
On delay
Shot
One shot
onoF
On/Off delay
onSh
One shot delay
TOP
Timer time setting 0,1 ... 9999
(0,1 ms ... 9999 ms)
is for time changing and is to fix.
Then the screen returns to timer setting top.
oFdy 0001C
Proximity variant:
Run teach-in on the background without
an object.
Through beam variant:
Perform adjustment when there is an object. The switching threshold is set to 10%
above the received light value.
Proximity variant:
1
st
step: set to an existing object.. 2
nd
step: set on the background without an
object.
Set the threshold at the center between
the 1st and 2nd point.
Through beam variant/Proximity variant
Start and End: Perform adjustment while
the object is passing.
Proximity variant:
Set to the existing object.
Set the zone (detection range) to ±10 %.
Reection variant:
Execute Teach-in without object.Use reector.
The switching threshold is set to 90% of the received light.
Through beam variant/Proximity variant:
Execute Teach-in without object.
The switching threshold is set to 90% of the received light.

1
2
3
9.2
(0.36)
37.3 (1.47)
7.7
(0.30)
51.9 (2.04)
10.5
(0.41)
33.2 (1.31)
2 – Ø 2.38
(0.08)
- Ø
(0.09)
8
(0.31)
18.8 (0.74)
27.8 (1.09)
10
(0.39)
7
(0.28)
Ø 4.2
(0.17)
55.4 (2.18)
4.3 (0.17)
34.6 (1.36)
5.7 (0.22)
68.9
(2.71)
3
(0.12)
16.1 (0.63)
Ø 8.6
(0.34)
3.55
(0.14)
10.4
(0.41)
Ø 8.6
(0.34)
8
(0.31)
3.55 (0.14)
1
2
3
4
5
6
B Basiseinheit
1 Ausgangsanzeige (orange)
2 Auswahl-Taste
3 Verriegelung Lichtleiter
4 Anzeige
5 Mode-Taste
6 Teach-in-Taste
1
2
1
2
2
4
5
3
1
1 Lichtleiter-Verriegelungönen.
2 LichtleiterinvorgeseheneÖnungenbiszumAnschlag
einführen.
3 Lichtleiter-Verriegelungschließen.
4 Lichtleiter
5 AnzeigeSender/Empfänger
C Anbringung auf/Entfernen von der Montageschiene
D Verbindung der Lichtleiter
E Einsatz von Lichtleitern mit schlanken Endhülsen
1
2
3
1 LichtleitermitschlankerEndhülse
2 Trennposition
3 Anpasskappe
F Endstück
G WLL180T
1 oenerWinkelca.180°
2 Kabel:Ø3,84Adern2m
3 SteckerM8,4-polig
WLL180T-P/N432
WLL180T-P/N434 (Rote LED)
WLL180T-P/N474 (Infrarot-LED)
Anschlussart Leitung Stecker,M8,4-pin
Schaltausgang
NPN/PNP
OpenCollector100mA/≤30VDCresistiv
Laststrom:≤100mA
Restspannung:≤1,8V
NPN/PNP
OpenCollector100mA/≤30VDCresistiv
Laststrom:≤100mA
Restspannung:≤1,8V
Versorgungsspannung 12...24VDC±10%inkl.Restwelligkeit
1)
12...24VDC±10%inkl.Restwelligkeit
1)
Stromverbrauch
≤50mA/24V ≤50mA/24V
Ansprechzeit 16µs/70
µs/250µs/2ms/8ms
16µs/70
µs/250µs/2ms/8ms
Ausgang Hell-/dunkelschaltend Hell-/dunkelschaltend
Kurzschlussschutz
m m
Lichtquelle RoteLED RoteLED:WLL180T-P/N434
Infrarot-LED:WLL180T-P/N474
Betriebsanzeige/ Display
Ausgangsanzeige:Orange(Q
1
)2x4-stellige7-Segment-Anzeige
Ausgangsanzeige:Orange(Q
1
)2x4-stellige7-Segment-Anzeige
Empfindlichkeitseinstellung Teach-in/Manuelle Einstellung Teach-in/Manuelle Einstellung
Zeitstufe Ausschaltverzögerung,Einschaltverzögerung,Oneshot,Ein-/Ausschaltverzögerung,
One shot delay
Ausschaltverzögerung,Einschaltverzögerung,Oneshot,Ein-/Ausschaltverzögerung,
One shot delay
Ein-/Ausschaltverzögerung 0,1ms...9999ms 0,1ms...9999ms
Einstellung Eingang EinstellungexternerEingang(Teach-in/Test/Sync) EinstellungexternerEingang(Teach-in/Test/Sync)
Umgebungstemperatur/Betrieb
–25...
+55°C/35...85%RF(keinFrost,keineKondensation)
2)
–25...
+55°C/35...85%RF(keinFrost,keineKondensation)
2)
Umgebungstemperatur/Lager –40...+70°C/35...85%RF(keinFrost,keineKondensation) –40...+70°C/35...85%RF(keinFrost,keineKondensation)
Schockfestigkeit 10...55HzDoppelamplitude1,5mm2Std.injedeRichtungx,y,z 10...55HzDoppelamplitude1,5mm2Std.injedeRichtungx,y,z
Schutzart
IP50
3)
IP50
3)
Gehäusematerial PC PC
Gewicht Leitungstyp:71g,M8-Typ:25g Leitungstyp:71g,M8-Typ:25g
1)
12...24VDC±10%,Klasse2Spannungsversorgung
2)
Max.Umgebungstemperatur:+55°C
3)
ULGehäusetyp1
Deutsch
A Anschlussschema
1
3
5
7
2
6
4
1
4
2
3
1 Braun:12-24VDC
2 Last
3 Schwarz:Schaltausgang
4 Schaltkreis
5 Weiß:ExternerEingang
6 Schutzbeschaltung
7 Blau:OV
NPN
PNP
1
4
2
3
1
3
5
7
2
6
4
1
2
3
4
1 12-24VDC
2 ExternerEingang
3 OV
4 Schaltausgang
(Maßeinheit:mm)

4.7ASC-Einstellung
EinstellenASC(AutomaticSensitivityControl)
ASc oFF C
wählenund einstellen.
DieAnzeigekehrtzumASC-Einstellmodus
zurück.
oFF
ASCausschalten
1)
on
Schwellwertautomatischan
Umgebunganpassen.
TOP
TIP
Schwellwert-Einstellung vorzugsweise nach
Reinigung.
C
B
E Einsatz von Lichtleitern mit schlanken Endhülsen
‒ AdapterstückvollständiggegendenUhrzeigersinndrehenund
Lichtleitereinführen.
VerschlussdurchDrehunginUhrzeigersinn.
‒ AbtrennendesüberschüssigenLichtleiters.
Einstellung
1 1-Punkt Teach-in
Teach-in-Tastefür3sdrücken.
1-Punkt-Teach-inwählen.
1Pt C
Teach-in-Tastedrücken.
1Pt C
123C
DieSchaltschwellenanzeigeblinktkurzund
dasDisplayzeigtdieGrundanzeige.
2 2-Punkt Teach-in
Teach-in-Tastefür3sdrücken.
2-Punkt-Teach-inwählen.
2Pt 1Pt C
1.Punkt:Teach-in-Tastedrücken.
2Pt 1Pt C
2.Punkt:Teach-in-Tastedrücken.
2Pt 2Pt C
123C
DieSchaltschwellenanzeigeblinktunddas
DisplayzeigtdieGrundanzeige.
C B
4.8EinstellungderStärkeder
Sende-LED
BeleuchtungsstärkekannindreiStufengewählt
werden.
SPor
¦ ¦ ¦ ¦ ¦ ¦
wählenund einstellen.
DieAnzeigekehrtzumNullwert-Top-Menü.
¦ ¦ ¦ ¦ ¦ ¦
Einstellung Standard
1)
¦ ¦ ¦ ¦
EinstellungmittlereStärke
¦ ¦
EinstellunggeringeStärke
TOP
TIP
SättigungdesempfangenenLichtsvermeiden.
4.9Lock-Level
ArtderTastensperre
LocL L1
wählenund einstellen.
DieAnzeigekehrtzumLock-Level-Top-Menü
zurück.
L1
AlleEingabe-Funktionen
gesperrt
L2
AlleEingabe-Funktionenge-
sperrtaußerexternerEingang
TOP
4.10EndederDetaileinstel-
lungen(Expert-Modus)
End EPrt
KehrtzumDetaileinstellungs-Top-Menüzurück.
Hinweise zur Funktionseinstellung
‒
1)
bedeutetWerkseinstellung.
‒ Einstelltasteca.0,3sdrücken,fallsnichtsanderesgenanntwird.
‒ DieAnzeigeblinkt,wenndieEinstellungs-Auswahlverfügbarist.
Rückkehr zur Normaleinstellung mit einer Taste
Die Tastefür2soderlängergedrückthalten,umzurNormalein-
stellung(Betriebsmodus)zurückzukehrenohnedenMenüpunktEnd
zuverwenden.
Sperren der Bedienelemente
SperrtalleEingabe-Funktionenwiein4.9ausgewählt(Manipula-
tionsschutz).
Beide
TastenimRUN-Modegleichzeitig2soderlänger
drücken.ZumEntsperrenanalogverfahren(Manipulationsschutz).
Sperrung
Entsperrung
Loc
300
unLc
300
SAM Circuit (ASC = Automatic Sensitivity Control)
Schwellenwertwirdautomatischzurückgesetzt,währendderSensor
laufenddasempfangeneLichtprüft.EinplötzlicherWechselder
Lichtmengewiez.B.dieReinigungderLinse,stelltdenSchwellen-
wertzurück.
Externer Teach-in
DerTeach-in-Eingang(ET)mussfür>200msaktiviertwerdenum
einenTeach-in-Vorgangdurchzuführen(ETan>10V...<U
V
für PNP-
Geräte;ETan0VfürNPN-Geräte).
3 Auto-Teach-in
Teach-in-Tastefür3sdrücken.
Auto-Teach-inwählen.
Auto StrtC
Start:Teach-in-Tastedrücken.
Auto StrtC
Ende:Teach-in-Tastedrücken.
Auto StoPC
123C
DieSchaltschwellenanzeigeblinktunddas
DisplayzeigtdieGrundanzeige.
4 Zone Teach-in
Teach-in-Tastefür3sdrücken.
Zonen-Teach-inwählen.
ZonE C
Teach-in-Tastedrücken.
ZonE C
ZonE goodC
DieSchaltschwellenanzeigeblinktunddas
DisplayzeigtdieGrundanzeige.
5 Teach-in transparenter Objekte
Teach-in-Tastefür3sdrücken.
gLAS C
Teach-in-Tastedrücken.
gLAS C
gLAS goodC
DieSchaltschwellenanzeigeblinktunddas
DisplayzeigtdieGrundanzeigean.
Optionen
F Endstück
BEF-EB01-W190
Änderungenvorbehalten.
FürweitergehendeInformationenbzgl.Kongurationsmenüund
Teach-in-FunktionensieheAnwenderhandbuchoder
www.sick.com.
Deutsch
Sicherheitshinweise
VorInbetriebnahmedieBedienungsanleitunglesen.Reektor
verwenden.ReektorWarnhinweisesollenSievorGefahrenschützen
oderhelfenIhnen,eineBeschädigungdesSensorsoderderAnlage
zuvermeiden.WendenSiekeineandereInstallations-oderBedie-
nungsprozedurwiehierbeschriebenan.
> SensorbeiabgeschalteterVersorgungsspannunganschließen
> VerwendenSiedenSensornichtohneSchutzabdeckung.
> EinBetriebinfolgendenUmgebungenkannzu
> Fehlfunktionenführen:
1.staubigeoderfeuchteUmgebung.
2.BereichemitkorrosivenGasen.
3.BereichemitspritzendemWasseroderÖl.
4.BereichemitstarkbewegtemUntergrund.
> VerwendenSiedenSensornichtimFreien.
> KeineVerwendungimUmfeldvonFeuer,explosiven
> GasenoderbrennbarenFlüssigkeiten.
> NichtimWasserverwenden.
> Sensornichtzerlegen,reparierenoderumbauen.Dieseskannzu
FeuerundElektroschockführen.
> NurimvorgeschriebenenBereichanwenden.
> Verpackungaufbewahren.
> KeinSicherheitsbauteilgemäßEU-Maschinenrichtlinie.
a
Dieser Sensor darf nicht als Sicherheitsgerät verwendet
werden, um den menschlichen Körper zu schützen.
A Anschlussschema
Manuelle Einstellung
DrückenSieeinederAuswahltasten:DieSchaltschwellenanzeige
blinkt.Einstellungistnunmöglich.AnpassungüberdieAuswahl-
tasten.
1Normal
300 350
KehrtautomatischindieNormaldarstellungnach5s
nachBeendigungderEinstellungzurück.
FehlerausgabewährenddesTeach-in
EineFehlermeldungwirdbeifehlerhafterEingabewährendder
Einstellungausgegeben.SiehenachfolgendeTabelle.
Err1
Err2
Err3
Empfangswertistzuniedrig
Empfangswertistzuniedrig
DifferenzzwischenzweiEmpfangswertenistzuklein
Funktionseinstellung
DieMode-Tastefür3sdrücken.
1.Betriebseinstellung DenBetriebsmodusauswählen.
L––d L onC
wählenund einstellen.
DieAnzeigekehrtzumBetriebseinstellungs-
Top-Menüzurück.
Lon
ON-hellschaltend.
1)
don
ON-dunkelschaltend.
TOP
2.EinstellungderAnsprechzeit DieAnsprechzeitwählen.
rESP LongC
wählenund einstellen.
DieAnzeigekehrtzumAnsprechzeit-Top-Menü
zurück.
High
SchnellsteEinstellung16µs
FASt
SchnelleEinstellung70µs
Stnd
Standard-Einstellung250µs
1)
Long
HoheReichweite2ms
SuPr
SuperhoheReichweite8ms
TOP
3.Zeitstufen-Einstellung Zeitstufewählen.
dELy C
wählenund einstellen.
OFFwechseltzurAusgangsanzeigezurück.
oFF
KeineZeitstufeaktiviert
1)
oFdy
OFF-Delay
ondy
ON-Delay
Shot
One-Shot
onoF
ON/OFF-Delay
onSh
One-Shot-Delay
TOP
Zeitstufenvon0,1...9999(0,1ms...9999ms)
wählbar
istfürZeitstufenwechselund ist
zurEinstellung.DanachkehrtdieAnzeigezum
Zeitstufen-Top-Menüzurück.
oFdy 0001
C
4.Detaileinstellungen
(Expertenmodus)
EPrt C
WeiterzurDetaileinstellung.
TOP
A
5.Reset
RücksetzenallerEinstellungen
rSEt no C
wählenund einstellen.
DieAnzeigekehrtzumInitialisierungs-Top-Menü
zurück.
no
Keine Initialisierung
1)
yES
Initialisierung
TOP
6.BeendenderEinstellung
End C
ZurückzurnormalenAnzeige
B Funktionstasten der Auswerteeinheit
C Installation der Auswerteeinheit
Anbringungauf/EntfernenvonderMontageschiene
AnbringendesSensors:
1
DenSensorindieMontageschieneeinhaken.
2 ZumArretierenvonobendrücken.
EntfernendesSensors:
1 DenSensorinPfeilrichtungschieben.
2 AnschlussseitefürdieLichtleiternachobenkippenundSensor
entfernen.
D Verbindung der Lichtleiter
‒ Lichtleiter-Verriegelungönen(siehe1).
‒ LichtleiterinvorgeseheneÖnungenbiszumAnschlageinführen
(siehe 2 -ca.15mm).
‒ Lichtleiter-Verriegelung schließen (siehe 3).
a
Bitte beachten
BeiVerwendungeinerTastervariantemitkoaxialerLichtleiter-
anordnung,denKern-Lichtleiteroderweiß-gekennzeichneten
LichtleitermitdemSenderverbinden.DenzweitenLichtleiter
mitdemEmpfängerverbinden.
A
4.1DisplaywertaufNull
setzen.
AnzeigewertderHauptanzeigeauf„0“stellen.
oFSt C
wählenund einstellen.
DieAnzeigekehrtzumNullwert-Top-Menü
zurück.
off
Nullwert- Einstellung aus-
schalten.
1)
on
Nullwert- Einstellung ein-
schalten.
TOP
4.2Display-Einstellungen EineDarstellungderDisplay-Einstellungen
wählen.
diSP dig C
wählenund einstellen.
DieAnzeigekehrtzumDisplay-Top-Menüzurück.
dig
NumerischeAnzeige
1)
bAr
Balken-Anzeige
Pct
Prozentuale Anzeige
4.3Eco-Modus
Stromsparmodusaktivieren.
Eco off C
wählenund einstellen.
DieAnzeigekehrtzumEco-Top-Menüzurück.
off
Stromsparmodusdeaktiviert
1)
on
Stromsparmodusaktiviert
Sollwert-Anzeigewirdnach20sabgeschaltet.
AktivierendurchDrückeneinerbeliebigenTaste.
TOP
4.4Anzeigedrehen
Display-Anzeigewirdgedreht.
turn off C
wählenund einstellen.
DieAnzeigekehrtzumTurn-Top-Menüzurück.
off
Anzeigenormal
1)
on
Anzeige„aufdemKopf“
TOP
4.5Hysterese-Einstellung
Hysterese-Einstellungwählen.
HyS P5 C
wählenund einstellen.
giltfürZahlenwechselund ist zur Ein-
stellung.DieAnzeigekehrtzumHysterese-Top-Menü
zurück.
TOP
P 5C
Zahlenbereich1…40%vomSollwert.
4.6Eingangs-Einstellung
Auswahl:Funktiondesext.Eingangs
InPt C
wählenund einstellen.
Eingang
rtch
Ext.Teach-in
1)
tESt
Test-Eingang
Sync
Synchronisation
DieAnzeigekehrtzumExtern-Eingangsfunktion-
Top-Menüzurück.
TOP
1 1-Punkt-Teach-in
+10
%
1
1 Schaltschwelle
2 2-Punkt-Teach-in
1
1.
2.
1 Schaltschwelle
3 Auto-Teach-in
4 Zonen-Teach-in
10 %
10 %
1
7
3
6
5
4
2
2
5 Teach-in transparenter Objekte
1
1 Reektor
Tastervariante:
Teach-inaufdenHintergrundohneObjekt
durchführen.
Einwegvariante:
BeivorhandenemObjekteinzustellen. DieSchaltschwellewird10%überdem
empfangenenLichtwertgesetzt.
Tastervariante:
1.Schritt:AufeinvorhandenesObjekt
einstellen.
2.Schritt:AufdenHintergrundohne
Objekteinstellen.
Legt die Schaltschwelle zwischen
1.und2.Punktfest.
Einwegvariante/Tastervariante
StartundEnde:Automatisches
EinstellenimlaufendenProzess.
Tastervariante:
AufdasvorhandeneObjekteinstellen.
StelltdieZonemit±10%entsprechenddemempfangenen
Lichtein.
Reexionsvariante:
Teach-inohneObjektdurchführen.
Reektorverwenden.
DieSchaltschwellewirdauf90%desempfangenenLichts
eingestellt.
Einwegsystem:
Teach-inohneObjektdurchführen.
DieSchaltschwellewirdauf90%desempfangenenLichts
eingestellt.
1 Nah
2 Schaltschwelle
3 ObereGrenze
4 Schwellwert
5 Zone
6 UntereGrenze
7 Fern

1
2
3
9.2
(0.36)
37.3 (1.47)
7.7
(0.30)
51.9 (2.04)
10.5
(0.41)
33.2 (1.31)
2 – Ø 2.38
(0.08)
- Ø
(0.09)
8
(0.31)
18.8 (0.74)
27.8 (1.09)
10
(0.39)
7
(0.28)
Ø 4.2
(0.17)
55.4 (2.18)
4.3 (0.17)
34.6 (1.36)
5.7 (0.22)
68.9
(2.71)
3
(0.12)
16.1 (0.63)
Ø 8.6
(0.34)
3.55
(0.14)
10.4
(0.41)
Ø 8.6
(0.34)
8
(0.31)
3.55 (0.14)
1
2
3
4
5
6
1
2
1
2
2
4
5
3
1
1
2
3
1
3
5
7
2
6
4
1
4
2
3
1
4
2
3
1
3
5
7
2
6
4
1
2
3
4
B Unité de base
1 Achagedelasortie(orange)
2 Touchedesélection
3 Verrouillagedesbres
optiques
4 Achage
5 Touchemode
6 Boutond'apprentissage
1 Ouvrirleverrouillagedesbresoptiques.
2 Introduirelesbresoptiquesdanslesouverturesprévues
jusqu'enbutée.
3 Fermerleverrouillagedesbresoptiques.
4 Fibresoptiques
5 Achageémetteur/récepteur
C Pose sur / retrait du rail de montage
D Raccordement des bres optiques
E Utilisation des bres optiques avec des embouts minces
1 Fibresoptiquesàemboutmince
2 Positiondeséparation
3 Capuchond'adaptation
F Embout terminal
G WLL180T
1 angleouvertenv.180°
2 Câble:Ø3,84conducteurs2m
3 ConnecteurmâleM8,4pôles
WLL180T-P/N432
WLL180T-P/N434 (LED rouge)
WLL180T-P/N474 (LED infrarouge)
Mode de raccordement
Câble ConnecteurmâleM8,4broches
Sortie de commutation NPN/PNP
OpenCollector100mA/≤30VDCrésistif
Courantdecharge:≤100mA
Tensionrésiduelle:≤1,8V
NPN/PNP
OpenCollector100mA/≤30VDCrésistif
Courantdecharge:≤100mA
Tensionrésiduelle:≤1,8V
Tension d’alimentation
12...24VDCycomprisondulationrésiduellede±10% 12...24VDCycomprisondulationrésiduellede±10%
Consommation électrique ≤50mA/24V ≤50mA/24V
Temps de réponse
16µs/70
µs/250µs/2ms/8ms
16µs/70
µs/250µs/2ms/8ms
Sortie
commutationclair/sombre commutationclair/sombre
Protection contre les courts-circuits
m m
Source lumineuse
LEDrouge
LEDrouge:WLL180T-P/N434
LEDinfrarouge:WLL180T-P/N474
Afficheur d'état / écran Affichagedesortie:orange(Q
1
,Q
2
)2x4afficheursà7segments Affichagedesortie:orange(Q
1
,Q
2
)2x4afficheursà7segments
Réglage de sensibilité
Apprentissage/réglagemanuel
Apprentissage/réglagemanuel
Incrément de temps Retardaudéclenchement,Retardàlamisesoustension,Oneshot,Retardàl‘enclen-
chement/audéclenchement,Oneshotdelay
Retardaudéclenchement,Retardàlamisesoustension,Oneshot,Retardàl‘enclen-
chement/audéclenchement,Oneshotdelay
Retard à l'enclenchement / au déclenchement
0,1ms...9999ms
0,1ms...9999ms
Réglage de l'entrée Réglagedel'entréeexterne(apprentissage/test/sync) Réglagedel'entréeexterne(apprentissage/test/sync)
Température ambiante/fonctionnement –25...+55°C/35...85%HR(pasdegel,pasdecondensation) –25...+55°C/35...85%HR(pasdegel,pasdecondensation)
Température ambiante/entrepôt
–40...+70°C/35...85%HR(pasdegel,pasdecondensation)
–40...+70°C/35...85%HR(pasdegel,pasdecondensation)
Immunité aux chocs 10...55Hz,amplitudedouble1,5mm,2hsurtouslesaxesx,y,z 10...55Hz,amplitudedouble1,5mm,2hsurtouslesaxesx,y,z
Indice de protection IP50 IP50
Matériau du boîtier
PC
PC
Poids
Typedecâble:71g,typeM8:25g
Typedecâble:71g,typeM8:25g
1)
12...24VDC±10%,classe2alimentationélectrique
2)
Températureambiantemaxi.:+55°C
3)
ULboîtierde1
(Unitédemesure:mm)
FRANÇAIS
A Schéma de raccordement
1 Marron:12à24VDC
2 Charge
3 Noir:sortiedecommutation
4 Circuit
5 Blanc:entréeexterne
6 Antiparasite
7 Bleu:OV
NPN
PNP
1 12à24VDC
2 Entréeexterne
3 O V
4 Sortiedecommutation

4Réglagedétaillé
(modeexpert)
EPrt C
Passerauréglagedétaillé.
TOP
A
5.Réinitialisation
Réinitialisertouslesparamètres
rSEt no C
sélectionneret régler.
L'affichagerevientaumenuprincipald'initialisation.
no
Pasd'initialisation
1)
yES
Initialisation
TOP
6.Finduréglage
End C
Retouràl'affichagenormal
B Touches de fonction de l'unité d'évaluation
C Installation de l'unité d'évaluation
Posesur/retraitduraildemontage
Poseducapteur:
1 Accrocherlecapteurauraildemontage.
2 Appuyerparlehautpourlebloquer.
Retraitducapteur:
1 Pousserlecapteurdanslesensdelaèche.
2 Basculerverslehautlecôtéraccordementpourlesbres
optiquesetretirerlecapteur.
D Raccordement des bres optiques
‒ Ouvrirleverrouillagedesbresoptiques(voir1).
‒ Introduirelesbresoptiquesdanslesouverturesprévues
jusqu'enbutée(voir2 -env.15mm).
‒ Fermerleverrouillagedesbresoptiques(voir3).
a
Attention
Silaversionavectoucheetbresoptiquescoaxialesest
utilisée,raccorderlesbresoptiquesdunoyauoulesbres
optiquesmarquéesenblancàl’émetteur.Raccorderles
secondesbresoptiquesaurécepteur.
A
4.1Réglerlavaleuraffichée
surzéro.
Réglerlavaleurdel'affichageprincipalsur“0”.
oFSt C
sélectionneret régler.
L'affichagerevientdanslemenuprincipalde
lavaleurzéro.
off
Désactiverleréglagedela
valeurzéro.
1)
on
Activerleréglagedela
valeurzéro.
TOP
4.2.Réglagesdel’écran Sélectionnerunaffichagedesréglagesde
l'affichage.
diSP dig C
sélectionneret régler.
L'affichagerevientdanslemenuprincipalde
l'affichage.
dig
Affichagenumérique
1)
bAr
Affichageenbarres
Pct
Affichageenpourcentage
4.3.Modeéco
Activerlemodeéco-énergie.
Eco off C
sélectionneret régler.
L'affichagerevientdanslemenuprincipalEco.
off
Modeéco-énergiedésactivé
1)
on
Modeéco-énergieactivé
L'affichagedelavaleurdeconsignedisparaît
après20secondes.Activationenappuyantsur
n'importequelletouche.
TOP
4.4.Tournerl'affichage
L'affichagepivote.
turn off C
sélectionneret régler.
L'affichagerevientdanslemenuprincipal
derotation.
off
Affichagenormal
1)
on
Affichageàl'envers
TOP
4.5Réglagehystérésis
Sélectionnerleréglagedel'hystérésis.
HyS P5 C
sélectionneret régler.
s'appliqueauchangementdechiffreet
estdestinéauréglage. L'affichagerevient
danslemenuprincipalde
l'hystérésis.
TOP
P 5C
Plagenumérique1…40%delavaleurde
consigne.
4.6Réglageinitial
Sélection:fonctiondel'entréeext.
InPt C
sélectionneret régler.
Entrée
rtch
Illum.Apprentissage
1)
tESt
Entréetest
Sync
Synchronisation
L'affichagerevientdans
lemenuprincipaldelafonctiond'entrée
externe.
TOP
4.7RéglageASC
Réglagedel'ASC(AutomaticSensitivityControl)
ASc oFF C
sélectionneret régler.
L'affichagerevientaumodederéglageASC.
OFF
DésactiverASC.
1)
on
Adapterautomatiquementle
seuilàl'environnement.
TOP
TIP
Réglageduseuildepréférenceaprèsle
nettoyage.
C
B
E Utilisation des bres optiques avec des embouts
minces
‒ Tournerl'adaptateuràfonddanslesensinversedesaiguilles
d'unemontreetintroduirelesbresoptiques.
Fermetureentournantdanslesensdesaiguillesd'unemontre.
‒ Couperlesbresoptiquessuperues.
Réglage
1 Apprentissage1point
Appuyersurleboutond'apprentissage
pendant3secondes.
Sélectionnerl'apprentissageà1point.
1Pt C
Appuyersurleboutond'apprentissage.
1Pt C
123C
L'affichageduseuildecommutation
clignoterapidementetl'affichagedebase
apparaît.
2 Apprentissage2points
Appuyersurleboutond'apprentissage
pendant3secondes.
Sélectionnerl'apprentissageà2points.
2Pt 1Pt C
1.points:appuyersurlatouche
d'apprentissage.
2Pt 1Pt C
2.points:appuyersurlatouche
d'apprentissage.
2Pt 2Pt C
123C
L'affichageduseuildecommutation
clignoteetl'affichagedebaseapparaît.
C B
4.8Réglagedel'intensitédela
LEDd'émission
Troisniveauxd'intensitéd'éclairagesont
disponibles.
SPor
¦ ¦ ¦ ¦ ¦ ¦
sélectionneret régler.
L'affichagerevientdanslemenuprincipalde
lavaleurzéro.
¦ ¦ ¦ ¦ ¦ ¦
Réglagestandard
1)
¦ ¦ ¦ ¦
Réglageintensitémoyenne
¦ ¦
Réglagefaibleintensité
TOP
TIP
Éviterdesaturerlalumièrereçue.
4.9Niveaublocage
Typedeblocagedetouches
LocL L1
sélectionneret régler.
L'affichagerevientdanslemenuprincipaldu
niveauverrouillage.
L1
Touteslesfonctionsdesaisie
bloquées
L2
Touteslesfonctionsdesaisie
bloquéessaufl'entréeexterne
TOP
4.10Findesréglagesdétaillés
(modeexpert)
End EPrt
Revientdanslemenuprincipaldesréglagesdétaillés.
Remarques sur le réglage de fonction
‒
1)
signieréglaged'usine.
‒ Appuyersurlatouchederéglagependant0,3secondesiaucune
autreinstructionn'estfournie.
‒ L’achageclignotelorsquelasélectionduréglageestdis-
ponible.
Retour au réglage normal avec une touche
Maintenirlatouche enfoncéependant2secondesminimum
pourrevenirdansleréglagenormal(modedefonctionnement)sans
utiliserl'optiondemenuFin.
Blocage des éléments de commande
Bloquetouteslesfonctionsdesaisiecommeindiquésous4.9
(protectioncontrelaneutralisationfrauduleuse).
AppuyersurlesdeuxtouchesenmêmetempsenmodeRUN
pendantaumoins2secondes.Procéderdelamêmefaçonpourle
déblocage
(protectioncontrelaneutralisationfrauduleuse).
Blocage
Déblocage
Loc
300
unLc
300
Circuit SAM (ASC = Automatic Sensitivity Control)
Leseuilestautomatiquementréinitialisélorsquelecapteurcontrôle
lalumièrereçueencontinu.Lavariationsoudainedelaquantitéde
lumière,parexemplependantlenettoyagedelalentille,réinitialise
leseuil.
Apprentissage externe
L'entréed'apprentissage(ET)doitêtreactivéependant>200ms
poureectuerunapprentissage(ET>10V...<UVpourappareils
PNP;ET0VpourappareilsNPN).
3 Auto-apprentissage
Appuyersurlatouched'apprentissage
pendant3secondes.
Sélectionnerl'auto-apprentissage.
Auto StrtC
Démarrage:appuyersurlebouton
d'apprentissage.
Auto StrtC
Fin:appuyersurleboutond'apprentissage
Auto StoPC
123C
L'affichageduseuildecommutationclignoteet
l'affichagedebaseapparaît.
4 Zoned'apprentissage
Appuyersurlatouched'apprentissage
pendant3secondes.
Sélectionnerlazoned'apprentissage.
ZonE C
Appuyersurleboutond'apprentissage.
ZonE C
ZonE goodC
L'affichageduseuildecommutationclignoteet
l'affichagedebaseapparaît.
5 Apprentissagedesobjetstransparents
Appuyersurlatouched'apprentissage
pendant3secondes.
gLAS C
Appuyersurleboutond'apprentissage.
gLAS C
gLAS goodC
L'affichageduseuildecommutationclignote
etl'affichagedebaseapparaît.
Options
F Embout terminal
BEF-EB01-W190
‒ Sousréservedemodications.
‒ Pourobtenirdesinformationscomplémentairessurlemenude
congurationetlesfonctionsd'apprentissage,voirlemanuel
d'utilisationouwww.sick.com.
FRANÇAIS
Consignes de sécurité
Lirelanoticed'utilisationavantlamiseenservice.Utiliserle
réecteur.Lesavertissementsduréecteurdoiventvousprotéger
contrelesdangersetempêcherl'endommagementducapteurou
del'installation.Nesuivezpasd'autreprocédured'installationou
d'utilisationquecelledécriteici.
> Brancherlecapteurlorsquelatensiond’alimentationestcoupée
> Nepasutiliserlecapteursanscouvercledeprotection.
> L'utilisationdanslesenvironnementssuivantspeutentraîner
desdysfonctionnements:
1environnementpoussiéreuxouhumide
2.zonesoùrègnentdesgazcorrosifs.
3Zonessoumisesàdesprojectionsd'eauoud'huile.
4Zonesavecunsous-solfortementmeuble.
> Nepasutiliserlecapteuràl'extérieur.
> Nepasutiliseràproximitédufeu,degazexplosifsoudeliquides
inammables.
> Nepasutiliserdansl'eau.
> Nepasdémonter,réparernitransformerlecapteur.Cecipeut
causerunincendieouunchocélectrique.
> Utiliseruniquementdanslazoneprescrite.
> Conserverl’emballage.
> Ilnes'agitpasd'uncomposantdesécuritéausensdela
directivemachinesCE.
a
Ne pas utiliser ce capteur comme un appareil de sécurité
permettant de protéger le corps humain.
A Schéma de raccordement
Réglagemanuel
Appuyezsurl'unedestouchesdesélection:l'achageduseuilde
commutationclignote.Leréglageestdésormaispossible.Modica
-
tionaveclestouchesdesélection.
1Normal
300 350
Revientautomatiquementàl'affichagenormal
5secondesaprèslafinduréglage.
Erreurpendantl'apprentissage
Unmessaged'erreurs'acheencasdesaisieincorrectependant
leréglage.Voirletableausuivant.
Err1
Err2
Err3
Lavaleurderéceptionesttropfaible
Lavaleurderéceptionesttropfaible
Ladifférenceentrelesdeuxvaleursderéceptionesttropfaible
Réglage de fonction
Appuyersurlatouchemodependant3secondes.
1Réglagedumode Sélectionnerlemodedefonctionnement.
L––d L onC
sélectionneret régler.
L'affichagerevientdanslemenuprincipalde
réglagedumode.
Lon
ON-commutationclaire.
1)
don
ON-commutationsombre.
TOP
2.Réglagedutempsde
réponse
Sélectionnerletempsderéponse.
rESP LongC
sélectionneret régler.
L'affichagerevientdanslemenuprincipaldu
tempsderéponse.
High
Réglageleplusrapide16µs
FASt
Réglagerapide70µs
Stnd
Réglagestandard250μs
1)
Long
Portéeélevée2ms
SuPr
Portéesuper-élevée8ms
TOP
3Réglaged'incrémentde
temps
Sélectionnerl'incrémentdetemps
dELy C
sélectionneret régler.
OFFpermetdereveniràl'affichageinitial.
oFF
Pasd'incrémentdetemps
activé
1)
oFdy
OFF-Delay
ondy
ON-Delay
Shot
Oneshot
onoF
ON/OFF-Delay
onSh
One-Shot-Delay
TOP
Incrémentsde0,1...9999
(0,1ms...9999ms)sélectionnables
s'appliqueauchangementdechiffreet
estdestinéauréglage.
pourleréglage.Puis,l'affichagerevientau
menuprincipaldel'incrémentdetemps.
oFdy 0001C
1 Apprentissage 1 point
+10
%
1
1 Seuildecommutation
2 Apprentissage 2 points
1
1.
2.
1 Seuildecommutation
3 Auto-apprentissage
4 Zone d‘apprentissage
10 %
10 %
1
7
3
6
5
4
2
2
5 Apprentissage des objets transparents
1
1 Réecteur
Versionavectouche:
Procéderàl’apprentissagesur
l’arrière-plansansobjet.
Versionàuneseulevoie:
Réglersiunobjetestprésent.
Leréglageduseuildecommutationest
supérieurde10%àlavaleurdelumière
reçue.
Versionavectouche:
1èreétape:réglersurunobjetexistant. 2eétape:réglersurl’arrière-plansans
objet.
Règleleseuildecommutationentre1
et2points.
Versionàuneseulevoie/Versionavec
touche
Démarrageetn:réglageautomatique
encoursdefonctionnement.
Versionavectouche:
Réglersurl’objetexistant.
Règlelazoneavec±10%selonlalumièrereçue.
Versionavecréexion:
Eectuerl’apprentissagesansobjet.
Leseuildecommutationestrégléà90%delalumièrereçue.
Systèmeémetteur-récepteur:
Apprentissagedesobjetstransparents.
Leseuildecommutationestrégléà90%delalumière
reçue.
1 Proche
2 Seuildecommutation
3 Limitesupérieure
4 Seuil
5 Zone
6 Limiteinférieure
7 Distant

1
2
3
4
5
6
1
2
1
2
2
4
5
3
1
1
2
3
1
3
5
7
2
6
4
1
4
2
3
1
4
2
3
1
3
5
7
2
6
4
1
2
3
4
1
2
3
9.2
(0.36)
37.3 (1.47)
7.7
(0.30)
51.9 (2.04)
10.5
(0.41)
33.2 (1.31)
2 – Ø 2.38
(0.08)
- Ø
(0.09)
8
(0.31)
18.8 (0.74)
27.8 (1.09)
10
(0.39)
7
(0.28)
Ø 4.2
(0.17)
55.4 (2.18)
4.3 (0.17)
34.6 (1.36)
5.7 (0.22)
68.9
(2.71)
3
(0.12)
16.1 (0.63)
Ø 8.6
(0.34)
3.55
(0.14)
10.4
(0.41)
Ø 8.6
(0.34)
8
(0.31)
3.55 (0.14)
B Unidade básica
1 Exibição de saída (laranja)
2 Tecla de seleção
3 Bloqueiodebraóptica
4 Exibição
5 Tecla de modo
6 Teclateach-in
1 Abrirobloqueiodebrasópticas.
2 Introduzirasbrasópticasnasaberturasprevistasaté
encostar.
3 Fecharobloqueiodebrasópticas.
4 Fibraóptica
5 Exibiçãoemissor/receptor
C Instalação sobre/remoção do trilho de montagem
D Conexão bra óptica
E Utilização de bras ópticas com luvas terminais nas
1 Fibraópticacomluvaterminalestreita
2 Posiçãodecorte
3 Capadeajuste
F Peça terminal
G WLL180T
1 ânguloabertoaprox.180°
2 Cabo:Ø3,84os2m
3 ConectormachoM8,4pinos
WLL180T-P/N432
WLL180T-P/N434 (LED vermelho)
WLL180T-P/N474 (LED infravermelho)
Tipo de conexão Cabo ConectormachoM8,4pinos
Saída de comutação
NPN/PNP
OpenCollector100mA/≤30VCCresistivo
Correntedecarga:≤100mA
Tensãoresidual≤1,8V
NPN/PNP
OpenCollector100mA/≤30VCCresistivo
Correntedecarga:≤100mA
Tensãoresidual≤1,8V
Tensão de alimentação 12...
24VCC±10%incl.ondulaçãoresidual 12...
24VCC±10%incl.ondulaçãoresidual
Consumo de corrente ≤50mA/24V ≤50mA/24V
Tempo de resposta 16µs/70µs/250µs/2ms/8ms 16µs/70µs/250µs/2ms/8ms
Saída Comutaçãoporsombra/luz Comutaçãoporsombra/luz
Proteção contra curto-circuito
m m
Fonte de luz LEDvermelho
LEDvermelho:WLL180T-P/N434
LEDinfravermelho:WLL180T-P/N474
Indicador de operação/ display Exibição de saída: laranja (Q
1
, Q
2
)2xindicadorde7segmentosde4posições Exibição de saída: laranja (Q
1
, Q
2
)2xindicadorde7segmentosde4posições
Ajuste da sensibilidade Teach-in/configuraçãomanual Teach-in/configuraçãomanual
Escala de tempo Atrasodedesligamento,Atrasodeligação,Oneshot,exibir/ocultar,Oneshotdelay Atrasodedesligamento,Atrasodeligação,Oneshot,exibir/ocultar,Oneshotdelay
exibir/ocultar 0,1ms...
9999 ms 0,1ms...
9999 ms
Configuração entrada Configuraçãoentradaexterna(teach-in/teste/sincr) Configuraçãoentradaexterna(teach-in/teste/sincr)
Temperatura ambiente, operação –25...
+55°C/35...
85%RF(semcongelamento,semcondensação) –25...
+55°C/35...
85%RF(semcongelamento,semcondensação)
Temperatura ambiente/depósito –40...
+70°C/35...
85%RF(semcongelamento,semcondensação) –40...
+70°C/35...
85%RF(semcongelamento,semcondensação)
Resistência a choques mecânicos
10...
55Hz,duplaamplitude1,5mm,2horasemcadadireçãox,y,z 10...
55Hz,duplaamplitude1,5mm,2horasemcadadireçãox,y,z
Tipo de proteção IP50 IP50
Material da carcaça PC PC
Peso
Tipodepotência:71g,tipoM8:25g
Tipodepotência:71g,tipoM8:25g
1)
12...24VCC±10%,alimentaçãodetensãoclasse2
2)
Temperaturaambientemáx.:+55°C
3)
ULtipodecarcaça1
(unidade de medida)
Português
A Esquema de conexão
1 marrom:12-24VCC
2 Carga
3 Preto:saídadecomutação
4 Circuitodecomutação
5 Branco:entradaexterna
6 Circuitodeproteção
7 azul:OV
NPN
PNP
1 12-24VCC
2 Entradaexterna
3 OV
4 Saídadecomutação

4.7ConfiguraçãoASC
ConfigurarASC(AutomaticSensitivityControl)
ASc oFF C
Selecionar e configurar .
Aexibiçãoretornaaomenuprincipaldomodo
deconfiguraçãoASC.
oFF
Desligar ASC
1)
on
Adequarovalorlimiarautomati-
camenteaoambiente.
TOP
TIP
Configuraçãodovalorlimiardepreferência
apóslimpeza.
C
B
E Utilização de bras ópticas com luvas terminais
nas
‒ Giraroadaptadortotalmenteemsentidoanti-horárioeintroduzir
abraóptica.
Fechamentomediantegiroemsentidohorário.
‒ Cortedabraópticaexcedente.
Conguração
1 Teach-inde1ponto
PressionarateclaTeach-indurante3s.
Selecionarteach-inde1ponto.
1Pt C
PressionarateclaTeach-in.
1Pt C
123C
Aexibiçãodovalorlimiarpiscabrevemente
eodisplayapresentaaexibiçãobásica.
2 Teach-inde2pontos
PressionarateclaTeach-in
durante3s.
Selecionarteach-inde2pontos.
2Pt 1Pt C
1.ponto:pressionarateclateach-in.
2Pt 1Pt C
2.ponto:pressionarateclateach-in.
2Pt 2Pt C
123C
Aexibiçãodovalorlimiarpiscaeodisplay
apresentaaexibiçãobásica.
C B
4.8Configuraçãodaintensida-
de do LED emissor
Aintensidadedeiluminaçãopodeserseleciona-
daemtrêsníveis.
SPor
¦ ¦ ¦ ¦ ¦ ¦
Selecionar e configurar .
Aexibiçãoretornaaomenuprincipaldo
valorzero.
¦ ¦ ¦ ¦ ¦ ¦
ConfiguraçãoStandard
1)
¦ ¦ ¦ ¦
Configuraçãodaintensidade
média
¦ ¦
Configuraçãodaintensidade
fraca
TOP
TIP
Evitarsaturaçãodaluzrecebida.
4.9Níveldebloqueio
Tipodebloqueiodeteclas
LocL L1
Selecionar e configurar .
Aexibiçãoretornaaomenuprincipaldenível
debloqueio.
L1
Todasasfunçõesdeinserção
bloqueadas
L2
Todasasfunçõesdeinserção
bloqueadas,excetoaentrada
externa
TOP
4.10Fimdasconfigurações
detalhadas
(modoespecialista)
End EPrt
Retornaaomenuprincipaldaconfiguraçãodedetalhes.
Indicações sobre a conguração de funções
‒
1)
signicaconguraçãodefábrica.
‒ Pressionartecladeconguraçãoporaprox.0,3s,casonão
houveroutraespecicação.
‒ Aexibiçãopiscaseaseleçãodeconguraçãoestiverdisponível.
Retornar à conguração normal com uma tecla
Manterpressionadaatecla por2soumaisparavoltaràcongu-
raçãonormal(modooperacional)semutilizaroitemdomenuFim.
Bloqueio dos elementos de comando
Bloqueiatodasasfunçõesdeinserçãocomoselecionadonoitem4.9
(proteçãocontramanipulação).
Pressionar as duas
asduasteclassimultaneamentenomodo
RUNdurante2soumais.Paradesbloquear,procederdemodoanálogo
(proteçãocontramanipulação).
Bloqueio
Desbloqueio
Loc
300
unLc
300
Circuito SAM (ASC = Automatic Sensitivity Control)
Ovalorlimiarérestauradoautomaticamenteenquantoosensorver-
icacontinuamentealuzrecebida.Umatrocasúbitadaquantidade
deluz,porexemplo,alimpezadalente,restauraovalorlimiar.
Teach-in externo
Aentradateach-in(ET)deveserativadadurante>200mspara
executaroprocedimentoteach-in(ETem>10Va<U
V
paradisposi-
tivosPNP;ETem0VparadispositivosNPN).
3 Teach-inautomático
PressionarateclaTeach-indurante3s.
Selecionarteach-inautomático.
Auto StrtC
Início:pressionarateclateach-in.
Auto StrtC
Fim:pressionarateclateach-in.
Auto StoPC
123C
Aexibiçãodovalorlimiarpiscaeodisplay
apresentaaexibiçãobásica.
4 Teach-indezona
PressionarateclaTeach-in
durante3s.
Selecionarteach-indezonas.
ZonE C
PressionarateclaTeach-in.
ZonE C
ZonE goodC
Aexibiçãodovalorlimiarpiscaeodisplay
apresentaaexibiçãobásica.
5 Teach-indeobjetostransparentes
PressionarateclaTeach-in
durante3s.
gLAS C
PressionarateclaTeach-in.
gLAS C
gLAS goodC
Aexibiçãodovalorlimiarpiscaeodisplay
apresentaaexibiçãobásica.
Opções
F Peça terminal
BEF-EB01-W190
‒ Manteralteração.
‒ Paramaisinformaçõessobreomenudeconguraçãoeas
funçõesdeteach-in,verManualdousuárioou
www.sick.com.
Português
Avisos de segurança
Leromanualdeinstruçõesantesdacolocaçãoemoperação.
Utilizarreetor.Osavisosdeadvertênciadoreetortêmporm
protegê-loderiscosouajudá-loaevitarumadanicaçãodosensor
oudainstalação.Nãoutilizeoutroprocedimentodeinstalaçãoou
deoperaçãoanãoseroaquidescrito.
> Conectarosensorcomatensãodealimentaçãodesligada
> Nãoutilizeosensorsemcoberturadeproteção.
> Aoperaçãosobasseguintescondiçõesambientaispode
resultar
> falhasdefuncionamento:
1.ambientecompoeiraeumidade.
2.áreascontendogasescorrosivos.
3.áreascomrespingosdeáguaeóleo.
4.áreascombasedemovimentaçãointensa.
> Nãoutilizeosensoraoarlivre.
> Nãoutilizaremambientescomfogo,gases
> explosivosoulíquidosinamáveis.
> Nãoutilizaremágua.
> Nãodecomporosensor,nemrepararoumodicar.Istopode
produzirfogoechoqueelétrico.
> Utilizarexclusivamentenaáreaespecicada.
> Guardaraembalagem.
> EstenãoéumcomponentedesegurançaconformeaDiretrizde
MáquinasEuropeia.
a
Este sensor não deve ser utilizado como dispositivo de
segurança para proteger o corpo humano.
A Esquema de conexões
Conguraçãomanual
Pressioneumadasteclasdeseleção:aexibiçãodolimiarde
comutaçãopisca.Agoraaconguraçãoépossível.Ajustepormeio
dasteclasdeseleção.
1 Normal
300 350
Retornaautomaticamenteparaarepresentaçãonormal
5sapósfinalizaçãodaconfiguração.
Ediçãodeerrosduranteoteach-in
Seforexecutadaumainserçãoerradaduranteaconguração,será
editadoumavisodeerro.Vejaatabelaaseguir.
Err1
Err2
Err3
Valorderecepçãoémuitobaixo
Valorderecepçãoémuitobaixo
Diferençaentredoisvaloresderecepçãoémuitopequena
Conguração de funções
Pressionaratecladomododurante3s.
1.Configuraçãodeoperação Selecionaromodooperacional.
L––d L on
C
Selecionar e configurar .
Aexibiçãoretornaaomenuprincipal
deconfiguraçãodeoperação.
Lon
ON-comutaçãoporluz.
1)
don
ON-comutaçãoporsombra.
TOP
2.Configuraçãodotempode
resposta
Selecionarotempoderesposta.
rESP LongC
Selecionar e configurar .
Aexibiçãoretornaaomenuprincipaldotempo
deresposta.
High
Configuraçãomaisrápida16μs
FASt
Configuraçãorápida70μs
Stnd
Configuraçãopadrão250µs
1)
Long
Distânciadecomutação
alta2ms
SuPr
Distânciadecomutaçãosuper
alta8ms
TOP
3.Configuraçãodeníveis
detempo
Selecionarníveldetempo.
dELy C
Selecionar e configurar .
OFFretornaparaexibiçãoinicial.
oFF
nenhumníveldetempoativado
1)
oFdy
OFF-Delay
ondy
ON-Delay
Shot
One-Shot
onoF
ON/OFF-Delay
onSh
One-Shot-Delay
TOP
Níveisdetemposelecionáveisde0,1...9.999
(0,1ms...9.999ms)
Valeparatrocadeníveldetempoe
´paraconfiguração.
Depoisdisso,aexibiçãoretornapara
omenuprincipaldeníveisdetempo.
oFdy 0001C
4.Configuraçõesdetalhadas
(modoespecialista)
EPrt C
Irparaconfiguraçãodetalhada.
TOP
A
5.Reset
Restaurartodasasconfigurações
rSEt no C
Selecionar e configurar .
Aexibiçãoretornaaomenuprincipalde
inicialização.
no
Seminicialização
1)
yES
Inicialização
TOP
6.Finalizaçãodaconfiguração
End C
Retornaàexibiçãonormal
B Teclas de funções da unidade de avaliação
C Instalação da unidade de avaliação
Instalaçãosobre/remoçãodotrilhodemontagem
Instalaçãodosensor:
1
Encaixarosensornotrilhodemontagem.
2 Paraxar,pressionarpelapartesuperior.
Remoçãodosensor:
1 Deslocarosensornadireçãodaseta.
2 Viraroladodaconexãodabraópticaparacimae
removerosensor.
D Conexão das bras ópticas
‒ Abrirotravamentodasbrasópticas(ver1).
‒ Introduzirasbrasópticasnasaberturasprevistasatéencostar
(ver2-aprox.15mm).
‒ Fecharotravamentodasbrasópticas(ver3).
a
Observar
Na utilização de uma variante do botão com disposição
coaxial das bras ópticas, unir a bra óptica de núcleo ou a
bra óptica identicada com branco com o emissor. Unir a
segunda bra óptica com o receptor.
A
4.1Ajustarovalordodisplay
emzero.
Configurarovalordeexibiçãodaexibição
principalem“0”.
oFSt C
Selecionar e configurar .
Aexibiçãoretornaaomenuprincipaldo
valorzero.
off
Desligar a configuração do
valorzero.
1)
on
Ligar a configuração do
valorzero.
TOP
4.2Configuraçõesdodisplay Selecionarumaexibiçãodasconfigurações
dodisplay.
diSP dig C
Selecionar e configurar .
Aexibiçãoretornaaomenuprincipaldodisplay.
dig
Exibiçãonumérica
1)
bAr
Exibição de barra
Pct
Exibiçãoempercentuais
4.3ModoEco
Ativarmododeeconomiadeenergia.
Eco off C
Selecionar e configurar .
Aexibiçãoretornaaomenuprincipaldo
modoEco.
off
Mododeeconomiadeenergia
desativado
1)
on
Mododeeconomiadeenergia
ativado
Aexibiçãodovalornominalédesligada
após20s.Ativaçãopressionandoumatecla
qualquer.
TOP
4.4Giraraexibição
Aexibiçãododisplayserágirada.
turn off C
Selecionar e configurar .
Aexibiçãoretornaaomenuprincipaldegiro.
off
Exibição normal
1)
on
Giradoem“posiçãoinvertida”
TOP
4.5Configuraçãodehisterese
Selecionarconfiguraçãodehisterese.
HyS P5 C
Selecionar e configurar .
Valeparatrocadenúmerose
paraconfiguração.Aexibiçãoretornaaomenu
principaldehisterese.
TOP
P 5C
Faixanuméricade1a40%dovalornominal.
4.6Configuraçãodeentrada
Seleção:funçãodaentradaexterna
InPt C
Selecionar e configurar .
Entrada
rtch
teach-inTeach-in
1)
tESt
Entradadeteste
Sync
Sincronização
Aexibiçãoretornaao
menuprincipaldafunçãodeentradaexterna.
TOP
1 Teach-in de 1 ponto
+10
%
1
1 Limiardecomutação
2 Teach-in de 2 pontos
1
1.
2.
1 Limiardecomutação
3 Teach-in automático
4 Teach-in de zona
10 %
10 %
1
7
3
6
5
4
2
2
5 Teach-in de objetos transparentes
1
1 Reetor
Variantedebotão:
executaroteach-innofundosemobjeto.
Variantedescartável:
Aserconguradoseexistirobjeto. Olimiardecomutaçãoédenidoem
10%acimadovalordeluzrecebido.
Variantedebotão:
1ºpasso:congurarparaumobjeto
existente.
2ºpasso:congurarparafundosem
objeto.
Deneolimiardecomutaçãoentreo1º
eo2ºponto.
Variantedescartável/Variantedebotão
Inícioem:conguraçãoautomática
noprocessoemandamento.
Variantedebotão:
Congurarparaoobjetoexistente.
Regulaazonaem10%deacordocomaluzrecebid.
Variantedereexão:
ExecutarTeach-insemobjeto.
Utilizarreetor.
Olimiardecomutaçãoéconguradopara90%daluz
recebida.
Sistemadeumavia:
ExecutarTeach-insemobjeto.
Olimiardecomutaçãoéconguradopara90%daluz
recebida.
1 Próximo
2 Limiardecomutação
3 Limitesuperior
4 Valorlimiar
5 Zona
6 Limiteinferior
7 Distante

1
2
3
4
5
6
1
2
1
2
2
4
5
3
1
1
2
3
1
3
5
7
2
6
4
1
4
2
3
1
4
2
3
1
3
5
7
2
6
4
1
2
3
4
1
2
3
9.2
(0.36)
37.3 (1.47)
7.7
(0.30)
51.9 (2.04)
10.5
(0.41)
33.2 (1.31)
2 – Ø 2.38
(0.08)
- Ø
(0.09)
8
(0.31)
18.8 (0.74)
27.8 (1.09)
10
(0.39)
7
(0.28)
Ø 4.2
(0.17)
55.4 (2.18)
4.3 (0.17)
34.6 (1.36)
5.7 (0.22)
68.9
(2.71)
3
(0.12)
16.1 (0.63)
Ø 8.6
(0.34)
3.55
(0.14)
10.4
(0.41)
Ø 8.6
(0.34)
8
(0.31)
3.55 (0.14)
B Unità principale
1 Display uscita (arancione)
2 Tasto di selezione
3 Bloccaggiobreottiche
4 Display
5 Tasto madalità
6 Tastoteach-in
1 Aperturabloccaggiobreottiche.
2 Introduzionebreottichenelleapertureprevistenoa
battuta.
3 Chiusurabloccaggiobreottiche.
4 Fibreottiche
5 Displayemettitore/ricevitore
C Applicazione a/rimozione da barra di montaggio
D Collegamento bre ottiche
E Impiego di bre ottiche con boccole terminali
1 Fibreotticheconboccolaterminaleallungata
2 Posizione di separazione
3 Calotta di adattamento
F Uscita - terminale
G WLL180T
1 Angolodiaperturaca.180°
2 Cavo:Ø3,84li2m
3 ConnettoremaschioM8,4poli
WLL180T-P/N432
WLL180T-P/N434 (LED rosso)
WLL180T-P/N474 (Infrarossi LED)
Tipo di collegamento
Cavo ConnettoremaschioM8,4pin
Uscita di commutazione NPN/PNP
OpenCollector100mA/≤30VDCresistivo
Correntedicarico:≤100mA
Tensioneresidua:≤1,8V
NPN/PNP
OpenCollector100mA/≤30VDCresistivo
Correntedicarico:≤100mA
Tensioneresidua:≤1,8V
Tensione di alimentazione
12...24VDC±10%incl.rippleresiduo 12...24VDC±10%incl.rippleresiduo
Assorbimento elettrico ≤50mA/24V ≤50mA/24V
Tempo di risposta
16µs/
70µs/250µs/2ms/8ms
16µs/
70µs/250µs/2ms/8ms
Uscita
Funzionamentolighton/darkon Funzionamentolighton/darkon
Protezione anti-cortocircuito
m m
Fonte luminosa
LED rosso
LEDrosso:WLL180T-P/N434
InfrarossiLED:WLL180T-P/N474
Indicatore di funzionamento / display Displayuscita:arancione(Q
1
,Q
2
)Displaya7segmenticon2x4cifre Displayuscita:arancione(Q
1
,Q
2
)Displaya7segmenticon2x4cifre
Impostazione della sensibilità
Regolazioneteach-in/manuale
Regolazioneteach-in/manuale
Scala temporale Ritardonellospegnimento,Ritardosull‘avvio,Oneshot,Ritardonell‘avvio/nello
spegnimento,Oneshotdelay
Ritardonellospegnimento,Ritardosull‘avvio,Oneshot,Ritardonell‘avvio/nello
spegnimento,Oneshotdelay
Ritardo nell'avvio / nello spegnimento
0,1ms...9.999ms
0,1ms...9.999ms
Regolazione ingresso Regolazioneingressoesterno(teach-in/test/sync) Regolazioneingressoesterno(teach-in/test/sync)
Temperatura ambiente / funzionamento –25...+55°C/35...85%RF(nogelo,nocondensa) –25...+55°C/35...85%RF(nogelo,nocondensa)
Temperatura ambiente / magazzino
–40...+70°C/35...85%RF(nogelo,nocondensa)
–40...+70°C/35...85%RF(nogelo,nocondensa)
Resistenza agli urti 10...55Hzdoppiaampiezza1,5mm2oreperognidirezionex,y,z 10...55Hzdoppiaampiezza1,5mm2oreperognidirezionex,y,z
Grado di protezione IP50 IP50
Materiale alloggiamento
PC
PC
Peso Tipodicavo:71g,tipoM8:25g Tipodicavo:71g,tipoM8:25g
1)
12...24VDC±10%,Class2alimentazioneelettrica
2)
Max.temperaturaambiente:+55°C)
3)
ULtipodiinvolucro1
(Unitàdimisura:mm)
Italiano
A Schema di collegamento
1 Marrone:12-24VDC
2 Carico
3 Nero:uscitadicommutazione
4 Circuito di commutazione
5 Bianco:ingressoesterno
6 Circuito di protezione
7 Blu:OV
NPN
PNP
1 12-24VDC
2 Ingresso esterno
3 OV
4 Uscita di commutazione

4.7ImpostazioneASC
ImpostareASC(AutomaticSensitivityControl)
ASc oFF C
selezionare e impostare.
Il display ritorna alla modalità di impostazi-
oneASC.
oFF
DisattivareASC
1)
on
Adattare automaticamente il
valoredisogliaall'ambiente.
TOP
TIP
Impostazionevaloredisogliaprevalentemente
dopolapulizia.
C
B
E Impiego di bre ottiche con boccole terminali
‒ Ruotarel'adattatorecompletamenteinsensoantiorarioe
introdurrelebreottiche.
Chiudereruotandoinsensoorario.
‒ Tagliarelebreotticheineccesso.
Regolazione
1 Teach-ina1punto
PremereiltastoTeach-inper3s.
Selezionareteach-ina1punto.
1Pt C
PremereiltastoTeach-in.
1Pt C
123C
Il display delle soglie di commutazione
lampeggiabrevementeemostralavisualiz-
zazionedibase.
2 Teach-ina2punti
PremereiltastoTeach-inper3s.
Selezionareteach-ina2punti.
2Pt 1Pt C
1.punto:premereiltastoteach-in.
2Pt 1Pt C
2.punto:premereiltastoteach-in.
2Pt 2Pt C
123C
Il display delle soglie di commutazione
lampeggiaemostralavisualizzazione
dibase.
C
B
4.8Regolazionedell'intensità
del LED di emissione
L'intensitàdiilluminazionepuòessereselezio-
nataintrelivelli.
SPor
¦ ¦ ¦ ¦ ¦ ¦
selezionare e impostare.
Ildisplayritornaalmenusuperioredivalore
zero.
¦ ¦ ¦ ¦ ¦ ¦
Regolazione standard
1)
¦ ¦ ¦ ¦
Regolazione intensità media
¦ ¦
Regolazione intensità ridotta
TOP
TIP
Evitarelasaturazionedellalucericevuta.
4.9Locklevel
Tipodibloccaggiopulsante
LocL L1
selezionare e impostare.
Ildisplayritornaalmenusuperioredilocklevel.
L1
Tutte le funzioni di immissione
sonobloccate
L2
Tutte le funzioni di immissione
sonobloccatetrannel'ingresso
esterno
TOP
4.10Finedelleimpostazioni
dettagliate (modalità esperti)
End EPrt
Ildisplayritornaalmenusuperiorediimpostazionedettagliata.
Indicazioni l'impostazione delle funzioni
‒
1)
signicaimpostazionedifabbrica.
‒ Premereilpulsantediimpostazioneperca.0,3ssenondiversa-
menteindicato.
‒ Ildisplaylampeggiaseèdisponibilelaselezioneimpostazioni.
Ritorno all'impostazione normale con un pulsante
Tenere premutoilpulsanteper2sooltreperritornareall'im-
postazionenormale(modalitàesercizio)senzautilizzarelavocedi
menune.
Bloccaggio degli elementi di comando
Bloccatuttelefunzionidiimmissionecomeselezionatoin4.9
(protezionedamanipolazione).
Premere
contemporaneamenteentrambiitastiinmodalità
RUNper2sooltre.Perlosbloccaggioprocedereinmodoanalogo
(protezionedamanipolazione).
Bloccaggio
Sbloccaggio
Loc
300
unLc
300
SAM Circuit (ASC = Automatic Sensitivity Control)
Ilvaloredisogliavieneresettatoautomaticamentementreilsensore
controllacostantementelalucericevuta.Unavariazioneimprovvisa
dellaquantitàdiluce,comeades.lapuliziadellalente,resettail
valoredisoglia.
Teach-in esterno
L'ingressoteach-in(ET)deveessereattivatoper>200mspereet-
tuareunaproceduraditeach-in(ETon>10V...<U
V
perdispositivi
PNP;ETon0VperdispositiviNPN).
3 Autoteach-in
Premereilpulsanteteach-inper3s.
Selezionareautoteach-in.
Auto StrtC
Avvio:premereiltastoteach-in.
Auto StrtC
Fine:premereiltastoteach-in.
Auto StoPC
123C
Il display delle soglie di commutazione lam-
peggiaemostralavisualizzazionedibase.
4 Teach-inazona
PremereiltastoTeach-inper3s.
Selezionareteach-inazona.
ZonE C
PremereiltastoTeach-in.
ZonE C
ZonE goodC
Il display delle soglie di commutazione
lampeggiaemostralavisualizzazione
dibase.
5 Teach-indioggettitrasparenti
PremereiltastoTeach-inper3s.
gLAS C
Teach-in-Tastedrücken.
gLAS C
gLAS goodC
Il display delle soglie di commutazione
lampeggiaemostralavisualizzazione
dibase.
Opzioni
F Terminale
BEF-EB01-W190
‒ Conriservadimodiche.
‒ Perulterioriinformazionisulmenudicongurazioneelefunzioni
teach-invedereilmanualeutenteowww.sick.com.
Italiano
Avvertenze di sicurezza
Primadellamessainservizioleggereleistruzioniperl'uso.Utilizzare
ilriettore.Leavvertenzedipericolosulriettorehannoloscopo
diproteggeredapericoliodiaiutareaevitaredannidelsensoreo
dell'impianto.Nonapplicareprocedurediinstallazioneoutilizzo
diversedaquellequidescritte.
> Collegareilsensorecontensionedialimentazionedisinserita.
> Nonutilizzareilsensoresenzacoperturadiprotezione.
> L'esercizionelleseguenticondizionipuò
> comportaremalfunzionamenti:
1.ambientipolverosioumidi
2.ambienticongascorrosivi
3.ambienticonspruzzidiacquaoilio
4.ambienticonfondimoltomobili.
> Nonutilizzareilsensoreall'aperto.
> Nonutilizzarevicinoaammelibere,
> gasesplosiviouidiinammabili.
> Nonutilizzarenell'acqua.
> Nondisassemblare,riparareosmontareilsensore.Ciòpuò
provocareincendiescosseelettriche.
> Utilizzaresoloperleapplicazioniprescritte.
> Conservarel'imballaggio.
> Nonèuncomponentedisicurezzaaisensidelladirettiva
macchineUE.
a
Questo sensore non deve essere utilizzato come dispositi-
vo di sicurezza per proteggere le persone siche.
A Schema di collegamento
Regolazione manuale
Premereunodeipulsantidiselezione:ildisplaydellesogliedicom-
mutazionelampeggia.Oraèpossibilel'impostazione.Adattamento
tramiteipulsantidiselezione.
1 Normale
300 350
Ritorna automaticamente alla raffigurazione normale
dopo5sdalterminedell'impostazione.
Emissioneerroriduranteilteach-in
Durantelaregolazionevieneemessounmessaggiodierroreincaso
diimmissioneerrata.Vederelaseguentetabella.
Err1
Err2
Err3
Ilvalorediricezioneètroppobasso
Ilvalorediricezioneètroppobasso
Ladifferenzatraduevaloridiricezioneètroppopiccola
Impostazione funzioni
Premereilpulsantemodalitàper3s.
1.Impostazioneesercizio Selezionarelamodalitàd'esercizio.
L––d L onC
selezionare e impostare.
Il display ritorna al menu superiore di imposta-
zioneesercizio.
Lon
ON-funzionamentolighton.
1)
don
ON-funzionamentodarkon.
TOP
2.Impostazionedeltempo
di risposta
Selezionareiltempodirisposta.
rESP
LongC
selezionare e impostare.
Il display ritorna al menu superiore di tempo
dirisposta.
High
Regolazionepiùveloce16μs
FASt
Regolazioneveloce70μs
Stnd
Regolazionestandard250µs
1)
Long
Distanzadilavoroelevata2ms
SuPr
Distanzadilavoromolto
elevata8ms
TOP
3.Regolazionescaletemporali selezionarescaletemporali.
dELy C
selezionare e impostare.
OFFritornaaldisplaydiuscita.
oFF
Nessuna scala temporale
attivata
1)
oFdy
OFF delay
ondy
ON delay
Shot
Oneshot
onoF
ON/OFF delay
onSh
Oneshotdelay
TOP
Scaletemporalida0,1...9.999(0,1ms...
9.999ms)selezionabili
è per la modifica delle scale temporali e
èperl'impostazione
Poi il display ritorna al menu superiore scale
temporali.
oFdy 0001C
4.Impostazionidettagliate
(modalità esperti)
EPrt C
Avantiall'impostazionedettagliata.
TOP
A
5.Reset
Reset di tutte le regolazioni
rSEt no C
selezionare e impostare.
Il display ritorna al menu superiore di impostazione
esercizio.
no
Nessuna inizializzazione
1)
yES
Inizializzazione
TOP
6.Terminarelaregolazione
End C
Indietro al display normale
B Tasti funzioni dell'unità di controllo
C Installazione dell'unità di controllo
Applicazionea/rimozionedabarradimontaggio
Applicazionedelsensore:
1 Agganciareilsensoreallabarradimontaggio.
2 Perilbloccaggiopremeredall'alto.
Rimozionedelsensore:
1 Spostareilsensoreindirezionedellafreccia.
2 Ribaltareversol'altoillatodicollegamentoperlebreottichee
rimuovereilsensore.
D Collegamento bre ottiche
‒ Aperturabloccaggiobreottiche(vedere1).
‒ Introduzionebreottichenelleapertureprevistenoabattuta
(vedere2 -ca.15mm).
‒ Chiusurabloccaggiobreottiche(vedere3).
a
Attenzione
Perl’impiegodiunavariantedipulsanteconassegnazione
dellebreottichecoassiali,collegareall’emettitorelebre
ottichedelnucleoolebreottichecontrassegnateinbianco.
Collegarealricevitorelesecondebreottiche.
A
4.1Impostareazeroilvalore
display.
Impostarea“0”ilvaloredeldisplayprincipale.
oFSt C
selezionare e impostare.
Ildisplayritornaalmenusuperioredivalore
zero.
off
Disattivarel'impostazione
valorezero.
1)
on
Attivarel'impostazione
valorezero.
TOP
4.2Impostazionidisplay Selezionareunaraffigurazionedelleimpostazioni
display.
diSP dig C
selezionare e impostare.
Ildisplayritornaalmenusuperioredisplay.
dig
Display numerico
1)
bAr
Displayabarre
Pct
Display a percentuale
4.3Modalitàeco
Attivaremodalitàdirisparmioenergetico.
Eco off C
selezionare e impostare.
Ildisplayritornaalmenusuperioreeco.
off
Modalitàdirisparmioenergeti-
codisattivata
1)
on
Modalitàdirisparmioenerge-
ticoattivata
Disattivazionedisplayvalorenominaledopo
20s.Attivazioneconpressionediunpulsante
apiacere.
TOP
4.4Ruotaredisplay
Ildisplayvieneruotato.
turn off C
selezionare e impostare.
Ildisplayritornaalmenusuperioredirotazione.
off
Display normale
1)
on
Display“intesta”
TOP
4.5Impostazioneisteresi
Selezionareimpostazioneisteresi.
HyS P5 C
selezionare e impostare.
valepermodificanumerie è
perl'impostazione.Ildisplayritornaalmenu
superiorediisteresi.
TOP
P 5C
Intervallonumeri1…40%delvalorenominale.
4.6Impostazioneingresso
Selezione:funzioneingressoesterno
InPt C
selezionare e impostare.
Ingresso
rtch
Est.teach-in
1)
tESt
Ingresso test
Sync
Sincronizzazione
Il display ritorna al menu superiore di funzione
ingressoesterno.
TOP
1 Teach-in a 1 punto
+10
%
1
1 Sogliadicommutazione
2 Teach-in a 2 punti
1
1.
2.
1 Sogliadicommutazione
3 Auto-Teach-in
4 Teach-in a zona
10 %
10 %
1
7
3
6
5
4
2
2
5 Teach-in di oggetti trasparenti
1
1 Riettore
Variantedipulsante:
eseguireilteach-insusfondosenza
oggetto.
Varianteasbarramento:
Impostazioneconoggettopresente.
Lasogliadicommutazioneviene
impostataal10%soprailvalorediluce
ricevuta.
Variantedipulsante:
1afase:impostaresuunoggetto
presente.
2aimpostaresuunosfondosenza
oggetto..
Deniscelasogliadicommutazionetrail
1.eil2.punto.
Varianteasbarramento/Variantedi
pulsante
Avvioene:impostazioneautomatica
duranteilprocesso.
Variantedipulsante:
Impostaresull’oggettopresente.
Impostalazonacon+10%infunzionedellalucericevuta.
Varianteariessione:
EsecuzioneTeach-insenzaoggetto.
Utilizzareilriettore.
Ilvaloredicommutazionevieneimpostatoal90%dellaluce
ricevuta.
Sistemaasbarramento:
EsecuzioneTeach-insenzaoggetto.
Ilvaloredicommutazionevieneimpostatoal90%dellaluce
ricevuta.
1 Vicino
2 Sogliadicommutazione
3 Limite superiore
4 valorlimiar
5 Zona
6 Limite inferiore
7 Lontano

1
2
3
4
5
6
1
2
1
2
2
4
5
3
1
1
2
3
1
3
5
7
2
6
4
1
4
2
3
1
4
2
3
1
3
5
7
2
6
4
1
2
3
4
1
2
3
9.2
(0.36)
37.3 (1.47)
7.7
(0.30)
51.9 (2.04)
10.5
(0.41)
33.2 (1.31)
2 – Ø 2.38
(0.08)
- Ø
(0.09)
8
(0.31)
18.8 (0.74)
27.8 (1.09)
10
(0.39)
7
(0.28)
Ø 4.2
(0.17)
55.4 (2.18)
4.3 (0.17)
34.6 (1.36)
5.7 (0.22)
68.9
(2.71)
3
(0.12)
16.1 (0.63)
Ø 8.6
(0.34)
3.55
(0.14)
10.4
(0.41)
Ø 8.6
(0.34)
8
(0.31)
3.55 (0.14)
B Unidad básica
1 Indicador de salida (naranja)
2 Tecla de selección
3 Bloqueodebraóptica
4 Pantalla
5 Tecla de modo
6 Teclateach-in
1 Abraelbloqueodelabraóptica.
2 Insertelabraópticaenlosoricioscorrespondientes
hastaeltope.
3 Cierreelbloqueodelabraóptica.
4 Fibraóptica
5 Indicadoremisor/receptor
C Montaje en el carril de montaje y retirada de este
D Conexión de la bra óptica
E Uso de bras ópticas con manguitos terminales delgados
1 Fibraópticaconmanguitoterminaldelgado
2 Posicióndecorte
3 Caperuzaadaptadora
F Tope nal
G WLL180T
1 Ánguloabiertoaprox.180°
2 Cable:Ø3,8,4conductores,2m
3 ConectormachoM8de4polos
WLL180T-P/N432
WLL180T-P/N434 (LED rojo)
WLL180T-P/N474 (LED infrarojo)
Tipo de conexión
Cable ConectormachoM8de4terminales
Salida conmutada NPN/PNP
OpenCollector100mA/≤30VCCresistivo
Corrientedecarga:≤100mA
Tensiónresidual:≤1,8V
NPN/PNP
OpenCollector100mA/≤30VCCresistivo
Corrientedecarga:≤100mA
Tensiónresidual:≤1,8V
Tensión de alimentación
12…24VCC±10%deondulaciónresidualincl. 12…24VCC±10%deondulaciónresidualincl.
Consumo de corriente ≤50mA/24V ≤50mA/24V
Tiempo de respuesta
16µs/70
µs/250µs/2ms/8ms
16µs/70
µs/250µs/2ms/8ms
Salida
Conmutaciónenclaro/oscuro Conmutaciónenclaro/oscuro
Protección contra cortocircuito
m m
Fuente de luz
LED rojo
LEDrojo:WLL180T-P/N434
LEDinfrarojo:WLL180T-P/N474
Indicador de servicio/pantalla Indicadordesalida:indicadorde7segmentosnaranjade2x4dígitos(Q
1
,Q
2
) Indicadordesalida:indicadorde7segmentosnaranjade2x4dígitos(Q
1
,Q
2
)
Ajuste de la sensibilidad
Ajustemanual/aprendizaje
Ajustemanual/aprendizaje
Fase de tiempo Retardodedesconexión,Retardodeconexión,Oneshot,Retardodeconexión/desconexión,
Oneshotdelay
Retardodedesconexión,Retardodeconexión,Oneshot,Retardodeconexión/desconexión,
Oneshotdelay
Retardo de conexión/desconexión
0,1ms…9.999ms
0,1ms…9.999ms
Ajuste de entrada Ajustedeentradaexterna(Teach-in/Test/Sync) Ajustedeentradaexterna(Teach-in/Test/Sync)
Temperatura ambiente/funcionamiento –25…+55°C/35…85%deHR(sinhielo/sincondensación) –25…+55°C/35…85%deHR(sinhielo/sincondensación)
Temperatura ambiente/almacenamiento
–40…+70°C/35…85%deHR(sinhielo/sincondensación)
–40…+70°C/35…85%deHR(sinhielo/sincondensación)
Resistencia a choque 10…55Hz,dobleamplitud1,5mm,2horaspordirecciónx,y,z 10…55Hz,dobleamplitud1,5mm,2horaspordirecciónx,y,z
Tipo de protección IP50 IP50
Material de la carcasa
PC
PC
Peso Tipodecable:71g,tipoM8:25g Tipodecable:71g,tipoM8:25g
1)
12…24VCC±10%,fuentedealimentacióndeclase2
2)
Temperaturaambientemáx.:+55°C
3)
TipodecarcasaUL1
(Unidaddemedida:mm)
Español
A Esquema de conexión
1 Marrón:12-24VCC
2 Carga
3 Negro:salidaconmutada
4 Circuitodeconmutación
5 Blanco:entradaexterna
6 Circuitodeprotección
7 Azul:0V
NPN
PNP
1 12-24VCC
2 Entradaexterna
3 0V
4 Salidadeconmuta-
da

4.7AjusteASC
AjustarASC(AutomaticSensitivityControl)
ASc oFF C
Seleccionary ajustar.
LapantallavuelvealmododeajusteASC.
oFF
DesconectarASC
1)
on
Ajustarautomáticamenteelvalor
deumbralalentorno.
TOP
TIP
Ajustarelvalordeumbralpreferentemente
despuésdelalimpieza.
C
B
E Uso de bras ópticas con manguitos terminales
delgados
‒ Girelapiezaadaptadoracompletamenteensentidocontrarioal
delasagujasdelrelojeinsertelabraóptica.
Secierragirandoenelsentidodelasagujasdelreloj.
‒ Cortelabraópticaquesobresalga.
Ajuste
1 Aprendizajede1punto
Pulselateclateach-indurante3s.
Seleccioneaprendizajede1punto.
1Pt C
Pulselateclateach-in.
1Pt C
123C
Elindicadordeumbraldeconmutación
parpadeabrevementeysemuestrala
pantallabásica.
2 Aprendizajede2puntos
Pulselateclateach-indurante3s.
Seleccioneaprendizajede2puntos.
2Pt 1Pt C
1.punto:pulselateclateach-in.
2Pt 1Pt C
2.punto:pulselateclateach-in.
2Pt 2Pt C
123C
Elindicadordeumbraldeconmutación
parpadeaysemuestralapantallabásica.
C B
4.8Ajustedelaintensidaddel
LED emisor
Puedenseleccionarsetresnivelesdeintensidad
deiluminación.
SPor
¦ ¦ ¦ ¦ ¦ ¦
Seleccionary ajustar.
Lapantallavuelvealmenúprincipalde
Valorcero.
¦ ¦ ¦ ¦ ¦ ¦
Ajusteestándar
1)
¦ ¦ ¦ ¦
Ajustedeintensidadmedia
¦ ¦
Ajustedeintensidadmínima
TOP
TIP
Evitelasaturacióndelaluzrecibida.
4.9Niveldebloqueo
Tipodebloqueodeteclas
LocL L1
Seleccionary ajustar.
LapantallavuelvealmenúprincipaldeNivel
debloqueo.
L1
Todaslasfuncionesdeentrada
bloqueadas
L2
Todaslasfuncionesdeentrada
bloqueadasexceptolaentrada
externa
TOP
4.10Finaldelaconfiguración
detallada(modoexperto)
End EPrt
LapantallavuelvealmenúprincipaldeAjustededetalle.
Indicaciones sobre el ajuste de funciones
‒
1)
signicaajustedefábrica.
‒ Pulselatecladeajustedurante0,3saprox.sinoseindicaotra
cosa.
‒ Lapantallaempiezaaparpadearsilaseleccióndeajusteestá
disponible.
Regreso al ajuste normal con una tecla
Mantengapulsadalatecla durante2somásparavolveral
ajustenormal(mododefuncionamiento)sinusarelpuntodemenú
Final.
Bloqueo de los elementos de mando
Bloqueatodaslasfuncionesdeentradadeacuerdoalnivelseleccionado
en4.9(proteccióncontramanipulación).
Pulselasdosteclas
simultáneamentedurante2somásenel
modoRUN.Procedadelmismomodoparaeldesbloqueo
(proteccióncontramanipulación).
Bloqueo
Desbloqueo
Loc
300
unLc
300
SAM Circuit (ASC = Automatic Sensitivity Control)
Elvalordeumbralserestableceautomáticamentemientraselsen-
sorcompruebacontinuamentelaluzrecibida.Uncambiorepentino
delacantidaddeluz,comoocurriría,p.ej.,siselimpialalente,
restableceelvalordeumbral.
Aprendizaje externo
Laentradadeaprendizaje(ET)debeactivarsedurante>200ms
paraefectuarunprocesodeaprendizaje(ETa>10V…<Vspara
dispositivosPNP;ETa0VparadispositivosNPN).
3 Aprendizajeautomático
Pulselateclateach-indurante3s.
Seleccioneaprendizajeautomático.
Auto StrtC
Inicio:pulselateclateach-in.
Auto StrtC
Final:pulselateclateach-in.
Auto StoPC
123C
Elindicadordeumbraldeconmutaciónpar-
padeaysemuestralapantallabásica.
4 Zonadeaprendizaje
Pulselateclateach-indurante3s.
Seleccionelazonadeaprendizaje.
ZonE C
Pulselateclateach-in.
ZonE C
ZonE goodC
Elindicadordeumbraldeconmutación
parpadeaysemuestralapantallabásica.
5 Aprendizajedeobjetostransparentes
Pulselateclateach-indurante3s.
gLAS C
Pulselateclateach-in.
gLAS C
gLAS goodC
Elindicadordeumbraldeconmutación
parpadeaysemuestralapantallabásica.
Opciones
F Tope nal
BEF-EB01-W190
‒ Reservadoelderechoarealizarmodicaciones.
‒ Paramásinformaciónrelacionadaconelmenúdecongura-
ciónyconlasfuncionesdeaprendizaje,consulteelmanualde
usuariooentreenwww.sick.com.
Español
Indicaciones de seguridad
Lealasinstruccionesdeusoantesdeefectuarlapuestaenservicio.
Useelreector.Lasadvertenciasdelreectortienenelcometido
deprotegerledeposiblesriesgosodeayudarleaevitardañosen
elsensoroenlainstalación.Nosiganingúnotroprocedimientode
instalaciónodeusodiferentealdescritoenestasinstrucciones.
> Conecteelsensorconlatensióndealimentacióndesconectada.
> Nouseelsensorsinlacubiertaprotectora.
> Suusoenalgunodelosentornosqueseespecicanacontinu-
aciónpuede
> afectarasucorrectofuncionamiento:
1.Entornopolvorientooconexcesodehumedad.
2.Zonascongasescorrosivos.
3.Zonasexpuestasasalpicadurasdeaguaoaceite.
4.Zonasexpuestasamovimientosenelsubsuelo.
> Nouseelsensorenexteriores.
> Nouseelsensorenambientespropiciosparaincendios,
> congasesexplosivosolíquidosinamables.
> Nouseesteproductodentrodelagua.
> Nodesmonte,reparenimodiqueelsensor,yaqueestopodría
provocarincendiosodescargaseléctricas.
> Estesensordebeusarseúnicamentedentrodelámbito
prescrito.
> Conserveelembalaje.
> NosetratadeuncomponentedeseguridadsegúnlaDirectiva
demáquinasdelaUE.
a
Este sensor no debe usarse como dispositivo de seguridad
para proteger a las personas.
A Esquema de conexión
Ajustemanual
Pulseunadelasteclasdeselección:elindicadordeumbralde
conmutaciónempiezaaparpadear.Estoindicaqueahorasepuede
realizarelajuste.Ajusteusandolasteclasdeselección.
1 Normal
300 350
Regresoautomáticoalapantallanormal5sdespuésde
finalizarseelajuste.
Emisióndeerroresduranteelprocesodeaprendizaje
Siseefectúaunaentradaincorrectaduranteelprocesodeajuste,
semuestraunmensajedeerror.Véaselasiguientetabla:
Err1
Err2
Err3
Elvalorrecibidoesdemasiadobajo
Elvalorrecibidoesdemasiadobajo
Ladiferenciaentredosvaloresrecibidosesdemasiadopequeña
Ajuste de las funciones
Pulsarlateclademododurante3s.
1.Ajustedelfuncionamiento Seleccionarelmododefuncionamiento.
L––d L onC
Seleccionary ajustar.
Lapantallavuelvealmenúprincipalde
Ajustedelfuncionamiento.
Lon
ON:conmutaciónenclaro.
1)
don
ON:conmutaciónenoscuro.
TOP
2.Ajustedeltiempode
respuesta
Seleccionareltiempoderespuesta.
rESP LongC
Seleccionary ajustar.
LapantallavuelvealmenúprincipaldeTiempo
derespuesta.
High
Tiempoderespuestamuy
corto:16μs
FASt
Tiempoderespuestacorto:
70μs
Stnd
Tiempoderespuestaestándar:
250µs
1)
Long
Granalcance:2ms
SuPr
Alcancemuygrande:8ms
TOP
3.Ajustedeetapastemporales Seleccionarlaetapatemporal.
dELy C
Seleccionary ajustar.
OFFcambiaalindicadordesalida.
oFF
Nosehaactivadoningunaetapa
temporal
1)
oFdy
OFF-Delay
ondy
ON-Delay
Shot
One-Shot
onoF
ON/OFF-Delay
onSh
One-Shot-Delay
TOP
Sepuedenseleccionaretapastemporales
de0,1a9.999(0,1ms…9.999ms)
seusanparacambiarlasetapas
temporalesy
pararealizarelajuste.
Después,lapantallavuelvealmenú
principaldeEtapastemporales.
oFdy 0001C
4.Ajustesdedetalle
(ModoExperto)
EPrt C
LlevaalmenúdeAjustededetalle.
TOP
A
5.Reset
Restablecimientodetodoslosajustes
rSEt no C
Seleccionary ajustar.
Lapantallavuelvealmenúprincipalde
Inicialización.
no
Noestáactivadalainicia-
lización
1)
yES
Inicialización
TOP
6.Finalizacióndelajuste
End C
Regresoalapantallanormal
B Teclas de funciones de la unidad de evaluación
C Instalación de la unidad de evaluación
Montajeenelcarrildemontajeyretiradadeeste
Montajedelsensor:
1 Engancheelsensorenelcarrildemontaje.
2 Acontinuación,presionedesdearribaparabloquearlo.
Retiradadelsensor:
1 Desliceelsensorenladireccióndelaecha.
2 Levanteelladodeconexióndelabraópticayretireelsensor.
D Conexión de la bra óptica
‒ Abraelbloqueodelabraóptica(véase1).
‒ Insertelabraópticaenlosoricioscorrespondienteshastael
tope(véase2 -aprox.15mm).
‒ Cierreelbloqueodelabraóptica(véase3).
a
Atención
Siseusaunavariantedepalpadorcondisposicióncoaxialde
labraóptica,labraópticadelnúcleoomarcadaenblanco
debeconectarsealemisor.Conectarelsegundoconductorde
braópticaalreceptor.
A
4.1Ponerelvalordepantalla
acero.
Configurara“0”elvalordeindicacióndela
pantallaprincipal.
oFSt C
Seleccionary ajustar.
Lapantallavuelvealmenúprincipalde
Valorcero.
off
Desconectaelajustedevalor
cero.
1)
on
Conectaelajustedevalorcero.
TOP
4.2Ajustesdepantalla Seleccionarunmétododerepresentacióndelos
ajustesdepantalla.
diSP dig C
Seleccionary ajustar.
LapantallavuelvealmenúprincipalPantalla.
dig
Pantallanumérica
1)
bAr
Pantalladebarras
Pct
Pantallaporcentual
4.3ModoEco
Activarelmododeahorrodeenergía.
Eco off C
Seleccionary ajustar.
LapantallavuelvealmenúprincipalEco.
off
Mododeahorrodeenergía
desactivado
1)
on
Mododeahorrodeenergía
activado
Lapantalladevalornominalsedesconectaalos
20s.Paraactivarlo,pulseunateclacualquiera.
TOP
4.4Girarlapantalla
Lapantallasegira.
turn off C
Seleccionary ajustar.
LapantallavuelvealmenúprincipalGirar.
off
Pantallanormal
1)
on
Pantallainvertida
TOP
4.5Ajustedehistéresis
Seleccionarajustedehistéresis.
HyS P5 C
Seleccionary ajustar.
seusanparacambiarelvalory
pararealizarelajuste.Lapantallavuelveal
menúprincipalHistéresis.
TOP
P 5C
Rangodevalordel1…40%delvalornominal.
4.6Ajustedeentrada
Seleccióndefuncióndelaentradaext.
InPt C
Seleccionary ajustar.
Entrada
rtch
Aprendizajeext.
1)
tESt
Entradadeprueba
Sync
Sincronización
Lapantallavuelveal
menúprincipalFuncióndeentradaext.
TOP
1 Aprendizaje de 1 punto
+10
%
1
1 Umbraldeconmutación
2 Aprendizaje de 2 puntos
1
1.
2.
1 Umbraldeconmutación
3 Teach-in automático
4 ZonaTeach-in
10 %
10 %
1
7
3
6
5
4
2
2
5 Teach-in de objetos transparentes
1
1 Reector
Variantedepalpador:
Realizarelaprendizajesobreelfondo
sinobjeto.
Varianteunidireccional:
Realiceelajusteconelobjetopresente.
Elumbraldeconmutaciónseajusta
un10%porencimadelvalorlumínico
recibido.
Variantedepalpador:
1.
er
paso:ajustarsobreunobjeto
existente.
2.
º
paso:ajustarsobreelfondosin
objeto.
Establezcaelumbraldeconmutación
entrelospuntos1y2.
Varianteunidireccional/Variantede
palpador
Inicioynal:ajusteautomáticodurante
elprocesoencurso.
Variantedepalpador:
Ajustarsobreelobjetopresente.
Ajustelazonaa+10%enfuncióndelaluzrecibida.
Variantedereexión:
RealiceelTeach-insinobjeto.
Elumbraldeconmutaciónseajustaaun90%delaluz
recibida.
Sistemaunidireccional:
realiceelTeach-insinobjeto.
Elumbraldeconmutaciónseajustaaun90%delaluz
recibida.
1 Cerca
2 Umbraldeconmutación
3 Límitesuperior
4 Valordeumbral
5 Zona
6 Límiteinferior
7 Lejos

1
2
3
4
5
6
1
2
1
2
2
4
5
3
1
1
2
3
1
3
5
7
2
6
4
1
4
2
3
1
4
2
3
1
3
5
7
2
6
4
1
2
3
4
1
2
3
9.2
(0.36)
37.3 (1.47)
7.7
(0.30)
51.9 (2.04)
10.5
(0.41)
33.2 (1.31)
2 – Ø 2.38
(0.08)
- Ø
(0.09)
8
(0.31)
18.8 (0.74)
27.8 (1.09)
10
(0.39)
7
(0.28)
Ø 4.2
(0.17)
55.4 (2.18)
4.3 (0.17)
34.6 (1.36)
5.7 (0.22)
68.9
(2.71)
3
(0.12)
16.1 (0.63)
Ø 8.6
(0.34)
3.55
(0.14)
10.4
(0.41)
Ø 8.6
(0.34)
8
(0.31)
3.55 (0.14)
B 基本单元
1 输出显示(橙色)
2 选择键
3 光导纤维体锁定装置
4 显 示
5 模式按键
6 示教键
1 打开光导纤维体锁定装置。
2 将光导纤维体插入指定开口直至极限位置。
3 关闭光导纤维体锁定装置。
4 光导纤维体
5 发射器/接收器显示
C 安装在安装导轨上/从安装导轨上移除
D 光导纤维体连接
E 使用带细长终端套管的光导纤维体
1 带细长终端套管的光导纤维体
2 分离位置
3 调整盖罩
F 端件
G WLL180T
1 开角约180°
2 电缆:Ø3.8,4芯线,2m
3 插头,M8,4针
WLL180T-P/N432
WLL180T-P/N434(紅色LED)
WLL180T-P/N474(紅外發光二極管)
连接类型
电缆 插头,M8,4针
开关量输出
NPN/PNP
开路集电极100mA/≤30VDC阻抗
负载电流:≤100mA
剩余电压:≤1.8V
NPN/PNP
开路集电极100mA/≤30VDC阻抗
负载电流:≤100mA
剩余电压:≤1.8V
工作电压
12~24VDC±10%含残余纹波 12~24VDC±10%含残余纹波
耗电量
≤50mA/24V ≤50mA/24V
响应时间
16µs/
70µs/250µs/2ms/8ms
16µs/
70µs/250µs/2ms/8ms
输出
明通/暗通开关 明通/暗通开关
短路保护
m m
光源
紅色LED 紅色LED:WLL180T-P/N434
紅外發光二極管:WLL180T-P/N474
状态指示灯/显示器
输出显示:橙色(Q
1
,Q
2
)2x4位数7段显示 输出显示:橙色(Q
1
,Q
2
)2x4位数7段显示
灵敏度调节
示教/手动设置 示教/手动设置
时间等级
断开延迟,接通延迟,Oneshot,接通/断开延迟,Onshotdelay
断开延迟,接通延迟,Oneshot,接通/断开延迟,Onshotdelay
接通/断开延迟
0.1ms~9,999ms 0.1ms~9,999ms
输入设置
外部输入设置(示教/测试/同步) 外部输入设置(示教/测试/同步)
环境温度/运行
–25~+55°C/35~85%RF(无冰冻,无冷凝)
–25~+55°C/35~85%RF(无冰冻,无冷凝)
环境温度/仓储
–40~+70°C/35~85%RF(无冰冻,无冷凝) –40~+70°C/35~85%RF(无冰冻,无冷凝)
抗冲击性
10~55Hz双振幅1.5mm每个方向x、y、z2小时 10~55Hz双振幅1.5mm每个方向x、y、z2小时
防护等级
IP50
IP50
外壳材料
PC PC
重量
电缆类型:71g,M8类型:25g 电缆类型:71g,M8类型:25g
1)
12~24VDC±10%,2级电压供给
2)
最高环境温度:+55°C
3)
UL外壳类型1
(计量单位:mm)
中文
A 接线图
1 棕色:12-24VDC
2 负荷
3 黑色:开关量输出
4 开关电路
5 白色:外部输入端
6 抑制器
7 蓝色:OV
NPN
PNP
1
12-24VDC
2 外部输入端
3 OV
4 开关量输出

设置
1 1点示教
按住示教键3秒。
选择1点示教。
1Pt C
按下示教键。
1Pt C
123C
开关阈值显示器短暂闪烁,显示器显
示基本显示。
2 2点示教
按住示教键3秒。
选择2点示教。
2Pt 1Pt C
第1点:按下示教键。
2Pt 1Pt C
第2点:按下示教键。
2Pt 2Pt C
123C
开关阈值显示器短暂闪烁,显示器
显示基本显示。
C
B
4.8设置发射LED强度 可选择三种等级的照明强度。
SPor
¦ ¦ ¦ ¦ ¦ ¦
选择和设置。
显示返回零值顶部菜单。
¦ ¦ ¦ ¦ ¦ ¦
默认设置
1)
¦ ¦ ¦ ¦
中等强度设置
¦ ¦
低强度设置
TOP
TIP
避免接收光饱和。
4.9锁级别 按键锁类型
LocL L1
选择和设置。
显示返回锁级别顶部菜单。
L1
所有输入功能被锁定
L2
除外部输入外的所有输入功
能被锁定
TOP
4.10结束详细设置(专
家模式)
End EPrt
返回详细设置顶部菜单。
关于功能设置的提示
‒
1)
意味着出厂设置。
‒ 除非另有说明,须按住设置键约0.3秒。
‒ 设置选项可用时,主指示灯闪烁。
利用按键返回正常设置
保持按住按键2秒或更长时间,以在不使用菜单项End的情况下
返回正常设置。
锁定操作元件
按照4.9中所选锁定所有输入功能(操作保护)。
在RUN模式下同时按住两个按键2秒或更长时间。模拟移动
进行解锁(操作保护)。
锁定
解锁
Loc
300
unLc
300
SAM Circuit(ASC = Automatic Sensitivity Control,自
动灵敏度控制)
传感器目前在检查接收光,阈值被自动复位。例如清洁透镜等光量的
突然变化将复位阈值。
外部示教
示教输入(ET)必须启用>200ms,以执行示教过程(针对PNP设备
ET处于>10V...<U
V
;针对NPN设备ET处于0V)。
3 自动示教
按住示教键3秒。
选择自动示教。
Auto StrtC
开始:按下示教键。
Auto StrtC
结束:按下示教键。
Auto StoPC
123C
开关阈值显示器短暂闪烁,显示器显
示基本显示。
4 区段示教
按住示教键3秒。.
选择区段示教。
ZonE C
按下示教键。
ZonE C
ZonE goodC
开关阈值显示器短暂闪烁,显示器
显示基本显示。
5 透明物体示教
按住示教键3秒。
gLAS C
按下示教键
gLAS C
gLAS goodC
开关阈值显示器短暂闪烁,显示器
显示基本显示。
选配
F 端件
BEF-EB01-W190
‒ 保留更改权利。
‒ 欲了解有关配置菜单和示教功能的更多信息,请参阅用户手册或
www.sick.com.
中文
安全须知
调试前阅读操作说明书。使用反射器。反射器警告可预防危险,或
帮助避免传感器或设备损坏。如此处所述,不要使用其他安装或操
作方法。
> 在工作电压断开的情况下连接传感器
> 不要在没有保护盖板的情况下使用传感器。
> 在下列环境下运行可能
> 导致功能故障:
1.多尘或潮湿环境。
2.具有腐蚀性气体的区域。
3.具有喷溅水或油的区域。
4.具有强烈运动地基的区域。
> 不要在户外使用传感器。
> 不要在有火、易爆
> 气体或易燃液体的环境中使用。
> 不要在水中使用。
> 不要拆解、维修或改装传感器。这可能导致火灾和电击。
> 仅在规定区域内使用。
> 妥善保管包装。
> 非欧盟机械指令中定义的安全部件。
a
此传感器不得用作安全装置以保护人身。
A 接线图
手动设置
按下一个选择键:开关阈值显示器闪烁。此时可进行设置。通过选择
键调整。
1正常
300 350
完成设置5秒后自动返回正常显示。
示教期间的错误输出
设置期间出现有错误的输入时将输出错误消息。参见下列表格。
Err1
Err2
Err3
接收值过低
接收值过低
接收值之间的差异过小
功能设置
按住模式按键3秒。
1.运行设置 选择运行模式。
L––d L onC
选择和设置。 .
显示返回运行设置顶部菜单。
Lon
ON-亮通.
1)
don
ON-暗通.
TOP
2.响应时间设置 选择响应时间。
rESP LongC
选择 和设置 。
显示返回响应时间顶部菜单。
High
最快设置16µs
FASt
快速设置70µs
Stnd
默认设置250µs
1)
Long
大扫描范围2ms
SuPr
超大扫描范围8ms
TOP
3.时间滞后设置 选择时间滞后。
dELy C
选择 和设置 。
OFF切换回输出显示。
oFF
时间滞后未启用
1)
oFdy
OFF-Delay
ondy
ON-Delay
Shot
单次
onoF
ON/OFF-Delay
onSh
One-Shot-Delay
TOP
可选择0.1...9999
(0.1ms...9999ms)的时间滞后
用于时间滞后切换和
用于设置。
此后显示返回时间滞后顶部菜单。
oFdy 0001C
4.详细设置
(专家模式)
EPrt C
继续至详细设置。
TOP
A
5.复位 复位所有设置
rSEt no C
选择和设置。
显示返回初始化顶部菜单。
no
无初始化
1)
yES
初始化
TOP
6.完成设置
End C
返回正常显示
B 评价单元功能键
C 安装评价单元
安装在安装导轨上/从安装导轨上移除
安装传感器:
1 将传感器钩入安装导轨。
2 从上方按压以锁止。
移除传感器:
1 沿箭头方向推动传感器。
2 向上翻起光导纤维体的连接侧并移除传感器。
D 光导纤维体连接
‒ 打开光导纤维体锁定装置(参见1)。
‒ 将光导纤维体插入指定开口直至极限位置(参见2 -大约15mm)。
‒ 关闭光导纤维体锁定装置(参见3)。
a
请注意
使用具有同轴光导纤维体结构的传感器类型时,将核心光导纤维
体或标记为白色的光导纤维体与发射器相连。将第二个光导纤维
体与接收器相连。
A
4.1将显示值设置为零。 将主显示器的显示值设置为“0”。
oFSt C
选择 和设置 。
显示返回零值顶部菜单。
off
关闭零值设置。
1)
on
开启零值设置。
TOP
4.2显示器设置 选择显示器设置的显示。
diSP dig C
选择 和设置 。
显示返回显示器顶部菜单。
dig
数字显示
1)
bAr
条形显示
Pct
比例显示
4.3Eco模式 启用省电模式。
Eco off C
选择 和设置 。
显示返回Eco顶部菜单。
off
已禁用省电模式
1)
on
已启用省电模式
理论值显示在20秒后关闭。按下任意
按键启用。
TOP
4.4旋转显示 显示器显示被旋转。
turn off C
选择 和设置 。
显示返回Turn顶部菜单。
off
显示正常1)
on
显示“在顶部”
TOP
4.5迟滞现象设置 选择迟滞现象设置。
HyS P5 C
选择和设置。
适用于数字切换和用于设置。
显示返回迟滞现象顶部菜单。
TOP
P 5C
理论值的1…40%数字范围。
4.6输入设置
选择:外部输入功能
InPt C
选择 和设置 。
输入
rtch
外部示教
1)
tESt
测试输入
Sync
同步
显示返回外部输入功能顶部菜单。
TOP
4.7ASC设置 设置ASC(AutomaticSensitivity
Control,自动灵敏度控制)
ASc oFF C
选择 和设置 。
显示返回ASC设置模式。
oFF
关闭ASC
1)
on
阈值根据环境自动调整。
TOP
TIP
清洁后优先设置阈值。
C
B
E 使用带细长终端套管的光导纤维体
‒ 完全逆时针旋转适配件并插入光导纤维体。
通过顺时针旋转关闭。
‒ 分离多余的光导纤维体。
1 1点示教
+10
%
1
1 开关阈值
2 2点示教
1
1.
2.
1 开关阈值
3 自动示教
4 区段示教
10 %
10 %
1
7
3
6
5
4
2
2
5 透明物体示教
1
1 反射器
传感器类型:
无物体背景下执行示教功能。
直射类型:
需要在现有物体中设置。
将开关阈值设置为高于接收光线值10%。
按钮类型:
第1步:设置为存在物体。 第2步:设置为无物体背景。 确定第1点和第2点之间的开关阈值。
直射类型/按钮类型
开始和结束:
运行过程中自动设置。
按钮类型:
设置为存在物体。
设置对应于接收光±10%的区段。
1近
2 开关阈值
3 上 限
4 阈值
5 区段
6 下 限
7远
反射类型:
执行无物体情况下的示教。
使用反射器。
将开关阈值设置为接收光的90%。
直射系统:
执行无物体情况下的示教。
将开关阈值设置为接收光的90%。

1
2
3
4
5
6
1
2
1
2
2
4
5
3
1
1
2
3
1
3
5
7
2
6
4
1
4
2
3
1
4
2
3
1
3
5
7
2
6
4
1
2
3
4
1
2
3
9.2
(0.36)
37.3 (1.47)
7.7
(0.30)
51.9 (2.04)
10.5
(0.41)
33.2 (1.31)
2 – Ø 2.38
(0.08)
- Ø
(0.09)
8
(0.31)
18.8 (0.74)
27.8 (1.09)
10
(0.39)
7
(0.28)
Ø 4.2
(0.17)
55.4 (2.18)
4.3 (0.17)
34.6 (1.36)
5.7 (0.22)
68.9
(2.71)
3
(0.12)
16.1 (0.63)
Ø 8.6
(0.34)
3.55
(0.14)
10.4
(0.41)
Ø 8.6
(0.34)
8
(0.31)
3.55 (0.14)
B ベースユニット
1 出力表示(オレンジ)
2 選択ボタン
3 光ファイバロック
4 ディスプレイ
5 モードボタン
6 ティーチインボタン
1 光ファイバロックを開ける。
2 光ファイバを所定の開口部の停止位置まで挿入する。
3 光ファイバロックを締める。
4 光ファイバ
5 投光/受光表示
C 取付レールへの取付/取付レールからの取外し
D 光ファイバ接続
E スリムなエンドスリーブ付き光ファイバの使用
1 スリムなエンドスリーブ付き光ファイバ
2 切断位置
3 アダプタキャップ
F エンドピース
G WLL180T
1 開放角約180°
2 ケーブル:Ø3.84コア2m
3 M8オスコネクタ、4ピン
WLL180T-P/N432
WLL180T-P/N434 (赤色LED)
WLL180T-P/N474 (赤外LED)
接続タイプ
ケーブル オスコネクタ、M8、4ピン
スイッチング出力
NPN/PNP
オープンコレクタ100mA/≤30VDC抵抗
負荷電流:≤100mA
残留電圧:≤1.8V
NPN/PNP
オープンコレクタ100mA/≤30VDC抵抗
負荷電流:≤100mA
残留電圧:≤1.8V
供給電圧
12...24VDC±10%残留リップルを含む 12...24VDC±10%残留リップルを含む
消費電力
≤50mA/24V ≤50mA/24V
応答時間
16µs/70
µs/250µs/2ms/8ms
16µs/70
µs/250µs/2ms/8ms
出力
ライトオン/ダークオン ライトオン/ダークオン
短絡保護
m m
光源
赤色LED
赤色LED
:WLL180T-P/N434
赤外LED:WLL180T-P/N474
ステータス表示灯/ディスプレイ
出力表示:オレンジ(Q
1
)2x4桁の7セグメントディスプレイ 出力表示:オレンジ(Q
1
)2x4桁の7セグメントディスプレイ
感度調節
ティーチイン/手動設定 ティーチイン/手動設定
タイマ機能
停止遅延時間,起動遅延時間,Oneshot,起動/停止遅延時間,Oneshotdelay
停止遅延時間,起動遅延時間,Oneshot,起動/停止遅延時間,Oneshotdelay
起動/停止遅延時間
0.1ms...9,999ms 0.1ms...9,999ms
入力設定
外部入力設定(Teach-in/Test/Sync) 外部入力設定(Teach-in/Test/Sync)
周囲温度/動作時
–25...+55°C/35...85%RF(非凍結、非結露) –25...+55°C/35...85%RF(非凍結、非結露)
周囲温度/保管時
–40...+70°C/35...85%RF(非凍結、非結露) –40...+70°C/35...85%RF(非凍結、非結露)
耐衝撃性
10...55Hz、二重振幅1.5mm、各方向(X、Y、Z)に2時間 10...55Hz、二重振幅1.5mm、各方向(X、Y、Z)に2時間
保護等級
IP50 IP50
筐体材質
PC PC
重量
ケーブルタイプ:71g、M8タイプ:25g ケーブルタイプ:71g、M8タイプ:25g
1)
12...24VDC±10%、クラス2供給電圧
2)
最高周囲温度:+55°C)
3)
UL規格筐体タイプ1
(単位:mm)
日本語
A 配線図
1 茶色:12-24VDC
2 負荷
3 黒色:スイッチング出力
4 回 路
5 白色:外部入力
6 サプレッサ
7 青色:OV
NPN
PNP
1
12-24VDC
2 外部入力
3 OV
4 スイッチング出力

4.7ASC設定 ASC(AutomaticSensitivityControl=自
動感度調整)設定
ASc oFF C
で選択し、 で設定します。
画面は、ASC設定モードのトップメニ
ュに戻ります。
oFF
ASCをオフにする
1)
on
環境に合わせて閾値を
自動調整
TOP
TIP
閾値設定は、好ましくは清掃後に行っ
てください。
C
B
E スリムなエンドスリーブ付き光ファイバの使用
‒ アダプタキャップを反時計回りに完全に回し、光ファイバを挿
入します。
時計回りに回してロックします。
‒ 余分な光ファイバを切断します。
設定
1 1ポイントティーチイン
ティーチインボタンを3秒間押
します。
1ポイントティーチインを選択し
ます。
1Pt C
ティーチインボタンを押し
ます。
1Pt C
123C
スイッチング閾値表示が短く点滅
し、ディスプレイは標準画面に戻
ります。
2 2ポイントティーチイン
ティーチインボタンを3秒間
押します。
2ポイントティーチインを選択
します。
2Pt 1Pt C
1.ポイント:ティーチインボタ
ンを押します。
2Pt 1Pt C
2.ポイント:ティーチインボタ
ンを押します。
2Pt 2Pt C
123C
スイッチング閾値表示が短く点滅
し、ディスプレイは標準画面に
戻ります。
C
B
4.8投光LEDの照度設定
照度は3段階から選択できます。
SPor
¦ ¦ ¦ ¦ ¦ ¦
で選択し、 で設定します。
画面は、投光照度設定のトップメニュ
に戻ります。
¦ ¦ ¦ ¦ ¦ ¦
標準設定
1)
¦ ¦ ¦ ¦
中
¦ ¦
強
TOP
TIP
受光が飽和しないように設定してく
ださい。
4.9ロックレベル
キーのロックレベル
LocL L1
で選択し、 で設定します。
画面は、ロックレベルのトップメニュ
に戻ります。
L1
すべての入力機能をロック
L2
外部入力を除く、すべての
入力機能をロック
TOP
4.10詳細設定終了
(エキスパートモード)
End EPrt
画面は、詳細設定のトップメニュに戻ります。
機能設定に関する注意事項
‒
1)
工場出荷時の設定。
‒ 何も指示されなければ、設定ボタンを約0.3秒間押します。
‒ 各設定を選択できるようになると、メイン画面が点滅します。
ワンボタンで標準設定へ戻る
標準設定(RUNモード)に戻るには、メニュの「終了」項目を使用せ
ずに、 ボタンを2秒間以上長押しします。
操作要素のロック
4.9の選択に応じて、すべての入力機能をロックします(不正操作
防止)。
RUNモードで、両方のボタン
を同時に2秒間以上長押ししま
す。ロック解除も同じように行ってください
(不正操作防止)。
ロック
ロック解除
Loc
300
unLc
300
SAM
回路
(ASC=AutomaticSensitivityControl=
自動感度調整)
センサが連続的に受光を点検している場合、閾値は自動的にリセッ
トされます。レンズの清掃などで輝度が急に変わると、閾値がリセ
ットされます。
外部ティーチイン
ティーチイン手順を実行するには、ティーチイン入力(ET)を200ミ
リ秒以上起動させなければなりません
(PNP装置ではET>10V...<U
V
、NPN装置ではET0V)。
3 自動ティーチイン
ティーチインボタンを3秒間押
します。
自動ティーチインを選択します。
Auto StrtC
開始:ティーチインボタンを押
します。
Auto StrtC
終了:ティーチインボタンを押
します。
Auto StoPC
123C
スイッチング閾値表示が短く点滅
し、ディスプレイは標準画面に戻
ります。
4 ゾーンティーチイン
ティーチインボタンを3秒間
押します。
ゾーンティーチインを選択し
ます。
ZonE C
ティーチインボタンを押し
ます。
ZonE C
ZonE goodC
スイッチング閾値表示が短く点滅
し、ディスプレイは標準画面に
戻ります。
5 透明体のティーチイン
ティーチインボタンを3秒間
押します。
gLAS C
ィーチインボタンを押します。
gLAS C
gLAS goodC
スイッチング閾値表示が短く点滅
し、ディスプレイは標準画面に
戻ります。
オプション
F エンドユニット
BEF-EB01-W190
‒ 予告なしに変更される場合があります。
‒ 設定メニューおよびティーチイン機能に関する詳細情報は、ユー
ザマニュアルまたはwww.sick.com を参照してください。
日本語
安全上の注意事項
コミッショニング前に取扱説明書をお読みください。リフレクタを
使用します。リフレクタの警告は、ユーザを危険から保護し、セン
サや設備の損傷を回避することを目的としています。ここで説明
されている方法以外の設置手順または操作手順は適用しないでく
ださい。
> 供給電圧を切断した状態でセンサを接続します。
> 保護カバーなしでセンサを使用しないでください。
> 以下の環境でセンサを動作させると、
> 機能障害が生じる可能性があります:
1.埃または湿気の多い環境
2.腐食性ガスのある領域
3.水飛沫またはオイル飛沫が生じる領域
4.地盤が強く動く領域
> 屋外でセンサを使用しないでください。
> 周囲に火気、爆発性ガス、または
> 可燃性の液体がある環境では使用しないでください。
> 水中では使用しないでください。
> センサを解体したり、修理したり、覆ったりしないでください。
これは火災や感電につながることがあります。
> 規定された領域でのみ使用してください。
> 梱包材は保管してください。
> 本製品はEU機械指令の要件を満たす安全コンポーネントではあ
りません。
a
人体保護を目的とした安全機器として本センサを使用すること
は禁じられています。
A 配線図
手動設定
選択ボタンの一つを押すと、スイッチング閾値表示が点滅します。
これで設定できるようになりました。選択ボタンを使用して調整
します。
1正常
300 350
設定終了後5秒経過すると、自動的に標準画面
に戻ります。
ティーチイン中のエラー表示
入力中にエラーが生じると、エラーメッセージが表示されます。以
下の表を参照してください。
Err1
Err2
Err3
受光値が低すぎる
受光値が低すぎる
2つの受光値の差が小さすぎる
機能設定
モードボタンを3秒間押します。
1.動作設定 動作モードを選択します。
L––d L onC
で選択し、 で設定します。
画面は、動作設定のトップメニュに
戻ります。
Lon
ON-ライトオン
1)
don
ON-ダークオン
TOP
2.応答時間の設定
応答時間を選択します。
rESP LongC
で選択し、 で設定します。
画面は、応答時間のトップメニュに
戻ります。
High
最速設定16µs
FASt
高速設定70µs
Stnd
標準設定250µs
1)
Long
長い検出距離2ms
SuPr
非常に長い検出距離8ms
TOP
3.タイマ設定 タイマと時間を選択します。
dELy C
で選択し、 で設定します。
OFFでタイマ設定のトップメニュに
戻ります。
oFF
タイマオフ
1)
oFdy
オフディレイ
ondy
オンディレイ
Shot
ワンショット
onoF
オン/オフディレイ
onSh
オンショットディレイ
TOP
タイマ設定0.1...9,999
(0.1 ms ... 9,999 ms)の範囲で選択可
でタイマ設定時間を変更し、
で設定します。
その後、画面はタイマ設定の
トップメニュに戻ります。
oFdy 0001C
4.詳細設定
(エキスパートモード)
EPrt C
詳細設定へ移動します。
TOP
A
5.リセット
工場出荷時の設定にすべてリセット
します。
rSEt no C
で選択し、 で設定します。
画面は、初期化(リセット)のトップメ
ニュに戻ります。
no
初期化なし
1)
yES
初期化
TOP
6.設定終了
End C
標準画面に戻る
B 評価ユニットの機能ボタン
C 評価ユニットの設置
取付レールへの取付/取付レールからの取外し
センサ取付:
1 センサを取付レールにはめ込みます。
2 上から押してロックします。
センサの取外し:
1 センサを矢印方向に押します。
2 光ファイバの接続側を上に持ち上げ、センサを取り外します。
D 光ファイバ接続
‒ 光ファイバロックを開けます(1を参照)。
‒ 光ファイバを所定の開口部の停止位置まで挿入します
(2 を参照-約15mm)。
‒ 光ファイバロックを締めます(3を参照)。
a
ご注意ください
同軸ファイバ配置によるセンサバリエーションを使用する場
合、コアファイバまたは白線でマークされた光ファイバを投光
器と接続します。二つ目の光ファイバは受光器と接続します。
A
4.1表示値をゼロにリ
セット
メイン画面の表示値を「0」に設定
します。
oFSt C
で選択し、 で設定します。
画面は、ゼロリセットのトップメニュ
に戻ります。
off
ゼロリセットをオフに
する。
1)
on
ゼロリセットをオンに
する。
TOP
4.2ディスプレイ設定 ディスプレイ設定表示を選択します。
diSP dig C
で選択し、 で設定します。
画面は、ディスプレイ設定のトップメ
ニュに戻ります。
dig
数値表示
1)
bAr
バー表示
Pct
パーセント表示
4.3エコモード 省電力モードを起動します。
Eco off C
で選択し、 で設定します。
画面は、エコモード設定のトップメニ
ュに戻ります。
off
省電力モード無効
1)
on
省電力モード有効
規定値画面は、20秒後に終了しま
す。任意のボタンを押すと有効にな
ります。
TOP
4.4画面回 ディスプレイ表示を回転させます。
turn off C
で選択し、 で設定します。
画面は、画面回転のトップメニュに
戻ります。
off
標準画面
1)
on
上下逆表示
TOP
4.5ヒステリシス設定 ヒステリシス設定を選択します。
HyS P5 C
で選択し、 で設定します。
で値を変更し、 で設定しま
す。画面は、ヒステリシス設定のトッ
プメニュに戻ります。
TOP
P 5C
数値範囲は規定値の1...40%
4.6入力設定
外部入力機能を選択します。
InPt C
で選択し、 で設定します。
入力
rtch
外部ティーチイン
1)
tESt
テスト入力
Sync
同期
画面は、外部入力機能の
トップメニュに戻ります。
TOP
1 1ポイントティーチイン
+10
%
1
1 スイッチング閾値
2 2ポイントティーチイン
1
1.
2.
1 スイッチング閾値
3 自動ティーチイン
4 ゾーンティーチイン
10 %
10 %
1
7
3
6
5
4
2
2
5 透明体のティーチイン
1
1 リフレクタ
透過形バリエーション/センサバリエ
ーション
開始および終了:
対象物移動中に自動設定。
センサバリエーション:
既存の対象物に合わせて設定します。
ゾーンは、受光に応じて+10%で調整されます。
1近
2 スイッチング閾値
3 上 限
4 閾値
5 ゾーン
6 下 限
7遠
センサバリエーション:
背景に対象物がない状態でティーチインを
実行します。
透過形バリエーション:
対象物が存在している状態で調整しま
す。
スイッチング閾値は受光値より10%多く
設定されます。
センサバリエーション:
ステップ1:既存の対象物に合わせて設定し
ます。
ステップ2:背景に対象物がない状態で設
定します。
1.と2.の中間にスイッチング閾値を設定
します。
リフレクタ形バリエーション:
対象物がない状態でティーチインを実行します。
リフレクタを使用します。
スイッチング閾値は、受光の90%に設定されます。
透過システム:
対象物がない状態でティーチインを実行します。
スイッチング閾値は、受光の90%に設定されます。

1
2
3
4
5
6
1
2
1
2
2
4
5
3
1
1
2
3
1
3
5
7
2
6
4
1
4
2
3
1
4
2
3
1
3
5
7
2
6
4
1
2
3
4
1
2
3
9.2
(0.36)
37.3 (1.47)
7.7
(0.30)
51.9 (2.04)
10.5
(0.41)
33.2 (1.31)
2 – Ø 2.38
(0.08)
- Ø
(0.09)
8
(0.31)
18.8 (0.74)
27.8 (1.09)
10
(0.39)
7
(0.28)
Ø 4.2
(0.17)
55.4 (2.18)
4.3 (0.17)
34.6 (1.36)
5.7 (0.22)
68.9
(2.71)
3
(0.12)
16.1 (0.63)
Ø 8.6
(0.34)
3.55
(0.14)
10.4
(0.41)
Ø 8.6
(0.34)
8
(0.31)
3.55 (0.14)
B базовый блок
1 Исходнаяиндикация
(оранжевый)
2 Кнопкавыбора
3 Блокировкаоптоволоконных
кабелей
4 Индикация
5 Кнопка«Mode»(режим)
6 Кнопкаобучения
1 Открытьблокировкуоптоволоконногокабеля.
2 Ввестиоптоволоконныйкабельвпредусмотренные
отверстиядоупора.
3 Закрытьблокировкуоптоволоконногокабеля.
4 Оптоволоконныйкабель
5 Индикацияпередатчик/приемник
C Установка на монтажную рейку/удаление с
монтажной рейки
D Подсоединение оптоволоконных кабелей
E Использование оптоволоконных кабелей с тонкими кабельными гильзами
1 Оптоволоконныйкабельстонкимикабельнымигильзами
2 Месторазъединения
3 Переходник-наконечник
F ывода (опция)
G WLL180T
1 открытыйуголприбл.180°
2 Кабель:Ø3,84жилы2м
3 ШтекерM8,4-конт.
WLL180T-P/N432
WLL180T-P/N434 (Красный светодиод)
WLL180T-P/N474 (инфракрасный светодиод)
Тип подключения Кабель Штекер,M8,4-конт.
Переключающий выход
NPN/PNP
OpenCollector100мА/≤30Впост.токарезистивн.
Токнагрузки:≤100мА
Остаточноенапряжение:≤1,8В
NPN/PNP
OpenCollector100мА/≤30Впост.токарезистивн.
Токнагрузки:≤100мА
Остаточноенапряжение:≤1,8В
Напряжение питания 12–24Впост.тока±10%вкл.остаточнуюпульсацию 12–24Впост.тока±10%вкл.остаточнуюпульсацию
Потребление электроэнергии
≤50мА/24В ≤50мА/24В
Время отклика 16мкс/70
мкс/250мкс/2мс/8мс
16мкс/70
мкс/250мкс/2мс/8мс
Выход срабатываниеприналичии/отсутствиисвета срабатываниеприналичии/отсутствиисвета
Защита от короткого замыкания
m m
Источник света Красныйсветодиод Красныйсветодиод:WLL180T-P/N434
инфракрасныйсветодиод:WLL180T-P/N474
Индикатор питания/дисплей
Исходнаяиндикация:оранжевый(Q
1
,Q
2
)2x4-разрядных7-сегментных
индикатора
Исходнаяиндикация:оранжевый(Q
1
,Q
2
)2x4-разрядных7-сегментных
индикатора
Регулировка чувствительности Обучение/ручнаянастройка Обучение/ручнаянастройка
Временная задержка
Задержкапривыключении,Задержкапривключении,Oneshot,Задержкапри
включении/выключении,Oneshotdelay
Задержкапривыключении,Задержкапривключении,Oneshot,Задержкапри
включении/выключении,Oneshotdelay
Задержка при включении/выключении 0,1мс–9999мс 0,1мс–9999мс
Настройка входа
Настройкавнешнеговхода(обучение/тест/синхр.) Настройкавнешнеговхода(обучение/тест/синхр.)
Окружающая температура/работа –25–+55°C/35–85%отн.влажность(безмороза,безконденсата) –25–+55°C/35–85%отн.влажность(безмороза,безконденсата)
Окружающая температура/хранение
–40–+70°C/35–85%отн.влажность(безмороза,безконденсата)
–40–+70°C/35–85%отн.влажность(безмороза,безконденсата)
Ударопрочность
10–55Гцразмахвибрационныхколебаний1,5мм2часавкаждом
направленииx,y,z
10–55Гцразмахвибрационныхколебаний1,5мм2часавкаждом
направленииx,y,z
Класс защиты
IP50
IP50
Материал корпуса
PC PC
Вес Типкабеля:71г,типM8:25г Типкабеля:71г,типM8:25г
1)
12...24Впост.тока±10%,источникнапряжениякласса2
2)
Макс.окружающаятемпература:+55°C
3)
ТипкорпусаUL1
(Единицыизмерения:мм)
Русский
A Схема подключений
1 Коричневый:12–24Впост.тока
2 Нагрузка
3 Черный:переключающийвыход
4 Переключающаясхема
5 Белый:внешнийвход
6 Устройствоподавления
7 Голубой:OВ
NPN
PNP
1 12–24Впост.тока
2 Внешнийвход
3 OВ
4 Переключающий
выход

4.6Настройкавхода
Выбор:функциявнешн.входа
InPt C
выбратьи настроить.
Вход
rtch
Внешн.обучение
1)
tESt
Тестовыйвход
Sync
Синхронизация
Индикациявозвращаетсякверхнемууровню
менюнастройкивнешнеговхода.
TOP
4.7НастройкаASC НастройкаASC(англ.:AutomaticSensitivity
Control=автоматическаярегулировка
чувствительности)
ASc oFF C
выбратьи настроить.
Индикациявозвращаетсяврежимнастройки
ASC.
oFF
ВыключитьASC.
1)
on
Автоматическиадаптировать
пороговоезначениек
окружающимусловиям.
TOP
TIP
Настройкупороговогозначениялучше
выполнятьпослеочистки.
C
B
E Использование оптоволоконных кабелей с
узкими гильзами для оконцевания
‒ Полностьюповернутьадаптерпротивчасовойстрелкииввести
оптоволоконныекабели.
Блокировкапутемвращенияпочасовойстрелке.
‒ Отрезатьлишнийоптоволоконныйкабель.
Настройка
1 1-точечноеобучение
Нажатьиудерживатькнопкуобучения
втечение3секунд.
Выбрать1-точечноеобучение.
1Pt C
нажатькнопкуобучения.
1Pt C
123C
Индикаторпороговсрабатывания
мигнет,инадисплеепоявитсяосновная
индикация.
2 2-точечноеобучение
Нажатьиудерживатькнопку
обучениявтечение3секунд.
Выбрать2-точечноеобучение.
2Pt 1Pt C
1-яточка:нажатькнопкуобучения.
2Pt 1Pt C
2-яточка:нажатькнопкуобучения.
2Pt 2Pt C
123C
Индикаторпороговсрабатывания
мигнет,инадисплеепоявитсяосновная
индикация.
C
B
4.8Настройкаинтенсивности
свечениясветодиода
передатчика
Можновыбратьтристепениинтенсивности
свечения.
SPor
¦ ¦ ¦ ¦ ¦ ¦
выбратьи настроить.
Индикациявозвращаетсякверхнемууровню
менюнастройкинулевогозначения..
¦ ¦ ¦ ¦ ¦ ¦
Настройкапоумолчанию
1)
¦ ¦ ¦ ¦
Настройкасосредней
интенсивностью
¦ ¦
Настройкаснезначительной
интенсивностью
TOP
TIP
Избегатьконцентрациивоспринимаемого
света.
4.9Уровеньблокировки Видблокировкикнопок
LocL L1
выбратьи настроить.
Индикациявозвращаетсякверхнемууровню
менюуровняблокировки.
L1
Заблокированывсефункции
ввода
L2
Заблокированывсефункции
вводакромевнешнеговхода
TOP
4.10Завершениеподробных
настроек(экспертныйрежим)
End EPrt
Возвраткверхнемууровнюменюподробнойнастройки.
Указания по функциональной настройке
‒
1)
означаетзаводскуюустановку.
‒ Кнопкунастройкинеобходимоудерживатьпримерно
0,3секунды,еслинеуказаноиное.
‒ Главнаяиндикациямигает,еслидоступенвыборнастроек.
Возврат к обычной настройке с помощью кнопки
Нажатьуудерживатькнопку втечение2секундилидольше,
чтобывернутьсякобычнойнастройке(режимработы),не
выбираявменюпунктокончаниянастройки.
Блокировка элементов управления
Блокируетвсефункциивводавсоответствиисвыбраннымивп.
4.9(защитаотнесанкционированногодоступа).
Обекнопки
нажатьодновременноврежимеRUNна2
секундыилидольше.Дляразблокировкидействоватьтакимже
образом(защитаотнесанкционированногодоступа).
Блокировка
Разблокировка
Loc
300
unLc
300
SAM Circuit (ASC = Automatic Sensitivity Control)
Пороговоезначениеавтоматическисбрасываетсяпри
непрерывнойпроверкедатчикомвоспринимаемогосвета.
Внезапноеизменениеколичествасвета,например,после
очисткилинзы,приводитксбросупороговогозначения.
Внешнее обучение
Вводобучения(ET)долженбытьактивированна>200мс,чтобы
выполнитьпроцессобучения(ETна>10В...<U
V
дляприборов
PNP;ETна0ВдляприборовNPN).
3 Автоматическоеобучение
Нажатьиудерживатькнопкуобучения
втечение3секунд.
Выбратьавтоматическоеобучение.
Auto StrtC
Запуск:нажатькнопкуобучения.
Auto StrtC
Завершение:нажатькнопкуобучения.
Auto StoPC
123C
Индикаторпороговсрабатывания
мигнет,инадисплеепоявитсяосновная
индикация.
4 Зонаобучения
Нажатьиудерживатькнопку
обучениявтечение3секунд.
Выбратьзоныобучения.
ZonE C
нажатькнопкуобучения.
ZonE C
ZonE goodC
Индикаторпороговсрабатывания
мигнет,инадисплеепоявитсяосновная
индикация.
5 Программирование прозрачных объектов
Нажатьиудерживатькнопку
обучениявтечение3секунд.
gLAS C
нажатькнопкуобучения.
gLAS C
gLAS goodC
Индикаторпороговсрабатывания
мигнет,инадисплеепоявитсяосновная
индикация.
Опции
F Концевой элемент
BEF-EB01-W190
‒ Правонавнесениеизмененийсохранено..
‒ Дальнейшаяинформацияоменюконфигурацииифункциях
программированияпутемобучениясодержитсявруководстве
пользователяилинасайте
www.sick.com
Русский
Указания по безопасности
Передвводомвэксплуатациюпрочитатьруководство
пользователя.Использоватьотражатель.Отражатель
Предупрежденияпризванызащититьвасотвозможных
опасностейилипомочьвампредотвратитьповреждениедатчика
илиустановки.Придерживайтесьпроцедурыустановкии
управления,описаннойвданномдокументе.
> Приподключениидатчикаотключитьнапряжениепитания.
> Неиспользоватьдатчикбеззащитнойкрышки.
> Использованиевследующейсредеможетпривести
> ксбоямвработе:
1.Пыльнаяиливлажнаясреда.
2.Участкискоррозионнымигазами.
3.Участкисбрызгамиводыилимасла.
4.Участкисоченьподвижнымоснованием.
> Неиспользоватьдатчикподоткрытымнебом.
> Неиспользоватьвблизиогня,взрывоопасных
> газовилигорючихжидкостей.
> Неиспользоватьвводе.
> Неразбирать,неремонтироватьинепереоборудовать
датчик.Этоможетпривестиквозгораниюипоражению
электрическимтоком.
> Использоватьтольковпредусмотреннойсфере.
> Сохранятьупаковку.
> Неявляетсяэлементомобеспечениябезопасностив
терминологииДирективыЕСпоработесмашинным
оборудованием.
a
Запрещается использовать данный датчик в качестве
элемента обеспечения безопасности
с целью защиты человеческого организма.
A Схема соединений
Ручнаянастройка
Нажмитеоднуизкнопоквыбора:индикаторпорогов
срабатыванияначнетмигать.Можновыполнитьнастройку.
Настройкаспомощьюкнопоквыбора.
1Обычныйвид
300 350
Автоматическийвозвраткобычномувидучерез
5секундпослезавершениянастройки..
Выводошибоквовремяобучения
Принеправильномвводевовремянастройкивыдается
сообщениеобошибке.См.следующуютаблицу.
Err1
Err2
Err3
Слишкомнизкоепринимаемоезначение
Уровеньизмерениянасыщен
Недостаточнаяразницамеждудвумяпринимаемыми
значениями
Функциональная настройка
Нажатьиудерживатькнопку«Mode»(режим)втечение3секунд.
1.Настройкарежимаработы Выбратьрежимработы.
L––d L onC
выбратьи настроить.
Индикациявозвращаетсякверхнемууровню
менюнастройкирежимаработы.
Lon
ON-активацияприналичии
отраженногосвета.
1)
don
ON-активацияприотсутствии
отраженногосвета.
TOP
2.Настройкавремени
отклика
Выбратьвремяотклика.
rESP LongC
выбратьи настроить.
Индикациявозвращаетсякверхнемууровню
менюнастройкивремениотклика.
High
Максимальнобыстрыйотклик
16мкс
FASt
Быстрыйотклик70мкс
Stnd
Настройкапоумолчанию
250мкс
1)
Long
Большоерасстояние
срабатывания2мс
SuPr
Оченьбольшоерасстояние
срабатывания8мс
TOP
3.Настройкавременной
задержки
Выбратьвременнуюзадержку.
dELy C
выбратьи настроить.
OFFвозвращаетсякисходнойиндикации.
oFF
Временнаязадержкане
активирована.
1)
oFdy
Задержкавыключения
ondy
Задержкавключения
Shot
Однократноесрабатывание
onoF
Задержкавключения/
выключения
onSh
Однократнаязадержка
включения
TOP
Временнуюзадержкуможновыбратьв
диапазонеот0,1до9999(от0,1до9999мс).
длявыборавременнойзадержкии
длянастройки.
Затеминдикациявозвращаетсякверхнему
уровнюменюнастройкивременнойзадержки.
oFdy 0001C
4.Подробныенастройки
(экспертныйрежим)
EPrt C
Дальшекподробнойнастройке.
TOP
A
5.Сброс
Сбросвсехнастроек.
rSEt no C
выбратьи настроить.
Индикациявозвращаетсякверхнемууровню
менюинициализации.
no
Безинициализации
1)
yES
Инициализация
TOP
6.Завершениенастройки
End C
Возвраткобычнойиндикации
B Функциональные кнопки блока оценки данных
C Установка блока оценки данных
Установканамонтажнуюрейку/удалениесмонтажнойрейки
Установкадатчика:
1 Зацепитьдатчикзамонтажнуюрейку.
2 Нажатьсверху,чтобызафиксировать.
Удалениедатчика:
1 Сдвинутьдатчиквнаправлении,указываемомстрелкой.
2 Повернутьсторонойдляподключенияоптоволоконныхкабелей
вверхиудалитьдатчик.
D Соединение оптоволоконных кабелей
‒ Открытьмеханизмблокировкиоптоволоконныхкабелей.(см.
1).
‒ Ввестиоптоволоконныекабеливпредусмотренныеотверстия
доупора(см.2 -прибл.15mm).
‒ Закрытьмеханизмблокировкиоптоволоконныхкабелей(см.
3).
a
Внимание!
Прииспользованиявариантадатчикаскоаксиальным
расположениемоптоволоконногокабеля,соединить
центральныйоптоволоконныйкабельилиобозначенный
белымоптоволоконныйкабельспередатчиком.Второй
оптоволоконныйкабельсоединитьсприёмником.
A
4.1Установказначенияна
дисплеенануль.
Установитьпоказаниянаглавноминдикаторе
на«0».
oFSt C
выбратьи настроить.
Индикациявозвращаетсякверхнемууровню
менюнастройкинулевогозначения.
off
Выключитьнастройкунулевого
значения.
1)
on
Включитьнастройкунулевого
значения.
TOP
4.2Настройкидисплея Выбратьспособпредставлениянастроек
дисплея.
diSP dig C
выбратьи настроить.
Индикациявозвращаетсякверхнемууровню
менюнастройкидисплея.
dig
Цифроваяиндикация
1)
bAr
Столбчатаяиндикация
Pct
Индикациявпроцентах
4.3Режим«Eco» Активироватьрежимэкономии
электроэнергии.
Eco off C
выбратьи настроить.
Индикациявозвращаетсякверхнемууровню
менюрежима«Eco».
off
Режимэкономии
электроэнергиивыключен
1)
on
Режимэкономии
электроэнергиивключен
Индикациязаданногозначенияотключается
черед20секунд.Активацияпутемнажатия
любойкнопки.
TOP
4.4Поворотиндикации Индикациянадисплееповорачивается.
turn off C
выбратьи настроить.
Индикациявозвращаетсякверхнемууровню
менюповорота.
off
Обычнаяиндикация
1)
on
Перевернутаяиндикация
TOP
4.5Hастройкагистерезиса Выбратьнастройкугистерезиса.
HyS P5 C
выбратьи настроить.
длявыборацифри для
настройки.Индикациявозвращаетсяк
верхнемууровнюменюгистерезиса.
TOP
P 5C
Числовойдиапазон1–40%отзаданного
значения.
1 1-точечное обучение
+10
%
1
1 Порогсрабатывания
2 2-точечное обучение
1
1.
2.
1 Порогсрабатывания
3 Автоматическое обучение
4 Зона обучения
10 %
10 %
1
7
3
6
5
4
2
2
5 Программирование прозрачных объектов
1
1 Отражатель
Вариантдатчика:
Провестиобучениенафонбезобъекта.
Одноразовыйвариант:
Выполнятьнастройкусприсутствующим
объектом.
Порогпереключенияустанавливается
на10%вышевоспринимаемого
световогозначения.
Вариантдатчика:
1-йшаг:настроитьнаимеющийся
объект.
2-йшаг:настроитьнафонбезобъекта. Определяетпорогсрабатываниямежду
1-йи2-йточкой.
Одноразовыйвариант/Вариант
датчика
Запускизавершение:
автоматическаянастройкавовремя
процесса.
Вариантдатчика:
Настроитьнаимеющийсяобъект.
Настройказоныс±10%всоответствиис
воспринимаемымсветом.
Вариантотражения:
Выполнятьобучениебезобъекта.
Порогпереключениянастраиваетсяна90%
воспринимаемогосвета.
Однопроходнаясистема:
Выполнятьобучениебезобъекта.
Порогпереключениянастраиваетсяна90%
воспринимаемогосвета.
1 Близко
2 Порогсрабатывания
3 Верхняяграница
4 Пороговоезначение
5 Зона
6 Нижняяграница
7 Fern
-
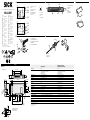 1
1
-
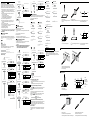 2
2
-
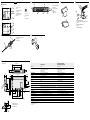 3
3
-
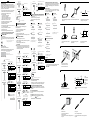 4
4
-
 5
5
-
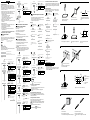 6
6
-
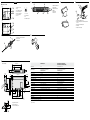 7
7
-
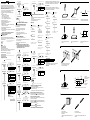 8
8
-
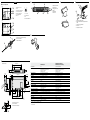 9
9
-
 10
10
-
 11
11
-
 12
12
-
 13
13
-
 14
14
-
 15
15
-
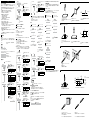 16
16
-
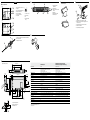 17
17
-
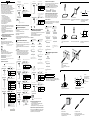 18
18


em outras línguas
- español: SICK WLL180T Instrucciones de operación
- français: SICK WLL180T Mode d'emploi
- italiano: SICK WLL180T Istruzioni per l'uso
- 日本語: SICK WLL180T 取扱説明書
Artigos relacionados
-
SICK WLL180T Standalone Instruções de operação
-
-
-
-
-
SICK WLL180T Instruções de operação
-
-
-
-