
the FoodCycler
™
SWR550
EN
QUICK GUIDE
DE
KURZANLEITUNG
FR
GUIDE RAPIDE
NL
SNELSTARTGIDS
ES
GUÍA RÁPIDA
IT
GUIDA RAPIDA
PT
MANUAL RÁPIDO

2
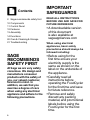
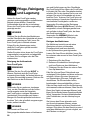
SAGE
RECOMMENDS
SAFETY FIRST
At Sage we are very safety
conscious. We design and
manufacture consumer
products with the safety of
you, our valued customer,
foremost in mind. In
addition, we ask that you
exercise a degree of care
when using any electrical
appliance and adhere to the
following precautions.
IMPORTANT
SAFEGUARDS
READ ALL INSTRUCTIONS
BEFORE USE AND SAVE FOR
FUTURE REFERENCE
• A downloadable version
of this document
is also available at
sageappliances.com
When using electrical
appliances, basic safety
precautions should always be
followed including:
• Before using for the
rst time ensure your
electricity supply is the
same as shown on the
label on the underside of
the appliance.
• Carefully read all
instructions before
operating the FoodCycler
for the rst time and save
for future reference.
• Remove and safely
discard any packing
material, and promotional
labels before using the
FoodCycler for the rst
time.
2 Sage recommends safety rst
10 Components
11 Control Panel
12 Features
13 Assembly
14 Functions
20 Care & Cleaning & Storage
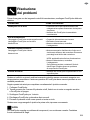
21 Troubleshooting
Contents

3
• To eliminate a choking
hazard for young
children, remove and
safely discard the
protective cover tted
to the power plug of this
appliance.
• Do not place the
FoodCycler near the
edge of a bench or table
during operation.
• Ensure the surface is
level, clean and free
of water and other
substances.
• Do not use the
FoodCycler on a sink
drain board.
• Do not place the
FoodCycler on or near
a hot gas or electric
burner, or where it could
touch another heated
appliance.
• Do not operate the
FoodCycler on an
inclined surface. Do not
move the FoodCycler
while it is switched on.
• Do not cover the air vents
while the FoodCycler is
operating.
• Never use the
FoodCycler without the
bucket in place correctly.
• Never use the
FoodCycler with an
empty bucket.
• Never touch the inside of
the FoodCycler while it is
operating as it is very hot.
• Always operate the
FoodCycler on a stable
and heat resistant
surface. Do not use on
a cloth-covered surface,
near curtains or other
ammable materials.
• Recommend keeping the
FoodCycler in an open
environment for better air
and humidity circulation.
• Hot air from the rear
side of the FoodCycler
during operation may
hold a lot of moisture.
Always provide sucient
clearance (minimum
20cm) above and on all

4
sides to eliminate any
moisture condensation
on the walls.
• Hot air is released
through the air vents
on the rear side of the
FoodCycler during
operation. Always keep
your hands and face at
a safe distance from the
hot air and from the air
vents.
• Never use the
FoodCycler without
the rear air outlet cover
installed as the inner
accessible surface of the
FoodCycler is very hot
during and sometimes
after operation.
• Never attempt to remove
the security seal sticker
or open the side cover
of the FoodCycler.
Warranty void if seal is
removed or damaged.
Misuse may cause
injury.
• Before starting to
operate the FoodCycler
each time, clean any dirt
or food residue on the
external surface of the
bucket and the surface
of the heating plate.
• The FoodCycler is
designed for processing
household FOOD
WASTE only. Do not add
non-food waste to the
FoodCycler.
• Do not ll the bucket
with hard food waste
such as hard bones or
other similar hard food
waste as it may damage
the bucket and the
FoodCycler.
• Do not over-ll the
bucket past the ‘Fill line’
marked on the interior of
the bucket.
• Do not pack down food
waste to keep it beneath
the ll line once full.
Overloading the bucket
may cause a jam and
damage the motor and
FoodCycler.

5
• Do not place anything on
top of the FoodCycler.
• Do not place any part
of the FoodCycler in the
dishwasher except the
bucket.
• To prevent burns or
personal injury, always
use protective hot
pads or insulated
oven mitts when
inserting, removing or
handling items from the
FoodCycler when hot.
Alternatively, allow the
FoodCycler to cool down
before handling.
• Always use extreme
caution when removing
any of the accessories or
disposing of food waste
from the bucket.
• It is recommended to
use only the accessories
supplied with this
FoodCycler.
• The use of any
accessory attachments
not recommended by
Sage may cause injuries.
• Do not attempt to
operate the FoodCycler
by any method other
than those described in
this book.
• Always ensure the
FoodCycler is properly
assembled before use.
Follow the instructions
provided in this book.
• The FoodCycler will not
operate unless properly
assembled with the lid
locked in place.
• Ensure the FoodCycler
lid is securely locked in
place before operating.
• The FoodCycler is not
intended to be operated
by means of an external
timer or separate
remote-control system.
• Do not store any item on
top of the FoodCycler
when in use and when
stored.
• Always ensure the
FoodCycler has cooled,
is turned o at the
power outlet and the

6
cord is unplugged from
the power outlet before
attempting to move the
FoodCycler.
• Always disconnect
the FoodCycler from
the power outlet if it is
left unattended and
before assembling,
disassembling or
cleaning.
• Do not place the
FoodCycler in direct
sunlight. Colour fading
and discolouration
may occur when
the FoodCycler is
consistently exposed to
UV light.
• Keep the FoodCycler
clean. Follow the
cleaning instructions
provided in this book.
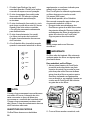
SPECIFICATIONS
FILTER LIFE
Processing Modes Drying, Grinding, Cooling
Product Dimension
(mm)
(W) 280 x (D) 320 x (H) 360
Power Input 220 – 240V 50/60Hz
Power
Consumption
500W
Energy Usage
(Running)
Approx. 0.8KWh per cycle
Energy Usage
(Standby Mode)
2KWh per month
Processing Time Approx. 4 – 6 hours*
Waste Volume
Reduction
Approx. over 80% **
Bucket Capacity Approx. 2 Litres
^A lter replacement warning light will alert
you when it is time to replace.
* Typical processing time takes an average
of 4-6 hours. Cycle time will vary depending
on the types of food being processed and
the total moisture content. Total maximum
processing time is maximum 8 hours. The
cooling phase takes up to an additional 30
minutes.
** The volume of the bucket contents may
be reduced by over 80% depending on the
amount and moisture content of the food
scraps being processed.
IMPORTANT SAFEGUARDS
FOR ALL ELECTRICAL
APPLIANCES
• Fully unwind the power
cord before use.
• Connect only to a 220V
or 240V power outlet.

7
• The appliance must
be used on a properly
grounded outlet. If it is
not sure, please consult
a qualied electrician.
• Do not, under any
circumstances, modify
the power plug or use a
power plug adapter.
• Do not place this
appliance on or near a
heat source, such as hot
plate, oven or heaters.
• Position the appliance
at a minimum distance
of 20cm away from
walls, curtains and other
heat or steam sensitive
materials and provide
adequate space above
and on all sides for air
circulation.
• Do not let the power
cord hang over the edge
of a bench or table,
touch hot surfaces or
become knotted.
• This appliance is for
household use only. Do
not use this appliance
for anything other than
its intended use. Do not
use in moving vehicles
or boats. Do not use
outdoors. Misuse may
cause injury.
• The appliance is not
intended for use by
persons (including
children) with reduced
physical, sensory or
mental capabilities,
or lack of experience
and knowledge, unless
they have been given
supervision or instruction
concerning use of the
appliance by a person
responsible for their
safety.
• Children should be
supervised to ensure that
they do not play with the
appliance.
• This appliance shall not
be used by children.

8
• Always turn the appliance
to the OFF position,
switch o at the power
outlet and unplug at the
power outlet when the
appliance is not in use.
• Before cleaning, always
turn the appliance to the
OFF position, switch o at
the power outlet, unplug
at the power outlet and
remove the power cord,
if detachable, from the
appliance and allow all
parts to cool.
• To protect against electric
shock, do not immerse
the power cord, power
plug or appliance in water
or any other liquid or
allow moisture to come
in contact with the parts,
unless it is recommended
in the cleaning
instructions.
• Any maintenance other
than cleaning should
be performed at an
authorised Sage Service
Centre.
• It is recommended to
regularly inspect the
appliance. To avoid a
hazard, do not use the
appliance if power cord,
power plug or appliance
becomes damaged
in any way. Return the
entire appliance to the
nearest authorised
Sage Service Centre
for examination and/or
repair.
• Children should not play
with the appliance.
• Cleaning of the
appliance should not be
carried out by children
unless they are 8 years
or older and supervised.
• The appliance and its
cord should be kept out
of reach of children aged
8 years and younger.
• The installation of
a residual current
device (safety switch)
is recommended to
provide additional safety
protection when using
electrical appliances.

9
It is advisable that
a safety switch with
a rated residual
operating current not
exceeding 30mA be
installed in the electrical
circuit supplying the
appliance. See a
qualied electrician for
professional advice.
• During electrical storms,
the appliance should
be disconnected from
the power source at the
wall socket to prevent
any electrical surges
that may arise during
the storm and which
may inadvertently cause
damage to the appliance
and its electronic
componentry.
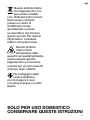
The symbol shown
indicates that this
appliance should not
be disposed of in normal
household waste. It
should be taken to a local
authority waste collection
centre designated for this
purpose or to a dealer
providing this service. For
more information, please
contact your local council
oce.
This symbol
indicates,
temperature of
accessible
surfaces may be high
when the appliance is
operating and for some
time after use.
To avoid electric
shock, do not
immerse the cord or plug
in water (or other liquids).

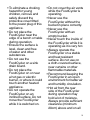
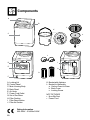
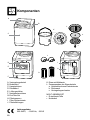
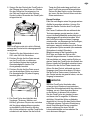
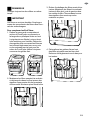
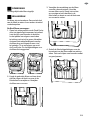
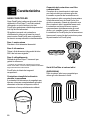
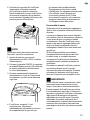
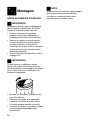
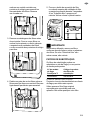
A. Locking Lid
B. Control Panel
C. Main Housing Body
D. Back Panel
E. Air Vents
F. Power Cord Outlet
G. Set of EcoFilters
H. Filter Cavities
I. Filter Reset Button
J. Filter Air Guides
K. Bucket with Agitators
L. Bucket Lid Assembly
a. Carbon Foam Lid Liner
b. Back Cover
c. Locking Screw
NOT PICTURED
• Non-Slip Feet
• Power Cord
Components
A
C
D
E
F
J
G
H
I
L
B
K
a
b
c
Rating Information
220–240V ~ 50/60Hz 500W

11
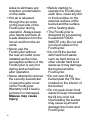
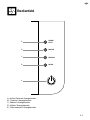
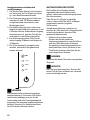
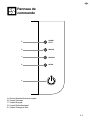
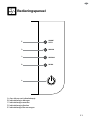
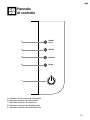
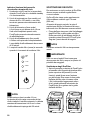
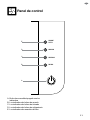
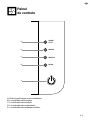
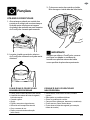
Control Panel
CHANGE
FILTER
COOLING
GRINDING
DRYING
A
B
C
D
E
A. Power On / O button with indicator light
B. Drying indicator light
C. Grinding indicator light
D. Cooling indicator light
E. Change lter indicator light

12
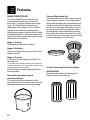
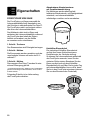
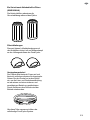
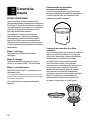
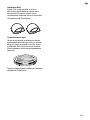
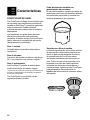
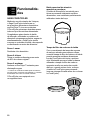
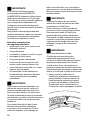
Carbon Filter Bucket Lid
Complete with an activated carbon foam lid-
liner to capture odours, the versatile carbon
lter bucket lid allows for accumulating food
waste outside of the FoodCycler until ready
to start your next cycle. Keep the bucket on
its own on your benchtop using the carbon
ltered lid while you accumulate your daily
food waste, then when full, place the bucket
in the FoodCycler to process (remove bucket
lid before placing into FoodCycler).
A set of 2 activated carbon EcoFilters
Activated carbon lters are designed to
reduce odours during cycling.
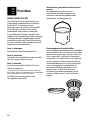
Features
SAGE FOODCYCLER
Your Sage FoodCycler transforms your
household food waste into nutrient rich
EcoChips™, using an intuitive three stage
cycle. The FoodCycler pulverizes and
dehydrates nearly all types of food waste.
Agitators turn inside the grinding bucket,
reducing food waste to small particles, while
simultaneously the FoodCycler aerates and
heats the bucket content, decomposing and
sterilising the food waste.
Stage 1- Drying
Dehydrates household food waste
Stage 2- Grinding
Grinds food waste down by over 80% of the
original volume**
Stage 3- Cooling
Cools down the remaining EcoChips™ for
safe disposal
** The volume of the bucket contents may be reduced by
over 80% depending on the amount and moisture content
of the food scraps being processed.
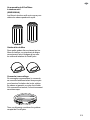
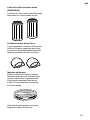
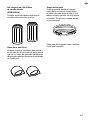
The FoodCycler comes equipped with the
following items:
Removable, porcelain-coated
aluminium bucket
The grinding bucket is designed to fully
grind and process food waste, with perfectly
calibrated resistance and strength testing.

13
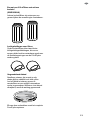
Filter Air Guides
Two small air guide covers sit on top of
the carbon lters, ensuring that the air and
water vapour is properly directed toward the
FoodCycler vents.
Locking Lid
Seamless design, slides and locks smoothly
into place prior to every cycle to help insulate
sound, reduce odours, and ensuring a safe,
reliable cycle. Removing the lid will pause
operation.
Each one of these parts forms the complete
FoodCycler system.
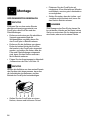
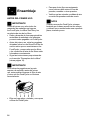
BEFORE FIRST USE
IMPORTANT
Ensure all packaging is removed from the
FoodCycler, EcoFilters and lter air guides
before using.
• Remove and safely discard any
packaging material or promotional labels
attached to your FoodCycler.
• Remove the stickers located on the top of
the two activated carbon EcoFilters that
come tted in the FoodCycler and ensure
that the lters and lter air guides are in
place before rst use.
• Follow the direction found in Replacing the
Filters on page 17.
IMPORTANT
Failure to remove the stickers located at the
top of each of the lters before rst use may
impede air ow and cause the FoodCycler to
fail to operate properly.
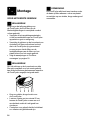
• Select a at, level and dry location for the
FoodCycler.
• For proper air ow, locate the FoodCycler
at least 20cm from any wall or furniture.
• Ensure the air inlet and outlets are not
blocked before use.
NOTE
When moving the FoodCycler, always lift
using two hands under the base and set
down gently on a at, level and dry surface.
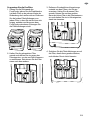
Assembly

14
Functions
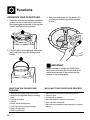
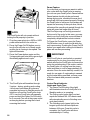
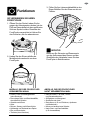
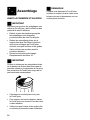
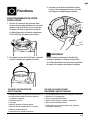
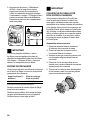
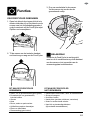
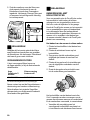
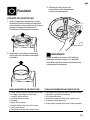
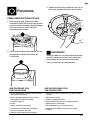
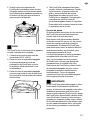
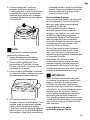
OPERATING YOUR FOODCYCLER
1. Open the lid by turning counter-clockwise
until the arrow on the bucket lid is facing
the unlock symbol pictured on the top part
of the FoodCycler. Lift to remove.
2. Lift the bucket up straight and away from
the FoodCycler using the folding metal
handle.
3. Add your food waste into the bucket. Do
not load the bucket beyond the marked
ll line.
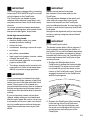
IMPORTANT
Before starting to operate the FoodCycler
each time, clean any dirt or food residue on
the external surface of the bucket and the
surface of the heating plate.
PROCESS
• Meat sh and poultry scraps (no bones)
• Most fruit and vegetable scraps, including
peels
• Cereals and grains
• Cheese
• Beans, seeds and legumes
• Coee grounds and paper tea bags
• Eggs and eggshells
• Pet food (no bones)
• Hard bones such as beef, lamb and pig bones.
• Candy or gum
• Cooking oils or greases
• Hard pits (peaches, apricots, nectarines)
• Nuts and other hard shells
• Hard fruit and vegetable leaves (example, pineapple
leaves)

15
IMPORTANT
The FoodCycler is designed for processing
household FOOD WASTE only. Do not add
non-food waste to the FoodCycler.
The FoodCycler can handle organic
materials that traditional composters can’t
and performs best when fed a wide variety
of foods.
To ensure optimal food waste breakdown,
mix food waste together, with heavier foods
interspersed with lighter, dryer foods.
Avoid high concentrations
of the following foods:
• starches (bread, cake, rice, pasta,
mashed potatoes, stung)
• citrus fruit rinds
• condiments, dressings, sauces & soups
• nut butters
• jam, jellies, marmalades
• high sugar fruits (grapes, cherries, melon,
oranges, bananas, etc.)
• meat, dairy and eggshells- sour creams,
yogurts, spoiled milk.
• The dense, starchy and/or moisture-rich
composition of these foods make them
dicult to process in large quantities.
IMPORTANT
When processing food waste that is high
in starches and sugar, sauces or fatty food
waste, be sure to mix them with other food
waste. If these types of food waste are
processed without mixing, there is a chance
that the end product may become stuck to
the bottom of the bucket and fail to process
entirely.
If your end product comes out less than
optimal, simply add more food waste and
start the cycle again. Be sure to cut up long
food waste such as corn cobs, corn husks,
etc. into smaller pieces as these items are
highly brous and may cause a jam if left
whole.
IMPORTANT
Always ensure that no food waste
falls outside of the bucket and into the
FoodCycler.
This may cause damage to the motor and
other internal components. You should
remove the bucket from the FoodCycler
prior to adding food waste. You can keep the
bucket on your kitchen benchtop and ll with
food waste
throughout the day/week until you are ready
to start a cycle by using the carbon ltered
bucket lid.
IMPORTANT
Do not overll your bucket.
The bucket comes with a full line (approx. 2
Litres capacity) inside along the interior of
the bucket. Do not add food waste above this
line. Do not pack down food waste to keep it
beneath the full line once full. Overlling the
bucket might cause the FoodCycler to jam
and not process.
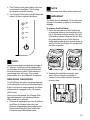
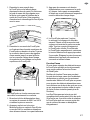
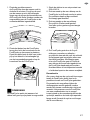
1. Replace the lled bucket into the
FoodCycler by sliding the bucket straight
into the cavity. The arrow on the bucket
rim should line up with the arrow on the
interior of the FoodCycler cavity. This will
engage the interlock on the FoodCycler
and the bucket gears.
2. Replace the FoodCycler lid by inserting
it into the top of the FoodCycler over
the bucket. Turn the lid clockwise until
the arrow on the lid aligns with the lock
symbol picture on the top part of the
FoodCycler.

16
NOTE
The FoodCycler will not operate without
locking the lid properly in position.
1. Plug the power plug into a 220V or 240V
power outlet and turn the outlet on.
2. Press the Power On/O button once to
turn the FoodCycler on to Ready mode
and the fan is running in low speed. The
light will illuminate.
3. Press the Power button again and the
3-stage cycling will start with a green light
illuminating against each cycle.
4. The FoodCycler will transition through
3 cycles – drying, grinding and cooling
- then beep once when all cycles are
complete and revert to Standby mode. All
lights turn o and the FoodCycler shuts
o. To turn the FoodCycler o manually,
press and hold the Power On/O button
for 3 seconds. Turn o at the power outlet
and unplug before opening the lid and
removing the bucket.
Pause Feature
If you nd that you have more waste to add to
your cycle while the FoodCycler is running,
you can use your FoodCycler’s Pause feature.
Pause feature should only be performed
during drying cycle, otherwise the new food
scraps will not be processed properly. Pausing
the FoodCycler to add more food scraps will
impact the accuracy of the cycle time, which
will extend the overall cycle period (though the
cycle will never last longer than 8 hours).
The EcoChips may not be fully processed
by the end of the cycle. In this case, you may
want to run the FoodCycler a second time to
completely dehydrate the bucket contents.
To Pause the FoodCycler, press the Power
On/O button once or open the lid while the
unit is processing. Pressing the Power On/O
button once again after locking the lid back in
place will resume processing.
IMPORTANT
If the FoodCycler is overloaded or operated
continuously for too long, the safety cut-out
switch will stop the FoodCycler to prevent the
motor from overheating. If this occurs, switch
the FoodCycler o, unplug from the power
outlet and allow to cool for approximately 30
minutes. Once the motor has fully cooled, it is
ready for use again. If overheating is caused
by the bucket being overlled, remove some
of the food waste and process in smaller
batches.
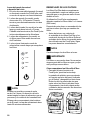
Control Panel Indicator
Lights and Cycle Time
1. The Power On/O button (blue light)
will illuminate when the FoodCycler is in
Standby mode or in operating.
2. The Drying cycle (green light) can last
anywhere between 60-100 minutes and
will automatically move to Grinding once
cycle has nished.
3. The Grinding cycle (green light) is the
longest cycle and can last anywhere
between 4-6hours. Once this cycle is
complete, the FoodCycler will move
automatically to Cooling.

17
4. The Cooling cycle (green light) is the last
cycle before completion. The Cooling
mode lasts under 30 minutes.
5. The Change Filter light (red) will illuminate
when it is time to replace the lters.
CHANGE
FILTER
COOLING
GRINDING
DRYING
NOTE
Typical processing time takes an average of
4 - 6 hours. Cycle time will vary depending
on the types of food being processed and
the total moisture content. Total maximum
processing time is 8 hours. The cooling
phase takes up to an additional 30 minutes.
Your EcoFilters should be replaced regularly
or as indicated to ensure an odourless cycle.
If the FoodCycler is used regularly, the lters
will need to be changed every 3-4 months
(500 Hours).
At the end of this period, the Change Filter
light will illuminate red indicating that the
lters need to be replaced.
• Remove all packaging from the EcoFilters
and Filter Air Guides before rst use.
Remove all packaging from replacement
lters before tting into the FoodCycler.
Follow the steps described below.
NOTE
Always change both lters at the same time.
IMPORTANT
The lters are not washable. Do not immerse
any part of the lters in water as it will cause
damage.
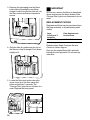
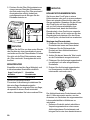
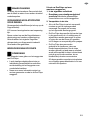
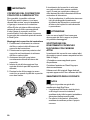
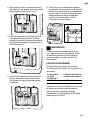
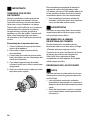
To replace the EcoFilters:
1. Open the back panel of the FoodCycler
by pressing down on the plastic tab at the
top of the panel (with the arrow), then pull
outwards to release. Remove the two lter
air guides sitting on top of the lters by
tilting slightly towards you, then lift them up
and out of the FoodCycler. Do not discard
the lter air guides.
2. Keeping the used lters straight, twist
each of them counter-clockwise to
remove from the lter cavities. Remove
one at a time.

18
3. Remove the packaging from the lters
before tting. Keeping the new lters
straight, insert the right, then the left, into
the lter cavities and twist clockwise to
secure.
4. Slide the lter air guides over the top of
the lters so they sit straight. Push down
slightly to t.
5. Locate the lter reset button along the
upper, inner lip of the lter cavity and
press and hold for 3 seconds. The
‘Change Filter’ light will turn o when it is
reset. Replace the back panel.
IMPORTANT
On rst use, remove the lters as described
above and remove the lters stickers. If the
‘Change Filter’ light is not illuminated, do not
reset.
REPLACEMENT FILTERS
Replacement lters may be purchased from
the Sage website† or at participating retail
outlets.
Sage
FoodCycler™
Model No
Filter Replacement
Product Code
SWR550GRY SWR050BLK
†Delivery charges may apply.
Please contact Sage Customer Service
Centre for further support.
Only use the original Sage lter specially
intended for this appliance. Do not use any
other lter.

19
IMPORTANT
For convenience, you can store the
FoodCycler under the bench or even outside
of the kitchen in an accessible area of the
house, like the laundry or garage. Keep just
the FoodCycler bucket on your benchtop
to accumulate your food waste hassle and
odour-free by using with the carbon lter
bucket lid. When full, remove the bucket
lid before placing into the FoodCycler to
process.
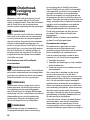
Assembling your bucket lid
1. Place the carbon lter foam liner inside
the bucket lid.
2. Place the back-lid cover on top of the
carbon lter foam liner.
3. Ensure that all pieces are properly aligned
within the ridge of the lid.
4. Place the locking screw into the centre
hole of all the aligned lid parts.
5. Turn locking screw clockwise until the lid
parts are secure.
Your carbon foam lid liner should be replaced
every 2-3 months to help reduce odours
released from collecting food waste inside
the grinding bucket.
• To replace, simply remove all packaging
from the replacement carbon lid liner and
place inside the lid as described above.
WARNING
The lters are not washable. Do not immerse
any part of the lters in water as it will cause
damage.
REPLACEMENT CARBON
FOAM LID LINER
Replacement carbon lid liners may be
purchased from the Sage website† .
†Delivery charges may apply.
Please contact Sage Customer Service
Centre for further support.
Only use the original Sage lter specially
intended for this appliance. Do not use any
other lter.
NOTE
The following is a guide to EcoChips disposal
only.
• Country, State/Territory and individual
council regulations regarding food waste
disposal will vary.
• Check with your local council for more
information before disposing.
There are two ways of
disposing your EcoChips:
1. In the General Bin
• Refer to state/territory and individual
council regulations for appropriate
disposal.
2. Applied in the Garden
• If applied to your garden, EcoChips must
be incorporated as part of the topsoil, not
just surface applied
• The EcoChips can be incorporated into
soil around fruit or nut trees or vines at any
time. Fallen produce must not be collected
o the ground for 90 days after each
application.
• The EcoChips can be used in agriculture,
home gardens and landscaping. If it is
applied to land to grow food that comes
into direct contact with the soil (such
as carrots, lettuces and leafy herbs)
consumers must wait 90 days before
planting to minimise potential health risks.

Care, Cleaning
& Storage
Keeping your FoodCycler clean will help
ensure that your FoodCycler performs
cleanly and eciently. Both the exterior of the
FoodCycler and the removable bucket should
be cleaned regularly.
NOTE
Before starting to operate your FoodCycler for
each time, clean the bottom of the grinding
bucket and the surface of the heating plate
using a clean and dry cloth.
Follow the directions below to keep your
FoodCycler looking (and working) at its best.
Always ensure the FoodCycler is turned o,
switched o at the power outlet and unplugged
and allow the FoodCycler to cool before
performing any cleaning or lter replacement.
Cleaning the outside of the FoodCycler
WARNING
DO NOT immerse your FoodCycler in water.
This will damage your FoodCycler beyond
repair and might cause electric shock. Exterior,
cosmetic cleaning only!
NOTE
Use a clean, dry cloth to clean external
surface, internal surface and heating plate
surface of the FoodCycler. With particularly
stubborn grime, you can add a small amount
of dish soap to your damp dish cloth before
thoroughly wringing out most of the moisture.
NOTE
Exposure to cooking oils and cleaning
chemicals may cause colour fading and
discolouration to the FoodCycler. If the
FoodCycler is exposed to oils or chemicals,
turn o and unplug the appliance and use a
damp cloth to clean the external surface of
the FoodCycler. Dry thoroughly using a dry,
lint-free cloth or paper towel to remove all
moisture before use.
DO NOT use gasoline, benzine, thinner,
harsh cleaners, etc. on and/or in the
FoodCycler while cleaning as they will
damage the FoodCycler.
NEVER use alcohol or other solvents on this
FoodCycler.
Cleaning the Grinding Bucket
The grinding bucket is made from tough
aluminium with a protective porcelain
coating, making your bucket dishwasher
friendly for ultimate convenience.
Allow your bucket to cool before handling or
placing it back in your FoodCycler.
1. Remove bucket.
2. Remove all blockages and loose particles
from grinding bucket.
3. Place bucket in lower rack of dishwasher.
If you nd that the bucket contains a residue
from the previous cycle and you would like to
remove it, you can run a cycle with only citrus
rinds (lemons, orange, etc.). The citrus peels
will help clear any residue or caked-on food
waste.
If a jam occurs and you cannot remove the
blockage manually, soak the bucket overnight
in warm water (soap optional). Avoid using
metal tools or metal wire brushes to clear out
the blockage.
You can also hand wash your bucket using
warm water, a small amount of dish soap
and a dish cloth. Scrub around and beneath
the agitators as much as possible to clean all
available surfaces.
A página está carregando...
A página está carregando...
A página está carregando...
A página está carregando...
A página está carregando...
A página está carregando...
A página está carregando...
A página está carregando...
A página está carregando...
A página está carregando...
A página está carregando...
A página está carregando...
A página está carregando...
A página está carregando...
A página está carregando...
A página está carregando...
A página está carregando...
A página está carregando...
A página está carregando...
A página está carregando...
A página está carregando...
A página está carregando...
A página está carregando...
A página está carregando...
A página está carregando...
A página está carregando...
A página está carregando...
A página está carregando...
A página está carregando...
A página está carregando...
A página está carregando...
A página está carregando...
A página está carregando...
A página está carregando...
A página está carregando...
A página está carregando...
A página está carregando...
A página está carregando...
A página está carregando...
A página está carregando...
A página está carregando...
A página está carregando...
A página está carregando...
A página está carregando...
A página está carregando...
A página está carregando...
A página está carregando...
A página está carregando...
A página está carregando...
A página está carregando...
A página está carregando...
A página está carregando...
A página está carregando...
A página está carregando...
A página está carregando...
A página está carregando...
A página está carregando...
A página está carregando...
A página está carregando...
A página está carregando...
A página está carregando...
A página está carregando...
A página está carregando...
A página está carregando...
A página está carregando...
A página está carregando...
A página está carregando...
A página está carregando...
A página está carregando...
A página está carregando...
A página está carregando...
A página está carregando...
A página está carregando...
A página está carregando...
A página está carregando...
A página está carregando...
A página está carregando...
A página está carregando...
A página está carregando...
A página está carregando...
A página está carregando...
A página está carregando...
A página está carregando...
A página está carregando...
A página está carregando...
A página está carregando...
A página está carregando...
A página está carregando...
A página está carregando...
A página está carregando...
A página está carregando...
A página está carregando...
A página está carregando...
A página está carregando...
A página está carregando...
A página está carregando...
A página está carregando...
A página está carregando...
A página está carregando...
A página está carregando...
A página está carregando...
A página está carregando...
A página está carregando...
A página está carregando...
A página está carregando...
A página está carregando...
A página está carregando...
A página está carregando...
A página está carregando...
A página está carregando...
A página está carregando...
A página está carregando...
A página está carregando...
A página está carregando...
A página está carregando...
A página está carregando...
A página está carregando...
A página está carregando...
A página está carregando...
A página está carregando...
A página está carregando...
A página está carregando...
A página está carregando...
A página está carregando...
A página está carregando...
A página está carregando...
A página está carregando...
A página está carregando...
A página está carregando...
A página está carregando...
A página está carregando...
A página está carregando...
A página está carregando...
A página está carregando...
A página está carregando...
A página está carregando...
A página está carregando...
A página está carregando...
A página está carregando...
A página está carregando...
A página está carregando...
A página está carregando...
A página está carregando...
A página está carregando...
A página está carregando...
A página está carregando...
A página está carregando...
A página está carregando...
-
 1
1
-
 2
2
-
 3
3
-
 4
4
-
 5
5
-
 6
6
-
 7
7
-
 8
8
-
 9
9
-
 10
10
-
 11
11
-
 12
12
-
 13
13
-
 14
14
-
 15
15
-
 16
16
-
 17
17
-
 18
18
-
 19
19
-
 20
20
-
 21
21
-
 22
22
-
 23
23
-
 24
24
-
 25
25
-
 26
26
-
 27
27
-
 28
28
-
 29
29
-
 30
30
-
 31
31
-
 32
32
-
 33
33
-
 34
34
-
 35
35
-
 36
36
-
 37
37
-
 38
38
-
 39
39
-
 40
40
-
 41
41
-
 42
42
-
 43
43
-
 44
44
-
 45
45
-
 46
46
-
 47
47
-
 48
48
-
 49
49
-
 50
50
-
 51
51
-
 52
52
-
 53
53
-
 54
54
-
 55
55
-
 56
56
-
 57
57
-
 58
58
-
 59
59
-
 60
60
-
 61
61
-
 62
62
-
 63
63
-
 64
64
-
 65
65
-
 66
66
-
 67
67
-
 68
68
-
 69
69
-
 70
70
-
 71
71
-
 72
72
-
 73
73
-
 74
74
-
 75
75
-
 76
76
-
 77
77
-
 78
78
-
 79
79
-
 80
80
-
 81
81
-
 82
82
-
 83
83
-
 84
84
-
 85
85
-
 86
86
-
 87
87
-
 88
88
-
 89
89
-
 90
90
-
 91
91
-
 92
92
-
 93
93
-
 94
94
-
 95
95
-
 96
96
-
 97
97
-
 98
98
-
 99
99
-
 100
100
-
 101
101
-
 102
102
-
 103
103
-
 104
104
-
 105
105
-
 106
106
-
 107
107
-
 108
108
-
 109
109
-
 110
110
-
 111
111
-
 112
112
-
 113
113
-
 114
114
-
 115
115
-
 116
116
-
 117
117
-
 118
118
-
 119
119
-
 120
120
-
 121
121
-
 122
122
-
 123
123
-
 124
124
-
 125
125
-
 126
126
-
 127
127
-
 128
128
-
 129
129
-
 130
130
-
 131
131
-
 132
132
-
 133
133
-
 134
134
-
 135
135
-
 136
136
-
 137
137
-
 138
138
-
 139
139
-
 140
140
-
 141
141
-
 142
142
-
 143
143
-
 144
144
-
 145
145
-
 146
146
-
 147
147
-
 148
148
-
 149
149
-
 150
150
-
 151
151
-
 152
152
-
 153
153
-
 154
154
-
 155
155
-
 156
156
-
 157
157
-
 158
158
-
 159
159
-
 160
160
-
 161
161
-
 162
162
-
 163
163
-
 164
164
-
 165
165
-
 166
166
-
 167
167
-
 168
168


Sage the FoodCycler Manual do usuário
- Tipo
- Manual do usuário
- Este manual também é adequado para
em outras línguas
- español: Sage the FoodCycler Manual de usuario
- français: Sage the FoodCycler Manuel utilisateur
- italiano: Sage the FoodCycler Manuale utente
- English: Sage the FoodCycler User manual
- Nederlands: Sage the FoodCycler Handleiding
- Deutsch: Sage the FoodCycler Benutzerhandbuch
Outros documentos
-
Samsung RF22K9581SR/AA-02 Manual do proprietário
-
Samsung RS62K6198SL Manual do usuário
-
Samsung RS51K5680SL Manual do usuário
-
Samsung RSA1ZTMG Manual do usuário
-
-
-
LG DHE3060DL Manual do proprietário
-
Samsung RH57H90507F Manual do usuário
-
mundoclima Series MH-V9 Manual do proprietário
-