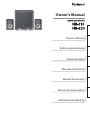
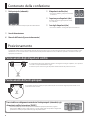
Roland CM-110 Manual do usuário
- Categoria
- Equipamento musical suplementar
- Tipo
- Manual do usuário

Deutsch Français Italiano Español Português NederlandsEnglish
Owner’s Manual
Bedienungsanleitung
Mode d’emploi
Manuale dell'utente
Manual del usuario
Manual do proprietário
Gebruikershandleiding
Owner’s Manual
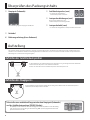
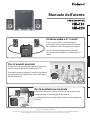
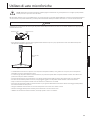
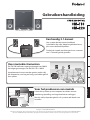
* The illustration shows the CM-220.

CAUTION
RISK OF ELECTRIC SHOCK
DO NOT OPEN
ATTENTION: RISQUE DE CHOC ELECTRIQUE NE PAS OUVRIR
CAUTION: TO REDUCE THE RISK OF ELECTRIC SHOCK,
DO NOT REMOVE COVER (OR BACK).
NO USER-SERVICEABLE PARTS INSIDE.
REFER SERVICING TO QUALIFIED SERVICE PERSONNEL.
The lightning flash with arrowhead symbol, within an
equilateral triangle, is intended to alert the user to the
presence of uninsulated “dangerous voltage” within the
product’s enclosure that may be of sufficient magnitude to
constitute a risk of electric shock to persons.
The exclamation point within an equilateral triangle is
intended to alert the user to the presence of important
operating and maintenance (servicing) instructions in the
literature accompanying the product.
INSTRUCTIONS PERTAINING TO A RISK OF FIRE, ELECTRIC SHOCK, OR INJURY TO PERSONS.
IMPORTANT SAFETY INSTRUCTIONS
SAVE THESE INSTRUCTIONS
WARNING - When using electric products, basic precautions should always be followed, including the following:
1. Read these instructions.
2. Keep these instructions.
3. Heed all warnings.
4. Follow all instructions.
5. Do not use this apparatus near water.
6. Clean only with a dry cloth.
7. Do not block any of the ventilation openings. Install in
accordance with the manufacturers instructions.
8. Do not install near any heat sources such as radiators,
heat registers, stoves, or other apparatus (including
amplifiers) that produce heat.
9. Do not defeat the safety purpose of the polarized or
grounding-type plug. A polarized plug has two blades with
one wider than the other. A grounding type plug has two
blades and a third grounding prong. The wide blade or the
third prong are provided for your safety. If the provided plug
does not fit into your outlet, consult an electrician for
replacement of the obsolete outlet.
WARNING:
IMPORTANT:
As the colours of the wires in the mains lead of this apparatus may not correspond with the coloured markings identifying
the terminals in your plug, proceed as follows:
The wire which is coloured GREEN-AND-YELLOW must be connected to the terminal in the plug which is marked by the
letter E or by the safety earth symbol or coloured GREEN or GREEN-AND-YELLOW.
The wire which is coloured BLUE must be connected to the terminal which is marked with the letter N or coloured BLACK.
The wire which is coloured BROWN must be connected to the terminal which is marked with the letter L or coloured RED.
THIS APPARATUS MUST BE EARTHED
THE WIRES IN THIS MAINS LEAD ARE COLOURED IN ACCORDANCE WITH THE FOLLOWING CODE.
GREEN-AND-YELLOW: EARTH, BLUE: NEUTRAL, BROWN: LIVE
For the U.K.
10. Protect the power cord from being walked on or pinched
particularly at plugs, convenience receptacles, and the
point where they exit from the apparatus.
11. Only use attachments/accessories specified
by the manufacturer.
12. Unplug this apparatus during lightning storms or when
unused for long periods of time.
13. Refer all servicing to qualified service personnel. Servicing
is required when the apparatus has been damaged in any
way, such as power-supply cord or plug is damaged, liquid
has been spilled or objects have fallen into the apparatus,
the apparatus has been exposed to rain or moisture, does
not operate normally, or has been dropped.
WARNING: To reduce the risk of fire or electric shock, do not expose this apparatus to rain or moisture.

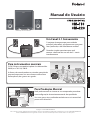
Owner’s Manual
Copyright © 2012 ROLAND CORPORATION
All rights reserved. No part of this publication may be reproduced in any form without the written permission of ROLAND CORPORATION.
Roland, CUBE MONITOR are either registered trademarks or trademarks of Roland Corporation in the United States and/or other countries.
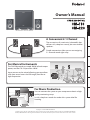
For Musical Instruments
The CM-220 provides an ample 200 W of total output
power, and the CM-110 provides 100 W.
Input sources can be mixed, allowing you to perform
with clear sound across the full range, from low to
high frequencies.
For Music Production
You can connect the system to your computer to obtain a high-
quality monitoring setup.
Its rich, deep bass sound also makes this system ideal for
listening.
A Convenient 2.1 Channel
The set consists of a main unit (subwoofer) that
delivers rich, deep bass sound, plus two satellite
speakers.
Simple connections allow you to start enjoying
2.1 channel sound right away.
Deutsch Français Italiano Español Português NederlandsEnglish
* The illustration shows the CM-220.

2
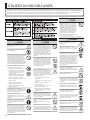
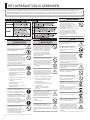
USING THE UNIT SAFELY
Used for instructions intended to alert the
user to the risk of injury or material
damage should the unit be used
improperly.
* Material damage refers to damage or
other adverse effects caused with
respect to the home and all its
furnishings, as well to domestic animals
or pets.
Used for instructions intended to alert the
user to the risk of death or severe injury
should the unit be used improperly.
The symbol alerts the user to things that must be
carried out. The specific thing that must be done is
indicated by the design contained within the circle. In the
case of the symbol at left, it means that the power-cord
plug must be unplugged from the outlet.
The symbol alerts the user to important instructions or
warnings.The specific meaning of the symbol is
determined by the design contained within the triangle. In
the case of the symbol at left, it is used for general
cautions, warnings, or alerts to danger.
The symbol alerts the user to items that must never be
carried out (are forbidden). The specific thing that must
not be done is indicated by the design contained within
the circle. In the case of the symbol at left, it means that
the unit must never be disassembled.
About WARNING and CAUTION Notices
About the Symbols
ALWAYS OBSERVE THE FOLLOWING
WARNING
Connect mains plug of this model to a
mains socket outlet with a protective
earthing connection.
Do not open or perform any internal
modications on the unit.
Do not attempt to repair the unit, or
replace parts within it (except when this
manual provides specic instructions
directing you to do so). Refer all servicing
to your retailer, the nearest Roland
Service Center, or an authorized Roland
distributor, as listed on the “Information”
page.
Never install the unit in any of the
following locations.
• Subject to temperature extremes (e.g.,
direct sunlight in an enclosed vehicle,
near a heating duct, on top of heat-
generating equipment); or are
• Damp (e.g., baths, washrooms, on wet
oors); or are
• Exposed to steam or smoke; or are
• Subject to salt exposure; or are
• Humid; or are
• Exposed to rain; or are
• Dusty or sandy; or are
• Subject to high levels of vibration and
shakiness.
Make sure you always have the unit
placed so it is level and sure to remain
stable. Never place it on stands that could
wobble, or on inclined surfaces.
The unit should be connected to a power
supply only of the type described as
marked on the rear side of unit.
Use only the attached power-supply cord.
Also, the supplied power cord must not be
used with any other device.
Do not excessively twist or bend the
power cord, nor place heavy objects on it.
Doing so can damage the cord, producing
severed elements and short circuits.
Damaged cords are re and shock hazards!
WARNING
This unit, either alone or in combination
with an amplier and headphones or
speakers, may be capable of producing
sound levels that could cause permanent
hearing loss. Do not operate for a long
period of time at a high volume level, or
at a level that is uncomfortable. If you
experience any hearing loss or ringing
in the ears, you should immediately stop
using the unit, and consult an audiologist.
Do not place containers containing liquid
on this product. Never allow foreign
objects (e.g., ammable objects, coins,
wires) or liquids (e.g., water or juice) to
enter this product. Doing so may cause
short circuits, faulty operation, or other
malfunctions.
Immediately turn the unit o, remove the
power cord from the outlet, and request
servicing by your retailer, the nearest
Roland Service Center, or an authorized
Roland distributor, as listed on the
“Information” page when:
• The power-supply cord or the plug has
been damaged; or
• If smoke or unusual odor occurs; or
• Objects have fallen into, or liquid has
been spilled onto the unit; or
• The unit has been exposed to rain (or
otherwise has become wet); or
• The unit does not appear to operate
normally or exhibits a marked change
in performance.
When using the unit in locations where
children are present, be careful so no
mishandling of the unit can take place. An
adult should always be on hand to provide
supervision and guidance.
Protect the unit from strong impact.
(Do not drop it!)
Before using the unit in a foreign country,
consult with your retailer, the nearest
Roland Service Center, or an authorized
Roland distributor, as listed on the
“Information” page.
WARNING
Do not force the unit’s power-supply cord
to share an outlet with an unreasonable
number of other devices. Be especially
careful when using extension cords—the
total power used by all devices you have
connected to the extension cord’s outlet
must never exceed the power rating
(watts/amperes) for the extension cord.
Excessive loads can cause the insulation
on the cord to heat up and eventually
melt through.
CAUTION
The unit should be located so that its
location or position does not interfere
with its proper ventilation.
Always grasp only the plug on the
power-supply cord when plugging into, or
unplugging from, an outlet or this unit.
At regular intervals, you should unplug
the power plug and clean it by using
a dry cloth to wipe all dust and other
accumulations away from its prongs.
Also, disconnect the power plug from
the power outlet whenever the unit is to
remain unused for an extended period of
time. Any accumulation of dust between
the power plug and the power outlet can
result in poor insulation and lead to re.
Try to prevent cords and cables from
becoming entangled. Also, all cords and
cables should be placed so they are out of
the reach of children.
Never climb on top of, nor place heavy
objects on the unit.
Never handle the power cord or its plugs
with wet hands when plugging into, or
unplugging from, an outlet or this unit.
Before moving the unit, disconnect the
power plug from the outlet, and pull out
all cords from external devices.
Before cleaning the unit, turn o the unit
and unplug the power cord from the
outlet (p. 5).
Whenever you suspect the possibility of
lightning in your area, pull the plug on the
power cord out of the outlet.
The metal portions of the main unit
(subwoofer) may become hot, so take care
to avoid burns.
Do not remove the speaker grille and
speaker by any means. Speaker not user
replaceable. Shock hazardous voltages
and currents are present inside the
enclosure.
Before using this unit, carefully read the sections entitled: “IMPORTANT SAFETY INSTRUCTIONS”, “USING THE UNIT SAFELY” (p. 2), and “IMPORTANT NOTES” (p. 3). These
sections provide important information concerning the proper operation of the unit. Additionally, in order to feel assured that you have gained a good grasp of every
feature provided by your new unit, Owner’s Manual should be read in its entirety. The manual should be saved and kept on hand as a convenient reference.

3
Deutsch Français Italiano Español Português NederlandsEnglish
Power Supply
• Do not connect this unit to same electrical outlet
that is being used by an electrical appliance that
is controlled by an inverter (such as a refrigerator,
washing machine, microwave oven, or air
conditioner), or that contains a motor. Depending
on the way in which the electrical appliance is
used, power supply noise may cause this unit to
malfunction or may produce audible noise. If it
is not practical to use a separate electrical outlet,
connect a power supply noise lter between this
unit and the electrical outlet.
• Before connecting this unit to other devices, turn
o all units. This will help prevent malfunctions
and/or damage to speakers or other devices.
• Although the LED is switched o, this does
not mean that the unit has been completely
disconnected from the source of power. If you
need to turn o the power completely, unplug the
power cord from the power outlet. For this reason,
the outlet into which you choose to connect the
power cord’s plug should be one that is within
easy reach and readily accessible.
• With the factory settings, the CM-110 and CM-220
will automatically be switched o approximately
4 hours after you stop playing or operating the
unit. If you don’t want the power to turn o
automatically, change the “AUTO OFF” setting to
“OFF” as described on p. 6.
Placement
• Using the unit near power ampliers (or other
equipment containing large power transformers)
may induce hum. To alleviate the problem, change
the orientation of this unit; or move it farther away
from the source of interference.
• This device may interfere with radio and television
reception. Do not use this device in the vicinity of
such receivers.
• Noise may be produced if wireless
communications devices, such as cell phones,
are operated in the vicinity of this unit. Such
noise could occur when receiving or initiating a
call, or while conversing. Should you experience
such problems, you should relocate such wireless
devices so they are at a greater distance from this
unit, or switch them o.
• Do not expose the unit to direct sunlight, place
it near devices that radiate heat, leave it inside
an enclosed vehicle, or otherwise subject it to
temperature extremes. Also, do not allow lighting
devices that normally are used while their light
source is very close to the unit (such as a piano
light), or powerful spotlights to shine upon the
same area of the unit for extended periods of time.
Excessive heat can deform or discolor the unit.
• When moved from one location to another where
the temperature and/or humidity is very dierent,
water droplets (condensation) may form inside
the unit. Damage or malfunction may result if
you attempt to use the unit in this condition.
Therefore, before using the unit, you must allow it
to stand for several hours, until the condensation
has completely evaporated.
• Do not allow rubber, vinyl, or similar materials to
remain on this unit for long periods of time. Such
objects can discolor or otherwise harmfully aect
the nish.
• Do not paste stickers, decals, or the like to this
instrument. Peeling such matter o the instrument
may damage the exterior nish.
• Depending on the material and temperature of
the surface on which you place the unit, its rubber
feet may discolor or mar the surface.
You can place a piece of felt or cloth under the
rubber feet to prevent this from happening. If you
do so, please make sure that the unit will not slip
or move accidentally.
• Do not put anything that contains water (e.g.,
ower vases) on this unit. Also, avoid the use of
insecticides, perfumes, alcohol, nail polish, spray
cans, etc., near the unit. Swiftly wipe away any
liquid that spills on the unit using a dry, soft cloth.
Maintenance
• For everyday cleaning wipe the unit with a soft,
dry cloth or one that has been slightly dampened
with water. To remove stubborn dirt, use a cloth
impregnated with a mild, non-abrasive detergent.
Afterwards, be sure to wipe the unit thoroughly
with a soft, dry cloth.
• Never use benzine, thinners, alcohol or solvents of
any kind, to avoid the possibility of discoloration
and/or deformation.
Additional Precautions
• Use a reasonable amount of care when using the
unit’s buttons, sliders, or other controls; and when
using its jacks and connectors. Rough handling
can lead to malfunctions.
• When connecting / disconnecting all cables, grasp
the connector itself—never pull on the cable. This
way you will avoid causing shorts, or damage to
the cable’s internal elements.
• A small amount of heat will radiate from the unit
during normal operation.
• To avoid disturbing your neighbors, try to keep the
unit’s volume at reasonable levels. You may prefer
to use headphones, so you do not need to be
concerned about those around you.
• When you need to transport the unit, package
it in the box (including padding) that it came
in, if possible. Otherwise, you will need to use
equivalent packaging materials.
• Some connection cables contain resistors. Do
not use cables that incorporate resistors for
connecting to this unit. The use of such cables
can cause the sound level to be extremely low,
or impossible to hear. For information on cable
specications, contact the manufacturer of the
cable.
• Otherwise, due to the structural design of this
instrument, small pets or other animals could end
up getting trapped inside it. If such a situation
is encountered, you must immediately turn o
the unit and disconnect the power cord from the
outlet. You should then consult with the retailer
from whom the instrument was purchased, or
contact the nearest Roland Service Center.
• Do not insert hands, ngers, etc, into the openings
in the unit. In particular, if the unit is to used in
households with small children, always provide
adult supervision to ensure that children keep
their hands and feet out of these openings.
IMPORTANT NOTES
• Company names and product names appearing
in this document are registered trademarks or
trademarks of their respective owners.

4
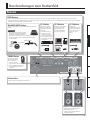
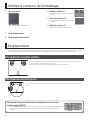
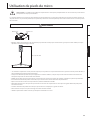
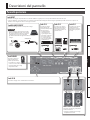
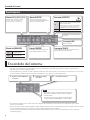
☐ Main unit (subwoofer)
* The illustration shows the main unit of the CM-220.
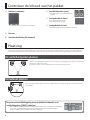
Check the Package Contents
☐ Power cord
☑ Owner’s manual (this document)
☐ Satellite speakers (two)
* You must use the included satellite speakers.
☐ Speaker covers (two)
You can attach these to the satellite speakers if
desired.
☐ Speaker cables (two)
* You must use the included speaker cables.
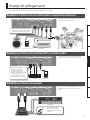
The volume and tone quality will be aected by how far from the wall you place the main unit and the satellite speakers, as well as by the material of
the wall and the characteristics of the oor. While you listen to the sound, adjust the position and volume as appropriate for your location.
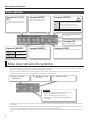
Placing the Satellite Speakers
We recommend that you place the satellite speakers at two corners of an equilateral triangle, with the
listening position at the third corner.
Point the front of each satellite speaker so that it faces the listening position.
Placing the Main Unit
It’s best to place the main unit (subwoofer) at the same distance as the satellite speakers, with the listening position
at the center.
Placement
Ensuring a natural link between the main unit (subwoofer) and the satellite
speakers ([PHASE] switch)
The [PHASE] switch switches the phase of the main unit (subwoofer). Choose either the “NOR” (normal) or
“INV” (inverse) setting, whichever produces the most natural link between the main unit (subwoofer) and
the satellite speakers.

5
Deutsch Français Italiano Español Português NederlandsEnglish
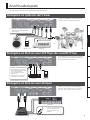
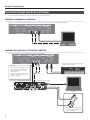
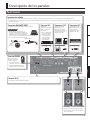
Panel Descriptions
Rear Panel
INPUT jacks
Here you can connect the audio source devices that you want to listen to. The signals from all jacks can be produced simultaneously.
* When connection cables with resistors are used, the volume level of equipment connected to the INPUT jacks may be low. If this happens, use connection cables that
do not contain resistors.
PHONES jack
Headphones (stereo
mini-plug; sold separately)
can be connected here.
* If headphones are connected, sound
will not be output from the main unit
(subwoofer) or satellite speakers.
CH 3 jack
The digital output
(coaxial cable) of
a device can be
connected here.
* Do not input anything
other than a stereo
digital signal. For
example, inputting a
5.1 channel or other
digital signal will
produce noise.
CH 2 jacks
A device such as television,
computer, or audio player
(with RCA phono plugs or
a stereo mini-plug) can be
connected here.
CH 1 jacks
A musical instrument
such as a keyboard
or V-Drums can be
connected here (1/4”
phone plugs).
BALANCED INPUT jacks
A mixer or similar device can be connected here.
Jack type
* This instrument is equipped with balanced
(XLR/TRS) type jacks. Wiring diagrams for these
jacks are shown below. Make connections after
rst checking the wiring diagrams of other
equipment you intend to connect.
1: GND
2: HOT
3: COLD
GND (SLEEVE)
HOT (TIP)
COLD (RING)
AC IN jack
Connect the included power cord here.
SATELLITE SPEAKER jacks
Connect the included satellite speakers here.
* Do not connect anything other than the
included speaker cables.
Jack type Jack type Jack type
Rear panel Rear panel

Turning the System On
6
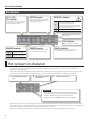
Top Panel
[ON] switch
This turns the system on.
[MASTER] knob
This adjusts the overall volume of the
output from the main unit (subwoofer) and
satellite speakers.
This will light in red when the system
is on.
[AUTO OFF] switch
ON
The system will be turned o automatically
when 4 hours have passed without any input
signal being detected.
* To resume operation, turn the unit o, then
on again; or set the [AUTO OFF] switch to the
“OFF” position.
OFF The system will not turned o automatically.
[CH 1], [CH 2], [CH 3] knobs
These adjust the volume of the sound
being input at the CH 1 jacks, CH 2 jacks,
and CH 3 jack.
[WOOFER] knob
This adjusts the volume of the output from
the main unit (subwoofer).
[PHASE] switch
This changes the phase of the sound that is output from the
main unit (subwoofer) (p. 4).
EQUALIZER knobs
[LOW] knob
Adjusts the volume of
the lower range.
[HIGH] knob
Adjusts the volume of
the upper range.
* To prevent malfunction and/or damage to speakers or other devices, always turn down the volume, and turn o all devices before making any
connections.
* Once the connections have been completed, turn on your various devices in the order specied. By turning on devices in the wrong order, you risk
causing malfunction and/or damage to speakers and other devices.
1. Set the [MASTER] knob
to 0.
NOTE
This system will be turned o automatically when
approximately 4 hours have passed without any input signal
being detected.
If you don’t want the system to be turned o automatically,
set the [AUTO OFF] switch to the “OFF” position.
3. Turn the system on.2. Turn on the connected
equipment.
* This unit is equipped with a protection circuit. A brief interval (a few seconds) after turning on is required before the unit will operate normally.
* Before turning on/o the unit, always be sure to turn the volume down. Even with the volume turned down, you might hear some sound when
turning on/o the unit. However, this is normal and does not indicate a malfunction.
* If you need to turn o the power completely, unplug the power cord from the power outlet. Refer to “Power Supply” (p. 3).
Turning the System On

7
Deutsch Français Italiano Español Português NederlandsEnglish
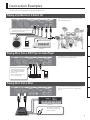
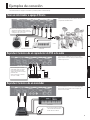
Sound from all connected equipment can be played simultaneously.
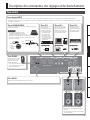
Playing a Synthesizer or V-Drums Set
V-DrumsSynthesizerPercussion Audio Player, etc.
You can connect an audio player or other source, and
play it back simultaneously.
or
* Use an adapter cable (such as an RCA phono
to 1/4” phone adapter) as appropriate for
the device you’re connecting.
Playing Music from a DVD Player or Audio Player
Audio playerDVD player
or
or
If your DVD player has a digital output jack, connect it to
the CH 3 jack for the best-quality playback.
Do not input anything other than
a stereo digital signal to the CH
3 jack. Inputting a digital signal
such as 5.1 channel audio will
produce noise.
Set the connected device to its
“stereo” or “PCM” setting.
Playing Music from a Mixer
Mixer
* Do not connect a guitar, bass,
or microphone directly to the
CM-110 or CM-220.
Connect your mixer to the BALANCED INPUT jacks. This
allows you to use the system as a set of high-quality
monitors.
Synthesizer
Connection Examples

Connection Examples
8
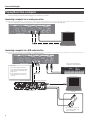
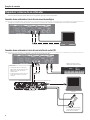
Playing Music from a Computer
If you’re connecting a computer, the following types of connections are possible.
Connecting a computer via an analog connection
This is the simplest type of connection. Connect your computer’s headphone jack or line output to the LINE input.
Computer
or
Connecting a computer via a USB audio interface
You can play back sound from your computer via a USB audio interface.
To the coaxial output jack
You can connect and play a
synthesizer at the same time.
Computer
USB audio interface
Coaxial cable
* Do not input anything other than a
stereo digital signal. Inputting a digital
signal such as 5.1 channel audio will
produce noise.
* If your audio interface does not have
a coaxial output jack, use the analog
connection.
To the analog output jacks
or
* Do not connect a guitar, bass,
or microphone directly to the
CM-110 or CM-220.

9
Deutsch Français Italiano Español Português NederlandsEnglish
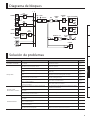
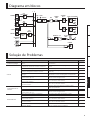
HPF
RECEIVER
DAC
LPF PHASE
NOR
INV
SPEAKER
WOOFER
EQUALIZER
LOW HIGH
MASTER
L
R
SATELLITE SPEAKER
CH1
INSTRUMENT
L/MONO
R
R
L
STEREO
DIGITAL
R
L
CH2
LINE
CH3
DIGITAL
PHONES
INPUT
INPUT
RL
OUT
POWER
AMP
POWER
AMP
BALANCED
INPUT
Block Diagram
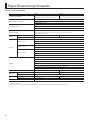
Problem Cause Action Page
System won’t turn on
Is the Power cord correctly connected to an electrical
outlet?
Make sure that the Power cord is correctly connected to an
electrical outlet.
p. 5
No sound
Is the external equipment connected correctly?
Check the type of jack and plug, and make the correct
connections.
—
Are each of the knobs adjusted correctly? Turn the knobs toward the right to raise the volume. p. 6
Could the Auto O function have operated?
Turn the system o, then on again; or turn o the [AUTO OFF]
switch.
p. 6
Could you be inputting an analog signal to the CH 3 jack?
Connect a coaxial cable to the CH 3 jack, and connect the other
end to the digital output jack of your equipment.
p. 5
Could you be inputting a digital signal such as 5.1 channel
audio to the CH 3 jack?
Input a stereo digital signal. p. 7
Could you have connected speakers other than the
included satellite speakers?
Use the included satellite speakers. p. 4
Could you be using cables other than the included
speaker cables?
Use the included speaker cables. p. 4
Sound is distorted or noisy
Could the respective knob be raised excessively?
Turn the respective knob toward the left to adjust the volume
appropriately.
p. 6
Is the input level from the connected device appropriate? Lower the volume of the connected device. —
Could you be inputting a digital signal such as 5.1 channel
audio to the CH 3 jack?
Input a stereo digital signal. p. 7
Insucient volume
Is each knob adjusted correctly? Turn the knobs toward the right to raise the volume. p. 6
Is the input level from the connected device appropriate? Raise the volume of the connected device. —
Could you have connected speakers other than the
included satellite speakers?
Use the included satellite speakers. p. 4
Could you be using cables other than the included
speaker cables?
Use the included speaker cables. p. 4
Could you be using a connection cable that contain a
built-in resistor?
When making connections to the INPUT jacks, use connection
cables that do not contain built-in resistors.
—
Troubleshooting

10
Roland CM-110, CM-220: CUBE MONITOR
CM-110 CM-220
Rated Power Output
100 W
(Main Unit 50 W + Satellite Speaker 25 W x 2)
200 W
(Main Unit 100 W + Satellite Speaker 50 W x 2)
Nominal Input Level (1 kHz)
CH 1 (INSTRUMENT): -20 dBu
CH 2 (LINE): -10 dBu
BALANCED INPUT: +4 dBu
Input Impedance
CH 1 (INSTRUMENT): 10 k ohms
CH 2 (LINE): 10 k ohms
BALANCED INPUT: 10 k ohms
Digital Input (CH 3)
Format: Conformity with IEC60958
Sample Rate: 32 kHz to 192 kHz (automatically) (de-emphasis: OFF)
Word Length: 24 bit
Speakers
Main Unit 16 cm (6.5 inches) 25 cm (10 inches)
Satellite Speaker 10 cm (4 inches, Magnetically-Shielded), 2 cm (3/4 inch, Magnetically-Shielded) (for each)
Controls
<Channel Control>
[CH 1] (INSTRUMENT) volume knob
[CH 2] (LINE) volume knob
[CH 3] (DIGITAL) volume knob
<Woofer Control>
[WOOFER] volume knob
[PHASE] switch
<Master Control>
EQUALIZER [HIGH] knob, [LOW] knob
[MASTER] volume knob
[AUTO OFF] switch
[ON] switch
Connectors
CH 1 (INSTRUMENT) jacks (L/MONO, R): 1/4-inch phone type
CH 2 (LINE) jacks (L, R, STEREO): RCA phono type, Stereo miniature phone type
CH 3 (DIGITAL) jack: RCA phono type
BALANCED INPUT jacks (L, R): XLR, 1/4-inch TRS phone type
PHONES jack: Stereo miniature phone type
SATELLITE SPEAKER jacks (only for dedicated Satellite Speakers)
AC IN jack
Power Consumption 47 W 67 W
Dimensions
Main Unit
330 (W) x 327 (D) x 368 (H) mm
13 (W) x 12-7/8 (D) x 14-1/2 (H) inches
381 (W) x 376 (D) x 413 (H) mm
15 (W) x 14-13/16 (D) x 16-5/16 (H) inches
Satellite Speaker
162 (W) x 197 (D) x 243 (H) mm
6-7/16 (W) x 7-13/16 (D) x 9-5/8 (H) inches
Weight
Main Unit 13.3 kg / 29 lbs 6 oz 18.8 kg / 41 lbs 8 oz
Satellite Speaker 3.1 kg / 6 lbs 14 oz(for each)
Accessories Power Cord, Speaker Cable (3.5 m) x 2, Owner’s Manual
* 0 dBu = 0.775 Vrms
* In the interest of product improvement, the specications and/or appearance of this unit are subject to change without prior notice.
Main Specications

11
Deutsch Français Italiano Español Português NederlandsEnglish
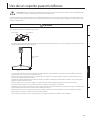
WARNING: The stability using microphone stands other than the folding stand integral with the speaker has not been evaluated for
safety and can result in hazardous injury to the user.
The satellite speakers are designed so that non-Roland specied microphone stands can be used to support them. By mounting the satellite speakers
on non-Roland specied microphone stands, you can position them at the optimal height for use as monitors or as a convenient PA system.
WARNING
The microphone stand holder on the bottom of each satellite speaker provides two holes: 3/8” and 5/8”. Use the hole that’s appropriate for your
microphone stand.
3/8” diameter5/8” diameter
• As shown in the illustration below, open the legs of the microphone stand (50 cm or more), and position it so that the total height (including the
satellite speaker) does not exceed 105 cm.
105 cm (41-3/8”)
or less
50 cm (19-11/16”)
or more
• If the microphone stand is higher than 105 cm (including the satellite speaker), or if the legs are not spread out, the stand and speaker may tip
over, causing injury or damage.
• When using microphone stands to support the satellite speakers, do not place them at unstable or inclined locations. You must place the stand on
a stable and horizontal surface.
• Make sure to appropriately manage the cables connected to the satellite speakers so as to prevent accidents, such as might be caused by
someone tripping over them.
• To prevent the stand and speaker from tipping over, do not place anything on a satellite speaker mounted on a microphone stand.
• After mounting a satellite speaker on a microphone stand, be sure to verify that it does not wobble.
• Be sure to get the assistance of at least one other person when mounting a satellite speaker on a microphone stand, or when adjusting the height
of the microphone stand while the satellite speaker is mounted.
• Firmly tighten the hardware of the microphone stand so that the satellite speaker does not move to left or right.
• Take care not to pinch your ngers when mounting the satellite speaker.
• Use a microphone stand that is strong and durable, such as one made from aluminium or steel.
Using Microphone Stands


Bedienungsanleitung
Copyright © 2012 ROLAND CORPORATION
Alle Rechte vorbehalten. Kein Teil dieser Publikation darf in irgendeiner Form ohne schriftliche Genehmigung der ROLAND CORPORATION reproduziert werden.
Roland und CUBE MONITOR sind eingetragene Marken oder Marken der Roland Corporation in den USA und/oder anderen Ländern.
Für Musikinstrumente
Der CM-220 bietet eine reichhaltige 200-Watt-
Gesamtausgangsleistung, der CM-110 bietet
100Watt.
Es können unterschiedliche Eingangsquellen
angeschlossen werden, da dieses Soundsystem eine
klare Wiedergabe des gesamten Frequenzspektrums
bietet.
Zur Musikproduktion
Sie können das System an Ihren Computer anschließen, um ein
Abhör-System bester Qualität zu erhalten.
Sein voller und satter Klang macht dieses System ideal für
Musikproduktionen.
Großartiges 2.1 Soundsystem
Das Paket besteht aus einem Hauptgerät
(Subwoofer), das einen vollen und
satten Bassklang liefert, sowie zwei
Satellitenlautsprechern.
Dank einfacher Anschlüsse können
Sie unverzüglich mit diesem System arbeiten.
Deutsch Français Italiano Español Português NederlandsEnglish
* Die Abbildung zeigt den CM-220.

2
SICHERER BETRIEB DES GERÄTS
WARNUNG
Schließen Sie den Netzstecker des
Geräts an eine Netzsteckdose mit
Schutzleiterverbindung an.
Önen Sie das Gerät nicht, bzw. nehmen
Sie keine internen Änderungen am Gerät
vor.
Versuchen Sie nicht, das Gerät zu
reparieren oder darin enthaltene Teile
zu ersetzen (außer in Fällen, für die in
dieser Anleitung genaue Anweisungen
gegeben sind). Wenden Sie sich
bezüglich jeglicher Reparaturen an Ihren
Fachhändler, ein Roland Service Center in
Ihrer Nähe oder an einen der autorisierten
Roland-Vertriebspartner, die auf der Seite
„Information“ aufgelistet sind.
Stellen Sie das Gerät niemals in
Umgebungen mit folgenden
Bedingungen auf:
• Extreme Temperaturen (z.B. direktes
Sonnenlicht in einem geschlossenen
Fahrzeug, in der Nähe einer
Heizungsleitung, auf Wärmequellen)
• Feuchtigkeit (z.B. Bäder, Waschräume,
nasse Fußböden)
• Dampf oder Rauch
• Hoher Salzgehalt in der Luft
• Hohe Luftfeuchtigkeit
• Regen
• Staub oder Sand
• Starke Vibrationen oder
Erschütterungen
Achten Sie darauf, dass das Gerät immer
waagerecht und stabil steht. Platzieren Sie
es nicht auf wackeligen Ständern oder auf
schiefen Standächen.
Das Gerät darf ausschließlich an einen
Netzanschluss angeschlossen werden, der
den Informationen auf der Rückseite des
Geräts entspricht.
Verwenden Sie ausschließlich das
angeschlossene Netzkabel. Außerdem
darf das mitgelieferte Netzkabel nicht für
ein anderes Gerät eingesetzt werden.
Verdrehen oder biegen Sie das Netzkabel
nicht zu stark, und stellen Sie keine
schweren Gegenstände auf das Kabel.
Dadurch kann das Kabel beschädigt
werden, was zu Unterbrechungen und
Kurzschlüssen führen kann. Schadhafte
Kabel können Brände und elektrische
Schläge verursachen!
WARNUNG
Dieses Gerät kann einzeln oder in
Kombination mit einem Verstärker
und Kopfhörern oder Lautsprechern
Schallpegel erzeugen, die zu dauerhaftem
Gehörverlust führen können. Betreiben
Sie das Gerät nicht über längere Zeit mit
hoher oder unangenehmer Lautstärke.
Sobald Sie eine Beeinträchtigung Ihres
Gehörs oder ein Klingeln in den Ohren
bemerken, sollten Sie den Betrieb des
Geräts sofort einstellen und sich an einen
HNO-Arzt wenden.
Stellen Sie auf diesem Gerät keine mit
Flüssigkeiten gefüllten Behälter ab.
Achten Sie darauf, dass in das Gerät keine
Fremdkörper (z.B. brennbare Objekte,
Münzen oder Drähte) oder Flüssigkeiten
(z.B. Wasser oder Saft) eindringen. Dies
kann zu Kurzschlüssen, Fehlfunktion oder
sonstigen Störungen führen.
Wenn einer der folgenden Fälle eintritt,
schalten Sie das Gerät sofort aus, ziehen
Sie das Netzkabel aus der Steckdose, und
wenden Sie sich an Ihren Fachhändler,
ein Roland Service Center in Ihrer
Nähe oder an einen der autorisierten
Roland-Vertriebspartner, die auf der Seite
„Information“ aufgelistet sind:
• Das Netzkabel oder der Stecker wurde
beschädigt.
• Rauch oder ein ungewöhnlicher
Geruch tritt auf.
• Gegenstände oder Flüssigkeiten sind in
das Gerät gelangt.
• Das Gerät war Regen (oder sonstiger
Feuchtigkeit) ausgesetzt.
• Das Gerät scheint nicht normal zu
funktionieren oder seine Leistung weist
eine deutliche Änderung auf.
Wenn das Gerät in der Gegenwart von
Kindern verwendet wird, achten Sie darauf,
dass das Gerät nicht unsachgemäß bedient
wird. Es sollten immer beaufsichtigende
Erwachsene anwesend sein.
Schützen Sie das Gerät vor starken Stößen.
(Lassen Sie es nicht fallen!)
Bevor Sie das Gerät in einem anderen
Land betreiben, wenden Sie sich an Ihren
Fachhändler, ein Roland Service Center in
Ihrer Nähe oder an einen der autorisierten
Roland-Vertriebspartner, die auf der Seite
„Informationen“ aufgeführt sind.
WARNUNG
Betreiben Sie den Netzadapter nicht
zusammen mit einer zu großen Anzahl von
Geräten an einer einzigen Netzsteckdose.
Seien Sie besonders vorsichtig beim
Einsatz von Verlängerungskabeln – die
Gesamtleistung aller an der Verlängerung
betriebenen Geräte darf die für das
Verlängerungskabel angegebene
zulässige Leistung (Watt-/Ampere-Zahl)
nicht überschreiten. Übermäßige Last
kann dazu führen, dass sich die Isolierung
erhitzt und ggf. schmilzt.
VORSICHT
Das Gerät und der Netzadapter sollten so
aufgestellt werden, dass deren Aufstellort
oder Position nicht die erforderliche
Luftzufuhr beeinträchtigt.
Fassen Sie das Netzkabel immer am
Stecker an, wenn Sie dieses in eine
Steckdose oder in das Gerät stecken oder
aus diesen herausziehen.
Sie sollten das Netzkabel in regelmäßigen
Abständen aus der Steckdose
herausziehen und die Kontakte am Stecker
mit einem trockenen Tuch von Staub
und anderen Ablagerungen befreien.
Ziehen Sie den Netzstecker auch dann
aus der Steckdose, wenn das Gerät
längere Zeit außer Betrieb ist. Jegliche
Staubansammlung zwischen Netzstecker
und Steckdose kann die Isolierung
beeinträchtigen und zu Bränden führen.
Sorgen Sie dafür, dass Kabel und
Leitungen nicht durcheinander geraten.
Achten Sie zudem darauf, dass sich alle
Kabel und Leitungen außerhalb der
Reichweite von Kindern benden.
Steigen Sie niemals auf das Gerät, und
stellen Sie keine schweren Gegenstände
darauf ab.
Fassen Sie das Netzkabel niemals mit
nassen Händen an, wenn Sie es in eine
Steckdose oder in das Gerät stecken oder
aus diesen herausziehen.
Bevor Sie das Gerät bewegen, ziehen Sie
das Netzkabel aus der Steckdose, und
ziehen Sie alle weiteren Kabel von/zu
externen Geräten ebenfalls heraus.
Bevor Sie das Gerät reinigen, schalten Sie
es aus, und ziehen Sie das Netzkabel aus
der Steckdose (S. 5).
Bei angekündigtem oder
heraufziehendem Gewitter sollten Sie
immer den Netzstecker aus der Steckdose
ziehen.
Die Metallteile des Hauptgeräts
(Subwoofer) können heiß werden,
vermeiden Sie daher Verbrennungen.
Entfernen Sie auf keinen Fall die
Lautsprecherabdeckung oder den
Lautsprecher. Der Lautsprecher darf nicht
durch den Benutzer ausgetauscht werden.
Innerhalb des Gehäuses treten Ströme
und Spannungen auf, die zu elektrischen
Schlägen führen können.
Vor dem Betrieb des Geräts lesen Sie bitte die nachfolgend aufgeführten Abschnitte sorgfältig durch: „WICHTIGE SICHERHEITSANWEISUNGEN“, SICHERER BETRIEB DES
GERÄTES“ (S. 2) und „WICHTIGE HINWEISE“ (S. 3). Diese Abschnitte liefern wichtige Hinweise zum sicheren Betrieb des Geräts. Um einen vollständigen Überblick über alle
Funktionen des Geräts zu erhalten, sollten Sie diese Bedienungsanleitung vollständig durchlesen. Bewahren Sie diese Anleitung an einem Ort auf, an dem Sie bei Bedarf
schnell darauf zurückgreifen können.

3
Deutsch Français Italiano Español Português NederlandsEnglish
Stromversorgung
• Schließen Sie dieses Gerät nicht an die gleiche
Netzsteckdose wie andere elektrische Geräte an,
die durch einen Wechselrichter gesteuert (z.B.
Kühlschrank, Waschmaschine, Mikrowellenherd
oder Klimaanlage) oder durch einen Motor
betrieben werden. Je nach Art und Weise, in der
das elektrische Gerät verwendet wird, können
die von ihm erzeugten Interferenzen in der
Netzversorgung zu Fehlfunktionen oder hörbaren
Störgeräuschen führen. Wenn es nicht möglich
ist, eine gesonderte Steckdose zu verwenden,
schalten Sie einen Netzentstörlter zwischen
dieses Gerät und die Netzsteckdose.
• Schalten Sie alle beteiligten Geräte aus, bevor
Sie dieses Gerät an andere Geräte anschließen.
Auf diese Weise können Sie Fehlfunktionen und/
oder Schäden an den Lautsprechern oder anderen
Geräten vermeiden.
• Auch wenn die LEDs erlöschen, bedeutet
dies nicht, dass das Gerät vollständig von der
Stromversorgung getrennt ist. Wenn Sie die
Stromversorgung ganz unterbrechen möchten,
ziehen Sie das Netzkabel aus der Netzsteckdose.
Aus diesem Grund sollte die Netzsteckdose, an der
dieses Gerät angeschlossen wird, in Reichweite
und leicht erreichbar sein.
• Der CM-110 und der CM-220 sind werkseitig
so eingestellt, dass sie nach ca. 4Stunden der
Inaktivität automatisch ausgeschaltet werden.
Wenn das Gerät nicht automatisch abgeschaltet
werden soll, ändern Sie die „AUTO OFF“-
Einstellungen zu „OFF“, wie auf S. 6 erläutert.
Aufstellung
• Der Einsatz des Geräts in der Nähe von
Leistungsverstärkern (oder anderen Geräten mit
großen Transformatoren) kann ein Brummen
verursachen. Um dieses Problem zu umgehen,
ändern Sie die Ausrichtung dieses Geräts, oder
stellen Sie es in größerer Entfernung zur Störquelle
auf.
• Dieses Gerät kann den Empfang von Radio- und
Fernsehsignalen stören. Verwenden Sie es deshalb
nicht in der Nähe solcher Empfangsgeräte.
• Wenn Geräte zur drahtlosen Kommunikation wie
Mobiltelefone in der Umgebung dieses Geräts
verwendet werden, können Geräusche entstehen.
Diese Geräusche können bei abgehenden oder
ankommenden Gesprächen oder während der
Verbindung entstehen. Sollten Sie Probleme dieser
Art haben, verwenden Sie die Mobilfunkgeräte
in größerer Entfernung zu diesem Gerät, oder
schalten Sie sie aus.
• Setzen Sie das Gerät keinem direkten Sonnenlicht
aus, stellen Sie es nicht neben Heizgeräten auf,
lassen Sie es nicht in einem geschlossenen
Fahrzeug liegen, und setzen Sie es auch sonst
keinen extremen Temperaturen aus. Achten
Sie auch darauf, dass Lichtquellen, deren Licht
normalerweise auf kurze Distanz verwendet
wird (z.B. eine Klavierlampe), oder kräftige Spots
nicht für längere Zeit immer die gleiche Stelle
des Gerätes beleuchten. Übermäßige Hitze kann
zu Verformungen oder Verfärbungen des Geräts
führen.
• Wenn das Gerät bei einem Transport aus kalter/
trockener Umgebung in eine feucht-warme
Umgebung gelangt, können sich Wassertröpfchen
(Kondensation) im Geräteinneren bilden. Es
können Schäden oder Fehlfunktionen auftreten,
falls Sie versuchen, das Gerät unter diesen
Bedingungen zu betreiben. Bevor Sie das Gerät
verwenden, lassen Sie es mehrere Stunden
lang stehen, bis die Kondensation vollständig
verdampft ist.
• Vermeiden Sie es, Gummi, Vinyl oder ähnliche
Materialien über längere Zeiträume auf das
Gerät zu legen. Diese Gegenstände könnten die
Oberäche des Geräts verfärben oder auf andere
Weise beeinträchtigen.
• Kleben Sie keine Sticker, Abziehbilder oder
ähnliches auf das Gerät. Beim Ablösen solcher
Materialien vom Gerät könnte die Oberäche
beschädigt werden.
• Je nach Material und Temperatur der Oberäche,
auf der Sie das Gerät aufstellen, können die
Gummifüße die Oberäche verfärben oder
beschädigen.
Um dies zu vermeiden, legen Sie ein Stück Filz
oder Sto unter die Gummifüße. Achten Sie in
diesem Fall jedoch darauf, dass das Gerät nicht
wegrutschen kann.
• Stellen Sie keine mit Wasser gefüllten Behälter
(z.B. Blumenvasen) auf das Gerät. Vermeiden Sie
den Einsatz von Insektiziden, Parfum, Alkohol,
Nagellackentferner, Sprühdosen usw. in der Nähe
des Gerätes. Wischen Sie umgehend jegliche
Flüssigkeiten, die auf das Gerät gelangen, mit
einem trockenen, weichen Tuch ab.
Wartung
• Für die normale Reinigung wischen Sie das
Gerät mit einem weichen, trockenen oder leicht
angefeuchteten Tuch ab. Um hartnäckigen
Schmutz zu entfernen, verwenden Sie ein mit
einer milden, nicht scheuernden Seifenlösung
getränktes Tuch. Wischen Sie sorgfältig mit einem
weichen, trockenen Tuch nach.
• Verwenden Sie kein Benzin oder
Verdünnungsmittel, Alkohol oder sonstige
Lösemittel, um Verfärbungen und/oder
Verformungen zu vermeiden.
Zusätzliche Vorsichtsmaßnahmen
• Seien Sie hinreichend vorsichtig bei Betätigung
der Tasten, Regler und anderer Bedienelemente
sowie beim Anschließen von Kabeln an
den Buchsen des Geräts. Eine unachtsame
Handhabung kann zu Fehlfunktionen führen.
• Wenn Sie Kabel anschließen oder abziehen,
ergreifen Sie das Kabel immer am Stecker – ziehen
Sie niemals am Kabel. Auf diese Weise vermeiden
Sie Kurzschlüsse und Schäden an den inneren
Bestandteilen der Kabel.
• Während des normalen Betriebs kann ein geringer
Wärmeanteil vom Gerät abgestrahlt werden.
• Halten Sie die Lautstärke des Geräts auf einem
vernünftigen Maß, um die Nachbarschaft nicht
unnötig zu stören. Sie können auch Kopfhörer
verwenden, so dass Sie auf Ihre Umgebung keine
Rücksicht zu nehmen brauchen.
• Wenn Sie das Gerät transportieren müssen,
verpacken Sie es möglichst im Originalkarton
(einschließlich des Verpackungsmaterials), in
dem es geliefert wurde. Anderenfalls sollten Sie
versuchen, ähnliches Packmaterial zu verwenden.
• Einige Anschlusskabel enthalten Widerstände.
Verwenden Sie für Anschlüsse an diesem Gerät
keine Kabel mit Widerständen. Die Verwendung
solcher Kabel kann dazu führen, dass der
Signalpegel sehr niedrig oder sogar unhörbar
ist. Informationen zu den technischen Daten von
Kabeln erhalten Sie vom jeweiligen Hersteller.
• Aufgrund der Bauart dieses Instruments könnten
kleine Tiere in das Innere gelangen und dort
eingeschlossen werden. Schalten Sie das Gerät in
diesem Fall unverzüglich aus, und ziehen Sie den
Netzstecker aus der Steckdose. Wenden Sie sich an
den Händler, bei dem Sie das Gerät gekauft haben
oder an das nächste Roland Service Center.
• Führen Sie keine Hände, Finger usw. in die
Önungen des Geräts ein. Bei Verwendung
des Geräts in Haushalten mit kleinen Kindern
sollte stets ein Erwachsener anwesend sein, um
sicherzustellen, dass Kinder ihre Hände und Füße
nicht in diese Önungen einführen.
• Die in diesem Dokument genannten
Unternehmens- und Produktnamen sind
eingetragene Marken oder Marken ihrer
jeweiligen Eigentümer.
WICHTIGE HINWEISE

4
☐ Hauptgerät (Subwoofer)
* Die Abbildung zeigt das Hauptgerät des CM-220.
Überprüfen des Packungsinhalts
☐ Netzkabel
☑ Bedienungsanleitung (dieses Dokument)
☐ Satellitenlautsprecher (zwei)
* Sie müssen die mitgelieferten
Satellitenlautsprecher verwenden.
☐ Lautsprecherabdeckungen (zwei)
Diese können auf Wunsch an den
Satellitenlautsprechern befestigt werden.
☐ Lautsprecherkabel (zwei)
* Sie müssen die mitgelieferten Lautsprecherkabel verwenden.
Die Lautstärke und die Tonqualität sind davon abhängig, in welchem Abstand von der Wand Sie das Hauptgerät und die Satellitenlautsprecher
aufstellen sowie vom Material der Wand und den Eigenschaften des Fußbodens. Passen Sie die Position und die Lautstärke entsprechend Ihrem
Aufstellungsort an, während Sie Klang wiedergeben.
Aufstellen der Satellitenlautsprecher
Es wird empfohlen, die Satellitenlautsprecher in zwei Ecken eines gleichseitigen Dreiecks aufzustellen,
während sich die Hörposition in der dritten Ecke bendet.
Richten Sie die Vorderseite der Satellitenlautsprecher auf die Hörposition aus.
Aufstellen des Hauptgeräts
Es wird empfohlen, das Hauptgerät (Subwoofer) mit dem gleichen Abstand wie die Satellitenlautsprecher
aufzustellen, mit der Hörposition in der Mitte.
Aufstellung
Sicherstellen eines natürlichen Klangs zwischen dem Hauptgerät (Subwoofer)
und den Satellitenlautsprechern ([PHASE]-Schalter)
Der [PHASE]-Schalter schaltet die Phase des Hauptgeräts (Subwoofer). Wählen Sie die Einstellung
„INV“ (invertiert) aus, falls der Klang bei der Einstellung „NOR“ (normal) ungewöhnlich dünn und
phasenverschoben sein sollte.

5
Deutsch Français Italiano Español Português NederlandsEnglish
Beschreibungen zum Bedienfeld
Rückseite
INPUT-Buchsen
Hier können Sie die Audioquellen anschließen, deren Klang Sie wiedergeben möchten. Die Signale aller Buchsen können gleichzeitig wiedergegeben werden.
* Wenn Verbindungskabel mit Widerständen verwendet werden, kann es sein, dass der Lautstärkepegel der an die INPUT-Buchsen angeschlossenen Geräte niedrig ist.
Verwenden Sie in diesem Fall Kabel ohne Widerstände.
PHONES-Buchse
Hier können Kopfhörer
angeschlossen werden
(Stereo-Miniklinke).
* Falls ein Kopfhörer
angeschlossen ist, wird der Ton nicht
über das Hauptgerät (Subwoofer)
oder die Satellitenlautsprecher
ausgegeben.
CH 3-Buchse
Hier kann der digitale
Ausgang (Koaxialkabel)
eines Geräts angeschlos-
sen werden.
* Schließen Sie nur ein
digitales Stereosignal
an. Wenn Sie beispiels-
weise 5.1-Kanal oder ein
anderes digitales Signal
anschließen, entstehen
Störgeräusche.
CH 2-Buchsen
Hier kann ein Fernsehgerät,
ein Computer oder ein
MP3-Player (mit Cinch
oder Stereo-Miniklinke)
angeschlossen werden.
CH 1-Buchsen
Hier kann ein
Musikinstrument wie ein
Keyboard oder V-Drums
angeschlossen werden
(mono oder stereo,
Klinke).
BALANCED INPUT-Buchsen
Hier kann ein Mischpult oder ein ähnliches Gerät angeschlossen
werden.
Buchsentyp
* Dieses Gerät besitzt symmetrische XLR/
TRS-Buchsen. Anschlussdiagramme für
diese Buchsen sind unten abgebildet.
Nehmen Sie die Anschlüsse erst vor, nachdem Sie sich auch die
Anschlussdiagramme der anderen anzuschließenden Geräte
angesehen haben.
1: MASSE
2: PLUS
3: MINUS
MASSE (MANTEL)
PLUS (SPITZE)
MINUS (RING)
Netzanschluss
Schließen Sie hier das mitgelieferte Netzkabel an.
SATELLITE SPEAKER-Buchsen
Schließen Sie hier die mitgelieferten
Satellitenlautsprecher an.
* Schließen Sie nur die mitgelieferten
Lautsprecherkabel an.
Buchsentyp Buchsentyp Buchsentyp
Rückseite Rückseite

Einschalten des Systems
6
Das Bedienfeld
[ON]-Schalter
Schaltet das System ein.
[MASTER]-Regler
Hiermit wird die Gesamtausgangslautstärke
des Hauptgeräts (Subwoofer) und der
Satellitenlautsprecher geregelt.
Leuchtet rot, wenn das System
eingeschaltet ist.
[AUTO OFF]-Schalter
ON
Das System wird automatisch ausgeschaltet, wenn
innerhalb von 4Stunden kein Eingangssignal
festgestellt wird.
* Zum Fortsetzen des Betriebs schalten Sie das
Gerät aus und wieder ein, oder stellen Sie den
[AUTO OFF]-Schalter auf „OFF“.
OFF Das System wird nicht automatisch ausgeschaltet.
Regler [CH 1], [CH 2] und
[CH 3]
Hiermit wird die Lautstärke der an den
Buchsen CH 1, CH 2 und CH 3 eingehenden
Signale geregelt.
[WOOFER]-Regler
Hiermit wird die Ausgangslautstärke des
Hauptgeräts (Subwoofer) geregelt.
[PHASE]-Schalter
Hiermit wird die Phase des vom Hauptgerät (Subwoofer)
ausgegebenen Klangs geändert (S. 4).
EQUALIZER-Regler
[LOW]-Regler
Regelt die Lautstärke
der Bässe.
[HIGH]-Regler
Regelt die Lautstärke
der Höhen.
* Um Fehlfunktionen und/oder Schäden an Lautsprechern oder anderen Geräten zu vermeiden, regeln Sie stets die Lautstärke herunter, und
schalten Sie alle Geräte aus, bevor Sie eine Verbindung herstellen.
* Nachdem Sie die Verbindungen hergestellt haben, schalten Sie Ihre Geräte in der angegebenen Reihenfolge ein. Wenn Sie die Geräte in der
falschen Reihenfolge einschalten, besteht die Gefahr von Fehlfunktionen und/oder Schäden an Lautsprechern und anderen Geräten.
1. Stellen Sie den [MASTER]-
Regler auf null.
HINWEIS
Das System wird automatisch ausgeschaltet, wenn
innerhalb von ca. 4Stunden kein Eingangssignal festgestellt
wird.
Wenn das System nicht automatisch ausgeschaltet werden
soll, stellen Sie den [AUTO OFF]-Schalter auf „OFF“.
3. Schalten Sie das System ein.2. Schalten Sie die
angeschlossenen Geräte ein.
* Dieses Gerät ist mit einer Schutzschaltung ausgestattet. Nach dem Einschalten entsteht eine kurze Betriebspause von einigen Sekunden, bis das
Gerät normal arbeitet.
* Achten Sie immer darauf, die Lautstärke herunterzuregeln, bevor Sie das Gerät ein- oder ausschalten. Selbst bei heruntergeregelter Lautstärke
sind möglicherweise Geräusche zu hören, wenn Sie das Gerät ein- oder ausschalten. Dies ist normal und stellt keine Fehlfunktion dar.
* Wenn Sie die Stromversorgung ganz unterbrechen möchten, ziehen Sie das Netzkabel aus der Netzsteckdose. Weitere Informationen nden Sie
unter „Stromversorgung“ (S. 3).
Einschalten des Systems
A página está carregando...
A página está carregando...
A página está carregando...
A página está carregando...
A página está carregando...
A página está carregando...
A página está carregando...
A página está carregando...
A página está carregando...
A página está carregando...
A página está carregando...
A página está carregando...
A página está carregando...
A página está carregando...
A página está carregando...
A página está carregando...
A página está carregando...
A página está carregando...
A página está carregando...
A página está carregando...
A página está carregando...
A página está carregando...
A página está carregando...
A página está carregando...
A página está carregando...
A página está carregando...
A página está carregando...
A página está carregando...
A página está carregando...
A página está carregando...
A página está carregando...
A página está carregando...
A página está carregando...
A página está carregando...
A página está carregando...
A página está carregando...
A página está carregando...
A página está carregando...
A página está carregando...
A página está carregando...
A página está carregando...
A página está carregando...
A página está carregando...
A página está carregando...
A página está carregando...
A página está carregando...
A página está carregando...
A página está carregando...
A página está carregando...
A página está carregando...
A página está carregando...
A página está carregando...
A página está carregando...
A página está carregando...
A página está carregando...
A página está carregando...
A página está carregando...
A página está carregando...
A página está carregando...
A página está carregando...
A página está carregando...
A página está carregando...
A página está carregando...
A página está carregando...
A página está carregando...
A página está carregando...
A página está carregando...
A página está carregando...
A página está carregando...
A página está carregando...
A página está carregando...
A página está carregando...
-
 1
1
-
 2
2
-
 3
3
-
 4
4
-
 5
5
-
 6
6
-
 7
7
-
 8
8
-
 9
9
-
 10
10
-
 11
11
-
 12
12
-
 13
13
-
 14
14
-
 15
15
-
 16
16
-
 17
17
-
 18
18
-
 19
19
-
 20
20
-
 21
21
-
 22
22
-
 23
23
-
 24
24
-
 25
25
-
 26
26
-
 27
27
-
 28
28
-
 29
29
-
 30
30
-
 31
31
-
 32
32
-
 33
33
-
 34
34
-
 35
35
-
 36
36
-
 37
37
-
 38
38
-
 39
39
-
 40
40
-
 41
41
-
 42
42
-
 43
43
-
 44
44
-
 45
45
-
 46
46
-
 47
47
-
 48
48
-
 49
49
-
 50
50
-
 51
51
-
 52
52
-
 53
53
-
 54
54
-
 55
55
-
 56
56
-
 57
57
-
 58
58
-
 59
59
-
 60
60
-
 61
61
-
 62
62
-
 63
63
-
 64
64
-
 65
65
-
 66
66
-
 67
67
-
 68
68
-
 69
69
-
 70
70
-
 71
71
-
 72
72
-
 73
73
-
 74
74
-
 75
75
-
 76
76
-
 77
77
-
 78
78
-
 79
79
-
 80
80
-
 81
81
-
 82
82
-
 83
83
-
 84
84
-
 85
85
-
 86
86
-
 87
87
-
 88
88
-
 89
89
-
 90
90
-
 91
91
-
 92
92


Roland CM-110 Manual do usuário
- Categoria
- Equipamento musical suplementar
- Tipo
- Manual do usuário
em outras línguas
- español: Roland CM-110 Manual de usuario
- français: Roland CM-110 Manuel utilisateur
- italiano: Roland CM-110 Manuale utente
- English: Roland CM-110 User manual
- Nederlands: Roland CM-110 Handleiding
- Deutsch: Roland CM-110 Benutzerhandbuch
Artigos relacionados
-
Roland PM-03 Manual do proprietário
-
-
Roland KC-60 Manual do usuário
-
Roland PM-100 Manual do proprietário
-
-
-
-
-
-
Outros documentos
-
Yamaha DDP-2 Manual do proprietário
-
-
-
-
Yamaha DVX-S200 Manual do usuário
-
-
Yamaha DXS15 Manual do proprietário
-
-
-
Genius SW-J2.1 500 Manual do usuário