
Android Internet Tablet
DARK GLOW 10.1
MANUAL DE USUARIO / USER MANUAL / GUIA DE UTILIZADOR

3
ES
¡ BIENVENIDO !
En esta guía encontrarás toda la información para sacar el
máximo partido a tu DARK GLOW 10.1.
CREA UNA CUENTA SPC
Un montón de ventajas gratis a un click.
Antes de continuar leyendo esta guía, te recomendamos
que visites www.spc-universe.com, CREES UNA CUENTA
SPC Y REGISTRES TU PRODUCTO.
Así, entrarás en el universo SPC: un club exclusivo para
nuestros clientes con importantes descuentos, así como
promociones para mejorar o renovar tu equipo SPC.
Además, con esta cuenta podrás acceder gratis a todos los
servicios de SPC, como apps para tablets y smartphones y
a nuestro apartado de soporte técnico.
Esto es SPC. A universe in technology.

54
ES
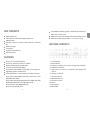
CONTENIDO DE LA CAJA
Tablet DARK GLOW 10.1
Cable USB para conectar el equipo con el PC
Cable USB-DC
Cable USB-OTG para conectar memorias USB, cámaras,
etc.
Cargador de batería
Manual de usuario
Libro de aspectos legales
Hoja de garantía
CARACTERÍSTICAS
Pantalla: 10.1’’ Táctil capacitiva
Procesador: Octa Core Cortex A7 @1.8GHz
Batería: Litio-polímero 6000mAh
Cámara: Frontal VGA; Trasera 2Mpx
Conexiones: Mini HDMI / Micro USB / auricular 3.5mm
Sistema operativo: Android 4.4.2
Otras características: MicroSD (hasta 32GB,
Acelerómetro
Reproduce música (MP3, WMA, WAV, APE, FLAC, AAC,
OGG, AMR, MID, MP1, MP2)
Reproduce video (AVI (DIVX/XVID), MKV, FLV, WMV,
VOB, 3GP, MOV, M2TS, MP4, MPG, TP, TRP, SVCD, VCD)
Reproduce imágenes (JPG, BMP, PNG, GIF)
Reproduce texto (EPUB, PDF)
Sistemas operativos compatibles: Windows XP/
Vista/7/8, MAC 10.6 o inferior, Linux
Autonomía: 5h de navegación web (valor medio
estimado)
Dimensiones y peso: 258 x 171 x 12 mm / 544 g

76
ES
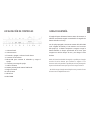
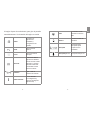
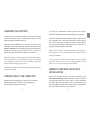
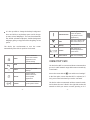
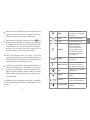
LOCALIZACIÓN DE CONTROLES
1. Cámara frontal
2. Cámara trasera
3. Encender / Apagar / Activar el modo ahorro
4. Conector de auriculares
5. Micro-USB para conectar al ordenador y cargar el
equipo
6. Conector para cargar el equipo
7. Subir el volumen
8. Ranura para tarjeta de memoria MicroSD
9. Bajar el volumen
10. Orificio Reset
11. Micrófono
12. Mini HDMI
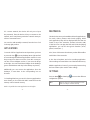
CARGA DE BATERÍA
El equipo dispone de batería interna. Antes de comenzar a
utilizarlo necesitarás cargarlo conectándolo al cargador de
batería incluido en la caja.
Con el equipo apagado, conecta un extremo del cable USB
en el cargador de batería y el otro extremo en el conector
del equipo (6). La batería empezará a cargarse. Carga la
batería durante un tiempo aproximado de 5 horas para
asegurar un máximo tiempo de uso y así alargar la vida
de ésta.
NOTA: Si la batería está MUY descargada, es posible que el equipo
necesite de varios minutos para comenzar a cargarse. Si no
observas nada en la pantalla es posible que esté muy descargado.
Espera varios minutos hasta que el proceso de carga comience.
- No olvides cargar el equipo antes del primer uso y cuando el icono
de batería esté completamente vacío.

98
ES
CONEXIÓN AL ORDENADOR
Con el equipo encendido, conéctalo a un ordenador con
el cable USB de la caja. El ordenador reconocerá el
dispositivo automáticamente.
Aparecerá una noticación en la parte superior izquierda
de la pantalla. Automáticamente la tablet será reconocida
por el ordenador.
Una vez el ordenador haya detectado el equipo,
éste actuará como un disco portátil. Por lo tanto, la
transferencia de archivos se realizará de la misma manera
que con cualquier otro dispositivo de almacenamiento
(seleccionando los cheros a copiar y arrastrándolos
a la unidad, o copiando y pegándolos en la unidad, por
ejemplo).
NOTA: No desconectes el equipo durante el proceso de copia o
borrado de datos ya que podría causar un mal funcionamiento de la
unidad y dañar el Software.
No introduzcas archivos o carpetas con nombres demasiado largos
o caracteres extraños, ya que podría causar un mal funcionamiento
del equipo. En tal caso, cambia el nombre de los archivos o
carpetas.
INSTALACIÓN TARJETA Y
DISPOSITIVOS USB
Introduce la tarjeta de memoria microSD (hasta 32GB)
en la ranura del lector de tarjetas (8) de manera que los
contactos de la tarjeta queden hacia dentro y hacia
atrás. Presiona hasta que ésta quede encajada dentro del
equipo y oigas un click. Para extraer la tarjeta, presiónala
ligeramente hacia dentro hasta oír un click. La tarjeta
sobresaldrá de la ranura y podrás así extraerla.
Para conectar una memoria o dispositivo USB, conecta un
extremo del cable USB-OTG suministrado en el equipo y el
otro extremo en el dispositivo USB que quieras conectar.
NOTA: Es posible que tengas que utilizar la uña o un objeto
ligeramente largo para ayudarte a introducir y extraer la tarjeta.
La tarjeta y memoria USB (no incluidas) tienen que estar
formateadas en FAT32.
ENCENDER / APAGAR EL EQUIPO
Enciende el equipo manteniendo pulsada la tecla (3)
durante varios segundos. El arranque tardará un tiempo,
deberás esperar hasta que nalice.

1110
ES
La primera vez que enciendas el equipo, te aparecerá
un asistente de conguración, sigue los pasos hasta
que éste nalice. Una vez nalizado, se mostrará el
escritorio principal, en el cuál podrás ver la barra inferior
de información, accesos directos a funciones, e icono de
acceso al menú.
Para apagar el equipo, mantén pulsada la tecla
(3) durante varios segundos. Pulsa sobre “Aceptar” para
conrmar la operación.
En los siguientes encendidos, el equipo se situará en
la pantalla de bloqueo, deberás pulsar y deslizar hacia
la derecha el icono del candado . Tras esto, verás el
escritorio principal, en el cuál podrás ver la barra inferior
de información, accesos directos a funciones, e icono de
acceso al menú.
NOTA: Para activar el ahorro de energia y bloquear la pantalla pulsa
la tecla (3) una vez. La pantalla se apagará pero el equipo
continuará encendido. Para volver a activarlo, pulsa una vez la
tecla (3) y a continuación, arrastra con el dedo lel icono del
candado hacia la derecha.
Si en alguna ocasión el equipo no funcionase correctamente o se
quedara bloqueado, introduce un objeto puntiagudo en el oricio
de la parte superior (10) y presiona el pulsador para resetear el
equipo.
PANTALLA TÁCTIL
Seleccionar una función, opción, icono, etc.: Para
seleccionar una función, opción, etc., simplemente
pulsa sobre ellas.
Desplazarse por una lista: Cuando en pantalla se
muestre una lista de elementos (carpetas, archivos,
submenús, etc.), podrás desplazarte por la lista
deslizando el dedo de arriba abajo o viceversa.
Seleccionar un elemento de la lista: Simplemente, pulsa
una vez sobre él.
Teclado virtual: cuando pulses sobre un campo de
introducción de texto, aparecerá en la parte inferior de
la pantalla un teclado virtual, que te permitirá escribir
como si de un teclado normal se tratara.
Volver al menú anterior: Para volver al menú anterior en
cualquiera de las pantallas, pulsa el icono situado
en la barra inferior o la tecla (4). Pulsa varias veces si
deseas volver al escritorio.

1312
ES
Volver al escritorio: Para volver directamente al
escritorio pulsa el icono de la pantalla.
USO DEL EQUIPO E INTERFAZ ANDROID™
El equipo tiene como sistema operativo Android 4.4
(KitKat), mejorando el interfaz gráco, funciones,
aplicaciones, etc. con respecto a sus versiones anteriores.
El equipo dispone de 5 escritorios donde se muestran
los iconos de acceso directo a las aplicaciones y widgets
(aplicaciones que permiten mostrarse y ejecutarse en
el escritorio). Para cambiar de un escritorio a otro, pulsa
sobre la pantalla y arrastra el dedo hacia la izquierda o
derecha.
La barra de estado situada en la parte superior de la
pantalla te muestra noticaciones del sistema, estado de
la red WIFI, estado de la batería, hora; y la barra inferior te
permite subir y bajar el volumen, ir a la anterior pantalla, al
escritorio principal, y a las aplicaciones recientes.
Además puedes personalizar la interfaz y escritorios:
eliminar un icono o widget, manteniéndolos pulsados y
moviéndolos, o arrastrándolos hacia la parte superior
de la pantalla “X Eliminar”, para borrarlos.
mover un icono o widget, pulsa prolongadamente sobre
él hasta que se agrande ligeramente, y arrástralo hacia
otro hueco vacío del mismo escritorio o de escritorios
contiguos.
Para añadir un widget, pulsa sobre el icono para
acceder al menú principal y a continuación pulsa
sobre la opción WIDGETS para mostrar los que están
disponibles (esto varía según las aplicaciones que
haya instaladas). Selecciona el que buscas, mantenlo
pulsado y éste aparecerá en la pantalla siempre que
haya espacio suciente.
Puedes agrupar iconos en carpetas en el escritorio para
ordenar y almacenar accesos directos, widgets, etc. en
su interior. Para ello mantén pulsado uno de los iconos
y arrástralo justo encima del otro.
También es posible cambiar el fondo de escritorio.
Pulsa prolongadamente sobre algún hueco del
escritorio, y en el menú emergente, selecciona “Fondos
de pantalla”. Podrás elegir entre los fondos de pantalla
animados predeterminados, la galería de fondos de
pantalla predeterminados, o cualquier imagen dentro de
la galería, como última opción.

1514
ES
El equipo dispone de acelerómetro, para girar la pantalla
automáticamente si la orientación del equipo es vertical.
Menú
Acceder a las
aplicaciones
instaladas y
conguración del
sistema.
Atrás
Volver al menú
anterior.
Inicio
Volver al escritorio
principal.
Reciente
Muestra las últimas
aplicaciones abiertas.
Puedes acceder a ellas
pulsando, o cerrarlas
pulsando sobre ellas
y deslizando el dedo
hacia un extremo
Volumen
Bajar o subir el
volumen del sistema.
Menú avanzado
Acceso al menú
de conguración y
opciones (en algunas
aplicaciones)
WiFi
Se muestra si está
activada la conexión
WiFi
Batería
Muestra el estado de
la batería
Búsqueda
Búsqueda web o
búsqueda rápida
de aplicaciones
instaladas
Búsqueda por voz
Búsqueda web por voz

1716
ES
CONECTIVIDAD: WIFI
El equipo tiene WiFi para poder conectarse a Internet
siempre y cuando te encuentres dentro de la cobertura de
una red WiFi con conexión a Internet. Para ello:
Accede al menú mediante el icono , y selecciona la
opción “Ajustes”. En la primera opción, asegúrate de que
el WiFi esté activado, o en caso contrario, pulsa sobre el
interruptor hasta que veas la palabra “SÍ”.
El equipo realizará una búsqueda automática de las redes
inalámbricas que encuentre, y verás la lista. Elige la red a
la que te quieres conectar, pulsando sobre ella. En caso de
ser una red segura, el equipo te pedirá la contraseña de la
red. A continuación el equipo intentará conectarse a la red,
y en caso satisfactorio, bajo la red, verás escrito “Conexión
establecida”. Signica que puedes acceder a Internet.
También puedes añadir una red manualmente, desde el
icono + en la parte superior derecha de la pantalla.
APLICACIONES
Para ver el listado completo de aplicaciones y acceder a
ellas, debes pulsar el icono , desde cualquier escritorio.
Desplázate de derecha a izquierda para moverte pos
las diferentes pantallas de aplicaciones en caso de no
entrar en una única pantalla. Además desde este punto,
si continúas hacia la derecha, accedes a la selección de
Widgets que puedes instalar en los escritorios (mantener
pulsado y soltar en escritorio para colocarlo).
También puedes acceder a las aplicaciones desde los
escritorios, en caso de tener el correspondiente icono
como acceso directo.
Para instalar aplicaciones, puedes hacerlo o bien desde
cualquier tienda de aplicaciones, o bien desde un archivo
con extensión “.APK” de la tarjeta de memoria o memoria
del sistema.
NOTA: Es posible que algunas aplicaciones estén en inglés.
MULTIMEDIA
El equipo trae preinstaladas algunas aplicaciones
multimedia, para reproducción de música, vídeos,
imágenes, y e-books. Dentro de cada una de las
aplicaciones, se mostrarán los archivos que encuentre
en cualquiera de las memorias (interna, microSD, USB) de
ese tipo. Podrás reproducir los archivos, y dentro de los
programas de reproducción, podrás realizar las funciones
típicas (zoom, pausar, avanzar, etc…).

1918
ES
Además, trae un explorador de archivos desde el que
visualizarás los diferentes archivos y carpetas de las
memorias.
También dispone de micrófono y una aplicación para
grabación de voz. Las grabaciones se guardan en la raíz
de la memoria interna.
Con la aplicación “Camera” podrás sacar fotos utilizando
la cámara frontal (también sirve para vídeollamadas).
AJUSTES
Pulsa Menú y Ajustes para acceder a las distintas
opciones de conguración.
Wi-Fi
Permite conectarte a una red WiFi que
el equipo encuentre o congurar una
manualmente
Uso de datos
Muestra el consumo de datos en caso de
utilizar un pincho USB 3G
Más…
Accede a otros ajustes de redes
inalámbricas
Sonido
Permite congurar el volumen,
noticaciones y otros parámetros de
sonido
Pantalla
Permite congurar parámetros
relacionados con la pantalla como el
brillo y fondo de pantalla
Almacenamiento
Muestra el espacio en memorias de las
diferentes memorias insertadas
Batería
Muestra el estado de batería y consumo
de las diferentes funciones
Aplicaciones
Puedes administrar las aplicaciones
instaladas y en ejecución
Servicios de
ubicación
Conguración de parámetros de
ubicación a través de WiFi
Seguridad
Conguración de parámetros de bloqueo
y seguridad del equipo
Idioma y entrada
de texto
Conguración de idioma, diccionarios,
teclado y síntesis de voz
Copia de
seguridad
Conguración de parámetros de copia
de seguridad y restauración de valores
de fábrica

2120
ES
Cuentas
Cuentas de usuario. Debes denir por
lo menos una cuenta de Google para la
completa funcionalidad del equipo. Otras
cuentas compatibles: Twitter, Exchange,
Facebook, Skype…
Fecha y hora
Conguración de la fecha y hora del
sistema
Accesibilidad
Gestión de funciones para ayuda a
personas con discapacidad visual
Opciones de
desarrollo
Opciones referentes al desarrollo
y funcionamiento del equipo, se
recomienda no cambiar
Información del
tablet
Información hardware y software del
equipo
Copyright © 2015 SPC
www.spc-universe.com
La información que contiene esta guía no podrá en ningún
caso transmitirse, reproducirse o difundirse de forma
alguna sin la autorización por escrito de SPC.
MARCAS COMERCIALES
SPC es una marca registrada de Telecom y Novatecno S.A.
NOTA: SPC se reserva el derecho de modicar en cualquier
momento la información de esta guía, la cual se ha elaborado con
el mayor cuidado, si bien toda la información y recomendaciones
que aquí constan no constituyen garantía alguna

2322
EN
WELCOME !
This guide includes all the information to make the most
out of your DARK GLOW 10.1.
GET AN SPC ACCOUNT
Free advantages just one click away.
Before going on reading this manual, we strongly
recommend you visiting www.spc-universe.com, SO YOU
CAN CREATE AN SPC ACCOUNT AND REGISTER YOUR
PRODUCT.
By doing this, you will be able to get into SPC universe: an
exclusive club where our clients can get incredible offers
and discounts and also upgrade or renew their products.
Moreover, having an account means free access to SPC
services: tablet and smartphone apps, technical support...
This is SPC. A universe in technology.

2524
EN
Compatible operating systems: Windows XP/Vista/7/8,
MAC 10.6 o lower, Linux
Battery life: 5h of web surng (estimated medium value)
Dimensions and weight: 258 x 171 x 12 mm / 544 g
UNIT AND CONTROLS
1. Front camera
2. Back camera
3. Switch on / Switch off / Power saving mode activation
4. Earphone connector
5. USB port to connect to computer and charge the
device
6. USB-DC connector
7. Increase volume
8. MicroSD card slot
9. Decrease volume
10. Reset
11. Microphone
12 Mini HDMI
BOX CONTENTS
DARK GLOW 10.1
USB cable to connect the player with the PC
USB-DC cable
USB-OTG cable to connect USB memories, cameras,
etc.
Battery charger
User guide
Legal information book
Warranty sheet
FEATURES
Screen: 10.1’’ touch capacitive
Processor: Octa Core Cortex A7 1.8GHz
Battery: Lithium-Polymer 6000mAh
Camera: Front VGA; Back 2Mpx
Connections: Mini HDMI / micro USB / 3.5m earphone
Operating system: Android 4.4.2
Other specications: MicroSD (up to 32GB), G-sensor
Plays music (MP3, WMA, WAV, APE, FLAC, AAC, OGG,
AMR, MID, MP1, MP2)
Plays video (AVI (DIVX/XVID), MKV, FLV, WMV, VOB, 3GP,
MOV, M2TS, MP4, MPG, TP, TRP, SVCD, VCD)
Plays pictures (JPG, BMP, PNG, GIF)
Plays e-books (EPUB, PDF)

2726
EN
You will see a notication on the top left of the screen.
Automatically tablet will be recognized by the computer.
Once the computer has detected the device, it will operate
like a portable disk. Therefore, le transfer will be carried
out in the same way as with any other storage device
(for example, selecting and dropping les to the unit, or
copying and pasting les in the unit).
NOTE: Do not disconnect the player during the data copying or
deleting process as this could cause the unit to malfunction and
damage the software.
Do not copy les or folders with le names too long or strange
characters, because it may cause a wrong performance of the
device. If so, change the name of the les or folders.
MEMORY CARD AND USB DEVICE
INSTALLATION
Insert the microSD memory card (up to 32GB) in the
microSD card slot (8) with the contacts of the card inside,
and looking at the back. Press until it is fully contained
inside the device and you hear a click. To extract the card,
press it slightly inwards until you hear a click. The card will
pop out of the slot, then you can remove it.
CHARGING THE BATTERY
The device has an internal battery. You have to charge
it before starting to use it, connecting the device to the
battery charger included in the box.
With the device switched off, connect one end of the
USB cable in the battery charger and the other end to the
device’s connector (6). The battery will start to be charging.
Charge the battery during around 5 hours to ensure a
maximum usage time and to lengthen its useful life.
NOTE: If the battery is TOO discharged, it’s possible that the device
needs some minutes to start charging. If you don’t see anything
in the display it’s possible that it is too discharged. Wait some
minutes until the charging process starts.
Do not forget to charge the device before the rst use and when the
battery icon is empty.
CONNECTION TO THE COMPUTER
With the device switched on, connect it to a computer
with the USB cable of the box. The computer will
automatically recognise the device.

2928
EN
To connect a USB memory or device, connect one end of
the USB-OTG cable supplied with the device and the other
end into the USB device that you want to connect.
NOTE: You may need to use your nger nail or a slightly long object
to help you to insert and remove the card.
The card and USB memory (not included) must be formatted in
FAT32.
TURNING ON / OFF THE DEVICE
Switch on the device by pressing the key (3) during
some seconds. This process needs some time, you have to
wait until it nishes.
The rst time you power the unit on, a conguration wizard
will appear, follow the steps until the end. Once completed,
the main desktop will be shown, where you can see the
bottom information bar, some shortcuts to different
functions, and the icon to access the menu.
To switch the device off, keep pressing the (3) during
some seconds. Press “OK” to conrm.
Next time you power it on, the device will go to locking
screen, you have to press and move the lock icon to the
right position. Then you will see the main desktop, where
you can see the bottom information bar, some shortcuts to
different functions, and the icon to access the menu.
NOTA: To activate the power saving mode and lock the screen,
press the (3) key once. The screen will switch off but the
device will continue powered on. To activate it again, press once
again the key (3) and then, move with the nger the lock
icon to the right posistion.
If at any time the device does not work correctly or if it gets blocked,
insert a sharp object and press the switch inside, a small hole (10).
TOUCH SCREEN
Select a function, option, etc: to select an option, just
press on it.
Move through a list: when you see in the screen a list
of items (folders, les, sub-menus, etc.), you can move
through the list by moving the nger from up to down
and vice versa.
Select an item from a list: just press once on it.

3130
EN
Virtual keypad: when you press on a text input eld, you
will see in the bottom part of the screen a virtual keypad,
which allows you to write as with a normal keypad.
Back to previous menu: to go back to the previous menu
in any of the displays, press on icon in the bottom
bar. Press it several times if you want to go to the main
desktop.
Go to desktop: To go directly to the main desktop press
the icon of the screen
UNIT OPERATION AND ANDROID™
INTERFACE
The device has Android 4.4 (KitKat) operating system,
improving the graphical interface, functions, applications
and other features comparing with the previous versions.
The device has 5 different desktops where the shortcuts
to some applications and widgets (applications that can
show and run in the desktop) are shown as icons. To move
from one desktop to another one, just press with the nger
on the screen and drag it to left or right position.
The status bar in the top part of the screen shows the
system notications, WiFi network status, battery status,
time; and the bottom bar allows you to increase or
decrease the volume, access to previous screen, to main
desktop, and to recent applications.
Moreover you can customize the interface and desktop:
Remove an icon or widget, keep pressed them and move
them, or drag them to upper position to “X Remove”, to
remove them.
Move an icon or widget, keep pressed on them until it
makes its size slightly bigger, and drag it to other empty
place from same desktop or any adjacent.
To add a widget, press on the icon to access to
main menu and then press on WIDGETS option to
show the available ones (this depends on the installed
applications). Choose the one you want, keep pressed it
and it will appear in the desktop if there is enough space
to allocate it.
You can group icons in folders in the desktop to sort and
store direct accesses, widgets, etc. inside them. To do
this, hold down an icon and drag it just above the other.

3332
EN
It is also possible to change the desktop background.
Press and hold on any desktop space and in the pop
up menu, select “Wallpapers”. You can choose between
the default animated wallpapers, default background
wallpaper gallery, or any picture from the gallery, as last
option.
The device has accelerometer to turn the screen
automatically if the device’s position is horizontal.
Menu
Press to show and
access the installed
applications and
system settings
Back
Back to previous menu
Home
Press to go to main
desktop.
Recent
Press to switch
between the most
recent opened
applications
Volume
Press to move down or
up the system volume.
Advanced menu
Press to go to settings
menu and options
(only works in some
applications)
WiFi
This icon is shown if the
WiFi connectivity is on
Battery
Battery status
Search
Web searching or
installed applications
quick search
Voice search
Web voice searching
CONNECTIVITY: WIFI
The device has WiFi to connect and browse Internet when
you are in a WiFi network range with Internet connectivity.
To activate it:
Access the menu with the , icon and choose “Settings”.
In the rst option, ensure that the WiFi is activated, or if
isn’t, press on the switch until you see the “ON” word.
The device makes an automatic wireless network search,
and it shows the ones it nds in the right side. Select the
network to which you want to connect, pressing on it. If

3534
EN
it’s a secure network, the device will ask you to input
the password. Then the device will try to connect to the
network, and if satisfactory, under the network name you
will see “Connected” word.
You can also add manually a network, from the icon + link
in the top right position.
APPLICATIONS
To see the full list of applications and open them, you have
to press the icon from any desktop. Move right and left
to move through the different applications screens in case
they occupy more than one screen. From this screen you
can also access Widgets section, if you move the nger
to the right. You can install these widgets in the desktops
(press and hold them and drop in the desktop to place it).
Additionally you can access the applications from the
desktops, in case there is the corresponding icon as
shortcut.
To install applications, you can do it from any applications
store directly, or from a le with “APK” extension from the
memory card or internal memory.
NOTE: It is possible that some applications are in English.
MULTIMEDIA
The device has some pre-installed multimedia applications,
for music, videos, pictures and e-books playing. Inside
each application, they will be displayed the les that are
found in any of the memories (internal, microSD, USB)
of this kind. You can play the les and inside the playing
applications, you can do the typical functions (zoom,
pause, forward, etc…).
Also, it has a le browser that shows you the different les
and folders of the memories.
It also has microphone and voice recording application.
The recordings are saved in the root of the internal memory.
With the application “Camera”, you can take pictures using
the front camera (also used for video calling)..
SETTINGS
Press on Menu and Settings to access the different
conguration options.
Wi-Fi
Allows to connect to a WiFi network that the device
nds or to congure a network manually

3736
EN
Data usage
Shows the data usage in case of using a USB 3G
dongle
More… Access to other settings of wireless networks
Sound
Allows to congure the volume, notications and
other parameters related with sound
Display
Allows to congure parameters related with the
display, like brightness and background picture
Storage
Shows the space of the different memories that are
in the device inserted that time
Battery
Shows the battery status and consumption of the
different applications
Apps
You can manage the different installed applications
and the ones that are running
Location services
Location services parameters conguration through
WiFi network
Security
Conguration of locking parameters and device’s
security
Language & input
Language, dictionaries, keyboard and voice
synthesis conguration
Backup & reset Backup parameters conguration and factory reset
Accounts
User accounts. You have to dene at least a Google
account to the fully working of the device. Other
compatible accounts: Twitter, Exchange, Facebook,
Skype…
Date & time System time and date conguration
Accessibility
Functions management to help people with visual
diculties
Developer options
Options related with development and performance
of the device, it’s recommended not to modify them
About tablet Hardware and software information of the device
Copyright © 2015 SPC
www.spc-universe.com
The information that this guide contains cannot be
transmitted, played or distributed in any case without the
written authorization of SPC.
COMERCIAL BRANDNAMES
SPC is a registered brandname of Telecom y Novatecno S.A.
NOTE: SPC reserves the right to modify the information of this
guide in any moment. All the information and recomendations that
we can nd here do not guarantee anything.

39
PT
38
BEM-VINDO
Neste guía encontrarás toda a informação para tirar o
máximo partido do teu GLEE 10.1B.
CRIE UMA CONTA SPC
Inúmeras vantangens grátis à distancia de um click.
Antes de continuar a ler esta guia, recomendamos-lhe que
visite www.spc-universe.com, QUE CRIE UMA CONTA SPC
E REGISTE O SEU PRODUTO.
Desta maneira entrará no universo SPC: um clube exclusivo
para os nossos clientes com importantes descontos e
promoções para melhorar e renovar o seu equipamento
SPC.
Além disto, com esta conta poderá aceder grátis a todos os
serviços da SPC, como apps para tablets e smartphones e
ao nosso suporte técnico.
Isto é a SPC. Um universo em tecnologia.
A página está carregando...
A página está carregando...
A página está carregando...
A página está carregando...
A página está carregando...
A página está carregando...
A página está carregando...
A página está carregando...
A página está carregando...
-
 1
1
-
 2
2
-
 3
3
-
 4
4
-
 5
5
-
 6
6
-
 7
7
-
 8
8
-
 9
9
-
 10
10
-
 11
11
-
 12
12
-
 13
13
-
 14
14
-
 15
15
-
 16
16
-
 17
17
-
 18
18
-
 19
19
-
 20
20
-
 21
21
-
 22
22
-
 23
23
-
 24
24
-
 25
25
-
 26
26
-
 27
27
-
 28
28
-
 29
29


SPC DARK GLOW 10.1 Manual do usuário
- Tipo
- Manual do usuário
- Este manual também é adequado para
em outras línguas
- español: SPC DARK GLOW 10.1 Manual de usuario
- English: SPC DARK GLOW 10.1 User manual
Artigos relacionados
-
SPC Glee 7 Manual do usuário
-
SPC SMARTEE WINBOOK Manual do usuário
-
-
-
-
SPC SMARTEE DUAL CORE Manual do usuário
-
-
-
-
Outros documentos
-
Sunstech Tab 2323 GMQC Guia de usuario
-
Wolder miTab Jump Manual do proprietário
-
-
Philips PI3900B2X/78 Guia rápido
-
-
-
MPMan MPDC97 BT Manual do proprietário
-
-
-