Logitech Flight Yoke System Guia de instalação

Tipo
Guia de instalação
FLIGHT YOKE SYSTEM
Professional Yoke and Throttle Quadrant Simulation Controller
Manche à volant et quadrant de commande des gaz
pour simulation devol pro
USER GUIDE
|
GUIDE DE L’UTILISATEUR
logitechG.com
3
4 ENGLISH
16 FRANÇAIS
29 ESPAÑOL
42 PORTUGUÊS
4 English
LEFT HANDLE
8-way point of view hat switch
2-way rocker switch
Single-function button
(back of left handle)
RIGHT HANDLE
2x2-way rocker switches
Single-function button
3-position Mode switch
(back of right handle)
CHRONOGRAPH
Accurate time and stopwatch function to time
each leg of your ight.
Display also indicates which programming mode
is selected.
5 English
GETTING STARTED: QUADRANT
LEVER KNOBS
Detachable lever knobs to congure
any combination of throttle, aps,
mixture or prop pitch
LEVERS
Smooth-travel levers
with 0 button detent
THREE 2-WAY ROCKER SWITCHES
6 English
INTRODUCTION
Congratulations on buying the Logitech G Flight Yoke System. The Flight Yoke features
realistic controls congurable for all the major ight simulation software to make
your ying experiences more realistic.
FEATURES:
8-way point of view hat switch
6 x 2-way rocker switches
2 x Single-function buttons
3-position mode switch
Downloadable software to program and customize controls and to save
personalized proles.
INSTALLING THE FLIGHT YOKE AND THROTTLE QUADRANT
First, x the Flight Yoke to your table or desk by
inserting the prongs of the mounting clamp into
the holes on the yoke base and then tightening
the screw mechanism until the yoke is rmly attached
(be careful not to overtighten the screw as you may
damage the clamp). Next, screw the mounting plate
to the Throttle Quadrant using the four screws
provided. You can screw the plate to one of two sides
of the quadrant depending on how you want
to mount the quadrant - either in front and
below your table or on top of it. Please note that whichever way you choose
to mount the quadrant, ensure that as you look at the unit the rocker switches are
at the bottom.
Now tighten the throttle unit clamp’s screw mechanism until it is rmly attached
to your table. You can also position the Throttle Quadrant on the left or right side of
the Flight Yoke.
7 English
Now, connect the Throttle Quadrant to the Flight Yoke with
the PS/2 connector provided.
Use the integrated USB Hub on the side of the Flight Yoke to easily
connect other parts of the Logitech G Flight range of products,
such as additional Flight Throttle Quadrants, Flight Rudder Pedals,
or other peripherals.
INSTALLATION FOR WINDOWS
®
10, WINDOWS
®
8.1
ANDWINDOWS
®
7
DRIVER INSTALLATION
1 Visit logitech.com/support/yoke to download the latest drivers and software
for your operating system.
2 With device disconnected, follow the onscreen instructions to complete the
installation.
3 At the Driver Setup screen, only when prompted, insert USB cable into one of
your computer’s USB ports, then click Next.
4 At the Driver Setup screen, click Next to test your controller.
5 Follow the on screen prompts to test the controls and verify device operation.
After the test, click OK.
8 English
IMPORTANT INFORMATION
Driver updates
From time to time there may be updates to the driver and programming software for
this product. You can check for the latest software updates by visiting the Logitech
website (support.logitech.com).
Enabling your controller in the game
Most games support game controllers, but typically default to the mouse and
keyboard until you go into the option menu within the game. The rst time you start
a game after installing your controller, go to the options menu within the main menu
of the game and make sure your controller is set up correctly. If you are having trouble
working out how to do this, or if you’re unsure whether the game itself supports game
controllers, then please refer to the user manual of that game for more help.
TECHNICAL SUPPORT
Online Support: support.logitech.com
PROGRAMMING YOUR LOGITECH G PRO FLIGHT YOKE AND THROTTLE
QUADRANT
The Pro Yoke System’s buttons, controls and axes correspond to commonly used
functions in Microsoft FS9 and FSX according to the tables below.
As with any software, if you wish to change the function of a button or control,
you will need to change the settings of the game software.
9 English
CONFIGURING YOUR FLIGHT YOKE AND THROTTLE QUADRANT FOR
MICROSOFT FLIGHT SIMULATOR 9 AND FSX
The Flight Yoke System’s buttons, controls and axes correspond to commonly used
functions in Microsoft FS9 and FSX. As with any software, if you wish to change
the function of a button or control, you will need to change the settings of the game
software.
Once you have done this, simply nd the command that you want to assign to
your controller from the list of commands, click it and then click the Change
Assignment button. A window will appear asking you to move the part of your
controller that you want to assign to that command - press/move the button/axis
that you want to assign to that command and then click OK.
Tip: You may nd that when you assign the levers on the quadrant to a command,
that they don’t appear to work when you test them in the game. If this happens then
you must look in the Sensitivities screen (Flight Simulator 2004) or the Calibration
tab of the Controls screen (Flight Simulator X) of the game, select the axis command
in the list there and ensure that the Sensitivity isn’t set too low (set the horizontal
sensitivity slider control to around 70%).
10 English
PROGRAMMING YOUR FLIGHT YOKE AND THROTTLE QUADRANT WITH
LOGITECH SOFTWARE
Introducing Logitech Programming Software
Software can be downloaded to congure your Flight controller for enhanced
functionality. It delivers a powerful set of features, allowing you to program your
device with the ultimate conguration for total interaction. For a complete guide
on how to program your Logitech G Flight controller, visit support.logitech.com or look
at the help tab on your app menu.
Software features:
Quick and easy setup in any game
Personalize the controller settings for your favorite games
Congure your controller with an on-screen 3D model and interface
Multiple setup option for each controller - ideal if a controller is used by several
people and you need more than one prole per device
Program special moves with sophisticated timing features
Download the latest drivers and software from http://www.logitech.com/
support/yoke
11 English
FUNCTION OVERVIEW
BUTTON 1
BUTTON 2
MODE SELECTOR
T1 = BUTTON 3
T2 = BUTTON 4
T3 = BUTTON 5
T4 = BUTTON 6
T5 = BUTTON 7
T6 = BUTTON 8
POV
CHRONOMETER DISPLAY
FUNCTION STOPWATCH/CLOCK
STOPWATCH START/STOP
STOPWATCH RESET
12 English
FLIGHT YOKE CONTROLS AND CORRESPONDING FUNCTIONS
IN MICROSOFT FLIGHT SIMULATOR
Function Default function in FS9 and FSX
Yoke axis X axis Ailerons
Y axis Elevator
Main Buttons Button 1 Brakes (apply/release)
T1 (button 3) Elevator trim down
T2 (button 4) Elevator trim up
T3 (button 5) Flaps retract incrementally
T4 (button 6) Flaps extend incrementally
T5 (button 7) Knee board display/hide
T6 (button 8) Landing gear up/down
Button 2 Views (cycle)
POV Panoramic viewing
Other Controls Mode switch Switch Mode when programming
software is running
Clock Buttons Function Clock / stopwatch swap
Start/Stop Start/stop stopwatch
Reset Reset stopwatch
13 English
FUNCTION OVERVIEW
T1 = BUTTON 15
T2 = BUTTON 16
T3 = BUTTON 17
T4 = BUTTON 18
T5 = BUTTON 19
T6 = BUTTON 20
Z BUTTON
RX BUTTON
Z AXIS
RX AXIS
RY AXIS
RY BUTTON
14 English
QUADRANT CONTROLS AND CORRESPONDING FUNCTIONS IN MICROSOFT
FLIGHT SIMULATOR
Function Default function in FS9 and FSX
Quadrant Axis Z axis Throttle
Rx axis Flaps
Ry axis Spoiler
Axis buttons Z button Assignable in game
Rx button Assignable in game
Ry button Assignable in game
Toggle switches T1 (button 15) Assignable in game
T2 (button 16) Assignable in game
T3 (button 17) Assignable in game
T4 (button 18) Assignable in game
T5 (button 19) Assignable in game
T6 (button 20) Assignable in game
15 English
HOW TO ASSIGN FLIGHT YOKE CONTROLS TO FLIGHT SIMULATOR FUNCTIONS.
If you wish to change the controls or set up the additional buttons that have not
been assigned by Flight Simulator automatically, then you must use the Assignments
(Flight Simulator 2004) or Controls (Flight Simulator X) screen within the game.
This is accessed from the Settings menu within the game.
When you access the Assignments/Controls screen in Flight Simulator, ensure that
the Logitech G Flight Yoke is selected in the option labelled Joystick Type. If you wish
to reassign any of the axes on your controller, (the yoke itself or the levers on
the throttle quadrant) you must select Joystick Axes (Flight Simulator 2004)
or Control Axes (Flight Simulator X) at the top of the window. If you wish to reassign
any of the buttons on your controller, you must rst select the Buttons/Keys tab at
the top of the window.
16 Français
MANCHE DE GAUCHE
Interrupteur principal à 8 angles de vue
Interrupteur à bascule va-et-vient
Bouton de fonction unique
(arrière du manche de gauche)
MANCHE DE DROITE
2 interrupteurs à bascule va-et-vient
Bouton de fonction unique
Commutateur de mode 3 positions
(arrière du manche de droite)
CHRONOGRAPH
E
Fonction de chronomètre et temps précise pour
chronotrer chaque étape de votre vol.
L'écran indique également quel mode de programmation
est sélectionné.
17 Français
DÉMARRAGE: QUADRANT
BOUTONS DE LEVIER
Des boutons de levier amovibles pour
congurer la commande des gaz, les volets,
le mélange ou le pas de l'hélice.
LEVIERS
Leviers sans aucune détente pour
des déplacements uides
TROIS INTERRUPTEURS À BASCULE
VA-ET-VIENT
18 Français
INTRODUCTION
Nous vous remercions pour votre achat de Logitech G Flight Yoke System. Le volant
présente des commandes réalistes congurables sur l'ensemble des principaux
logiciels de simulation de vol, pour des expériences de vol plus réalistes.
FONCTIONS:
Bouton principal à 8 angles de vue
6 interrupteurs à bascule va-et-vient
2 boutons à fonction unique
Commutateur de mode à 3 positions
Logiciel à télécharger pour programmer et personnaliser les commandes et pour
enregistrer des prols personnalisés.
19 Français
INSTALLATION DU VOLANT ET DU QUADRANT DE COMMANDE DES GAZ
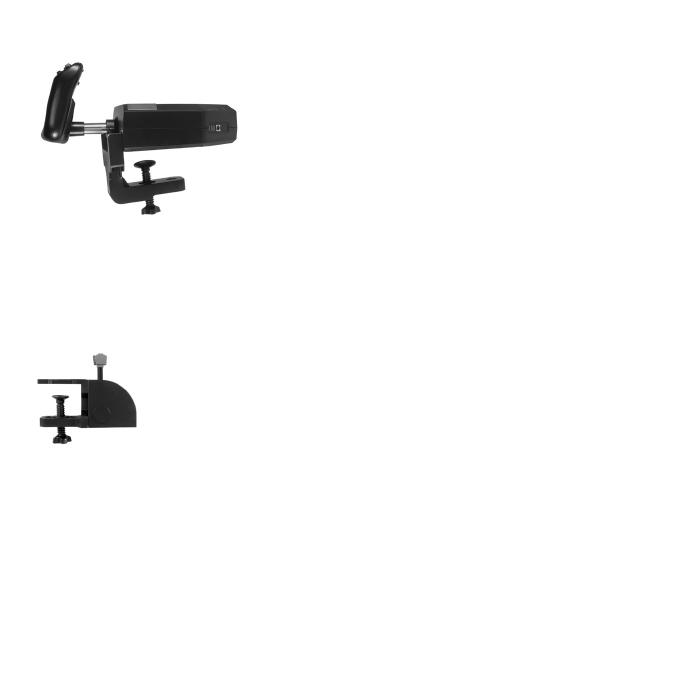
Fixez d'abord le volant à votre table ou bureau en
insérant les dents du clip de xation dans les trous
de la base du volant puis serrez le mécanisme des vis
jusqu'à ce que le volant soit fermement xé
(attention à ne pas trop serrer la vis, vous risqueriez
d'endommager le clip). Ensuite, vissez la plaque de
xation au quadrant de commande des gaz en
utilisant les quatre vis fournies. Vous pouvez visser
la plaque sur l'un des deux côtés du quadrant en
fonction de la façon dont vous souhaitez xer
le quadrant: à l'avant, sous ou dessus la table. Veuillez noter que, quelle que soit
la façon dont vous xez le quadrant, vous devez vous assurer que l'unité
des interrupteurs à bascule se trouve sur la partie basse.
Serrez le mécanisme de vis du clip de xation de la commande des gaz jusqu'à
ce qu'elle soit fermement xée à la table. Vous pouvez également positionner
le quadrant de commandes des gaz à gauche ou à droite du volant.
Raccordez maintenant le quadrant de commande des gaz au volant
avec le connecteur PS/2 fourni.
Utilisez le hub USB intégré sur le côté du volant pour connecter
facilement d'autres éléments de la gamme de produits
Logitech G Flight, comme des quadrants de commande des gaz,
des pédales de direction de vol ou d'autres périphériques.
20 Français
INSTALLATION POUR WINDOWS
®
10, WINDOWS
®
8.1
ETWINDOWS
®
7
INSTALLATION DES PILOTES
1 Rendez-vous sur logitech.com/support/yoke pour télécharger les derniers pilotes
et le logiciel compatibles avec votre système d'exploitation.
2 Déconnectez le dispositif et suivez les instructions à l'écran pour terminer
l'installation.
3 À l'achage de l'écran de conguration des pilotes, lorsque vous y êtes invité,
insérez le câble USB dans l'un des ports USB de votre ordinateur et cliquez
sur Suivant.
4 À l'achage de l'écran de conguration des pilotes, cliquez sur Suivant pour tester
votre contrôleur.
5 Suivez les invites à l'écran pour tester les commandes et vérier le fonctionnement
du dispositif. Après le test, cliquez sur OK.
  • Page 1 1
  • Page 2 2
  • Page 3 3
  • Page 4 4
  • Page 5 5
  • Page 6 6
  • Page 7 7
  • Page 8 8
  • Page 9 9
  • Page 10 10
  • Page 11 11
  • Page 12 12
  • Page 13 13
  • Page 14 14
  • Page 15 15
  • Page 16 16
  • Page 17 17
  • Page 18 18
  • Page 19 19
  • Page 20 20
  • Page 21 21
  • Page 22 22
  • Page 23 23
  • Page 24 24
  • Page 25 25
  • Page 26 26
  • Page 27 27
  • Page 28 28
  • Page 29 29
  • Page 30 30
  • Page 31 31
  • Page 32 32
  • Page 33 33
  • Page 34 34
  • Page 35 35
  • Page 36 36
  • Page 37 37
  • Page 38 38
  • Page 39 39
  • Page 40 40
  • Page 41 41
  • Page 42 42
  • Page 43 43
  • Page 44 44
  • Page 45 45
  • Page 46 46
  • Page 47 47
  • Page 48 48
  • Page 49 49
  • Page 50 50
  • Page 51 51
  • Page 52 52
  • Page 53 53
  • Page 54 54
  • Page 55 55

Logitech Flight Yoke System Guia de instalação

Tipo
Guia de instalação