STIHL RMA 235.0 Manual do usuário
- Categoria
- Cortadores de grama
- Tipo
- Manual do usuário


Contents
1 Introduction................................................. 2
2 Guide to Using this Manual.........................2
3 Overview..................................................... 3
4 Safety Precautions......................................4
5 Preparing the Lawn Mower for Operation... 9
6 Charging the Battery, LEDs........................ 9
7 Assembling the Lawn Mower...................... 9
8 Removing and Fitting the Battery..............11
9 Inserting and Removing the Activation Key
.................................................................. 11
10 Switching the Lawn Mower On and Off.....12
11 Checking the Lawn Mower and Battery.... 12
12 Operating the Lawn Mower.......................13
13 After Finishing Work..................................14
14 Transporting..............................................14
15 Storing.......................................................14
16 Cleaning....................................................15
17 Maintenance............................................. 15
18 Repairing...................................................16
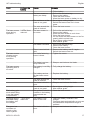
19 Troubleshooting........................................ 16
20 Specifications............................................18
21 Spare Parts and Accessories....................18
22 Disposal.................................................... 19
23 Safety Information for Lawn Mowers........ 19
1 Introduction
Dear Customer,
Thank you for choosing STIHL. We develop and
manufacture our quality products to meet our
customers’ requirements. The products are
designed for reliability even under extreme con‐
ditions.
STIHL also stands for premium service quality.
Our dealers guarantee competent advice and
instruction as well as comprehensive service
support.
STIHL expressly commit themselves to a sus‐
tainable and responsible handling of natural
resources. This user manual is intended to help
you use your STIHL product safely and in an
environmentally friendly manner over a long
service life.
We thank you for your confidence in us and hope
you will enjoy working with your STIHL product.
Dr. Nikolas Stihl
IMPORTANT! READ BEFORE USING AND
KEEP IN A SAFE PLACE FOR REFERENCE.
2 Guide to Using this Manual
2.1 Applicable Documents
This instruction manual constitutes original man‐
ufacturer’s instructions in the sense of EC Direc‐
tive 2006/42/EC.
Local safety regulations apply.
► In addition to this instruction manual, read,
understand and keep the following documents:
–
STIHL AK battery safety information
–
STIHL AL 101, 300, 500 charger instruction
manual
–
Safety information for STIHL batteries and
products with built-in battery:
www.stihl.com/safety-data-sheets
2.2 Warning Notices in Text
DANGER
■ This notice refers to risks which result in seri‐
ous or fatal injury.
► Serious or fatal injuries can be avoided by
taking the precautions mentioned.
WARNING
■ This notice refers to risks which can result in
serious or fatal injury.
► Serious or fatal injuries can be avoided by
taking the precautions mentioned.
NOTICE
■ This notice refers to risks which can result in
damage to property.
► Damage to property can be avoided by tak‐
ing the precautions mentioned.
2.3 Symbols in Text
This symbol refers to a chapter in this
instruction manual.
English
2 0478-131-9541-B
© ANDREAS STIHL AG & Co. KG 2021
0478-131-9541-B. VA0.E21.
Printed on chlorine-free paper
Printing inks contain vegetable oils, paper can be recycled.
Translation of Original Instruction Manual
0000009167_009_GB

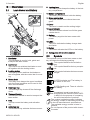
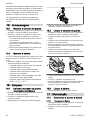
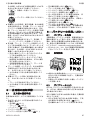
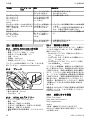
3 Overview
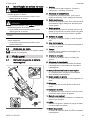
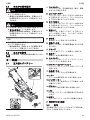
3.1 Lawn Mower and Battery
1 Handlebar
The handlebar is used to hold, guide and
transport the lawn mower.
2 Control bar
The control bar switches the blades on and
off together with the locking button.
3 Locking button
The locking button switches the blades on
and off together with the control bar for mow‐
ing.
4 Rotary knob
The rotary knob clamps the upper handlebar
onto the lower handlebar and is used to fold
down the handlebar.
5 Discharge flap
The discharge flap closes off the discharge
chute.
6 Transport handle
The transport handle is used to transport the
lawn mower.
7 Flap
The flap covers the battery and activation
key.
8 Activation key
The activation key activates the lawn mower.
9 Locking lever
The locking lever keeps the battery in the bat‐
tery compartment.
10 Battery compartment
The battery compartment holds the battery.
11 Grass catcher box
The grass catcher box collects the mown
grass.
12 Lever
The lever is used to set the cutting height.
13 Level indicator
The level indicator shows how full the grass
catcher box is.
14 Battery
The battery supplies the lawn mower with
power.
15 LEDs
The LEDs indicate the battery charge state
and faults.
16 Button
The button activates the LEDs on the battery.
# Rating plate with machine number
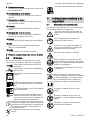
3.2 Symbols
The symbols can be on the lawn mower or bat‐
tery and have the following meaning:
This symbol identifies the activation
key.
This symbol identifies the key recepta‐
cle.
XX
This symbol indicates the lawn mower
weight.
1 LED illuminates red. The battery is
too warm or too cold.
4 LEDs flashing red. There is a fault in
the battery.
L
W
A
Guaranteed sound power level in
accordance with Directive 2000/14/EC
in dB(A) for the purpose of comparing
the sound emissions of products.
The number beside the symbol indicates
the energy content of the battery according
to the cell manufacturer's specifications.
The available energy content is lower in
practice.
Do not dispose of the product with domes‐
tic waste.
3 Overview English
0478-131-9541-B 3

Activating and deactivating the blade.
4 Safety Precautions
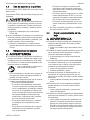
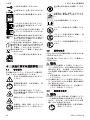
4.1 Warning Symbols
The warning symbols on the lawn mower or bat‐
tery have the following meaning:
Follow the safety instructions and their
measures.
Read, understand and keep the
instruction manual.
Beware of objects being thrown up -
keep a safe distance and keep other
people away.
Do not touch a turning blade.
Remove the battery during work stop‐
pages, transport, storage, maintenance
or repair.
Protect the lawn mower from rain and
humidity.
Pull out the activation key during work
stoppages, transport, storage, mainte‐
nance or repair.
Maintain a safety distance.
Protect the battery from heat and fire.
Protect the battery from rain and mois‐
ture. Do not immerse in liquids.
Observe the permissible temperature
range for the battery.
4.2 Intended Use
The STIHL RMA 235 lawn mower is used to
mow dry grass.
The lawn mower is supplied with power by a
STIHL AK battery.
WARNING
■ Batteries not approved by STIHL for the lawn
mower may cause fires and explosions. This
may result in serious or fatal injury to people
and damage to property.
►
Use the lawn mower with a STIHL AK bat‐
tery.
■ Failure to use the lawn mower or battery as
intended may result in serious or fatal injury to
people and damage to property.
►
Use the lawn mower and battery as descri‐
bed in this instruction manual.
4.3 Requirements for the User
WARNING
■ Uninstructed users cannot recognise or evalu‐
ate the dangers posed by the lawn mower and
battery. This may result in serious or fatal
injury to the user or other people.
► Read, understand and keep the
instruction manual.
► If passing on the lawn mower or battery to
another person: provide them with the
instruction manual also.
►
Make sure that the user meets the following
conditions:
–
The user is rested.
–
The user is physically, sensorily and
mentally capable of operating the lawn
mower and battery and working with
them. If the user is physically, sensorily
or mentally impaired, the machine must
only be used under supervision or fol‐
lowing instruction by a responsible per‐
son.
–
The user can recognise and evaluate
the dangers posed by the lawn mower
and battery.
–
The user is aware that they are respon‐
sible for accidents and damage.
–
The user is of legal age or the user is
being trained under supervision in a
profession in accordance with national
regulations.
English 4 Safety Precautions
4 0478-131-9541-B

–
The user has received instruction from a
STIHL specialist dealer or a competent
person before using the lawn mower for
the first time.
–
The user is not impaired by alcohol,
medicines or drugs.
►
If anything is unclear: consult a STIHL spe‐
cialist dealer.
4.4 Clothing and Equipment
WARNING
■ Objects may be thrown up at high velocity
while working. This may result in injury to the
user.
►
Wear long trousers made from resistant
material.
■ Dust may be stirred up while working. Breath‐
ing in dust may be harmful to health and
cause allergic reactions.
►
If dust is stirred up: wear a dust mask.
■ Unsuitable clothing may get caught on wood,
brambles and in the lawn mower. This may
result in serious injury to the user.
►
Wear close-fitting clothing.
► Remove scarves and jewellery.
■ The user may come into contact with the blade
during cleaning, maintenance or transport.
This may result in injury to the user.
►
Wear work gloves made from resistant
material.
■ Wearing unsuitable footwear may cause the
user to slip. This may result in injury to the
user.
►
Wear sturdy, closed-toed footwear with
high-grip soles.
■ Material particles may be expelled when
sharpening the blade. This may result in injury
to the user.
►
Wear close-fitting safety glasses. Suitable
safety glasses are tested in accordance
with EN 166 or national regulations and
available commercially with the correspond‐
ing marking.
►
Wear work gloves made from resistant
material.
4.5 Work Area and Surroundings
4.5.1 Lawn Mower
WARNING
■
Bystanding people, children and animals can‐
not recognise or evaluate the dangers posed
by the lawn mower and high-velocity objects.
This may result in serious injury to bystanding
people, children and animals and damage to
property.
► Keep bystanding people, children
and animals out of the work area.
► Maintain a distance from objects.
► Do not leave the lawn mower unattended.
► Make sure that children cannot play with
the lawn mower.
■ The lawn mower is not waterproof. Working in
the rain or in a damp environment may result
in electric shock. This may result in injury to
the user and damage to the lawn mower.
►
Do not work in the rain or in a damp envi‐
ronment.
► Do not mow wet grass.
■ Electrical components of the lawn mower may
produce sparks. Sparks may cause fires and
explosions in highly flammable or explosive
environments. This may result in serious or
fatal injury to people and damage to property.
►
Do not work in a highly flammable or explo‐
sive environment.
4.5.2 Battery
WARNING
■ Bystanders, children and animals cannot rec‐
ognize or assess the dangers of the battery.
Bystanders, children and animals may be seri‐
ously injured.
►
Keep bystanders, children and animals
away from the work area.
► Do not leave the battery unattended.
► Make sure that children cannot play with
the battery.
■ The battery is not protected against all ambi‐
ent conditions. If the battery is exposed to cer‐
tain ambient conditions, it may catch fire or
explode. This can result in serious injuries and
damage to property.
► Protect battery from heat and fire.
► Do not throw the battery into a fire.
► Use and store the battery at temper‐
atures between ‑ 10 °C and + 50 °C.
► Protect the battery from rain and
damp – do not immerse it in fluids.
► Keep battery away from metallic objects.
► Do not expose battery to high pressure.
► Do not expose battery to microwaves.
4 Safety Precautions English
0478-131-9541-B 5

► Protect battery from chemicals and salts.
4.6 Safe Condition
4.6.1 Lawn Mower
The lawn mower is in safe condition when the
following conditions are met:
–
The lawn mower is undamaged.
–
The lawn mower is clean and dry.
–
The controls are working and have not been
modified.
–
The blade is correctly attached.
–
Genuine STIHL accessories for this lawn
mower are attached.
–
The accessories are correctly attached.
WARNING
■ If not in safe condition, components may no
longer operate correctly and safety devices
may be disabled. This may result in serous or
fatal injury to people.
►
Do not use a damaged lawn mower.
► If the lawn mower is dirty or wet: clean the
lawn mower and allow it to dry.
► Do not modify the lawn mower.
► If the controls are not working: do not use
the lawn mower.
► Attach genuine STIHL accessories for this
lawn mower.
► Attach the blade as described in this
instruction manual.
► Attach accessories as described in this
instruction manual or in the instruction man‐
ual for the accessories.
►
Do not insert objects into the apertures in
the lawn mower.
► Never connect the key receptacle terminals
to metallic objects and cause a short circuit.
► Replace worn or damaged warning signs.
► If anything is unclear: consult a STIHL spe‐
cialist dealer.
4.6.2 Blade
The blade is in safe condition when the following
conditions are met:
–
The blade and attachments are undamaged.
–
The blade is not deformed.
–
The blade is correctly attached.
–
The blade is correctly sharpened.
–
The blade is burr-free.
–
The blade is correctly balanced.
–
The minimum thickness and minimum width of
the blade are not fallen below,
20.2.
–
The sharpening angle is observed, 20.2.
WARNING
■ In unsafe condition, blade parts may come
loose and be expelled. This may result in seri‐
ous injury to people.
►
Use an undamaged blade and attachments.
► Attach the blade correctly.
► Sharpen the blade correctly.
► If the minimum thickness or minimum width
is fallen below: replace the blade.
► Have the blade balanced by a STIHL spe‐
cialist dealer.
► If anything is unclear: consult a STIHL spe‐
cialist dealer.
4.6.3 Battery
The battery is in safe condition when the follow‐
ing conditions are met:
–
The battery is not damaged.
–
The battery is clean and dry.
–
The battery is working and has not been modi‐
fied.
WARNING
■ The battery cannot function safely if it is not in
safe condition. There is a risk of serious injury
to persons.
►
Use an undamaged and functioning battery.
► Do not charge a damaged or defective bat‐
tery.
► If the battery is dirty or wet: clean the bat‐
tery and allow it to dry.
► Do not modify the battery.
► Do not insert objects into the apertures in
the battery.
► Never connect the battery terminals to met‐
allic objects and cause a short circuit.
► Do not open the battery.
► Replace worn or damaged warning signs.
■ Fluid may leak from a damaged battery. If the
fluid contacts the skin or eyes, this may cause
irritation.
►
Avoid contact with the fluid.
► In the event of contact with the skin: wash
the affected areas with plenty of soap and
water.
►
In the event of contact with the eyes: rinse
the eyes with plenty of water for at least 15
minutes and seek medical attention.
■
A damaged or defective battery may emit an
unusual odour, smoke or catch fire. This may
result in serious or fatal injury to people and
damage to property.
►
If the battery emits an unusual odour or
smoke: do not use the battery and keep it
away from flammable materials.
English 4 Safety Precautions
6 0478-131-9541-B

► If the battery catches fire: try to extinguish
the battery using a fire extinguisher or
water.
4.7 Working
WARNING
■
In certain situations, the user may no longer
be able to concentrate on their work. This may
result in the user stumbling, falling and becom‐
ing seriously injured.
►
Work calmly and carefully.
► If the light and visibility conditions are poor:
do not use the lawn mower.
► Operate the lawn mower alone.
► Watch out for obstacles.
► Do not tilt the lawn mower.
► Work standing on the ground and maintain
balance.
► If signs of fatigue occur: take a break.
► If mowing on a slope: mow across the
slope.
► Do not mow on steep slopes.
■ The turning blade may cut the user. This may
result in serious injury to the user.
► Do not touch a turning blade.
► If the blade is blocked by an object:
switch the lawn mower off, pull out
the activation key and remove the
battery. Only then remove the object.
■
The lawn mower may cause vibrations when
working.
► Wear gloves.
► Take breaks.
► If signs of a circulatory disturbance occur:
consult a doctor.
■ If the blade hits a foreign object when working,
the foreign object or parts of it may be dam‐
aged or thrown up at high velocity. This may
result in injury to people and damage to prop‐
erty.
►
Remove foreign objects from the work area.
■ When the control bar for mowing is released,
the blade continues to turn for a short time.
This may result in serious injury to people.
►
Wait until the blade is no longer turning.
■ Sparks can be produced if the turning blade
hits a hard object. Sparks may cause fires in
highly flammable environments. This may
result in serious or fatal injury to people and
damage to property.
►
Do not work in a highly flammable environ‐
ment.
DANGER
■ If working near live wires, the blade may come
into contact with the live wires and damage
them. This may result in serious or fatal injury
to the user.
►
Do not work near live wires.
■ The user may be struck by lighting if working
during a thunderstorm. This may result in seri‐
ous or fatal injury to the user.
►
Do not work during thunderstorms.
4.8 Transporting
4.8.1 Lawn Mower
WARNING
■ The lawn mower may tip over or move during
transport. This may result in injury to people
and damage to property.
► Pull out the activation key.
► Remove the battery.
► Secure the lawn mower with lashing straps,
belts or a net so it cannot tip over and
move.
4.8.2 Battery
WARNING
■
The battery is not protected against all ambi‐
ent conditions. The battery may be damaged if
it is exposed to certain ambient conditions and
damage to property may occur.
►
Never transport a damaged battery.
► Store the battery in non-conductive packag‐
ing.
■ The battery may turn over or shift during trans‐
port. This may result in personal injuries and
damage to property.
►
Pack the battery in packaging in such a way
that it cannot move.
► Secure the packaging so that it cannot
move.
4.9 Storing
4.9.1 Lawn Mower
WARNING
■
Children cannot recognise or evaluate the
dangers posed by the lawn mower. There is a
risk of serious injury to children.
4 Safety Precautions English
0478-131-9541-B 7

► Pull out the activation key.
► Remove the battery.
► Keep the lawn mower out of reach of chil‐
dren.
■ Moisture may cause corrosion to the electric
contacts on the lawn mower and metal compo‐
nents. This may result in damage to the lawn
mower.
► Pull out the activation key.
► Remove the battery.
► Keep the lawn mower clean and dry.
■ If the activation key and battery are inserted
during storage, the blade may unintentionally
be activated. This may result in serious injury
to people and damage to property.
► Pull out the activation key.
► Remove the battery.
4.9.2 Battery
WARNING
■
Children are not aware of and cannot assess
the dangers of the battery and can be seri‐
ously injured.
►
Store the battery out of the reach of chil‐
dren.
■ The battery is not protected against all ambi‐
ent conditions. The battery may be damaged if
it is exposed to certain ambient conditions.
►
Store the battery in a clean and dry condi‐
tion.
► Store the battery in an enclosed location.
► Store the battery separately from the
mower and charger.
► Store the battery in non-conductive packag‐
ing.
► Store the battery at temperatures
between -10°C and +50°C.
4.10 Cleaning, Maintenance and
Repair
WARNING
■
If the activation key and battery are inserted
during cleaning, maintenance or repair, the
blade may unintentionally be activated. This
may result in serious injury to people and
damage to property.
► Pull out the activation key.
► Remove the battery.
■ Abrasive cleaning agents, using a water jet for
cleaning or sharp objects may result in dam‐
age to the lawn mower, blade and battery. If
the lawn mower, blade and battery are not
cleaned correctly, components may no longer
operate correctly and safety devices may be
disabled. This may result in serious injury to
people.
► Clean the lawn mower, blade and battery
as described in this instruction manual.
■ If the lawn mower, blade or battery are not
maintained or repaired correctly, components
may no longer operate correctly and safety
devices may be disabled. This may result in
serous or fatal injury to people.
►
Do not maintain or repair the lawn mower or
battery yourself.
► If the lawn mower or battery need to be
maintained or repaired: consult a STIHL
specialist dealer.
►
Maintain the blade as described in this
instruction manual.
■ The user may cut themselves on sharp cutting
edges during blade cleaning, maintenance or
repair. This may result in injury to the user.
►
Wear work gloves made from resistant
material.
■ The blade may become hot during sharpening.
This may result in the user burning them‐
selves.
►
Wait until the blade has cooled down.
► Wear work gloves made from resistant
material.
English 4 Safety Precautions
8 0478-131-9541-B

5 Preparing the Lawn Mower
for Operation
5.1 Preparing the Lawn Mower for
Operation
The following steps must be performed before
commencing work:
► Make sure that the following components are
in safe condition:
–
Lawn mower, 4.6.1.
–
Blade, 4.6.2.
–
Battery, 4.6.3.
►
Check the battery,
11.3.
►
Fully charge the battery, 6.1.
►
Clean the lawn mower, 16.2.
►
Check the blade, 11.2.
►
Attach the handlebar, 7.1.
►
Fold up the handlebar, 7.2.1.
► If mowing and the mown grass is to be collec‐
ted in the grass catcher box: attach the grass
catcher box, 7.3.2.
► If mowing and the mown grass is to be ejected
to the rear: detach the grass catcher box,
7.3.3.
►
Set the cutting height,
12.2.
►
Check the controls, 11.1.
► If the steps cannot be performed: do not use
the lawn mower and consult a STIHL special‐
ist dealer.
6 Charging the Battery, LEDs
6.1 Charging the Battery
The charging time depends on several factors,
e.g. temperature of the battery or the ambient
temperature. The actual charging time may differ
from the specified charging time. For specified
charging times see www.stihl.com/charging-
times.
► Recharge the battery fully as described in the
instruction manual for the STIHL AL 101, 300,
500 chargers.
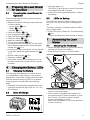
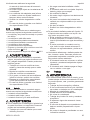
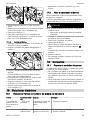
6.2 State of Charge
1
0000-GXX-0629-A0
20-40%
40-60%
60-80%
80-100%
0-20%
► Press the button (1).
The LEDs (5) glow green for about 5 seconds
and indicate the state of charge.
► If the LED on the right flashes green: Charge
the battery.
6.3 LEDs on Battery
The LEDs can show the state of charge or mal‐
functions. The LEDs can glow or flash green or
red.
The state of charge is indicated when the LEDs
glow or flash green.
► If the LEDs glow or flash red: Troubleshooting,
19.1.
There is a malfunction in the mower or battery.
7 Assembling the Lawn
Mower
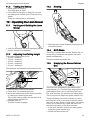
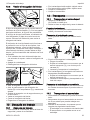
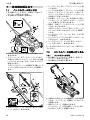
7.1 Attaching the Handlebar
► Switch the lawn mower off, pull out the activa‐
tion key and remove the battery.
► Place the lawn mower on a level surface.
► Hold lower handlebars (1) against the lawn
mower so the bores align.
► Push screws (3) together with washers (2)
through the bores in lower handlebar (1) and
lawn mower (4) from the outside inwards,
screw in and tighten to 3 Nm.
Both lower handlebars (1) are firmly attached
to lawn mower (4).
5 Preparing the Lawn Mower for Operation English
0478-131-9541-B 9

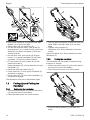
► Hold upper handlebar (5) against lower han‐
dlebars (1) so the bores align.
► Place cable (10) into cable clip (8).
► On the side with the cable, push screw (6)
through bores (11) in cable clip (8), upper han‐
dlebar (5) and lower handlebar (1) from the
outside inwards.
► On the other side, push screw (6) through
bores (11) in upper handlebar (5) and lower
handlebar (1) from the outside inwards.
► Fit rotary knob (9) onto screws (6) on both
sides and screw in.
Upper handlebar (5) is firmly attached to lower
handlebars (1).
► Place the cable into cable clips (7).
► Press cable clip (7) onto upper handlebar (5)
and allow to engage.
► Press cable clip (12) onto lower handlebar (1)
and allow to engage.
The handlebar must not be dismantled again.
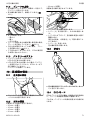
7.2 Folding Up and Folding the
Handlebar
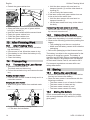
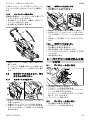
7.2.1 Folding Up the Handlebar
► Switch the lawn mower off, pull out the activa‐
tion key and remove the battery.
► Place the lawn mower on a level surface.
► Fold up upper handlebar (2) and hold with one
hand. Make sure that cable (4) is not dam‐
aged.
► Tighten rotary handles (1).
Handlebar (2) is firmly attached to the lawn
mower.
Upper handlebar (2) is firmly attached to lower
handlebar (3).
7.2.2 Folding the Handlebar
The handlebar can be folded for space-saving
transport or storage.
► Switch the lawn mower off, pull out the activa‐
tion key and remove the battery.
► Place the lawn mower on a level surface.
► Unscrew rotary handles (1) until they turn
freely.
English 7 Assembling the Lawn Mower
10 0478-131-9541-B

► Fold down upper handlebar (2) forwards,
ensuring that cable (3) is not damaged.
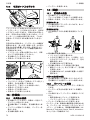
7.3 Assembling, Attaching and
Detaching the Grass Catcher
Box
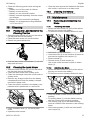
7.3.1 Assembling the Grass Catcher Box
► Fit upper part of grass catcher box (1) onto
lower part of grass catcher box (2).
► Press pins (3) through openings (4) from the
inside.
► Press upper part of grass catcher box (1)
downwards.
The upper part of the grass catcher box
engages with a click.
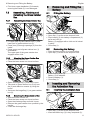
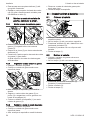
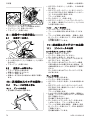
7.3.2 Attaching the Grass Catcher Box
► Switch the lawn mower off.
► Place the lawn mower on a level surface.
► Open discharge flap (1) and hold it open.
► Take hold of grass catcher box (2) by han‐
dle (3) and attach to mounts (4) using the
hooks.
► Set down discharge flap (1) on grass catcher
box (2).
7.3.3 Detaching the Grass Catcher Box
► Switch the lawn mower off.
► Place the lawn mower on a level surface.
► Open the discharge flap and hold it open.
► Remove the grass catcher box upwards by the
handle.
► Close the discharge flap.
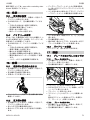
8 Removing and Fitting the
Battery
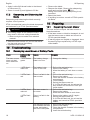
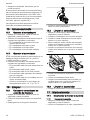
8.1 Fitting the Battery
► Place the lawn mower on a level surface.
► Open flap (1) as far as the stop and hold.
► Push battery (2) into battery compartment (3)
as far as it will go.
Battery (2) engages with a click and is locked
in place.
► Close flap (1).
8.2 Removing the Battery
► Place the lawn mower on a level surface.
► Open flap (1) as far as the stop and hold.
► Press locking lever (2).
Battery (3) is released.
► Remove battery (3).
► Close flap (1).
9 Inserting and Removing
the Activation Key
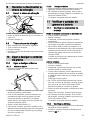
9.1 Inserting the Activation Key
► Open flap (1) as far as the stop and hold.
► Insert activation key (2) in key receptacle (3).
8 Removing and Fitting the Battery English
0478-131-9541-B 11

► Close flap (1).
9.2 Removing the Activation Key
► Open the flap as far as the stop and hold.
► Pull out the activation key.
► Close the flap.
► Keep the activation key out of the reach of
children.
10 Switching the Lawn Mower
On and Off
10.1 Activating and Deactivating the
Blade
10.1.1 Activating the Blade
► Place the lawn mower on a level surface.
► Press locking button (1) with the right hand
and hold.
► Pull control bar for mowing (2) with the left
hand fully in the direction of handlebar (3) and
hold so the thumb encloses handlebar (3).
The blade turns.
► Release locking button (1).
► Hold handlebar (3) and control bar for mow‐
ing (2) with the right hand so the thumb enclo‐
ses handlebar (3).
10.1.2 Deactivating the Blade
► Release the control bar for mowing.
► Wait until the blade is no longer turning.
► If the blade continues to turn: pull out the acti‐
vation key, remove the battery and consult a
STIHL specialist dealer.
The lawn mower is defective.
11 Checking the Lawn Mower
and Battery
11.1 Checking the Controls
Locking button and control bar
► Pull out the activation key.
► Remove the battery.
► Press the locking button and release it again.
► Pull the control bar fully in the direction of the
handlebar and release it again.
► If the locking button or the control bar is stiff or
does not spring back into the initial position:
do not use the lawn mower and consult a
STIHL specialist dealer.
The locking button or the control bar is defec‐
tive.
Activating the blade
► Insert the activation key.
► Fit the battery.
► Press the locking button with the right hand
and hold.
► Pull the control bar with the left hand fully in
the direction of the handlebar and hold so that
the thumb encloses the handlebar.
The blade turns.
► If 3 LEDs flash red: pull out the activation key,
remove the battery and consult a STIHL spe‐
cialist dealer.
There is a fault in the lawn mower.
► Release the locking button and control bar.
The blade stops turning after a short time.
► If the blade continues to turn: pull out the acti‐
vation key, remove the battery and consult a
STIHL specialist dealer.
The lawn mower is defective.
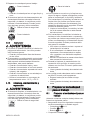
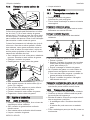
11.2 Checking the Blade
► Switch the lawn mower off, pull out the activa‐
tion key and remove the battery.
► Tilt the lawn mower sideways and set it down,
16.1.
► Measure the following:
–
Thickness a
–
Width b
–
Sharpening angle c
► If the minimum thickness or minimum width
are fallen below: replace the blade, 20.2.
► If the sharpening angle is not observed:
sharpen the blade, 20.2.
► If anything is unclear: consult a STIHL special‐
ist dealer.
English 10 Switching the Lawn Mower On and Off
12 0478-131-9541-B

11.3 Testing the Battery
► Press button on battery.
The LEDs glow or flash.
► If the LEDs do not glow or flash: Do not use
the battery and contact your STIHL servicing
dealer.
There is a malfunction in the battery.
12 Operating the Lawn Mower
12.1 Holding and Guiding the Lawn
Mower
► Hold the handlebar with both hands so that the
thumbs enclose the handlebar.
12.2 Adjusting the Cutting Height
Five cutting heights can be set:
–
25 mm = position 1
–
35 mm = position 2
–
45 mm = position 3
–
50 mm = position 4
–
60 mm = position 5
The positions are indicated on the lawn mower.
► Hold the lawn mower at the handle.
► Press lever (2) outwards and hold.
► Move the lawn mower to the desired position
by raising and lowering the lever.
The current cutting height can be read off at
cutting height indicator (3).
► Release lever (2).
The lawn mower engages.
12.3 Mowing
► Push the lawn mower forwards slowly and in a
controlled manner.
12.4 ECO Mode
The STIHL cordless lawn mower detects the cur‐
rent working conditions and adjusts the blade
speed automatically.
This may extend the battery life.
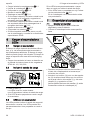
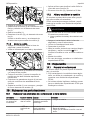
12.5 Emptying the Grass Catcher
Box
The flow of air generated by the blade raises
level indicator (1). The flow of air stops when the
grass catcher box is full. If the flow of air is too
low, level indicator (2) returns to its resting state.
This is a prompt to empty the grass catcher box.
The functionality of the level indicator is restric‐
ted if the flow of air is impaired. External influen‐
ces such as wet, dense or high grass, low cutting
levels, dirt or the like can impair the flow of air
and the functionality of the level indicator.
► If the level indicator drops to its resting state:
empty the grass catcher box.
► Switch the lawn mower off.
12 Operating the Lawn Mower English
0478-131-9541-B 13

► Detach the grass catcher box.
► Open tab (1).
► Open and hold upper part of grass catcher
box (2) by handle (3).
► Hold the lower handle with the second hand.
► Empty the grass catcher box.
► Close the grass catcher box.
► Attach the grass catcher box.
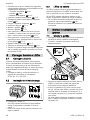
13 After Finishing Work
13.1 After Finishing Work
► Switch off the mower, remove the activation
key and battery.
► If the mower is wet: Allow the mower to dry.
► If the battery is wet: Allow the battery to dry.
► Clean the mower.
► Clean the battery.
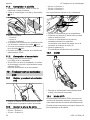
14 Transporting
14.1 Transporting the Lawn Mower
► Switch the lawn mower off.
The blade must not be turning.
► Pull out the activation key and remove the bat‐
tery.
Pushing the lawn mower
► Push the lawn mower forwards slowly and in a
controlled manner.
Carrying the lawn mower
► Wear work gloves made from resistant mate‐
rial.
► If only the lawn mower is being carried:
► Fold down the handlebar.
► Hold the lawn mower with one hand on
transport handle (1) and the other hand on
housing (2).
► Lift and carry the lawn mower.
► If the lawn mower and grass catcher box are
to be carried at the same time:
► Hold the lawn mower with one hand on
transport handle (1).
► Lift the lawn mower and carry to the side of
the body.
Transporting the lawn mower in a vehicle
► Secure the lawn mower upright so it does not
tip over and cannot move.
14.2 Transporting the Battery
► Switch off the mower and remove the battery.
► Make sure the battery is in a safe condition.
► Observe the following points when packing the
battery:
–
The packaging must be non-conductive.
–
Make sure the battery cannot shift inside the
packaging.
► Secure the packaging so that it cannot move.
The battery is subject to the requirements for the
transport of dangerous goods. The battery is
classified as UN 3480 (lithium-ion batteries) and
has been tested in accordance with UN Manual
of Tests and Criteria, Part III, sub-section 38.3.
For transport regulations see www.stihl.com/
safety-data-sheets
15 Storing
15.1 Storing the Lawn Mower
► Switch the lawn mower off, pull out the activa‐
tion key and remove the battery.
► Store the lawn mower in accordance with the
following conditions:
–
The lawn mower is out of reach of children.
–
The lawn mower is clean and dry.
–
The lawn mower cannot tip over.
–
The lawn mower cannot roll away.
15.2 Storing the Battery
STIHL recommends that you store the battery
with a charge between 40% and 60% (2 LEDs
glow green).
English 13 After Finishing Work
14 0478-131-9541-B

► Check the following points when storing the
battery:
–
Battery is out of the reach of children.
–
Battery is clean and dry.
–
Battery is in an enclosed location.
–
Battery is stored separately from the mower
and charger.
–
Battery is in non-conductive packaging.
–
Battery is in a temperature range between
-10°C and +50°C.
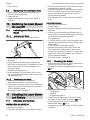
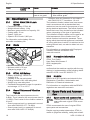
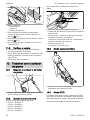
16 Cleaning
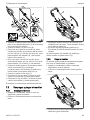
16.1 Placing the Lawn Mower in the
Cleaning Position
► Switch the lawn mower off, pull out the activa‐
tion key and remove the battery.
► Place the lawn mower on a level surface.
► Detach the grass catcher box.
► Hold the lawn mower at handlebar (1), tilt side‐
ways and set down.
16.2 Cleaning the Lawn Mower
► Switch the lawn mower off, pull out the activa‐
tion key and remove the battery.
► Clean the lawn mower with a damp cloth.
► Clean the discharge chute with a soft brush or
a damp cloth.
► Remove any foreign bodies from the battery
compartment and clean the battery compart‐
ment with a damp cloth.
► Clean the electric contacts in the battery com‐
partment with a paintbrush or a soft brush.
► Clean ventilation slots (1), (2) with a paint‐
brush.
► Upend the lawn mower.
► Clean the area around the blade and the blade
with a stick, a soft brush or a damp cloth.
16.3 Cleaning the Battery
► Clean the battery with a damp cloth.
17 Maintenance
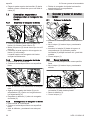
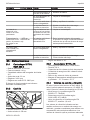
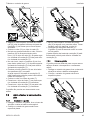
17.1 Removing and Attaching the
Blade
17.1.1 Removing the Blade
► Switch the lawn mower off, pull out the activa‐
tion key and remove the battery.
► Tilt the lawn mower sideways and set it down.
► Hold blade (1) with one hand.
► Unscrew screw (2) in the direction of the arrow
and remove together with coupler (3).
► Remove blade (1).
► Discard screw (2) and coupler (4).
Use a new screw and new coupler to attach
blade (1).
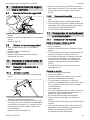
17.1.2 Attaching the Blade
► Switch the lawn mower off, pull out the activa‐
tion key and remove the battery.
► Tilt the lawn mower sideways and set it down.
► Clean the blade contact surface and blade
bushing.
► Fit mowing blade (1) onto the blade bushing
with the curved wings pointing upwards.
► The locating lugs (4) on the blade bushing
must be located in the recesses in the mowing
blade.
► Hold mowing blade (1) with one hand and fit
new coupler (3).
16 Cleaning English
0478-131-9541-B 15

► Apply Loctite 243 thread locker to the thread
of new screw (2).
► Screw in screw (2) and tighten to 20 Nm.
17.2 Sharpening and Balancing the
Blade
Sharpening and balancing the blade correctly
requires a lot of practice.
STIHL recommends having the blade sharpened
and balanced by a STIHL specialist dealer.
WARNING
■ The cutting edges of the blade are sharp. This
may result in the user cutting themselves.
► Wear work gloves made from resistant
material.
► Switch the lawn mower off, pull out the activa‐
tion key and remove the battery.
► Upend the lawn mower.
► Remove the blade.
► Sharpen the blade. Observe the sharpening
angle and cool the blade, 20.2.
Bluing of the blade during sharpening is not
permitted.
► Attach the blade.
► If anything is unclear: consult a STIHL special‐
ist dealer.
18 Repairing
18.1 Repairing the Lawn Mower
The user should not repair the lawn mower or
blade themselves.
► If the lawn mower or blade is damaged: do not
use the lawn mower or blade and consult a
STIHL specialist dealer.
► If warning signs are illegible or damaged: have
the warning signs replaced by a STIHL spe‐
cialist dealer.
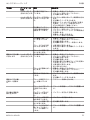
19 Troubleshooting
19.1 Remedying Lawn Mower or Battery Faults
Fault LEDs on the
battery
Cause Remedy
The lawn mower
does not start
when switched
on.
1 LED flashes
green.
The battery charge
state is too low.
► Charge the battery.
1 LED illumi‐
nates red.
The battery is too
warm or too cold.
► Pull out the activation key.
► Remove the battery.
► Allow the battery to cool down or warm
up.
3 LEDs flash
red.
There is a fault in the
lawn mower.
► Pull out the activation key.
► Remove the battery.
► Clean the electric contacts in the battery
compartment.
► Fit the battery.
► Switch the lawn mower on.
► If 3 LEDs still flash red: do not use the
lawn mower and consult a STIHL spe‐
cialist dealer.
3 LEDs illumi‐
nate red.
The lawn mower is
too warm.
► Pull out the activation key.
► Remove the battery.
► Allow the lawn mower to cool down.
4 LEDs flash
red.
There is a fault in the
battery.
► Remove the battery and fit it again.
► Switch the lawn mower on.
► If 4 LEDs still flash red: do not use the
battery and consult a STIHL specialist
dealer.
The electrical connec‐
tion between the lawn
mower and battery
has been interrupted.
► Pull out the activation key.
► Remove the battery.
► Clean the electric contacts in the battery
compartment.
► Insert the activation key.
English 18 Repairing
16 0478-131-9541-B

Fault LEDs on the
battery
Cause Remedy
► Fit the battery.
The lawn mower or
battery are damp.
► Pull out the activation key.
► Remove the battery.
► Clean the lawn mower.
► Allow the lawn mower or battery to dry.
The resistance at the
blade is too great.
► Set a higher cutting height.
► Switch the lawn mower on in lower
grass.
The area around the
blade is blocked.
► Clean the lawn mower.
The lawn mower
stops during
operation.
3 LEDs illumi‐
nate red.
The lawn mower is
too warm.
► Pull out the activation key.
► Remove the battery.
► Allow the lawn mower to cool down.
► Clean the lawn mower.
► Do not switch the lawn mower on too fre‐
quently within a short time.
► Set a higher cutting height.
► Mow shorter grass.
The blade is blocked. ► Pull out the activation key.
► Remove the battery.
► Clean the lawn mower.
There is an electrical
fault.
► Remove the battery and fit it again.
► Switch the lawn mower on.
The lawn mower
vibrates exces‐
sively during
operation.
The blade fastening
screw is loose.
► Tighten the screw.
The blade is not cor‐
rectly balanced.
► Sharpen and balance the blade.
The lawn mower
operating time is
too short.
The battery is not fully
charged.
► Fully charge the battery.
The battery service
life has been excee‐
ded.
► Replace the battery.
The area around the
blade is blocked.
► Clean the lawn mower.
The blade is blunt or
worn.
► Sharpen and balance the blade.
The resistance at the
blade is too great.
► Set a higher cutting height.
► Mow shorter grass.
The battery gets
stuck when fitting
it into the battery
compartment.
The guides or electric
contacts in the battery
compartment are
dirty.
► Clean the lawn mower.
Charging fails to
start after fitting
the battery into
the charger.
1 LED illumi‐
nates red.
The battery is too
warm or too cold.
► Leave the battery inserted in the
charger.
Charging starts automatically as soon as
the permissible temperature range is
reached.
The grass has
not been cut
cleanly or the
lawn is yellow.
The blade is blunt or
worn.
► Sharpen and balance the blade.
19 Troubleshooting English
0478-131-9541-B 17

Fault LEDs on the
battery
Cause Remedy
The resistance at the
blade is too great.
► Set a higher cutting height.
► Mow shorter grass.
20 Specifications
20.1 STIHL RMA 235.0 Lawn
Mower
–
Permissible battery: STIHL AK
–
Weight without battery: 14 kg
–
Maximum grass catcher box capacity: 30 l
–
Cutting width: 33 cm
–
Speed: 3,400 rpm
–
Speed in ECO mode: 2,900 rpm
For information on the battery life see
www.stihl.com/battery-life.
20.2 Blade
–
Minimum thickness a: 1.6 mm
–
Minimum width b: 56 mm
–
Sharpening angle c: 30°
20.3 STIHL AK Battery
–
Battery technology: Lithium-ion
–
Voltage: 36 V
–
Capacity in Ah: see rating label
–
Energy content in Wh: see rating label
–
Weight in kg: see rating label
–
Permissible temperature range for operation
and storage: -10°C to +50°C
20.4 Sound Values and Vibration
Values
The K value for the sound pressure level is
2 dB(A). The K value for the sound power level is
1.5 dB(A). The K value for the vibration values is
0.9 m/s².
–
Sound pressure level L
pA
measured in accord‐
ance with EN 60335-2-77: 76 dB(A)
–
Sound power level L
wA
measured in accord‐
ance with 2000/14/EC: 87.9 dB(A)
–
Vibration value a
hv
measured in accordance
with EN 60335-2-77, handlebar: 1.8 m/s²
The indicated vibration values have been meas‐
ured in accordance with a standardised test
method and can be used for the purpose of com‐
paring electrical appliances. The actual vibration
values that occur may deviate from the indicated
values, depending on the type of application.
The indicated vibration values can be used for an
initial assessment of the vibration load. The
actual vibration load must be assessed. Times
during which the electrical appliance is switched
off, along with times in which it is switched on but
running without load, can also be taken into con‐
sideration.
For information on compliance with Employers'
Vibration Directive 2002/44/EC see
www.stihl.com/vib.
20.5 Normative Information
STIHL Tirol GmbH
Hans Peter Stihl-Strasse 5
6336 Langkampfen
Austria
confirms that the machine complies with the reg‐
ulations in implementation of the following stand‐
ards IEC 60335‑1 and IEC 60335‑2‑77.
20.6 REACH
REACH is an EC regulation and stands for the
Registration, Evaluation, Authorisation and
Restriction of Chemical substances.
For information on compliance with the REACH
regulation see www.stihl.com/reach.
21 Spare Parts and Accesso‐
ries
21.1 Spare parts and accessories
These symbols indicate original STIHL
spare parts and original STIHL acces‐
sories.
STIHL recommends the use of original STIHL
spare parts and accessories.
Despite ongoing market observation, STIHL is
unable to judge the reliability, safety and suitabil‐
English 20 Specifications
18 0478-131-9541-B

ity of other manufacturers' spare parts and
accessories; accordingly, STIHL cannot warrant
for the use of those parts.
Original STIHL spare parts and original STIHL
accessories are available from STIHL dealers.
21.2 Essential Spare Parts
–
Blade: 6311 702 0110
–
Blade fastening screw: 9018 321 1800
–
Coupler: 6311 702 0600
22 Disposal
22.1 Disposing of the Lawn Mower
Information on disposal is available from a STIHL
specialist dealer.
► Dispose of the lawn mower, blade, accesso‐
ries and packaging in accordance with regula‐
tions and in an environmentally friendly man‐
ner.
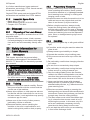
23 Safety Information for
Lawn Mowers
23.1 Introduction
This chapter describes the general safety
instructions preformulated in the standard EN
60335-2-77, Annex EE, for electrically operated
lawn mowers.
WARNING
■ Read all the safety instructions, instructions,
illustrations and technical data provided with
the lawn mower. Failure to comply with the fol‐
lowing instructions may cause electrical shock,
fire and/or serious injury. Keep all safety
instructions and instructions for the future.
23.2 Training
a
)
Read the instruction manual carefully. Ensure
that you are familiar with the controls and the
correct use of the machine;
b)
Never allow children or other persons who are
not familiar with the instructions for use to use
the lawn mower. Local regulations may specify
a minimum age for users;
c)
Never mow in the vicinity of other persons,
particularly children or animals;
d)
Be aware that the person operating the
machine or the user is responsible for acci‐
dents involving third parties or their property.
23.3 Preparatory Measures
a)
Always wear sturdy shoes and long trousers
when operating the machine. Never operate
the machine barefoot or in lightweight sandals.
Avoid wearing loose clothing or clothing with
hanging cords or belts.
b)
Inspect the area on which the machine is to be
used and remove any objects that could be
taken in and thrown up by the machine.
c)
Before using the machine, always visually
inspect the cutting blade, the retaining pins
and the entire cutting unit for wear or damage.
To avoid imbalance, worn or damaged cutting
blades and retaining pins must be replaced in
pairs. Worn or damaged warning signs must
be replaced.
23.4 Handling
a)
Only mow during the day or with good artificial
light.
b)
If possible, avoid using the machine when the
grass is wet.
c)
Always ensure good stability on slopes.
d)
Operate the machine only at walking pace.
e)
Only mow across and never up or down the
slope.
f)
Be particularly careful when changing direction
on a slope.
g)
Do not mow on excessively steep slopes.
h)
Be particularly careful when turning the lawn
mower around or pulling it towards you.
i)
Stop the cutting blade(s) when the machine
needs to be tilted for transportation over surfa‐
ces other than grass and when moving the
lawn mower from and to the area to be mown.
j)
Never use the lawn mower with damaged
safety devices or protective grilles or without
attached safety devices, e.g. deflectors and/or
grass-catching units.
k)
Exercise care when starting or pressing the
starting switch and observe the manufacturer's
instructions. Ensure that you keep your feet far
enough away from the cutting blade(s).
l)
The lawn mower must not be tilted when start‐
ing it, unless the lawn mower needs to be lif‐
ted during the process. In this case, only tilt it
as far as is absolutely necessary and only
raise the side facing away from the user.
m
)
Do not start the motor when you are standing
in front of the discharge chute.
22 Disposal English
0478-131-9541-B 19

n)
Never put hands or feet on or underneath
rotating parts. Always keep away from the dis‐
charge opening.
o)
Never lift or carry a lawn mower with the motor
running.
p)
Stop the motor and pull out the starting key.
Ensure that all moving parts have come to a
complete stop:
–
whenever you leave the lawn mower;
–
before remedying blockages, including
those in the discharge chute;
–
before checking, cleaning or working on the
lawn mower;
–
after hitting a foreign object. Inspect the
lawn mower for damage and perform the
necessary repairs before re-starting and
using the lawn mower.
If the lawn mower begins to vibrate exces‐
sively, it must be checked immediately.
–
Check for damage;
–
make the necessary repairs to damaged
parts;
–
ensure that all screws, pins and bolts are
tightly fastened.
23.5 Maintenance and Storage
a)
Ensure that all nuts, pins and bolts are tightly
fastened and that the machine is in a safe
working condition.
b)
Check the grass-catching unit regularly for
wear or loss of functionality.
c)
In the interests of safety, replace all worn or
damaged parts.
d)
Be aware that on machines with more than
one cutting blade, the movement of one cut‐
ting blade can cause the other cutting blade to
turn.
e)
Ensure when adjusting the machine that your
fingers do not become pinched between mov‐
ing cutting blades and stationary parts of the
machine.
f)
Allow the motor to cool down before storing
the machine.
g)
Note when maintaining the cutting blades that
the cutting blades can be moved even if the
power source is switched off.
h)
In the interests of safety, replace all worn or
damaged parts. Only use genuine spare parts
and accessories.
Índice
1 Prólogo......................................................20
2 Informaciones relativas a estas instruc‐
ciones para la reparación..........................21
3 Sinopsis.................................................... 21
4 Indicaciones relativas a la seguridad........ 22
5 Preparar el cortacésped para el trabajo....27
6 Cargar el acumulador y LEDs...................28
7 Ensamblar el cortacésped........................ 28
8 Colocar y sacar el acumulador................. 30
9 Insertar la llave de seguridad y retirarla....31
10 Conectar y desconectar el cortacésped....31
11 Comprobar el cortacésped y el acumulador
.................................................................. 31
12 Trabajar con el cortacésped..................... 32
13 Después del trabajo.................................. 33
14 Transporte.................................................33
15 Almacenamiento....................................... 34
16 Limpiar...................................................... 34
17 Mantenimiento.......................................... 34
18 Reparación................................................35
19 Subsanar las perturbaciones.................... 35
20 Datos técnicos.......................................... 37
21 Piezas de repuesto y accesorios.............. 38
22 Gestión de residuos.................................. 38
23 Indicaciones técnicas de seguridad para
cortacéspedes...........................................38
1 Prólogo
Distinguidos clientes,
Nos alegramos de que se hayan decidido
por STIHL. Desarrollamos y confeccionamos
nuestros productos en primera calidad y con
arreglo a las necesidades de nuestros clientes.
De esta manera conseguimos elaborar produc‐
tos altamente fiables incluso en condiciones de
esfuerzo extremas.
STIHL también presta un Servicio Postventa de
primera calidad. Nuestros comercios especializa‐
dos garantizan un asesoramiento e instrucciones
competentes así como un amplio asesoramiento
técnico.
STIHL se declara expresamente a favor de tratar
la naturaleza de forma sostenible y responsable.
Estas instrucciones de servicio pretenden asis‐
tirle para hacer un uso ecológico y seguro de su
producto STIHL durante toda su vida útil.
Le agradecemos su confianza y le deseamos
que disfrute de su producto STIHL.
español
20 0478-131-9541-B
© ANDREAS STIHL AG & Co. KG 2021
0478-131-9541-B. VA0.E21.
Impreso en papel blanqueado sin cloro.
Los colores de la impresión contienen aceites vegetales, por lo que el papel es reciclable.
Traducción del manual de instrucciones original
0000009167_009_E
A página está carregando...
A página está carregando...
A página está carregando...
A página está carregando...
A página está carregando...
A página está carregando...
A página está carregando...
A página está carregando...
A página está carregando...
A página está carregando...
A página está carregando...
A página está carregando...
A página está carregando...
A página está carregando...
A página está carregando...
A página está carregando...
A página está carregando...
A página está carregando...
A página está carregando...
A página está carregando...
A página está carregando...
A página está carregando...
A página está carregando...
A página está carregando...
A página está carregando...
A página está carregando...
A página está carregando...
A página está carregando...
A página está carregando...
A página está carregando...
A página está carregando...
A página está carregando...
A página está carregando...
A página está carregando...
A página está carregando...
A página está carregando...
A página está carregando...
A página está carregando...
A página está carregando...
A página está carregando...
A página está carregando...
A página está carregando...
A página está carregando...
A página está carregando...
A página está carregando...
A página está carregando...
A página está carregando...
A página está carregando...
A página está carregando...
A página está carregando...
A página está carregando...
A página está carregando...
A página está carregando...
A página está carregando...
A página está carregando...
A página está carregando...
A página está carregando...
A página está carregando...
A página está carregando...
A página está carregando...
-
 1
1
-
 2
2
-
 3
3
-
 4
4
-
 5
5
-
 6
6
-
 7
7
-
 8
8
-
 9
9
-
 10
10
-
 11
11
-
 12
12
-
 13
13
-
 14
14
-
 15
15
-
 16
16
-
 17
17
-
 18
18
-
 19
19
-
 20
20
-
 21
21
-
 22
22
-
 23
23
-
 24
24
-
 25
25
-
 26
26
-
 27
27
-
 28
28
-
 29
29
-
 30
30
-
 31
31
-
 32
32
-
 33
33
-
 34
34
-
 35
35
-
 36
36
-
 37
37
-
 38
38
-
 39
39
-
 40
40
-
 41
41
-
 42
42
-
 43
43
-
 44
44
-
 45
45
-
 46
46
-
 47
47
-
 48
48
-
 49
49
-
 50
50
-
 51
51
-
 52
52
-
 53
53
-
 54
54
-
 55
55
-
 56
56
-
 57
57
-
 58
58
-
 59
59
-
 60
60
-
 61
61
-
 62
62
-
 63
63
-
 64
64
-
 65
65
-
 66
66
-
 67
67
-
 68
68
-
 69
69
-
 70
70
-
 71
71
-
 72
72
-
 73
73
-
 74
74
-
 75
75
-
 76
76
-
 77
77
-
 78
78
-
 79
79
-
 80
80


STIHL RMA 235.0 Manual do usuário
- Categoria
- Cortadores de grama
- Tipo
- Manual do usuário
em outras línguas
- español: STIHL RMA 235.0 Manual de usuario
- English: STIHL RMA 235.0 User manual
- 日本語: STIHL RMA 235.0 ユーザーマニュアル
Artigos relacionados
-
STIHL RMA 235.0 Manual do usuário
-
-
-
-
STIHL RMA 510 V Manual do proprietário
-
-
-
-
-