
DIGIRAD N
Selettore digitale via radio
Istruzioni d’uso ed avvertenze
Radio digital selector
Operating instructions and warnings
Sélecteur numérique radio
Notice d’emploi et avertissements
Digitale Funktastatur
Bedienungsanleitung und Hinweise
Selector de radio digital
Instrucciones de uso y advertencias
Seletor digital de rádio
Instruções para utilização e advertências
Bezprzewodowa kontrola dostępu
Instrukcja montażu i użytkowania
Радио цифровой селектор
Инструкции и предупреждения
Draadloze toegangscontrole
Bedieningsinstructies en waarschuwingen
I63005 Rev. 00 (28-11-2022)


DIGIRAD N
1
IT
DIGIRAD N
Selettore digitale via radio
Istruzioni d’uso ed avvertenze
Sommario
1Riepilogo avvertenze 17Funzioni disponibili 4
2Descrizione Prodotto 28Impostazioni 7
3Dati Tecnici 29Connessione con APP 9
4Installazione e montaggio 210 Verifi ca stato e sostituzione batterie 9
5Menù di programmazione semplifi cato 311 Dismissione del Prodotto 9
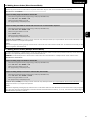
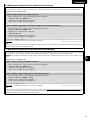
1 RIEPILOGO AVVERTENZE
ATTENZIONE! IMPORTANTI ISTRUZIONI DI SICUREZZA. LEGGERE E SEGUIRE ATTENTAMENTE TUTTE LE AVVER-
TENZE E LE ISTRUZIONI CHE ACCOMPAGNANO IL PRODOTTO POICHÉ UN’INSTALLAZIONE ERRATA PUÒ CAUSARE DANNI
A PERSONE, ANIMALI O COSE. LE AVVERTENZE E LE ISTRUZIONI FORNISCONO IMPORTANTI INDICAZIONI RIGUARDAN-
TI LA SICUREZZA, L’INSTALLAZIONE, L’USO E LA MANUTENZIONE. CONSERVARE LE ISTRUZIONI PER ALLEGARLE AL
FASCICOLO TECNICO E PER CONSULTAZIONI FUTURE.
ATTENZIONE Non permettere ai bambini di giocare con l’apparecchio. L’apparecchio
può essere utilizzato da bambini di età non inferiore agli 8 anni, persone con ridotte
capacità fi siche, mentali o sensoriali, o in generale da qualunque persona priva di
esperienza o comunque della necessaria esperienza, purchè sotto sorveglianza oppure
che le stesse abbiano ricevuto una corretta formazione all’uso sicuro dell’apparecchio e
alla comprensione dei pericoli ad esso inerenti.
ATTENZIONE I comandi ad installazione fi ssa (pulsanti, ecc) devono essere situati
fuori dalla portata dei bambini ad almeno 150 cm di altezza da terra. Non permettere
ai bambini di giocare con l’apparecchio, i comandi fi ssi o con i radiocomandi dell’impianto.
ATTENZIONE In nessun caso utilizzare l’apparecchio in presenza di atmosfera
eplosiva o in ambienti che possano essere aggressivi e danneggiare parti del prodotto.
Verifi care che le temperature nel luogo di installazione siano idonee e rispettino le
temperature dichiarate nell’etichetta del prodotto.
ATTENZIONE In ottemperanza alla Direttiva UE 2012/19/EG sui rifi uti di apparecchiature
elettriche ed elettroniche (WEEE), questo prodotto elettrico non deve essere smaltito come
rifi uto municipale misto. Si prega di smaltire il prodotto portandolo al punto di raccolta
municipale locale per un opportuno riciclaggio.
TUTTO QUELLO CHE NON È ESPRESSAMENTE PREVISTO NEL MANUALE D’INSTALLAZIONE, NON È PERMESSO. IL BUON
FUNZIONAMENTO DELL’OPERATORE È GARANTITO SOLO SE VENGONO RISPETTATI I DATI RIPORTATI. LA DITTA NON RI-
SPONDE DEI DANNI CAUSATI DALL’INOSSERVANZA DELLE INDICAZIONI RIPORTATE IN QUESTO MANUALE. LASCIANDO
INALTERATE LE CARATTERISTICHE ESSENZIALI DEL PRODOTTO, LA DITTA SI RISERVA DI APPORTARE IN QUALUNQUE
MOMENTO LE MODIFICHE CHE ESSA RITIENE CONVENIENTI PER MIGLIORARE TECNICAMENTE, COSTRUTTIVAMENTE E
COMMERCIALMENTE IL PRODOTTO, SENZA IMPEGNARSI AD AGGIORNARE LA PRESENTE PUBBLICAZIONE.

DIGIRAD N
2
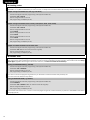
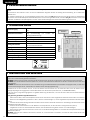
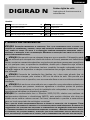
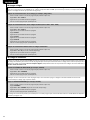
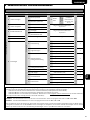
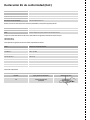
2 DESCRIZIONE DEL PRODOTTO
DIGIRAD N è un selettore quadri canale a tastiera radio progettato per il controllo di centrali di comando e di ricevitori DEA SYSTEM
compatibili.
Il selettore può funzionare sia in ambiente interno che esterno ed essendo alimentato a batterie, non necessita della posa di cablaggi.
Il circuito integrato è munito di 2 numeri seriali distinti. Il primo S/N_D (numero seriale dispositivo) serve ad identifi care il selettore
all’interno dell’ecosistema NET-LINK di DEA System e non potrà essere modifi cato, il secondo S/N_R (numero seriale radio) serve per
l’invio di comandi ai dispositivi accoppiati simulando la logica di funzionamento di un radiocomando a 4 canali.
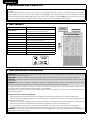
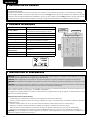
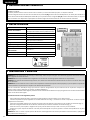
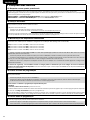
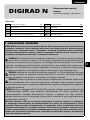
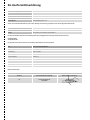
3 DATI TECNICI
Alimentazione 2 batterie CR2450 in serie (ioni di litio, 3V) Sensore
crepuscolare
Tastiera
Led di stato
Durata batterie 2 anni con 10 attivazioni al giorno (con time-out
retroilluminazione a volore di default)
Frequenza radio 433,92 MHz
Codifi ca radio HCS Rolling Code, Dip Switch, D.A.R.T.
Canali radio 4
Portata radio 200m in campo aperto
40m in caso di utilizzo interno
Codici di accesso Max 300
Lunghezza codici Da 2 a 8 cifre
Grado di protezione IP54
Temperatura di funzionamento -20÷50 °C
Dimensioni prodotto 137x74x28 mm
Peso 200 g
4 INSTALLAZIONE E MONTAGGIO
ATTENZIONE: Per le operazioni di montaggio e/o smontaggio, utilizzare sempre l’attrezzatura più opportuna seguendo meticolosamente
le norme vigenti del Paese di vendita.
ATTENZIONE: Rimuovere il coperchio con attenzione seguendo le istruzioni. Evitare di rimuovere le parti forzando i componenti.
ATTENZIONE: I comandi ad installazione fi ssa (pulsanti, ecc) devono essere situati fuori dalla portata dei bambini ad almeno 150 cm di
altezza da terra.
ATTENZIONE: Non montare il selettore in prossimità o addirittura su superfi ci metalliche (inclusi vetri a specchio) in quanto questo
potrebbe comprometterne il funzionamento, in particolare per quanto riguarda la distanza di trasmissione.
Prima dell’installazione, individuare il luogo dove montare il selettore assicurandosi che la distanza dai rispettivi ricevitori non sia
superiore alla portata massima dichiarata (vedi paragrafo “3. DATI TECNICI”).
Si consiglia inoltre di eseguire alcune prove di trasmissione da una distanza superiore, al fi ne di assicurare il corretto funzionamento
anche con batteria scarica.
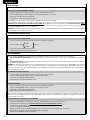
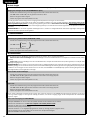
Si prega di procedere secondo i punti seguenti:
• Aprire l’apparecchio svitando e rimuovendo la vite speciale sul fondo della base posteriore con l’apposita chiave fornita.
• Forare la superfi cie di appoggio seguendo le misure indicate in Fig. 4 tenendo in considerazione se la stessa richiede l’utilizzo dei
tasselli ad espansione forniti;
• Interporre tra la parete di appoggio e la base inferiore del selettore il cuscinetto isolante e fi ssare la base con le viti fornite (Fig. 5);
• Rimuovere le 2 linguette isolanti dalle batterie verifi cando che il selettore funzioni correttamente (Fig. 3);
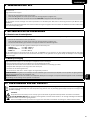
• Prima di chiudere la parte superiore, assicurarsi che la guarnizione in silicone sia stata rimontata e non sia danneggiata;
• Agganciare la parte superiore del selettore alla base appena fi ssata alla parete e riavvitare la vite speciale sul fondo (Fig. 6).
ATTENZIONE: Nel rimontare la parte superiore del selettore, inclinare leggermente il guscio per facilitare l’incastro e applicando una
leggera pressione verso il basso (Fig. 7).

DIGIRAD N
3
IT
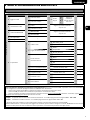
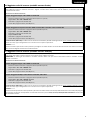
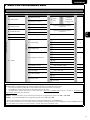
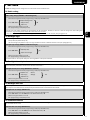
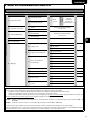
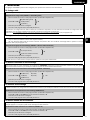
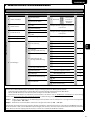
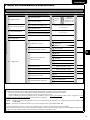
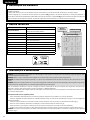
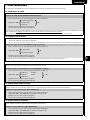
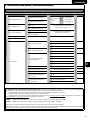
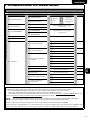
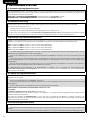
5 MENÙ DI PROGRAMMAZIONE SEMPLIFICATO
ATTIVAZIONE MODALITÀ PROGRAMMAZIONE (Digitare 1 + 3 per 5 secondi)
HOME (LED bianco fi sso)
FUNZIONE
1 lampeggio veloce
PARAMETRI
2 lampeggi veloci
VALORI
Seguire quanto descritto nel paragrafo “6. FUNZIONI DISPONIBILI” per una descrizione approfondita
DEFAULT
1Aggiunta codici
1Comando diretto
1Codice
singolo
3 lampeggi
veloci
Seguire la
procedura
indicata al punto
6.6 e 6.7
/
2Comando multiplo
2Cancellazione codici 1Cancellazione singolo
codice Seguire la procedura indicata
al punto 6.8
2Cancellazione totale
3Codice INSTALLATORE
1Aggiunta codice
INSTALLATORE Seguire la procedura indicata
al punto 6.9
2Cancellazione codice
INSTALLATORE
4Non disponibile //
5Non disponibile
9Impostazioni
1Codifi ca radio
1HCS Rolling Code
12Dip Switch
3D.A.R.T.
2Logica retroilluminazione 1Sempre OFF 2
2ON con poca luce
3Livello intensità
retroilluminazione
1Minima
1
2Bassa
3Media
4Alta
5Massima
4Time-out retroilluminazione _ _ _ Inserire secondi (1-255) 3
5Time-out comandi _ _ _ Inserire secondi (1-255) 5
6Lunghezza codici _ _ _ Inserire valore (2-8) 4
7Feedback sonoro 1ON 1
2OFF
8Reset fabbrica 1Reset solo delle impostazioni /
2Reset totale
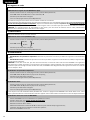
Una volta attivata la modalità programmazione (vedi paragrafo 6.2) ed entrati nel livello HOME, è possibile usare i tasti del DIGIRAD
N per navigare tra i vari livelli di programmazione e modifi care i dati memorizzati.
• Usare i tasti numerici da 0 a 9 per le selezioni numeriche (scelta funzione-parametro-valore).
• Usare il tasto E per confermare la funzione o il parametro e memorizzare il valore;
• Usare il tasto C per annullare (pressione breve). Consente anche di tornare al livello HOME (pressione 1 secondo), oppure uscire
completamente dalla programmazione (pressione 5 secondi).
Esempio - “Impostare time-out comandi su durata di 10 secondi”: In modalità programmazione, digitare: 9 E + 5 E + 10 E
Esempio - “Disabilitare il feedback sonoro”: In modalità programmazione, digitare: 9 E + 7 E + 2 E
In generale, dopo aver cambiato un valore nelle funzioni 3-4-5-9 si tornerà automaticamente al livello HOME.
Nel caso delle funzioni 1 e 2 invece dopo aver aggiunto (o cancellato) il primo codice e assegnato un canale, DIGIRAD N rimarrà in attesa
di ulteriori codici quindi nel caso si volesse terminare l’operazione, sarà necessario premere il tasto C per uscire.

DIGIRAD N
4
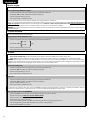
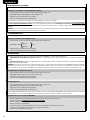
6 FUNZIONI DISPONIBILI
6.1 Feedback digitazione
In generale, con feedback sonoro attivo (impostazione di default), si ha un riscontro sonoro ad ogni pressione di un tasto.
Sono poi sempre attivi, al termine della digitazione, i LED di segnalazione sulla parte superiore del tastierino, per indicare l’esito di
un’operazione sia nell’utilizzo normale sia in programmazione.
CODICE CORRETTO o PROGRAMMAZIONE RIUSCITA: beep prolungato e accensione LED verdi.
CODICE ERRATO o PROGRAMMAZIONE NON RIUSCITA: 3 beep brevi e accensione LED rossi.
6.2 Attivazione tastiera
Per prolungare la durata delle batterie ed in assenza di comandi attivi, il selettore sarà normalmente in condizione di stand-by. Per
attivarlo sarà suffi ciente premere un tasto qualsiasi del tastierino numerico.
L’attivazione viene confermata da:
• Breve lampeggio dei LED superiori rossi e bianco.
• Attivazione della retroilluminazione del tastierino (se attivata e se presente una condizione di scarsa luminosità).
Se non vi è alcuna digitazione (e non si è all’interno della modalità di programmazione), il tastierino si disattiva e torna in stand-by una
volta trascorso il tempo defi nito nel time-out retroilluminazione (vedi paragrafo 7.4).
6.3 Memorizzazione su dispositivo DEA SYSTEM
DIGIRAD N è programmato in fabbrica con 4 codici di acceso, al fi ne di consentire una prima rapida programmazione su centrali o
ricevitori in frequenza 433MHz e impostati su codifi ca HCS (Rolling-code o Fixed-code):
1111 per attivazione canale radio CH1 (= tasto 1 di un radiocomando)
2222 per attivazione canale radio CH2 (= tasto 2 di un radiocomando)
3333 per attivazione canale radio CH3 (= tasto 3 di un radiocomando)
4444 per attivazione canale radio CH4 (= tasto 4 di un radiocomando)
• Mettere in apprendimento radio la centrale di comando oppure il ricevitore DEA SYSTEM (P005 su centrali di comando serie RR
oppure NET, rA.02 su centrali di comando serie NET-EVO, tasto P1 su ricevitori);
• Premere un tasto qualsiasi del tastierino numerico per attivare DIGIRAD N; lampeggeranno brevemente i LED rossi e bianco;
• Nel caso si stia memorizzando su un ricevitore, sarà importante digitare il codice corrispondente al canale radio che si vuole
salvare; Per quanto riguarda le centrali di comando invece, si potrà digitare indifferentemente uno dei 4 codici assegnati ai canali radio;
• Riportare la centrale di comando oppure il ricevitore in condizioni di utilizzo e verifi care che digitando sul tastierino il codice appena
memorizzato il comando venga inviato.
Per questioni di sicurezza, si consiglia di eliminare i codici di default e sostituirli con dei nuovi codici di accesso al termine delle
operazioni di associazione dei dispositivi. Non sarà necessario ripetere la memorizzazione di DIGIRAD N sui dispositivi DEA SYSTEM
precedentemente associati.
6.4 Accesso alla programmazione
Per modifi care oppure semplicemente accedere alle funzioni di DIGIRAD N, sarà necessario innanzitutto entrare nella modalità di
programmazione.
Seguire i passaggi di seguito riportati:
• Premere un tasto qualsiasi per attivare DIGIRAD N;
• Premere e mantenere premuti per 5 secondi i tasti 1 e 3. Il buzzer emetterà un beep continuo; rilasciare i tasti al temine del beep;
• Il LED bianco si accende fi sso, indicando che si è in modalità di programmazione.
Usare i tasti E e C durante la programmazione rispettivamente per:
E: confermare
C: cancellare, tornare al menu precedente (singola pressione)
Nel caso in cui oltre al LED bianco fi sso si accendano insieme anche i LED rossi e verdi lampeggianti, signifi ca che la modalità di
programmazione è stata bloccata tramite un codice installatore (vedi paragrafo 6.9)
Entro 15s digitare il codice installatore (se lo si conosce) e confermare con il tasto E per accedere alla modalità di programmazione.
Resterà acceso solo il LED bianco fi sso. Se non si inserisce un codice installatore valido, allo scadere dei 15s il selettore tornerà in
stand-by.
6.5 Uscita dalla programmazione
È possibile uscire dalla modalità programmazione in due modi:
• Premere e mantenere premuto per 5 secondi il tasto C. Il buzzer emetterà un beep continuo. Rilasciare il tasto al temine del beep.
• In alternativa, la modalità programmazione si disattiva automaticamente dopo 2 minuti dall’ultima pressione di un tasto.

DIGIRAD N
5
IT
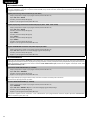
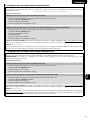
6.6 Aggiunta codici di accesso (modalità accesso diretto)
Se un codice viene memorizzato in modalità “accesso diretto”, quel codice potrà attivare ad ogni digitazione il canale radio associato.
Sarà suffi ciente attivare il tastierino numerico e digitare il codice senza nessun altro tasto di conferma, il comando radio verrà
immediatamente inviato.
PROCEDURA DI MEMORIZZAZIONE:
Esempio di aggiunta singolo codice 5555 su canale CH1
• Attivare la tastiera ed entrare in programmazione (tasti 1 e 3 per 5s)
• Digitare 1 E + 1 E + 1 E + 5555 E + 1 E
• Attendere lo spegnimento dei LED verdi
• Uscire dalla programmazione (tasto C per 5s)
Esempio di aggiunta in sequenza del codice 6666 su canale CH2 e del codice 7777 su canale CH3
• Attivare la tastiera ed entrare in programmazione (tasti 1 e 3 per 5s)
• Digitare 1 E + 1 E + 1 E + 6666 E + 2 E
• Attendere lo spegnimento dei LED verdi
• Digitare 7777 E + 3 E
• Attendere lo spegnimento dei LED verdi
• Uscire dalla programmazione (tasto C per 5s)
In caso di errore (LED rossi): Il codice che si è tentato di memorizzare potrebbe essere già salvato (non è possibile utilizzare lo stesso
codice due volte) oppure la digitazione non è corretta. Prova a ripetere l’operazione.
UTILIZZO:
Attivare il tastierino premendo un tasto qualsiasi e poi digitare un codice valido: il comando radio verrà inviato. Per rinviare il comando,
sarà necessario digitare nuovamente il codice associato.
6.7 Aggiunta codici di accesso (modalità accesso multiplo)
Se un codice viene memorizzato in modalità “accesso multiplo”, quel codice potrà attivare entro un certo tempo (time-out comandi), uno
o più canali radio anche in maniera ripetuta, senza dover essere ridigitato ogni volta.
ATTENZIONE: un codice già memorizzato in modalità “accesso diretto” non può essere memorizzato anche in modalità “accesso
multiplo” e viceversa.
PROCEDURA DI MEMORIZZAZIONE:
Esempio di aggiunta singolo codice 8888 su canale CH1
• Attivare la tastiera ed entrare in programmazione (tasti 1 e 3 per 5s)
• Digitare 1 E + 2 E + 1 E + 8888 E + 1 E
• Attendere lo spegnimento dei LED verdi
• Uscire dalla programmazione (tasto C per 5s)
Esempio di aggiunta multiplo codice 9999 su canali CH1, CH2 e CH4
• Attivare la tastiera ed entrare in programmazione (tasti 1 e 3 per 5s)
• Digitare 1 E + 2 E + 1 E + 9999 E + 1 2 4 E
• Attendere lo spegnimento dei LED verdi
• Uscire dalla programmazione (tasto C per 5s)
In caso di errore (LED rossi): Il codice che si è tentato di memorizzare potrebbe essere già salvato (non è possibile utilizzare lo stesso
codice due volte) oppure la digitazione non è corretta. Prova a ripetere l’operazione.
UTILIZZO:
Attivare la tastiera premendo un tasto qualsiasi e poi inserire un codice valido: entro il tempo defi nito dal timeout comandi (vedi paragrafo
7.5), premere uno dei tasti corrispondenti ai canali radio associati a quel codice (1, 2, 3 o 4), anche più volte a seconda del canale radio
che si desidera attivare.

DIGIRAD N
6
6.8 Cancellazione codici
È possibile eseguire la cancellazione di un singolo codice oppure una cancellazione totale di tutti i codici in memoria. Ad esempio,
dopo il primo accoppiamento di DIGIRAD N su qualsiasi dispositivo DEA SYSTEM che si desidera controllare, è sempre raccomandato
cancellare i 4 codici di fabbrica per ragioni di sicurezza.
Esempio di cancellazione singola di un codice (es. codice 1111)
• Attivare la tastiera ed entrare in programmazione (tasti 1 e 3 per 5s)
• Digitare
2 E + 1 E + 1111 E
• Attendere lo spegnimento dei LED verdi
• Uscire dalla programmazione (tasto C per 5s)
Esempio di cancellazione singola dei 4 codici di fabbrica (1111 - 2222 - 3333 - 4444)
• Attivare la tastiera ed entrare in programmazione (tasti 1 e 3 per 5s)
• Digitare
2 E + 1 E + 1111 E
• Attendere lo spegnimento dei LED verdi
• Digitare 2222 E
• Attendere lo spegnimento dei LED verdi
• Digitare 3333 E
• Attendere lo spegnimento dei LED verdi
• Digitare
4444 E
• Attendere lo spegnimento dei LED verdi
• Uscire dalla programmazione (tasto C per 5s)
Esempio di cancellazione TOTALE di tutti i codici in memoria
• Attivare la tastiera ed entrare in programmazione (tasti 1 e 3 per 5s)
• Digitare
2 E + 2 E + E per 5s fi no al termine del beep lungo
• Attendere lo spegnimento dei LED verdi
• Uscire dalla programmazione (tasto C per 5s)
6.9 Codice installatore
È possibile bloccare l’accesso alla modalità di programmazione di DIGIRAD N per evitare modifi che da parte di utenti sconosciuti. Dopo
aver confi gurato un codice installatore, per accedere alla modalità di programmazione, sarà sempre necessario digitare il codice corretto
prima di qualsiasi altra operazione. Il codice installatore dovrà essere sempre di 6 cifre (indipendentemente dalla lunghezza dei codici
di accesso impostati) e non dovrà contenere i tasti C ed E.
Inserimento del CODICE INSTALLATORE (es. 123456)
• Attivare la tastiera ed entrare in programmazione (tasti 1 e 3 per 5s)
• Digitare
3 E + 1 E + 123456 E
• Attendere lo spegnimento dei LED verdi
• Uscire dalla programmazione (tasto C per 5s)
In caso si voglia eliminare il blocco alla programmazione, sarà necessario cancellare il codice installatore.
Se si conosce il codice, seguire i passaggi di seguito riportati:
Cancellazione del CODICE INSTALLATORE (es. 123456)
• Attivare la tastiera ed entrare in programmazione (tasti 1 e 3 per 5s)
• Digitare
123456 E
• Digitare 3 E + 2 E + 123456 + E per 5s fi no al termine del beep lungo
• Attendere lo spegnimento dei LED verdi
• Uscire dalla programmazione (tasto C per 5s)
Nel caso si sia smarrito il codice installatore e si voglia sbloccare la programmazione, sarà necessario eseguire un RESET TOTALE del
dispositivo (vedi paragrafo 7.8).

DIGIRAD N
7
IT
7 IMPOSTAZIONI
È possibile confi gurare le impostazioni di DIGIRAD N, in modo da adattarlo alle necessità del sito d’installazione.
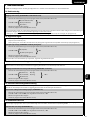
7.1 Codifi ca radio
Sono disponibili 3 codifi che radio.
Cambio codifi ca radio (DEFAULT: 1 HCS Rolling Code)
• Attivare la tastiera ed entrare in programmazione (tasti 1 e 3 per 5s)
• Digitare
9 E + 1 E +
1 (HCS Rolling Code)
2 (Dip-Switch)
3 (D.A.R.T.)
+ E
• Attendere lo spegnimento dei LED verdi
• Uscire dalla programmazione (tasto C per 5s)
Normalmente la codifi ca radio viene defi nita all’inizio dell’installazione. Ad ogni modo, se ci fosse la necessità di cambiare codifi ca radio
ad installazione avvenuta, gli eventuali codici precedentemente memorizzati, continueranno a funzionare correttamente.
Si dovrà in ogni caso procedere ad un nuova memorizzazione di DIGIRAD N sulla centrale di comando o sul ricevitore (vedi paragrafo 6.3).
7.2 Logica retroilluminazione
Per la retroilluminazione del tastierino numerico, sono disponibili 2 opzioni disponibili:
- Sempre OFF (LED sempre spenti);
- ON con poca luce (LED accesi solo in condizioni di scarsa luminosità e per un tempo massimo defi nito (vedi paragrafo 7.4);
Cambio logica retroilluminazione (DEFAULT: 2 ON con poca luce)
• Attivare la tastiera ed entrare in programmazione (tasti 1 e 3 per 5s)
• Digitare
9 E + 2 E +
1 (Sempre OFF)
2 (ON con poca luce)
+ E
• Attendere lo spegnimento dei LED verdi
• Uscire dalla programmazione (tasto C per 5s)
I LED di stato sul guscio superiore saranno sempre attivi indipendentemente dall’opzione selezionata.
7.3 Livello intensità retroilluminazione
È possibile regolare il livello di intensità della retroilluminazione. ATTENZIONE! aumentare il livello di intensità causerà un maggior
consumo delle batterie e di conseguenza ridurrà la vita delle batterie stesse.
Cambio livello intensità retroilluminazione (DEFAULT: 1 minima)
• Attivare la tastiera ed entrare in programmazione (tasti 1 e 3 per 5s)
• Digitare
9 E + 3 E +
1 (Minima) 2 (Bassa)
3 (Media) 4 (Alta)
5 (Massima)
+ E
• Attendere lo spegnimento dei LED verdi
• Uscire dalla programmazione (tasto C per 5s)
7.4 Time-out retroilluminazione
È possibile regolare il tempo dopo il quale i LED dei tasti si spengono dopo la pressione di un tasto. ATTENZIONE! l’aumento della durata
comporterà un maggior consumo delle batterie e di conseguenza ridurrà la vita delle batterie stesse.
Cambio time-out retroilluminazione (DEFAULT: 3s)
• Attivare la tastiera ed entrare in programmazione (tasti 1 e 3 per 5s)
• Digitare
9 E + 4 E + da 1 a 255 (inserire i secondi desiderati) + E
• Attendere lo spegnimento dei LED verdi
• Uscire dalla programmazione (tasto C per 5s)
7.5 Time-out comandi
È possibile regolare il tempo entro il quale è possibile inviare un comando dopo aver digitato un codice di accesso valido in modalità
accesso multiplo. La pressione di un qualsiasi tasto ricaricherà il time-out.
Cambio time-out comandi (DEFAULT: 5s)
• Attivare la tastiera ed entrare in programmazione (tasti 1 e 3 per 5s)
• Digitare 9 E + 5 E + da 1 a 255 (inserire i secondi desiderati) + E
• Attendere lo spegnimento dei LED verdi
• Uscire dalla programmazione (tasto C per 5s)

DIGIRAD N
8
7.6 Lunghezza codici
È possibile regolare la lunghezza dei codici che si dovranno digitare per controllare i dispositivi accoppiati.
Cambio lunghezza codici (DEFAULT: 4 cifre)
• Attivare la tastiera ed entrare in programmazione (tasti 1 e 3 per 5s)
• Digitare
9 E + 6 E + da 2 a 8 (inserire valore desiderato) + E
• Attendere lo spegnimento dei LED verdi
• Uscire dalla programmazione (tasto C per 5s)
Normalmente la lunghezza dei codici viene defi nita all’inizio dell’installazione.
Se ci fosse la necessità di cambiare la lunghezza dei codici ad installazione avvenuta, e ci fossero dei codici già memorizzati, questi
potranno funzionare solo se la nuova lunghezza impostata è maggiore, in tal caso l’utente dovrà semplicemente aggiungere uno o più
0 (zero) alla fi ne del codice da inserire (es. codice memorizzato 1234, nuova lunghezza 6, il codice da digitare per attivare il comando
sarà 123400).
ATTENZIONE: Nel caso la nuova lunghezza dei codici impostata fosse più corta, per ragioni di sicurezza tutti i codici memorizzati in
precedenza verranno resettati ed i codici dovranno essere nuovamente appresi.
7.7 Feedback sonoro
È possibile disattivare il feedback sonoro del tastierino.
Cambio feedback sonoro (DEFAULT: 1 ON)
• Attivare la tastiera ed entrare in programmazione (tasti 1 e 3 per 5s)
• Digitare
9 E + 7 E +
1 (ON)
2 (OFF)
+ E
• Attendere lo spegnimento dei LED verdi
• Uscire dalla programmazione (tasto C per 5s)
7.8 Reset
Nel caso fosse necessario resettare i dati memorizzati su DIGIRAD N, sono disponibili 2 opzioni:
- Reset solo delle impostazioni: reset delle impostazioni ai valori di default e cancellazione del codice installatore (se impostato);
- Reset totale: reset delle impostazioni ai valori di default, cancellazione del codice installatore (se impostato) e cancellazione di
TUTTI i codici di accesso memorizzati.
ATTENZIONE: Al termine di un reset totale, per ragioni di sicurezza viene cambiato automaticamente anche il numero seriale radio interno
di DIGIRAD N, questo per evitare che una persona malintenzionata possa utilizzare il selettore per controllare i dispositivi dell’impianto
accoppiati. Dopo il cambio del numero seriale radio, si dovrà necessariamente accoppiare nuovamente DIGIRAD N sulla centrale di
comando oppure sul ricevitore in uso.
Reset solo delle impostazioni
• Attivare la tastiera ed entrare in programmazione (tasti 1 e 3 per 5s)
• Digitare
9 E + 8 E + 1 + E per 5s fi no al termine del beep lungo
• Attendere lo spegnimento dei LED verdi
• Uscire dalla programmazione (tasto C per 5s)
Reset totale
• Attivare la tastiera ed entrare in programmazione (tasti 1 e 3 per 5s)
• Digitare
9 E + 8 E + 2 + E per 5s fi no al termine del beep lungo
• Attendere lo spegnimento dei LED verdi
• Uscire dalla programmazione (tasto C per 5s)
Se un codice installatore precedentemente impostato fosse smarrito, l’accesso alla programmazione di DIGIRAD N verrà negato.
In questa eventualità, sarà comunque possibile effettuare un reset totale del dispositivo ma sarà necessario accedere alle batterie
seguendo i passaggi di seguito riportati:
Reset totale con accesso alle BATTERIE
• Smontare DIGIRAD N dalla parete svitando la vite speciale sul fondo
• Attivare la tastiera per assicurarsi di uscire dalla modalità di stand-by;
• Sfi lare la batteria BT2 (Fig. 8);
• Reinserire la batteria nell’alloggiamento;
• Premere e mantenere premuti contemporaneamente i tasti C + 0 + E ed attendere il beep lungo (circa 5s);
• Lo spegnimento dei LED verdi confermerà il successo dell’operazione;
• Rimontare DIGIRAD N sulla parete.

DIGIRAD N
9
IT
8 CONNESSIONE CON APP
Se si dispone di uno smartphone con installata l’APP DEA System, è possibile mettere DIGIRAD N in comunicazione con quest’ultimo.
Seguire i passaggi di seguito riportati:
• Attivare il tastierino e premere il tasto 0;
• Mantenere premuto il tasto 0 ed attendere il termine del beep lungo (circa 5s);
• Si accenderanno i tasti C, O, E oltre al LED bianco superiore lampeggiando lentamente.
Per interrompere la ricezione di comandi esterni da parte dell’APP DEA System, sarà suffi ciente premere una volta il tasto C sul DIGIRAD
N.
In ogni caso, passati 5 minuti senza ricevere segnali, il selettore sospenderà automaticamente la comunicazione con l’APP ed entrerà
in modalità stand-by.
9 VERIFICA STATO E SOSTITUZIONE BATTERIE
9.1 Verifi ca stato batterie
È possibile verifi care in qualsiasi momento lo stato di carica delle batterie seguendo i passaggi di seguito riportati:
• Attivare il tastierino e premere il tasto 9;
• Mantenere premuto il tasto 9 ed attendere il termine del beep lungo (circa 5s);
• I LED di stato superiori si accenderanno lampeggiando, fi no al rilascio del tasto 9
Il colore dei LED lampeggianti indicherà la soglia di carica delle batterie:
- Luce
VERDE: carica 60% -- 100%
- Luce VERDE/ROSSA: carica 15% -- 59%
- Luce ROSSA: carica 0% -- 14%
Qualora la soglia di carica della batteria scenda sotto il 15%, dopo aver digitato un codice di accesso valido DIGIRAD N eseguirà un
pre-lampeggio dei LED rossi prima dell’invio di un comando, al fi ne di segnalare all’utente che si dovrà procedere quanto prima alla
sostituzione delle batterie.
9.2 Sostituzione batterie
Per la rimozione e/o la sostituzione delle batterie, seguire i passaggi di seguito riportati:
• Svitare la vite speciale sul fondo servendosi della chiave fornita;
• Rimuovere la parte superiore del selettore inclinando leggermente e sollevando delicatamente;
• Sfi lare entrambe le batterie e sostituirle con una nuova coppia;
• Verifi care che il selettore funzioni correttamente;
• Rimontare la parte superiore seguendo la procedura inversa.
ATTENZIONE: L’utilizzo di batterie di tipo errato può causare rischio di incendio e/o esplosione del prodotto. Utilizzare esclusivamente
batterie del tipo indicato.
ATTENZIONE: È preferibile sostituire sempre entrambe le batterie per evitare segnalazioni di stato carica falsate oltre ad una riduzione
sensibile del funzionamento del prodotto.
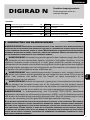
10 DISMISSIONE DEL PRODOTTO
ATTENZIONE In ottemperanza alla Direttiva UE 2012/19/EG sui rifi uti di apparecchiature elettriche ed elettroniche (WEEE), que-
sto prodotto elettrico non deve essere smaltito come rifi uto municipale misto. Si prega di smaltire il prodotto portandolo al punto
di raccolta municipale locale per un opportuno riciclaggio.
Attenzione!
Questo prodotto contiene una batteria di tipo a “bottone”. Tenere le batterie nuove ed usate fuori dalla portata dei bambini.
! NON INGERIRE LA BATTERIA ! Se la batteria viene ingerita, può provocare gravi ustioni interne in sole 2 ore e portare alla
morte.
In caso di sospetta ingestione o di inserimento in altri orifi zi corporei, rivolgersi immediatamente ad un medico.

DIGIRAD N
10

DIGIRAD N
11
EN
DIGIRAD N
Radio digital selector
Operating instructions and
warnings
Summary
1Warning summary 11 7Available functions 14
2Product description 12 8Settings 17
3Technical data 12 9Connection with APP 19
4Installation and assembly 12 10 Battery status and replacement check 19
5Simplifi ed programming menu 13 11 Product Disposal 19
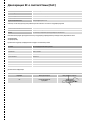
1 WARNINGS SUMMARY
WARNING! IMPORTANT SAFETY INSTRUCTIONS. CAREFULLY READ AND FOLLOW ALL WARNINGS AND INSTRUC-
TIONS THAT ACCOMPANY THE PRODUCT SINCE INCORRECT INSTALLATION COULD CAUSE HARM TO PEOPLE, ANIMALS
OR OBJECTS. WARNINGS AND INSTRUCTIONS PROVIDE IMPORTANT INFORMATION REGARDING SAFETY, INSTALLA-
TION, USE AND MAINTENANCE. KEEP THE INSTRUCTIONS TOGETHER WITH THE TECHNICAL DOCUMENTATION AND FOR
FUTURE REFERENCE.
WARNING Do not allow children to play with the appliance. The device may be used
by children of not less than 8 years of age, people with reduced physical, mental or
sensory impairment, or generally anyone without experience or, in any case, the required
experience provided the device is used under surveillance or that users have received
proper training on safe use of the device and are aware of the dangers related to its use.
WARNING Fixed installation command (buttons, etc.) must be situated out of the
reach of children at a height of at least 150 cm from the ground. Do not allow children
to play with the device, the fi xed commands or the radio controls of the system.
WARNING Under no circumstances use the device in an explosive atmosphere or in
areas that may be corrosive or could damage product parts. Check that the
temperatures at the installation site are suitable and comply with the temperatures
declared on the product label.
WARNING In compliance with EU Directive 2012/19/EG on waste electrical and electronic
equipment (WEEE), this electrical product should not be treated as municipal mixed
waste. Please dispose of the product and bring it to the collection for an appropriate local
municipal recycling.
EVERYTHING THAT IS NOT EXPRESSLY PROVIDED FOR IN THE INSTALLATION MANUAL IS NOT ALLOWED. CORRECT
OPERATOR OPERATION IS ONLY ENSURED WHEN THE REPORTED DATA IS RESPECTED. THE COMPANY DOES NOT
TAKE RESPONSIBILITY FOR DAMAGE CAUSED BY FAILURE TO COMPLY WITH THE INSTRUCTIONS CONTAINED IN THIS
MANUAL. WITHOUT AFFECTING THE ESSENTIAL FEATURES OF THE PRODUCT, THE COMPANY RESERVES THE RIGHT
TO MAKE ANY CHANGES DEEMED APPROPRIATE AND AT ANY TIME IN ORDER TO TECHNICALLY, STRUCTURALLY AND
COMMERCIALLY IMPROVE THE PRODUCT WITHOUT BEING REQUIRED TO UPDATE THIS DOCUMENT.

DIGIRAD N
12
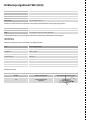
2 PRODUCT DESCRIPTION
DIGIRAD N is a four-channel radio keypad selector designed to control compatible DEA SYSTEM command units and/or receivers.
The selector can work both indoors and outdoors and being powered by batteries, it does not require wiring.
The integrated circuit has 2 distinct serial numbers. The fi rst S/N_D (device serial number) is used to identify the selector within the DEA
System NET-LINK ecosystem and cannot be changed, the second S/N_R (radio serial number) is used to send commands to the paired
devices by simulating the operating logic of a 4-buttons remote.
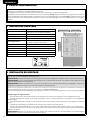
3 TECHNICAL DATA
Power supply 2x CR2450 batteries in series (lithium-ion, 3V)
Dusk sensor
Keypad
Status LEDs
Battery life 2 years with 10 activations per day (with
backlight time-out at default)
Radio frequency 433.92 MHz
Radio coding HCS Rolling Code, Dip Switch, D.A.R.T.
Radio channels 4
Radio signal range 200m in open fi eld
40m for indoor use
Access codes Max 300
Code length 2 to 8 digits
Degree of protection IP54
Operating temperature -20÷50 °C
Product dimensions 137x74x28 mm
Product weight 200 g
4 INSTALLATION AND ASSEMBLY
WARNING: For assembly and / or disassembly operations, always use the most appropriate equipment, meticulously following the
regulations in force in the sales Country.
WARNING: Remove the lid carefully following the instructions. Do not remove parts by forcing components.
WARNING: Fixed installation controls (buttons, etc.) must be located out of the reach of children at least 150 cm above the ground.
WARNING: Do not mount the selector near or even on metal surfaces (including mirrored glass) as this could compromise its operation,
in particular with regard to the transmission distance.
Before installation, identify the place to mount the selector making sure that the distance from the respective receivers does not exceed
the maximum declared range (see paragraph “3. TECHNICAL DATA”).
It is also advisable to perform some transmission tests from a greater distance, in order to ensure correct operation even with a fl at
battery.
Please proceed according to the following points:
• Open the device by unscrewing and removing the special screw on the bottom with the wrench provided;
• Drill the support surface following the measurements indicated in Pic. 4, taking into account whether it requires the use of the
supplied expansion plugs;
• Place the insulating pad between the wall and the rear base of the selector and fi x the base with the supplied screws (Pic. 5);
• Remove the 2 insulating tabs from the batteries, checking that the selector works correctly (Pic. 3);
• Before closing the upper part, make sure that the silicone gasket has been reassembled and is not damaged;
• Hook the upper part of the selector to the base previously fi xed to the wall and tighten the special screw on the bottom (Pic. 6).
WARNING: When reassembling the upper part of the selector, slightly tilt the shell to facilitate the interlocking and apply a slight downward
pressure (Pic. 7).

DIGIRAD N
13
EN
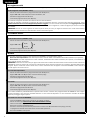
5 SIMPLIFIED PROGRAMMING MENU
PROGRAMMING MODE ACTIVATION (Enter 1 + 3 for 5 seconds)
HOME (fi x white LED)
FUNCTION
1 fast blink
PARAMETERS
2 fast blinks
VALUES
Follow what is described in paragraph “6. AVAILABLE FUNCTIONS ”for an in-depth description
DEFAULT
1Adding codes
1Direct command
1Single
code
3 fast blinks
Follow the
procedure
indicated in
points 6.6 and
6.7
/
2Multiple command
2Deleting codes 1Single code cancellation Follow the indicated procedure
in point 6.8
2Total cancellation
3INSTALLER code 1Adding INSTALLER code Follow the indicated procedure
in point 6.9
2Erasing the INSTALLER code
4Not available //
5Not available
9Setting
1Radio coding
1HCS Rolling Code
12Dip Switch
3D.A.R.T.
2Backlight logic 1Always OFF 2
2ON with low light
3Backlight intensity level
1Minimum
1
2Low
3Average
4High
5Maximum
4Backlight time-out _ _ _ Enter seconds (1-255) 3
5Command time-out _ _ _ Enter seconds (1-255) 5
6Code length _ _ _ Enter value (2-8) 4
7Sound feedback 1ON 1
2OFF
8Factory reset 1Reset of the settings only /
2Total reset
Once the programming mode has been activated (see paragraph 6.2) and the HOME level has been entered, it is possible to use the
DIGIRAD N keys to navigate between the various programming levels and modify the stored values.
• Use the numeric keys from 0 to 9 for numeric selections (function-parameter-value choice);
• Use the E key to confi rm the function or parameter and store the value;
• Use the C key to cancel (short press). It also allows you to return to the HOME level (press for 1 second), or completely exit
programming mode (press for 5 seconds).
Example - “Set Command time-out to a duration of 10 seconds”: In programming mode, enter: 9 E + 5 E + 10 E
Example - “Turn off Sound feedback”: In programming mode, enter: 9 E + 7 E + 2 E
In general, after changing a value in functions 3-4-5-9 it will automatically return to the HOME level.
In the case of functions 1 and 2, on the other hand, after adding (or deleting) the fi rst code and assigning a channel, DIGIRAD N will wait
for further codes so if you want to end the operation, you will need to press the C key to exit.

DIGIRAD N
14
6 AVAILABLE FUNCTIONS
6.1 Typing feedback
In general, with the sound feedback active (default setting), there is sound feedback every time a key is pressed.
At the end of typing, the status LEDs on the top of the selector are always active, to indicate the outcome of an operation both in normal
use and in programming.
CORRECT CODE or SUCCESSFUL PROGRAMMING: prolonged beep and green LEDs on.
WRONG CODE or PROGRAMMING FAILED: 3 short beeps and red LEDs on.
6.2 Keypad activation
To prolong the battery life and in the absence of active commands, the selector will normally be in stand-by mode. To wake it up, simply
press any key on the numeric keypad.
The awakening will be confi rmed by:
• Short blink of the upper red and white LEDs.
• Activation of the keypad backlight (if enabled and if there is a low light condition).
If no key is pressed (and you are not in programming mode), the keypad switches off and returns to stand-by once the time defi ned in the
backlight time-out has elapsed (see paragraph 7.4).
6.3 Memorization on DEA SYSTEM devices
DIGIRAD N is factory programmed with 4 access codes, in order to allow a fi rst rapid programming on control units or receivers with
433MHz radio frequency and set in HCS (Rolling-code or Fixed-code) encoding:
1111 to activate radio channel CH1 (= key 1 of a remote)
2222 to activate radio channel CH2 (= key 2 of a remote)
3333 to activate radio channel CH3 (= key 3 of a remote)
4444 to activate radio channel CH4 (= key 4 of a remote)
• Put the DEA SYSTEM control unit or receiver in radio learning mode (P005 on RR or NET series control units, rA.02 on NET-EVO
series control units, P1 key on receivers);
• Press any key on the numeric keypad to activate DIGIRAD N; the red and white LEDs will blink briefl y;
• If you are memorizing on a receiver, it will be important to enter the code corresponding to the radio channel to be saved; For the
control units, on the other hand, indifferently enter one of the 4 codes assigned to the radio channels;
• Return the control unit or the receiver to normal use conditions and check that the command is sent by typing the code just
memorized on the keypad.
For security reasons, it is recommended to delete the default codes and replace them with new access codes at the end of the
device pairing operations. It will not be necessary to repeat the memorization of DIGIRAD N on the previously paired DEA System
devices.
6.4 Access to programming mode
To modify or simply access the DIGIRAD N functions, you will fi rst need to enter programming mode.
Follow the steps below:
• Press any key to activate DIGIRAD N;
• Press and hold keys 1 and 3 for 5 seconds. The buzzer will emit a continuous beep; release the keys at the end of the beep;
• The white LED lights up fi x, indicating that you are in programming mode.
Use the E and C keys during programming respectively to:
E: confi rm
C: cancel, return to the previous menu (single press)
If, in addition to the fi x white LED, the red and green LEDs also light up blinking, it means that the programming mode has been locked
by means of an installer code (see paragraph 6.9).
Within 15s enter the installer code (if you know it) and confi rm with the E key to access the programming mode. Only the fi x white LED
will remain on. If a valid installer code is not entered, after 15s the selector will return to stand-by mode.
6.5 Exit programming mode
Programming mode can be exited in two ways:
• Press and hold the C key for 5 seconds. The buzzer will emit a continuous beep. Release the key at the end of the beep.
• Alternatively, the programming mode will automatically exit after 2 minutes from the last press of any key.

DIGIRAD N
15
EN
6.6 Adding Access Codes (Direct Access Mode)
If a code is memorized in “direct access” mode, that code can activate the associated radio channel at each entry. Simply activate the
numeric keypad and enter the code without any other confi rmation key, the radio command will be sent immediately.
MEMORIZATION PROCEDURE:
Example of adding single code 5555 on channel CH1
• Activate the keypad and enter programming mode (keys 1 and 3 for 5s)
• Enter 1 E + 1 E + 1 E + 5555 E + 1 E
• Wait for the green LEDs to turn off
• Exit programming mode (C key for 5s)
Example of adding code 6666 on channel CH2 and code 7777 on channel CH3 in sequence
• Activate the keypad and enter programming mode (keys 1 and 3 for 5s)
• Enter 1 E + 1 E + 1 E + 6666 E + 2 E
• Wait for the green LEDs to turn off
• Enter 7777 E + 3 E
• Wait for the green LEDs to turn off
• Exit programming mode (C key for 5s)
In case of error (red LEDs): The code you tried to memorize may already be stored (it is not possible to use the same code twice) or the
typing was incorrect. Try to repeat the operation.
USAGE:
Activate the keypad by pressing any key and then enter a valid code: the radio command will be sent. To resend the command, you will
need to re-type the associated code.
6.7 Adding Access Codes (Multiple Access Mode)
If a code is memorized in “multiple access” mode, that code can activate, within a certain time (command time-out), one or more radio
channels, even repeatedly, without having to be re-entered each time.
WARNING: a code already stored in “direct access” mode cannot be memorized also in “multiple access” mode and vice versa.
MEMORIZATION PROCEDURE:
Example of adding single code 8888 on channel CH1
• Activate the keypad and enter programming mode (keys 1 and 3 for 5s)
• Enter 1 E + 2 E + 1 E + 8888 E + 1 E
• Wait for the green LEDs to turn off
• Exit programming mode (C key for 5s)
Example of adding multiple code 9999 on channels CH1, CH2 and CH4
• Activate the keypad and enter programming mode (keys 1 and 3 for 5s)
• Enter 1 E + 2 E + 1 E + 9999 E + 1 2 4 E
• Wait for the green LEDs to turn off
• Exit programming mode (C key for 5s)
In case of error (red LEDs): The code you tried to memorize may already be stored (it is not possible to use the same code twice) or the
typing was incorrect. Try to repeat the operation.
USAGE:
Activate the keypad by pressing any key and then enter a valid code: within the time defi ned by the command timeout (see paragraph
7.5), press one of the keys corresponding to the radio channels associated with that code (1, 2, 3 or 4), even more times depending on
the radio channel you want to activate.

DIGIRAD N
16
6.8 Deleting codes
It is possible to perform the cancellation of a single code or a total cancellation of all stored codes. For example, after the fi rst pairing
of DIGIRAD N on any DEA SYSTEM device you want to control, it is always recommended to delete the 4 factory codes for security reasons.
Example of single cancellation of a code (e.g. code 1111)
• Activate the keypad and enter programming mode (keys 1 and 3 for 5s)
• Enter 2 E + 1 E + 1111 E
• Wait for the green LEDs to turn off
• Exit programming mode (C key for 5s)
Example of single cancellation of the 4 factory codes (1111 - 2222 - 3333 - 4444)
• Activate the keypad and enter programming mode (keys 1 and 3 for 5s)
• Enter 2 E + 1 E + 1111 E
• Wait for the green LEDs to turn off
• Enter 2222 E
• Wait for the green LEDs to turn off
• Enter 3333 E
• Wait for the green LEDs to turn off
• Enter 4444 E
• Wait for the green LEDs to turn off
• Exit programming mode (C key for 5s)
Example of a TOTAL cancellation of all stored codes
• Activate the keypad and enter programming mode (keys 1 and 3 for 5s)
• Enter 2 E + 2 E + E for 5s until the end of the long beep
• Wait for the green LEDs to turn off
• Exit programming mode (C key for 5s)
6.9 Installer code
Access to DIGIRAD N programming mode can be locked to prevent changes by unknown users. After confi guring an installer code, to
enter programming mode it will always be necessary to enter the correct code before any other operation. The installer code must always
have 6 digits (regardless of the length of the access codes set) and must not contain the C and E keys.
Entering an INSTALLER CODE (e.g. 123456)
• Activate the keypad and enter programming mode (keys 1 and 3 for 5s)
• Enter 3 E + 1 E + 123456 E
• Wait for the green LEDs to turn off
• Exit programming mode (C key for 5s)
If you want to remove the programming mode lock, you will need to erase the installer code previously set.
If you know the code, follow the steps below:
Erasing an INSTALLER CODE (e.g. 123456)
• Activate the keypad and enter programming mode (keys 1 and 3 for 5s)
• Enter 123456 E
• Enter 3 E + 2 E + 123456 + E for 5s until the end of the long beep
• Wait for the green LEDs to turn off
• Exit programming mode (C key for 5s)
If the installer code has been lost, in order to unlock the programming mode, it will be necessary to perform a TOTAL RESET of the device
(see paragraph 7.8).

DIGIRAD N
17
EN
7 SETTINGS
DIGIRAD N settings can be confi gured to suit the needs of the installation site.
7.1 Radio coding
There are 3 radio codings available.
Radio coding change (DEFAULT: 1 HCS Rolling Code)
• Activate the keypad and enter programming mode (keys 1 and 3 for 5s)
• Enter 9 E + 1 E +
1 (HCS Rolling Code)
2 (Dip-Switch)
3 (D.A.R.T.)
+ E
• Wait for the green LEDs to turn off
• Exit programming mode (C key for 5s)
Normally the radio coding is defi ned at the beginning of the installation. However, if there is a need to change the radio coding after
installation, any previously stored codes will continue to work correctly.
In any case, DIGIRAD N must be memorized again on the control unit or on the receiver (see paragraph 6.3).
7.2 Backlight logic
For the backlight of the numeric keypad, there are 2 options available:
- Always OFF (Key LEDs always off);
- ON with low light (Key LEDs lit only in low light conditions and for a defi ned maximum time (see paragraph 7.4);
Backlight logic change (DEFAULT: 2 ON with low light)
• Activate the keypad and enter programming mode (keys 1 and 3 for 5s)
• Enter 9 E + 2 E +
1 (Always OFF)
2 (ON with low light)
+ E
• Wait for the green LEDs to turn off
• Exit programming mode (C key for 5s)
The status LEDs on the top will always be active regardless of the option selected.
7.3 Backlight intensity level
You can adjust the backlight intensity level. ATTENTION! increasing the intensity level will cause a greater consumption of the batteries
and consequently will reduce the life of the batteries themselves.
Backlight intensity level change (DEFAULT: 1 minimum)
• Activate the keypad and enter programming mode (keys 1 and 3 for 5s)
• Enter 9 E + 3 E +
1 (Minimum) 2 (Low)
3 (Average) 4 (High)
5 (Maximum)
+ E
• Wait for the green LEDs to turn off
• Exit programming mode (C key for 5s)
7.4 Backlight time-out
You can adjust the time after which the key LEDs turn off after a key is pressed. ATTENTION! increasing the duration will cause a greater
consumption of the batteries and consequently will reduce the life of the batteries themselves.
Backlight time-out change (DEFAULT: 3s)
• Activate the keypad and enter programming mode (keys 1 and 3 for 5s)
• Enter 9 E + 4 E + from 1 to 255 (enter the desired seconds) + E
• Wait for the green LEDs to turn off
• Exit programming mode (C key for 5s)
7.5 Command time-out
You can adjust the time within which a command can be sent after entering a valid access code in multiple access mode. Pressing any
key will reload the time-out.
Command time-out change (DEFAULT: 5s)
• Activate the keypad and enter programming mode (keys 1 and 3 for 5s)
• Enter 9 E + 5 E + from 1 to 255 (enter the desired seconds) + E
• Wait for the green LEDs to turn off
• Exit programming mode (C key for 5s)

DIGIRAD N
18
7.6 Code length
You can adjust the length of the codes that you will have to enter to control the paired devices.
Code length change (DEFAULT: 4 digits)
• Activate the keypad and enter programming mode (keys 1 and 3 for 5s)
• Enter 9 E + 6 E + from 2 to 8 (enter the desired value) + E
• Wait for the green LEDs to turn off
• Exit programming mode (C key for 5s)
Normally the length of the access codes is defi ned at the beginning of the installation.
If there is a need to change the length of the codes after installation, and there are codes already stored, these will only work if the new
length set is greater, in which case the user will simply have to add one or more 0s (zero) at the end of the code to be entered (e.g.
stored code 1234, new length set to 6, the code to type to activate the command will be 123400).
WARNING: If the new code length set is shorter, for security reasons all previously memorized codes will be reset and the codes will have
to be learned again.
7.7 Sound feedback
You can turn off the keypad sound feedback.
Sound feedback change (DEFAULT: 1 ON)
• Activate the keypad and enter programming mode (keys 1 and 3 for 5s)
• Enter 9 E + 7 E +
1 (ON)
2 (OFF)
+ E
• Wait for the green LEDs to turn off
• Exit programming mode (C key for 5s)
7.8 Reset
If there is a need to reset the data stored on DIGIRAD N, 2 options are available:
- Reset of the settings only: resets the settings to the default values and deletes the installer code (if set);
- Total reset: resets the settings to the default values, deletes the installer code (if set) and deletes ALL stored access codes.
WARNING: At the end of a total reset, for safety reasons, the internal radio serial number of DIGIRAD N is also automatically changed,
to prevent an ill-intentioned person from using the selector to control the paired system devices. After changing the radio serial number,
DIGIRAD N must necessarily be paired again on the control unit or on the receiver in use.
Reset of the settings only
• Activate the keypad and enter programming mode (keys 1 and 3 for 5s)
• Enter 9 E + 8 E + 1 + E for 5s until the end of the long beep
• Wait for the green LEDs to turn off
• Exit programming mode (C key for 5s)
Total reset
• Activate the keypad and enter programming mode (keys 1 and 3 for 5s)
• Enter 9 E + 8 E + 2 + E for 5s until the end of the long beep
• Wait for the green LEDs to turn off
• Exit programming mode (C key for 5s)
If a previously set installer code is lost, access to DIGIRAD N programming will be denied. In this case, it will still be possible to perform
a total reset of the device but it will be necessary to access the batteries by following the steps below:
Total reset with access to the BATTERIES
• Remove DIGIRAD N from the wall by unscrewing the special screw on the bottom;
• Activate the keypad to make sure you exit stand-by mode;
• Remove the BT2 battery (Fig. 8);
• Reinsert the battery in the housing;
• Press and hold down keys C + 0 + E at the same time and wait for the long beep (about 5s);
• The turning off of the green LEDs will confi rm the success of the operation;
• Reassemble DIGIRAD N on the wall.
A página está carregando...
A página está carregando...
A página está carregando...
A página está carregando...
A página está carregando...
A página está carregando...
A página está carregando...
A página está carregando...
A página está carregando...
A página está carregando...
A página está carregando...
A página está carregando...
A página está carregando...
A página está carregando...
A página está carregando...
A página está carregando...
A página está carregando...
A página está carregando...
A página está carregando...
A página está carregando...
A página está carregando...
A página está carregando...
A página está carregando...
A página está carregando...
A página está carregando...
A página está carregando...
A página está carregando...
A página está carregando...
A página está carregando...
A página está carregando...
A página está carregando...
A página está carregando...
A página está carregando...
A página está carregando...
A página está carregando...
A página está carregando...
A página está carregando...
A página está carregando...
A página está carregando...
A página está carregando...
A página está carregando...
A página está carregando...
A página está carregando...
A página está carregando...
A página está carregando...
A página está carregando...
A página está carregando...
A página está carregando...
A página está carregando...
A página está carregando...
A página está carregando...
A página está carregando...
A página está carregando...
A página está carregando...
A página está carregando...
A página está carregando...
A página está carregando...
A página está carregando...
A página está carregando...
A página está carregando...
A página está carregando...
A página está carregando...
A página está carregando...
A página está carregando...
A página está carregando...
A página está carregando...
A página está carregando...
A página está carregando...
A página está carregando...
A página está carregando...
A página está carregando...
A página está carregando...
A página está carregando...
A página está carregando...
A página está carregando...
A página está carregando...
A página está carregando...
A página está carregando...
A página está carregando...
A página está carregando...
A página está carregando...
A página está carregando...
A página está carregando...
A página está carregando...
A página está carregando...
A página está carregando...
A página está carregando...
A página está carregando...
-
 1
1
-
 2
2
-
 3
3
-
 4
4
-
 5
5
-
 6
6
-
 7
7
-
 8
8
-
 9
9
-
 10
10
-
 11
11
-
 12
12
-
 13
13
-
 14
14
-
 15
15
-
 16
16
-
 17
17
-
 18
18
-
 19
19
-
 20
20
-
 21
21
-
 22
22
-
 23
23
-
 24
24
-
 25
25
-
 26
26
-
 27
27
-
 28
28
-
 29
29
-
 30
30
-
 31
31
-
 32
32
-
 33
33
-
 34
34
-
 35
35
-
 36
36
-
 37
37
-
 38
38
-
 39
39
-
 40
40
-
 41
41
-
 42
42
-
 43
43
-
 44
44
-
 45
45
-
 46
46
-
 47
47
-
 48
48
-
 49
49
-
 50
50
-
 51
51
-
 52
52
-
 53
53
-
 54
54
-
 55
55
-
 56
56
-
 57
57
-
 58
58
-
 59
59
-
 60
60
-
 61
61
-
 62
62
-
 63
63
-
 64
64
-
 65
65
-
 66
66
-
 67
67
-
 68
68
-
 69
69
-
 70
70
-
 71
71
-
 72
72
-
 73
73
-
 74
74
-
 75
75
-
 76
76
-
 77
77
-
 78
78
-
 79
79
-
 80
80
-
 81
81
-
 82
82
-
 83
83
-
 84
84
-
 85
85
-
 86
86
-
 87
87
-
 88
88
-
 89
89
-
 90
90
-
 91
91
-
 92
92
-
 93
93
-
 94
94
-
 95
95
-
 96
96
-
 97
97
-
 98
98
-
 99
99
-
 100
100
-
 101
101
-
 102
102
-
 103
103
-
 104
104
-
 105
105
-
 106
106
-
 107
107
-
 108
108


em outras línguas
- español: DEA DIGIRAD_N El manual del propietario
- français: DEA DIGIRAD_N Le manuel du propriétaire
- italiano: DEA DIGIRAD_N Manuale del proprietario
- English: DEA DIGIRAD_N Owner's manual
- русский: DEA DIGIRAD_N Инструкция по применению
- Nederlands: DEA DIGIRAD_N de handleiding
- Deutsch: DEA DIGIRAD_N Bedienungsanleitung
- polski: DEA DIGIRAD_N Instrukcja obsługi
Outros documentos
-
Dedicated Micros SD (4 & 32 Channel) Installation & Operation Guide
-
Martin 3032 Controller Manual do usuário
-
V2 Elettronica V2 Sirmo Digit Manual do proprietário
-
-
Fagor DRO 20i for EDM Manual do proprietário
-
Panasonic TXL37GN23 Instruções de operação
-
 Key Automation 580EGKTR1 Manual do usuário
-
-
Philips HTS9800W/12 Instruções de operação
-
Panasonic TXP42ST33J Instruções de operação
