Hoover UH73300 Guia de usuario
- Categoria
- Aspirador de pó
- Tipo
- Guia de usuario
Este manual também é adequado para

TABLE OF CONTENTS
Important Safety Instructions . . . . . . . . . . . . . . . . . . . . . . . . . . . . . . . .3
Assembly .................................................5
User Controls .............................................5
Getting to Know Your Hoover
®
REACT
™
QuickLift
™
Upright .........6
Available Tools and Accessories ............................7
Directions for Use: Hard Floor Duster . . . . . . . . . . . . . . . . . . . . . . .8
Directions for Use: Baseboard Duster .......................9
Hoover
®
FloorSense
™
Technology..........................10
Using the Hoover App . . . . . . . . . . . . . . . . . . . . . . . . . . . . . . . . . . . . .12
Using Your Hoover
®
REACT
™
QuickLift
™
Upright ................13
Maintenance . . . . . . . . . . . . . . . . . . . . . . . . . . . . . . . . . . . . . . . . . . . . .14
Troubleshooting . . . . . . . . . . . . . . . . . . . . . . . . . . . . . . . . . . . . . . . . . .17
Warranty Information . . . . . . . . . . . . . . . . . . . . . . . . . . . . . . . . . . . . . .18
Français.................................................19
Español . . . . . . . . . . . . . . . . . . . . . . . . . . . . . . . . . . . . . . . . . . . . . . . . .37
This manual is for models UH73300, UH73300PC, UH73300CA, UH73310, UH73311, UH73330,
UH73340 & UH73340PC.

Welcome to Hoover ownership.
Make it official.
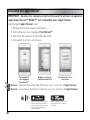
Compatible with the Hoover App.
Download the Hoover App to register your new
vacuum, customize FloorSense
™
settings,
receive filter maintenance reminders and
access tips and tricks.
Apple and the Apple logos are
trademarks
of Apple, Inc., registered
in the U.S., and other countries.
App Store is a service mark of Apple Inc.
Android, Google Play, and the
Google Play logo are
trademarks of Google Inc.
You can also register by:
Calling: 1-800-944-9200
Visiting: Hoover.com
It’s Guaranteed.
See Warranty for complete details.
TM

3
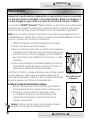
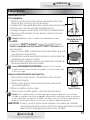
Important Safety Instructions
SAVE THESE INSTRUCTIONS.
IMPORTANT: READ CAREFULLY BEFORE ASSEMBLY AND USE. THIS PRODUCT IS INTENTED FOR HOUSE-
HOLD USE ONLY. IF USED COMMERCIALLY, WARRANTY IS VOID.
When using an electrical appliance, basic precautions should always be followed, including the following:
WARNING: TO REDUCE THE RISK OF FIRE, ELECTRIC SHOCK, DAMAGE OR INJURY:
• Fully assemble before operating.
• Operate vacuum only at voltage specified on data label on bottom of the vacuum canister.
• Do not leave appliance when plugged in. Unplug from outlet when not in use and before cleaning
or servicing.
• Do not use outdoors or on wet surfaces.
• Do not allow to be used as a toy. Not intended for use by children age 12 and under. Close attention
is necessary when used near children. To avoid injury or damage, keep children away from product,
and do not allow children to place fingers or other objects into any openings.
• Use only as described in this manual. Use only manufacturer’s recommended attachments
and products.
• Do not use with damaged cord or plug. If appliance is not working as it should, has been dropped,
damaged, left outdoors, or dropped into water, take it to a service center prior to continuing use.
• Do not pull or carry by cord, use cord as a handle, close a door on a cord or pull cord around sharp
edges or corners. Do not place product on cord. Do not run appliance over cord. Keep cord away
from heated surfaces.
• Do not unplug by pulling on cord. To unplug, grasp the plug, not the cord.
• Do not handle plug or appliance with wet hands.
• Do not put any object into openings. Do not use with any opening blocked. Keep free of dust, lint,
hair and anything that may reduce air flow.
• Keep hair, loose clothing, fingers and all parts of body away from openings and moving parts.
• Turn off all controls before unplugging.
• Use extra care when cleaning on stairs. To avoid personal injury or damage, and to prevent
the vacuum from falling, always place vacuum at the bottom of stairs on floor. Do not place
vacuum on stairs or furniture, as it may result in injury or damage. When using tools, always
ensure handle is in upright position.
• Do not use to pick up flammable or combustible liquids, such as gasoline or fine wood shavings,
or use in areas where they may be present.
• Do not pick up anything that is burning or smoking, such as cigarettes, matches or hot ashes.
• Unplug this appliance before connecting the air-powered Turbo Tool.
• Do not use without dirt cup and/or filters in place.

4
• Always turn off this appliance before connecting or disconnecting the hose or motorized nozzle.
WARNING: This product contains chemicals known to the state of California to cause cancer, birth defects or
reproductive harm.
WASH HANDS AFTER HANDLING.
CAUTION: TO REDUCE THE RISK OF DAMAGE:
• Avoid picking up hard, sharp objects with this product, as they may cause damage. Store
appropriately indoors in a dry place. Do not expose machine to freezing temperatures.
• Do not use sharp objects to clean out the hose as they can cause damage.
• With brush roll on, do not allow cleaner to sit in one location for an extended period of time, as
damage to floor can result.
WARNING: TO REDUCE THE RISK OF ELECTRIC SHOCK, THIS APPLIANCE HASA POLARIZED PLUG (ONE BLADE
IS WIDER THAN THE OTHER). THIS PLUG WILL FIT IN A POLARIZED OUTLET ONLY ONE WAY. IF
THE PLUG DOES NOT FIT FULLY IN THE OUTLET, REVERSE THE PLUG. IF IT STILL DOES NOT FIT,
CONTACT A QUALIFIED ELECTRICIAN TO INSTALL THE PROPER OUTLET. DO NOT CHANGE THE PLUG IN
ANY WAY.
This equipment has been tested and found to comply with the limits for a Class B digital device, pursuant to part
15 of the FCC Rules. These limits are designed to provide reasonable protection against harmful interference in
a residential installation. This equipment generate, uses and can radiate radio frequency energy, and if not in-
stalled and used in accordance with the instructions, may cause harmful interference to radio communications.
However, there is not guarantee that interference will not occur in a particular installation. If this equipment
does cause harmful interference to radio or television reception, which can be determined by turning the equip-
ment off and on, the user is encouraged to try to correct interference by one or more of the following measures:
• Reorient or relocate the receiving antenna.
• Increase the separation between the equipment and receiver.
• Connect the equipment into an outlet on a circuit different from that to which the receiver
is connected.
• Consult the dealer or an experienced radio/TV technician for help.
Under Industry Canada regulations, this radio transmitter may only operate using an antenna of a type and max-
imum (or lesser) gain approved for the transmitter by Industry Canada. To reduce potential radio interference to
other users, the antenna type and its gain should be so chosen that the equivalent isotropically radiated power
(e.i.r.p.) is not more than that necessary for successful communication.
Contains transmitter module IC: 12246A-BM77SPPSYC2
This device complies with Industry Canada license-exempt RSS standards(s). Operation is subject to the
following two conditions: (1) this device may not cause interference, and (2) this device must accept any
interference, including interference that may cause undesired operation of the device.

5
4
1
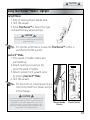
2 3 4
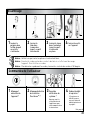
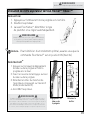
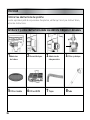
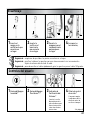
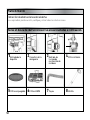
Insert wand
into the spine
until it clicks
in place.
Insert handle
into wand until it
clicks in place.
Insert hose
into canister
until it clicks
in place.
Place tools
onboard.
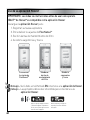
Assembly
1
Power the unit
ON/OFF.*
Power FloorSense
™
ON/OFF.*
System Check
Indicator*
Refer to the Maintenance
section or the Hoover App
for directions on how to
remove clogs.
Tip - Make sure all pieces click into place.
Tip - Wrap cord around hooks for convenient storage. Attach the plug end to the cord.
Tip - To unwrap cord quickly, rotate cord hook 180 degrees.
User Controls
Suction Control
Valve*
If vacuum is difficult to
push, open the Suction
Control Valve on the
handle.
2 31
*See page 6

6
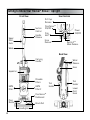
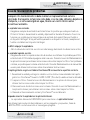
Getting to Know Your Hoover
®
REACT
™
Upright
Tool
Holder
Carrying
Handle
Separator
HEPA
Filter 2
Hose
Floor
Nozzle
Dirt Cup
Release
Handle
Release
Upper
Cord
Hook
Wand
FloorSense
TM
ON/OFF
Rinsable
Filters
Tool
Holder
FloorSense
TM
Dashboard
Headlights
QuickLift
TM
Mode Release
Hose
Release
Clog
Alert
Front View
Back View
HEPA
Filter 1
Power
ON/OFF
User Controls
Wand
Release
Suction
Control
Brush Roll
Lower
Cord
Hook

7
Pet Pe
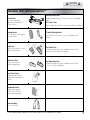
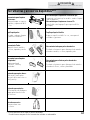
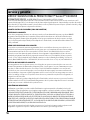
Available Tools and Accessories
***
Deluxe Crevice Tool:
Rubberized tip that protects furniture when cleaning tight
spaces.
XL Crevice Tool:
Extra-long, flexible tip that reaches into hard-to-clean spaces.
Flexible Dusting Brush:
Dust hard-to-reach surfaces such as fan blades and
blinds.
Pet Turbo Tool:
Uniquely designed to remove stubborn pet hair from
furniture, stairs, upholstery and more.
Pet Upholstery Tool:
Uniquely designed to remove stubborn pet hair from
couches, curtains and pillows.
***Tools vary by model number. Refer to hoover.com for tools included in each model.
CAUTION
Not to be used for grooming a pet.
!!
Crevice Tool:
Great for cleaning in
tight spaces and hard-to
-clean corners.
Dusting Brush:
Delicate bristles that gently
clean fine dust.
Turbo Tool:
Easily clean furniture, stairs,
upholstery and more.
Upholstery Tool:
Deep clean couches,
curtains and pillows.
Hard Floor Duster:
Gently pick up fine dust
and pet hair on hard floors
and tile.
Baseboard Duster:
Uniquely designed to
effortlessly clean fine
dust from baseboards.
Accessory Bag:
Use to store tools.

8
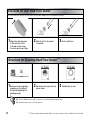
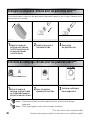
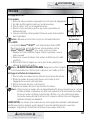
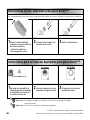
Use the Hard Floor Duster to gently pick up fine dust and pet hair on hard floors and tile.
Directions for Use: Hard Floor Duster
***
Attach tool to the end of
the wand.
Align the cleaning pad
to the bottom of the
tool and attach using
the hook and loop strips.
Dust hard floors.
Tip - Do not add bleach or fabric softener. Use mild liquid detergent only.
Tip - Avoid using on wet or sticky surfaces.
Remove cleaning pad by
stepping on the edge of
the pad and pulling the
wand upwards.
Machine wash separately in
warm water.
Tumble dry on low.
Directions for Cleaning: Hard Floor Duster
***
***Tools vary by model number. Refer to hoover.com for tools included in each model.
2 31
2 31

9
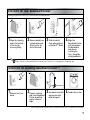
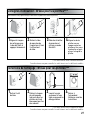
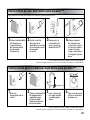
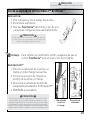
1
2 3 4
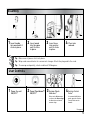
Uniquely designed to effortlessly clean fine dust from baseboards.
Remove wand from
vacuum spine and
attach tool to the
end of the wand.
Align the cleaning
pad to the bottom
of the tool by
pressing firmly.
Detach canister
from spine and use
in QuickLift
TM
Mode.
Align the
Baseboard Duster
with pad against
the baseboard
and wheels
touching the
floor, then glide
along baseboard.
Directions for Use: Baseboard Duster
***
1
1
2 3 4
Remove cleaning
pad from Baseboard
Duster by pulling
gently from one
edge.
Remove tool from
wand.
Hand wash only with
warm water and
mild detergent.
Tumble dry on low.
Directions for Cleaning: Baseboard Duster
***
1
***Tools vary by model number. Refer to hoover.com for tools included in each model.
Tip - Do not use Baseboard Duster if pad is wet. Only use if cleaning pad is completely dry.

10
Hoover
®
FloorSense
™
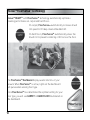
Technology
Hoover
®
REACT
TM
with FloorSense
TM
technology automatically optimizes
cleaning performance on carpet and hard floors.
On carpet, FloorSense
TM
automatically increases brush
roll speed to lift deep-down embedded dirt.
On hard floors, FloorSense
TM
automatically slows the
brush roll to prevent scattering of dirt across the floor.
The FloorSense
TM
Dashboard displays
useful functions of your
vacuum. When FloorSense
TM
is active, lights on the dashboard
will pulse when sensing floor type.
Once FloorSense
TM
has determined the optimal setting for your
floor type, you will see CARPET or HARD FLOOR illuminated on
the dashboard.

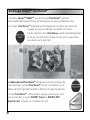
11
Hoover
®
FloorSense
™
Technology
When cleaning CARPET,
FloorSense™ automatically
increases brush roll
speed to lift deep-down
embedded dirt.
On HARD FLOOR,
FloorSense™ automatically
slows the brush roll to
prevent scattering of dirt
across the floor.
BRUSH ROLL will be
displayed when the brush
roll is jammed or overloaded.
Refer to the Maintenance
section or the Hoover App
for directions on how to
clean the brush roll.
Tip - To a
llow FloorSense™ to determine floor type and optimize brush roll speed automatically;
ensure the FloorSense™ control is in the ON position.
2 31
!!
FloorSense™
LED Dashboard
WARNING
To reduce the risk of injury from moving parts,
unplug before cleaning or servicing.

12
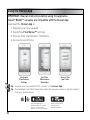
IMPORTANT: Read all instructions before using this appliance.
Hoover
®
REACT
TM
vacuums are compatible with the Hoover App
Download the Hoover App to:
1. Register your new vacuum
2. Customize FloorSense
™
settings
3. Receive filter maintenance reminders
4. Access tips and tricks
Tip - Vacuum must be powered ON to connect to the Hoover App.
Tip - The headlights will flash three times when the vacuum connects and disconnects
from your mobile device.
Using the Hoover App
Customize
FloorSense
TM
Settings
Access Tips
and Tricks
Set Filter
Maintenance
Reminders
Apple and the Apple logos are
trademarks
of Apple, Inc., registered
in the U.S., and other countries.
App Store is a service mark of Apple Inc.
Android, Google Play, and the
Google Play logo are
trademarks of Google Inc.

13
Upright Mode
1. Step on nozzle and pull handle back.
2. Turn ON vacuum.
3. Allow FloorSense™ to detect floor type
and automatically adjust settings.
Tip - For optimal performance, ensure the FloorSense™ control is
switched to the ON position.
QuickLift
TM
Mode
1. Press wand or handle release and
pull handle up.
2. Attach cleaning accessory to the
end of the wand or handle.
3. Detach canister from vacuum spine
by pressing QuickLift
TM
Mode.
4. Turn ON vacuum.
Tip - For directions on cleaning bare floors,
refer to the Hard Floor Duster section
of this manual.
Using Your Hoover
®
REACT
™
Upright
CAUTION
Use extra care when cleaning on stairs. To avoid personal
injury or damage, and to prevent the cleaner from falling,
always place cleaner at the bottom of the stairs or on
the floor. Do no place cleaner on stairs or furniture, as it
may result in injury or damage. When using tools, always
ensure handle is in the upright position.
!!
CAUTION
Not to be used for grooming a pet.
!!
CAUTION
When vacuum is reclined with brush roll switched
on, never leave the vacuum in one position for any
long period of time.
! !
Detach CanisterWand or Handle
Release

14
Any other servicing should be done by an authorized service representative.
If appliance is not working as it should, has been dropped, damaged, left outdoors,
or dropped into water, take it to a service center prior to continuing use.
Hoover
®
REACT
TM
vacuums should have regular maintenance checks to maintain
optimal performance and suction. Refer to this manual or your Hoover App to learn
how to maintain your vacuum.
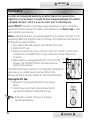
Notice: A Thermal Protector has been designed into your cleaner to protect it from
overheating. When the Thermal Protector activates, the cleaner will stop running. If
this happens proceed as follows:
1. Turn cleaner OFF and unplug it from the electrical outlet.
2. Empty the dirt cup.
3. Inspect the nozzle inlet, hose connector, hose, dirt cup inlet, cyclonic filter,
rinsable filters and HEPA filters for any obstructions. Clear obstructions
if present.
4. When cleaner is unplugged and motor cools off for 30
minutes, the Thermal Protector will deactivate and
cleaning may continue.
If the Thermal Protector continues to activate after following the
above steps, your cleaner needs servicing. Refer to the
Warranty section in the user manual for servicing information.
Emptying the Dirt Cup:
1. Remove dirt cup by pressing the dirt cup release
button.
2. Hold dirt cup over a trash can and press the dirt
cup trap door release to empty the dirt cup.
Tip - Empty dirt cup after every use to maintain
optimal performance.
Maintenance
WARNING
To reduce the risk of personal injury, unplug before cleaning or servicing.
!!
WARNING
Do not use vacuum without dirt cup and dry filters.
!!
Dirt Cup Release
Empty Dirt Cup

15
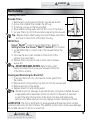
Cleaning the Filters:
Rinsable Filters
1. Remove dirt cup by pressing the dirt cup release button.
2. Access the rinsable filters under the dirt cup.
3. To remove, pull up on the tab provided.
4. Rinse under running water until all dirt is out of the filters.
5. Let your filters dry for 24 hours before replacing into vacuum.
Tip - Replace filters when heavily discolored. Make sure filters
are flush to the bottom of the filter housing.
HEPA Filters
Hoover
®
REACT
™
products have 2 HEPA filters. Refer to
Getting to Know Your Hoover
®
REACT
™
QuickLift
™
for location.
1. Locate HEPA filters on each side of the vacuum below the
dirt cup.
2. Unscrew the vent cover located on the bottom of the
canister to access filters.
3. Remove filters and tap on side of trash can to release
excess dirt.
Tip -
DO NOT RINSE HEPA FILTERS. Replace filters when
heavily
discolored. Do not use your vacuum without all
of the filters in place.
Cleaning and Maintaining the Brush Roll:
1. To access the brush roll, unscrew the nozzle guard from
the nozzle.
2.
Remove brush roll by pulling it up and out from the vacuum belt.
3. Remove any hair or blockages.
4. Replace brush roll and nozzle guard.
Tip - Rotate brush roll manually to ensure the belt is properly installed. Vacuum
is equipped with an automatic brush roll shutoff in the event of overload
or jam. Check for obstructions in the brush roll area and remove any
obstructions. When obstructions are cleared, resume cleaning as normal.
LUBRICATION: The motor and brush roll are equipped with bearings which contain
sufficient lubrication for their lifetime. The addition of lubrication could cause damage.
Do not add lubricant to motor or brush roll.
Maintenance
WARNING
To reduce the risk of personal injury, unplug before cleaning or servicing.
!!
CAUTION
To reduce the risk of injury from moving parts,
do not use vacuum without dirt cup or dry filters.
!!
Dirt Cup Release
Remove Filter
Clean Brush Roll

16
CAUTION
To reduce the risk of injury from moving parts,
unplug before cleaning or servicing.
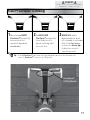
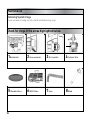
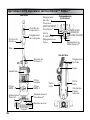
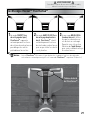
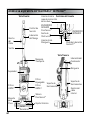
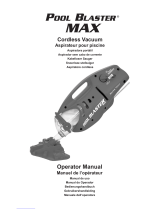
Removing System Clogs
If your vacuum is losing suction, check and remove any clogs.
Maintenance
1
2 3 4
Hose connectorNozzle inlet Dirt cup inlet
Check for clogs in the areas highlighted below.
1
Cyclonic filter
1
6 7
5
HEPA filtersRinsable filters
Hose
8
Wand

17
Any other servicing should be done by an authorized service representative.
If appliance is not working as it should, has been dropped, damaged, left outdoors,
or dropped into water, take it to a service center prior to continuing use.
Vacuum will not turn ON.
Always be sure to plug it in firmly. A Thermal Protector may have been activated
- unplug and let vacuum cool for 30 minutes. If this does not work, there may be no
voltage in the wall plug. Check fuse or breaker in home. If there is a blown fuse or
tripped breaker, replace fuse or reset breaker in home.
My vacuum is hard to push.
Open the Suction Control Valve near the handle by sliding the valve up.
My vacuum is losing suction.
Be sure to empty the dirt cup if it is full. You may have a clogged filter. Your filter
should be rinsed every 4-6 uses. Refer to the Maintenance section or the Hoover App
for directions on how to clean your filters.
If problem persists, you may have a clog in the system. Refer to Maintenance in the
user manual for directions on removing clogs.
My brush roll is not spinning or FloorSense
TM
dashboard is not displaying correctly.
1. Unplug and remove any hair or other blockages around the brush roll if FloorSense™
is displaying “HARD FLOOR” while on carpet.
2. Clean filters. Refer to the Maintenance section or the Hoover App for directions on
how to clean filters.
3. Check for clogs in the system. Refer to the Maintenance section or the Hoover App for
directions on how to clean filters.
4. Resume normal operation and FloorSense™ will reset.
I can’t connect my vacuum to the Hoover App.
Vacuum must be powered ON to connect to the Hoover App.
For more troubleshooting or FAQ’s please call: 1-800-944-9200 or visit hoover.com if you have
any questions.
Troubleshooting Guide
WARNING
To reduce the risk of personal injury, unplug before cleaning or servicing.
!!
CAUTION
To reduce the risk of injury from moving parts,
unplug before cleaning or servicing.
!!

18
SERVICE & WARRANTY FOR HOOVER
®
REACT
™
QuickLift
™
PRODUCT
SERVICE INFORMATION
REPRESENTATIVE Call 1-800-944-9200 USA & Canada
In the event that further assistance is required, visit and authorized service center. Find one nearest you by visiting our website at www.
hoover.com. Costs of any transportation to and from any place of repair are to be paid by the owner. Always identify your product
by the model number and manufacturing code when requesting information or ordering replacement parts. (the model number and
manufacturing code for the vacuum appears on the bottom of the canister.)
LIMITED FIVE YEAR WARRANTY (DOMESTIC USE)
WHAT THIS WARRANTY COVERS
When used and maintained in normal household use and in accordance with the Owner’s Manual, your HOOVER
®
product is warranted against original defects in material and workmanship for a full five year from date of purchase
(the “Warranty Period”). During the Warranty Period, Hoover
®
will provide labor and parts, at no cost to you, to
correct any such defect in products purchased in the United States, U.S. Military Exchanges and Canada.
HOW TO MAKE A WARRANTY CLAIM
If this product is not as warranted, take or send the product to either a Hoover
®
Sales and Service Center or Hoover
®
Authorized Warranty Service Dealer along with proof of purchase. For an automated referral to authorized service
outlets in the U.S.A., phone: 1-800-944-9200 OR visit Hoover
®
online at www.hoover.com. For additional assistance
or information concerning this Warranty or the availability of warranty service outlets, phone the Hoover
®
Consumer
Response Center, Phone 1-800-944-9200, Mon-Fri 8am-7pm EST. In Canada, contact Hoover
®
Canada, Carson
Building, 100 Carson St., Etobicoke, Ontario M8W 3R9, Phone: 1-800-944- 9200, Mon-Fri 8am-7pm EST.
WHAT THIS WARRANTY DOES NOT COVER
This Warranty does not cover: use of the product in a commercial operation (such as maid, janitorial and equipment rental services),
filter, brush roll, belt, improper maintenance of the product, damage due to misuse, acts of God, nature, vandalism or other acts
beyond the control of Hoover
®
, owner’s acts or omissions, use outside the country in which the product was initially purchased and
resales or transfers of the product by the original owner. This warranty does not cover pick up, delivery, transportation or house calls.
However, if you mail your product to a Hoover
®
Sales and Service Center for warranty service, cost of shipping will be paid one way.
This warranty does not apply to products purchased outside the United States, including its territories and
possessions, outside a U.S. Military Exchange and outside of Canada. This warranty does not cover products
purchased from a party that is not an authorized retailer, dealer, or distributor of Hoover
®
products.
OTHER IMPORTANT TERMS
This Warranty is not transferable and may not be assigned. This Warranty shall be governed and construed under the laws of
the state of Ohio. The Warranty Period will not be extended by any replacement or repair performed under this Warranty.
THIS WARRANTY IS THE EXCLUSIVE WARRANTY AND REMEDY PROVIDED BY HOOVER
®
. ALL OTHER WARRANTIES,
EXPRESSED OR IMPLIED, INCLUDING WARRANTlES OF MERCHANTABILITY OR FITNESS FOR PARTICULAR PURPOSE, ARE
DISCLAIMED. IN NO EVENT WILL HOOVER BE LIABLE FOR ANY SPECIAL, INDIRECT, INCIDENTAL OR CONSEQUENTIAL
DAMAGES OF ANY KIND OR NATURE TO OWNER OR ANY PARTY CLAlMlNG THROUGH OWNER, WHETHER BASED IN
CONTRACT, NEGLIGENCE, TORT OR STRICT PRODUCTS LIABILITY OR ARISING FROM ANY CAUSE WHATSOEVER.
Some states do not allow the exclusion of consequential damages, so the above exclusion may not apply to you. This
warranty gives you specific rights; you may also have others that vary from state to state.
Service & Warranty

19
Consignes de sécurité importantes...........................21
Assemblage..............................................23
Commandes de l’utilisateur.................................23
Apprivoiser votre aspirateur vertical Hoover
MD
REACT
MC
QuickLift
MC
...............................................24
Outils et accessoires offerts . . . . . . . . . . . . . . . . . . . . . . . . . . . . . .25
Consignes d’utilisation : Brosse pour les planchers durs . . . . . .26
Consignes d’utilisation : Brosse pour les plinthes ............27
Technologie Hoover
MD
FloorSense
MC
........................28
Utilisation de l’appli Hoover ................................30
Utilisation de votre aspirateur vertical Hoover
MD
REACT
MC
QuickLift
MC
. . . . . . . . . . . . . . . . . . . . . . . . . . . . . . . . . . . . . . . . . . . . . . .31
Entretien ................................................32
Dépannage . . . . . . . . . . . . . . . . . . . . . . . . . . . . . . . . . . . . . . . . . . . . . .35
Renseignements sur la garantie .............................36
Ce manuel est pour les modeles UH73300, UH73300PC, UH73300CA, UH73310, UH73311,
UH73330, UH73340 & UH73340PC.
CONTENU

20
Bienvenue chez Hoover.
Devenez officiellement propriétaire.
Compatible avec l’appli Hoover.
Téléchargez l’appli Hoover pour enregistrer
votre nouvel aspirateur, personnaliser
vos réglages FloorSense
MC
, recevoir des
rappels d’entretien du filtre et consulter les
trucs et astuces.
Apple et le logo Apple sont des marques
déposées d’Apple Inc., et des marques
déposées aux États-Unis et dans d’autres
pays. App Store est une marque de
commerce d’Apple Inc.
Android, Google Play et le logo Google
Play sont des marques de commerce
de Google Inc.
L’enregistrement de votre
produit est aussi possible :
par téléphone : +1 800 944-9200
sur le Web : Hoover.com
C’est garanti.
Consultez la garantie pour
obtenir plus de détails.
TM
A página está carregando...
A página está carregando...
A página está carregando...
A página está carregando...
A página está carregando...
A página está carregando...
A página está carregando...
A página está carregando...
A página está carregando...
A página está carregando...
A página está carregando...
A página está carregando...
A página está carregando...
A página está carregando...
A página está carregando...
A página está carregando...
A página está carregando...
A página está carregando...
A página está carregando...
A página está carregando...
A página está carregando...
A página está carregando...
A página está carregando...
A página está carregando...
A página está carregando...
A página está carregando...
A página está carregando...
A página está carregando...
A página está carregando...
A página está carregando...
A página está carregando...
A página está carregando...
A página está carregando...
A página está carregando...
A página está carregando...
A página está carregando...
-
 1
1
-
 2
2
-
 3
3
-
 4
4
-
 5
5
-
 6
6
-
 7
7
-
 8
8
-
 9
9
-
 10
10
-
 11
11
-
 12
12
-
 13
13
-
 14
14
-
 15
15
-
 16
16
-
 17
17
-
 18
18
-
 19
19
-
 20
20
-
 21
21
-
 22
22
-
 23
23
-
 24
24
-
 25
25
-
 26
26
-
 27
27
-
 28
28
-
 29
29
-
 30
30
-
 31
31
-
 32
32
-
 33
33
-
 34
34
-
 35
35
-
 36
36
-
 37
37
-
 38
38
-
 39
39
-
 40
40
-
 41
41
-
 42
42
-
 43
43
-
 44
44
-
 45
45
-
 46
46
-
 47
47
-
 48
48
-
 49
49
-
 50
50
-
 51
51
-
 52
52
-
 53
53
-
 54
54
-
 55
55
-
 56
56


Hoover UH73300 Guia de usuario
- Categoria
- Aspirador de pó
- Tipo
- Guia de usuario
- Este manual também é adequado para
em outras línguas
- español: Hoover UH73300 Guía del usuario
- français: Hoover UH73300 Mode d'emploi
- English: Hoover UH73300 User guide
Artigos relacionados
-
Hoover UH74205 Manual do usuário
-
-
-
-
-
-
-
-
Hoover WH10600 Manual do proprietário
-
Outros documentos
-
Pulsar PEGA14 Manual do proprietário
-
 Riccar Prima Power Team Manual do proprietário
-
 Riccar R60 Broom Vacuum Manual do usuário
-
Morphy Richards PERFORMAIR CYCLONIC VACUUM CLEANER 71062 Manual do proprietário
-
 Water Tech Pool Blaster Manual do usuário
-
Shark Professional Commercially Rated Upright Vacuum UV210N, UV210BSN, UV210BVN Manual do usuário
-
Dirtdevil BD22050 Manual do usuário
-
Shark NV682 Manual do usuário
-


