Shark NV682 Manual do usuário
- Categoria
- Aspirador de pó
- Tipo
- Manual do usuário

®
www.PoweredLiftAway.com
1.800.798.7398
Model/Modèle/Modelo
NV682

1
www.PoweredLiftAway.com
TECHNICAL SPECIFICATIONS:
Voltage: 120V., 60Hz
Watts: 800W
Amps: 6.7A
Contents
Getting to Know Your Shark Rotator
®
Lift-Away
™
Speed .................................................................................................3
Assembly ...........................................................................................................................................................................4
Upright Cleaning ...............................................................................................................................................................5
What Does the Brushroll Indicator Light Mean? ..............................................................................................................5
Above Floor Cleaning . ......................................................................................................................................................6
Changing Floor Nozzles .....................................................................................................................................................7
Powered Lift-Away Cleaning ............................................................................................................................................8
Lift-Away Cleaning ............................................................................................................................................................8
Canister Cleaning ............................................................................................................................................................9
Maintenance ..................................................................................................................................................................10
Emptying the Dust Cup.................................................................................................................................................10
Cleaning the Filters ......................................................................................................................................................10
Checking for Blockages ................................................................................................................................................11
Troubleshooting Guide ....................................................................................................................................................12
Warranty .........................................................................................................................................................................12
Contenu
Índice
SPÉCIFICATIONS TECHNIQUES :
Tension : 120V., 60Hz
Watts : 800W
Ampères : 6.7A
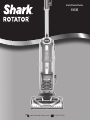
Thank you for
purchasing the Shark
Rotator
®
Powered
Lift-Away
™
Speed.
Merci d’avoir fait
l’achat de l’aspirateur
Shark Rotator
MD
Powered Lift-Away
MC
Speed.
Gracias por haber
comprado la aspiradora
Shark Rotator
®
Powered Lift-Away
™
Speed.
ESPECIFICACIONES TÉCNICAS :
Voltaje: 120V., 60Hz
Potencia : 800W
Amperes : 6.7A
Apprendre à connaître votre aspirateur Shark Rotator
MD
Powered Lift-Away
MC
Speed ................................................14
Assemblage.....................................................................................................................................................................15
Nettoyage vertical...........................................................................................................................................................16
Que signifient les couleurs du témoin de la brosse motorisée?.....................................................................................16
Nettoyage sur surface élevée . .......................................................................................................................................17
Changer les embouts pour plancher ...............................................................................................................................18
Nettoyage motorisé Lift-Away ........................................................................................................................................19
Nettoyage Lift-Away .......................................................................................................................................................19
Nettoyage du traîneau ..................................................................................................................................................20
Entretien .........................................................................................................................................................................21
Vider le récipient à poussière ......................................................................................................................................21
Nettoyer les filtres .......................................................................................................................................................21
Vérification des obstructions .......................................................................................................................................22
Guide de dépannage .......................................................................................................................................................23
Garantie...........................................................................................................................................................................23
Partes de su Shark Rotator
®
Powered Lift-Away
™
Speed ..............................................................................................25
Armado ............................................................................................................................................................................26
Limpieza en modo vertical ..............................................................................................................................................27
¿Qué significa la luz indicadora del cepillo motorizado? ................................................................................................27
Para limpiar por encima del piso . ..................................................................................................................................28
Para cambiar las boquillas para piso ..............................................................................................................................29
Para limpiar con el Lift-Away motorizado .......................................................................................................................30
Limpieza con el Lift-Away ...............................................................................................................................................30
Limpieza en modo compacta .......................................................................................................................................31
MANTENIMIENTO ........................................................................................................................................................32
Vaciado del recipiente de la tierra ...............................................................................................................................32
Limpie los filtros ...........................................................................................................................................................32
Verificación de obstrucciones ......................................................................................................................................33
Guía de solución de problemas.......................................................................................................................................34
Garantía...........................................................................................................................................................................34
English Français Español

1.800.798.7398
2
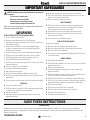
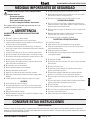
IMPORTANT SAFEGUARDS
FOR HOUSEHOLD USE ONLY
READ ALL INSTRUCTIONS BEFORE USE
SAVE THESE INSTRUCTIONS
POLARIZED PLUG
To reduce the risk of electric shock, this vacuum cleaner has a polarized plug (one blade is wider than the other). As a safety feature, this plug will fit into a
polarized outlet only one way. If the plug does not fit fully into the outlet, reverse the plug. If it still does not fit, contact a qualified electrician. DO NOT force into
outlet or try to modify to fit.
IMPORTANT SAFEGUARDS
CAUTION: The Power nozzle, wand, and handle contain electrical
connections:
- These are not serviceable parts.
- Do not use to vacuum any liquids.
- Do not immerse in water when cleaning.
- If handle/wand is damaged, discontinue use.
English
When using an electrical appliance, basic safety precautions should always
be observed, including the following:
WARNING
TO REDUCE THE RISK OF FIRE, ELECTRIC SHOCK OR INJURY:
1 DO NOT use outdoors or on wet surfaces.
2 Unplug from electrical outlet when not in use and before servicing.
3 Inspect power cord or plug for any damage before use. DO NOT use vacuum cleaner
with a damaged cord or plug.
4 If vacuum cleaner is not working as it should, has been dropped, damaged,
left outdoors, or dropped into water, return it to SharkNinja Operating LLC for
examination, repair, or adjustment.
5 The hose contains electrical wires. Do not use when damaged, cut or punctured.
6 DO NOT pull or carry vacuum cleaner by the cord or use the cord as a handle.
7 DO NOT unplug by pulling on cord; to unplug, grasp the plug, not the cord.
8 DO NOT handle plug or vacuum cleaner with wet hands.
9 DO NOT run the vacuum cleaner over the power cord, close a door on the cord or pull
cord around sharp corners.
10 The use of an extension cord is not recommended.
11 DO NOT leave vacuum cleaner when plugged in.
12 Keep cord away from heated surfaces.
13 Turn off all controls before plugging or unplugging the vacuum cleaner.
14 Always turn off this appliance before connecting or disconnecting either the hose or
motorized nozzle.
15 Store your vacuum cleaner with the power cord secured around the two cord holders.
GENERAL USE
16 Use only as described in this manual.
17 DO NOT put any objects into openings. DO NOT use with any opening blocked; keep
free of dust, lint, hair, and anything that may reduce air flow.
18 Keep your work area well lit.
19 Keep the vacuum cleaner moving over the carpet surface at all times to avoid
damaging the carpet fibers.
20 DO NOT place vacuum cleaner on unstable surfaces such as chairs or tables.
21 DO NOT allow young children to operate the vacuum cleaner or use as a toy. Close
attention is necessary when used near children.
22 DO NOT use without dust cup and/or filters in place.
HOSE ATTACHMENTS
23 DO NOT use if air flow is restricted; if the air paths or the motorized floor nozzle
become blocked, turn the vacuum cleaner off and unplug from electrical outlet.
Remove all obstructions before you turn on the unit again.
24 Keep the end of the hose and accessory openings away from face and body.
25 Keep cleaning tools and hose suction openings away from hair, face, fingers,
uncovered feet, or loose clothing.
26 Only use manufacturer’s recommended attachments.
DUST CUP/FILTERS/ACCESSORIES
Before turning on the vacuum:
27 Make sure that all filters are thoroughly dry after routine cleaning.
28 Make sure that dust cup and all filters are in place after routine maintenance.
29 Make sure accessories are free of blockages.
30 Only use filters and accessories provided by SharkNinja Operating LLC. [Failure to do
so will void the warranty.]
GENERAL CLEANING
31 DO NOT pick up large-sized objects.
32 DO NOT pick up hard or sharp objects such as glass, nails, screws or coins that could
damage the vacuum cleaner.
33 DO NOT use to pick up drywall dust.
34 DO NOT pick up smoking or burning objects such as hot coals, cigarette butts,
fireplace ash or matches.
35 DO NOT pick up flammable or combustible materials such as lighter fluid, gasoline, or
kerosene or use vacuum in areas where they may be present.
36 DO NOT pick up toxic solutions such as chlorine bleach, ammonia, or drain cleaner.
37 DO NOT use in an enclosed space where vapors are present from paint, paint thinner,
moth-proofing substances, flammable dust or other explosive or toxic materials.
38 DO NOT vacuum up any liquids.
39 DO NOT immerse vacuum cleaner in water or other liquids.
40 DO NOT use outdoors or on wet surfaces; use only on dry surfaces.
41 Use extra care when cleaning on stairs.
42 Remove brushroll from unit before rinsing.

www.PoweredLiftAway.com
3
G
ETTING TO KNOW YOUR SHARK ROTATOR
®
POWERED LIFT-AWAY
™
SPEED
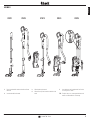
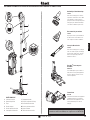
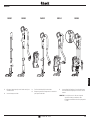
Canister Caddy
XCY680PB
Transform your Rotator into a fully powered
canister, giving you the freedom to roll the
pod along while keeping cleaning tools
close by.
Pet Multi-Tool
187FLI680
Two cleaning tools in one. The stiff bristle
brush gets stuck-on debris off a multitude of
surfaces. Remove the bristles to reveal an
upholstery tool for removing stubborn pet
hair from upholstery and more.
Pet Power Brush
188FLI680
Designed for removal of pet hair and ground
in dirt from carpeted stairs and upholstery.
Duster Crevice
189FLI680
Two cleaning tools in one. The crevice tool
gives you extended cleaning reach for small
spaces, while the dusting brush cleans a
multitude of surfaces.
Dust Away
™
Pro & Microfiber Pad
XGEN680PB
Durable enough for big crumbs and debris,
but gentle enough for the most delicate
dusting on hard wood and tile floors.
Looking for more accessories and replacement parts?
Check out www.PoweredLiftAway.com or call 1-800-798-7398.
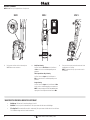
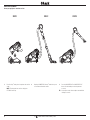
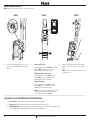
1
3
9
5
6
10
2
Wand Release
7
8
11
4
12
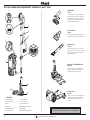
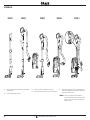
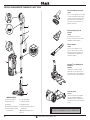
MAIN UNIT
1 Surface Selector
2 Suction Control
3 Hose
4 Hose Clip
5 Upper Cord Hook
6 Power Switch
7 Wand Release
8 Lift-Away Pod
9 Lower Cord Hook
10 Motorized Floor Nozzle
11 Headlights
12 Brushroll Indicator Light

1.800.798.7398
4
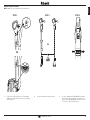
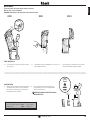
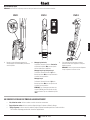
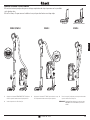
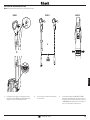
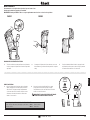
ASSEMBLY
1 Place the selected floor nozzle on the floor and insert
the wand.
2 Insert the handle into the wand.
3 Slide the pod onto the wand.
4 Slide the hose clip into the notch at the back of the
wand.
5 Insert the duster crevice and pet-multi tool into the
accessory posts as shown.
TIP: For quick cord access, rotate upper hook down and
remove cord. Rotate back for cord storage.
STEP 1 STEP 2 STEP 3 STEP 4 STEP 5
English
SLIDE
CLICK

5
www.PoweredLiftAway.com
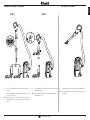
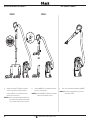
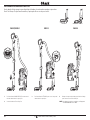
UPRIGHT CLEANING
NOTE: DO NOT use to pick up drywall dust or fireplace ash.
1 Plug in power cord into electrical outlet and press
POWER button to turn vacuum on.
2 Hard Floor Cleaning
Set Floor Selector to Hard Floor and Suction Control
to Max for full suction or variable depending on user
preference.
Thick Carpet & Area Rugs Cleaning
Set Floor Selector to Carpet and Suction Control to
Min for reduced suction or variable depending on user
preference.
Carpet Cleaning
Set Floor Selector to Carpet and Suction Control to Max
for full suction or variable depending on user preference.
NOTE: For deep cleaning per ASTM F 608 (embedded dirt in
carpets) please set to Carpet and Suction Control to Max.
3 Place your left foot gently on the floor nozzle and tilt the
handle back to start cleaning.
NOTE: The brushroll will only spin once the vacuum is
reclined back.
STEP 1 STEP 2 STEP 3
Suction Control
Floor Selector
MinMax
WHAT DOES THE BRUSHROLL INDICATOR LIGHT MEAN?
• Solid Green: The brushroll is on and working as it should.
• Solid Red: There is a jam in the brushroll area. Turn your vacuum off and remove the blockage.
• *Flashing Red: The motorized floor nozzle is overheating. Turn your vacuum off and wait for it to cool down.
*See Troubleshooting section for further instructions.

1.800.798.7398
6
English
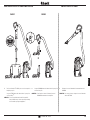
ABOVE FLOOR CLEANING
NOTE: DO NOT use to pick up drywall dust or fireplace ash.
1 For above floor cleaning with the hose, press the WAND or
HANDLE release (depending on the amount of reach required)
then lift handle up.
2 Insert wand or handle directly into desired tool. 3 This unit is equipped with SUCTION CONTROL to help when
dusting delicate objects or drapery. Located at base of the
handle, slide the SUCTION CONTROL tab to minimize suction.
Be sure to close again for maximum suction.
OR
STEP 1 STEP 2 STEP 3
Wand Release
OR
Suction Control
MinMax

7
www.PoweredLiftAway.com
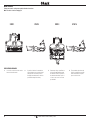
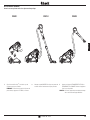
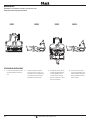
CHANGING FLOOR NOZZLES
1 Press the WAND RELEASE button to remove the wand
from the motorized floor nozzle.
2 Insert the wand into the Dust Away Pro.
3 Press the LIFT-AWAY button to lift the pod off the
motorized floor nozzle.
4 Place the pod onto the wand and slide down to connect
to the Dust Away Pro.
NOTE: For best results, ensure that the SUCTION CONTROL
is set to MAX.
Wand Release
CLICK
Use the motorized floor nozzle for deep cleaning carpets and picking up large debris on hard floors.
Use the Dust Away
™
Pro to pick
up debris and wipe away fine dust in one easy step.
STEP 1/STEP 2 STEP 3 STEP 4
DUST AWAY PRO
MOTORIZED FLOOR NOZZLE

1.800.798.7398
8
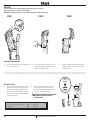
1 Press LIFT-AWAY button to lift the pod off the floor
nozzle.
Insert the WAND into either the motorized floor nozzle
or the Dust Away
™
Pro.
TIP: Using the vacuum in Powered Lift-Away mode gives you
extended reach for cleaning under furniture and in tight
spaces.
2 Insert the HANDLE into either the motorized floor nozzle
or the Dust Away Pro.
TIP: Attaching the HANDLE directly into the nozzles makes
cleaning stairs easy.
1 Attach the desired accessory directly into the HANDLE.
TIP: For an extended reach, attach the desired accessory into
the WAND.
POWERED LIFT-AWAY
™
CLEANING
Wand Release
LIFT-AWAY
™
CLEANING
English
STEP 1 STEP 2
OR
OR

9
www.PoweredLiftAway.com
CLICK
CANISTER CLEANING
Convert your upright to a convenient canister
1 From Lift-Away
™
mode, place the pod onto the canister
caddy.
NOTE: To release pod from canister caddy, press
LIFT-AWAY and lift up.
2 Cleaning in POWERED Lift-Away
™
mode allows you to
still use the motorized floor nozzle.
3 Press the WAND RELEASE or HANDLE RELEASE
button. Lift the handle up and attach preferred
accessory.
TIP: Use the posts on the canister caddy to store additional
cleaning accessories.
STEP 1 STEP 2 STEP 3

1.800.798.7398
10
RECOMMENDED FILTER CLEANING SCHEDULE:
Pre-motor Filter Kit (Foam & Felt): XFF680 Every 3 months
Post Motor Filter: XHF680 Every year
English
EMPTY THE DUST CUP
1 Pull up on the dust cup release latch and lift the dust
cup off the pod.
2 Holding the dust cup over a garbage bag or can, press the
bottom empty release latch.
3 Press the top dust cup release latch to access the dust
screen and remove built-up debris as required.
HEPA
CLEAN THE FILTERS
1 With the dust cup removed, remove and rinse the foam
and felt filters every 3 months. Let air dry completely
before replacing. Hand wash only. Tap loose dirt off
filters between washes as needed.
2 Once a year open the filter grill and remove and
rinse the HEPA filter. Let air dry completely before
replacing. Hand wash only.
IMPORTANT: DO NOT PICK UP FIREPLACE ASH
OR DRYWALL DUST.
MAINTENANCE
To keep your vacuum’s suction power optimal, follow these instructions.
Make sure unit is off and cord unplugged.
IMPORTANT: Allow ALL filters to dry completely before replacing into the vacuum.
STEP 1 STEP 2 STEP 3
FELT FILTER
FOAM FILTER
FILTER FRAME

11
www.PoweredLiftAway.com
MAINTENANCE
To keep your vacuum’s suction power optimal, follow these instructions.
Make sure unit is off and cord unplugged.
CHECK FOR BLOCKAGES
1 Use a coin to unlock the 3 locks on the
bottom of the floor nozzle.
2 A portion of the base is removable to
allow for better access to the brushroll
and exposure to the airway. Shine a
flashlight from the bottom to check for
possible blockage in the airway.
3 Remove any string, carpet fibers or
hair that may be wrapped around
the brushroll. There is a groove on
the brush bar that allows a pair of
scissors to cut across it to loosen
up the debris.
4 To reassemble, replace base by
lining it up along the front of the
nozzle. Push down to snap into
place. Lock the 3 locks.
STEP 1 STEP 2 STEP 4STEP 3

1.800.798.7398
12
TROUBLESHOOTING GUIDE
Customer Service: 1-800-798-7398
English
SharkNinja Operating LLC warrants this product to be free from material defects and workmanship for a period of seven (7) years from the date of purchase when utilized for normal household use, subject to the following
conditions, exclusions and exceptions.
The liability of SharkNinja Operating LLC is limited solely to the cost of the repair or replacement of the unit at our option. This Limited Warranty does not cover normal wear of parts and does not apply to any unit that
has been tampered with or used for commercial purposes. This Limited Warranty does not cover damage caused by misuse, abuse, negligent handling or damage due to faulty packaging or mishandling in transit. This
Limited Warranty does not cover damage or defects caused by or resulting from damages from shipping or repairs, service or alteration to the product or any of its parts, which have been performed by a repair person not
authorized by SharkNinja Operating LLC.
If your appliance fails to operate properly while in use under normal household conditions within the warranty period, you may return the complete appliance and accessories with proof of purchase and date, freight
prepaid. For assistance with warranty service options or customer support, please call our customer care and product specialists at 1-800-798-7398 or visit our website at www.sharkrocket.com.
If the appliance is found by SharkNinja Operating LLC to be defective, in SharkNinja Operating LLC’s sole discretion, we will repair or replace it free of charge. Proof of purchase is required and a fee of $19.95 will apply
to cover the cost of return freight.*
Non-durable parts including, without limitation, filters, brushes and electrical parts which normally require replacement are specifically excluded from warranty.
This Limited Warranty is extended to the original purchaser of the unit and excludes all other legal, implied and/or conventional warranties. The responsibility of SharkNinja Operating LLC if any, is limited to the specific
obligations expressly assumed by it under the terms of this Limited Warranty. In no event is SharkNinja Operating LLC liable for incidental or consequential damages to anyone of any nature whatsoever. Some states do
not permit the exclusion or limitation of incidental or consequential damages, so the above may not apply to you.
This Limited Warranty gives you specific legal rights, and you may also have other rights which vary from state to state or province to province.
*IMPORTANT: Carefully pack item to avoid damage in shipping. Be sure to include proof of purchase date and to attach a tag to item before packing including your name, complete address and phone number with a note
giving purchase information, model number and what you believe is the problem with the item. We recommend you insure the package (as damage in shipping is not covered by your warranty). Mark the outside of your
package “ATTENTION CUSTOMER SERVICE”.
Shark and Rotator are registered trademarks of SharkNinja Operating LLC.
Lift-Away and Dust-Away are trademarks of SharkNinja Operating LLC.
SEVEN-YEAR (7) LIMITED WARRANTY
Vacuum is not picking up dirt. No suction or light suction • Check filters to see if they need cleaning. Follow instructions for rinsing and drying the filters before re-inserting back into the vacuum.
• Dust cup may be full; empty dust cup.
• Check hose, hose connections, nozzles, and accessories for blockages; clear blockages if required.
• Remove any string, carpet fibers or hair that may be wrapped around the brushroll.
Vacuum lifts area rugs • Turn off the unit to disengage the brushroll and restart with the POWER button for suction only cleaning.
• Suction is powerful. Take care when vacuuming area rugs or rugs with delicately sewn edges.
• Turn off the unit and disengage the area rug from the brushroll and restart the unit.
Brushroll does not spin • If brushroll indicator light on the floor nozzle turns red, the brushroll has stopped spinning. Immediately turn off and unplug vacuum,
disconnect the nozzle and remove blockage before reconnecting and turning vacuum back on.
• Pull the handle toward you and release the floor nozzle to disengage the auto-off feature.
• Make sure that the carpet height selector is not on the HARD FLOOR setting.
• Immediately turn off and unplug vacuum, disconnect the nozzle and remove blockage before reconnecting and turning vacuum back on.
Vacuum turns off on its own or indicator light flashes red • This vacuum cleaner is equipped with a motor protective thermostat. If for some reason your vacuum overheats, the thermostat will
automatically turn the suction motor off. Should this occur, perform the following steps to restart the thermostat:
1. Turn the unit off.
2. Unplug the vacuum.
3. Empty the dust cup and clean filters (see page previous page)
4. Check for blockages in hose, accessories and inlet openings.
5. Allow the unit to cool for a minimum of 45 minutes.
6. Plug in the vacuum.
7. Restart the unit by turning the power on.
Note: If vacuum still does not start, contact Customer Service at: 1-800-798-7398.

13
www.PoweredLiftAway.com
MESURES DE PROTECTION IMPORTANTES
POUR USAGE DOMESTIQUE SEULEMENT
CONSERVEZ CES INSTRUCTIONS
FICHE POLARISÉE
Pour réduire le risque de chocs électriques, cet aspirateur possède une fiche polarisée (une lame est plus large que l’autre). Par mesure de sécurité, cette fiche ne peut être insérée
que d’un seul côté dans une prise polarisée. Si la fiche ne s’insère pas complètement dans la prise de courant, inversez-la. Si cela ne fonctionne toujours pas, contactez un électricien
qualifié. NE FORCEZ PAS ou ne modifiez pas la fiche pour la brancher dans une prise de courant.
MISE EN GARDE : Le bout motorisé, le tuyau et la poignée contiennent
des connexions électriques :
- Il n’y a aucune pièce pouvait faire l’objet d’un entretien ou d’une
réparation.
- N’utilisez pas l’appareil pour aspirer tout liquide.
- Ne plongez pas l’appareil dans l’eau lors de son nettoyage.
- Si le tuyau ou la poignée s’endommagent, arrêtez d’utiliser l’aspirateur.
LISEZ TOUTES LES INSTRUCTIONS AVANT L’UTILISATION
Lorsque vous utilisez un appareil électrique, des précautions concernant la
sécurité doivent toujours être observées, incluant celles qui suivent :
AVERTISSEMENT
POUR RÉDUIRE LE RISQUE D’INCENDIE, DE CHOCS ÉLECTRIQUES OU DE BLESSURES :
1 N’UTILISEZ PAS à l’extérieur ou sur des surfaces mouillées.
2 Débranchez l’aspirateur de la prise de courant lorsqu’il n’est pas utilisé et avant tout entretien.
3 Inspectez le cordon ou la fiche électrique pour tout dommage avant d’utiliser l’aspirateur.
N’UTILISEZ PAS l’aspirateur si le cordon ou la fiche est endommagée.
4 Si l’aspirateur ne fonctionne pas comme il se doit, a été échappé, endommagé, laissé à
l’extérieur ou bien échappé dans l’eau, veuillez le retourner à SharkNinja Operating LLC pour un
examen, une réparation ou un ajustement.
5 Le tuyau contient des fils électriques. N’utilisez pas l’appareil si le tuyau est endommagé,
coupé ou percé.
6 NE TIREZ PAS ou NE TRANSPORTEZ PAS l’aspirateur par le cordon d’alimentation et n’utilisez
pas celui-ci comme une poignée.
7 NE le DÉBRANCHEZ PAS en tirant sur le cordon d’alimentation. Pour le débrancher, agrippez la
fiche et non le cordon.
8 NE MANIPULEZ PAS la fiche d’alimentation électrique ou l’aspirateur avec des mains humides.
9 NE PASSEZ PAS l’aspirateur par-dessus le cordon d’alimentation. Ne fermez pas une porte sur
le cordon et ne le faites pas passer sur des coins pointus.
10 L’utilisation d’une rallonge électrique n’est pas recommandée.
11 NE LAISSEZ PAS l’aspirateur sans surveillance lorsqu’il est branché.
12 Gardez le cordon éloigné des surfaces chaudes.
13 Fermez toutes les commandes avant de brancher ou débrancher l’aspirateur.
14 Veuillez toujours mettre cet appareil hors tension avant de brancher ou de débrancher le tuyau
ou l’accessoire motorisé.
15 Rangez votre aspirateur avec le cordon d’alimentation bien enroulé autour des deux supports à
cordon.
UTILISATION GÉNÉRALE
16 Utilisez seulement de la façon indiquée dans ce manuel.
17 N’INSÉREZ PAS d’objets dans les ouvertures. N’UTILISEZ PAS si des ouvertures sont bouchées;
assurez-vous qu’il n’y a pas de poussière, de charpie, de cheveux et tout autre objet pouvant
réduire le débit d’air.
18 Veuillez garder votre zone de travail bien éclairée.
19 L’aspirateur doit toujours être en mouvement sur le tapis afin d’éviter d’endommager les fibres.
20 NE PLACEZ PAS l’aspirateur sur des surfaces instables telles que des chaises ou des tables.
21 NE LAISSEZ PAS les jeunes enfants utiliser l’aspirateur ou l’utiliser comme un jouet. Une
attention particulière doit être portée lorsqu’il utilisé près des enfants.
22 N’UTILISEZ PAS l’aspirateur si le récipient à poussière ou les filtres ne sont pas en place.
ACCESSOIRES POUR BOYAU
23 N’UTILISEZ PAS l’aspirateur si le débit d’air est restreint. Si les conduits d’air ou le bout
motorisé sont obstrués, éteignez l’aspirateur et débranchez-le de la prise électrique. Retirez
toutes les obstructions avant de remettre l’appareil en marche.
24 Tenez éloigné de votre visage et votre corps, le tuyau et les ouvertures pour accessoires.
25 Gardez les outils de nettoyage et les orifices d’aspiration éloignés de vos cheveux, de votre
figure, de vos doigts, de vos pieds nus ou de vêtements amples.
26 N’utilisez que les accessoires recommandés par le manufacturier.
RÉCIPIENT À POUSSIÈRE / FILTRES / ACCESSOIRES
Avant de mettre l’aspirateur en marche :
27 Assurez-vous que les filtres sont complètement secs après le nettoyage de routine.
28 Après avoir effectué l’entretien de routine, assurez-vous que le récipient à poussière et tous les
filtres sont bien en place.
29 Assurez-vous que les accessoires sont libres de toute obstruction.
30 Utilisez seulement les filtres et accessoires fournis par SharkNinja Operating LLC. [À défaut de
quoi, la garantie sera annulée.]
NETTOYAGE GÉNÉRAL
31 NE RAMASSEZ PAS de gros objets.
32 NE RAMASSEZ pas de gros objets ou des objets pointus comme du verre, des clous, des vis ou
de la monnaie lesquels pourraient endommager l’aspirateur.
33 N’UTILISEZ PAS l’aspirateur pour ramasser de la poussière de cloison sèche.
34 NE RAMASSEZ PAS d’objets fumants ou brûlants comme des charbons chauds, des cendres
chaudes, des bouts de cigarettes ou des allumettes.
35 NE RAMASSEZ PAS de liquides inflammables ou combustibles tels que de l’essence à briquets,
du carburant, du kérosène ou n’utilisez pas l’aspirateur dans des endroits où ces produits
peuvent être présents.
36 NE RAMASSEZ PAS de solutions toxiques telles que de l’eau de javel, de l’ammoniac ou du
nettoyeur à drains.
37 N’UTILISEZ PAS dans des endroits clos où il y a des vapeurs provenant de la peinture, des
diluants à peinture, des substances antimites, de la poussière inflammable ou tout autre
matériel explosif ou toxique.
38 NE PASSEZ PAS l’aspirateur sur aucun liquide.
39 NE PLONGEZ PAS l’aspirateur dans l’eau ou tout autre liquide.
40 N’UTILISEZ PAS à l’extérieur ou sur des surfaces mouillées; utilisez uniquement sur des
surfaces sèches.
41 Faites très attention lors du nettoyage de l’escalier.
42 Retirez la brosse de l’aspirateur avant de la rincer.

1.800.798.7398
14
APPRENDRE À CONNAÎTRE VOTRE ASPIRATEUR SHARK ROTATOR
MD
POWERED LIFT-AWAY
MC
SPEED
Porte-traîneau
XCY680PB
Transformez votre Rotator en un équipement
complètement motorisé, vous offrant la
liberté de faire rouler l’appareil à vos côtés
tout en gardant tout près vos outils de
nettoyage.
Outil multiple d’animal domestique
187FLI680
Deux outils de nettoyage en un. La brosse
à poils raides devient coincée sur les débris
d’une multitude de surfaces. Retirez les
poils pour dévoiler un outil spécialisé pour le
nettoyage de poils d’animaux domestiques
sur les articles rembourrés et plus encore.
Brosse motorisée pour animaux
188FLI680
Conçue pour enlever les poils d’animaux et
la saleté incrustée sur les marches recou-
vertes de tapis et les articles rembourrés.
Suceur plat Duster Crevice
189FLI680
Deux outils de nettoyage en un. L’outil pour
fentes vous donne une portée de nettoyage
étendue pour les petits espaces, alors que
la brosse de dépoussiérage nettoie une
multitude de surfacess.
Dust Away
MC
Pro et tampon en
microfibres
XGEN680PB
Assez durable pour les grosses miettes et
débris, mais assez doux pour la plupart des
poussières délicates sur le bois sur et les
carreaux de planchers.
Recherchez-vous plus d’accessoires et des pièces de rechange?
Commandez au www.PoweredLiftAway.com ou appelez-nous au 1 800 798-7398.
Français
1
3
9
5
6
10
2
Wand Release
7
8
11
4
12
UNITÉ PRINCIPALE
1 Sélecteur de surface
2 Contrôle d’aspiration
3 Tuyau
4 Crochet du tuyau
5 Crochet supérieur du cordon
6 Interrupteur d’alimentation
7 Dégagement du tube
8 Corps de l’aspirateur Lift-Away
9 Crochet inférieur du cordon
10 Brosse à plancher motorisée
11 Voyants lumineux
12 Témoin de la brosse rotative

15
www.PoweredLiftAway.com
ASSEMBLAGE
1 Placez le bout choisi pour planchers sur le plancher et
insérez le tuyau.
2 Insérez la poignée dans le tuyau.
3 Glissez le corps de l’aspirateur dans le tuyau.
4 Glissez l’attache-tuyau dans la coche au dos du tuyau.
5 Insérez le suceur plat et l’accessoire polyvalent pour
animaux domestiques dans les pinces de retenue pour
accessoires comme illustré.
CONSEIL : Pour un accès rapide au cordon, tournez le
crochet supérieur vers le bas et retirez le cordon.
Retournez le crochet à sa position initiale pour
ranger le cordon.
ÉTAPE 1 ÉTAPE 2 ÉTAPE 3 ÉTAPE 4 ÉTAPE 5
SLIDE
CLICK

1.800.798.7398
16
Français
NETTOYAGE VERTICAL
REMARQUE : N’UTILISEZ PAS l’aspirateur pour ramasser de la poussière de cloison sèche ou des cendres de cheminées.
1 Branchez le cordon d’alimentation dans une prise
électrique appuyez sur le bouton POWER pour mettre en
marche l’aspirateur.
2 Nettoyage de plancher dur
Positionnez le Sélecteur de :Planchers à Plancher Dur
et le Contrôle d’aspiration à Max pour une aspiration
totale ou variable selon vos préférences.
Nettoyage de tapis épais et de petits tapis
Positionnez le Sélecteur de Planchers à Tapis et le
Contrôle d’aspiration à Min pour une aspiration réduite
ou variable selon vos préférences.
Nettoyage de tapis
Positionnez le Sélecteur de Planchers à Tapis et le
Contrôle d’aspiration à Max pour une aspiration totale
ou variable selon vos préférences.
REMARQUE : Pour un nettoyage en profondeur selon
la norme ASTM F-608 (saleté incrustée dans les tapis),
veuillez positionner à Tapis avec le Contrôle d’aspiration
à Max.
3 Placez votre pied gauche légèrement sur l’embout
pour plancher et basculez la poignée vers l’arrière pour
débuter le nettoyage.
REMARQUE : La brosse à plancher tournera uniquement
lorsque l’aspirateur est incliné vers l’arrière.
ÉTAPE 1 ÉTAPE 2 ÉTAPE 3
Suction Control
Sélecteur de
plancher
MinMax
QUE SIGNIFIENT LES COULEURS DU TÉMOIN DE LA BROSSE MOTORISÉE?
• Vert, allumé en continu : La brosse rotative est activée et fonctionne correctement.
• Rouge, allumé en continu : La brosse rotative est bloquée; éteignez l’aspirateur et éliminez le blocage.
• * Rouge, clignotant : La brosse motorisée surchauffe; éteignez l’aspirateur et attendez que la brosse rotative refroidisse.
*Voir le Guide de Dépannage pour obtenir des instructions supplémentaires.

17
www.PoweredLiftAway.com
NETTOYAGE SUR SURFACE ÉLEVÉE
REMARQUE : N’UTILISEZ PAS l’aspirateur pour ramasser de la poussière de cloison sèche ou des cendres de cheminées.
1 Pour le nettoyer au-dessus du plancher avec le tuyau, appuyez
sur le bouton de dégagement du tube ou de la poignée (selon la
portée nécessaire), puis soulevez la poignée.
2 Insérez le tube ou la poignée directement dans
l’accessoire désiré.
3 Cette unité est équipée avec un CONTRÔLE DE L’ASPIRATION
pour aider lors du nettoyage d’objets délicats ou de tentures.
Situé à la base de la poignée, glissez l’onglet de CONTRÔLE
DE L’ASPIRATION pour réduire l’aspiration. Assurez-vous de le
refermer pour une aspiration maximale.
OU
ÉTAPE 1 ÉTAPE 2 ÉTAPE 3
Wand Release
OU
Contrôle
d’aspiration
manuelle
MinMax

1.800.798.7398
18
Français
CHANGER LES EMBOUTS POUR PLANCHER
1 Appuyez sur le bouton DÉGAGEMENT DU TUYAU pour
retirer le tuyau de l’embout motorisé pour plancher.
2 Insérez le tuyau dans le Dust Away Pro.
3 Appuyez sur le bouton LIFT-AWAY pour soulever le corps
de l’aspirateur de l’embout motorisé pour plancher.
4 Placez le corps de l’aspirateur sur le tuyau et descendez-
le pour le relier au Dust Away Pro.
REMARQUE : Pour de meilleurs résultats, assurez-vous que
CONTRÔLE DE L’ASPIRATION est positionné
à MAX.
Wand Release
CLICK
Utilisez le bout motorisé pour planchers pour un nettoyage en profondeur des tapis et pour ramasser les gros débris
sur les planchers durs.
Utilisez Dust Away
MC
Pro pour ramasser les débris et essuyez la poussière fine dans une étape simple
.
ÉTAPE 1/ÉTAPE 2 ÉTAPE 3 ÉTAPE 4
DUST AWAY PRO
EMBOUT MOTORISÉ POUR PLANCHER

19
www.PoweredLiftAway.com
1 Appuyez sur le bouton LIFT-AWAY pour soulever le
corps de l’aspirateur de l’embout pour plancher.
Insérez le TUBE dans soit l’embout motorisé pour
planchers ou le Dust Away Pro.
CONSEILS : Utiliser l’aspirateur en mode Powered Lift-Away
vous donne une plus longue portée pour nettoyer
sous les meubles et dans les espaces restreints.
2 Insérez la POIGNÉE dans soit l’embout motorisé pour
planchers ou le Dust Away Pro.
CONSEILS : Fixer la POIGNÉE directement dans les embouts
rend facile le nettoyage des escaliers.
1 Fixez l’accessoire désiré directement dans la POIGNÉE.
CONSEIL S: Pour une plus longue portée, fixez l’accessoire
désiré dans le TUYAU.
NETTOYAGE MOTORISÉ LIFT-AWAY
MC
Wand Release
NETTOYAGE LIFT-AWAY
MC
ÉTAPE 1 ÉTAPE 2
OU
OU
A página está carregando...
A página está carregando...
A página está carregando...
A página está carregando...
A página está carregando...
A página está carregando...
A página está carregando...
A página está carregando...
A página está carregando...
A página está carregando...
A página está carregando...
A página está carregando...
A página está carregando...
A página está carregando...
A página está carregando...
A página está carregando...
-
 1
1
-
 2
2
-
 3
3
-
 4
4
-
 5
5
-
 6
6
-
 7
7
-
 8
8
-
 9
9
-
 10
10
-
 11
11
-
 12
12
-
 13
13
-
 14
14
-
 15
15
-
 16
16
-
 17
17
-
 18
18
-
 19
19
-
 20
20
-
 21
21
-
 22
22
-
 23
23
-
 24
24
-
 25
25
-
 26
26
-
 27
27
-
 28
28
-
 29
29
-
 30
30
-
 31
31
-
 32
32
-
 33
33
-
 34
34
-
 35
35
-
 36
36


Shark NV682 Manual do usuário
- Categoria
- Aspirador de pó
- Tipo
- Manual do usuário
em outras línguas
- español: Shark NV682 Manual de usuario
- français: Shark NV682 Manuel utilisateur
- English: Shark NV682 User manual
Artigos relacionados
-
Shark NV683 Manual do usuário
-
-
-
-
-
-
-
-
-
Outros documentos
-
 Riccar Prima Power Team Manual do proprietário
-
Windmere V1000 Manual do usuário
-
-
Palson 30486 Manual do proprietário
-
-
 Russell Hobbs RHCV21 Manual do usuário
-
Electrolux EL4042A Manual do usuário
-
Dirt Devil Vacuum Cleaner 1-113217-000 Manual do usuário
-
-
Morphy Richards PERFORMAIR CYCLONIC VACUUM CLEANER 71062 Manual do proprietário

