Campbell Hausfeld XT251000 Manual do usuário
- Tipo
- Manual do usuário

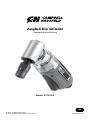
Angled Die Grinder
Operating Instructions
Model: XT251000
IN745600 6/17
© 2017 Campbell Hausfeld
A Marmon/Berkshire Hathaway Company
EN

REGISTER YOUR PRODUCT ONLINE NOW! www.campbellhausfeld.com/reg
READ AND FOLLOW ALL INSTRUCTIONS
SAVE THESE INSTRUCTIONS • DO NOT DISCARD
Please read and save these instructions. Read carefully before
attempting to assemble, install, operate or maintain the product
described.
Protect yourself and others by observing all safety information. Failure
to comply with instructions could result in personal injury and/or
property damage! Retain instructions for future reference.
REMINDER: Keep your dated proof of purchase for warranty purposes!
Attach it to this manual or file it for safekeeping.
Model #: ________________________________
Serial #: ________________________________
Purchase Date: __________________________
For parts, product & service information
visit www.campbellhausfeld.com
Campbell Hausfeld
100 Production Drive
Harrison, Ohio 45030

1
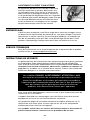
BEFORE YOU BEGIN
Description
Grinding, porting, polishing, deburring in a confined space is a cinch with
the help of an angled die grinder! This little powerhouse weighs in just over
a pound and exhausts out the bottom. An easy valve adjustment, located on
the side of the housing, regulates air flow for whatever output you need to
get stuff done.
Campbell Hausfeld
®
makes it easier for you to finish your projects like a pro.
The company’s history of creating quality products began in 1836, when
it manufactured horse-drawn wagons and agricultural equipment. Today,
Campbell Hausfeld offers a complete line of air compressors, air tools and
accessories, inflators, nailers and staplers, spray guns, pressure washers, and
more. Finish your projects faster and easier with Campbell Hausfeld – The Air
Power Expert.
UNPACKING
After unpacking the unit, inspect carefully for any damage that may have
occurred during transit. Check for loose, missing or damaged parts. Check
to be sure all supplied accessories are enclosed with the unit. In case of
questions, damaged or missing parts, please visit www.campbellhausfeld.com
for customer assistance.
Do not operate unit if damaged during shipping,
handling or use. Damage may result in bursting and
cause injury or property damage.
Other Parts (Not Provided)
You will need the following items and/or accessories to properly set-up and
optimally use your angled die grinder:
• 1/4 inch Plug NPT (M)
o For less stress on your air hose and you, try a flex plug.
• 3/8 inch (ID) Air Hose
• 1/4 inch Coupler NPT (F)
o Eliminate coupler confusion with a universal coupler style.
o Quick-connect couplers quickly, easily join hoses to tools.
o If you don’t use a flex plug, consider a swivel coupler to prevent
hose kinks and reduce stress on your air hose.
• 20 Gallon air compressor or larger
• Grinding stones/attachments with a 1/4 inch shank
• PTFE tape for all fitting connections
• Adjustable wrench for tightening fitting connections
• Grease injection gun for gear lubrication
See www.campbellhausfeld.com for additional information on accessories to
support your air tools and pneumatic system.

2
BEST PRACTICES
u For best output, maintain pressure at the tool of 90 PSI.
u The longer your air hose the greater the pressure drop from compressor to tool.
If you are using a hose longer than 50 feet, consider upgrading to a 1/2 inch ID air
hose to ensure proper tool pressure.
u Failure to lubricate and maintain your air tools properly will dramatically shorten
their life. Use oil every time you use your air tool to lubricate, clean and inhibit rust
in one step. Campbell Hausfeld sells air tool oil under part number ST1270.
SPECIFICATIONS
XT251000
Maximum pressure (PSI) 90
CFM no load 100% duty 2.8 CFM @ 90 PSI
SCFM no load 100% duty 19.6 SCFM @ 90 PSI
Air Compressor Recommendation 20 gallon
RPM (free speed) 20,000
Collet size 1/4 inch
Size Type Angled
Variable Speed Yes
Horsepower 0.2 HP
Air Inlet 1/4 inch NPT (F)
Minimum Hose Size 3/8 inch
Housing Material Composite
Tool Weight 1.1 Lbs.
Tool Length 6-1/4 inch
Tool Height 1-5/8 inch
Tool Width 3-1/8 inch

3
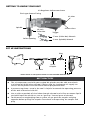
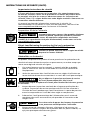
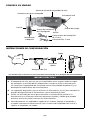
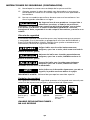
GETTING TO KNOW YOUR UNIT
17 mm (Collet Nut) Wrench
12 mm (Spindle) Wrench
Air Inlet
Exhaust Port
Air Regulator Adjustment Screw
Trigger
Spindle
Flush-type Grease Fitting
1/4 inch
Collet Nut
Collet Opening
SET UP INSTRUCTIONS
Plug
Quick
Coupler
Air Hose
* Items shown in Set Up Instructions are not included with this tool.
BEST PRACTICES
u The air compressor used with your angled die grinder must be able to maintain
a minimum of 90 PSI when the tool is being used. An inadequate air supply can
cause a loss of power and inconsistent tool output/performance.
u A pressure regulator—used at the tool--is helpful to control the operating pressure
of the tool and maintain 90 PSI.
u Use an oiler to provide oil circulation through the tool and a filter to remove liquid
and solid impurities which can rust or “gum up” internal parts of the tool.
u To disconnect a coupler/plug from a system set-up: push the coupler and plug
together before pulling the coupler sleeve back and separating the coupler and
plug.

4
LUBRICATION
Motor:
To protect your tool, lubricate the motor every time--before and after--you
use this tool. You cannot oil the motor too often or put too much oil in the
air inlet.
1. Disconnect the die grinder from air supply.
2. Turn the tool upside down.
3. While pulling the trigger, pour approximately a teaspoon of air tool oil
in the air inlet. Campbell Hausfeld makes an air tool oil under model
number ST1270.
4. Connect the tool to the air supply and cover the exhaust port with a
towel.
5. Trigger the tool for about 10 seconds. Oil will spray from the exhaust
port when the tool is triggered.
6. Continue to run until no oil is discharged.
7. Wipe all residual oil from tool before use.
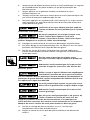
Gear:
Periodic lubrication of the bevel gear through the
flush-type grease fitting will extend the life of
the die grinder. Under regular use, inject a small
amount grease into the flush-type grease fitting
with a grease injection gun every week.
OPERATING INSTRUCTIONS
CHANGING ATTACHMENTS
1. Disconnect tool from air supply.
2. To loosen the collet nut to remove an
attachment (or to open the collet nut in
preparation to insert an attachment):
a. Hold the spindle stationary with the
spindle wrench (provided); aligning the
flat sides of the spindle with the sides of the wrench.
b. Align the collet wrench with the flat sides of the collet nut and turn
the collet wrench counter clockwise to loosen the collet nut and
remove the attachment.
3. Insert shank of grinder attachment into collet opening. Make sure shank
is fully inserted.
4. Tighten the collet nut with the wrenches provided:
a. Hold the spindle stationary with the spindle wrench (provided);
aligning the flat sides of the spindle with the sides of the wrench.
b. Align the collet wrench with the flat sides of the collet nut and turn
the collet wrench clockwise to tighten the collet nut and secure the
attachment.

5
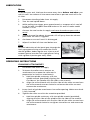
AIR-FLOW/SPEED ADJUSTMENT
The air-flow regulator controls how much air
enters the motor which defines the motor speed/
power. To adjust the amount of air flowing to the
motor, turn the air regulator adjustment screw in
either direction (turns 360 degrees) until desired
flow/motor speed is achieved. To prevent injury,
do not adjust power settings while the tool is
running.
STORAGE
Lubricate your angled die grinder before storing. Follow the air motor
lubrication instructions with an exception to step #5. Only run the die grinder
for 2-3 seconds (instead of 10 seconds) because more oil needs to remain in
the tool when storing. Store your tool in a cool dry place.
TECHNICAL SERVICE
For information regarding the operation or repair of this product, please visit
www.campbellhausfeld.com.
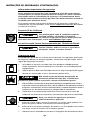
SAFETY INSTRUCTIONS
This manual contains information that is very important to know and
understand. This information is provided for SAFETY and to PREVENT
EQUIPMENT PROBLEMS. To help recognize this information, observe the
symbols found on page 8. The Safety Symbols throughout this manual are to
alert you to important safety hazards and precautions.
The DANGER, WARNING, CAUTION, and NOTICE notifications
and instructions in this manual cannot cover all possible condi-
tions and situations that may occur. It must be understood by
the operator that caution is a factor which cannot be built into
this product, but must be supplied by the operator.
With any piece of equipment, new or used, the most important part of its
operation is SAFETY!
Campbell Hausfeld encourages you to familiarize yourself with your new
equipment and stresses safe operation.
The next few pages of this manual are a summary of the main safety aspects
associated with this unit. Be sure to read and understand completely before
operating the machine.
The symbols used throughout the operation and maintenance sections of
this manual call attention to safety procedures.

6
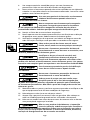
SAFETY INSTRUCTIONS (CONTINUED)
Important Safety Information
Please read and save these instructions. Read carefully before attempting to
assemble, install, operate or maintain the product described. Protect yourself
and others by observing all safety information. Failure to comply with
instructions could result in personal injury and/or property damage! Retain
instructions for future reference.
This manual contains important safety, operational and maintenance
information. If you have any questions, please visit
www.campbellhausfeld.com for customer assistance.
California Proposition 65
This product can expose you to chemicals including
lead, which are known to the State of California
to cause cancer and birth defects or other reproductive harm. For more
information go to www.P65Warnings.ca.gov.
Illinois Lead Poisoning Prevention Act
Contains lead. May be harmful if eaten or chewed.
Complies with Federal Standards.
General Safety
This product is a part of a high pressure system and the following safety
precautions must be followed at all times along with any other existing safety
rules.
1. Read all manuals included with this product carefully. Be thoroughly
familiar with the controls and the proper use of the equipment.
2. Only persons well acquainted with these rules of safe operation should
be allowed to use the air tool.
Do not exceed maximum operating pressure of the
air tool (90 PSI). The air tool could explode and result
in death or serious personal injury.
3. Do not exceed any pressure rating of any component in the system.
Maximum operating pressure of 90 PSI is measured at the tool inlet
while the tool is running. The pressure drop between the compressor
and tool needs to be compensated for at the compressor.
4. Disconnect the air tool from air supply before changing tools or
attachments, servicing and during non-operation.
Safety glasses and ear protection must be worn
during operation.
5. Do not wear loose fitting clothing, scarves, or neck ties. Loose clothing
may become caught in moving parts and result in serious personal injury.
6. Do not wear jewelry when operating any tool. Jewelry may become
caught in moving parts and result in serious personal injury.
MANUAL

7
7. Do not depress trigger when connecting the air supply hose.
8. Always use attachments designed for use with air powered tools. Do not
use damaged or worn attachments.
9. Never trigger the tool when not applied to a work object. Attachments
must be securely attached. Loose attachments can cause serious injury.
Use of a whip hose prevents accidental triggering of
tool when pressurized air is connected to system.
Never carry a tool by the hose or pull hose to move
tool or a compressor. Keep hoses away from heat,
oil and sharp edges. Replace any hose that is damaged, weak or worn.
10. Protect air lines from damage or puncture.
11. Never point an air tool at oneself or any other person. Serious injury
could occur.
12. Check air hoses for weak or worn condition before each use. Make sure
all connections are secure.
Release all pressure from the system before
attempting to install, service, relocate or perform
any maintenance.
Disconnect air tool from air supply before changing
attachments or serious injury could occur.
Make sure attachment shank is fully inserted into
collet opening and collet is securely tightened.
Loose attachments could fly off during operation and cause serious injury.
Only use attachments rated at or above tool rated 20,000 RPM.
This air tool requires lubrication before initial use
and before and after each additional use.
Disconnect air tool from air supply before
lubricating.
Cover exhaust port with a towel before applying air
pressure. Oil will discharge through exhaust port
during first few seconds of operation after an airtool has been lubricated.
Failure to cover exhaust port can result in serious injury.
13. Keep all nuts, bolts and screws tight and ensure equipment is in safe
working condition.
14. Do not put hands near or under moving parts.
15. Always secure workpiece in a vise or clamp. Do not place hands on the
back cylinder when operating the tool.
16. Do not use a cut-off disc mandrel on this tool unless a safety guard is in
place.
Do not misuse this product. Excessive exposure to
vibration, work in awkward positions, and repetitive
work motions can cause injury to hands and arms. Stop using any tool if
discomfort, numbness, tingling, or pain occur, and consult a physician.

8
SAFETY INSTRUCTIONS (CONTINUED)
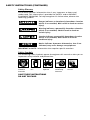
Safety Glossary
This manual contains information that is very important to know and
understand. This information is provided for SAFETY and to PREVENT
EQUIPMENT PROBLEMS. To help recognize this information, observe the
following symbols.
Danger indicates an imminently hazardous situation
which, if not avoided, WILL result in death or serious
injury.
Warning indicates a potentially hazardous situation
which, if not avoided, COULD result in death or
serious injury.
Caution indicates a potentially hazardous situation
which, if not avoided, MAY result in minor or
moderate injury.
Notice indicates important information, that if not
followed, may cause damage to equipment.
IMPORTANT or NOTE: Information that requires special attention.
Safety Symbols
The following Safety Symbols appear throughout this manual to alert you to
important safety hazards and precautions.
SAVE THESE INSTRUCTIONS
DO NOT DISCARD
MANUAL
Wear Eye
and Mask
Protection
Read Manual
First
Risk of
Explosion
Wear Eye
and Hearing
Protection
Risk of
Pressure

99
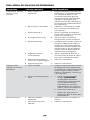
GENERAL TROUBLESHOOTING GUIDE
SYMPTOM POSSIBLE CAUSE(S) CORRECTIVE ACTION
Tool runs slowly or will
not operate
1. Grit or gum in tool 1. Flush the tool with Campbell
Hausfeld air tool oil, gum solvent, or
an equal mixture of SAE 10 motor
oil and kerosene. Lubricate the
tool after cleaning with Campbell
Hausfeld (or comparable) air tool oil.
2. No oil in tool 2. Lubricate the tool according to
the lubrication instructions in this
manual.
3. Low air pressure 3. Adjust the compressor regulator to
90 PSI while the tool is running free.
4. Air hose leaks 4. Tighten and seal hose fittings, if leaks
are found.
5. Pressure drops 5. Be sure hose is properly sized. Long
hoses or tools using large volumes of
air may require a hose with an I.D. of
1/2 inch or larger depending on total
hose length.
6. Regulator adjusted wrong 6. Adjust air flow regulator with a
flathead screwdriver to maximum
speed.
7. Worn ball bearing in motor
or in angle head
7. Replace tool.
8. Worn gears 8. Replace tool.
Moisture blowing out
of tool
1. Water in tank 1. Drain tank (See air compressor
manual). Oil tool and run until no
water is evident. Oil tool again and
run 1-2 seconds.
2. Water in the air lines/hoses 2 a. Install a water separator/filter.
NOTE: Separators work properly
only when air passing through
the separator is cool. Locate
separator/filter as far as possible
from compressor.
b. Install an air dryer.
c. Anytime water enters the
tool, the tool should be oiled
immediately.
Excessive vibration 1. Damaged stone or burr 1. Replace with new stone or burr.
2. Collet shaft bent 2. Replace tool.

Reminder: Keep your dated proof of purchase for warranty purposes! Attach it to this manual or file it
for safekeeping.
LIMITED WARRANTY
1. DURATION: From the date of purchase by the original purchaser as follows: Two (2) Years.
2. WHO GIVES THIS WARRANTY (WARRANTOR): Campbell Hausfeld, a Marmon/Berkshire Hathaway
Company, 100 Production Drive, Harrison, Ohio, 45030. Visit www.campbellhausfeld.com.
3. WHO RECEIVES THIS WARRANTY (PURCHASER): The original purchaser (other than for purposes of
resale) of the Campbell Hausfeld product.
4. WHAT PRODUCTS ARE COVERED BY THIS WARRANTY: This Campbell Hausfeld air tool.
5. WHAT IS COVERED UNDER THIS WARRANTY: Substantial defects in material and workmanship which
occur within the duration of the warranty period with the exceptions below.
6. WHAT IS NOT COVERED UNDER THIS WARRANTY:
A. Implied warranties, including those of merchantability and FITNESS FOR A PARTICULAR
PURPOSE ARE LIMITED FROM THE DATE OF ORIGINAL PURCHASE AS STATED IN THE DURATION.
If this product is used for commercial, industrial or rental purposes, the warranty will apply for
ninety (90) days from the date of purchase. Some States do not allow limitation on how long an
implied warranty lasts, so the above limitations may not apply to you.
B. ANY INCIDENTAL, INDIRECT, OR CONSEQUENTIAL LOSS, DAMAGE, OR EXPENSE THAT MAY
RESULT FROM ANY DEFECT, FAILURE, OR MALFUNCTION OF THE CAMPBELL HAUSFELD
PRODUCT. Some States do not allow the exclusion or limitation of incidental or consequential
damages, so the above limitation or exclusion may not apply to you.
C. Any failure that results from an accident, purchaser’s abuse, neglect or failure to operate
products in accordance with instructions provided in the owner’s manual(s) supplied with
product. Accident, purchaser’s abuse, neglect or failure to operate products in accordance with
instructions shall also include the removal or alteration of any safety devices. If such safety
devices are removed or altered, this warranty is void.
D. Normal adjustments which are explained in the owner’s manual(s) provided with the product.
7. RESPONSIBILITIES OF WARRANTOR UNDER THIS WARRANTY: Repair or replace, at Warrantor’s
option, products or components which are defective, have malfunctioned and/or failed to conform
within the duration of the specific warranty period.
8. RESPONSIBILITIES OF PURCHASER UNDER THIS WARRANTY:
A. Provide dated proof of purchase and maintenance records.
B. Visit www.campbellhausfeld.com to obtain your warranty service options. Freight costs must be
borne by the purchaser.
C. Use reasonable care in the operation and maintenance of the products as described in the
owner’s manual(s).
9. WHEN WARRANTOR WILL PERFORM REPAIR OR REPLACEMENT UNDER THIS WARRANTY: Repair
or replacement will be scheduled and serviced according to the normal work flow at the servicing
location, and depending on the availability of replacement parts.
This Limited Warranty applies in the United States, Canada and Mexico only and gives you specific legal
rights. You may also have other rights which vary from state to state or country to country.
10

Meuleuse à rectifier à angle droit
Instructions d’Utilisation
Modèle: XT251000
IN745600 6/17
© 2017 Campbell Hausfeld
A Marmon/Berkshire Hathaway Company
FR

ENREGISTREZ VOTRE PRODUIT EN LIGNE MAINTENANT !
www.campbellhausfeld.com/reg
LIRE ET SUIVRE TOUTES LES INSTRUCTIONS
CONSERVER CES INSTRUCTIONS • NE PAS JETER
Lire et conserver ces instructions. Il faut les lire attentivement avant
de commencer à assembler, installer, faire fonctionner ou entretenir
l’appareil décrit.
Pour se protéger et protéger autrui, observer toutes les informations sur
la sécurité. Négliger d’appliquer ces instructions peut causer
des blessures et/ou des dommages matériels! Conserver ces instructions
pour consultation ultérieure.
RAPPEL: Conservez votre preuve d’achat datée aux fins de garantie!
Attachez-le à ce manuel ou classez-le pour le garder en sécurité.
N° de modèle : _____________________________
N° de série : _______________________________
Date d’achat : _____________________________
Pour de l’information sur les pièces,
produits et services veuillez visiter
www.campbellhausfeld.com
Campbell Hausfeld
100 Production Drive
Harrison, Ohio 45030

Fr1
AVANT DE COMMENCER
Description
Un meulage, portage, polissage, ébavurage dans les espaces clos très simple avec
l’aide d’une meule à rectifier les matrices à angle droit! Cette petite centrale
puissante pèse à peine une livre (0,5 kg) et possède un système d’échappement
en dessous. Un ajustement de vanne facile, situé sur le côté du boîtier, régule le
débit d’air à la puissance nécessaire afin d’accomplir votre tâche.
CampbellHausfeld
®
vous facilite le travail afin de terminer vos projets en pro.
L’histoire de l’entreprise est parsemée de produits de qualités depuis 1836,
alors que furent fabriqués les wagons tirés par les chevaux et les équipements
agraires. Aujourd’hui, Campbell Hausfeld offre une gamme complète de
compresseurs, outils et d’accessoires pneumatiques, pompes de gonflage,
de cloueurs, agrafeuses, pistolets pulvérisateurs, laveuses à pression, et plus.
Terminez vos projets plus rapidement et plus facilement grâce à Campbell
Hausfeld – l’expert de la puissance de l’air.
DÉBALLAGE
Dès que l’appareil est déballé, l’inspecter attentivement pour tout signe
de dommages en transit. Vérifier s’il y a des pièces desserrées, manquantes
ou endommagées. Vérifier pour s’assurer que tous les accessoires fournis
sont inclus avec l’appareil. Pour toutes questions, pièces endommagées ou
manquantes, veuillez visiter www.campbellhausfeld.com pour l’assistance à la
clientèle.
Ne pas utiliser un modèle qui a été endommagé
pendant le transport, la manipulation ou l’utilisation.
Le dommage peut résulter en explosion et peut causer des blessures ou
dégâts matériels.
Autres pièces (non fournies)
Il vous faudra les éléments et/ou accessoires suivants pour correctement
mettre en marche et utiliser de manière optimale votre meule à rectifier les
matrices à angle droit :
• Connecteur 6,4 mm (1/4 po) NTP (M)
o Pour une réduction du stress pour vous et votre tuyau, essayez un
connecteur flexible.
• Tuyau à air 9,5 mm (3/8 po) (DIA. INT.)
• Raccord 6,4 mm (1/4 po) NPT (F)
o Élimine la confusion par l’utilisation d’un raccord de style universel.
o Les coupleurs à attache rapide raccordent rapidement et facilement
les tuyaux aux outils.
o Si vous n’utilisez pas un connecteur flexible, un raccord pivotant
pourrait être utilisé afin d’éviter l’entortillement et réduire le stress
imposé à votre tuyau d’air.
• Compresseur d’air 75,70L (20gal) ou plus.
• Roches/joints à meulage avec une tige de 6,4 mm (1/4 po)
• Ruban PTFE pour tous les joints des raccords
• Clé ajustable pour serrer les joints des raccords
• Pistolet graisseur à injection pour la lubrification de l’équipement
Voir au www.campbellhausfeld.com pour d’autres informations sur les
accessoires accompagnant vos outils et votre système pneumatique.

Fr2
MEILLEURES PRATIQUES
u Pour une meilleure puissance, maintenez la pression à l’outil de 621 kPa.
u Plus votre tuyau à air est long, plus la pression diminuera entre le compresseur et
l’outil. Si vous utilisez un tuyau à air dépassant 15,2m (50 pi), on devrait plutôt
utiliser un tuyau à air de 12,7 mm (1/2 po) de dia. int. pour assurer une pression
appropriée à l’outil.
u À défaut de lubrifier et de correctement entretenir vos outils pneumatiques diminuera
drastiquement leur durée de vie. Utilisez de l’huile chaque fois que vous utilisez votre
outil pour le lubrifier, le nettoyer et éviter la rouille, en une seule étape. Campbell
Hausfeld offre une huile à outils pneumatiques sous le numéro de pièceST1270.
CARACTÉRISTIQUES TECHNIQUES
XT251000
Pression maximale (kPa) 621
pi³/min (L/min) sans charge de service à 100% 79,3 L/min @ 621 kPa
pi³/min standard (L/min) sans charge de service à 100% 550,0 L/min @ 621 kPa
Recommandation pour le compresseur d’air 75,70 L
Classification RPM (vitesse à vide) 20,000
Taille du col 6,4 mm (1/4 po.)
Type de format À angle
Vitesse variable Oui
Puissance 0.2 HP
Arrivée d’air 1/4 po NPT (F)
Taille minimum du tuyau 9,5 mm (3/8 po)
Matériau du logement Composite
Poids de l’outil 0,50 kg
Longueur du tuyau 15,88 cm (6-1/4 po.)
Hauteur de l’outil 4,13 cm (1-5/8 po.)
Largeur du tuyau 7,94 cm (3-1/8 po.)

Fr3
APPRENEZ À CONNAÎTRE VOTRE UNITÉ
Clé de 17 mm (Écrou du col)
Clé de 12 mm (Tige de manoeuvre)
Arrivée d’air
Sortie de
l’échappement
Vis d’ajustement
du régulateur d’air
Détente
Tige de
manoeuvre
Raccord de graissage
de type encastrable
Écrou du col
de 1/4 po
Ouverture du col
INSTRUCTIONS DE MISE EN MARCHE
Bouchon
Raccord
Rapide
Tuyau À Air
* Les éléments montrés aux Instructions de mise en marche ne sont pas fournis avec cet outil.
MEILLEURES PRATIQUES
u Le compresseur d’air utilisé avec votre meule à rectifier les matrices à angle droit
doit être capable de maintenir au moins 621 psi lorsque l’outil est en fonction.
Un approvisionnement d’air inadéquat peut causer une perte de puissance et une
performance inconstante de l’outil.
u Un régulateur de pression – utilisé sur l’outil – est utile pour contrôler la pression
de fonctionnement de l’outil et maintenir 621 kPa.
u Utilisez un huileur pour offrir une circulation de l’huile dans l’outil et un filtre pour
retirer les impuretés liquides et solides pouvant causer la rouille ou de l’encrassage.
u Pour débrancher un raccord/embout d’un système: poussez le raccord et l'embout
ensemble avant de tirer le manchon du raccord vers l’arrière et en séparant le
coupleur et l'embout.

Fr4
LUBRIFICATION
Moteur:
Pour protéger votre outil, lubrifiez le moteur chaque fois –avant et après–
l’avoir utilisé. Vous ne pouvez huiler le moteur trop fréquemment ou placer
trop d’huile dans l’arrivée d’air.
1. Débranchez la meule à rectifier les matrices de l’alimentation d’air.
2. Tournez l’outil à l’envers.
3. En tirant sur la détente, versez environ une cuillerée à thé d’huile à
outils pneumatiques dans l’arrivée d’air. Campbell Hausfeld offre une
huile à outils pneumatiques sous le numéro de modèle ST1270.
4. Connectez l’outil à l’alimentation d’air et couvrez la sortie de
l’échappement avec une serviette.
5. Mettez l’outil en marche pendant 10 secondes. L’huile sera pulvérisée
par la sortie de l’échappement lorsque l’outil sera mis en marche.
6. Continuez tant qu’il y aura de l’huile.
7. Essuyez toute huile résiduelle de l’outil avant de l’utiliser.
OUTIL : Une lubrification régulière de l’engrenage
conique via le raccord de graissage de type
encastrable fera augmenter la durée de vie de
votre meule à rectifier les matrices. Sous des
conditions d’utilisation normales, injectez une
petite quantité de graisse dans le raccord de
graissage de type encastrable avec un pistolet
graisseur à injection une fois par semaine.
MODE D’EMPLOI
CHANGER LES ÉLÉMENTS
1. Débranchez l’outil de l’alimentation d’air.
2. Pour dévisser l’écrou du col afin d’enlever
un élément fixe (ou bien pour ouvrir
l’écrou du col afin d’insérer ou d’attacher
un nouvel élément) :
a. Tenez la tige de manoeuvre afin qu’elle soit immobile avec la clé à
tige (fournie); en alignant les côtés plats de la tige de manoeuvre
aux côtés de la clé.
b. Alignez la clé du col aux côtés plats de l’écrou du col et tournez la
clé du col dans le sens contraire des aiguilles d’une montre pour
desserrer l’écrou du col et enlever l’élément.
3. Insérez la tige de l’élément de la meule dans l’ouverture du col. Veillez
à ce que la tige soit complètement insérée.
4. Serrez l’écrou du col avec les clés fournies :
a. Tenez la tige de manoeuvre afin qu’elle soit immobile avec la clé
à tige (fournie); en alignant les côtés plats de la tige de manoeuvre
aux côtés de la clé.
b. Alignez la clé du col aux côtés plats de l’écrou du col et tournez la
clé du col dans le sens des aiguilles d’une montre pour serrer l’écrou
du col et fixer l’élément.

Fr5
AJUSTEMENT DU DÉBIT D’AIR/VITESSE
Le régulateur de débit d’air contrôle la quantité
d’air qui entre dans le moteur, définissant ainsi
sa vitesse/puissance. Pour ajuster le montant du
débit d’air qui se propage au moteur, tournez la
vis d’ajustement du régulateur d’air vers la gauche
ou la droite (elle tourne 360 degrés) jusqu’à ce que
la vitesse de débit/du moteur soit obtenue. Pour
éviter les blessures, ne changez pas les réglages
de puissance lorsque l’outil est en marche.
ENTREPOSAGE
Lubrifiez votre meuleuse à rectifier à angle droit avant de la ranger. Suivre
les directives de lubrification du moteur d’air, sauf pour l’étape 5. Ne faites
fonctionner la meule à rectifier les matrices que pendant 2-3 secondes (au
lieu de 10 secondes) parce qu’il doit rester davantage d’huile dans l’outil
pendant l’entreposage. Rangez votre outil dans un endroit frais et sec.
SERVICE TECHNIQUE
Pour de l’information sur le fonctionnement ou la réparation de ce produit,
veuillez visiter le www.campbellhausfeld.com.
INSTRUCTIONS DE SÉCURITÉ
Ce guide contient de l’information très importante que vous devez connaître
et comprendre. Cette information est fournie à des fins de SÉCURITÉ et
dans le but d’ÉVITER DES PROBLÈMES AVEC L’ÉQUIPEMENT. Pour faciliter la
reconnaissance de cette information, observez les symboles se trouvant à la
pageFr8. Les symboles sur la sécurité de ce manuel, visent à vous alerter des
importants dangers à la sécurité et les précautions.
Les symboles DANGER, AVERTISSEMENT, ATTENTION et AVIS
ainsi que les instructions de ce manuel ne peuvent pas couvrir
toutes les conditions et situations qui pourraient se produire.
L’opérateur doit comprendre que le bon sens et des précautions
sont des facteurs qui ne peuvent pas être inclus dans ces
produits, mais doivent être fournis par l’opérateur.
Avec toute pièce d’équipement, neuve ou usée, la plus importante partie de
l’opération est la SÉCURITÉ!
Campbell Hausfeld vous encourage à vous familiariser avec votre nouvel
équipement et insiste sur un fonctionnement sécuritaire.
Les prochaines pages de ce manuel résument les aspects principaux sur la
sécurité liée avec cette unité. Assurez-vous de les lire et les comprendre
entièrement avant d’utiliser cet appareil.
Les symboles utilisés dans les sections de fonctionnement et d’entretien du
présent manuel attirent l’attention sur les procédures de sécurité.

Fr6
INSTRUCTIONS DE SÉCURITÉ (SUITE)
Importantes instructions de sécurité
S’il vous plaît lire et conserver ces instructions. Lire attentivement avant
de monter, installer, utiliser ou de procéder à l’entretien du produit décrit.
Se protéger ainsi que les autres en observant toutes les instructions de
sécurité, sinon, il y a risque de blessure et/ou dégâts matériels! Conserver ces
instructions comme référence.
Ce manuel contient des informations concernant la sécurité, le
fonctionnement et l’entretien. Si vous avez des questions, veuillez visiter
www.campbellhausfeld.com pour l’assistance à la clientèle.
Proposition 65 de la Californie
Ce produit peut vous exposer à des produits chimiques
incluant le plomb, connus par l’état de la Californie
comme pouvant causer le cancer, des anomalies congénitales ou d’autres
troubles de la reproduction. Pour plus d’informations, rendez-vous sur le site
www.P65Warnings.ca.gov.
Illinois Lead Poisoning Prevention Act (Loi sur la prévention
de l’empoisonnement au plomb de l’État de l’Illinois)
Contient du plomb. Peut être nocif si ingéré ou mâché.
Respecte les normes fédérales.
Généralités sur la sécurité
Ce produit fait partie d’un système à haute pression et les précautions de
sécurité suivantes doivent être prises en permanence, en même temps que
toute autre règle de sécurité en vigeur.
1. Lire attentivement tous les manuels, y compris celui de ce produit.
Bien se familiariser avec les commandes et l’utilisation correcte de
l’équipement.
2. Seules les personnes bien familiarisées avec ces règles d’utilisation en
toute sécurité doivent être autorisées à se servir de l’outil pneumatique.
Ne pas dépasser la pression maximum de service
de l’outil pneumatique (621 kPa). L’outil
pneumatique risque d’exploser et d’avoir pour résultat des blessures graves,
ou mortelles.
3. Ne pas dépasser la pression nominale de n’importe quelle pièce du
système. La pression de service maximum de 621 kPa est mesurée à
l’arrivée de l’outil pendant que l’outil fonctionne. La perte de pression
entre le compresseur et l’outil doit être réglé au compresseur.
4. Débrancher l’outil pneumatique de l’alimentation en air avant de
remplacer des outils ou accessoires, de procéder à l’entretien et de
ranger l’outil.
Il est nécessaire de porter des lunettes de protection
et un protecteur auditif pendant l’utilisation.
5. Ne pas porter de vêtements flottants, d’écharpe ni de cravate. Les
vêtements flottants risquent de se prendre dans les pièces mobiles, ce
qui peut provoquer des blessures graves.
MANUAL
A página está carregando...
A página está carregando...
A página está carregando...
A página está carregando...
A página está carregando...
A página está carregando...
A página está carregando...
A página está carregando...
A página está carregando...
A página está carregando...
A página está carregando...
A página está carregando...
A página está carregando...
A página está carregando...
A página está carregando...
A página está carregando...
A página está carregando...
A página está carregando...
A página está carregando...
A página está carregando...
A página está carregando...
A página está carregando...
A página está carregando...
A página está carregando...
A página está carregando...
A página está carregando...
A página está carregando...
A página está carregando...
-
 1
1
-
 2
2
-
 3
3
-
 4
4
-
 5
5
-
 6
6
-
 7
7
-
 8
8
-
 9
9
-
 10
10
-
 11
11
-
 12
12
-
 13
13
-
 14
14
-
 15
15
-
 16
16
-
 17
17
-
 18
18
-
 19
19
-
 20
20
-
 21
21
-
 22
22
-
 23
23
-
 24
24
-
 25
25
-
 26
26
-
 27
27
-
 28
28
-
 29
29
-
 30
30
-
 31
31
-
 32
32
-
 33
33
-
 34
34
-
 35
35
-
 36
36
-
 37
37
-
 38
38
-
 39
39
-
 40
40
-
 41
41
-
 42
42
-
 43
43
-
 44
44
-
 45
45
-
 46
46
-
 47
47
-
 48
48


Campbell Hausfeld XT251000 Manual do usuário
- Tipo
- Manual do usuário
em outras línguas
Artigos relacionados
-
Campbell Hausfeld XT250000 Manual do usuário
-
-
-
-
-
-
-
-
-
