Campbell Hausfeld AF010600 Guia de usuario
- Tipo
- Guia de usuario

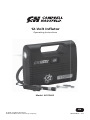
12-Volt Infl ator
Operating Instructions
Model: AF010600
IN642200AV 2/17
© 2016 Campbell Hausfeld
A Marmon/Berkshire Hathaway Company
EN

REGISTER YOUR PRODUCT ONLINE NOW! www.campbellhausfeld.com
READ AND FOLLOW ALL INSTRUCTIONS
SAVE THESE INSTRUCTIONS • DO NOT DISCARD
Please read and save these instructions. Read carefully before
attempting to assemble, install, operate or maintain the product
described.
Protect yourself and others by observing all safety information. Failure
to comply with instructions could result in personal injury and/or
property damage! Retain instructions for future reference.
REMINDER: Keep your dated proof of purchase for warranty purposes!
Attach it to this manual or file it for safekeeping.
Please see page 6 for Safety Glossary and Safety Symbols.
Model #: ________________________________
Purchase Date: __________________________
For parts, product & service information
visit www.campbellhausfeld.com
Campbell Hausfeld
100 Production Drive
Harrison, Ohio 45030

BEFORE YOU BEGIN
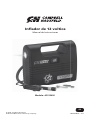
Description
This 12-volt inflator comes with an inflation nozzle and sports needle. The
inflator can be used for emergency roadside tire inflation and to inflate bike
tires, soccer balls, beach balls and other sporting equipment.
UNPACKING
After unpacking the unit, inspect carefully for any damage that may have
occurred during transit. Check for loose, missing or damaged parts. Check
to be sure all supplied accessories are enclosed with the unit. In case of
questions, damaged or missing parts, please visit www.campbellhausfeld.com
for customer assistance.
Do not operate unit if damaged during shipping,
handling or use. Damage may result in bursting and
cause injury or property damage.
Other Parts (Not Provided)
You will need the following to operate this Campbell Hausfeld inflator:
• 12-volt DC power outlet rated 15 amps or higher
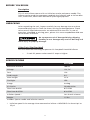
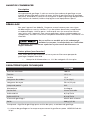
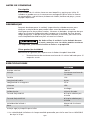
SPECIFICATIONS
AF010600
Maximum Pressure 100 PSI
Voltage 12V, DC
Fuse 12A
Cord Length 9 ft.
Hose Length 22 in.
Flashlight LED
Gauge Analog
Air Outlet Shrader Valve
Flow Rate @ 0 PSI 0.53 CFM
Flow Rate @ 35 PSI 0.28 CFM
Inflation Speed * Less than 6 minutes
Weight 1.5 lbs.
Includes: Sports needle and inflation nozzle.
* Inflation speed is the average time measured to inflate a 195/65/R15 tire from 0 psi to
35 psi
1

2
DIMENSIONS
Length 6-7/8 in.
Width 3.0 in.
Height 6-1/8 in.
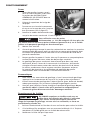
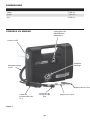
GETTING TO KNOW YOUR UNIT
Figure 1
LED Flashlight
Analog Gauge
Inflation Nozzle
Sports Needle
12V Power Cord
Inflation Hose
ON / OFF Switch
Air Hose
Connector

3
OPERATION
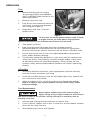
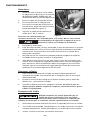
Tires
1. Before inflating the tire, review
all warnings listed in the GENERAL
SAFETY INSTRUCTIONS section of this
operating manual.
2. Remove valve stem cap.
3. Turn the air hose connector onto the
valve stem in a clockwise direction
until snug (See Figure 2).
4. Plug power cord into 12-volt DC
power outlet.
For use with 12-volt DC power outlets rated 15 amps
or higher. Do not use with older 8 amp cigarette
lighter receptacles or fuse will blow and inflator will not work.
5. Turn power switch on.
6. Stop inflation when the proper pressure has been reached.
Recommended tire inflation pressure for the vehicle can typically be
found in the vehicle’s owner’s manual or on the driver’s side door jamb.
7. Do not over inflate tires as tires may rupture/explode causing serious
injury and/or property damage.
8. Tire inflation should only be done in a safe area, well off roadway and
away from traffic. Use reflective warning triangles and/or safety flares
to alert other drivers of roadside emergency. Always follow the tire
inflation safety advice and procedures noted in the vehicle’s operating
manual.
Inflatables
1. To use the inflation accessories, screw appropriate inflation accessory
into the air hose connector until snug.
2. Insert the inflation accessory into the inflatable object (tire, football raft,
etc.) and turn on the inflator.
3. When the object is firm, switch the inflator off. Do not over inflate
objects as objects may rupture/explode causing serious injury and/or
property damage.
Fuse Replacement
Never replace a blown fuse with a fuse having a
higher rating. Using a higher rated fuse will transmit
too much current to the inflator’s wiring causing it to overheat, melt or,
possibly, catch fire.
1. Unscrew end of plug counter-clockwise to remove fuse.
2. If fuse is blown, replace with a new 12-amp fuse. Always replace a blown
fuse with the same size fuse.
3. Reassemble plug. Do not over-tighten.
Figure 2

4
TECHNICAL SERVICE
For information regarding the operation or repair of this product, please visit
www.campbellhausfeld.com
GENERAL SAFETY INSTRUCTIONS
This manual contains information that is very important to know and
understand. This information is provided for SAFETY and to PREVENT
EQUIPMENT PROBLEMS. To help recognize this information, observe the
symbols found on page 6. The Safety Symbols throughout this manual are to
alert you to important safety hazards and precautions.
The DANGER, WARNING, CAUTION, and NOTICE notifications
and instructions in this manual cannot cover all possible condi-
tions and situations that may occur. It must be understood by
the operator that caution is a factor which cannot be built into
this product, but must be supplied by the operator.
With any piece of equipment, new or used, the most important part of its
operation is SAFETY!
Campbell Hausfeld encourages you to familiarize yourself with your new
equipment and stresses safe operation.
The next few pages of this manual are a summary of the main safety aspects
associated with this unit. Be sure to read and understand completely before
operating the machine.
The symbols used throughout the operation and maintenance sections of
this manual call attention to safety procedures.
California Proposition 65
• This product or its power cord may contain chemicals known to the State
of California to cause cancer and birth defects or other reproductive
harm. Wash hands after handling.
Important Safety Information
Please read and save these instructions. Read carefully before attempting to
assemble, install, operate or maintain the product described. Protect yourself
and others by observing all safety information. Failure to comply with
instructions could result in personal injury and/or property damage! Retain
instructions for future reference.
This manual contains important safety, operational and maintenance
information. If you have any questions, please visit
www.campbellhausfeld.com for customer assistance.
MANUAL

5
General Safety
• Always operate this tire inflator in an open and well-ventilated area and
not inside a confined area, such as a garage. Doing so may lead to bodily
harm or asphyxiation resulting in death.
• Do not leave the inflator unattended while the unit is running.
• Wear eye protection during the inflation process. Never exceed the
recommended pressure for any inflatable object. Do not over inflate
objects as objects may rupture/explode causing serious injury and/or
property damage.
• The air hose connector must be properly connected to secure the
inflation accessories. Use extreme caution when using inflation
accessories.
• Always put the car in park; set the emergency brake; and “chock” the
wheels before using the inflator as personal injury and/or property
damage may occur.
• Tire inflation should only be done safely away from the roadway, with
use of triangles or flares, and in compliance with the vehicle’s operating
manual.
• Always use a separate pressure gauge to check the actual pressure in
tires and in low pressure inflatable objects.
• Inflator must cool for 20 minutes after 20 minutes of continuous
operation. The inflator is not designed to operate continuously for more
than 20 minutes. Exceeding recommended run-time or not allowing for
adequate cooling will cause inflator to overheat and could damage or
destroy inflator.
• When using inflator on high pressure tires, such as those used on large
trucks, trailers or tractors, tire inflation must be executed in stages--NOT
exceeding the 20 minutes of run-time and NOT omitting the 20 minutes
of cooling required for proper use of this inflator.
• Make sure the air hose connector is properly connected to the valve
stem. Failure to properly connect the air hose will result in slower
inflation and/or no air getting to the tire.
• Inflator will get hot to the touch and may cause serious injury--do not
hold or touch while operating. Keep away from flammable materials.

GENERAL SAFETY INSTRUCTIONS (CONTINUED)
Safety Glossary
This manual contains information that is very important to know and
understand. This information is provided for SAFETY and to PREVENT
EQUIPMENT PROBLEMS. To help recognize this information, observe the
following symbols.
Danger indicates an imminently hazardous situation
which, if not avoided, WILL result in death or serious
injury.
Warning indicates a potentially hazardous situation
which, if not avoided, COULD result in death or
serious injury.
Caution indicates a potentially hazardous situation
which, if not avoided, MAY result in minor or
moderate injury.
Notice indicates important information, that if not
followed, may cause damage to equipment.
IMPORTANT or NOTE: Information that requires special attention.
Safety Symbols
The following Safety Symbols appear throughout this manual to alert you to
important safety hazards and precautions.
SAVE THESE INSTRUCTIONS
DO NOT DISCARD
6
Risk of
Pressure
MANUAL
Read Manual
First

7
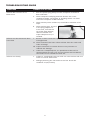
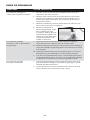
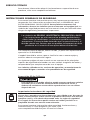
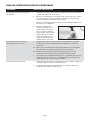
TROUBLESHOOTING GUIDE
SYMPTOM CORRECTIVE ACTION
Inflator does not turn on or
blows fuses
1. Push the power plug firmly into the receptacle and twist it
back and forth.
2. Check receptacle and plug terminal for dirt. Use a non-
conductive probe--not fingers or anything metal—to check
and clean receptacle and/or terminal.
3. Check vehicle power outlet fuse; should be a minimum of 15
amps.
4. Check inflator fuse, located
in the plug adaptor. To
access fuse, unscrew the
tip of the plug adaptor,
remove old fuse and
inspect. Replace fuse, if
needed .
Inflator runs but tire/article does
not inflate
1. Ensure air hose connector is properly seated on the valve stem
and tightened.
2a. Check tire/article for leaks. Check inflator hose for cracks and
leaks at fittings.
2b. Inspect tire/article to confirm there are no punctures or
sidewall tire damage.
3. If the tire is completely flat, it is possible that the tire has
separated from the rim. If so, the tire inflator will not deliver
the volume of air needed to inflate tire.
Inflator runs slowly 1. Inflator is overheated from too much use. Shut inflator off and
allow to cool for 20 minutes.
2. Voltage powering the 12V outlet is too low. Check the
condition of (car) battery.

Reminder: Keep your dated proof of purchase for warranty purposes! Attach it to this manual or file it
for safekeeping.
LIMITED WARRANTY
1. DURATION: From the date of purchase by the original purchaser as follows: One (1) Year.
2. WHO GIVES THIS WARRANTY (WARRANTOR): Campbell Hausfeld a Marmon/Berkshire Hathaway
Company, 100 Production Drive, Harrison, Ohio, 45030. Visit www.campbellhausfeld.com
3. WHO RECEIVES THIS WARRANTY (PURCHASER): The original purchaser (other than for purposes of
resale) of the Campbell Hausfeld product.
4. WHAT PRODUCTS ARE COVERED BY THIS WARRANTY: Any Campbell Hausfeld nailer, stapler, air tool,
spray gun, inflator or air accessory supplied or manufactured by Warrantor.
5. WHAT IS COVERED UNDER THIS WARRANTY: Substantial defects in material and workmanship which
occur within the duration of the warranty period.
6. WHAT IS NOT COVERED UNDER THIS WARRANTY:
A. Implied warranties, including those of merchantability and FITNESS FOR A PARTICULAR
PURPOSE ARE LIMITED FROM THE DATE OF ORIGINAL PURCHASE AS STATED IN THE DURATION.
If this product is used for commercial, industrial or rental purposes, the warranty will apply for
ninety (90) days from the date of purchase. Some States do not allow limitation on how long an
implied warranty lasts, so the above limitations may not apply to you.
B. ANY INCIDENTAL, INDIRECT, OR CONSEQUENTIAL LOSS, DAMAGE, OR EXPENSE THAT MAY
RESULT FROM ANY DEFECT, FAILURE, OR MALFUNCTION OF THE CAMPBELL HAUSFELD
PRODUCT. Some States do not allow the exclusion or limitation of incidental or consequential
damages, so the above limitation or exclusion may not apply to you.
C. Any failure that results from an accident, purchaser’s abuse, neglect or failure to operate
products in accordance with instructions provided in the owner’s manual(s) supplied with
product. Accident, purchaser’s abuse, neglect or failure to operate products in accordance with
instructions shall also include the removal or alteration of any safety devices. If such safety
devices are removed or altered, this warranty is void.
D. Normal adjustments which are explained in the owner’s manual(s) provided with the product.
E. Items or service that are normally required to maintain the product, i.e. o-rings, springs,
bumpers, debris shields, driver blades, fuses, batteries, gaskets, packings or seals, fluid nozzles,
needles, sandblast nozzles, lubricants, material hoses, filter elements, motor vanes, abrasives,
blades, cut-off wheels, chisels, chisel retainers, cutters, collets, chucks, rivet jaws, screw driver
bits, sanding pads, back-up pads, impact mechanism, or any other expendable part not
specifically listed. These items will only be covered for ninety (90) days from date of original
purchase. Underlined items are warranted for defects in material and workmanship only.
7. RESPONSIBILITIES OF WARRANTOR UNDER THIS WARRANTY: Repair or replace, at Warrantor’s
option, products or components which are defective, have malfunctioned and/or failed to conform
within duration of the warranty period.
8. RESPONSIBILITIES OF PURCHASER UNDER THIS WARRANTY:
A. Provide dated proof of purchase and maintenance records.
B. Deliver or ship the Campbell Hausfeld product or component to the nearest Campbell Hausfeld
Authorized Service Center. Freight costs, if any, must be borne by the purchaser.
C. Use reasonable care in the operation and maintenance of the products as described in the
owner’s manual(s).
9. WHEN WARRANTOR WILL PERFORM REPAIR OR REPLACEMENT UNDER THIS WARRANTY: Repair
or replacement will be scheduled and serviced according to the normal work flow at the servicing
location, and depending on the availability of replacement parts.
This Limited Warranty applies in the United States, Canada and Mexico only and gives you specific legal
rights. You may also have other rights which vary from state to state or country to country.
8

9
NOTES:

10
NOTES:

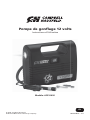
Pompe de gonfl age 12volts
Instructions d’Utilisation
Modèle: AF010600
IN642200AV 2/17
© 2016 Campbell Hausfeld
A Marmon/Berkshire Hathaway Company
FR

ENREGISTREZ VOTRE PRODUIT EN LIGNE MAINTENANT !
www.campbellhausfeld.com
LIRE ET SUIVRE TOUTES LES INSTRUCTIONS
CONSERVER CES INSTRUCTIONS • NE PAS JETER
Lire et conserver ces instructions. Il faut les lire attentivement avant
de commencer à assembler, installer, faire fonctionner ou entretenir
l’appareil décrit.
Pour se protéger et protéger autrui, observer toutes les informations sur
la sécurité. Négliger d’appliquer ces instructions peut causer
des blessures et/ou des dommages matériels! Conserver ces instructions
pour consultation ultérieure.
RAPPEL: Conservez votre preuve d’achat datée aux fi ns de garantie!
Attachez-le à ce manuel ou classez-le pour le garder en sécurité.
Consultez la page6 quant au glossaire et les symboles sur la sécurité.
N° de modèle : _____________________________
Date d’achat : _____________________________
Pour de l’information sur les pièces,
produits et services veuillez visiter
www.campbellhausfeld.com
Campbell Hausfeld
100 Production Drive
Harrison, Ohio 45030

AVANT DE COMMENCER
Description
Cette pompe de gonflage 12 volts est munie d’un embout de gonflage et une
aiguille de gonflage pour articles de sport. Utiliser le gonfleur pour le gonflage
des pneus au bord de la route en cas d’urgence et pour le gonflage des pneus de
vélos, ballons de football, ballons de plage et autre équipement sportif.
DÉBALLAGE
Dès que l’appareil est déballé, l’inspecter attentivement pour tout signe
de dommages en transit. Vérifier s’il y a des pièces desserrées, manquantes
ou endommagées. Vérifier pour s’assurer que tous les accessoires fournis
sont inclus avec l’appareil. Pour toutes questions, pièces endommagées ou
manquantes, veuillez visiter www.campbellhausfeld.com pour l’assistance à la
clientèle.
Ne pas utiliser un modèle qui a été endommagé
pendant le transport, la manipulation ou l’utilisation.
Le dommage peut résulter en explosion et peut causer des blessures ou
dégâts matériels.
Autres pièces (non fournies)
Vous aurez besoin des éléments suivants pour utiliser cette pompe de
gonflage Campbell Hausfeld:
• Une prise d’alimentation c.c. 12V de catégorie 15A ou plus
CARACTÉRISTIQUES TECHNIQUES
AF010600
Pression maximale 100 PSI
Tension 12 V, c.c.
Fusible 12A
Longueur du cordon 2,7m (9pi)
Longueur du tuyau 56cm (22po)
Lampe de poche DEL
Manomètre Analogue
Sortie d’air Vanne Schrader
Débit @ 0 PSI 0,53 pi³/min
Débit @ 35 PSI 0,28pi³/min
Vitesse de gonflage * Moins de 6minutes
Poids 680g (1,5 lb)
Comprend: Aiguille de gonflage pour articles de sport, et embout de gonflage.
* La vitesse de gonflage est le temps moyen mesuré à gonfler un pneu195/65/R15 de 0 à
35psi
Fr1

Fr2
Lampe de poche DEL
Manomètre
analogue
Embout de
gonflage
Aiguille pour
article de sport
Cordon
d’alimentation
12V
Tuyau de gonflage
Interrupteur de
marche/arrêt
DIMENSIONS
Leng. 17,46 cm
Larg. 7,62 cm
Haut. 15,56 cm
APPRENEZ À CONNAÎTRE VOTRE UNITÉ
Figure 1
Connecteur
pour tuyau
à air

Fr3
FONCTIONNEMENT
Pneus
1. Avant de gonfler le pneu, revoir
tous les avertissements listés dans
la section des INSTRUCTIONS
GÉNÉRALES DE SÉCURITÉ dans ce
manuel d’utilisation.
2. Enlever le capuchon de la tige de
soupape.
3. Tournez en sens horaire le connecteur
du tuyau sur le corps de valve, jusqu’au
bon ajustement (voir la figure 2).
4. Brancher le cordon d’alimentation dans
une prise de courant continu de 12 volts.
Pour utilisation avec des prises
d’alimentation c.c. 12V de catégorie 15A ou plus. Ne
pas utiliser avec les anciennes prises d’allume-cigarette de 8A, car le fusible
grillera et la pompe de gonflage ne fonctionnera pas.
5. Mettre sous tension.
6. Cesser le gonflage lorsque la pression recherchée est atteinte. La pression
recommandée des pneus pour un véhicule se trouve généralement dans
le manuel du propriétaire du véhicule ou sur le montant du côté de la
porte du conducteur.
7. Ne pas gonfler les pneus à l’excès alors qu’ils peuvent se rompre/exploser
causant de graves blessures et/ou des dommages matériels.
8. Le gonflage des pneus ne devrait être effectué que dans une zone
sécuritaire, bien à l’écart de la route et de la circulation. Utilisez des
triangles d’avertissement et/ou des torches de sécurité afin d’alerter
les autres conducteurs d’une urgence routière. Respectez toujours
les conseils de sécurité et les procédures de gonflage des pneus
mentionnées dans le manuel de l’utilisateur du véhicule.
Pneumatiques
1. Pour utiliser les accessoires de gonflage, vissez l’accessoire de gonflage
approprié sur le connecteur du tuyau à air, jusqu’au bon ajustement.
2. Insérez l’accessoire de gonflage dans l’objet à gonfler (pneu, ballon de football,
radeau pneumatique, etc.) et mettez la pompe de gonflage en marche.
3. Une fois que l’objet est ferme, éteignez la pompe de gonflage. Ne pas
gonfler les objets à l’excès alors qu’ils peuvent se rompre/exploser
causant de graves blessures et/ou des dommages matériels.
Remplacement de fusibles
Ne JAMAIS remplacer un fusible sauté avec un
fusible d’une classification plus élevée. L’utilisation
d’un fusible de catégorie plus élevée transmettra trop de courant au
filage de la pompe de gonflage, causant ainsi sa surchauffe, sa fonte ou
possiblement, prendre feu.
1. Dévisser l’extrémité de la fiche dans le sens antihoraire pour retirer le fusible.
2. Si le fusible grille, remplacer avec un nouveau fusible de 12 A. Toujours
remplacer un fusible grillé par un fusible de même taille.
3. Remonter la fiche. Ne pas trop serrer.
Figure 2

Fr4
SERVICE TECHNIQUE
Pour de l’information sur le fonctionnement ou la réparation de ce produit,
veuillez visiter le www.campbellhausfeld.com
INSTRUCTIONS GÉNÉRALES DE SÉCURITÉ
Ce guide contient de l’information très importante que vous devez connaître
et comprendre. Cette information est fournie à des fins de SÉCURITÉ et
dans le but d’ÉVITER DES PROBLÈMES AVEC L’ÉQUIPEMENT. Pour faciliter la
reconnaissance de cette information, observez les symboles se trouvant à la
pageFr6. Les symboles sur la sécurité de ce manuel, visent à vous alerter des
importants dangers à la sécurité et les précautions.
Les symboles DANGER, AVERTISSEMENT, ATTENTION et AVIS
ainsi que les instructions de ce manuel ne peuvent pas couvrir
toutes les conditions et situations qui pourraient se produire.
L’opérateur doit comprendre que le bon sens et des précautions
sont des facteurs qui ne peuvent pas être inclus dans ces
produits, mais doivent être fournis par l’opérateur.
Avec toute pièce d’équipement, neuve ou usée, la plus importante partie de
l’opération est la SÉCURITÉ!
Campbell Hausfeld vous encourage à vous familiariser avec votre nouvel
équipement et insiste sur un fonctionnement sécuritaire.
Les prochaines pages de ce manuel résument les aspects principaux sur la
sécurité liée avec cette unité. Assurez-vous de les lire et les comprendre
entièrement avant d’utiliser cet appareil.
Les symboles utilisés dans les sections de fonctionnement et d’entretien du
présent manuel attirent l’attention sur les procédures de sécurité.
Proposition 65 de Californie
• Ce produit ou son cordon peuvent contenir des produits chimiques
qui, de l’avis de l’État de Californie, causent le cancer et des anomalies
congénitales ou autres problèmes de reproduction. Lavez-vous les mains
après la manipulation.
Importantes instructions de sécurité
S’il vous plaît lire et conserver ces instructions. Lire attentivement avant
de monter, installer, utiliser ou de procéder à l’entretien du produit décrit.
Se protéger ainsi que les autres en observant toutes les instructions de
sécurité, sinon, il y a risque de blessure et/ou dégâts matériels! Conserver ces
instructions comme référence.
Ce manuel contient des informations concernant la sécurité, le
fonctionnement et l’entretien. Si vous avez des questions, veuillez visiter
www.campbellhausfeld.com pour l’assistance à la clientèle.
MANUAL

Fr5
Généralités sur la sécurité
• Toujours utiliser cette pompe de gonflage dans un endroit ouvert et bien
aéré ne se trouvant pas dans un espace clos comme un garage. Si ce n’est
pas le cas, vous pourriez subir des dommages corporels ou vous asphyxier
jusqu’à la mort.
• Ne pas laisser le gonfleur en marche sans surveillance.
• Portez une protection pour les yeux pendant le processus de gonflage.
Ne dépassez jamais la pression recommandée pour les objets. Ne pas
gonfler les objets à l’excès alors qu’ils peuvent se rompre/exploser
causant de graves blessures et/ou des dommages matériels.
• Le connecteur pour tuyau à air doit être correctement branché pour bien
fixer les accessoires de gonflage. Il faut être extrêmement prudent en
utilisant les accessoires de gonflement.
• Placez toujours l’auto en position de stationnement; apposez le frein
d’urgence; et calez les roues avant d’utiliser la pompe de gonflage,
sachant que des blessures personnelles et/ou des dommages matériels
peuvent survenir.
• Le gonflage des pneus devrait s’effectuer sécuritairement, loin de la
route, avec l’utilisation de triangles ou de torches, en respect avec le
manuel d’utilisation du véhicule.
• Toujours utiliser un autre manomètre pour vérifier la pression actuelle
dans les pneus et dans les objets gonflables de pression basse.
• Le gonfleur DOIT se refroidir pendant 20 minutes après 20 minutes
de fonctionnement continu. Le gonfleur n’est past conçu pour le
fonctionnement continu pendant plus que 20 minutes. Dépasser le temps
de fonctionnement recommandé ou ne pas permettre un refroidissement
approprié causera la surchauffe de la pompe de gonflage, ce qui pourrait
causer des dommages ou la destruction de la pompe de gonflage.
• Lorsque vous utilisez la pompe de gonflage sur des pneus de haute
pression, comme ceux sur de grands camions, remorques ou tracteurs, le
gonflage des pneus s’effectuer par étapes, ne dépassant PAS 20minutes
de fonctionnement et SANS omettre le 20minutes de refroidissement
exigé pour l’utilisation appropriée de cette pompe de gonflage.
• Assurez-vous que le connecteur pour tuyau à air est correctement
branché au corps de valve. Ne pas brancher correctement le tuyau à air
causera un gonflage plus lent et/ou aucun air ne pénètrera dans le pneu.
• La pompe de gonflage peut devenir chaude au toucher et entraîner de
graves blessures - ne pas tenir ou toucher pendant le fonctionnement.
Tenir loin des matières inflammables.

INSTRUCTIONS GÉNÉRALES DE SÉCURITÉ (SUITE)
Glossaire sur la sécurité
Ce manuel contient de l’information très importante qui est fournie pour
la SÉCURITÉ et pour ÉVITER LES PROBLÈMES D’ÉQUIPEMENT. Rechercher les
symboles suivants pour cette information.
Danger indique une situation dangereuse imminente
qui MÈNERA à la mort ou à des blessures graves si
elle n’est pas évitée.
Avertissement indique une situation potentiellement
dangereuse qui, si elle n’est pas évitée, POURRAIT
mener à la mort ou à de graves blessures.
Attention indique une situation potentiellement
dangereuse qui, si elle n’est pas évitée, PEUT mener
à des blessures mineures ou modérées.
Avis indique de l’information importante qui
pourrait endommager l’équipement si elle n’est pas
respectée.
IMPORTANT ou REMARQUE: Information qui exige une attention spéciale.
Symboles de sécurité
Les symboles de sécurité suivants apparaissent dans l’ensemble de ce manuel
pour vous aviser des dangers et précautions importants de sécurité.
CONSERVER CES INSTRUCTIONS
NE PAS JETER
Fr6
Risque de
pression
MANUAL
Lire d’abord
le manuel
A página está carregando...
A página está carregando...
A página está carregando...
A página está carregando...
A página está carregando...
A página está carregando...
A página está carregando...
A página está carregando...
A página está carregando...
A página está carregando...
A página está carregando...
A página está carregando...
-
 1
1
-
 2
2
-
 3
3
-
 4
4
-
 5
5
-
 6
6
-
 7
7
-
 8
8
-
 9
9
-
 10
10
-
 11
11
-
 12
12
-
 13
13
-
 14
14
-
 15
15
-
 16
16
-
 17
17
-
 18
18
-
 19
19
-
 20
20
-
 21
21
-
 22
22
-
 23
23
-
 24
24
-
 25
25
-
 26
26
-
 27
27
-
 28
28
-
 29
29
-
 30
30
-
 31
31
-
 32
32


Campbell Hausfeld AF010600 Guia de usuario
- Tipo
- Guia de usuario
em outras línguas
- español: Campbell Hausfeld AF010600 Guía del usuario
- français: Campbell Hausfeld AF010600 Mode d'emploi
- English: Campbell Hausfeld AF010600 User guide
Artigos relacionados
-
Campbell Hausfeld 12V INFLATOR W LIGHT 100 PSI AF011400 Manual do usuário
-
-
-
-
-
-
-
-
-
Outros documentos
-
Husky HDR650 Instruções de operação
-
-
Black & Decker ASI200-LA Manual do usuário
-
-
Black & Decker ASI300 Manual do usuário
-
-
Stanley SFMCE520 Manual do usuário
-
-
BLACK DECKER ASI500 H1 Manual do proprietário
-
Black & Decker BDCINF18 Manual do usuário