Teka TKS 890 H Manual do usuário
- Categoria
- Secadoras
- Tipo
- Manual do usuário

TKS 890 H
SECADORA
INSTRUCTION MANUAL
MANUAL DE INSTRUCCIONES
MANUAL DE INSTRUÇÕES
ES
PT
EN

S
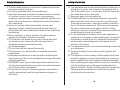
Safety information
Catalogue
Catalogue
1
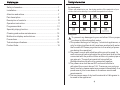
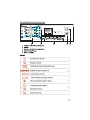
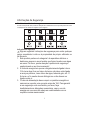
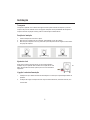
Dry Care Symbols
Safety notes
!
Dry
Dry clean Do not dry clean
Dry clean normal cycle
with any solvent
Normal
Not tumble dry normal
Do not dry
Dry flat
Drip dry
Line dry / hang to dry
In the shade
A
F
Dry clean normal cycle
petroleum solvent only
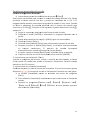
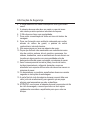
To prevent any damages to your and others' life or property,
you have to follow the safety notes.
Please pay attention to use the drying machine if the materials of your
clothes can not be dried by it or contain the symbols as follows:
Safety information..............................................................1
Installation........................................................................6
Attention and advice...........................................................7
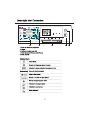
Part description............................................................... ..8
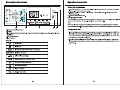
Description of controls.......................................................10
Operation instruction.........................................................11
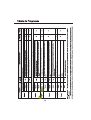
Programme table..............................................................12
Specialty drying function...................................................13
Cleaning and routine maintenance.....................................15
Malfunction display and solutions......................................16
Precautions.....................................................................17
Technical specifications....................................................18
Product fiche....................................................................19
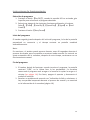
1.This product belongs to Category electrical appliances, and
only for drying textiles which have been washed with water in
the household. Please pay attention to the safety of power
use during the operation!
2.The power source with reliable earthing must be used. Its
earth wire must be buried under the ground and shall not be
connected with the public utilities such as city water pipe or
gas pipe etc. The earth wire and null wire shall be
distinguished and shall not be connected together.
3.The power wire shall be met IEC and must be able to
withstand the current above 10A. To ensure your and your
family's safety, please make improvement immediately if any
power use at your home does no the above-mentioned
requirements.
4.The maximum mass of dry textile material is 8 kilograms to
be used in the appliance.

2
2 3
Safety information
Catalogue
Safety information
5.That the tumble dryer is not to be used if industrial chemicals
have been used for cleaning.
6.Do not dry unwashed items in the tumble dryer.
7.Items that have been soiled with substances such as cooking
oil, acetone, alcohol, petrol, kerosene, spot removers,
turpentine, waxes and wax removers should be washed in hot
water with an extra amount of detergent before being dried in
the tumble dryer.
8.Items such as foam rubber (latex foam), shower caps,
waterproof textiles, rubber backed articles and clothes or
pillows fitted with foam rubber pads should not be dried in the
tumble dryer.
9.Fabric softeners, or similar products, should be used as
specified by the fabric softener instructions.
10.The final part of a tumble dryer cycle occurs without heat
(cool down cycle) to ensure that the items are left at a
temperature that ensures that the items
will not be damaged.
11.The lint trap has to be cleaned frequently.
12.The lint must not to be allowed to accumulate around the
tumble dryer.
13.Adequate ventilation has to be provided to avoid the back
flow of gases into the room from appliance burning other fuels,
including open fires.
14.WARNING: never stop a tumble dryer before the end of the
drying cycle unless all items are quickly removed and spread
out so that the heat is dissipated.
15.The exhaust air must not be discharged into a flue which is
used for exhausting fumes from appliance burning gas or
other fuels.
16.The appliance must not be install behind a lockable door, a
sliding door or a door with a hinge on the opposite side to
that of the tumble dryer. In such a way that a full opening of
the tumble dryer door is restricted.
17.Keep pets away from this appliance.
18.Oil-affected items can ignite spontaneously, especially
when exposed to heat sources such as in a tumble dryer.
The items become warm, causing an oxidation reaction in
the oil. Oxidation creates heat. If the heat cannot escape,
the items can become hot enough to catch fire. Piling,
stacking or storing oil-affected items can prevent heat from
escaping and so create a fire hazard.
19.If it is unavoidable that fabrics that contain vegetable or
cooking oil or have been contaminated by hair care products
be placed in a tumble dryer they should first be washed in
hot water with extra detergent-this will reduce, but not
eliminate, the hazard.
20.The appliance should not be overturned during normal use
or maintenance.
21.Remove all objects from pockets such as lighters and
matches.
22.This appliance can be used by children aged from 8 years
and above and persons with reduced physical, sensory or
mental capabilities or lack of experience and knowledge if
they have been given supervision or instruction concerning
use of the appliance in a safe way and understand the
hazards involved. Children shall not play with the appliance.
Cleaning and user maintenance shall not be made by
children without supervision.

4
4 5
Safety information
Catalogue
Safety information
23.If the power cable is damaged, it must be replaced by the
manufacturer, its service agent or similarly qualified persons
in order to avoid a hazard.
24.This appliance is for indoor use only.
25.The openings must not be obstructed by a carpet.
26.Children of less than 3 years should be kept away unless
continuously supervised.
27.If the appliance appear high temperature abnormally ,
please draw the mail plug immediately.
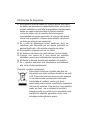
Correct Disposal of this product:
This marking indicates that this product hould not be
disposed with other household wastes throughout the
EU. To prevent possible harm to the environment or
human health from uncontrolled waste disposal, recycle
it responsibly to promote the sustainable reuse of
material resources. To return your used device, please
use the return and collection systems or contact the
retailer where the product was purchased. They can take
this product for environmental safe recycling.
Injury danger
Electric shock hazard
1.Do not draw the power cord forcefully to pull out the mains
plug.
2.Please do not plug/draw the mains plug with wet hands.
3.Do not damage the power cord and the power plug.
1.Do not disassemble and install the dryer under no instruction
or supervision.
2.Do not stack this dryer on washing machine without stacking
kits.(if want stacking on washing machine, please purchase
the Independent parts and it must be installed by the
manufacturer, its service agent or similarly qualified persons
in order to avoid a hazard.)
3.Do not lean on the opened door of the dryer.
4.Do not put any pyrotoxin on the dryer, such as the candle,
electric cooker.
Damage danger
1.Do not dry over the rated capacity.
2.Do not operate the dryer without the filter door and filter base.
3.Do not dry the clothes before being spun.
4.Do not expose the dryer directly under the sun, and indoor
use only.
5.Do not install the dryer in the humid and drenching
environment.
6.At the cleaning and maintenance, please do remember to pull
out the power plug and do not directly wash the dryer with
water.
Explosion danger
Please do not dry the clothes with some flammable substances
such as the coal oil, alcohol or there will be the explosion.

6 7
Catalogue
Installation
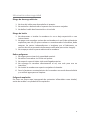
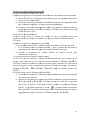
Installation Position
Level Adjusting
Once in its permanent operating position,
check that the dryer is absolutely level with the aid
of a spirit level. If it is not, adjust the feet with a tool.
Power Supply Connection
1.Make sure that the voltage of the power supply is the same as the electric specification of the dryer.
2.Do not connect the dryer with the power connection board, the universal plug or socket.
1.It is recommended that, for your convenience, the machine is positioned close to your washing
machine.
2.The tumble dryer must be installed in a clean place, where dirt does not build up. Air must be able
to circulate freely all round the appliance. Do not obstruct the front air inlet or the air intake grilles
at the back of the machine.
3.To keep vibration and noise to a minimum when the dryer is in use, it should be placed on a firm
and level surface.
4.The feet must never be removed. Do not restrict the floor clearance through deep pile carpets,
strips of wood or similar. This might cause heat built-up which would interfere with the operation
of the appliance.
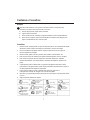
used as the handle for delivery. If the dryer can’t be transported erect, the dryer could be slant
Transport
Move cautiously. Do not grasp any salient parts of machine. The machine door can not be
to right less than 30° .
Attention and Advice
1.Before drying, thoroughly spin the laundry in washing machine. High spin speed can reduce the drying
time and save energy consumption.
2.For uniform drying result, sort the laundry according to fabric type and drying programme.
3.Before drying, please close zips, hooks and eyelets, button up, tie fabric belts, etc.
4.Do not over dry the clothes, because over dried clothes can easily get creases or shrinkage.
5.Do not dry the articles containing rubber or similar elastic materials such as raincoats, bicycle covers and
6.The door can be opened only after the programme of the drying machine is completed. Do not open the
7.Clean the lint filter and empty container after each use to avoid extension of drying time and energy
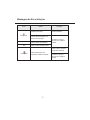
9.The weight references as follows:
Blended Coats
(about 800g)
Jackets (about
800g in cotton)
Towel Quilts
(about 900g
in cotton)
Shirts (about
300g in cotton)
Work Clothes
(upper and lower)
(about 1120g in
cotton)
Underpants
(about 70g in
cotton)
Undershirts
(about 180g in
cotton)
Single Sheets
(about 600g in
cotton)
Jeans Trousers
(about 800g)
Pajamas
(about 200g)
Socks (about 30g in
blended material)
consumption.
Attention
etc.
door before the programme finished, as the skin may be scalded by steam or hot surface.
Advice
a)Put some clean rags into the drum.
b)Plug the power, press .
【On/Off 】
c)Select the 【Refresh】 Programme, press 【Start/Pause】 button.
d)After finishing this programme, please follow the “cleaning and routine maintenance” (refer to page 15)
to clean the filter door.
Leave it to stand for 2 hours after transporting. Before first use, please use the soft fabric to
to clean the inside drum.
8 .. Please choose the related programme when deal with wool material clothes, to make the cloth more fresh
. and fluffy.
During drying, the compressor and the water pump generate some noise which is entirely normal.

8
8 9
Catalogue
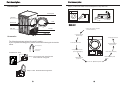
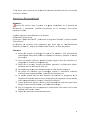
Part description
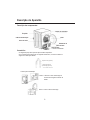
Part Description
Power Cord
Filter door
Container
Door
Control panel
Air inlet
Filter base
Filter cover
Drum
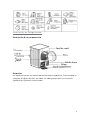
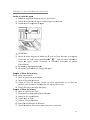
Accessories
The following parts are optional for specific models.
If your dryer has following parts, please them instruction
below .
install following the
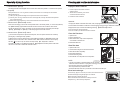
Hose holder(optional)
Condensing drain
hose(optional)
Step 1: removing the drain hose from the
hose connector using plier.
Step 2: insert the external drainage hose.
Installation step:
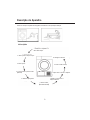
Part description
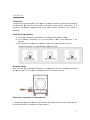
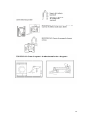
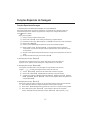
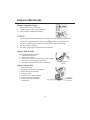
Quick start
1.Check if the container and filters
have been cleaned up
3. Close the machine door
2. Open the door and
load the laundry
4. Plug the power cord and
press the【On/Off】key
8.Press the 【】keyOn/Off
7. Remove the laundry when
6. Press the 【Start/Pause】button
9. Clean the filters and
empty container
10.Unplug the power cord
5. Select the desired
programme
finished
Max.120cm
200cm
Step 3: put the hose holder on the washing basin or any other sink.


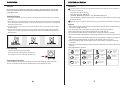
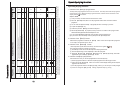
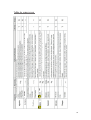
Note:1. This symbol means the energy efficiency test programme “standard cotton programme”, which is most suitable to dry normal cotton load at rated load capacity
2.The programmes above are only recommended for using, users can choose the appropriate programme according to the personal habits. Thick and multi-layered
fabrics,e.g. bedlinen, jeans, jackets etc, are not easy to dry, you'd better choose Jeans programme and maximum drying intensity level..
12 13
Programme table
Specialty drying function
When the time programme is selected, the 【Time】 button can be used to adjust the drying time in
Used to adjust the dryness level of the laundry. The level has four grades .
The drying time increases 3 minutes in every grade.
2. Instruction of the Time function【】
10 min. steps. The maximum time is 150 min.
Specialty drying function
4. Instruction of the function【My Cycle】
Used to define and save your favorite proragmmes that are used frequently.
(1).Use the programme selector to select the required programme and other drying functions.
(2).Press and hold the 【Intensity】 button for 3 seconds until the display flashing and the required
(3).Except the 【Cotton Iron】【Delicate】【Synthetic Iron】 【Wool】【Time】, all the other
(2).Press the 【Intensity】 button repeatedly to select the drying time.
(1).The intensity function can be activated only before the programme start.
(3).Turn the programme selector to the 【My Cycle】 position, you can start your favorite proragmmes.
1. Instruction to the drying procedure【Delay】
Steps in details
(1).Load your laundry and make sure the machine door is closed.
(2).Press the 【On/Off】button,then to turn the programme selector knob and select a desired
(3).You can select the 【Anti-Crease or 【Signal】functions according to your 】 need.
(4).To press the 【Delay】 key.
(5).Continue to press the 【Delay】to select the delay time.
(6).After the 【Start/Pause】 key is pushed, the dryer is at the run condition. The drying procedure
will be automatically performed when the delay time is over.
(7).If you push the【Start/Pause】button again, the delay function will be paused.
(8).If you want to cancel the “Delay” function, please press the 【On/Off】button.
programme.
YN
Y
N
YN
YN
YN
YY
Iron
For non-iron washing made of synthetic and blended fabrics,cotton.
For cottons and coloureds made of cotton or linen.
Standard
Standard
Synthetics
Shirts
Jean
Mix
Extra
Sports
Iron
My Cycle
3.5kg
8.0kg
Cotton
Extra
(max)
Weight
Special
Programme
3.0kg
8.0kg
3.5kg
Define and save you faveriate programme.
Warm
Time
To warm clothes from minimum 10 min. to maximum 120 min.(in 10 min. steps).
To dry thin synthetic fabrics which are not ironed, such as easy care shirts, table linen, baby clothes, socks.
To dry thick or multi-layered synthetic fabrics. Drying level: extra dry.
To dry cotton pieces of clothing. Drying level: applicable to iron.
To dry cotton pieces of clothing. Drying level: cupboard dry.
To dry cotton pieces of clothing. Drying level: extra dry.
Application/Properties
To dry thin synthetic fabrics which are also to be ironed, such as knitwear, shirts.
1.0kg
Delicate
To dry delicate laundry that is suitable for drying or laundry which is advised to be hand-washed
at a lower temperature.
Wool
For a fluffy and fresh wool clothing(Can not be used for drying wool clothing), When the cycle is done,
take out the clothes at once, let them dry in the air.
Cool
Refresh
1.0kg
To air clothes without blowing hot air from minimum 10 min. to maximum 30 min.(in 10 min. steps).
To dry jeans or leisure clothes that are spun at high speeds in the washing machine.
If you can not determine what the clothing's material is, please choose Mix.
To dry sportswear, thin fabrics, polyester,which are not ironed.
For easy care clothes such shirts and blouses with anti-crease mechanism for minimum ironing effort.
Place clothes loosely in the dryer. Once dried, hang it on a clothes hange
maximum 150 min.(in 10 min. steps).
To refresh the clothes that have been kept at closed environments for a long time from minimum 20 min. to
Delay
Time
3. Instruction of the Intensity function【】
programmes can be setted the 【Intensity】 function.
programme has been saved.
If you want to change the 【My Cycle】 settings, repeat the steps (1) and (2).
Delicate
Wool
My Cycle
Y
N
1.0kg
To delay the drying programme from 0 hour to 24 hours. The delay time means the programme
will start after x hours. When the delay programme starts, the time starts to decrease on the
display and the icon blinks.

(1).This machine incorporates a special child safety lock, which can prevent children from carelessly
(2).When the dryer is at the operation state, press the【】and Anti-Crease 【Signal】buttons at the
same time for over 3 seconds to start child lock function. When child lock function is set, the display
8. Instruction of the Child Lock feature【】
pressing keys or making the faulty operation.
time for over 3 seconds to release the child lock function.
start state of the child lock, the【Anti-Crease】and 【Signal】buttons shall be pressed at the same
will show “ ” icon and no key can effect to the dryer except 【On/Off】button. Under the
7. Instruction of the Anti-Crease function【】
At the end of the drying cycle, the anti-crease operation time is 30 minutes (default ) or 120 minutes (selected).
The 【
Anti-Crease】 light shall illuminate when the anti-crease function is selected. This function
prevents the laundry from creases. The laundry can be removed during the anti-crease phase. Except
【Cool】,【Refresh】and 【Wool】, all the other programmes have this function.
14 15
Catalogue
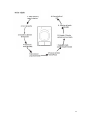
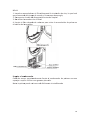
Empty the water container
1.Open the filter cover.
2.Unscrew both locking levers towardas each other.
3.Clean the filter base completely.
4.Re-insert the filter base!
5.Screw both locking levers.
6.Close the filter cover flap until it locks into position.
1.Open the door.
2.Take out the filter door.
3.Clean the filter door; wipe off the scrap threads
4.Reinstall the filter door.
which will cause the extension of drying time and energy consumption;
1.The fluff accumulated on the filter will block the air circulation,
2.Do disconnect the power cord before cleaning!
3.Do not operate the dryer without the filter!
4.Clean the filter after each use to prevent lint accumulation inside the dryer.
NOTE!
Clean filter base
accumulated on the filter door.
1. Hold and pull out the water container
with two hands;
2. Tilt the water container, pour out the
condensed water into basin;
3. Install the
WARNING:
1.
2.Do not drink the condensed water
.
water container.
Empty the water container after each use, the programme will be paused and the “ ”
icon will flash if the water container is full during the drying process. After the container
emptyed, the dryer can be restarted by pressing
【Start/Pause】button.
3.Do not use the dryer without the water container
Clean the filter door
Catalogue
Cleaning and routine maintenance
As necessary, approx. once every 2 months, remove the fluff from
the heat exchanger using the sponge or soft brush.
When doing this, please use gloves.
Note: The fluff can be removed more easily if it is first
dampened e. g. with a laundry dampener.
Clean heat exchanger
Filter door
Locking lever
Filter cover
Filter base
Specialty drying function
5. Instruction of the 【Lamp】
The lamp inside the drum will lighten about 3 minutes when the button pressed or 1 minute the door opened.
6. Signal【 】
Set up the buzzer on or off. In general condition, the buzzer is on. Please press it if needed.
When the buzzer on:
(1) The dryer will give the leading sound if press the extra function buttons.
(2) If the dryer is running, rotate the function choosing knob, the dryer will remind the operator
it is an invalid choose.
(3) When the drying programme is done, the buzzer will also remind the user.

1716
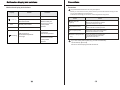
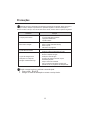
Malfunction display and solutions
Malfunction display and solutions
“”E32
“”E33
Empty container
Dispiay
Reason
Solutions
Container is full
Water pump failure or water
level sensor failure
P lease contact your
local service center
if the problem
persists
Humidity sensor failure
Temperature sensor failure
Filter is plug up or
environment temperature
is too high
P lease contact your
local service center
if the problem
persists
C lean filter and
confirm the
ambient temperature
Precautions
Precautions
Only authorised technicans can carry out repairs.
Before you call customer service, please check if you have deal with the fault by yourself
Check if the clothes is over load .
Problem
Solution
Display does not
light up
Check if the main plug is inserted.
Check if the programme is selected.
Check the main power supply.
Dryer does not start
Check if the start button is pushed.
Check if the door is entirely closed.
Door is open by itself
Press door until it “clicks”into position.
Degree of dryness is not
reached or drying time too
long
If you cannot deal with the faulty by yourself and need help:
or if you have follow the user instructions.
A technician will charge you for advice, even during the warranty period.
1.Press the key 【On/Off】.
2.Pull out the mains plug and call the service.
Use the appropriate programme.
Clean the filter door and filter base.
keep the Air inlet clear.
“ ”is flashing
“ ”is flashing

18
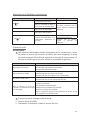
Technical specifications
Specification
Overall Size
Net Weight
Rated Drying Capacity
595×622×845(mm)
52kg
8.0kg
Power supply
220-240V~
Ambient temperature
Refrigerant
R134a
50Hz
+5c +35c
。
~
。
Rated power
650W
Brand:
Model:
Rated capacity: 8kg
Dryer Type: Condenser
Energy efficiency class: A++
Energy consumption 236.0kWh per year, based on 160 drying cycles of the standard cotton
programme at full and partial load, and the consumption of the low-power modes. Actual
consumption per cycle will depend on how the appliance is used.
Automatic or non-automatic:Automatic
EU Ecolabel: N/A
Energy consumption of the standard cotton programme at full load: 1.98 kWh
Energy consumption of the standard cotton programme at partial load: 1.08 kWh
Power consumption of the off-mode (Po): 0.01 W
Power consumption of the left-on mode (Pl): 0.8 W
Duration of the left-on mode: 10 min
The
'
standard
cotton
programme'
used
at
full
and
partial
load
is
the
standard
drying
programme
to
which
the
information
in
the
label
and
the
fiche
relates, that
this
programme is
suitable
for
drying
normal
wet
cotton
laundry
and
that
it
is
the
most
efficient
programme in
terms
of
energy
consumption
for
cotton.
Weighted programme time of the standard cotton programme at full and partial load: 150 min
Programme time of the standard cotton programme at full load: 198 min
Programme time of the standard cotton programme at partial load: 115 min
Condensation efficiency class B on a scale from G (least efficient) to A (most efficient).
Average condensation efficiency of the standard cotton programme at full load: 80.1%
Average condensation efficiency of the standard cotton programme at partial load: 80.1%
Weighted condensation efficiency for the standard cotton programme at full and partial
load: 80.1%
Sound power level for the standard cotton programme at full load: 69dB
Teka
TKS 890 H
energy
Product fiche
Note:
1. The rated capacity is the maximum capacity, make sure that the dry clothes which are loaded to the appliance do not
exceed the rated capacity each time.
2.Do not install the tumble dryer in a room when there is a risk of frost occurring. At temperatures around freezing point the
tumble dryer may not be able to operate properly.
3.There is a risk of damage if the condensed water is allowed to freeze in the pump, hoses and / or condensed water container.
Product fiche
19
Contains fluorinated greenhouse gases covered by the Kyoto Protocol.
Hermetically sealed

2
ÍNDICE:
Información sobre seguridad…………………………………………… 3
Instalación………………………………………………………………………… 7
Atención y asesoramiento……………………………………………….. 8
Descripción de componentes…………………………………………… 9
Descripción del panel de control……………………………………… 11
Instrucciones de funcionamiento……………………………………. 12
Tabla de programas………………………………………………………… 13
Funciones especiales de secado……………………………………… 14
Limpieza y mantenimiento rutinario………………………………. 16
Alarmas en Display y soluciones……………………………….……. 18
Precauciones………………………………………………………………….. 18
Especificaciones técnicas……………………………………………….. 19
Ficha de producto………………………………………………………….. 20

3
Información sobre seguridad
Símbolos para el cuidado del secado
Preste atención al utilizar la secadora si los materiales de la ropa no pueden ser
secados por ella o contienen los siguientes símbolos:
Notas de seguridad
Para evitar daños en usted, otras personas o cualquier propiedad deben seguir las
siguientes normas de seguridad
1. Este producto pertenece a la categoría I de electrodomésticos eléctricos, solo
para el sacado de textiles que hayan sido lavados con agua en el hogar. Por
favor preste atención a la potencia de seguridad usada durante el proceso
2. Debe usarse una fuente de alimentación con toma de tierra fiable. El cable
debe ser enterrado bajo tierra y no debe estar en contacto con servicios
públicos como tuberías de agua o gas. El cable de tierra y el cable nulo deben
distinguirse y no deberán conectarse juntamente.
3. El cable de alimentación debe estar de acuerdo con el estándar nacional y
debe ser capaz de soportar la corriente por encima de 16A. Para garantizar la
seguridad de usted y su familia, por favor adapte inmediatamente si casa si
cualquier especificación de la energía no cumple con los requisitos
mencionados con anterioridad.
4. La cantidad máxima de textiles en seco que se puede utilizar en esta máquina
es de 8 Kg.
5. La secadora no podrá ser usada si ha sido limpiada con productos químicos
industriales.
6. El quita pelusas debe ser limpiado con frecuencia.
7. No permita que la pelusa se acumule alrededor de la secadora.
8. Es necesaria una ventilación adecuada de la habitación para evitar, a través del
reflujo de gases, la quema de otros combustibles, incluidos fuegos abiertos.
9. No seque prendas sucias en la secadora.
10. Debe lavar con agua caliente y con una cantidad extra de detergente prendas
que se hayan manchado con aceite, acetona, alcohol, gasolina, keroseno,
removedores, removedores de aguarrás, cera, etc.
11. No debe utilizar la secadora para productos tales como espuma de goma (látex
forma), gorros de ducha, textiles impermeables, goma respaldados por
artículos y ropa o almohadas equipadas con almohadillas de espuma de goma,
etc.
12. El suavizante o productos similares, deben ser utilizados según lo especificado
en las instrucciones.

4
13. La última parte de un ciclo de secado en secadora ocurre sin calor (ciclo de
enfriamiento) para asegurarse de que los artículos queden a una temperatura y
evitar que estos se estropeen.
14. ATENCIÓN: No parar la secadora nunca antes de que finalice el programa a
menos que todas las prendas se saquen rápidamente y se extiendan para
disipar el calor.
15. El aire de escape no debe salir por el mismo conducto utilizado para expulsar
vapores de gas u otros combustibles.
16. Este electrodoméstico no debe instalarse detrás de una puerta con cierre, una
puerta corredera o una puerta con una bisagra en el lado contrario a la
apertura de la secadora. De esta manera se logra una apertura total de la
puerta.
17. Prendas contaminadas con petróleo pueden inflamarse, especialmente cuando
son expuestas a fuentes de calor tales como una secadora. Los artículos se
calientan oxidando el aceite. La oxidación genera calor.
Si el calor no puede
escapar, los artículos pueden calentarse demasiado como para prenderse fuego.
A
montonar, apilar o guardar artículos con aceite evita que el calor escape y así
crear riesgo de incendio.
18. Para poder utilizar prendas que han sido inevitablemente contaminadas por
aceite vegetal o de cocinar o por productos de cuidado del cabello, debe
lavarlas con agua caliente previamente y utilizar una cantidad extra de
detergente. Esto reduce el riego pero, no lo elimina.
19. El aparato no debe ser volcado durante el uso normal o el mantenimiento.
20. Retire todos los objetos de los bolsillos de las prendas como mecheros o
fósforos.
21. Este aparato puede ser utilizado por niños mayores de 8 años y personas con
reducción capacidades físicas, sensoriales o mentales o falta de experiencia y
conocimiento si han tenido instrucciones relativas al uso del aparato de forma
segura, en tendiendo los riesgos que conllevan o bien, bajo supervisión. Los
niños no deben jugar con este aparato. La limpieza y mantenimiento del mismo
no puede ser realizada por niños sin la supervisión de un adulto.
22. Si el cable de alimentación está dañado, debe ser remplazado por el fabricante,
el agente de servicios o personas especializadas para evitar riegos.
23. La secadora está fabricada para un uso únicamente en interiores.
24. La apertura de la puerta del aparato no debe obstaculizarse con una alfombra o
similares.
25. Los niños menores de 3 años deben ser alejados, a no ser que haya una
supervisión continua.
26. Mantener a las mascotas alejadas del aparato.
27. Si encuentra que la secadora tiene una temperatura anormalmente alta, por
favor desconéctelo de la corriente inmediatamente

Des
e
Este
dom
hum
pro
m
disp
o
cont
a
prod
e
char cor
símbolo in
d
ésticos en
ana y evita
m
over la
r
o
sitivo usa
d
a
cto con e
ucto para
r
rectame
n
d
ica que e
s
toda la UE
.
r la elimina
r
eutilizació
n
d
o, por fav
o
l distribui
d
r
eciclaje se
g
te este p
r
s
te product
.
Para evit
a
ción incon
t
n
sostenib
o
r utilice lo
s
or donde
c
g
uro ambie
n
r
oducto
o no debe
a
r posibles
t
rolada de
r
le de rec
s
sistemas
d
c
ompró el
n
tal.
desechars
e
daños en
m
r
esiduos. R
e
ursos mat
d
e recogida
producto.
e
como el r
e
m
edio amb
i
e
cíclelo cor
r
eriales. P
a
y devoluci
ó
Ellos pued
e
e
sto de res
i
ente o en
r
ectament
e
a
ra devolv
e
ó
n o pónga
en llevars
e
5
iduos
salud
e
para
e
r el
se en
e
este

6
Información sobre seguridad
Riesgo de descarga eléctrica
1. No tirar del cable para desenchufar el aparato.
2. No enchufar o desenchufar el aparato con las manos mojadas.
3. No dañe el cable de alimentación o el enchufe
Riesgo de lesión
1. No desmontar o instalar la secadora sin no es bajo supervisión o con
instrucciones.
2. No poner esta secadora encima de una lavadora sin un Kit de apilamiento
específico para ello (Si quiere colocar su secadora sobre la lavadora, debe
comprar las partes independientes e instalarse por el fabricante, su
servicio técnico o personas similarmente calificadas para evitar riesgos).
3. No se apoye sobre la puerta abierta de la secadora.
Daños peligrosos
1. No seque por encima de la capacidad nominal.
2. No utilice la secadora si el filtro anti pelusa.
3. No seque la ropa sin haber sido centrifugada anterior.
4. No exponga la secadora directamente al sol, eso solo para uso en
interiores.
5. No instale la secadora en espacios mojados o húmedos.
6. Para la limpieza o mantenimiento de la secadora recuerdo desenchufarla
y no utilizar agua para su limpieza.
Peligro de explosión
Por favor no seque ropa impregnada de sustancias inflamables como alcohol,
aceite de carbón o se producirá una explosión.

Ins
t
Tra
n
Tra
n
de l
a
seca
der
e
Pos
i
1
2
3
Niv
e
Una
uso
d
Con
1. A
s
las
e
t
alación
n
sporte
n
sportar c
o
a
misma.
N
a
dora no
p
e
cha
i
ción de i
n
1
. Por fav
o
2
. No col
o
parqué.
3
. No colo
piezas
s
e
l de ajus
t
vez este
e
d
e un nive
exión a l
a
s
egúrese
d
e
specificac
i
o
n precau
c
N
o utilice
p
uede tra
n
n
stalació
n
o
r coloque
o
que el a
que la sec
a
s
e congele
t
e
e
n la posi
c
l. Si no lo
e
a
fuente d
d
e que la t
e
i
ones eléc
t
c
ión. No s
u
la puerta
d
n
sportars
e
n
la secado
r
p
arato en
a
dora en l
u
y la maqui
c
ión defini
e
stá, ajust
e
e alimen
t
e
nsión de
t
ricas de la
u
jete la m
a
d
e la seca
e
recta, e
s
r
a en una
s
una pen
u
gares ext
e
i
na deje d
e
i
tiva, com
p
e
las patas
t
ación
la fuente
d
a
secadora
.
a
quina po
r
dora com
o
s
ta puede
s
uperficie
s
diente, s
o
e
riores pa
r
e
funciona
r
p
ruebe qu
e
con la he
r
d
e aliment
.
r
las parte
s
o
asa de t
r
inclinarse
s
olida y pl
a
o
bre una
a
r
a preveni
r
r
.
e
esta niv
e
ramienta.
a
ción es l
a
s
más sali
e
r
ansporte.
e
30 º ha
c
a
na.
a
lfombra
r
que sus
e
lada haci
a
misma q
u
7
e
ntes
Si la
c
ia la
o en
endo
u
e en

2. P
o
univ
At
e
Ate
n
fabr
i
ma
n
a) p
o
b) E
n
c) P
r
"Sta
d)
d
lim
p
Con
1
2
3
4
5
6
7
8
9
o
r favor, n
o
ersal o zó
c
e
nción y
A
n
ción:
Antes del
icación y
n
char la ro
p
o
ner algun
n
chufe a l
a
r
esione "B
o
rt/Pause".
d
espués d
e
p
ieza y ruti
n
sejos:
1
. Antes
d
centrif
u
de ene
r
2
. Para u
n
progra
m
3
. Antes
d
botone
s
4
. No seq
u
5
. No seq
similar
e
6
. La pue
r
secado
r
sufrir q
u
7
. Limpie
e
alargar
8
. Elija el
aquede
9
. Seguir l
a
o
lo conec
c
alo.
A
sesora
m
primer c
i
transport
e
p
a:
os trapos
l
a
corriente
o
tón de O
n
e
termina
n
ario", lim
d
el secado
,
u
gado alta
r
gía.
n
secado u
m
a de seca
d
e su sec
a
s
, atar las
c
u
e excesiv
a
ue los ar
t
e
s como i
m
r
ta puede
r
a. No abr
a
u
emadura
s
e
l filtro de
el proceso
programa
más fresc
a
a
s siguien
t
t
e con la
p
m
iento
i
clo, el p
o
e
puede
n
l
impios en
n
/Of
f
", sel
e
r este pr
o
piar el con
,
centrifu
g
puede re
d
niforme,
o
do corres
p
a
do, cerra
r
c
orreas de
a
mente la
r
t
ículos qu
m
permeabl
e
abrirse s
ó
a
la puerta
s
por el va
p
pelusa y
v
de secad
o
que corr
e
a
y suave.
t
es referen
p
laca de c
o
o
lvo y la
g
n perma
n
el tambor
e
ccione el
ograma,
p
n
densador
g
ue la rop
a
d
ucir el tie
m
o
rdene la
r
p
ondiente.
r
cremalle
r
tela, etc.
ropa porq
u
e conten
g
e
s, cubiert
ó
lo despu
antes de
t
p
or o sup
e
v
acié el caj
o
y consu
m
e
sponda al
n
cias de pe
o
nexión de
g
rasa acu
m
ecer en l
.
programa
p
or favor
de aire y
e
a
en la la
v
m
po de s
e
r
opa segú
n
r
as, ganc
h
u
e la ropa
g
an cauch
o
as de bici
c
és de fin
a
t
erminar e
l
rficie calie
ón despu
é
m
ir más en
e
material
d
s
o:
alimenta
c
m
ulada en
a secado
r
"Rápido"
y
siga el "
m
l filtro de
p
v
adora. Un
cado y pe
r
n
el tipo d
os y anill
o
puede arr
u
o
o mate
letas, etc.
a
lizar el p
l
program
a
nte.
é
s de cada
e
rgía.
d
e lana p
a
c
ión, el en
c
el period
r
a. Para
e
y
pulsa el
b
m
antenim
p
elusa.
n
a velocid
a
rmite el a
h
d
e materia
o
s para o
j
u
garse
riales elá
s
p
rograma
d
a
, ya que p
uso para
e
a
ra que la
8
c
hufe
o de
e
vitar
b
otón
i
ento
a
d de
h
orro
l y el
j
etes,
s
ticos
d
e la
uede
e
vitar
ropa

De
s
Des
c
Acc
e
Las
s
com
sigu
i
s
cripción
c
ripción
d
e
sorios
s
iguientes
pone de a
l
i
endo las s
de com
p
d
e los co
m
partes so
n
l
guna de e
iguientes i
p
onente
s
m
ponente
s
opcional
e
llas, por fa
nstruccio
n
s
s
e
s para mo
a
vor use u
n
n
es.
delos esp
e
n
os guante
e
cíficos. Si
s
s para su
c
su secado
r
c
olocación
9
r
a se

10
A página está carregando...
A página está carregando...
A página está carregando...
A página está carregando...
A página está carregando...
A página está carregando...
A página está carregando...
A página está carregando...
A página está carregando...
A página está carregando...
A página está carregando...
A página está carregando...
A página está carregando...
A página está carregando...
A página está carregando...
A página está carregando...
A página está carregando...
A página está carregando...
A página está carregando...
A página está carregando...
A página está carregando...
A página está carregando...
A página está carregando...
A página está carregando...
A página está carregando...
A página está carregando...
A página está carregando...
A página está carregando...
A página está carregando...
A página está carregando...
A página está carregando...
A página está carregando...
-
 1
1
-
 2
2
-
 3
3
-
 4
4
-
 5
5
-
 6
6
-
 7
7
-
 8
8
-
 9
9
-
 10
10
-
 11
11
-
 12
12
-
 13
13
-
 14
14
-
 15
15
-
 16
16
-
 17
17
-
 18
18
-
 19
19
-
 20
20
-
 21
21
-
 22
22
-
 23
23
-
 24
24
-
 25
25
-
 26
26
-
 27
27
-
 28
28
-
 29
29
-
 30
30
-
 31
31
-
 32
32
-
 33
33
-
 34
34
-
 35
35
-
 36
36
-
 37
37
-
 38
38
-
 39
39
-
 40
40
-
 41
41
-
 42
42
-
 43
43
-
 44
44
-
 45
45
-
 46
46
-
 47
47
-
 48
48
-
 49
49
-
 50
50
-
 51
51
-
 52
52


Teka TKS 890 H Manual do usuário
- Categoria
- Secadoras
- Tipo
- Manual do usuário
em outras línguas
- español: Teka TKS 890 H Manual de usuario
- English: Teka TKS 890 H User manual
Artigos relacionados
Outros documentos
-
Becken MAQ SECAR ROUPS 8KG BDM2741 HP Manual do proprietário
-
-
EAS ELECTRIC EMTD81B Manual do usuário
-
Whirlpool AQC9 BF7 T1 (AG) Guia de usuario
-
HOTPOINT/ARISTON AQC9 2F7 TM2 1 (EU) Guia de usuario
-
-
HOTPOINT/ARISTON FTCD 971 6H1 P (EU) Manual do proprietário
-
-
Electrolux EDC78550W Manual do usuário
-