
70mai Mini Dash Cam
User Manual

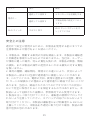
Contents
&OHMJTI
ļşŝ
ŝŖŔŕ
&TQ
B°PM
1
PSUVHV©T
傈劥铃

1
Thank you for choosing the 70mai Mini Dash Cam
The 70mai Mini Dash Cam is equipped with professional video
recording chip and image sensor for capturing high-quality
videos.
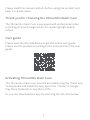
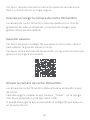
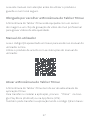
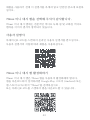
User guide
Please scan the QR code below to get the online user guide.
Please use the product according to the instructions in the user
guide.
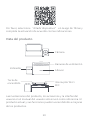
Activating 70mai Mini Dash Cam
The 70mai Mini Dash Cam must be activated using the 70mai app.
To download and install the app, search for "70mai" in Google
Play Store (Android) or App Store (iOS).
Or you can download the app by scanning the QR code below:
Please read this manual carefully before using the product and
keep it in a safe place.

2
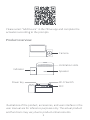
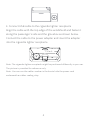
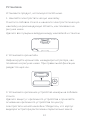
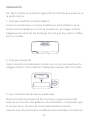
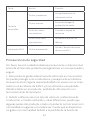
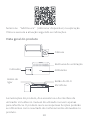
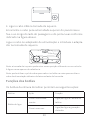
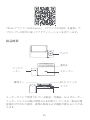
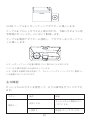
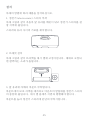
Product overview
Illustrations of the product, accessories, and user interface in the
user manual are for reference purposes only. The actual product
and functions may vary due to product enhancements.
Camera
Indicator
Ventilation slots
Speaker
Power key
Wi-Fi Switch
MIC
Please select "Add Device" in the 70mai app and complete the
activation according to the prompts.

2 3
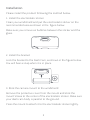
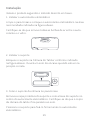
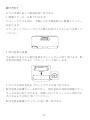
Installation
Please install the product following the method below.
1. Install the electrostatic sticker
Clean your windshield and put the electrostatic sticker on the
recommended area as shown in the gure below.
Make sure you remove air bubbles between the sticker and the
glass.
2. Install the bracket
Lock the bracket to the Dash Cam, as shown in the gure below.
You will hear a snap when it is in place.
3. Stick the camera mount to the windshield
Remove the protective cover from the mount and stick the
mount's base to the center of the electrostatic sticker. Make sure
your dash cam body is parallel to the ground.
Press the mount to attach it to the electrostatic sticker tightly.

4
4. Connect USB cable to the cigarette lighter receptacle
Align the cable with the top edge of the windshield and fasten it
along the passenger's side and the glovebox as shown below.
Connect the cable to the power adapter and insert the adapter
into the cigarette lighter receptacle.
Note: The cigarette lighter receptacle might be positioned dierently in your car.
The picture is provided for reference only.
Note: You can use the cable crowbar in the box to hide the power cord
underneath a rubber sealing strip.
Pillar A

4 5
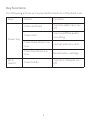
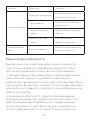
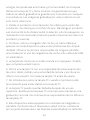
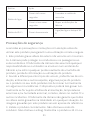
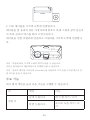
Key functions
The following actions are supported for buttons of the dash cam:
Keys Action Function
Power key
Press and hold
Turn the dash cam on/
o
Press once
Turn on/o the audio
recording
Press three times in a
row
Format memory card
Press ve times in a
row
Reset factory settings
Wi-Fi
Switch
Press briey
Turn Wi-Fi hotspot on /
o

6
Safety precautions
Please read all precautions and instructions carefully before using
this product to ensure proper and safe usage.
1. This product records videos outside of moving vehicles. It can't
protect drivers and passengers from any accidents. We shall
not take any responsibility if the user gets involved in any trac
accident and/or bear any loss due to product failure, information
loss, or product operation.
2. Due to dierences in vehicle type, driving preferences, the
environment, and other dierences, parts of the product or the
whole product may not work normally in some circumstances.
The device may not record normally due to loss of power source,
abnormal temperatures and/or humidity, collisions, damage to
the TF card, and other reasons. We do not guarantee that all the
recorded videos will be saved completely in any given situation.
The images recorded by this product are for reference only.
3. Install the product correctly. Do not block the driver's vision.
Do not obstruct the air bag. Keep the product at least 20cm away
from the driver and passengers. Incorrect installation of the
product may cause product failure and injury.
4. Please use the car charger and USB cable that comes with this
device to avoid compatibility issues. 70mai is not responsible for
any loss caused by the use of non- standard car chargers and USB
cables.
5. The memory card is not included in the package. You will need
to buy it by yourself.
6. Use a TF card with storage capacity between 16GB and 64GB,
and reading and writing speed not lower than Class10. Format
the TF card before using it.

6 7
7. Do not insert or pull out the TF card when the product is work-
ing to avoid damaging the TF card.
8. TF card may be damaged after repetitive use. Replace TF cards
in time to maintain proper recording. We shall not bear any
responsibility caused by failed TF cards.
9. This device is equipped with a built-in battery that is not remov-
able. Do not disassemble the device yourself. The battery (battery
pack or assembled battery) shall not be exposed to overheating
environments such as sunlight, re, or the like. If the battery is
replaced improperly, there is a danger of explosion, so that it can
only be replaced with a battery of the same or equivalent type.
10. The device should not be exposed to water droplets or water
splashes. Keep the device dry to avoid battery failure.
11. If the battery is deformed, swelling, or leaking, stop using the
product immediately and contact customer service.
12. Do not shake or press the product. Strong impact or shaking
may cause irreparable damage to the product.
13. Do not clean this product by chemical solvents or cleansers.
14. Keep this product away from strong magnetic elds to avoid
damage.
15. Do not use this product in temperatures higher than 60℃ or
lower than -10℃ .
16. Please note that the housing's temperature rises when the
device is running.
17. Use this product within the scope of the law.

8
Specications
Model name: Midrive D05
Image sensor: OV OS05A10
Resolution: 2560×1600
Camera: FOV 140° , F1.8
Wireless connection: Wi-Fi IEEE 802.11 b/g/n/ 2.4GHz
G-sensor: Acceleration sensor
Extended storage: MicroSD card, 16GB~64GB, Class10 or above
Supported OS: Android4.4/iOS9.0 and above
Power supply: car cigarette lighter
Battery type: li-polymer battery
Battery capacity: 500mAh
Input: 5V 1.5A
Dimensions: 86.9 × 47 × 31.9mm
Package contents
1. 70mai Mini Dash Cam ×1
2. USB cable×1
3. Power adapter×1
4. Electrostatic sticker×1
5. Heat resistant adhesive ×1
6. Cable crowbar ×1
7. Mounting bracket ×1
8. User manual×1

8 9
FCC
Changes or modications not expressly approved by the party
responsible for compliance could void the user's authority to
operate the equipment.
This equipment has been tested and found to comply with the
limits for a Class B digital device, pursuant to Part 15 of the FCC
Rules. These limits are designed to provide reasonable protection
against harmful interference in a residential installation. This
equipment generates, uses and can radiate radio frequency
energy and, if not installed and used in accordance with the
instructions, may cause harmful interference to radio communi-
cations. However, there is no guarantee that interference will not
occur in a particular installation.
If this equipment does cause harmful interference to radio or
television reception, which can be determined by turning the
equipment o and on, the user is encouraged to try to correct the
interference by one or more of the following measures:
-- Reorient or relocate the receiving antenna.
-- Increase the separation between the equipment and receiver.
-- Connect the equipment into an outlet on a circuit dierent from
that to which the receiver is connected.
-- Consult the dealer or an experienced radio/TV technician for
help.
This device complies with Part 15 of the FCC Rules. Operation
is subject to the following two conditions: (1) this device may
not cause harmful interference, and (2) this device must accept
any interference received, including interference that may cause
undesired operation.
This equipment complies with FCC radiation exposure limits set

10
forth for an uncontrolled environment. This equipment should
be installed and operated with a minimum distance of 20 cm
between the radiator & your body. This transmitter must not be
co-located or operating in conjunction with any other antenna or
transmitter.
Service: [email protected]
For further information, please go to www.70mai.com
Manufacturer: 70mai Co., Ltd.
Address: Room 2220, building 2, No.588, Zixing road,
MinHang District, Shanghai.CHINA

10 11
Благодарим вас за выбор мини-видеорегистратора
70mai
Мини-видеорегистратор 70mai оснащен профессиональным
чипом видеозаписи и датчиком изображения для съемки
высококачественных видеороликов.
Руководство пользователя
Отсканируйте приведенный ниже QR-код для доступа к
руководству пользователя в Интернете.
Используйте продукт в соответствии с инструкциями в
руководстве пользователя.
Активация мини-видеорегистратора 70mai
Мини-видеорегистратор 70mai необходимо активировать с
помощью приложения 70mai.
Чтобы загрузить и установить приложение, выполните поиск
по запросу “70mai” в Google Play Store (Android) или App
Store (iOS).
Приложение можно также загрузить, отсканировав
следующий QR-код:
Внимательно прочитайте данное руководство перед
использованием продукта и храните его в надежном месте.

12
Выберите “Добавить устройство” в приложении 70mai и
завершите активацию, следуя подсказкам.
Обзор продукта
Камера
Индикатор
Вентиляционные
отверстия
Динамик
Кнопка
питания
Переключатель Wi-Fi
Микрофон
Изображения продукта, аксессуаров и пользовательского
интерфейса в руководстве пользователя приведены
только для справки. Фактический продукт и функции могут
отличаться в результате внесения изменений в продукт.

12 13
Установка
1. Наклейте электростатическую наклейку
Очистите лобовое стекло и нанесите электростатическую
наклейку на рекомендуемую область, как показано на
рисунке ниже.
Удалите все пузырьки воздуха между наклейкой и стеклом.
2. Установите кронштейн
Зафиксируйте кронштейн на видеорегистраторе, как
показано на рисунке ниже. При правильной фиксации
раздастся щелчок.
3. Установите крепежное устройство камеры на лобовое
стекло
Удалите защиту с крепежного устройства и приклейте
основание крепежного устройства по центру
электростатической наклейки. Убедитесь, что корпус
видеорегистратора расположен параллельно земле.
Установите продукт, используя способ ниже.

14
Прижмите крепежное устройство, чтобы плотно прикрепить
его к электростатической наклейке.
4. Подключите кабель USB к прикуривателю
Выровняйте кабель с верхним краем лобового стекла и
закрепите его вдоль пассажирской стороны и перчаточного
ящика, как показано ниже.
Подключите кабель к адаптеру питания и вставьте адаптер в
прикуриватель.
Примечание. Расположение прикуривателя в вашем автомобиле может
отличаться.
Изображение приведено только для справки.
Примечание. Вы можете скрыть кабель питания под резиновым
уплотнением, отодвинув его ломиком.
Основные функции
Кнопки видеорегистратора поддерживают следующие
действия:
Стойка A

14 15
Кнопки Действие Функция
Кнопка питания
Нажатие и удержание
Включение/выключение
видеорегистратора
Одно нажатие
Включение/выключение
аудиозаписи
Нажатие три раза
подряд
Форматирование карты
памяти
Нажатие пять раз
подряд
Восстановление
заводских настроек
Переключатель
Wi-Fi
Быстрое нажатие
Включение/выключение
точки доступа Wi-Fi
Меры предосторожности
Внимательно прочитайте все меры предосторожности
и инструкции перед использованием продукта, чтобы
обеспечить правильное и безопасное использование.
1. Данный продукт записывает видео снаружи движущихся
транспортных средств. Он не обеспечивает защиту
водителей и пассажиров от каких-либо происшествий. Мы не
несем ответственности в случае ДТП и/или любых убытков в
результате неисправности продукта, утери информации или
работы устройства.
2. Из-за различий в типе ТС, предпочтениях вождения,
окружающей среды и др. продукт или его части могут не
работать надлежащим образом в некоторых ситуациях.
Устройство может осуществлять запись с ошибками из-
за отсутствия внешнего источника питания, нештатных

16
температур и/или влажности, ударов, повреждения TF-
карты и других причин. Мы не гарантируем, что все
записанные видео будут полностью сохранены в каждой
ситуации. Изображения, записанные данным продуктом,
предназначены только для справки.
3. Установите продукт правильно. Не блокируйте поле
зрения водителя. Не создавайте препятствий подушке
безопасности. Располагайте устройство на расстоянии
не менее 20 см от водителя и пассажиров. Неправильная
установка устройства может привести к неисправностям
работы и травмам.
4. Используйте автомобильное зарядное устройство и
кабель USB, поставляемые вместе с этим продуктом, чтобы
избежать проблем с совместимостью. Компания 70mai
не несет ответственности за любые потери, связанные с
использованием нестандартных автомобильных зарядных
устройств и кабелей USB.
5. Карта памяти не входит в комплект поставки. Ее требуется
приобрести отдельно.
6. Используйте карту TF емкостью от 16 ГБ до 64 ГБ с
характеристиками чтения и записи не ниже класса 10.
Отформатируйте TF-карту перед ее использованием.
7. Не вставляйте и не извлекайте карту TF во время работы
устройства во избежание повреждения TF-карты.
8. Постоянное использование может привести к
повреждению TF-карты. Своевременно заменяйте TF-
карты для обеспечения надлежащей записи. Мы не несем
ответственности за последствия в результате сбоев в работе
TF-карт.
9. Данное устройство оснащено встроенным несъемным
аккумулятором. Не разбирайте устройство самостоятельно.

16 17
Запрещается подвергать аккумулятор (комплект
аккумуляторов или аккумулятор в сборе) воздействию
высоких температур, например солнечных лучей, огня и др. В
случае неправильной замены аккумулятора существует риск
взрыва, поэтому требуется заменять аккумулятор на такой
же или аналогичного типа.
10. Запрещается подвергать устройство воздействию капель
и брызг воды. Держите устройство сухим во избежание сбоя
аккумулятора.
11. Если аккумулятор деформирован, раздут или протекает,
немедленно прекратите использование продукта и
обратитесь в службу поддержки.
12. Не трясите и не нажимайте на продукт. Сильные удары
или тряска могут привести к неустранимым повреждениям
продукта.
13. Не очищайте продукт с помощью химических
растворителей и очистителей.
14. Держите продукт вдали от сильных магнитных полей,
чтобы избежать повреждения.
15. Не используйте продукт в при температурах выше 60℃
или ниже -10℃ .
16. Обратите внимание, что корпус устройства нагревается
при работе.
17. Используйте данный продукт только в соответствии с
законом.

18
Технические характеристики
Название модели: Midrive D05
Датчик изображения: OV OS05A10
Разрешение: 2560×1600
Камера: FOV 140° , F1.8
Беспроводное подключение: Wi-Fi IEEE 802.11 b/g/n/ 2,4 ГГц
Гироскоп: датчик ускорения
Расширение хранилища: карта MicroSD, 16 ГБ~64 ГБ, класс 10
или выше
Поддерживаемые ОС: Android4.4/iOS9.0 и выше
Источник питания: автомобильный прикуриватель
Тип аккумулятора: литий-полимерный аккумулятор
Емкость аккумулятора: 500 мАч
Вход: 5 В 1.5 А
Размеры: 86,9 × 47 × 31,9 мм
Справочная служба: [email protected]om
Для получения дополнительной информации перейдите на
сайт www.70mai.com
Производитель: 70mai Co., Ltd.
Адрес: Room 2220, building 2, No.588, Zixing road, MinHang
District, Shanghai.CHINA
Комплектация
1. Мини-видеорегистратор 70mai, 1 шт.
2. Кабель USB, 1 шт.
3. Адаптер питания, 1 шт.
4. Электростатическая наклейка, 1 шт.
5. Теплоустойчивый клей, 1 шт.
6. Ломик, 1 шт.
7. Крепежный кронштейн, 1 шт.
8. Руководство пользователя, 1 шт.
A página está carregando...
A página está carregando...
A página está carregando...
A página está carregando...
A página está carregando...
A página está carregando...
A página está carregando...
A página está carregando...
A página está carregando...
A página está carregando...
A página está carregando...
A página está carregando...
A página está carregando...
A página está carregando...
A página está carregando...
A página está carregando...
A página está carregando...
A página está carregando...
A página está carregando...
A página está carregando...
A página está carregando...
A página está carregando...
A página está carregando...
A página está carregando...
A página está carregando...
A página está carregando...
A página está carregando...
A página está carregando...
A página está carregando...
A página está carregando...
A página está carregando...
A página está carregando...
-
 1
1
-
 2
2
-
 3
3
-
 4
4
-
 5
5
-
 6
6
-
 7
7
-
 8
8
-
 9
9
-
 10
10
-
 11
11
-
 12
12
-
 13
13
-
 14
14
-
 15
15
-
 16
16
-
 17
17
-
 18
18
-
 19
19
-
 20
20
-
 21
21
-
 22
22
-
 23
23
-
 24
24
-
 25
25
-
 26
26
-
 27
27
-
 28
28
-
 29
29
-
 30
30
-
 31
31
-
 32
32
-
 33
33
-
 34
34
-
 35
35
-
 36
36
-
 37
37
-
 38
38
-
 39
39
-
 40
40
-
 41
41
-
 42
42
-
 43
43
-
 44
44
-
 45
45
-
 46
46
-
 47
47
-
 48
48
-
 49
49
-
 50
50
-
 51
51
-
 52
52


em outras línguas
Artigos relacionados
-
70mai M500 Manual do usuário
-
70mai A500S Manual do usuário
-
 70mai Dash Cam Lite (MidriveD08) Manual do usuário
-
70mai M300 Manual do usuário
-
 70mai A1ZHSU-zb5L Manual do usuário
-
 70mai 360 Degree Manual do usuário
-
 70mai 600A 11100mAh Portable Jump Starter Power Bank, 12V Emergency Car Booster (up to 4.0L Gas, 2.0L Diesel Engine), Fast Charge, USB Output, Type-C Port, Built-in Flashlight (2020) Manual do usuário
-
 70mai 4G Manual do usuário


