70mai Dash Cam Omni User Manual
View the User guide for
product functions and FAQs.


Contents
English ...........................................................................................................................................................................01
Español ..........................................................................................................................................................................07
Deutsch .........................................................................................................................................................................12
Français .........................................................................................................................................................................17
Italiano ...........................................................................................................................................................................22
ƹǜǚǚǓǑǒ .........................................................................................................................................................................27
Português .....................................................................................................................................................................32
Polski ..............................................................................................................................................................................37
Magyar ...........................................................................................................................................................................42
ƼǓǙljǯǖǚǥǓǑǒ .................................................................................................................................................................47
5RP¤QÅ .........................................................................................................................................................................52
傈劥铃 ............................................................................................................................................................................57
묻펂
7L̜QJ9L̤W ......................................................................................................................................................................65
PWlWYu ..........................................................................................................................................................................69
Bahasa Indonesia ........................................................................................................................................................73
籖넒⚥俒 ........................................................................................................................................................................77

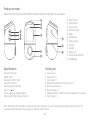
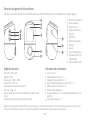
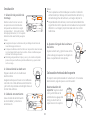
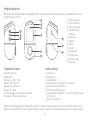
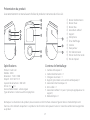
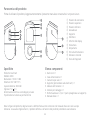
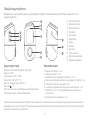
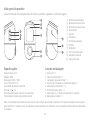
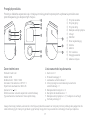
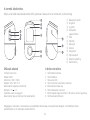
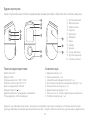
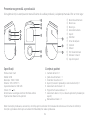
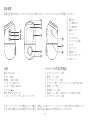
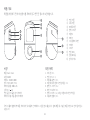
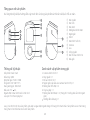
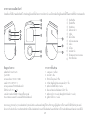
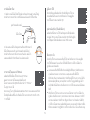
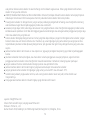
Power button
Ύ Upper button
Ώ Lower button
ΐ Adhesive sticker
Α Mount
Β Microphone
Γ Display screen
Δ Camera
Ε Speaker
Ζ Power port
Η Round-shape indicator
Θ 5SJQPEIFBE
Product overview
Please read this manual carefully before using the product and keep it in a safe place.
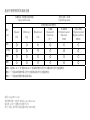
Specifications
Product: Dash Cam
Model: X200
Resolution: 1920 × 1080
Lens: FOV 140°/ F1.5
Battery capacity: 300 mAh
Input: 5 V 2 A
Power supply: Car cigarette lighter
Battery type: Lithium polymer battery
Packing list
Dash Cam × 1
Power cord × 1
Car charger × 1
Mount(Pre-installed on the dash cam) × 1
Electrostatic sticker × 2
Wiring crowbar × 1
Adhesive sticker × 2 (With 1 piece pre-applied to the mount)
User manual × 1
Note: Illustrations of the product, accessories, and user interface in the user manual are for reference purposes only. The
actual product and functions may vary due to product enhancements.

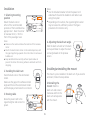
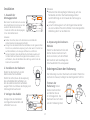
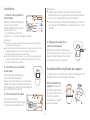
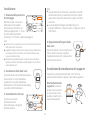
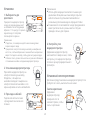
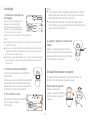
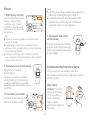
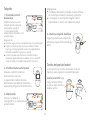
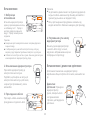
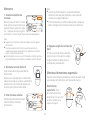
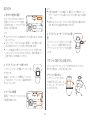
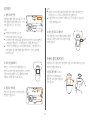
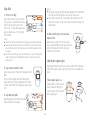
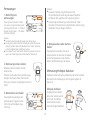
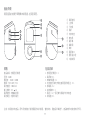
3. Routing cable
Route the power cord to the
cigarette lighter and connect to
power.
4. Adjusting the dash cam angle
Hold the dash cam and turn the dash
cam up and down to adjust the dash
cam angle based on the preview
screen.
2. Installing the dash cam
Paste the dash cam on the electrostatic
sticker.
Make sure the gap on the adhesive sticker
aligns with that on the electrostatic sticker
and the display screen faces the car interior.
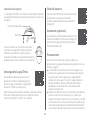
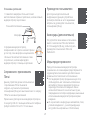
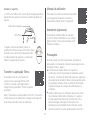
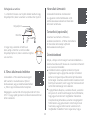
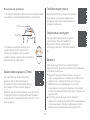
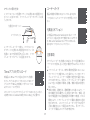
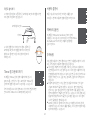
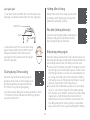
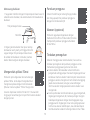
Installing/uninstalling the mount
The mount is pre-installed on the dash cam. If you need to
uninstall it, follow the steps below:
Uninstalling the
mount: Hold the
dash cam and screw it
clockwise and then the
dash cam will separate
with the mount.
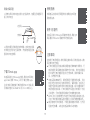
Installation
1. Selecting mounting
position
Mount the dash cam on
either of the recommended
positions of front windshield as
appropriate: 1. Near the center
of rearview mirror; 2. On the
front of the passenger seat.
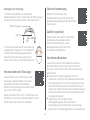
Notes:
Make sure the camera is below the level line of the rearview
mirror.
Attach the electrostatic sticker on the selected position, with
the gap image facing upwards. Press the sticker to remove air
bubbles out.
Keep windshield clean and dry without liquid residue to
prevent the sticker from losing adhesion and dash cam from
dropping.
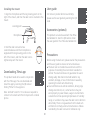
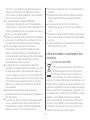
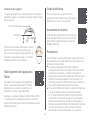
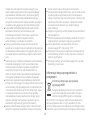
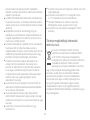
Notes:
Use the included crowbar to hide the power cord
underneath the vehicle’s headliner and rubber seal
along the A-pillar.
Depending on the vehicle, the cigarette lighter socket
may be located in a different position. The figure
provided is for reference only.

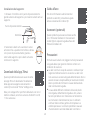
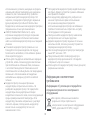
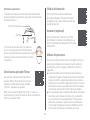
Downloading 70mai app
This product needs to be used in conjunction
with the 70mai app. You can download and
install the app by scanning the QR code or
finding “70mai” in the app store.
Note: Android 5.0 & iOS 11.0 or above is required to
connect to the dash cam’s Wi-Fi hotspot with a mobile
phone.
User guide
For more on product functions and FAQs,
please see the user guide by scanning the QR
code.
Accessories (optional)
This product can also be used with the 70mai
4G Hardwire Kit. Scan the QR code to obtain
the user guide for the 70mai 4G Hardwire Kit.
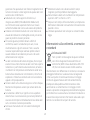
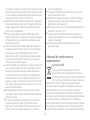
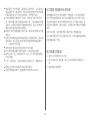
Microphone
Locating point
Installing the mount:
1. Align the microphone with the big locating point on the
right of the mount, and then the dash cam is inserted to the
mount.
2. Hold the dash cam and screw
counterclockwise until the microphone is
aligned with the big locating point on the
left of the mount, and then the dash cam is
tightened up with the mount.
Precautions
Before using the dash cam, please read all the precautions
and the user guide to ensure correct and safe use.
The dash cam is intended to assist drivers with the
purpose of recording the environment outside the
vehicle. The dash cam does not guarantee the user’s
driving safety. We shall not be held liable for any
accident, damage, or loss of information caused by
operating the dash cam while driving.
Due to differences in vehicle conditions, driving style,
driving environment, etc., some functions may not
work properly. A power failure, usage in environments
outside the normal operating temperature or humidity
range, or a collision may cause the dash cam to function
abnormally. There is no guarantee that this dash cam
will function normally under all circumstances. Videos
recorded by this dash cam are for reference only.

The eMMC (Embedded Multi Media Card) is built in the
dash cam for storage. You can find the memory capacity
information on the label of the dash cam and product
box.
Install this dash cam correctly, and do not block the
driver’s line of sight, nor block the vehicle’s airbag, in
order to avoid product failure or personal injury.
Use the included car charger, power cord, and other
accessories in order to avoid product failure due to non-
conformance. We shall not be held liable for any loss or
damage caused by the use of a non-genuine car charger
or power cord.
The dash cam is equipped with a built-in battery that
cannot be removed. Do not disassemble the dash cam.
Do not expose batteries or battery packs to sunlight,
fire, or environments where the ambient temperature is
extreme heat. There is a risk of explosion if the battery is
incorrectly installed, therefore only use and replace with
the same or an equivalent type of battery.
Keep the dash cam away from water drops or splashes.
Keep the device dry to avoid battery failure.
If the battery becomes deformed, swollen, or starts
leaking during use or storage, stop using the dash cam
immediately in order to avoid safety issues, and contact
after-sales service.
Never wash the dash cam with chemical solvent or
cleaner.
Keep the dash cam away from any strong magnetic fields,
as they may cause damage to the dash cam.
Do not use the dash cam in environments with
temperatures over 60°C or below -10°C.
After working for a period of time, the case temperature
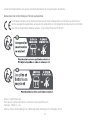
Regulatory compliance information
WEEE information
All products bearing this symbol are waste
electrical and electronic equipment (WEEE as
in directive 2012/19/EU) which should not be
mixed with unsorted household waste. Instead,
you should protect human health and the
environment by handing over your waste equipment
to a designated collection point for the recycling of
waste electrical and electronic equipment, appointed
by the government or local authorities. Correct disposal
and recycling will help prevent potential negative
consequences to the environment and human health.
Please contact the installer or local authorities for more
information about the location as well as terms and
conditions of such collection points.
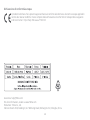
EU declaration of conformity
The manufacturer hereby, declares that
this equipment is in compliance with the
applicable Directives and European Norms, and
amendments. The full text of the EU declaration
of conformity is available at the following internet address:
https://help.70mai.asia/1193.html
of the dash cam will rise, please be careful when
touching it.
Only use this dash cam within the scope permitted by
law.

Cautions
Disposal of a battery into fire or a hot oven, or
mechanically crushing or cutting of a battery, that can
result in an explosion.
Leaving a battery in an extremely high temperature
surrounding environment that can result in an explosion
or the leakage of flammable liquid or gas.
A battery subjected to extremely low air pressure that
may result in an explosion or the leakage of flammable
liquid or gas.
This device is equipped with a built-in battery that cannot
be removed or replaced. Do not disassemble or modify
the battery by yourself.
Replacement of a battery with an incorrect type can
defeat a safeguard (for example, in the case of some
lithium battery types).
FCC caution
Changes or modifications not expressly approved by the
party responsible for compliance could void the user’s
authority to operate the equipment.
This equipment has been tested and found to comply
with the limits for a Class B digital device, pursuant to Part
15 of the FCC Rules. These limits are designed to provide
reasonable protection against harmful interference in a
residential installation. This equipment generates, uses
and can radiate radio frequency energy and, if not installed
and used in accordance with the instructions, may cause
harmful interference to radio communications. However,
there is no guarantee that interference will not occur in a
particular installation.
If this equipment does cause harmful interference to
radio or television reception, which can be determined by
turning the equipment off and on, the user is encouraged
to try to correct the interference by one or more of the
following measures:
- Reorient or relocate the receiving antenna.
- Increase the separation between the equipment and
receiver.
- Connect the equipment into an outlet on a circuit
different from that to which the receiver is connected.
- Consult the dealer or an experienced radio/TV technician
for help.
This device complies with Part 15 of the FCC Rules.
Operation is subject to the following two conditions: (1)
this device may not cause harmful interference, and (2) this
device must accept any interference received, including
interference that may cause undesired operation.
This equipment complies with FCC radiation exposure
limits set forth for an uncontrolled environment. This
equipment should be installed and operated with a
minimum distance of 20 cm between the radiator & your
body. This transmitter must not be co-located or operating
in conjunction with any other antenna or transmitter.
FCC ID: 2AOK9-X200

Service: [email protected]
For further information, please go to www.70mai.com
Manufacturer: 70mai Co., Ltd.
Address: Room 2220, Building 2, No. 588 Zixing Road, Minhang District, Shanghai, China
Hereby, 70mai Co.,Ltd. declares that the radio equipment type X200 is in compliance with Radio Equipment
Regulations 2017. The full text of the UKCA declaration of conformity is available at the following internet address:
https://help.70mai.asia/2145.html
ISED compliance statement
This device contains licence-exempt transmitter(s)/receiver(s) that comply with Innovation, Science and Economic
Development Canada’s licence-exempt RSS(s). Operation is subject to the following two conditions:
(1) This device may not cause interference.
(2) This device must accept any interference, including interference that may cause undesired operation of the device.
L’émetteur/récepteur exempt de licence contenu dans le présent appareil est conforme aux CNR d’Innovation, Sciences et
Développement économique Canada applicables aux appareils radio exempts de licence. L’exploitation est autorisée aux
deux conditions suivantes :
(1) L’appareil ne doit pas produire de brouillage;
(2) L’appareil doit accepter tout brouillage radioélectrique subi, même si le brouillage est susceptible d’en compromettre le
fonctionnement.
ISED Radiation Exposure statement
This equipment complies with IC RSS-102 radiation exposure limits set forth for an uncontrolled environment. This equipment
should be installed and operated with minimum distance 20 cm between the radiator and your body.
Cet équipement est conforme aux limites d’exposition aux radiations IC CNR-102 établies pour un environnement non
contrôlé. Cet équipement doit être installé et utilisé avec une distance minimale de 20 cm entre le radiateur et votre corps.
IC: 28033-X200

Botón de encendido
Ύ Botón superior
Ώ Botón inferior
ΐ Etiqueta adhesiva
Α Soporte
Β Micrófono
Γ Botón de pantalla
Δ Cámara
Ε Altavoz
Ζ Puerto de potencia
Η Indicador de forma
redondeada
Θ Cabeza del trípode
Descripción general del producto
Por favor, lea este manual con atención antes de utilizar el producto y consérvelo en un lugar seguro.
Especificaciones
Producto: Dash Cam
Modelo: X200
Resolución: 1920 × 1080
Lente: FOV 140°/ F1.5
Capacidad de la batería: 300 mAh
Entrada: 5 V 2 A
Fuente de alimentación: Encendedor de cigarrillos del
coche
Tipo de batería: Batería de polímero de litio
Volumen de suministro
Dash Cam × 1
Cable de alimentación × 1
Cargador para automóvil × 1
Soporte(preinstalado en la dash cam) × 1
Adhesivos electrostáticos × 2
Palanca del cableado × 1
Etiqueta adhesiva × 2 (1 colocada previamente en el
soporte)
Manual del usuario × 1
Nota: Las ilustraciones del producto, los accesorios y la interfaz del usuario en el manual del usuario solo sirven como
referencia. El producto actual y sus funciones pueden variar debido a mejoras de los productos.

3. Cable de enrutamiento
Lleve el cable de alimentación
al encendedor y conecte la
alimentación.
4. Ajustar el ángulo de la cámara
de coche
Sujete la dash cam y gírela hacia arriba
y hacia abajo para ajustar su ángulo en
base a la pantalla de vista previa.
2. Colocación de la dash cam
Pegue la dash cam en el adhesivo
electrostático.
Asegúrese de que el hueco en el adhesivo
coincide con el del adhesivo electrostático
y el botón de pantalla está dirigido hacia el
interior del vehículo.
Colocación/retirada del soporte
El soporte está preinstalado en la dash cam. Si necesita
desinstalarlo, siga los pasos a continuación:
Desinstalación del
soporte: Sujete la dash
cam y atorníllela en el
sentido de las agujas del
reloj y la dash cam se
separará con el soporte.
Instalación
1. Selección de posición de
montaje
Monte la dash cam en una de
las posiciones recomendadas
del parabrisas delantero según
corresponda: 1. Cerca del centro
del espejo retrovisor; 2. En la parte
delantera del asiento del pasajero.
Notas:
Asegúrese de que la cámara está por debajo de la línea de
nivel del espejo retrovisor.
Coloque el adhesivo electrostático en la posición seleccionada,
con la imagen del hueco hacia arriba. Pulse el adhesivo para
eliminar las burbujas de aire.
Mantenga el parabrisas limpio y seco y sin residuos líquidos
para evitar que el adhesivo pierda adherencia y que la dash
cam se caiga.
Notas:
Use la palanca suministrada para ocultar el cable de
alimentación por debajo del revestimiento del techo y
del sello de goma del vehículo, a lo largo del pilar A.
Dependiendo del vehículo, la toma del encendedor de
cigarrillos del coche puede estar situada en una posición
diferente. La imagen proporcionada solo sirve como
referencia.

Descargando la app 70mai
Este producto debe usarse junto con la
aplicación de 70mai. Puede descargar e
instalar la app escaneando el código QR o
buscando “70mai” en la app store.
Nota: Para que sea posible la conexión al punto de acceso
Wi-Fi de la cámara del coche con un teléfono móvil es
necesario Android 5.0 y iOS 11.0 o superior.
Guía del usuario
Para ver más información sobre las funciones
del producto y preguntas frecuentes,
consulte la guía del usuario escaneando el
código QR.
Accesorios (opcional)
Este producto también puede utilizarse con el
70mai 4G Hardwire Kit. Escanee el código QR
para obtener la guía de funcionamiento del
70mai 4G Hardwire Kit.
Micrófono
Punto de localización
Colocación del soporte:
1. Coloque el micrófono con el punto de localización grande
a la derecha del soporte y después la dash cam se coloca en
el soporte.
2. Sujete la dash cam y atornille en sentido
contrario a las agujas del reloj hasta que el
micrófono coincida con el gran punto de
localización situado a la izquierda del soporte y
después la dash cam se aprieta con el soporte.
Precauciones
Antes de usar la cámara de coche, lea todas las
precauciones y la guía del usuario para garantizar un uso
correcto y seguro.
La finalidad de esta cámara de coche es ayudar a los
conductores a grabar el entorno exterior del vehículo.
La cámara de coche no garantiza la seguridad de
conducción del usuario. No somos responsables de
ningún accidente, daño o pérdida de información
causada por la utilización de la cámara de coche
durante la conducción.
Debido a las diferencias en las condiciones del vehículo,
el estilo o entorno de conducción, etc., puede que
algunas funciones no funcionen correctamente. Un fallo
en la alimentación, un uso en entornos fuera del rango
normal de temperatura o humedad de funcionamiento
o una colisión pueden hacer que la cámara de coche no

funcione con normalidad. No hay garantía de que esta
cámara de coche funcione normalmente en todas las
circunstancias. Los vídeos grabados por esta cámara de
coche son solo para referencia.
La Tarjeta Multimedia Integrada (eMMC) está
incorporada en la cámara de coche con finalidades de
almacenamiento. La información sobre la capacidad de la
memoria se puede encontrar en la etiqueta de la cámara
de coche y en la caja del producto.
Instale esta cámara de coche correctamente sin bloquear
la línea de visión del conductor ni el airbag del vehículo,
para evitar fallos del producto o lesiones personales.
Utilice el cargador para automóvil, el cable de
alimentación y otros accesorios incluidos para evitar
fallos en el producto debido a incompatibilidades. No
somos responsables de ninguna pérdida o daño causado
por el uso de un cargador de automóvil o cable de
alimentación que no sean originales.
La cámara de coche está equipada con una batería
integrada no extraíble. No desmonte la cámara de coche.
No exponga las baterías o los paquetes de baterías a la
luz solar, el fuego o a entornos en los que la temperatura
ambiente sea de calor extremo. Si la batería no se instala
correctamente existe riesgo de explosión, por lo tanto,
debe usarla y sustituirla con el mismo tipo de batería o
uno equivalente.
Mantenga la cámara alejada de gotas de agua o
salpicaduras. Mantenga el dispositivo seco para evitar un
fallo de la batería.
Si la batería se deforma, se hincha o tiene fugas durante
el uso o el almacenamiento, deje de usar la dash cam
inmediatamente para evitar problemas de seguridad y
póngase en contacto con el servicio posventa.
Información sobre el cumplimiento de la
normativa
Información sobre RAEE
Todos los productos que llevan este símbolo son
residuos de aparatos eléctricos y electrónicos
(RAEE según la directiva 2012/19/UE) que no
deben mezclarse con residuos domésticos sin
clasificar. En su lugar, debe proteger la salud humana y el
medio ambiente entregando sus equipos de desecho a un
punto de recogida para el reciclaje de residuos de equipos
eléctricos y electrónicos, designado por el gobierno o las
autoridades locales. La eliminación y el reciclado correctos
ayudarán a evitar posibles consecuencias negativas
para el medio ambiente y la salud humana. Póngase en
contacto con el instalador o con las autoridades locales
para obtener más información sobre la ubicación y las
condiciones de dichos puntos de recogida.
Nunca lave la cámara de coche con solvente químico o
limpiador.
Mantenga esta cámara de coche alejada de cualquier
campo magnético potente, ya que pueden dañar la
cámara.
No use esta cámara de coche en entornos con
temperaturas superiores a los 60°C ni por debajo de
-10°C.
Después de trabajar durante un tiempo, la temperatura
de la carcasa de la dash cam aumentará, tenga cuidado
al tocarla.
Utilice esta cámara de coche exclusivamente dentro del
ámbito permitido por la ley.

Declaración de conformidad de la UE
El fabricante, por la presente, declara que el equipo cumple con las Directivas y Normas Europeas aplicables y
las enmiendas. Encontrará el texto completo de la declaración de conformidad de la UE en esta dirección de
Internet:
https://help.70mai.asia/1193.html
Asistencia: [email protected]
Para obtener más información, visite www.70mai.com
Fabricante: 70mai Co., Ltd.
Dirección: Sala 2220, Edificio 2, Nr. 588 Zixing Road, Distrito Minhang, Shanghai, China

Ein/Aus-Schalter
Ύ Taste nach oben
Ώ Taste nach unten
ΐ Selbstklebender
Aufkleber
Α Halterung
Β Mikrofon
Γ Display
Δ Kamera
Ε Lautsprecher
Ζ Netzanschluss
Η Runde Anzeige
Θ Stativkopf
Produktübersicht
Bitte lesen Sie dieses Handbuch sorgfältig durch, bevor Sie das Produkt verwenden, und bewahren Sie es an
einem sicheren Ort auf.
Technische Daten
Produkt: Dash Cam
Modell: X200
Auflösung: 1.920 × 1.080
Objektiv: FOV 140°/F1.5
Akkukapazität: 300 mAh
Eingang: 5 V 2 A
Stromversorgung: Autozigarettenanzünder
Batterietyp: Lithium-Polymer-Akku
Lieferumfang
Dashcam × 1
Netzkabel × 1
Autoladegerät × 1
Halterung (an der Dashcam vorinstalliert) × 1
Elektrostatischer Aufkleber × 2
Verkabelungshebestange × 1
Selbstklebender Aufkleber × 2 (1 Stück an der Halterung
vormontiert)
Benutzerhandbuch × 1
Hinweis: Die Abbildungen des Produkts, des Zubehörs und der Benutzeroberfläche im Benutzerhandbuch dienen nur als
Referenz. Das tatsächliche Produkt und die Funktionen können aufgrund von Weiterentwicklungen des Produkts variieren.

3. Verlegen des Kabels
Verlegen Sie das Netzkabel
zum Zigarettenanzünder und
schließen Sie es an.
4. Anpassung des Dashcam-
Winkels
Halten Sie die Dashcam fest und
drehen Sie die Dashcam nach
oben und unten, um den Winkel
der Dashcam auf Grundlage des
Vorschaubildschirms anzupassen.
2. Installieren der Dashcam
Kleben Sie die Dashcam an den
elektrostatischen Aufkleber.
Stellen Sie sicher, dass die Aussparung
des selbstklebenden Aufklebers an
der des elektrostatischen Aufklebers
ausgerichtet ist und dass das Display zum
Fahrzeuginnenraum weist.
Anbringen/Lösen der Halterung
Die Halterung ist an der Dashcam vorinstalliert. Wenn Sie
sie trennen müssen, befolgen Sie die folgenden Schritte:
Trennen der
Halterung: Halten
Sie die Dashcam fest
und drehen Sie sie
im Uhrzeigersinn. Die
Dashcam lässt sich dann
von der Halterung lösen.
Installation
1. Auswahl der
Montageposition
Montieren Sie die Dashcam an einer
der empfohlenen Positionen an der
vorderen Windschutzscheibe:
1. Nahe der Mitte des Rückspiegels;
2. Vor dem Beifahrersitz.
Hinweise:
Stellen Sie sicher, dass sich die Kamera unterhalb der
Höhenlinie des Rückspiegels befindet.
Bringen Sie den elektrostatischen Aufkleber an der gewünschten
Position an, wobei die Aussparung nach oben weist. Drücken Sie
auf den Aufkleber, um etwaige Luftblasen zu entfernen.
Sorgen Sie dafür, dass die Windschutzscheibe sauber und
trocken bleibt und keine Flüssigkeitsreste aufweist, um zu
verhindern, dass der Aufkleber die Haftung verliert und die
Dashcam herunterfällt.
Hinweise:
Benutzen Sie die beigefügte Hebestange, um das
Netzkabel unter der Dachverkleidung und der
Gummidichtung an der A-Säule des Fahrzeugs zu
verbergen.
Je nach Fahrzeug kann sich der Zigarettenanzünder
an einer anderen Position befinden. Die bereitgestellte
Abbildung dient nur als Referenz.

Herunterladen der 70mai-App
Dieses Produkt muss in Verbindung mit der
70mai-App verwendet werden. Sie können
die App herunterladen und installieren,
indem Sie den QR-Code scannen oder im App
Store nach „70mai“ suchen.
Hinweis: Android 5.0 bzw. iOS 11.0 oder drüber sind
erforderlich, um sich mit einem Mobiltelefon mit dem
WLAN-Hotspot der Dashcam zu verbinden.
Gebrauchsanweisung
Weitere Informationen zu den
Produktfunktionen und FAQs finden Sie in
der Bedienungsanleitung, indem Sie den QR-
Code scannen.
Zubehör (optional)
Dieses Produkt kann auch mit dem 70mai
4G-Hardware-Kit verwendet werden.
Scannen Sie den QR-Code, um die
Bedienungsanleitung für das 70mai
4G-Hardware-Kit aufzurufen.
Mikrofon
Markierungspunkt
Anbringen der Halterung:
1. Richten Sie das Mikrofon an dem großen
Markierungspunkt auf der rechten Seite der Halterung aus
und setzen Sie die Dashcam dann in die Halterung ein.
2. Halten Sie die Dashcam fest und drehen Sie
sie gegen den Uhrzeigersinn, bis das Mikrofon
an dem großen Markierungspunkt auf der
linken Seite der Halterung ausgerichtet ist.
Damit ist die Dashcam an der Halterung fixiert. Vorsichtsmaßnahmen
Lesen Sie bitte alle Vorsichtsmaßnahmen und das
Benutzerhandbuch durch, bevor Sie die Dash Cam
benutzen, um die korrekte und sichere Anwendung zu
gewährleisten.
Die Dashcam ist dafür vorgesehen, Fahrer zu
unterstützen, indem sie die Umgebung außerhalb des
Fahrzeugs aufnimmt. Die Dashcam garantiert nicht die
Fahrsicherheit des Benutzers. Wir übernehmen keine
Haftung für Unfälle, Schäden oder Informationsverluste,
die durch den Betrieb der Dashcam während der Fahrt
hervorgerufen werden.
Aufgrund von Unterschieden in den
Fahrzeugbedingungen, beim Fahrstil, der
Fahrumgebung usw. funktionieren eventuell einige
Funktionen nicht ordnungsgemäß. Ein Stromausfall, die

Verwendung in Umgebungen außerhalb des normalen
Temperatur- oder Feuchtigkeitsbereichs oder eine
Kollision kann dazu führen, dass die Dashcam nicht
normal funktioniert. Es kann nicht garantiert werden,
dass die Dashcam unter allen Bedingungen normal
funktioniert. Videos, die von der Dashcam aufgezeichnet
werden, dienen nur als Referenz.
Die eMMC (Embedded Multi Media Card) ist zur
Speicherung in die Dashcam eingebaut. Die
Informationen zur Speicherkapazität finden Sie auf dem
Etikett der Dashcam und auf der Produktverpackung.
Installieren Sie diese Dashcam korrekt und versperren
Sie nicht die Sichtlinie des Fahrers oder den Airbag des
Fahrzeugs, um Produktversagen oder Personenschäden
zu vermeiden.
Verwenden Sie das beigefügte Autoladegerät,
das Netzkabel und andere Zubehörteile, um ein
Produktversagen aufgrund einer Nichtübereinstimmung
zu vermeiden. Wir übernehmen keine Haftung für
Verluste oder Schäden, die durch die Verwendung
eines nicht originalen Autoladegerätes oder Netzkabels
entstehen.
Die Dashcam ist mit einem eingebauten Akku
ausgestattet, der nicht entfernt werden kann. Bauen Sie
die Dashcam nicht auseinander. Setzen Sie die Akkus
oder Akku-Packs nicht dem Sonnenlicht, Feuer oder
Umgebungen aus, in denen die Umgebungstemperatur
extrem heiß ist. Es besteht die Gefahr einer Explosion,
wenn der Akku fehlerhaft installiert wird. Verwenden und
ersetzen Sie ihn daher nur durch denselben oder einen
gleichwertigen Batterietyp.
Schützen Sie die Dashcam vor Wassertropfen und
Informationen zur Einhaltung gesetzlicher
Vorschriften
WEEE-Informationen
Alle mit diesem Symbol gekennzeichneten
Produkte sind Elektroschrott und Elektrogeräte
(WEEE entsprechend EU-Richtlinie 2012/19/
EU) und dürfen nicht mit unsortiertem
Haushaltsmüll vermischt werden. Schützen Sie stattdessen
Ihre Mitmenschen und die Umwelt, indem Sie Ihre zu
entsorgenden Geräte an eine dafür vorgesehene, von
der Regierung oder einer lokalen Behörde eingerichtete
-spritzern. Halten Sie das Gerät trocken, um einen Ausfall
der Batterie zu vermeiden.
Wenn die Batterie verformt oder aufgebläht ist oder
während der Anwendung oder Lagerung undicht wird,
stellen Sie die Verwendung der Dashcam unverzüglich
ein, um Sicherheitsprobleme zu vermeiden, und setzen
Sie sich mit dem Kundendienst in Verbindung.
Waschen Sie die Dashcam niemals mit chemischen
Lösungs- oder Reinigungsmitteln.
Halten Sie die Dashcam fern von starken Magnetfeldern,
da sie Schäden an der Dashcam hervorrufen können.
Verwenden Sie die Dashcam nicht in Umgebungen mit
Temperaturen von über 60 °C oder unter -10 °C.
Nachdem die Dashcam einige Zeit lang gelaufen ist,
steigt die Gehäusetemperatur der Dashcam. Seien Sie
vorsichtig, wenn Sie sie berühren.
Verwenden Sie diese Dashcam nur im gesetzlich
zugelassenen Rahmen.

EU-Konformitätserklärung
Der Hersteller erklärt hiermit, dass dieses Produkt den betreffenden Bestimmungen und europäischen Normen
sowie deren überarbeiteten Fassungen entspricht. Der vollständige Wortlaut der EU-Konformitätserklärung ist
unter der folgenden Internetadresse abrufbar: https://help.70mai.asia/1193.html
Sammelstelle zum Recycling von Elektroschrott und Elektrogeräten bringen. Eine ordnungsgemäße Entsorgung und
Recycling helfen, negative Auswirkungen auf die Gesundheit von Umwelt und Menschen zu vermeiden. Wenden Sie sich bitte
an den Installateur oder lokale Behörden, um Informationen zum Standort und den allgemeinen Geschäftsbedingungen
solcher Sammelstellen zu erhalten.
Service: [email protected]
Weitere Informationen finden Sie unter www.70mai.com.
Hersteller: 70mai Co., Ltd.
Adresse: Room 2220, Building 2, No. 588 Zixing Road, Minhang District, Shanghai, China
A página está carregando...
A página está carregando...
A página está carregando...
A página está carregando...
A página está carregando...
A página está carregando...
A página está carregando...
A página está carregando...
A página está carregando...
A página está carregando...
A página está carregando...
A página está carregando...
A página está carregando...
A página está carregando...
A página está carregando...
A página está carregando...
A página está carregando...
A página está carregando...
A página está carregando...
A página está carregando...
A página está carregando...
A página está carregando...
A página está carregando...
A página está carregando...
A página está carregando...
A página está carregando...
A página está carregando...
A página está carregando...
A página está carregando...
A página está carregando...
A página está carregando...
A página está carregando...
A página está carregando...
A página está carregando...
A página está carregando...
A página está carregando...
A página está carregando...
A página está carregando...
A página está carregando...
A página está carregando...
A página está carregando...
A página está carregando...
A página está carregando...
A página está carregando...
A página está carregando...
A página está carregando...
A página está carregando...
A página está carregando...
A página está carregando...
A página está carregando...
A página está carregando...
A página está carregando...
A página está carregando...
A página está carregando...
A página está carregando...
A página está carregando...
A página está carregando...
A página está carregando...
A página está carregando...
A página está carregando...
A página está carregando...
A página está carregando...
A página está carregando...
A página está carregando...
A página está carregando...
A página está carregando...
-
 1
1
-
 2
2
-
 3
3
-
 4
4
-
 5
5
-
 6
6
-
 7
7
-
 8
8
-
 9
9
-
 10
10
-
 11
11
-
 12
12
-
 13
13
-
 14
14
-
 15
15
-
 16
16
-
 17
17
-
 18
18
-
 19
19
-
 20
20
-
 21
21
-
 22
22
-
 23
23
-
 24
24
-
 25
25
-
 26
26
-
 27
27
-
 28
28
-
 29
29
-
 30
30
-
 31
31
-
 32
32
-
 33
33
-
 34
34
-
 35
35
-
 36
36
-
 37
37
-
 38
38
-
 39
39
-
 40
40
-
 41
41
-
 42
42
-
 43
43
-
 44
44
-
 45
45
-
 46
46
-
 47
47
-
 48
48
-
 49
49
-
 50
50
-
 51
51
-
 52
52
-
 53
53
-
 54
54
-
 55
55
-
 56
56
-
 57
57
-
 58
58
-
 59
59
-
 60
60
-
 61
61
-
 62
62
-
 63
63
-
 64
64
-
 65
65
-
 66
66
-
 67
67
-
 68
68
-
 69
69
-
 70
70
-
 71
71
-
 72
72
-
 73
73
-
 74
74
-
 75
75
-
 76
76
-
 77
77
-
 78
78
-
 79
79
-
 80
80
-
 81
81
-
 82
82
-
 83
83
-
 84
84
-
 85
85
-
 86
86


em outras línguas
- français: 70mai 360 Degree Manuel utilisateur
- italiano: 70mai 360 Degree Manuale utente