
DOC022.97.90258
© HACH Company, 2010, All rights reserved. Printed in Spain
Manual
Manual
Manual de instruções
Manuel utilisateur
操作手册
07/2010, Edition 1
07/2010, Edición 1
07/2010, Edição 1
07/2010, Edition 1
2010
年7月,第一版
sensION+ DO 6_HACH_0710.indd 1sensION+ DO 6_HACH_0710.indd 1 14/9/10 10:51:1714/9/10 10:51:17

sensION+ DO 6_HACH_0710.indd 2sensION+ DO 6_HACH_0710.indd 2 14/9/10 10:51:1814/9/10 10:51:18

ENGLISHESPAÑOLFRANÇAIS PORTUGUÊSCONTACT
中文
中文
sensION+ DO 6_HACH_0710.indd 3sensION+ DO 6_HACH_0710.indd 3 14/9/10 10:51:1814/9/10 10:51:18

sensION+ DO 6_HACH_0710.indd 4sensION+ DO 6_HACH_0710.indd 4 14/9/10 10:51:1814/9/10 10:51:18

1
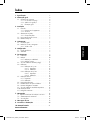
Table of contents
1. Technical Specifications . . . . . . . . . . . . . . . . . . . . . . . 3
2. General information . . . . . . . . . . . . . . . . . . . . . . . . . 4
2.1. Safety information . . . . . . . . . . . . . . . . . . . . . . . . . 4
2.1.1. Use of hazard information . . . . . . . . . . . . . . 4
2.1.2. Precautionary labels . . . . . . . . . . . . . . . . . . 4
2.2. General product information . . . . . . . . . . . . . . . . . . 4
3. Installation . . . . . . . . . . . . . . . . . . . . . . . . . . . . . . . . 5
3.1. Contents . . . . . . . . . . . . . . . . . . . . . . . . . . . . . . . . 5
3.1.1. Component list . . . . . . . . . . . . . . . . . . . . . . 5
3.1.2. Accessories . . . . . . . . . . . . . . . . . . . . . . . . 5
3.2. Battery power . . . . . . . . . . . . . . . . . . . . . . . . . . . . 6
3.2.1. Inserting the batteries . . . . . . . . . . . . . . . . . 6
3.3. Disconnecting/connecting the sensor . . . . . . . . . . . . 7
3.4. Carrying case . . . . . . . . . . . . . . . . . . . . . . . . . . . . 7
4. Start-up . . . . . . . . . . . . . . . . . . . . . . . . . . . . . . . . 8
4.1. General information . . . . . . . . . . . . . . . . . . . . . . . . 8
4.2. User interface and browsing . . . . . . . . . . . . . . . . . . 8
4.2.1. Keyboard and display . . . . . . . . . . . . . . . . . 8
5. Set-up . . . . . . . . . . . . . . . . . . . . . . . . . . . . . . . . 9
5.1. Atmospheric pressure . . . . . . . . . . . . . . . . . . . . . . . 9
5.2. Salinity . . . . . . . . . . . . . . . . . . . . . . . . . . . . . . . . 9
6. Operation . . . . . . . . . . . . . . . . . . . . . . . . . . . . . . . . 9
6.1. Polarisation . . . . . . . . . . . . . . . . . . . . . . . . . . . . . . 10
6.2. Measurement. . . . . . . . . . . . . . . . . . . . . . . . . . . . . 10
6.2.1. Stability measuring . . . . . . . . . . . . . . . . . . . 11
6.2.2. Continuous measuring . . . . . . . . . . . . . . . . . 11
6.3. Changing measuring units (%/mg/L) . . . . . . . . . . . . 11
6.4. Calibration . . . . . . . . . . . . . . . . . . . . . . . . . . . . . . 12
6.4.1. One-point calibration . . . . . . . . . . . . . . . . . 12
6.4.1.1. Preparation . . . . . . . . . . . . . . . . . 12
6.4.1.2. Calibration . . . . . . . . . . . . . . . . . 12
6.4.2. Two-point calibration . . . . . . . . . . . . . . . . . 13
6.4.2.1. Preparation . . . . . . . . . . . . . . . . . 13
6.4.2.2. Calibration . . . . . . . . . . . . . . . . . 13
6.5. Manual calibration . . . . . . . . . . . . . . . . . . . . . . . . . 14
6.5.1. Preparation . . . . . . . . . . . . . . . . . . . . . . . . 14
6.5.2. Calibration . . . . . . . . . . . . . . . . . . . . . . . . 14
6.6. Readjusting temperature . . . . . . . . . . . . . . . . . . . . . 15
6.7. Restoring factory settings . . . . . . . . . . . . . . . . . . . . . 16
6.8. Disabling auto power off . . . . . . . . . . . . . . . . . . . . 16
6.9. Changing temperature units . . . . . . . . . . . . . . . . . . 16
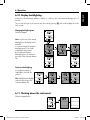
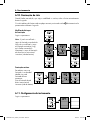
6.10. Display backlighting . . . . . . . . . . . . . . . . . . . . . . . . 17
6.11. Shutting down the instrument . . . . . . . . . . . . . . . . . 17
7. Maintenance . . . . . . . . . . . . . . . . . . . . . . . . . . . . . . . 18
7.1. Cleaning the measuring instrument and accessories . . 18
7.2. Storing the instrument . . . . . . . . . . . . . . . . . . . . . . 18
7.3. Changing batteries. . . . . . . . . . . . . . . . . . . . . . . . . 18
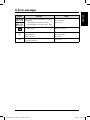
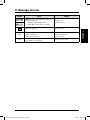
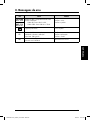
8. Error messages . . . . . . . . . . . . . . . . . . . . . . . . . . . . . 19
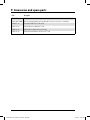
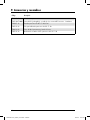
9. Accessories and spare parts . . . . . . . . . . . . . . . . . . 20
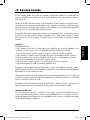
10. Limited warranty . . . . . . . . . . . . . . . . . . . . . . . . . . . 21
Contact Information
ENGLISH
sensION+ DO 6_HACH_0710.indd ANG:1sensION+ DO 6_HACH_0710.indd ANG:1 14/9/10 10:51:1814/9/10 10:51:18

sensION+ DO 6_HACH_0710.indd ANG:2sensION+ DO 6_HACH_0710.indd ANG:2 14/9/10 10:51:1814/9/10 10:51:18

3
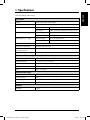
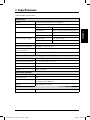
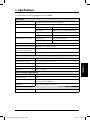
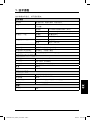
1. Specifications
Subject to change without notice.
Specifications
Display
Liquid crystal, backlit, with pictograms
Keypad
Membrane, 5 keys
Saturation 0.0 to 199.9% and 200 to 250% (25°C)
Concentration 0.00 to 19.99 mg/L and 20.0 to 22.0 mg/L (25°C)
Reproducibility (± 1 digit)
Dissolved oxygen ≤ 0.2 of the measured value
Temperature ≤ 0.1 °C (≤ 0.1 °F)
Measuring error (± 1 digit)
Dissolved oxygen ≤ 0.5 of the measured value
Temperature ≤ 0.2 °C (≤ 0.4 °F)
Temperature
0.0 to 50.0°C (0 to 122°F)
Temperature compensation
Automatic, with NTC sensor
Correction of salinity and
atmospheric pressure
Automatic, with manual data entry
Standard calibrations
At 1 or 2 points. 0% and 100% saturation
Dimensions of the measuring instrument and ambient conditions
Operating temperature
0 °C to 50 °C (32 °F to 122 °F)
Storage temperature
–15 °C to 65 °C (5 °F to 149 °F)
Ambient conditions
80% relative humidity (non-condensing)
Weight
300 g
Size
186 x 73 x 38 mm
Additional technical data
Energy management
Automatic power off after 5 minutes of inactivity
Type of protection
IP 67
Power supply (batteries)
Three 1.5V AA batteries. Autonomy of over 500 hours
Connector
MP-5, five-contact multipin
Warranty
Warranty
3 years
ENGLISH
sensION+ DO 6_HACH_0710.indd ANG:3sensION+ DO 6_HACH_0710.indd ANG:3 14/9/10 10:51:1814/9/10 10:51:18

4
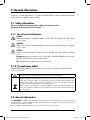
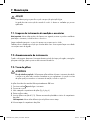
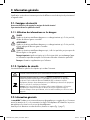
2. General information
As a result of constant improvements to our products sometimes differences may exist between this manual
and the instructions supplied with the instrument.
2.1. Safety information
Please, read carefully this information before installing and using the instrument !
Pay attention to all danger and caution statements.
2.2. General information
The
sensION ™+ DO 6
is a polarographic measuring instrument for dissolved oxygen. The instrument measures
the saturation (in %) or the concentration (in mg/L) and the temperature of the sample. The atmospheric pressure and
salt content are automatically corrected.
Before being able to read a measurement, you will need to connect a sensor (Fig. 3, pg. 7).
2.1.1. Use of hazard information
DANGER
Indicates a potentially or imminently hazardous situation that, if not avoided, will result in death
or serious injury.
WARNING
Indicates a potentially or imminently hazardous situation that, if not avoided, may result in death
or serious injury.
CAUTION
Indicates a potentially hazardous situation that, if not avoided, may result in minor or moderate
injury.
Important note: Indicates a situation that, if not avoided, could lead to damage to the instrument.
Important information that requires special emphasis.
Note: Information that supplements points in the main text.
2.1.2. Precautionary labels
Read all labels and tags attached to the instrument. Personal injury or damage to the instrument could
occur if not observed.
This symbol references the instruction manual for operation or safety information.
Electrical equipment marked with this symbol may not be disposed of in European public disposal
systems after 12 August of 2005. In conformity with European local and national regulations (EU
Directive 2002/96/EC), European electrical equipment users must now return old or end-of life
equipment to the Producer for disposal at no charge to the user.
Note: For return for recycling, please contact the equipment producer or supplier for instructions on
how to return end-of-life equipment, producer-supplied electrical accessories, and all auxiliary items
for proper disposal.
sensION+ DO 6_HACH_0710.indd ANG:4sensION+ DO 6_HACH_0710.indd ANG:4 14/9/10 10:51:1814/9/10 10:51:18

5
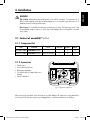
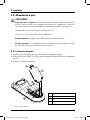
3. Installation
3.1.1. Component list
Code Instrument Sensor Accessories Batteries Manual
LPV4500.97.0002
sensION ™+ DO 6
–– ––
✓✓
LPV4551.97.0002
sensION ™+ DO 6
LZW5120.97.0002
✓✓✓
ENGLISH
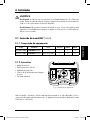
WARNING
Risk of falling. Measurements are made directly in situ with this instrument. To prevent the risk of
falling, ensure compliance with all local safety regulations on securing with ropes and on the use of
adequate protective clothing and footwear.
Risk of injury. Do not attach the measuring instrument to your body. The measuring sensor could
be accidentally caught in a motor or stirrer and could endanger the user through the connected
sensor cable.
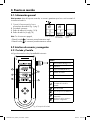
3.1. Content of
sensION ™+ DO 6
After removing the instrument, check each part for possible damage. All components on the attached list
must be present. If there are any missing or damaged parts, contact the manufacturer or distributor.
3.1.2. Accesorios
• Carrying case.
• Sensor electrolyte (25 mL).
• Replacement membrane
• Two 90-mL bottles for sample and sensor
cleaning.
• Tube for calibration.
Fig. 1. Equipment composition
DO6
sensION
™
sensION+ DO 6_HACH_0710.indd ANG:5sensION+ DO 6_HACH_0710.indd ANG:5 14/9/10 10:51:1814/9/10 10:51:18

6
3. Installation
3.2. Battery power
WARNING
Risk of fire or explosion. Use only AA alkaline batteries for the measuring instrument and ensure that
the batteries are correctly inserted in their compartment. Inserting batteries incorrectly can damage
the instrument and cause fires or explosions.
The measuring instrument works with three batteries (1.5 V, AA).
The batteries supplied have a useful life of approximately 500 hours.
Important note: never use different types of batteries together.
Important note: if the measuring instrument is not going to be used for a long period of time, remove
the batteries to prevent leakage in the instrument.
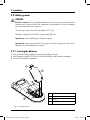
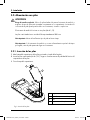
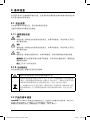
3.2.1. Inserting the batteries
1. Open the lid of the battery compartment by pressing and pulling on the tab.
2. Insert the batteries supplied (1.5 V AA). Note the polarity markings inside the battery compartment.
3. Close the lid of the battery compartment.
Fig. 2. Inserting the batteries
1
Tab
2
Battery compartment lid
3
Batteries
4
Battery compartment
+
+
+
2
1
3
4
sensION+ DO 6_HACH_0710.indd ANG:6sensION+ DO 6_HACH_0710.indd ANG:6 14/9/10 10:51:1914/9/10 10:51:19

7
3. Installation
ENGLISH
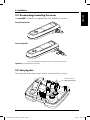
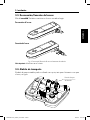
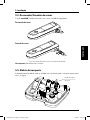
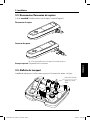
3.3. Disconnecting/connecting the sensor
The
sensION ™+ DO 6
kits are supplied with the sensor attached to the instrument.
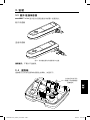
Fig. 3. Disconnecting/connecting the sensor to the measuring instrument
Sensor disconnection
Sensor connection
Important: do not unscrew the connector.
3.4. Carrying case
The carrying case can be used as a support for both, instrument and sensor, see figure:
Electrode position
when it is not in use.
sensION+ DO 6_HACH_0710.indd ANG:7sensION+ DO 6_HACH_0710.indd ANG:7 14/9/10 10:51:1914/9/10 10:51:19

8
4. Start-up
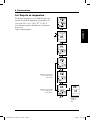
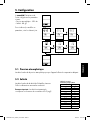
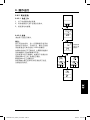
4.1. General information
Important note: before start-up, make sure that the sensor is connected to the measuring instrument.
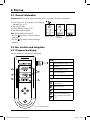
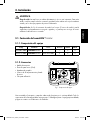
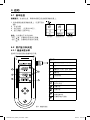
Fig. 4. Keypad description
Display
1 Measured DO values (mg/L or %).
2 Temperature.
3 Measuring time (hh:mm:ss).
4 Units of measurement.
5 Battery indicator.
Keypad
- Instrument on/off.
- Display light on.
- Start of measuring.
- Start of calibration.
- Selection of temperature units.
- Entry of numerical values during
set-up.
5
4
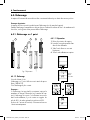
4.2 User interface and navigation
4.2.1 Keyboard and display
Figure 4 indicates the instrument keys and display.
1. Connect the sensor (if necessary) to the measuring
instrument (Fig. 3, pg. 7).
2. Turn on the instrument.
3. Perform calibration (see pg. 12-14).
4. Take measurement (see pg.10).
Note: With the instrument switched off,
- Press the
key and the instrument will begin
measuring.
- Press the
key and the instrument will begin
calibration.
Software version. Instrument
serial number.
Standby screen.
1
2
3
sensION+ DO 6_HACH_0710.indd ANG:8sensION+ DO 6_HACH_0710.indd ANG:8 14/9/10 10:51:2114/9/10 10:51:21

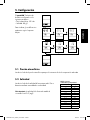
9
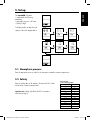
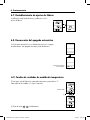
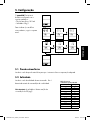
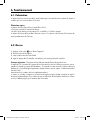
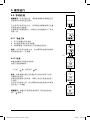
5. Set-up
The
sensION ™+ DO 6
is supplied with the following
parameters:
– Atmospheric pressure: 1013 mb.
– Salinity: 0.0 g/L.
To display and/or modify these pa-
rameters, follow the diagram below.
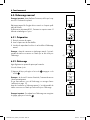
5.1. Atmospheric pressure
Enter the atmospheric pressure value for the instrument to make the relevant compensation.
5.2. Salinity
Enter the salinity value of the sample to be measured. This is deter-
mined with a conductivity measurement.
Important note: salinity only affects the DO concentration
measurement (mg/L).
2 s
2 s
2 s 2 s
2 s
2 s
Conductivity (mS/cm) NaCl (g/L)
1.9 1.0
3.7 2.0
7.3 4.0
10.9 6.0
17.8 10.1
25.8 15.1
33.6 20.2
41.2 25.4
48.9 30.6
56.3 35.8
62.2 40.0
69.4 45.3
75.7 50.0
Conversion table
specific conductivity/salinity
ENGLISH
sensION+ DO 6_HACH_0710.indd ANG:9sensION+ DO 6_HACH_0710.indd ANG:9 14/9/10 10:51:2114/9/10 10:51:21

10
6. Operation
6.1. Polarisation
The sensor must be connected and polarized before calibration. The measuring instrument polarizes the
sensor whenever it is connected, even if it is switched off.
Required polarisation
The sensor must be polarised 6 hours before use if:
• it is not connected to the measuring instrument
• the batteries have been inserted for the first time, they are running low or they need changing
The sensor must be polarised for 10 approximately minutes if the sensor is disconnected from the measuring
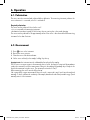
instrument for less than 5 minutes.
6.2. Measurement
1. Press
to turn on the instrument.
2. Remove the sensor protector.
3. Clean the sensor with deionized water.
4. Stir the sensor uniformly in the sample, holding it by the top.
Important notes: the instrument must be calibrated before taking the first reading.
The DO sensor consumes oxygen in the measured solution; hence, the liquid in contact with the membrane
needs to be renewed for a correct measurement. Otherwise, the reading will gradually drop. Gently stir the
liquid to be measured using the sensor. The minimum flow must be 0.3 mL/s.
Before measuring, the sensor must be fully polarised.
Salt content affects oxygen measurement when the result is expressed in mg/L and it must be adjusted
manually. To do this, measure the conductivity of the sample, determine the salt content (see table on pg. 9) and
manually enter it in the instrument.
sensION+ DO 6_HACH_0710.indd ANG:10sensION+ DO 6_HACH_0710.indd ANG:10 14/9/10 10:51:2114/9/10 10:51:21

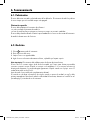
11
6. Operation
ENGLISH
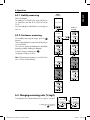
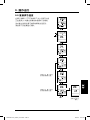
+
Stability
measuring
Continuous
measuring
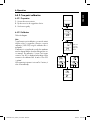
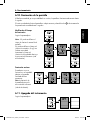
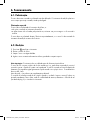
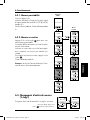
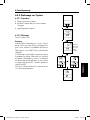
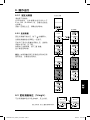
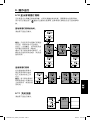
6.2.1. Stability measuring
Follow the diagram.
The reading is not locked on the screen until the sen-
sor signal varies less than 0.1% DO (0.125 nA) for
15 sec.
Once the reading has stabilized, the screen lights up
for 2 sec.
6.2.2. Continuous measuring
Once stability measuring has begun, press the
key twice.
The instrument displays the measured value directly on
screen at all times.
The continuous reading should always be started after
beginning a stability reading (see diagram).
To end a continuous reading, press
.
The display will light up for 2 sec.
Note: if the measuring instrument is not used for 5 min-
utes, it will shut off automatically.
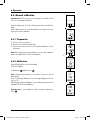
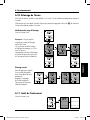
6.3. Changing measuring units (%/mg/L)
To change the units of measurement from % to mg/L or vice versa.
2 s
In Stability measuring, hold down
the
key for 2 s.
sensION+ DO 6_HACH_0710.indd ANG:11sensION+ DO 6_HACH_0710.indd ANG:11 14/9/10 10:51:2214/9/10 10:51:22

12
6. Operation
Screw the
sensor
to the 1st tube.
6.4. Calibration
The sensor and the measuring instrument must be calibrated correctly to obtain precise measurements.
Important notes:
The sensor must be connected and polarized before calibration (see sensor manual).
During calibration, the membrane must not enter into contact with the surface of the water. The membrane
must remain dry since water droplets can affect calibration.
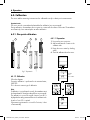
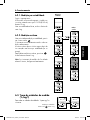
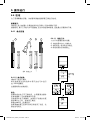
Fig. 5. Preparación
1 2 3 4
6.4.1.1. Preparation
1. Unscrew the sensor protector.
2. Add a small amount of water to the
calibrator tube.
3. Empty the excess water by shaking
gently.
4. Screw the calibrator tube to the sensor.
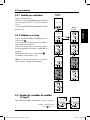
6.4.1. One-point calibration
6.4.1.2. Calibration
Follow the diagram.
One-point calibration is performed in air saturated water,
100% DO.
This is the most common type of calibration.
Note:
If calibration is not performed correctly, the membrane must
be cleaned and the electrolyte changed (see sensor manual).
The calibration is correct if an oxygen content of over 98% is
displayed when taking a measurement in the calibrator tube.
A value of over 99% is optimal.
If the measuring instrument is not used for 5 minutes, it shuts
off automatically.
sensION+ DO 6_HACH_0710.indd ANG:12sensION+ DO 6_HACH_0710.indd ANG:12 14/9/10 10:51:2214/9/10 10:51:22

13
6. Operation
ENGLISH
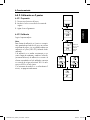
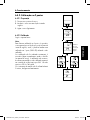
6.4.2. Two-point calibration
6.4.2.1. Preparation
1. Unscrew the sensor protector.
2. Dip the sensor into an oxygen-free solution.
3. Stir the sensor gently.
6.4.2.2. Calibration
Follow the diagram.
Note:
To perform a two-point calibration, you must be certain
that the solution is oxygen-free; otherwise, one-point
calibration (100% DO) using the calibrator tube is
preferable.
If calibration is not performed correctly, the membrane
must be cleaned and the electrolyte changed (see sen-
sor manual). The calibration is correct if an oxygen
content of over 98% is displayed when taking a mea-
surement in the calibrator tube. A value of over 99%
is optimal.
If the measuring instrument is not used for 5 minutes, it
shuts off automatically.
Dip the sen-
sor into an
oxygen-free
solution
sensION+ DO 6_HACH_0710.indd ANG:13sensION+ DO 6_HACH_0710.indd ANG:13 14/9/10 10:51:2214/9/10 10:51:22

14
6. Operation
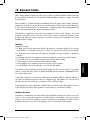
6.5. Manual calibration
Important note: before turning on the instrument, check that the DO
sensor is connected and polarised.
Manual readjustment of the dissolved oxygen measured within the
range.
When readjusting DO, the instrument behaves as though it were per-
forming a one-point calibration.
6.5.1. Preparation
1. Unscrew the sensor protector.
2. Rinse the sensor with deionized water.
3. Dip the sensor into the solution in which manual calibration is to be
performed.
Note: Before beginning manual calibration, you must take a measure-
ment in the standard to be used in the calibration.
6.5.2. Calibration
Stir gently holding the sensor by the handle.
Follow the diagram.
(1)
Hold down
and then press .
Note: If the measuring instrument is not used for 5 minutes, it shuts off
automatically.
If errors occur during calibration, an error message will appear on screen
(see pg. 19).
Before beginning manual calibration, you must take a measurement in the
standard to be used in the calibration.
Important note: to exit calibration without saving the adjustment,
press
.
(1)
sensION+ DO 6_HACH_0710.indd ANG:14sensION+ DO 6_HACH_0710.indd ANG:14 14/9/10 10:51:2314/9/10 10:51:23

15
6. Operation
ENGLISH
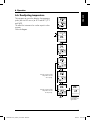
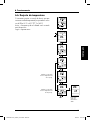
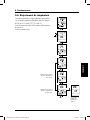
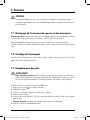
6.6. Readjusting temperature
The instrument can correct the deviation of a temperature
probe (built into DO sensors) at 25°C and 85°C (77°F
and 185°F).
This allows the instrument to be used as a precision ther-
mometer.
Follow the diagram.
2 s
Enter the correction of the
temperature sensor at
25 °C (77 °F).
Enter the correction of the
temperature sensor at
85 °C (185 °F).
To exit adjust-
ment without sav-
ing the data.
sensION+ DO 6_HACH_0710.indd ANG:15sensION+ DO 6_HACH_0710.indd ANG:15 14/9/10 10:51:2314/9/10 10:51:23

16
6. Operation
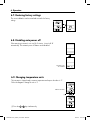
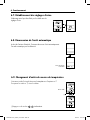
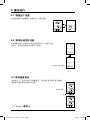
6.7. Restoring factory settings
2 s
6.9. Changing temperature units
The instrument is shipped ready to measure temperature and express the values in °C.
Follow the diagram to change the units to °F.
6.8. Disabling auto power off
If the measuring instrument is not used for 5 minutes, it turns itself off
automatically. This automatic power off feature can be disabled.
2 s
etc.
Automatic power
off is disabled
Stable measurement
The current calibration can be erased and restored to the factory
settings.
(1)
(1) Press the
keys simultaneously.
sensION+ DO 6_HACH_0710.indd ANG:16sensION+ DO 6_HACH_0710.indd ANG:16 14/9/10 10:51:2314/9/10 10:51:23
A página está carregando...
A página está carregando...
A página está carregando...
A página está carregando...
A página está carregando...
A página está carregando...
A página está carregando...
A página está carregando...
A página está carregando...
A página está carregando...
A página está carregando...
A página está carregando...
A página está carregando...
A página está carregando...
A página está carregando...
A página está carregando...
A página está carregando...
A página está carregando...
A página está carregando...
A página está carregando...
A página está carregando...
A página está carregando...
A página está carregando...
A página está carregando...
A página está carregando...
A página está carregando...
A página está carregando...
A página está carregando...
A página está carregando...
A página está carregando...
A página está carregando...
A página está carregando...
A página está carregando...
A página está carregando...
A página está carregando...
A página está carregando...
A página está carregando...
A página está carregando...
A página está carregando...
A página está carregando...
A página está carregando...
A página está carregando...
A página está carregando...
A página está carregando...
A página está carregando...
A página está carregando...
A página está carregando...
A página está carregando...
A página está carregando...
A página está carregando...
A página está carregando...
A página está carregando...
A página está carregando...
A página está carregando...
A página está carregando...
A página está carregando...
A página está carregando...
A página está carregando...
A página está carregando...
A página está carregando...
A página está carregando...
A página está carregando...
A página está carregando...
A página está carregando...
A página está carregando...
A página está carregando...
A página está carregando...
A página está carregando...
A página está carregando...
A página está carregando...
A página está carregando...
A página está carregando...
A página está carregando...
A página está carregando...
A página está carregando...
A página está carregando...
A página está carregando...
A página está carregando...
A página está carregando...
A página está carregando...
A página está carregando...
A página está carregando...
A página está carregando...
A página está carregando...
A página está carregando...
A página está carregando...
A página está carregando...
A página está carregando...
A página está carregando...
A página está carregando...
A página está carregando...
A página está carregando...
A página está carregando...
A página está carregando...
A página está carregando...
A página está carregando...
A página está carregando...
A página está carregando...
-
 1
1
-
 2
2
-
 3
3
-
 4
4
-
 5
5
-
 6
6
-
 7
7
-
 8
8
-
 9
9
-
 10
10
-
 11
11
-
 12
12
-
 13
13
-
 14
14
-
 15
15
-
 16
16
-
 17
17
-
 18
18
-
 19
19
-
 20
20
-
 21
21
-
 22
22
-
 23
23
-
 24
24
-
 25
25
-
 26
26
-
 27
27
-
 28
28
-
 29
29
-
 30
30
-
 31
31
-
 32
32
-
 33
33
-
 34
34
-
 35
35
-
 36
36
-
 37
37
-
 38
38
-
 39
39
-
 40
40
-
 41
41
-
 42
42
-
 43
43
-
 44
44
-
 45
45
-
 46
46
-
 47
47
-
 48
48
-
 49
49
-
 50
50
-
 51
51
-
 52
52
-
 53
53
-
 54
54
-
 55
55
-
 56
56
-
 57
57
-
 58
58
-
 59
59
-
 60
60
-
 61
61
-
 62
62
-
 63
63
-
 64
64
-
 65
65
-
 66
66
-
 67
67
-
 68
68
-
 69
69
-
 70
70
-
 71
71
-
 72
72
-
 73
73
-
 74
74
-
 75
75
-
 76
76
-
 77
77
-
 78
78
-
 79
79
-
 80
80
-
 81
81
-
 82
82
-
 83
83
-
 84
84
-
 85
85
-
 86
86
-
 87
87
-
 88
88
-
 89
89
-
 90
90
-
 91
91
-
 92
92
-
 93
93
-
 94
94
-
 95
95
-
 96
96
-
 97
97
-
 98
98
-
 99
99
-
 100
100
-
 101
101
-
 102
102
-
 103
103
-
 104
104
-
 105
105
-
 106
106
-
 107
107
-
 108
108
-
 109
109
-
 110
110
-
 111
111
-
 112
112
-
 113
113
-
 114
114
-
 115
115
-
 116
116
-
 117
117
-
 118
118


em outras línguas
- español: Hach sensION+ DO6 Manual de usuario
- français: Hach sensION+ DO6 Manuel utilisateur
- English: Hach sensION+ DO6 User manual
Artigos relacionados
-
Hach LPV3560.97.0002 Manual do usuário
-
 Hach sensION+ pH1 Manual do usuário
-
Hach sensION+ MM150 DL Manual do usuário
-
 Hach sensION+ EC7 Manual do usuário
-
 Hach sensION+ EC71 Manual do usuário
-
Hach sensION+ EC5 Manual do usuário
-
 Hach sensIONTM+ pH31 Manual do usuário
-
 Hach sensION+ pH3 Manual do usuário
-
 Hach sensION+ MM374 Manual do usuário
-
 Hach sensION MM340 Manual do usuário


