Oregon Scientific BAR200U Manual do usuário
- Categoria
- Estações meteorológicas
- Tipo
- Manual do usuário


EN
1
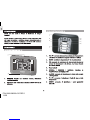
WEATHER IN MOTION
Model: BAR200 / BAR200U / BAR200A
USER MANUAL
CONTENTS
Introdction ........................................................................ 2
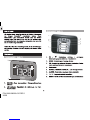
Overview .......................................................................... 2
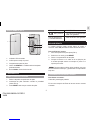
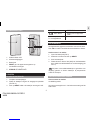
Front View .................................................................... 2
Back View .................................................................... 2
Remote Sensor ........................................................... 3
Getting Started ................................................................ 3
Insert Batteries ............................................................ 3
Remote Sensor ............................................................... 3
Sensor Data Transmission .......................................... 3
Clock ................................................................................ 4
Clock Reception .......................................................... 4
Manually Set Clock ...................................................... 4
Alarm ............................................................................... 5
Weather Forecast ........................................................... 5
Temperature And Humidity ............................................ 5
Near-Far Function .......................................................... 5
Backlight ......................................................................... 5
Reset ................................................................................ 6
Precautions ..................................................................... 6
Specifications ................................................................. 7
About Oregon Scientific ................................................ 7
Eu-declaration Of Conformity ....................................... 7
Fcc Statement ................................................................ 8
Declaration Of Conformity ........................................ 8
P/N: 086L004956-010 REV1
2/60


EN
3
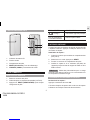
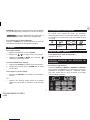
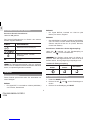
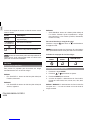
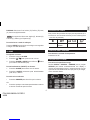
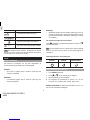
LOCATION MEANING
Clock / alarm Main unit batteries low
Outdoor temperature
and humidity area Sensor batteries low
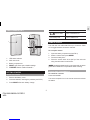
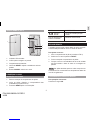
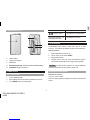
REMOTE SENSOR
The main unit can collect data from up to 3 sensors. Press
CH to toggle between the sensor channels.
To set up the sensor:
1. Open the battery compartment (see FIG 3).
2. Select a channel then press RESET.
3. Close the battery door.
4. Place the sensor within 30 m (98 ft) of the main unit
using the table stand or wall mount.
NOTE Use alkaline batteries for longer usage and consumer
grade lithium batteries in temperatures below freezing.
SENSOR DATA TRANSMISSION
To search for a sensor:
Press and hold CH.
The sensor reception icon in the remote sensor area shows
the status:
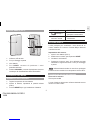
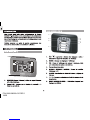
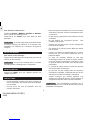
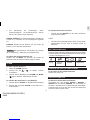
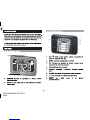
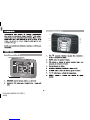
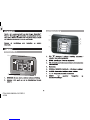
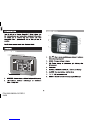
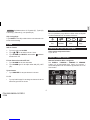
REMOTE SENSOR (FIG 3)
1. LED status indicator
2. Wall mount hole
3. Battery compartment
4. RESET hole: Reset unit to default settings
5. CHANNEL button: Select channel 1
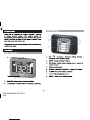
GETTING STARTED
INSERT BATTERIES
1. Remove the battery cover.
2. Insert the batteries, matching the polarities (see FIG 2).
3. Press RESET after each battery change.
1
2
3
4
5
P/N: 086L004956-010 REV1
4/60

EN
4
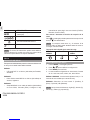
ICON DESCRIPTION
Main unit is searching for sensor(s)
A channel has been found
Sensor 1 data received
and “--.-“ The sensor cannot be found.
TIP The transmission range may vary depending on many
factors. You may need to experiment with various locations
to get the best results.
CLOCK
CLOCK RECEPTION
This product is designed to synchronize its clock
automatically with a clock signal.
BAR200:
• EU: DCF-77 signal: within 1500 km (932 miles) of
Frankfurt, Germany.
BAR200U:
• UK: MSF-60 signal: within 1500 km (932 miles) of
Anthorn, England.
BAR200A:
• WWVB-60 signal: within 3200km (2000 miles) of Fort
Collins Colorado. Manually set clock to select time zone
(Pacific, Mountain, Central or Eastern).
To enable / disable signal reception:
Press and hold enable or to disable signal reception.
NOTE Reception takes 2-10 minutes. If the signal is weak,
it can take up to 24 hours to get a valid signal.
Clock signal reception indicator:
STRONG SIGNAL WEAK SIGNAL NO SIGNAL
MANUALLY SET CLOCK
1. Press and hold MODE.
2. Press or to change the settings.
3. Press MODE to confirm.
4. The settings order is: time zone offset, 12 / 24 hr format,
hour, minute, year, month, day and language.
BAR200 / BAR200U: Time zone offset sets the clock + / - 23
hours from the received clock signal time.
BAR200A: Select the time zone: (P) Pacific, (E) Eastern,
(C) Central or (M) Mountain.
NOTE The language options are English (E), German (D),
French (F), Italian (I), and Spanish (S).
To select display mode:
Press MODE to choose between clock with seconds and
clock with weekday.
P/N: 086L004956-010 REV1
5/60

EN
5
ALARM
To set the alarm:
1. Press and hold ALARM.
2. Press / to set hour / minute.
3. Press ALARM or MODE to confirm. indicates alarm
is ON.
To toggle alarms ON / OFF:
1. Press ALARM to display alarm time
2. Press ALARM again to turn alarm ON / OFF.
To silence the alarms:
• Press SNOOZE to silence it for 8 minutes
OR
• Press any other key to turn the alarm off and activate it
again after 24 hours.
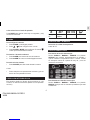
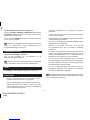
WEATHER FORECAST
This product forecasts the next 12 to 24 hours of weather
within a 30-50 km (19-31 mile) radius (US- with a 75%
accuracy).
Sunny Partially Cloudy Rainy
Cloudy
TEMPERATURE AND HUMIDITY
To toggle temperature unit:
Press °C / °F.
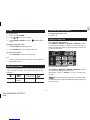
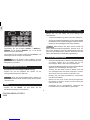
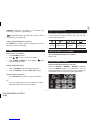
NEAR-FAR FUNCTION
To enable Near-Far function:
Slide SCROLL / MANUAL / SENSOR to SENSOR position
to automatically change it’s display to reveal the indoor /
outdoor temperature when you approach within 2 feet of the
clock as shown below.
To disable Near-Far function:
Slide SCROLL / MANUAL / SENSOR to MANUAL position
to only show the display it is currently on.
Alternatively, slide to SCROLL to scroll through both
displays.
NOTE When the radio-controlled clock is receiving data,
the Near-Far function will be disabled to prevent interrupting
the clock signal.
P/N: 086L004956-010 REV1
6/60

EN
6
BACKLIGHT
To activate backlight:
Push down on the top of the unit to activate the backlight
function.
NOTE When backlight is activated it will automatically
revert to temperature / time display.
RESET
Press RESET to return to the default settings.
PRECAUTIONS
• Do not subject the unit to excessive force, shock, dust,
temperature or humidity.
• Do not cover the ventilation holes with any items such
as newspapers, curtains etc.
• Do not immerse the unit in water. If you spill liquid over
it, dry it immediately with a soft, lint-free cloth.
• Do not clean the unit with abrasive or corrosive materials.
• Do not tamper with the unit ’s internal components. This
invalidates the warranty.
• Only use fresh batteries. Do not mix new and old
batteries.
• Images shown in this manual may differ from the actual
display.
• When disposing of this product, ensure it is collected
separately for special treatment.
• Placement of this product on certain types of wood
may result in damage to its finish for which Oregon
Scientific will not be responsible. Consult the furniture
manufacturer's care instructions for information.
• The contents of this manual may not be reproduced
without the permission of the manufacturer.
• Do not dispose old batteries as unsorted municipal
waste. Collection of such waste separately for special
treatment is necessary.
• Please note that some units are equipped with a
battery safety strip. Remove the strip from the battery
compartment before first use.
NOTE The technical specifications for this product and the
contents of the user manual are subject to change without
notice.
P/N: 086L004956-010 REV1
7/60

EN
7
SPECIFICATIONS
TYPE DESCRIPTION
MAIN UNIT
L x W x H 155 x 45 x 105 mm (6.1 x 1.8 x 4.1 in)
Weight 232 g (8.2 oz) without batteries
Temperature range -5°C to 50°C (23°F to 122°F)
Resolution 0.1°C (0.2°F)
Signal frequency 433 MHz
Power 4 x UM-3 (AA) 1.5 V batteries
REMOTE UNIT (THN132N)
L x W x H 92 x 60 x 20 mm (3.6 x 2.4 x 0.8 in)
Weight 62 g (2.22 ounces)
Transmission range 30 m (98 ft) unobstructed
Temperature range -20°C to 60°C (-4°F to 140°F)
Power 1 x UM-3 (AA) 1.5 V batteries
ABOUT OREGON SCIENTIFIC
Visit our website (www.oregonscientific.com) to learn more
about Oregon Scientific products. If you’re in the US and
would like to contact our Customer Care department directly,
please visit: www2.oregonscientific.com/service/support
OR
Call 1-800-853-8883.
For international inquiries, please visit: www2.oregonscientific.
com/about/international
EU-DECLARATION OF CONFORMITY
Hereby, Oregon Scientific, declares that this Weather In
Motion (model: BAR200 / BAR200U / BAR200A) is in
compliance with the essential requirements and other
relevant provisions of Directive 1999/5/EC. A copy of the
signed and dated Declaration of Conformity is available on
request via our Oregon Scientific Customer Service.
COUNTRIES RTTE APPROVAL COMPLIED
All EC countries, Switzerland
and Norway N
CH
P/N: 086L004956-010 REV1
8/60

EN
8
FCC STATEMENT
This device complies with Part 15 of the FCC Rules.
Operation is subject to the following two conditions: (1) This
device may not cause harmful interference, and (2) This
device must accept any interference received, including
interference that may cause undesired operation.
WARNING Changes or modifications not expressly
approved by the party responsible for compliance could void
the user’s authority to operate the equipment.
NOTE This equipment has been tested and found to
comply with the limits for a Class B digital device, pursuant
to Part 15 of the FCC Rules. These limits are designed to
provide reasonable protection against harmful interference
in a residential installation.
This equipment generates, uses and can radiate radio
frequency energy and, if not installed and used in accordance
with the instructions, may cause harmful interference to
radio communications. However, there is no guarantee
that interference will not occur in a particular installation.
If this equipment does cause harmful interference to radio
or television reception, which can be determined by turning
the equipment off and on, the user is encouraged to try
to correct the interference by one or more of the following
measures:
• Reorient or relocate the receiving antenna.
• Increase the separation between the equipment and receiver.
• Connect the equipment into an outlet on a circuit different
from that to which the receiver is connected.
• Consult the dealer or an experienced radio / TV technician for help.
DECLARATION OF CONFORMITY
The following information is not to be used as contact for
support or sales. Please call our customer service number
(listed on our website at www.oregonscientific.com), or on
the warranty card for this product) for all inquiries instead.
We
Name: Oregon Scientific, Inc.
Address: 19861 SW 95th Ave.,Tualatin,
Oregon 97062 USA
Telephone No.: 1-800-853-8883
declare that the product
Product No.: BAR200 / BAR200U / BAR200A
Product Name: Near Far Weather Station
Manufacturer: IDT Technology Limited
Address: Block C, 9/F, Kaiser Estate,
Phase 1,41 Man Yue St., Hung Hom,
Kowloon, Hong Kong
is in conformity with Part 15 of the FCC Rules. Operation is
subject to the following two conditions: 1) This device may
not cause harmful interference. 2) This device must accept
any interference received, including interference that may
cause undesired operation.
P/N: 086L004956-010 REV1
9/60

IT
1
Tempo In Movimento
Modello: BAR200 / BAR200U /
BAR200A
MANUALE PER L’UTENTE
INDICE
Introduzione ..................................................................... 2
Panoramica ...................................................................... 2
Vista Anteriore ............................................................. 2
Vista Posteriore .......................................................... 2
Sensore Remoto ......................................................... 3
Operazioni Preliminari .................................................... 3
Inserimento Delle Batterie ........................................... 3
Sensore Remoto .............................................................. 3
Trasmissione Dei Dati Del Sensore ............................ 3
Orologio ........................................................................... 4
Ricezione Dell’ora ........................................................ 4
Impostazione Manuale Dell’ora ................................... 4
Sveglia .............................................................................. 5
Previsioni Meteorologiche .............................................. 5
Temperatura Interna ed Esterna .................................... 5
Funzione NEAR-FAR ....................................................... 5
Retroilluminazione .......................................................... 6
Funzione Reset ................................................................ 6
Avvertenze ....................................................................... 6
Specifiche tecniche ......................................................... 7
Informazioni Su Oregon Scientific ................................. 7
Dichiarazione Di Conformita’ UE ................................... 7
P/N: 086L004956-010 REV1
10/60


IT
3
POSIZIONE SIGNIFICATO
Orologio /
sveglia
Batterie dell’unità
principale in esaurimento
Area temperatura
esterna e umidità
Batterie del sensore in
esaurimento
SENSORE REMOTO
L’unità principale può visualizzare i dati rilevati da un
numero massimo di 3 sensori. Premere CH per alternare
i canali dei sensori.
Impostazione del sensore:
1. Aprire il vano batterie (FIG. 3).
2. Selezionare un canale, quindi premere RESET.
3. Chiudere il vano batterie.
4. Posizionare il sensore entro 30 m dall’unità principale
utilizzando il supporto da tavolo o il foro per montaggio
a parete.
NOTA Utilizzare batterie alcaline in caso di uso prolungato
e batterie al litio in ambienti con temperature inferiori allo 0.
TRASMISSIONE DEI DATI DEL SENSORE
Ricerca di un sensore:
Tenere premuto CH.
L’icona di ricezione del sensore nell’area relativa al sensore
remoto ne indica lo stato:
SENSORE REMOTO (FIG. 3)
1. Indicatore LED di stato
2. Foro per fissaggio a parete
3. Vano batterie
4. Foro RESET: consente di ripristinare i valori
predefiniti dell’unità
5. Pulsante CHANNEL: consente di selezionare il sensore
remoto per la visualizzazione delle informazioni
OPERAZIONI PRELIMINARI
INSERIMENTO DELLE BATTERIE
1. Togliere la copertura del vano batterie.
2. Inserire le batterie, rispettando la polarità indicata
(FIG.2).
3. Premere RESET dopo ogni sostituzione di batteria.
1
2
3
4
5
P/N: 086L004956-010 REV1
12/60

IT
4
ICONA DESCRIZIONE
L’unità principale è alla ricerca del/i
sensore/i
È stato rilevato un canale
Sono stati ricevuti i dati del sensore
relativo al canale 1
e “--.-“ Impossibile trovare il sensore.
SUGGERIMENTO Il campo di trasmissione può variare
in base a molti fattori. È possibile dover provare diverse
posizioni prima di ottenere i risultati migliori.
OROLOGIO
RICEZIONE DELL’ORA
Questo prodotto è progettato per sincronizzare
automaticamente l’orologio orologio con un segnale orario.
BAR200:
• EU: segnale DCF-77: entro 1500 km da Francoforte,
Germania.
BAR200U:
• UK: segnale MSF-60: entro 1500 km da Anthorn,
Inghilterra.
BAR200A:
• Segnale WWVB-60: entro 3200 km da Fort Collins, Colorado.
Impostare l’orologio manualmente per selezionare il fuso
orario (Pacific, Mountain, Central oppure Eastern).
Attivazione / disattivazione della ricezione del segnale:
Per attivare la ricezione del segnale, tenere premuto ,
per disattivarla tenere premuto .
NOTA Per la ricezione sono necessari dai 2 ai 10 minuti.
Se il segnale è debole, possono occorrere fino a 24 ore per
riceverne uno valido.
Indicatore della ricezione del segnale dell’ora:
SEGNALE SEGNALE NESSUN
FORTE DEBOLE SEGNALE
IMPOSTAZIONE MANUALE DELL’ORA
1. Tenere premuto MODE.
2. Premere o per modificare le impostazioni.
3. Premere MODE per confermare.
4. L’ordine delle impostazioni è: differenza di fuso orario,
formato ora 12 / 24, ore, minuti, anno, mese, giorno e
lingua.
BAR200 / BAR200U: La differenza di fuso orario imposta
l’orologio a + / - 9 ore dall’ora del segnale ricevuto.
BAR200A: Selezionare la zona relativa al fuso orario: (P)
Pacific, (E) Eastern, (C) Central oppure (M) Mountain.
NOTA Le opzioni della lingua sono inglese (E), tedesco
(D), francese (F), italiano (I) e spagnolo (S).
P/N: 086L004956-010 REV1
13/60

IT
5
Selezione della modalità di visualizzazione:
Premere MODE per scegliere tra ora con secondi e ora con
giorno della settimana.
SVEGLIA
Impostazione della sveglia:
1. Tenere premuto ALARM.
2. Premere / per impostare ora e minuti.
3. Premere ALARM o MODE per confermare. L’icona
indica che la sveglia è attiva.
Attivazione / disattivazione delle sveglie:
1. Premere ALARM per visualizzare l’ora della sveglia
2. Premere nuovamente ALARM per attivare / disattivare
la sveglia.
Silenziamento delle sveglie:
• Premere SNOOZE per silenziarla per 8 minuti.
OPPURE
• Premere un tasto qualsiasi per spegnere la sveglia e
per attivarla nuovamente dopo 24 ore.
PREVISIONI METEOROLOGICHE
Questo prodotto è in grado di mostrare le previsioni
meteorologiche per le successive 12-24 ore entro un raggio
di 30-50 km con una precisione del 70-75%.
Sereno Parzialmente Nuvoloso Pioggia
nuvoloso
TEMPERATURA INTERNA ED ESTERNA
Selezione delle unità di misura della temperatura:
Premere °C / °F.
FUNZIONE NEAR - FAR
Attivazione della funzione
Spostare SCROLL / MANUAL / SENSOR sulla
posizione SENSOR per modificare automaticamente la
visualizzazione, così da mostrare la temperatura interna /
esterna come nell’immagine qui sotto, quando ci si trova
entro 0,6 m dall’orologio.
Disattivazione della funzione
Spostare SCROLL / MANUAL / SENSOR sulla posizione
MANUAL per mostrare soltanto la visualizzazione attiva al
momento.
P/N: 086L004956-010 REV1
14/60

IT
6
In alternativa, spostare su SCROLL per alternare le due
visualizzazioni.
NOTA Quando l’orologio radiocontrollato riceve dati,
la funzione NEAR-FAR viene disattivata per evitare
l’interruzione del segnale dell’ora.
RETROILLUMINAZIONE
Attivazione della retroilluminazione:
Premere la parte superiore dell’unità per attivare la funzione
di retroilluminazione.
NOTA Quando la retroilluminazione è attiva, la
visualizzazione passerà automaticamente a quella di
temperatura e ora.
FUNZIONE RESET
Premere RESET per ripristinare le impostazioni predefinite
dell’unità.
AVVERTENZE
• Non sottoporre il prodotto a forza eccessiva, urti,
polvere, temperatura o a umidità.
• Non otturare i fori di aerazione con oggetti come
giornali, tende, etc.
• Non immergere l’unità in acqua. Se si versa del liquido
sul prodotto, asciugarlo immediatamente con un panno
morbido e liscio.
• Non pulire l’unità con materiali abrasivi o corrosivi.
• Non manomettere i componenti interni. In questo modo
si invalida la garanzia.
• Utilizzare solo batterie nuove. Non mescolare batterie
nuove con batterie vecchie.
• Le immagini del manuale possono differire dalla realtà.
• Al momento dello smaltimento del prodotto, utilizzare la
raccolta differenziata.
• Oregon Scientific declina ogni responsabilità per
eventuali danni alle finiture causati dal posizionamento
del prodotto su determinati tipi di legno. Consultare le
istruzioni fornite dal fabbricante del mobile per ulteriori
informazioni.
• Il contenuto di questo manuale non può essere
ristampato senza l’autorizzazione del fabbricante.
• Non smaltire le batterie vecchie come rifiuto non
differenziato. È necessario che questo rifiuto venga
smaltito mediante raccolta differenziata per essere
trattato in modo particolare.
• Alcune unità sono dotate di una striscia di sicurezza per
le batterie. Rimuovere la striscia dal vano batterie prima
del primo utilizzo.
NOTA Le specifiche tecniche del prodotto e il contenuto
del manuale per l’utente possono essere modificati senza
preavviso.
P/N: 086L004956-010 REV1
15/60

IT
7
SPECIFICHE TECNICHE
TIPO DESCRIZIONE
UNITÀ PRINCIPALE
L x l x h 155 x 45 x 105 mm
Peso 232 g (batterie escluse)
Campo di misurazione Da -5°C a 50°C
della temperatura
Risoluzione 0,1°C
Frequenza segnale 433 MHz
Alimentazione 4 batterie UM-3 (AA) da 1,5 V
UNITÀ REMOTA (THN132N)
L x l x h 92 x 60 x 20 mm
Peso 62 g
Campo di trasmissione 30 m in campo aperto
Campo di misurazione Da -20°C a 60°C
della temperatura
Alimentazione 1 batteria UM-3 (AA) da 1,5 V
INFORMAZIONI SU OREGON SCIENTIFIC
Per avere maggiori informazioni sui nuovi prodotti Oregon
Scientific visita il nostro sito internet www.oregonscientific.it,
dove potrai trovare tutte le informazioni di cui hai bisogno.
Per ricerche di tipo internazionale puoi visitare invece il sito
www2.oregonscientific.com/about/international.asp.
DICHIARAZIONE DI CONFORMITA’ UE
Con la presente Oregon Scientific dichiara che questo prodotto
(modello: BAR200 / BAR200U / BAR200A) è conforme ai
requisiti essenziali ed alle altre disposizioni pertinenti stabilite
dalla direttiva 1999/5/CE. Una copia firmata e datata della
Dichiarazione di Conformità è disponibile, su richiesta, tramite il
servizio clienti della Oregon Scientific.
PAESI CONFORMI ALLA DIRETTIVA R&TTE
Tutti i Paesi Europei, Svizzera CH
E Norvegia N
P/N: 086L004956-010 REV1
16/60

FR
1
Météo En Mouvement
Modèle : BAR200 / BAR200U /
BAR200A
MANUEL DE L’UTILISATEUR
SOMMAIRE
Introduction ..................................................................... 2
Vue D’ensemble ............................................................... 2
Face Avant ................................................................... 2
Face Arrière .................................................................. 2
Capteur A Distance ....................................................... 3
Pour Commencer ............................................................ 3
Mise En Place Des Piles .............................................. 3
Capteur A Distance ......................................................... 3
Transmission Des Données Du Capteur ...................... 3
Horloge ............................................................................. 4
Réception De L’horloge ................................................ 4
Régler Manuellement L’horloge .................................... 4
L’alarme ............................................................................ 5
Prévisions Météorologiques .......................................... 5
Température Et Humidité ................................................ 5
Fonction Affichage par détection de mouvement ....... 5
Retro Eclairage ................................................................ 6
Reinitialisation ................................................................. 6
Précautions ...................................................................... 6
Caractéristiques .............................................................. 7
A Propos D’oregon Scientific ......................................... 7
Europe - Déclaration De Conformité ............................. 7
P/N: 086L004956-010 REV1
17/60


FR
3
EMPLACEMENT SIGNIFICATION
Horloge / Piles faibles (Appareil principal)
Alarme
zone de température Piles du capteur faibles
et humidité extérieure.
CAPTEUR À DISTANCE
L’appareil principal est à même de collecter les données de
3 capteurs maximum. Appuyez sur CH pour alterner entre
les canaux du capteur.
Installation du capteur :
1. Ouvrez le couvercle pour accéder au compartiment des
piles (FIG 3).
2. Sélectionnez un canal. Appuyez sur RESET
3. Fermez le couvercle du compartiment des piles.
4. Installez le capteur à 30 m maximum (98 pieds) de
l’appareil principal à l’aide du support de table ou de la
fixation murale.
REMARQUE Utilisez des piles alcalines pour un usage
prolongé et des piles au lithium pour la consommation lors
de températures inférieures au gel.
TRANSMISSION DES DONNEES DU CAPTEUR
Recherche d’un capteur :
Appuyez et maintenez la touche CH.
L’icône de réception du capteur situé sur la zone du capteur
à distance vous indique le statut de la transmission :
CAPTEUR A DISTANCE (FIG 3)
1. Indicateur de statut LCD
2. Fixation murale
3. Compartiment des piles
4. RESET (Réinitialisez): Trou de redémarrage
5. CHANNEL (CANAL): Commutateur de canal
POUR COMMENCER
MISE EN PLACE DES PILES
1. Retirez le couvercle des piles.
2. Insérez les piles, en respectant les polarités (voir FIG 2).
3. Appuyez sur RESET (REINITIALISER) après chaque
changement de piles.
1
2
3
4
5
P/N: 086L004956-010 REV1
19/60

FR
4
ICONE DESCRIPTION
L’appareil principal est à la recherche
du/des capteur(s)
Un canal a été trouvé.
Les données du capteur 1 sont en
cours de réception.
et ‘’-- :-‘’ Le capteur est introuvable
ASTUCE La distance de transmission peut varier en
fonction de plusieurs facteurs. Vous pouvez essayer
plusieurs emplacements, afin d’obtenir les meilleurs
résultats possibles.
HORLOGE
RÉCEPTION DE L’HORLOGE
Ce produit est conçu pour synchroniser automatiquement
l’horloge avec le signal radio.
BAR200 :
• EU : Signal DCF-77 : dans un rayon de 1500 Km (932
miles) depuis Frankfort, Allemagne.
BAR200 U :
• UK : Signal MSF-60 : dans un rayon de 1500 Km (932
miles) depuis Anthorn, Angleterre.
BAR200A :
• Signal WWVB-60 : dans un rayon de 3200 km (2000
miles) de Fort Collins, Colorado. Réglez manuellement
l’horloge pour sélectionner le fuseau horaire (heure
Pacifique, des montagnes, Centrale ou côte Est
Activer / désactiver la réception du signal :
Maintenez le bouton pour activer ou pour désactiver
le signal de réception.
REMARQUE La réception prend de 2 à 10 minutes. Si le
signal est faible 24 heures peuvent êtres nécessaires pour
obtenir un signal valide.
Indicateur de réception du signal de l’Horloge :
SIGNAL SIGNAL AUCUN SIGNAL
FORT FAIBLE
REGLER MANUELLEMENT L’HORLOGE
1. Appuyez et maintenez la touche MODE.
2. Appuyez sur ou pour modifier les réglages.
3. Appuyez sur MODE pour confirmer.
4. Les réglages s’effectuent dans l’ordre suivant : Fuseau
horaire, format 12/24 heures, heure, minutes, année,
mois, jour et la langue.
BAR200 / BAR200U : La fonction de fuseau horaire règle
l’horloge à + / - 23 heures de l’heure du signal reçu.
P/N: 086L004956-010 REV1
20/60
A página está carregando ...
A página está carregando ...
A página está carregando ...
A página está carregando ...
A página está carregando ...
A página está carregando ...
A página está carregando ...
A página está carregando ...
A página está carregando ...
A página está carregando ...
A página está carregando ...
A página está carregando ...
A página está carregando ...
A página está carregando ...
A página está carregando ...
A página está carregando ...
A página está carregando ...
A página está carregando ...
A página está carregando ...
A página está carregando ...
A página está carregando ...
A página está carregando ...
A página está carregando ...
A página está carregando ...
A página está carregando ...
A página está carregando ...
A página está carregando ...
A página está carregando ...
A página está carregando ...
A página está carregando ...
A página está carregando ...
A página está carregando ...
A página está carregando ...
A página está carregando ...
A página está carregando ...
A página está carregando ...
A página está carregando ...
A página está carregando ...
A página está carregando ...
A página está carregando ...
-
 1
1
-
 2
2
-
 3
3
-
 4
4
-
 5
5
-
 6
6
-
 7
7
-
 8
8
-
 9
9
-
 10
10
-
 11
11
-
 12
12
-
 13
13
-
 14
14
-
 15
15
-
 16
16
-
 17
17
-
 18
18
-
 19
19
-
 20
20
-
 21
21
-
 22
22
-
 23
23
-
 24
24
-
 25
25
-
 26
26
-
 27
27
-
 28
28
-
 29
29
-
 30
30
-
 31
31
-
 32
32
-
 33
33
-
 34
34
-
 35
35
-
 36
36
-
 37
37
-
 38
38
-
 39
39
-
 40
40
-
 41
41
-
 42
42
-
 43
43
-
 44
44
-
 45
45
-
 46
46
-
 47
47
-
 48
48
-
 49
49
-
 50
50
-
 51
51
-
 52
52
-
 53
53
-
 54
54
-
 55
55
-
 56
56
-
 57
57
-
 58
58
-
 59
59
-
 60
60


Oregon Scientific BAR200U Manual do usuário
- Categoria
- Estações meteorológicas
- Tipo
- Manual do usuário
em outros idiomas
Artigos relacionados
-
 Oregon Scientific RMS600 / RMS600A Manual do usuário
-
Oregon Scientific BAR339P Manual do proprietário
-
 Oregon Scientific BAR669 / BAR669A Manual do usuário
-
Oregon Scientific RM336PESU Manual do usuário
-
 Oregon Scientific BAR 310HG Manual do usuário
-
 Oregon Scientific RAR232 Manual do usuário
-
 Oregon Scientific BAR122HGN Manual do usuário
-
 Oregon Scientific DP200 / DP200A Manual do usuário
-
 Oregon Scientific BAR28 3 Manual do usuário


