Becken PLACA GAS CRISTAL MCGHS60 Q403GFE Manual do proprietário
- Categoria
- Fogões
- Tipo
- Manual do proprietário

Gas Hob
Model: MCGHS60

Instruction Manual
Dear client,
We thank you for purchasing this product.
This appliance was submitted to several laboratorial tests, which certify its
quality. To simplify the use of this appliance, this instruction manual has been
provided. The instructions must ensure a quick and safe use.
Please read carefully the instructions and safety measures described in this
manual.
We wish our clients great satisfaction in using their new appliance.
(1

Index
1. Safety Instructions .......................................................................................... 5
1.1. Power Energy .......................................................................................... 6
1.2. Power Cord and Other Cables ................................................................. 6
1.3. Humidity and Water ................................................................................. 6
1.4. Cleaning ................................................................................................... 6
1.5. General Precautions ................................................................................ 8
2. Utilization and Functioning ............................................................................. 9
2.1. Product Description.................................................................................. 9
2.2. How to Operate the Gas Hob ................................................................... 9
2.2.1. Lighting Burners .................................................................................... 9
2.3. Installation .............................................................................................. 11
2.3.1. Location .............................................................................................. 11
2.3.2. When the Hob is First Installed ........................................................... 12
2.3.3. Gas Connection .................................................................................. 12
2.3.4. Cut Out Dimensions ............................................................................ 13
2.3.5. Electrical Connection .......................................................................... 13
2.3.6. Fitting the Hob Into the Worktop ......................................................... 14
2.3.7. Checking the Hob After Installation and Before Using ........................ 14
2.4. Conversion from NG to LPG or from LPG to NG ................................... 15
2.4.1. Method ................................................................................................ 15
(1

2.4.2. Adjusting the Gas Rate ....................................................................... 16
2.5. Instructions for the Installer.................................................................... 16
3. Troubleshooting .......................................................................................... ..16
4. Technical Specifications ............................................................................. ..17
5. Aftermarket ................................................................................................. ..19
6. Environment Conservation ........................................................................... 20
(1

1. Safety Instructions
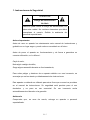
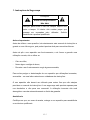
ATTENTION
Risk of Electric Shock
Do Not Open
Attention: to avoid the risk of electric shock, do not
remove the cover. The interior does not contain any
parts that may be repaired by the user. Ask for
assistance to qualified personnel.
Important Warnings
Before using your appliance, read carefully this instruction manual and keep it in
a safe place, as you may need it for future consultations.
Before you start your appliance, and to ensure a correct use, do not use it if:
- It has fallen on the ground;
- You notice any evidence of damage;
- Any anomaly occurs during its operation;
To avoid hazards and deterioration of your appliance by an incorrect use, it is
advisable to read the instructions carefully and attentively.
Your appliance must not be used to other ends than the ones foreseen in the
instructions manual. Your safety is only guaranteed in a household use and not
for commercial use. The incorrect use will not be covered and automatically
cancels the right to warranty.
Assistance
Be sure that, in case of malfunction, you take your appliance to a qualified
technician for assistance.
(1

THIS APPLIANCE CAN BE USED BY CHILDREN FROM 8 YEARS OLD AND ABOVE AND
PERSONS WITH REDUCED PHYSICAL, SENSORY OR MENTAL CAPABILITIES OR LACK
OF EXPERIENCE AND KNOWLEDGE IF THEY HAVE BEEN GIVEN SUPERVISION OR
INSTRUCTION CONCERNING USE OF THE APPLIANCE IN A SAFE WAY AND
UNDERSTAND THE HAZARDS INVOLVED. CHILDREN SHALL NOT PLAY WITH THE
APPLIANCE. CLEANING AND MAINTENANCE SHALL NOT BE MADE BY CHILDREN
WITHOUT SUPERVISION.
1.1. Power Energy
Make sure the voltage of the electric network is compatible with the one of the
appliance. If it does not match, consult the vendor or Customer Support Service.
1.2. Power Cord and Other Cables
Do not roll up or pull the cord to disconnect the appliance, and do not use to
twine the appliance. Keep the cord far from warm surfaces.
Never use the appliance if it has a damaged cable or socket, or if it is not
working properly.
In case of damage of the power cord, do not use your appliance. Take it to
technical assistance for its replacement.
1.3. Humidity and Water
Do not use your appliance in humid places. Do not let your appliance to catch
water under any circumstance, as it may be dangerous. TO AVOID FIRE
HAZARD OR ELECTRIC SHOCK DO NOT EXPOSE YOUR APPLIANCE TO
HUMIDITY OR WATER. Do not place your appliance under water (for example
for washing).
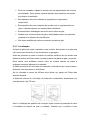
1.4. Cleaning
Before any maintenance or cleaning can be carried out, you must
DISCONNECT the hob from the electricity supply.
The hob is best cleaned whilst it is still warm as spillage can be removed
more easily than if it is left to cool.
(1

The Hob Panel
Regularly wipe over the hob top using a soft cloth well wrung out in warm
water to which a little washing up liquid has been added. Avoid the use of
the following:1) household detergent and bleaches;2) impregnated pads
unsuitable for non-stick saucepans;3) steel wool pads;4) bath/sink stain
removers.
Pan Supports
If washing them by hand, take care when drying them as the enameling
and drying process occasionally leaves rough edges. If necessary,
remove stubborn stains using a paste cleaner.
The Burners
The burner caps and crowns can be removed for cleaning. Wash the
burner caps and crowns using hot soapy water, and remove marks with a
mild paste cleaner. A well moistened soap impregnated steel wool pad
can be used with caution, if the marks are particularly difficult to remove.
After cleaning, be sure to wipe dry with a soft cloth.
Ignition electrode
The electric ignition is obtained through a ceramic "electrode" and a
metal electrode. Keep these components very clean, to avoid lighting
difficulties, and check that the burner crown holes are not obstructed.
Thermocouple
The thermocouple is very crucial for cutting gas supply in case of flame
out during cooking, be sure to keep them in very clean condition.
1.5. General Precautions
(1

The hob should not be installed in a bed sitting room with a volume of
less than 20m嘓. If it is installed in a room of volume less than 5m嘓 an air
vent of effective area of 110cm嘒is required. If it is installed in a room of
volume between 5m嘓and 10m嘓, an air vent of effective area of 50cm嘒 is
required, while if the volume exceeds 11m嘓no air vent is required.
However, if the room has a door which opens directly to the outside no
air vent is required even if the volume is between 5m嘓and 11m嘓. If there
are other fuels burning appliances in the same room, which should be
consulted to determine the requisite air vent requirements.
This hob is designed to be operated by adults. Do not allow children to
play near or with the hob.
The hob gets hot when it is in use.
Children should be kept away until it has cooled.
Children can also injure themselves by pulling pans or pots off the hob.
This hob is intended for domestic cooking only. It is not designed for
commercial or industrial purposes.
When in use a gas cooking appliance will produce heat and moisture in
the room in which it has been installed. Ensure there is a continuous air
supply, keeping air vents in good condition or installing a cooker hood
with a venting hose.
When using the hob for a long period of time, the ventilation should be
improved, by opening a window or increasing the extractor speed.
Do not use hob if it is in contact with water. Do not operate the hob with
wet hands.
Ensure the control knobs are in the closed position when not in use.
When using other electrical appliances, ensure the cable does not come
into contact with the hot surfaces of the cooking appliance.
Unstable or misshapen pans should not be used on the hob as unstable
pans can cause an accident by tipping or spillage.
Never leave the hob unattended when cooking with oil and fats.
Never use plastic or aluminum foil dishes on the hob.
Perishable food, plastic items and aerosols may be affected by heat and
should not be stored above or below the hob unit.
(1

The hob should only be repaired or serviced by an authorized Service
Engineer and only genuine approved spare parts should be used.
2. Utilization and Functioning
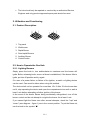
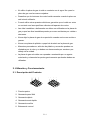
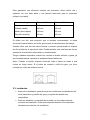
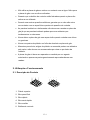
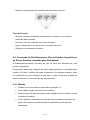
2.1. Product Description
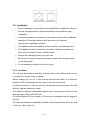
1. Top panel
2. Wok burner
3. Rapid Burner
4. Semi-rapid Burners
5. Auxiliary Burner
6. Control knobs
2.2. How to Operate the Gas Hob
2.2.1. Lighting Burners
Simply press the knob in, turn anticlockwise to maximum and the burner will
ignite. Before releasing knob, ensure a flame is established, if the burner fails to
ignite, put into off position and try again.
If in case of a power failure or failure of the ignition, a match or lighting devise
can be used. Care must be taken when using this method.
The device shall not be operated for more than 15s. If after 15s the burner has
not lit, stop operating the device and open the compartment door and/ or wait at
least 1 min before attempting a further ignition of the burner.
In the event of the burner flames being accidentally extinguished, turn off the
burner control and do not attempt to re-ignite the burner for at least 1 min.
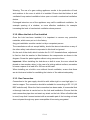
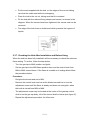
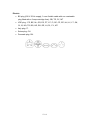
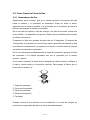
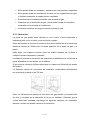
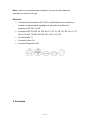
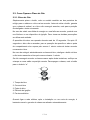
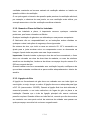
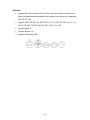
If you cannot light the flame even after several attempts, check the "cap" and
“crown” (see diagram – figure 1) are in the correct position. To put the flame out,
turn the knob to the symbol “ƽ”
(1

1㧚Burner Cap
2. Burner crown
3. Burner plate
4. Ignition electrode
5. Thermocouple
When switching on the mains, after installation or a power cut, it is quite normal
for the spark generator to be activated automatically.
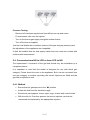
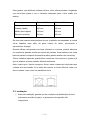
To ensure maximum burner efficiency, you had better use pots and pans with a
flat bottom fitting the size of the burner used (see table).
Burner Minimum Diameter Maximum diameter
Wok
Large (rapid)
Medium (semi-rapid)
Small (auxiliary)
240mm
180 mm
120 mm
80 mm
260mm
260 mm
220 mm
160 mm
If you use a saucepan which is smaller than the recommended size, the flame
will spread beyond the bottom of the vessel, causing the handle to overheat.
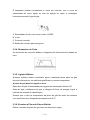
When use one pan with concave or convex bases, you can put one accessorial
pan support on the pan support. And use an appreciate pan on the accessorial
pan support.㧔Accessorial pan may not provided㧕
Take care when frying food in hot oil or fat, as the overheated splashes could
easily ignite.
Warning: As soon as a liquid starts boiling, turn down the flame so that it will
barely keep the liquid simmering. If the control knobs become difficult to turn,
please contact your local service centre.
(1

2.3. Installation
Prior to installation, ensure that the local distribution conditions (nature of
the gas and gas pressure) and the adjustment of the appliance are
compatible.
It shall be installed and connected in accordance with current installation
regulations. Particular attention shall be given to the relevant
requirements regarding ventilation.
This appliance must be installed and serviced by a competent person
This appliance shall be installed in accordance with the regulations in
force and only used in a well ventilated space.
Remove all packaging before using the hob
Ensure that the gas and electrical supply complies with the type stated
on the rating label
Do not attempt to modify the hob in any way.
2.3.1. Location
The hob may be located in a kitchen, a kitchen/diner or bed sitting room, but not
in a bathroom, shower room or garage.
Before making the cut out in the worktop ensures that there is a minimum
distance of 55 mm between the rear edge of the hob and the wall.
A minimum distance of 100 mm must be left between the side edges of the hob
and any adjacent cabinets or walls.
The minimum distance combustible material can be fitted above the hob in line
with the edges of the hob is 400 mm.
If it is fitted below 400 mm a space of 50 mm must be allowed from the edges of
the hob.
The minimum distance combustible material can be fitted directly above the hob
is 700 mm. (See Figure 4*)
(1

Warning: The use of a gas cooking appliance results in the production of heat
and moisture in the room in which it is installed. Ensure that the kitchen is well
ventilated: keep natural ventilation holes open or install a mechanical ventilation
device.
Prolonged intensive use of the appliance may call for additional ventilation, for
example opening of a window, or more effective ventilation, for example
increasing the level of mechanical ventilation where present.
2.3.2. When the Hob is First Installed
Once the hob has been installed, it is important to remove any protective
materials, which were put on in the factory.
Any gas installation must be carried out by a competent person.
The manufacturer will not accept liability, should the above instructions or any of
the other safety instructions incorporated in this book be ignored.
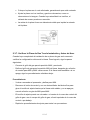
On the end of the shaft, which includes the GJ 1/2" threaded elbow, adjustment
is fixed so that the washer is fitted between the components as shown in the
diagram. Screw the parts together without using excessive force.
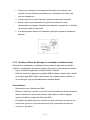
Important: When installing the hob above a built-in oven, the oven should be
placed on two wooden strips; in the case of a joining cabinet surface, remember
to leave a space of at least 45 x 560 mm at the back.
When installing on a built-in oven without forced ventilation, ensure that there
are air inlets and outlets for ventilating the interior of the cabinet adequately.
2.3.3. Gas Connection
Connection to the gas supply should be with either rigid or semi-rigid pipe, i.e.
steel or copper. The connection should be suitable for connecting to RC 1/2 (1/2
BSP male thread). When the final connection has been made, it is essential that
a thorough leak test is carried out on the hob and installation. Ensure that the
main connection pipe does not exert any strain on the hob. When a flexible tube
is used, keep that it cannot contact with a moveable part of the housing unit and
does not pass through any space susceptible of becoming congested.
(1

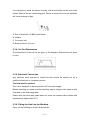
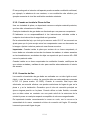
It is important to install the elbow correctly, with the shoulder on the end of the
thread, fitted to the hob connecting pipe. Failure to ensure the correct assembly
will cause leakage of gas.
A: End of shaft with 1/2 BSP male thread
B: Washer
C: Connector nut
D: Barb connector for hose
2.3.4. Cut Out Dimensions
The dimensions of the cut-out are given in the diagram. (Dimensions are given
in mm).
2.3.5. Electrical Connection
Any electrical work required to install this hob should be carried out by a
qualified electrician or competent person.
The Hob must be earthed:
This hob is designed to be connected to AC electrical supply.
Before switching on, make sure the electricity supply voltage is the same as that
indicated on the hob rating label.
Ensure that the hob supply cable does not come into contact with surfaces with
temperatures higher than 50˚C.
2.3.6. Fitting the Hob Into the Worktop
Carry out the building in of the hob as follows:
(1

Put the seals supplied with the hob, on the edges of the cut out taking
care that the seals meet without overlapping;
Place the hob in the cut out, taking care that it is centered
Fix the hob with the relevant fixing clamps and screws, as shown in the
diagram. When the screws have been tightened, the excess seal can be
removed.
The edge of the hob forms a double seal which prevents the ingress of
liquids.
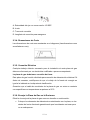
2.3.7. Checking the Hob After Installation and Before Using
When the hob has been fully installed it will be necessary to check the minimum
flame setting. To do this, follow the step below,
- Turn the gas tap to MAX position and ignite
- Set the gas tap to the MIN flame position then turn the control knob from
MIN to MAX several times. If the flame is unstable or is extinguished follow
the procedure below.
Procedure:
- Re-ignite the burner and set to MIN.
- Remove the control knob and use a thin bladed screwdriver to turn the
adjustment screw until the flame is steady and does not extinguish, when
the knob is turned from MIN to MAX.
- The adjustment screw may be located at the centre of the gas tap control
shaft or on the gas tap body, left of the control shaft or below (see figure 8*).
- Repeat the adjustment procedure for all burners.
(1

Pressure Testing:
- Remove left hand pan support and front left burner cap and crown.
- Fit manometer tube over the injector.
- Turn on the burner gas supply and ignite another burner.
- Turn off the burner supplies.
that the local distribution conditions (nature of the gas and gas pressure) and
the adjustment of the appliance are compatible.
It shall be installed that the hob supply cable does not come into contact with
surfaces with temperatures
2.4. Conversion from NG to LPG or from LPG to NG
The replacement / conversion of the gas hob should only be undertaken by a
competent person.
It is important to note that this model is designed for use with which gas
category. Please check the note on the appliance. But it can be converted from
one gas category to another providing the correct injectors are fitted and the
gas rate is adjusted to suit.
2.4.1. Method
Ensure that the gas taps are in the “ƽ” position
Isolate the hob from the electrical supply
Remove all pan supports, burner caps, rings, crowns and control knobs
With the aid of a 7mm box spanner the burner injectors can then be
unscrewed and replaced by the appropriate injectors.
(1

2.4.2. Adjusting the Gas Rate
With the aid of a thin bladed screwdriver completely tighten down by the pass
adjustment screw, which is located down the center of the gas tap control shaft.
Upon completion stick the replacement rating plate on the under side of the hob.
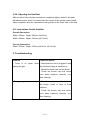
2.5. Instructions for the Installer
Overall dimensions
Width: 590mm Depth: 500mm (MGHS60).
Width: 590mm Depth: 510mm (MCGHS60).
Cut out dimensions
Width: 553mm Depth: 473mm (MGHS60, MCGHS60).
3. Troubleshooting
Problem
• There is no spark when
lighting the gas
Corrective action
• Check that the unit is plugged in and
the electrical supply is switched on
• Check the mains fuse has not blown
• Check the burner cap and crown
have been replaced correctly, e.g.
after cleaning.
• The gas ring burns unevenly • Check the main jet is not blocked and
the burner crown is clear of food
particles.
• Check the burner cap and crown
have been replaced correctly, e.g.
after cleaning.
(1

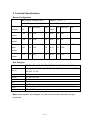
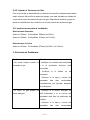
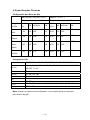
4. Technical Specifications
Burner Configuration
NG (I2H(20)/ I2E(20)/ I2E+) LPG (I3+㧔28~30/37㧕)
Injector Dia. (mm) and kW Injector Dia. (mm) and kW
Gas
category
MCGH
S60 kW MGHS60 kW MCG
HS60 kW MGHS60 kW
Wok
burner 1.38 3.3 1.24 3.3 0.92 3.3 0.93 3.3
Rapid
burner 1.18 2.5 1.08 2.5 0.80 2.5 0.8 2.5
Semi
rapid
burner
0.92 1.5 0.93 1.5 0.63 1.5 0.68
1.75
Auxiliary
burner 0.75 1.0 0.75 1.0 0.53 1.0 0.53 1.0
Gas Category
¥ I3+㧔28~30/37㧕BE, FR, IT, LU, IE, GB, GR, PT, ES, CY, CZ, LT, SK, CH, SI
I3B/P(30)
LU, NL, DK, FI, SE, CY, CZ, EE, LT, MT, SK, SI, BG, IS, NO, TR,
HR, RO, IT, HU
I3B/P(37) PL
I3B/P(50) AT, DE, CH, SK
I2Lw PL
I2Ls PL
I2E+ BE, FR
I2H(20㧕FR, IT, BE, NL, DK, IE, GB, GR, ES, PT, AT, FI, SE CZ, EE, HU,
I2E(20) DE, LU, PL
Note: when injectors are changed, the new one should be marked by the gas
technician.
(1

Electric:
BS plug (230 V 50 Hz supply, 3 core flexible cable with non rewireable
plug fitted with a 3 amp cartridge fuse): GB, TR, CY, MT
VDE plug㧦FR, BE, NL, GR, ES, PT, AT, FI, SE, CZ, EE, HU, LV, LT, SK,
SI, IS, NO, TR, BG, HR, RO, DE, LU,PL, CY, MT.
Italy plug: IT.
Swiss plug: CH.
Denmark plug: DK.
(1

5. Aftermarket
Becken has designed this appliance in order to guarantee the maximum
reliability. However, if a problem occurs, by following the procedures suggested
in this section you may be able to determine its cause.
Do not attempt to open the appliance – there is a risk of electrical shock.
If you are not able to solve the problem, please contact your seller or
manufacturer.
All users must be familiarized with this section. Knowing what could go wrong
can help you avoid the occurrence of problems.
WARNING: any attempt of fixing the appliance without contacting the
manufacturer will nullify the warranty.
In case the problem persists, take your appliance to an aftermarket section of
any Worten, Modelo or Continente store in order to solve the problem.
Worten Equipamentos para o Lar ensures for a period of 2 years, counting from
the date of purchase of this appliance, a warranty against any found
manufacturing defect. The warranty supposes a correct use and maintenance of
the appliance, namely according to the instructions expressed in this manual. In
case otherwise identified, the malfunctions will not be under the warranty.
The repairing of electrical appliances must only be made by qualified
technicians, as otherwise there may occur future complications on the
appliances.
To avoid unnecessary risks, in case there are any malfunctions on the wires or
on another type of components, repairing must be made on the specialized
locations of technical assistance, as appropriate tools are needed.
(1

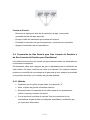
6. Environment Conservation
Aiming to protect the environment, we try to reduce to a
maximum the volume of the packages which are confined to
three easy separation materials: cardboard, paper and
plastic.
The appliance is made of recyclable material, once
disassembled by a specialized company. Follow the local
legislation concerning recycling of all materials.
(1
A página está carregando...
A página está carregando...
A página está carregando...
A página está carregando...
A página está carregando...
A página está carregando...
A página está carregando...
A página está carregando...
A página está carregando...
A página está carregando...
A página está carregando...
A página está carregando...
A página está carregando...
A página está carregando...
A página está carregando...
A página está carregando...
A página está carregando...
A página está carregando...
A página está carregando...
A página está carregando...
A página está carregando...
A página está carregando...
A página está carregando...
A página está carregando...
A página está carregando...
A página está carregando...
A página está carregando...
A página está carregando...
A página está carregando...
A página está carregando...
A página está carregando...
A página está carregando...
A página está carregando...
A página está carregando...
A página está carregando...
A página está carregando...
A página está carregando...
A página está carregando...
A página está carregando...
A página está carregando...
A página está carregando...
A página está carregando...
-
 1
1
-
 2
2
-
 3
3
-
 4
4
-
 5
5
-
 6
6
-
 7
7
-
 8
8
-
 9
9
-
 10
10
-
 11
11
-
 12
12
-
 13
13
-
 14
14
-
 15
15
-
 16
16
-
 17
17
-
 18
18
-
 19
19
-
 20
20
-
 21
21
-
 22
22
-
 23
23
-
 24
24
-
 25
25
-
 26
26
-
 27
27
-
 28
28
-
 29
29
-
 30
30
-
 31
31
-
 32
32
-
 33
33
-
 34
34
-
 35
35
-
 36
36
-
 37
37
-
 38
38
-
 39
39
-
 40
40
-
 41
41
-
 42
42
-
 43
43
-
 44
44
-
 45
45
-
 46
46
-
 47
47
-
 48
48
-
 49
49
-
 50
50
-
 51
51
-
 52
52
-
 53
53
-
 54
54
-
 55
55
-
 56
56
-
 57
57
-
 58
58
-
 59
59
-
 60
60
-
 61
61
-
 62
62


Becken PLACA GAS CRISTAL MCGHS60 Q403GFE Manual do proprietário
- Categoria
- Fogões
- Tipo
- Manual do proprietário
em outras línguas
Artigos relacionados
Outros documentos
-
Jocel JPK4GI200136 Manual do usuário
-
Jocel JP2GV009081 Manual do usuário
-
-
-
-
Infiniton GG-430 Manual do proprietário
-
Aeg-Electrolux 75857G-M Manual do usuário
-
Electrolux EQG4120BOZ Manual do usuário