A página está carregando...

TM
1
FORNO
SD14WHGAB
SD14WHSAX
Sommario
Installazione, 2-3
Posizionamento
Collegamento elettrico
Descrizione dell’apparecchio, 4
Vista d’insieme
Targhetta caratteristiche
Avvio e utilizzo, 5
Precauzioni e consigli, 6
Sicurezza generale
Smaltimento
Manutenzione e cura, 7
Escludere la corrente elettrica
Pulire l’apparecchio
Anomalie e rimedi, 8
Assistenza attiva 7 giorni su 7
Italiano, 1 Français, 17
Nederlands, 41
English,9
GB
IT
FR
NL
Istruzioni per l’uso
Português, 25
PT
Español, 33
ES

IT
2
È importante conservare questo libretto per poterlo
consultare in ogni momento. In caso di vendita, di
cessione o di trasloco, assicurarsi che resti insieme
all’apparecchio per informare il nuovo proprietario sul
funzionamento e sui relativi avvertimenti.
! Leggere attentamente le istruzioni: ci sono importanti
informazioni sull’installazione, sull’uso e sulla sicurezza.
Posizionamento
! Gli imballaggi non sono giocattoli per bambini e
vanno eliminati secondo le norme per la raccolta
differenziata (vedi Precauzioni e consigli).
! L’installazione va effettuata secondo queste istruzioni
e da personale professionalmente qualicato. Una errata
installazione può causare danni a persone, animali o
cose.
! Nell’imballaggio è presente in dotazione un set di
spessori che consente l’allineamento ottimale con gli
apparecchi ai quali il cassetto può essere abbinato
nell’installazione.
Per l’installazione leggere la documentazione tecnica
fornita con l’apparecchio.
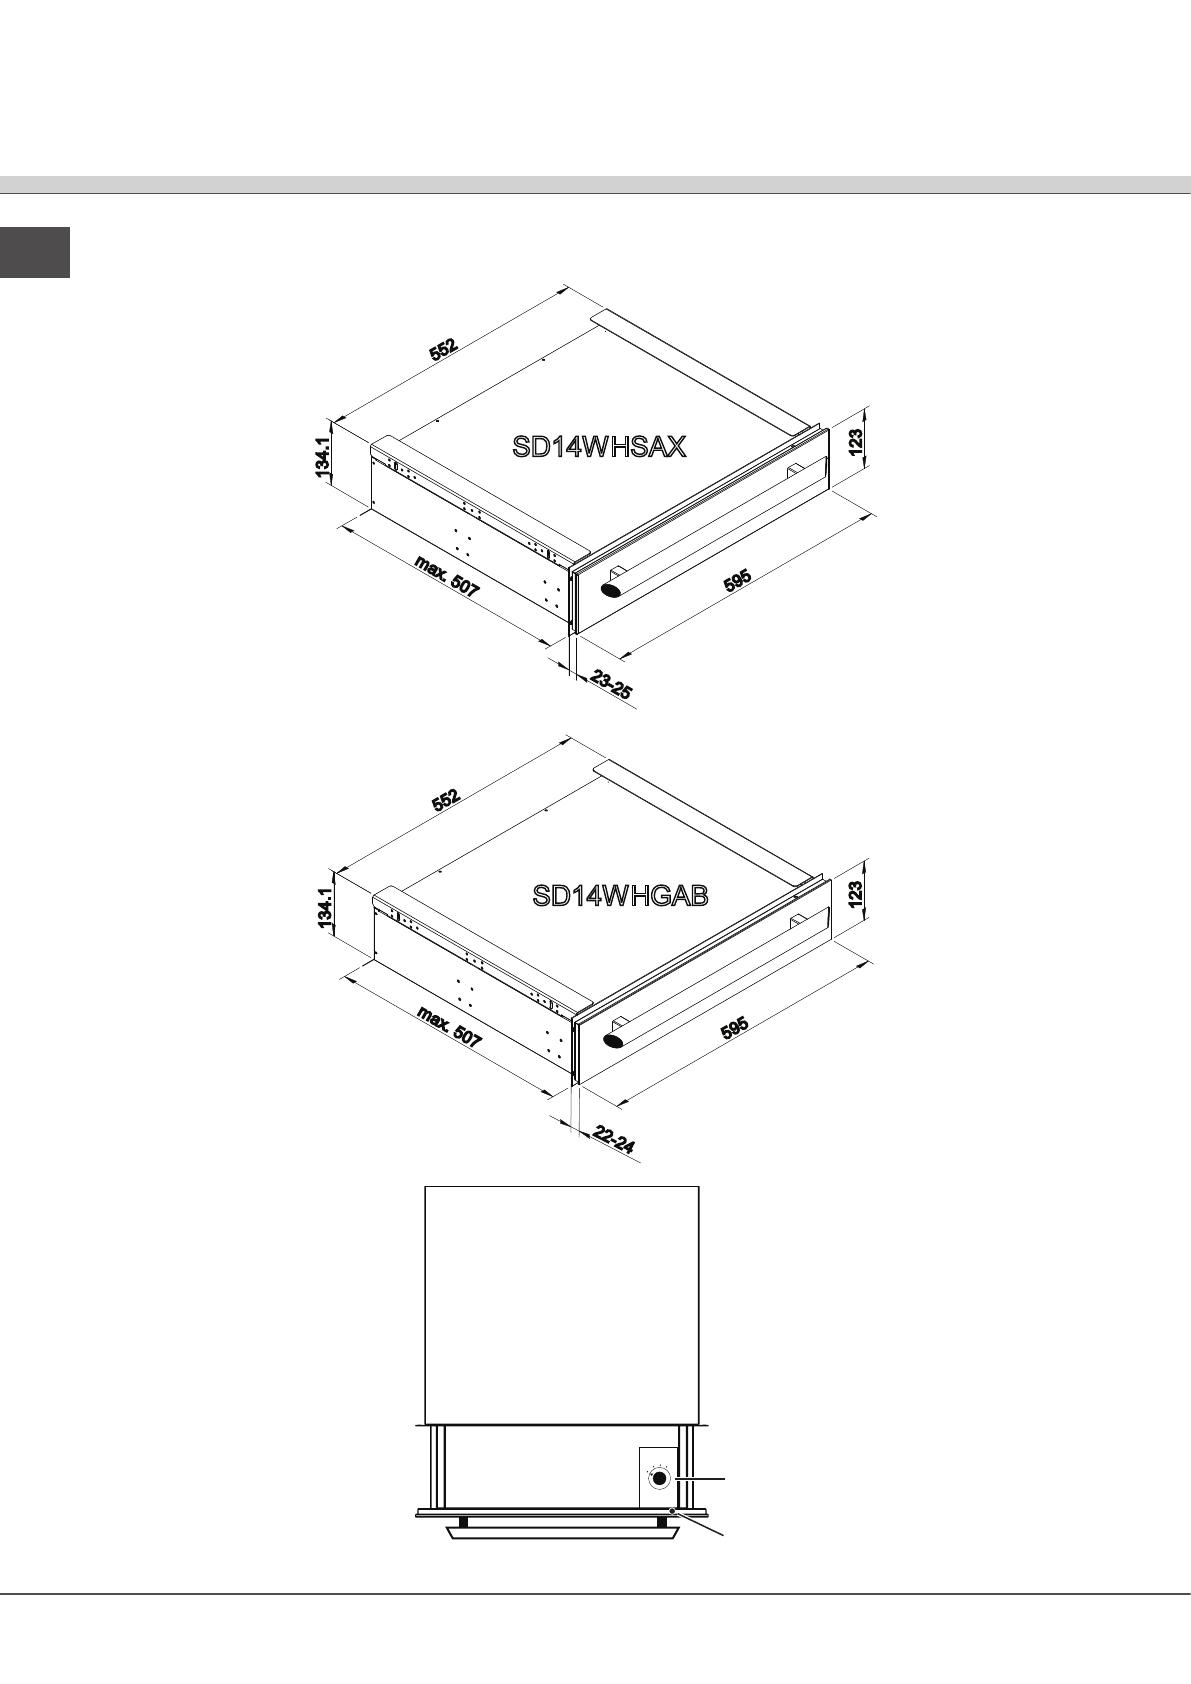
Forno sopra - cassetto sotto (vedi gura)
* dimensioni incasso
1 - inserire il cassetto
2 - appoggiare le staffette sul cassetto e ssarle con le
3 viti su ogni lato del mobile della cucina
3 - aprire il cassetto e appoggiare il forno sulle staffe
4 - allineare forno e cassetto e ssare il forno con le viti
5 - ssare il cassetto
Collegamento elettrico
! Il cassetto dotato di cavo di alimentazione tripolare è
predisposto per il funzionamento con corrente alternata,
con tensione e frequenza indicate nella targhetta
caratteristiche posta sull’apparecchio (vedi sotto).
Allacciamento del cavo di alimentazione alla rete
In caso di collegamento diretto alla rete è necessario
interporre tra l’apparecchio e la rete un interruttore
onnipolare con apertura minima fra i contatti di 3
mm dimensionato al carico e rispondente alle norme
in vigore (il lo di terra non deve essere interrotto
dall’interruttore). Il cavo di alimentazione deve essere
posizionato in modo tale che in nessun punto superi di
50°C la temperatura ambiente.
! L’installatore è responsabile del corretto collegamento
elettrico e dell’osservanza delle norme di sicurezza.
Prima di effettuare l’allacciamento accertarsi che:
• la presa abbia la messa a terra e sia a norma di legge;
• la presa sia in grado di sopportare il carico massimo
di potenza della macchina, indicato nella targhetta
caratteristiche (vedi sotto);
• la tensione di alimentazione sia compresa nei valori
nella targhetta caratteristiche (vedi sotto);
• la presa sia compatibile con la spina
dell’apparecchio. In caso contrario sostituire la presa
o la spina; non usare prolunghe e multiple.
! Ad apparecchio installato, il cavo elettrico e la presa
della corrente devono essere facilmente raggiungibili.
! Il cavo non deve subire piegature o compressioni.
Installazione
TARGHETTA CARATTERISTICHE
Dimensioni
larghezza cm 50,5
altezza cm 7,29
profondità cm 45,5
Volume
lt. 16,5
Capacità
massima
20 Kg
Collegamenti
elettrici
tensione 230-240V~ 50/60Hz
potenza massima assorbita 85W
Questa apparecchiatura è
conforme alle seguenti Direttive
Comunitarie:
2006/95/CEE del 12/12/06 (Bassa
Tensione) e successive
modificazioni
2004/108/CEE del 15/12/04
(Compatibilità Elettromagnetica)
e successive modificazioni
93/68/CEE del 22/07/93 e
successive modificazioni.
2002/96/CE e successive
modificazioni.

2
IT
3
1
5
3
4
2
45
min.
560
min.
580
min.
580
min.
550
min.
550
min.
45
min.
560
min.

IT
4
Descrizione
dell’apparecchio
Vista d’insieme
SD14WHSAX
SD14WHGAB
5
5
2
1
3
4
.
1
5
9
5
123
2
3
-
2
5
m
a
x
.
5
0
7
5
5
2
134.1
m
a
x
.
5
0
7
2
2
-
2
4
5
9
5
123
0
1
2
3
Spia
FUNZIONAMENTO
Manopola
PROGRAMMI

4
IT
5
Avvio e utilizzo
Il cassetto termico consente di:
• lievitare impasti, scongelare alimenti (posizione 1
della manopola programmi)
• riscaldare e mantenere caldi alimenti (posizione 2 e
3 della manopola programmi)
• riscaldare pentole e stoviglie (posizione 1 della
manopola programmi)
! L’apparecchio riscalda soltanto se il cassetto è stato
chiuso correttamente.
Per avviare la funzione desiderata:
1. aprire il cassetto esercitando una leggera pressione
sulla facciata del cassetto (meccanismo push-push);
2. inserire le stoviglie da riscaldare o gli alimenti da
lievitare/scongelare/riscaldare;
3. scegliere la funzione tramite la manopola
PROGRAMMI. La spia FUNZIONAMENTO si accende;
4. chiudere il cassetto;
5. viene attivata una resistenza elettrica che permette
l’esecuzione del programma scelto.
Per interrompere la funzione aprire il cassetto e
posizionare la manopola PROGRAMMI su 0. La spia
FUNZIONAMENTO si spegne.

IT
6
Precauzioni e consigli
! L’apparecchio è stato progettato e costruito in
conformità alle norme internazionali di sicurezza.
Queste avvertenze sono fornite per ragioni di sicurezza
e devono essere lette attentamente.
Sicurezza generale
• L’apparecchio è stato concepito per un uso di tipo
non professionale all’interno dell’abitazione.
• L’apparecchio non va installato all’aperto, nemmeno
se lo spazio è riparato, perché è molto pericoloso
lasciarlo esposto a pioggia e temporali.
• Non toccare la macchina a piedi nudi o le mani o i
piedi bagnati o umidi.
• L’apparecchio deve essere usato per riscaldare
alimenti, solo da persone adulte e secondo le
istruzioni riportate in questo libretto.
• Evitare che il cavo di alimentazione di altri
elettrodomestici entri in contatto con parti calde del
cassetto.
• Utilizzare sempre appositi guanti per estrarre
recipienti dal cassetto.
• Non riporre materiale inammabile nel cassetto:
se l’apparecchio viene messo inavvertitamente in
funzione potrebbe incendiarsi.
• Le superci interne del cassetto possono diventare
calde.
• Non staccare la spina dalla presa della corrente
tirando il cavo, bensì afferrando la spina.
• Non fare pulizia o manutenzione senza aver prima
staccato la spina dalla rete elettrica.
• In caso di guasto, in nessun caso accedere ai
meccanismi interni per tentare una riparazione.
Contattare l’Assistenza (vedi Assistenza).
Smaltimento
• Smaltimento del materiale di imballaggio: attenersi
alle norme locali, così gli imballaggi potranno essere
riutilizzati.
• La direttiva Europea 2002/96/CE sui riuti di
apparecchiature elettriche ed elettroniche (RAEE),
prevede che gli elettrodomestici non debbano essere
smaltiti nel normale usso dei riuti solidi urbani.
Gli apparecchi dimessi devono essere raccolti
separatamente per ottimizzare il tasso di recupero
e riciclaggio dei materiali che li compongono ed
impedire potenziali danni per la salute umana e
l’ambiente. Il simbolo del cestino barrato è riportato
su tutti i prodotti per ricordare gli obblighi di raccolta
separata.
Si potranno consegnare gli elettrodomestici dimessi
al servizio di raccolta pubblico, portarli presso
le apposite aree comunali o, se previsto dalla
legge nazionale in materia, renderli ai rivenditori
contestualmente all’acquisto di un nuovo prodotto di
tipo equivalente.
Tutti i principali produttori di elettrodomestici sono
attivi nella creazione e gestione di sistemi di raccolta
e smaltimento degli apparecchi dimessi.

6
IT
7
Manutenzione e cura
Escludere la corrente elettrica
Prima di ogni operazione isolare l’apparecchio dalla
rete di alimentazione elettrica.
Pulire l’apparecchio
• Le parti esterne possono essere pulite con una
spugnetta imbevuta di acqua tiepida, e sapone
neutro. Se le macchie sono difcili da asportare
usare prodotti specici. Si consiglia di sciacquare
abbondantemente e di asciugare dopo la pulizia.
Non usare polveri abrasive o sostanze corrosive.
• L’interno del cassetto va pulito con acqua calda e
detersivo, risciaquare e asciugare con un panno
morbido. Evitare gli abrasivi.
• Si consiglia di non spruzzare detergenti direttamente
sulla zona comandi ma di utilizzare una spugnetta.
! Non utilizzare mai pulitori a vapore o ad alta pressione
per la pulizia dell’apparecchio.

8
IT
8
Anomalie e rimedi
Può accadere che il cassetto non funzioni o non funzioni bene. Prima di chiamare l’assistenza, vediamo che cosa si
può fare. Innanzi tutto vericare che non ci siano interruzioni nelle reti di alimentazione elettrica.
Anomalie
Le stoviglie o gli alimenti restano freddi
Le stoviglie o gli alimenti non si riscaldano
a sufcienza.
Il cassetto non si chiude correttamente.
La spia FUNZIONAMENTO non si accende.
Possibili cause / Soluzione:
• L’apparecchio non è stato attivato.
• Si è vericato una calo di corrente.
• Il cassetto non è stato chiuso correttamente.
• Mantenere le stoviglie o gli alimenti più a lungo nel
cassetto.
• Il cassetto non è stato chiuso correttamente.
• Vericare la corretta installazione del cassetto.
• Vericare che la manopola PROGRAMMI non sia in
posizione 0.
Se, nonostante tutti i controlli, il cassetto non funziona e l’inconveniente da voi rilevato persiste, chiamate il Centro
Assistenza Tecnica. Comunicare:
• il modello della macchina (Mod.)
• il numero di serie (S/N)
Queste ultime informazioni si trovano sulla targhetta caratteristiche posta sull’apparecchio e/o sull’imballo.
! Non ricorrete mai a tecnici non autorizzati e riutate sempre l’installazione di pezzi di ricambio non originali.
Assistenza Attiva 7 giorni su 7
Se nasce il bisogno di assistenza o manutenzione basta chiamare il Numero Unico Nazionale 199.199.199* per
essere messi subito in contatto con il Centro Assistenza Tecnica più vicino al luogo da cui si chiama.
È attivo 7 giorni su 7, sabato e domenica compresi, e non lascia mai inascoltata una richiesta.
* Al costo di 14,25 centesimi di Euro al minuto (iva inclusa) dal Lun. al Ven. dalle 08:00 alle 18:30, il Sab. dalle 08:00 alle
13:00 e di 5,58 centesimi di Euro al minuto (iva inclusa) dal Lun. al Ven. dalle 18:30 alle 08:00, il Sab. dalle 13:00 alle 08:00 e
i giorni festivi, per chi chiama dal telefono sso.
Per chi chiama da radiomobile le tariffe sono legate al piano tariffario dell’operatore telefonico utilizzato.
Le suddette tariffe potrebbero essere soggette a variazione da parte dell’operatore telefonico; per maggiori informazioni
consultare il sito www.aristonchannel.com.

8
9
8
SD14WHGAB
SD14WHSAX
Contents
Installation, 10-11
Positioning
Electrical connection
Description of the appliance, 12
Overall view
Data plate
Start-up and use, 13
Precautions and tips, 14
General safety
Disposal
Care and maintenance, 15
Switching the appliance off
Cleaning the appliance
Troubleshooting, 16
Operating Instructions
OVEN
Italiano, 1 Français, 17
Nederlands, 41
English,9
IT GB FR
NL
Português, 25
PT
Español, 33
ES

GB
10
Before operating your new appliance please read
this instruction booklet carefully. It contains important
information concerning the safe operation, installation
and maintenance of the appliance.
! Please keep these operating instructions for future
reference. Make sure that the instructions are kept with
the appliance if it is sold, given away or moved.
Positioning
! Keep all packaging material out of the reach of
children. It may present a choking or suffocation hazard
(see Precautions and tips).
! The appliance must be installed by a qualied person
in compliance with the instructions provided. Incorrect
installation may cause harm to people and animals or
may damage property.
! A set of spacers is included in the packaging; this
can be used to achieve optimal alignment between
the drawer and the appliances with which it can be
combined during installation.
For further information regarding installation, please
read the technical documentation supplied with the
appliance.
Oven above - drawer below (see gure)
* cupboard dimensions
1 - insert the drawer
2 - put the brackets on the drawer and secure to the
cupboard with the 3 screws
3 - open the drawer and place the oven on the brackets
4 - align oven and drawer and secure the oven using
the screws provided
5 - secure the drawer to the cupboard
Electrical connection
! The compartment tted with a three-pole power supply
cable is designed to operate with an alternating current
at the voltage and frequency indicated on the data plate
located on the appliance (see below).
Connecting the supply cable to the mains
The appliance must be directly connected to the mains
using an omnipolar circuit-breaker with a minimum contact
opening of 3 mm installed between the appliance and
the mains. The circuit-breaker must be suitable for the
charge indicated and must comply with current electrical
regulations (the earthing wire must not be interrupted by the
circuit-breaker). The supply cable must be positioned so
that it does not come into contact with temperatures higher
than 50°C at any point.
! The installer must ensure that the correct electrical
connection has been made and that it is fully compliant
with safety regulations.
Before connecting the appliance to the power supply,
make sure that:
• The appliance is earthed and the plug is compliant with
the law.
• The socket can withstand the maximum power of the
appliance, which is indicated on the data plate (see
below).
• The voltage is in the range between the values
indicated on the data plate (see below).
• The socket is compatible with the plug of the
appliance. If the socket is incompatible with the plug,
ask an authorised technician to replace it. Do not use
extension cords or multiple sockets.
! Once the appliance has been installed, the power
supply cable and the electrical socket must be easily
accessible.
! The cable must not be bent or compressed.
Installation
TABLE OF CHARACTERISTICS
Dimensions
width 50.5 cm
height 7.29 cm
depth 45.5 cm
Volume
16.5 l
Maximum
capacity
20 kg
Electrical
connections
voltage at 230-240V~
50/60Hz maximum power
absorbed 85W
This appliance conforms to
the following European
Economic Community
directives:
2006/95/EEC dated
12/12/06 (Low Voltage) and
subsequent amendments;
2004/108/EEC dated
15/12/04 (Electromagnetic
Compatibility) and
subsequent amendments;
93/68/EEC dated 22/07/93
and subsequent
amendments.
2002/96/EEC and
subsequent amendments.

10
GB
11
1
5
3
4
2
45
min.
560
min.
580
min.
580
min.
550
min.
550
min.
45
min.
560
min.
GB
12
Description of the appliance
Overall view
SD14WHSAX
SD14WHGAB
5
5
2
1
3
4
.
1
5
9
5
123
2
3
-
2
5
m
a
x
.
5
0
7
5
5
2
134.1
m
a
x
.
5
0
7
2
2
-
2
4
5
9
5
123
0
1
2
3
OPERATION
indicator light
SELECTOR
knob

12
GB
13
Start-up and use
The heated compartment makes it possible to:
• Leaven dough and defrost food (position 1 on the
selector knob).
• Reheat food and keep it warm (positions 2 and 3 on
the selector knob).
• Heat up pans and crockery (position 1on the selector
knob).
! The appliance only heats up if the compartment has
been closed properly.
To activate the desired function:
1. Open the compartment by pressing gently on the
front panel (push/push mechanism).
2. Place the crockery or the food to be leavened/
defrosted/reheated inside.
3. Select a function using the SELECTOR knob. The
OPERATION indicator light illuminates.
4. Close the compartment.
5. A heating element will be activated, thus enabling the
selected programme to be performed.
To stop the function, open the compartment and turn
the SELECTOR knob to 0. The OPERATION indicator
light will switch off.

GB
14
Precautions and tips
! This appliance has been designed and manufactured
in compliance with international safety standards. The
following warnings are provided for safety reasons and
must be read carefully.
General safety
• The appliance was designed for domestic use inside
the home and is not intended for commercial or
industrial use.
• The appliance must not be installed outdoors, even
in covered areas. It is extremely dangerous to leave
the appliance exposed to rain and storms.
• Do not touch the appliance with bare feet or with wet
or damp hands and feet.
• The appliance must be used by adults only for the
preparation/reheating of food, in accordance with the
instructions provided in this booklet.
• Ensure that the power supply cables of other
electrical appliances do not come into contact with
the hot parts of the compartment.
• Always use oven gloves when removing cookware
from the compartment.
• Do not place ammable materials in the
compartment: if the appliance is switched on
accidentally, these materials could catch re.
• The internal surfaces of the compartment may
become hot.
• When unplugging the appliance, always pull the plug
from the mains socket; do not pull on the cable.
• Never perform any cleaning or maintenance work
without having disconnected the appliance from the
electricity mains.
• If the appliance breaks down, under no
circumstances should you attempt to perform
the repairs yourself. Repairs carried out by
inexperienced persons may cause injury or further
malfunctioning of the appliance. Contact a Service
Centre (see Assistance).
Disposal
• When disposing of packaging material: observe local
legislation so that the packaging may be reused.
• The European Directive 2002/96/EC relating to
Waste Electrical and Electronic Equipment (WEEE)
states that household appliances should not be
disposed of using the normal solid urban waste
cycle. Exhausted appliances should be collected
separately in order to optimise the cost of re-using
and recycling the materials inside the machine, while
preventing potential damage to the atmosphere
and to public health. The crossed-out dustbin is
marked on all products to remind the owner of their
obligations regarding separated waste collection.
Exhausted appliances may be collected by the public
waste collection service, taken to suitable collection
areas in the area or, if permitted by current national
legislation, they may be returned to the dealers
as part of an exchange deal for a new equivalent
product.
All major manufacturers of household appliances
participate in the creation and organisation of
systems for the collection and disposal of old and
disused appliances.

14
GB
15
Care and maintenance
Switching the appliance off
Disconnect your appliance from the electricity supply
before carrying out any work on it.
Cleaning the appliance
• The external parts may be cleaned using a sponge
which has been soaked in lukewarm water and
neutral soap. Use specialised products for the
removal of stubborn stains. After cleaning, rinse
and dry thoroughly. Do not use abrasive powders or
corrosive substances.
• The inside of the compartment should be cleaned
using hot water and detergent, then rinsed
thoroughly and dried with a soft cloth. Do not use
abrasive products.
• We recommend that detergents are not sprayed
directly onto the control panel, but that a sponge is
used instead.
! Never use steam cleaners or pressure cleaners on the
appliance.

16
GB
16
Troubleshooting
If, despite all these checks, the compartment does not function properly and the problem persists, contact the
Technical Assistance Centre. Please have the following information to hand:
• The appliance model (Mod.).
• The serial number (S/N).
This information can be found on the data plate located on the appliance and/or on the packaging.
! Never use the services of unauthorised technicians and never accept replacement parts which are not
original.
It may happen that the compartment does not function properly or even at all. Before calling the service centre for
assistance, check if anything can be done. First, check that there are no problems relating to the electricity supply.
Problem
The crockery or foods remain cold.
The crockery or foods do not heat up sufciently.
The compartment does not close properly.
The OPERATION indicator light does not illuminate.
Possible causes / Solutions:
• The appliance has not been activated.
• There has been a dip in the electricity supply current.
• The compartment has not been closed properly.
• Keep the crockery or foods inside the compartment
for a longer period of time.
• The compartment has not been closed properly.
• Make sure that the compartment has been installed
correctly.
• Make sure that the SELECTOR knob is not in the 0
position.

16
17
16
SD14WHGAB
SD14WHSAX
Sommaire
Installation, 18-19
Positionnement
Raccordement électrique
Description de l’appareil, 20
Vue d’ensemble
Plaque signalétique
Mise en marche et utilisation, 21
Précautions et conseils, 22
Sécurité générale
Mise au rebut
Nettoyage et entretien, 23
Mise hors tension
Nettoyage de l’appareil
Anomalies et remèdes, 24
Mode d’emploi
FOUR
Italiano, 1 Français, 17
Nederlands, 41
English,9
GB
FR
IT
NL
Português, 25
PT
Español, 33
ES

FR
18
Conserver ce mode d’emploi pour pouvoir le consulter
à tout moment. En cas de vente, de cession ou de
déménagement, veiller à ce qu’il suive l’appareil pour
informer le nouveau propriétaire sur son fonctionnement
et lui fournir les conseils correspondants.
!Lire attentivement les instructions : elles contiennent
des conseils importants sur l’installation, l’utilisation et la
sécurité de l’appareil
Positionnement
! Les emballages ne sont pas des jouets pour enfants, il
faut les mettre au rebut en respectant la réglementation
sur le tri sélectif des déchets (voir Précautions et
conseils).
! L’installation doit être effectuée par un professionnel
du secteur conformément aux instructions du fabricant.
Une mauvaise installation peut causer des dommages
à des personnes, des animaux ou des biens.
! L’emballage contient un lot de cales d’épaisseur
qui permet un alignement optimal avec les appareils
auxquels le tiroir peut être associé lors de l’installation.
Pour l’installation, lire la documentation technique
fournie avec l’appareil.
Four au-dessus et tiroir en dessous (voir gure)
* dimensions d’encastrement
1 - installer le tiroir
2 - poser les équerres sur le tiroir et les xer avec 3 vis
sur chaque coté du meuble
3 - ouvrir le tiroir et poser le four sur les équerres
4 - aligner le four et le tiroir et xer le four à la façade
du meuble à l’aide des vis
5 - xer le tiroir à la façade du meuble
Raccordement électrique
!Le tiroir muni d’un câble d’alimentation tripolaire est
prévu pour un fonctionnement au courant alternatif
à la tension et à la fréquence indiquées sur la plaque
signalétique apposée sur l’appareil (voir ci-dessous).
Branchement du câble d’alimentation au réseau
électrique
En cas de raccordement direct au réseau, il faut
intercaler entre l’appareil et le réseau un interrupteur
à coupure omnipolaire ayant au moins 3 mm
d’écartement entre les contacts, dimensionné à la
charge et conforme aux normes en vigueur (le l de
terre ne doit pas être interrompu par l’interrupteur). Le
câble d’alimentation ne doit atteindre, en aucun point,
une température dépassant de 50°C la température
ambiante.
! L’installateur est responsable du bon raccordement
électrique de l’appareil et du respect des normes de
sécurité.
Avant de procéder au branchement, s’assurer que :
• la prise est bien munie d’une terre conforme à la loi;
• la prise est bien apte à supporter la puissance
maximale de l’appareil, indiquée sur la plaque
signalétique (voir ci-dessous);
• la tension d’alimentation est bien comprise entre les
valeurs indiquées sur la plaque signalétique (voir ci-
dessous);
• la prise est bien compatible avec la che de
l’appareil. Si ce n’est pas le cas, remplacer la prise
ou la che, ne pas utiliser de rallonges ni de prises
multiples.
! Après installation de l’appareil, le câble électrique et la
prise de courant doivent être facilement accessibles
! Le câble ne doit être ni plié ni excessivement écrasé.
Installation
PLAQUE SIGNALETIQUE
Dimensions
largeur 50,5 cm
hauteur 7,29 cm
profondeur 45,5 cm
Volume
l 16,5
Capacité
maximale
20 kg
Raccordements
électriques
tension a 230-240V~50/60Hz
puissance maxi. absorbée
85W
Cet appareil est conforme
aux Directives
Communautaires suivantes :
2006/95/CEE du 12/12/06
(Basse Tension) et
modifications successives
2004/108/CEE du 15/12/04
(Compatibilité
électromagnétique) et
modifications successives
93/68/CEE du 22/07/93 et
modifications successives.
2002/96/CE et modifications
successives.

18
FR
19
1
5
3
4
2
45
min.
560
min.
580
min.
580
min.
550
min.
550
min.
45
min.
560
min.

FR
20
Description de l’appareil
Vue d’ensemble
SD14WHSAX
SD14WHGAB
5
5
2
1
3
4
.
1
5
9
5
123
2
3
-
2
5
m
a
x
.
5
0
7
5
5
2
134.1
m
a
x
.
5
0
7
2
2
-
2
4
5
9
5
123
0
1
2
3
Voyant
FONCTIONNEMENT
Bouton
PROGRAMMES
1/48