
INSTRUCTIONS MANUAL
MANUEL D’INSTRUCTIONS
MANUALE D’ISTRUZIONI
BETRIEBSANLEITUNG
MANUAL DE INSTRUCCIONES
INSTRUCTIEHANDLEIDING
OHJEKIRJA
MANUAL DE INSTRUÇÕES
BRUKSANVISNING
KEZELÉSI ÚTMUTATÓ
MULTI INOX
BOOSTESILENT
GB
AR
TR
IT
FR
DE
ES
NL
FI
PT
SE
RU
CZ
SI
SK
HR
MERS
MK
HU

2
GB
1. SAFETY MEASURES
Before starting the pump, read this instruction booklet carefully and keep it in a safe place for
future reference.
For safety reasons, the pump must not be used by anyone who has not read these instructions.
The appliance is not intendend for use by persons (including children) with reduced physical, sensory or mental
capabilities, or lack of experience and knowledge, unless they have been given supervision or instruction con-
cerning use of the appliance by a person responsable for their safety. Children should be supervised to ensure
that they do not play with the appliance.
The power cord must never be used to carry or move the pump. Always use the pump’s handle.
When handling the pump, while it is connected to the electric power supply, you should avoid all
contact with water.
Never remove the plug by pulling on the power cord.
Before taking any action on the pump, always remove the plug from the power socket.
If the power supply cord has been damaged, it must be replaced by the manufacturer or its autho-
rized customer support service in order to avoid all risks.
Overload protection. The pump has a thermal overload safety device. In the event of any overhea-
ting of the motor, this device automatically switches off the pump. The cooling time is roughly 15
to 20 minutes, then the pump automatically comes on again. If the overload cut-out is tripped, it is
essential to identify and deal with the cause of the overheating. See Troubleshooting.
2. USE OF THE VARIOUS TYPES OF PUMPS
2.1 Self priming multi-impeller surface pumps (MULTI INOX)
Available with 1, 3, 4 or 5 impellers. The range of products includes pumps with stainless steel casings as
well as plastic casings.
• suitable for domestic water supplies and for small and medium gardens.
• Ideal for emptying small tanks. The pumps are made of chlorine resistant materials (normal concentration).
• suitable for irrigation, drawing from water collection tanks
2.2 Boosters with integrated electronics (BOOSTERSILENT)
Characterised by their extremely silent running, and available with 3, 4 and 5 impellers.
• Including an electronic safety device to prevent the dry-running of the pump.
• Ideal for the irrigation of gardens and grounds, and domestic water supplies.
•

3
(e.g. petroleum oil, petrol, and thinners), grease, oils or foodstuffs.
Comply with the rules and regulations of the local water authority when using the pump for the
supply of domestic water.
Given the different provisions applicable to the safety of electric systems in different countries,
make sure that the pump system, as concerns its intended use, is in accordance with current
legislation.
Before starting the pump, make sure that:
•
lable power supply;
• there are no signs of damage to the pump or its power cord;
•
• the electric system is complete with a residual current circuit-breaker (I n
•
has stabilised.
If the pump is installed below the water level (below head), bleed the air from the pump casing by
operation again.
Attaching the suction hose
• Fit the suction hose from the water source to the pump making sure that the pump is above the
• water level. Do not position the suction hose above the level of the pump (to avoid air bubbles forming in
• the suction hose).
• The suction hose should be mounted in such a way that it does not create any mechanical stress on the
• pump.
• The foot valve should be placed at least 30 cm below the minimum water level.
•
• The suction hose and the pump’s suction inlet should be of the same diameter.
Attaching the delivery hose
• To get the best performance from the pump, it is recommended that the diameter of the delivery hose is at least 1”
• During the self-priming phase, all taps, valves, etc. on the delivery hose must be fully open in order to allow
the air inside the hose to escape.
lower than the pump, a suction hose must be used that is equipped with the foot valve. This will allow the
hose when the pump shuts off automatically, avoiding any problems when restarting.
GB

4
Booster with integrated electronics
Installation
T
T
on the pump.
Using of the pump
Plug the electric cable into the socket. The pump will automatically begin to run.
If the suction phase is not activated within 120 seconds, the pump will shut-off automatically. The pump will
then try 2 more attempts to self prime for 120 seconds each.
The electric pump is equipped with an integrated electronic device that allows the unit to automatically intervene
in the following ways:
• Automatic operation of the pump
The pump automatically starts when a tap is opened and shuts-off approximately 10 seconds after it is closed.
• Dry- Run Protection
If the pump senses that it is not drawing any water, it will automatically switch-off after approx. 45 seconds.
press the RESET pad to restart the pump.
will attempt to restart the pump after 1 hour, 5 hours and 20 hours, and then once every 24 hours. The electronic
press the RESET button to restart the pump.
• Electronic display signals
Greed Led (Power) on.
The pump is connected to the main power and is ready to supply water (as soon as a tap is opened).
Yellow Led (Pump on) on.
The pump is supplying water.
The pump is not functioning due to lack of water on the suction side: the dry running protection program is
activated.
4. RECOMMENDATIONS
To ensure the proper operation of the pump, it is important to comply with the following recommendations:
controlled pumps).
The pump must never be allowed to run dry.
• The diameter of the suction and delivery hoses must not be less than the relative inlet or outlet (25
the suction height exceeds 4 meters. Do not use metal connectors on the pump’s threads.
• Connect the suction hose including a foot valve avoiding counterslopes, traps, goosenecks and kinks
in the hose.
•
Never expose the pump to the rain or direct jets of water.
•
exposed to direct jets of water and do not immerse the pump in water.
GB

5
MAINTENANCE AND CLEANING
It is absolutely essential to prevent any risk of the pump freezing. In the event of freezing temperatures, remove
the pump from the liquid, empty it and keep it in a place where it cannot freeze. The pump must be disconnected
from the mains power supply before any cleaning operation is performed.
The pump is maintenance free.
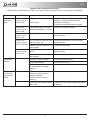
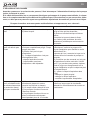
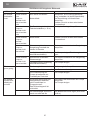
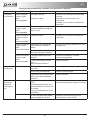
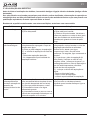
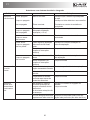
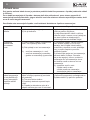
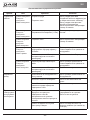
5. TROUBLESHOOTING
Before taking any troubleshooting action, disconnect the pump from the power supply.
If there is any damage to the power cord or pump, any necessary repairs or replacements must
-
Multi-impeller self priming Surface pumps and Boosters with tank
Fault Cause Solution
The pump does
not
turn on
1) No power.
2) Shaft blocked.
1) Check if power is supplied to the socket
and that the plug is correctly inserted.
2) Remove the plug from the power socket
and insert a screwdriver into the notch on
the shaft (from the cooling fan side) and
unblock it by turning the screwdriver.
The pump turns
but
does not deliver
water
1) The air inside the pump has not been
completely bled. Pump casing without
water.
2) Entry of air from the suction pipe.
3) - the suction valve is not submerged
in water
- suction valve blocked
- the maximum suction depth has been
exceeded.
1) Stop the pump, unscrew the delivery
pipe, shake the pump and suction hose to
remove any air bubbles. Top up with water,
connect the hose ensuring it is correctly
sealed and start the pump again.
2) Check that the joints of the suction
hose have been performed correctly.
Make sure there are no counterslopes,
traps, goosenecks or constriction on
the suction pipe and that the foot valve
is not blocked.
3) - place the suction valve in water
- clean the foot valve
- clean the suction basket
- check the suction depth.
The pump stops
due to overhe-
ating
caused by the
opening of the
overheating ther-
mal protection.
1) The power supply does not conform
to that on the rating plate of the motor
(voltage too high or too low).
2) A solid object has blocked the impeller.
3) The pump has been operating with
water that is too hot.
4) The pump ran dry or ran with the deli-
very tap closed for more than 10 minutes
1)-4) Remove the plug, remove the
cause of the overheating, wait for
the motor to cool and start it again.
GB

6
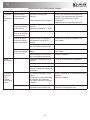
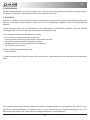
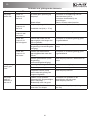
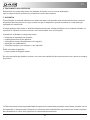
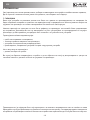
Booster with integrated electronics
Fault LED Cause Solution
The pump
does not
work
Power is off
Pump on is off
Alarm is off
No power
Faulty card
Check that the mains power supply is
and the connections.
Contact an authorised service centre.
Power is on
Pump on is off
Alarm is off
The delivery hose is blocked
Incorrect installation (+ 15 m)
Check the hydraulic system
Power is on
Pump on is on
Alarm is on
Faulty card Contact an authorised
service centre
Power is on
Pump on is off
Lack of suction water no more
than 26 hours ago
Check that the suction hose has been
Impeller blocked (thermal cut-
out tripped)
Clean/free the pump
Power is on
Pump on is off
Alarm is on
Lack of water for more than 26
hours
Check that the suction hose has been
Impeller blocked (thermal cut-
out tripped)
Clean the pump
delivery
Excessive suction depth Check the suction depth
Foot valve blocked Clean the foot valve
Performance of the pump
is reduced due to foreign
objects
Clean the pump
The pump
continuousl
y stops and
starts.
There are leaks in the system
The pump has sucked in
foreign materials
The non-return valve is
leaking
Clean the pump
The water level drops rapidly
below 8m
Position the foot valve deeper (not below
8 meters)
GB

7
6. DISPOSAL
This product or its parts must be disposed of in accordance with the laws regarding the environment;
Use the local, public or private, refuse collection services.
7. GUARANTEE
Any material or manufacturing defects will be corrected during the guarantee period established by current law
in the country where the product is purchased. It is up to the manufacturer to decide whether to repair or replace
any faulty parts.
The manufacturer’s guarantee covers all substantial defects attributable to manufacturing or material defects,
providing the product has been used correctly and in compliance with the instructions.
The guarantee becomes null and void in the event of the following:
• unauthorized attempts to repair the appliance;
• unauthorized technical changes to the appliance;
• use of non-original spare parts; manhandling;
• inappropriate use, e.g. for industrial purposes.
The guarantee does not cover:
• parts liable to rapid wear and tear.
For any action under guarantee, contact an authorized customer support service, presenting your receipt for
the purchase of the product.
The manufacturer accepts no liability for any inaccuracies in the present booklet due to printing or copying er-
rors. The manufacturer reserves the right to make any changes to the product he deems necessary or useful,
without affecting its essential features.
GB

8
FR
1. MESURES DE SÉCURITÉ
Avant la mise en marche de la pompe, lire attentivement ce livret d’instructions et le conserver
pour toute consultation successive.
L’appareil n’est pas destiné à être utilisé par des personnes (enfants compris) dont les capacités physiques,
sensorielles ou mentales sont réduites, ou manquant d’expérience ou de connaissance, à moins qu’elles aient
-
structions concernant l’utilisation de l’appareil. Il faut surveiller les enfants pour s’assurer qu’ils ne jouent pas
avec l’appareil.
Le câble d’alimentation ne doit jamais être utilisé pour transporter ou pour déplacer la pompe.
Utiliser toujours la poignée de la pompe.
Si le câble d’alimentation est abîmé, il doit être remplacé par le constructeur ou par son service
Protection contre la surcharge
Recherche des Pannes.
2. UTILISATION DES DIFFÉRENTS TYPES DE POMPE
2.1 Pompes de surface auto-amorçantes multicellulaires (MULTI INOX)
Disponibles avec 1, 3, 4, 5 roues. La gamme de produits comprend des pompes avec corps en acier inox ou
avec corps en plastique.
• Idéales pour l’approvisionnement en eau dans les applications domestiques et pour les jardins de petites et
moyennes dimensions.
• Particulièrement adaptées pour le vidage de petits bassins. Les pompes sont réalisées avec des matériaux
résistant au chlore (concentrations normales).
• Adaptées à l’irrigation avec puisage de l’eau dans un réservoir de collecte
•
Caractérisés par un fonctionnement extrêmement silencieux grâce à leur technique de construction
particulière, disponibles avec 3, 4, 5 roues.
• Munis de dispositif électronique de sécurité qui prévient le fonctionnement à sec de la pompe.
• Adaptés à l’irrigation de jardins et terrains et pour l’approvisionnement en eau de type domestique.
• Caractérisés par une pression et un débit constants.

9
FR
-
produits alimentaires.
locales des autorités responsables de la gestion des ressources en eau.
•
• Le câble d’alimentation de la pompe ou la pompe ne sont pas endommagés.
•
•
•
Avant la première mise en service, remplir avec de l’eau propre le corps de la pompe et le tuyau
Si la pompe est installée à un niveau inférieur par rapport à celui de l’eau (sous charge d’eau),
faire sortir l’air du corps de la pompe en ouvrant le bouchon de remplissage. La pompe se remplit
d’eau de manière autonome.
remplissage.
Montage du tuyau d’aspiration
• Installer le tuyau d’aspiration de la source d’eau à la pompe de manière ascendante. Ne pas placer
le tuyau d’aspiration au-dessus du niveau de la pompe (pour éviter la formation de bulles d’air dans le
tuyau d’aspiration).
• Le tuyau d’aspiration doit être monté de manière à n’exercer aucune pression mécanique sur la pompe.
• Le clapet de pied doit être placé au minimum à 30 cm sous le niveau minimum de l’eau.
• La pompe aspire l’eau uniquement lorsque le tuyau d’aspiration est absolument étanche.
•
Montage du tuyau de refoulement
• Pour exploiter au mieux les performances de la pompe, il est recommandé d’utiliser un tuyau de
refoulement ayant un diamètre de 1” ou supérieur.
• Au cours de l’amorçage, les éléments de fermeture présents dans le tuyau de refoulement doivent être
complètement ouverts pour faire sortir l’air présent dans les tubes.

10
doivent être remplis d’eau à ras bord pour pouvoir effectuer l’aspiration. Dans le cas d’utilisation dans des puits
ou dans tous les cas où le niveau de l’eau est inférieur à la pompe, il faut toujours utiliser un tuyau d’aspiration
muni de clapet de pied antiretour, qui permet de le remplir à la première installation et empêche qu’il se vide
quand la pompe s’arrête en évitant ainsi des problèmes en phase de redémarrage. Pour remplir la pompe,
utiliser le bouchon de remplissage.
Installation
La pression à l’aspiration ne doit pas dépasser 2 bar.
L
La pompe ne fonctionne pas si le robinet se trouve à plus de 15 m au-dessus du niveau de la
pompe.
Dans ce modèle, il n’est pas possible de remplir le tuyau d’aspiration par le bouchon de remplis-
sage présent sur la pompe, à cause de la présence du clapet antiretour.
Utilisation de la pompe
Si la phase d’aspiration n’est pas activée dans les 120 secondes, la pompe s’arrête automatiquement, après
quoi 2 autres essais d’amorçage suivront de 120 secondes chacun.
L’électropompe est dotée d’un dispositif électronique intégré qui la transforme en une électropompe à interven-
tion automatique assurant les fonctions suivantes:
•
La pompe démarre automatiquement à l’ouverture du robinet et s’arrête à 10 secondes environ après la
fermeture du robinet.
• Protection contre le fonctionnement à sec de la pompe
En cas d’absence d’eau, la pompe se déconnecte automatiquement après 45 secondes environ. Cette situation
-
FR

11
automatique essaie de redémarrer la pompe au bout d’1 heure, au bout de 5 heures et au bout de 20 heures
puis une fois toutes les 24 heures. À partir de la première intervention de la protection contre la marche à sec
manque d’eau: led rouge clignotante avec cycles alternant un clignotement et une pause. Pour faire démarrer
•
Led verte (Power) allumée.
La pompe est branchée et prête à distribuer l’eau (dès qu’un robinet est ouvert).
Led jaune (Pump on) allumée.
La pompe distribue de l’eau.
Led rouge (Alarm) clignotante avec cycles d’1 clignotement.
La pompe ne fonctionne pas à cause du manque d’eau à l’aspiration : le programme de protection pour la
marche à sec est intervenu.
4. CONSEILS POUR L’UTILISATION
Pour le fonctionnement correct de la pompe, il faut respecter les règles de fonctionnement suivantes:
La pompe ne doit pas fonctionner avec le robinet de refoulement complètement fermé (sauf pour
La pompe ne doit pas fonctionner à sec.
•
correspondants (25 mm) sur la pompe. Quand la hauteur d’aspiration dépasse 4 mètres il est con
• Connecter le tuyau d’aspiration avec clapet de pied, en évitant les contre-pentes, les siphons, les cols
de cygne et les étranglements du tuyau.
• Positionner la pompe à plat, dans une position stable, dans un lieu sec et à l’écart de substances
• Contrôler que les branchements aux prises électriques sont à l’abri des inondations, éviter que la
pompe soit exposée au jet d’eau direct, ne pas immerger la pompe dans l’eau.
ENTRETIEN ET NETTOYAGE
Il faut éviter absolument que la pompe soit exposée au risque de gel. En cas de température présentant ce
risque, retirer la pompe du liquide à pomper, la vider et la remiser dans un endroit à l’abri du gel.
Avant toute intervention de nettoyage, la pompe doit être débranchée.
La pompe ne nécessite aucun entretien.
FR

12
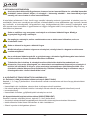
5. RECHERCHE DES PANNES
-
tion ou le remplacement de la pièce doivent être effectués par le Constructeur ou par son service après-
Pompes de surface auto-amorçantes multicellulaires et suppresseurs avec réservoir
Pannes Cause Remèdes
La pompe ne tourne
pas
1) Absence d’alimentation électrique.
2) Arbre bloqué.
1) Contrôler si la tension arrive à la prise
-
tation:
introduire le tournevis dans la fente
sur l’arbre (côté ventilateur de refroi-
dissement) et débloquer en tournant le
tournevis.
La pompe tourne
mais ne refoule pas
d’eau
1) L’air dans le corps de la pompe
n’est pas complètement purgé. Corps
pompe sans eau.
2) Entrée d’air par le tuyau
d’aspiration.
3) - le clapet d’aspiration n’est pas
immergé dans l’eau
- clapet d’aspiration bouché
- la profondeur maximum
d’aspiration a été dépassée.
1) Arrêter la pompe, dévisser le tuyau de
refoulement, secouer la pompe et le
tuyau d’aspiration pour faciliter la sortie
des bulles d’air ;
rajouter de l’eau, remonter le tuyau en le
serrant à fond et remettre la pompe en
marche.
2) Contrôler que les raccords sur le tuyau
qu’il n’y a pas de contre-pentes, siphons,
cols de cygne ou étranglements sur le
tuyau d’aspiration et que le clapet de pied
n’est pas bloqué.
3) - placer le clapet d’aspiration dans
l’eau
- nettoyer le clapet de pied
- contrôler la profondeur d’aspiration.
La pompe s’arrête
pour surchauffe suite
au déclenchement de
la protection thermi-
que pour surchauffe.
1) Alimentation non conforme aux
données de plaque du moteur
(tension trop élevée ou basse).
2) Un corps solide a bloqué la roue.
3) La pompe a fonctionné avec de
l’eau trop chaude.
4) La pompe a fonctionné à sec ou
avec le robinet de refoulement
fermé pendant plus de 10 minutes.
cause qui a provoqué la surchauffe,
attendre le refroidissement du moteur et
redémarrer..
FR

13
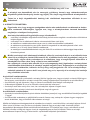
Panne LED Cause Remède
La pompe
ne
fonctionne
pas
Power éteinte
Pump on éteinte
Alarm éteinte
Manque de tension de
secteur
Carte électronique en panne
correcte (voir plaquette des données).
connexions.
S’adresser à un centre SAV autorisé.
Power allumée
Pump on éteinte
Alarm éteinte
Le tuyau de refoulement est
bloqué
Mauvaise installation (+ 15 m)
Power allumée
Pump on allumée
Alarm allumée
Carte électronique en panne s’adresser à un centre SAV autorisé
Power allumée
Pump on éteinte
Alarm clignotante
Manque d’eau à l’aspiration
remontant à moins de 26
heures
bien installé
Roue bloquée (intervention
de l’interrupteur thermique)
Nettoyer/débloquer la pompe
Power allumée
Pump on éteinte
Alarm allumée
Lack of water for more than 26
hours
bien installé
Roue bloquée (intervention
de l’interrupteur thermique)
Nettoyer la pompe
Débit
Profondeur d’aspiration trop
élevée
Contrôler la profondeur d’aspiration
Clapet de pied obstrué Nettoyer le clapet de pied
Capacité de la pompe
réduite à cause de matériaux
étrangers
Nettoyer la pompe
La pompe
démarre
puis
s’arrête
continuelle
ment
Il y a des fuites dans l’instal-
lation.
Présence de corps étrangers
à l’intérieur de la pompe.
Le clapet antiretour n’est pas
étanche.
la pompe.
Nettoyer la pompe
Le niveau de l’eau baisse
rapidement au-delà de 8 m
Placer le clapet de pied plus en
profondeur (en deçà de 8 m)
FR

14
6. MISE AU REBUT
Ce produit ou certaines des ses parties doivent être mises au rebut dans le respect des normes sur
l’environnement;
Utiliser les systèmes locaux, publics ou privés, de collecte des déchets.
7. GARANTIE
Tout vice de matériau ou de fabrication sera éliminé durant la période de garantie prévue par la loi en vigueur
dans le pays d’achat du produit en procédant, à notre choix, à la réparation ou au remplacement. Notre garantie
couvre tous les défauts substantiels imputables à des vices de fabrication ou de matériau employé à condition
que le produit ait été utilisé de manière correcte et conforme aux instructions.
La garantie ne s’applique plus dans les cas suivants :
• Tentatives de réparation sur la pompe,
•
• Utilisation de pièces de rechange non originales,
• Endommagement/actes de malveillance,
• Utilisation non appropriée, par ex. emploi industriel.
Sont exclus de la garantie :
• Pièces sujettes à usure rapide.
Pour toute demande d’intervention sous garantie, s’adresser à un centre de service après-vente agréé en
présentant la preuve d’achat du produit.
Le Constructeur décline toute responsabilité concernant les éventuelles inexactitudes contenues dans ce livret,
si elles sont dues à des erreurs d’imprimerie ou de transcription. Il se réserve le droit d’apporter aux produits to-
FR

15
1. MISURE DI SICUREZZA
Prima della messa in funzione della pompa, leggere attentamente il presente libretto di istruzioni
e conservarlo per successive consultazioni.
e mentali siano ridotte, oppure con mancanza di esperienza o di conoscenza, a meno che esse abbiano potuto
o di istruzioni riguardanti l’uso dell’apparecchio. I bambini devono essere sorvegliati per sincerarsi che non
giochino con l’apparecchio.
Il cavo di alimentazione non deve mai essere utilizzato per trasportare o per spostare la pompa.
Utilizzate sempre il manico della pompa.
Non staccare mai la spina dalla presa tirando il cavo.
Se il cavo di alimentazione è danneggiato, esso deve essere sostituito dal costruttore o dal suo
servizio assistenza tecnica autorizzato, in modo da prevenire ogni rischio.
Protezione da sovraccarico
La pompa è dotata di un salvamotore termico. In caso di eventuale surriscaldamento del motore,
il salvamotore spegne la pompa automaticamente. Il tempo di raffreddamento è di circa 15-20
min. dopo di che la pompa si riaccende automaticamente. Dopo l’intervento del salvamotore è
assolutamente necessario ricercarne la causa ed eliminarla. Consultate Ricerca Guasti.
2. UTILIZZO DEI VARI TIPI DI POMPA
Disponibili con 1, 3, 4, 5 giranti, in versione con corpo in acciaio inox
• Ideali per l’approvvigionamento idrico in applicazioni domestiche e in giardini di piccola e media
grandezza.
• Particolarmente adatte per lo svuotamento di piccoli bacini. Le pompe sono realizzate con materiali
resistenti al cloro (normali concentrazioni).
• Adatte per l’irrigazione con prelievo dell’acqua da un serbatoio di raccolta.
2.2 Autoclavi con elettronica integrata (BOOSTERSILENT)
Disponibili con 3, 4 e 5 giranti. La particolare tecnica costruttiva rende questi autoclavi estremamente
silenziosi.
• Idonee per l’irrigazione di giardini e terreni, l’approvvigionamento idrico domestico.
• Dotate di dispositivo elettronico di sicurezza che previene il funzionamento a secco della pompa.
• Caratterizzate da pressione e portata costanti.
IT

16
corrosivi o esplosivi (es. petrolio, benzina, diluenti), grassi, oli o prodotti alimentari.
In caso di utilizzo della pompa per l’alimentazione idrica domestica rispettare le normative locali
delle autorità responsabili della gestione delle risorse idriche.
Viste le diverse disposizioni vigenti nei singoli paesi nell’ambito della sicurezza degli impianti
elettrici, assicurarsi che l’impianto sia conforme alle normative in essere.
• Il voltaggio e la frequenza riportati sulla targhetta tecnica della pompa corrispondano ai dati dell’im
pianto elettrico di alimentazione.
• Il cavo di alimentazione della pompa o la pompa non siano danneggiati.
• Il collegamento elettrico deve avvenire in luogo asciutto, al riparo di eventuali allagamenti.
•
• Eventuali prolunghe siano conformi alla normativa vigente.
(sotto-battente), far fuoriuscire l’aria dal corpo della pompa aprendo il tappo di carico. La pompa
nuovamente l’operazione di caricamento.
Montaggio del tubo di aspirazione
• La pompa aspira acqua solo quando il tubo di aspirazione è assolutamente a tenuta stagna.
• Il tubo di aspirazione dovrebbe avere lo stesso diametro della bocca di aspirazione della pompa.
• Installare il tubo d’aspirazione dalla sorgente d’acqua alla pompa in modo ascendente. Non collocare il tubo di
aspirazione sopra il livello della pompa (per evitare formazione di bolle d’aria nel tubo di aspirazione).
• Il tubo di aspirazione deve essere montato in modo che non eserciti alcuna pressione meccanica sulla pompa.
• La valvola di fondo deve essere collocata minimo 30 cm sotto il livello minimo dell’acqua.
Montaggio del tubo di mandata
• Per sfruttare al meglio le prestazioni della pompa si raccomanda di utilizzare un tubo di mandata con diametro
di 1” o superiore.
• Durante il processo di adescamento gli elementi di chiusura presenti nel tubo di mandata devono essere aperti
completamente per fare uscire l’aria presente nei tubi.
IT

17
Prima della messa in uso, riempire completamente di acqua la pompa ed il tubo di aspirazione per
permettere l’adescamento. Nell’uso in pozzi o in tutti i casi in cui il livello dell’acqua è inferiore alla pompa, è
di riempirlo alla prima installazione e ne impedisce lo svuotamento quando la pompa si ferma evitando così
problemi in fase di riavvio.
Nel caso di installazione in cui il livello dell’acqua è superiore rispetto a quello della pompa si consiglia
l’utilizzo di una valvola di non ritorno direttamente sul corpo pompa.
Autoclavi con elettronica integrata
Installazione
La pressione in ingresso pompa non deve essere superiore a 2 bar.
La pompa non funziona se il rubinetto si trova a più di 15 m al di sopra del livello della pompa.
tubo di aspirazione tramite il tappo di carico presente sulla pompa.
Uso della pompa
Inserire la spina del cavo di alimentazione nella presa di corrente. La pompa inizia a funzionare.
Se la fase di aspirazione non si attiva entro 120 secondi la pompa si arresta automaticamente,
dopodiché seguiranno altri 2 tentativi di adescamento per altri 120 secondi ciascuno.
La pompa è dotata di un dispositivo elettronico integrato che la trasforma in un’elettropompa ad intervento
automatico e svolge le seguenti funzioni:
• Funzionamento in automatico della pompa
La pompa si avvia automaticamente all’apertura del rubinetto e si arresta circa 10 secondi dopo la chiusura
del rubinetto.
• Protezione contro il funzionamento a secco della pompa (anti-dry-run)
In mancanza d’acqua la pompa si disinserisce automaticamente dopo circa 45 secondi. Questo viene
indicato dal led rosso “Alarm”. Per riattivare la pompa premere il tasto RESET, dopo aver ripristinato il
pompa, il reset automatico prova a riavviare la pompa dopo un’ora, dopo 5 ore, dopo 20 ore e
quando la pompa non riprende il funzionamento regolare, il display elettronico continua a segnalare la
IT

18
• Segnalazioni del display elettronico
Led verde (Power) acceso.
La pompa è collegata alla rete elettrica ed è pronta per erogare acqua (non appena viene aperto un rubinetto).
Led giallo (Pump on) acceso.
La pompa sta erogando acqua.
La pompa non funziona per mancanza d’acqua in aspirazione: è intervenuto il programma di protezione per
la marcia a secco.
4. CONSIGLI SULL’USO
Per un corretto funzionamento della pompa devono essere rispettate le seguenti regole di funzionamento:
La pompa non deve funzionare con il rubinetto di mandata completamente chiuso (escluse le
pompe controllate elettronicamente).
La pompa non deve funzionare a secco.
• Le tubazioni di aspirazione e di mandata non devono essere più piccole del diametro delle relative
bocche (25 mm) della pompa. Quando l’altezza di aspirazione è superiore ai 4 metri si consiglia di
montare un tubo di diametro più grande sulla bocca di aspirazione. Non usare raccordi metallici sulle
• Collegare il tubo di aspirazione completo di valvola di fondo, evitando contropendenze, sifoni, colli
d’oca e strozzature del tubo.
•
o esplosive. Non esporla mai alla pioggia ed a getti d’acqua diretti.
• Accertarsi che i collegamenti alle prese elettriche siano posti al riparo da inondazioni, evitare che la
pompa sia esposta al getto diretto dell’acqua, non immergere la pompa nell’acqua.
MANUTENZIONE E PULIZIA
E’ assolutamente necessario evitare che la pompa sia esposta a congelamento. In caso di temperatura di gelo,
togliete la pompa dal liquido da pompare, svuotatela e riportatela in un luogo al riparo dal gelo. Prima di effettua-
re qualsiasi intervento di pulizia, la pompa deve essere scollegata dalla rete di alimentazione.
La pompa è esente da manutenzione.
IT

19
5. RICERCA GUASTI
Prima di iniziare la ricerca guasti è necessario interrompere il collegamento elettrico della pompa (to-
-
neggiata l’intervento di riparazione o sostituzione deve essere eseguito dal Costruttore o dal suo servi-
Guasti Cause Rimedi
La pompa non
gira.
1) Mancanza di alimentazione elettrica.
2) Albero bloccato.
1) Controllare se c’è tensione nella presa
e se la spina è ben inserita.
2) Togliere la spina dalla presa: inserire il
cacciavite nell’intaglio sull’albero (dal lato
ventola di raffreddamento) e sbloccare
ruotando il cacciavite.
La pompa gira ma
non eroga acqua.
1) L’aria nel corpo pompa non è
completamente spurgata. Corpo pompa
senz’acqua.
2) Ingresso di aria dalla tubazione
d’aspirazione.
3) - la valvola di aspirazione non è
nell’acqua
- valvola di aspirazione ostruita
- è stata oltrepassata la profondità di
aspirazione max.
1) Fermare la pompa, svitare il tubo di
mandata, scuotere la pompa e il tubo di
aspirazione per agevolare l’uscita delle
bolle d’aria; rabboccare con acqua,
riavvicinare il tubo serrando a tenuta e
avviare nuovamente la pompa.
2) Controllare che le giunzioni sul tubo di
-
care che non vi siano contropendenze,
sifoni, colli d’oca o strozzature sul tubo
di aspirazione e che non sia bloccata la
valvola di fondo sul tubo di aspirazione.
3) - collocare la valvola di aspirazione in
acqua
- pulire la valvola di fondo
- pulire il cestello di aspirazione
- controllare la profondità di aspirazione.
La pompa si ferma
per surriscaldamento
per l’intervento del
moto-protettore
termico.
1) Alimentazione non conforme ai dati
di targa del motore (tensione troppo
alta o bassa).
2) Un corpo solido ha bloccato la
girante.
3) La pompa ha funzionato con acqua
troppo calda.
4) La pompa ha funzionato a secco o
con il rubinetto di mandata chiuso per
un periodo superiore a 10 minuti.
1)-4) Disinserire la spina, rimuovere la
causa che ha provocato il surriscalda-
mento, attendere il raffreddamento della
pompa e riavviare.
IT

20
Autoclavi con elettronica integrata
Anomalia LED Causa Rimedio
La pompa
non funziona
Power spento
Pump on spento
Alarm spento
Non arriva corrente
Scheda guasta
nella rete (vedi targhetta tecnica).
Rivolgersi ad un centro assistenza
autorizzato.
Power acceso
Pump on spento
Alarm spento
Il tubo di mandata è bloccato
Installazione impropria (+15 m)
Power acceso
Pump on acceso
Alarm acceso
Scheda guasta Rivolgersi ad un centro assistenza
autorizzato
Power acceso
Pump on spento
Alarm lampeg-
giante
Mancata acqua in aspirazione
non più di 26 ore fà
del tubo di aspirazione.
Girante bloccata (intervento
dell’interruttore termico)
Pulire/sbloccare la pompa
Power acceso
Pump on spento
Alarm acceso
Mancata acqua da più di 26 ore
tubo di aspirazione.
Girante bloccata (intervento
dell’interruttore termico)
Pulire la pompa
Mandata
Profondità di aspirazione
troppo elevata
Controllare la profondità di aspirazione
Valvola di fondo ostruita Pulire la valvola di fondo
Capacità della pompa ridotta
a causa di materiali estranei
Pulire la pompa
La pompa si
attiva e
disattiva in
continua-
zione
Vi sono perdite nell’impianto.
Probabile presenza di corpi
estranei all’interno della
pompa.
La valvola di non ritorno non
fa tenuta.
della pompa
Pulire la pompa
Il livello dell’acqua si abbassa
velocemente oltre gli 8m
Collocare la valvola di fondo più in pro-
fondità (non oltre gli 8m)
IT
A página está carregando ...
A página está carregando ...
A página está carregando ...
A página está carregando ...
A página está carregando ...
A página está carregando ...
A página está carregando ...
A página está carregando ...
A página está carregando ...
A página está carregando ...
A página está carregando ...
A página está carregando ...
A página está carregando ...
A página está carregando ...
A página está carregando ...
A página está carregando ...
A página está carregando ...
A página está carregando ...
A página está carregando ...
A página está carregando ...
A página está carregando ...
A página está carregando ...
A página está carregando ...
A página está carregando ...
A página está carregando ...
A página está carregando ...
A página está carregando ...
A página está carregando ...
A página está carregando ...
A página está carregando ...
A página está carregando ...
A página está carregando ...
A página está carregando ...
A página está carregando ...
A página está carregando ...
A página está carregando ...
A página está carregando ...
A página está carregando ...
A página está carregando ...
A página está carregando ...
A página está carregando ...
A página está carregando ...
A página está carregando ...
A página está carregando ...
A página está carregando ...
A página está carregando ...
A página está carregando ...
A página está carregando ...
A página está carregando ...
A página está carregando ...
A página está carregando ...
A página está carregando ...
A página está carregando ...
A página está carregando ...
A página está carregando ...
A página está carregando ...
A página está carregando ...
A página está carregando ...
A página está carregando ...
A página está carregando ...
A página está carregando ...
A página está carregando ...
A página está carregando ...
A página está carregando ...
A página está carregando ...
A página está carregando ...
A página está carregando ...
A página está carregando ...
A página está carregando ...
A página está carregando ...
A página está carregando ...
A página está carregando ...
A página está carregando ...
A página está carregando ...
A página está carregando ...
A página está carregando ...
A página está carregando ...
A página está carregando ...
A página está carregando ...
A página está carregando ...
A página está carregando ...
A página está carregando ...
A página está carregando ...
A página está carregando ...
A página está carregando ...
A página está carregando ...
A página está carregando ...
A página está carregando ...
A página está carregando ...
A página está carregando ...
A página está carregando ...
A página está carregando ...
A página está carregando ...
A página está carregando ...
A página está carregando ...
A página está carregando ...
A página está carregando ...
A página está carregando ...
A página está carregando ...
A página está carregando ...
A página está carregando ...
A página está carregando ...
A página está carregando ...
A página está carregando ...
A página está carregando ...
A página está carregando ...
A página está carregando ...
A página está carregando ...
A página está carregando ...
A página está carregando ...
A página está carregando ...
A página está carregando ...
-
 1
1
-
 2
2
-
 3
3
-
 4
4
-
 5
5
-
 6
6
-
 7
7
-
 8
8
-
 9
9
-
 10
10
-
 11
11
-
 12
12
-
 13
13
-
 14
14
-
 15
15
-
 16
16
-
 17
17
-
 18
18
-
 19
19
-
 20
20
-
 21
21
-
 22
22
-
 23
23
-
 24
24
-
 25
25
-
 26
26
-
 27
27
-
 28
28
-
 29
29
-
 30
30
-
 31
31
-
 32
32
-
 33
33
-
 34
34
-
 35
35
-
 36
36
-
 37
37
-
 38
38
-
 39
39
-
 40
40
-
 41
41
-
 42
42
-
 43
43
-
 44
44
-
 45
45
-
 46
46
-
 47
47
-
 48
48
-
 49
49
-
 50
50
-
 51
51
-
 52
52
-
 53
53
-
 54
54
-
 55
55
-
 56
56
-
 57
57
-
 58
58
-
 59
59
-
 60
60
-
 61
61
-
 62
62
-
 63
63
-
 64
64
-
 65
65
-
 66
66
-
 67
67
-
 68
68
-
 69
69
-
 70
70
-
 71
71
-
 72
72
-
 73
73
-
 74
74
-
 75
75
-
 76
76
-
 77
77
-
 78
78
-
 79
79
-
 80
80
-
 81
81
-
 82
82
-
 83
83
-
 84
84
-
 85
85
-
 86
86
-
 87
87
-
 88
88
-
 89
89
-
 90
90
-
 91
91
-
 92
92
-
 93
93
-
 94
94
-
 95
95
-
 96
96
-
 97
97
-
 98
98
-
 99
99
-
 100
100
-
 101
101
-
 102
102
-
 103
103
-
 104
104
-
 105
105
-
 106
106
-
 107
107
-
 108
108
-
 109
109
-
 110
110
-
 111
111
-
 112
112
-
 113
113
-
 114
114
-
 115
115
-
 116
116
-
 117
117
-
 118
118
-
 119
119
-
 120
120
-
 121
121
-
 122
122
-
 123
123
-
 124
124
-
 125
125
-
 126
126
-
 127
127
-
 128
128
-
 129
129
-
 130
130
-
 131
131
-
 132
132


DAB BOOSTER SILENT Manual do usuário
- Tipo
- Manual do usuário
- Este manual também é adequado para
em outros idiomas
- français: DAB BOOSTER SILENT Manuel utilisateur
- italiano: DAB BOOSTER SILENT Manuale utente
- slovenčina: DAB BOOSTER SILENT Používateľská príručka
Artigos relacionados
Outros documentos
-
 Guinard Dorinox 4500 K 790w Guia de usuario
-
 Guinard Xenajet 4000 K 850w Guia de usuario
-
Comet YA 130 - 150 Manual do usuário
-
AL-KO HWA 1300 F , 5000 L/h, Manual do usuário
-
-
 TALLAS D-BOOST 1100/45 115-120V/60Hz Guia de instalação
-
 Guinard EV 45 Guia de usuario
-
SAER SAER SELF-PRIMING JET M 60 Manual do usuário
-
 Agriline Diverton Guia de usuario
-
 Valex 1370624 Manual do proprietário


