
CELL-KIT
INSTALLATION GUIDE
GUÍA DE INSTALACIÓN
GUIDE D'INSTALLATION
GUIDA DI INSTALLAZIONE
GUIA DE INSTALAÇÃO
INSTALLATIONSANLEITUNG
KURULUM KILAVUZU
РУКОВОДСТВО ПО УСТАНОВКЕ
INSTRUKCJA INSTALACJI
Cellular Communication Module
for Hunter ICC2 Controllers

2
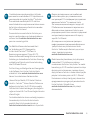
Overview
The Cellular Communication Module is used to
connect ICC2 Controllers to Hunter’s CentralusTM
Irrigation Management Platform. This 4G LTE
communication module allows for wide area
connectivity to Centralus cloud-based control
and provides an alternative to Wi-Fi and Ethernet
connections to the internet.
hunter.info/centralus2
A Hunter Centralus account is required to complete
controller setup and conguration in the soware.
Visit centralus.hunterindustries.com to set up a
free account.
ES
FR
IT
Table of Contents
2 Overview
4 Components
4 Kit Contents
7 Inner Module
10 Product Installation
10 SyncPort® Adapter Installation
12 Antenna Installation
17 Inner Module Installation
20 Cellular Conguration with the
Centralus Platform
20 How to Complete Your Setup
22 Compliance
26 Notes
El módulo de comunicación por datos móviles se utiliza
para conectar los programadores ICC2 a la plataforma
de gestión de riego CentralusTM de Hunter. Este módulo
de comunicación 4G LTE permite una conectividad de
gran alcance al control en la nube de Centralus y es una
alternativa a las conexiones a Internet mediante Wi-Fi
y Ethernet.
Se requiere una cuenta Centralus de Hunter para
completar la conguración del programador en el
soware. Visite centralus.hunterindustries.com para
crear una cuenta gratuita.
Le module de communication cellulaire est utilisé
pour connecter les programmateurs ICC2 à la
plateforme de gestion de l'arrosage CentralusTM
de Hunter. Ce module de communication 4G LTE
permet de bénécier du contrôle basé sur le cloud
de Centralus sur des surfaces étendues et constitue
une alternative aux connexions à Internet par Wi-Fi
et Ethernet.
Un compte Hunter Centralus est nécessaire pour
congurer et paramétrer le programmateur dans le
logiciel. Rendez-vous sur centralus.hunterindustries.com
pour vous créer un compte gratuit.
Il modulo di comunicazione dati viene utilizzato per
collegare i programmatori ICC2 alla piattaforma
di gestione dell'irrigazione CentralusTM di Hunter.
Questo modulo di comunicazione 4G LTE consente
la connettività a largo raggio al controllo Centralus
basato su cloud ed è un'alternativa alle connessioni
Internet Wi-Fi ed Ethernet.
Per completare l'impostazione e la congurazione del
programmatore nel soware, è necessario un account
Hunter Centralus. Visitare centralus.hunterindustries.com
per congurare un account gratuito.

3
hunterindustries.com
DE
TR
RU
PT
PL
Overview
Das Mobilfunk-Kommunikationsmodul dient
zur Verbindung von ICC2-Steuergeräten
mit der Hunter CentralusTM-Plattform für
Bewässerungsmanagement. Dieses 4G-LTE-
Kommunikationsmodul ermöglicht eine weiträumige
Anbindung an die cloudbasierte Centralus-Steuerung
und bietet eine Alternative zur Internetverbindung
über WLAN oder Ethernet.
Zur Einrichtung und Konguration von Steuergeräten
in der Soware ist ein Hunter-Centralus-Konto
erforderlich. Unter centralus.hunterindustries.com
können Sie ein kostenloses Konto einrichten.
O módulo de comunicação por celular é utilizado
para conectar os controladores ICC2 à plataforma de
gerenciamento de irrigação CentralusTM da Hunter.
Esse módulo de comunicação 4G LTE viabiliza a
conectividade de área ampla com o controle na nuvem
do Centralus e oferece uma alternativa às conexões
Wi-Fi e Ethernet à internet.
É necessário ter uma conta Hunter Centralus para
concluir a conguração e o ajuste do controlador no
soware. Acesse centralus.hunterindustries.com
para criar uma conta gratuita.
Модуль для подключения к сети мобильной
связи используется для установления связи
контроллеров ICC2 с платформой для управления
орошением CentralusTM от компании Hunter.
Этот коммуникационный модуль стандарта 4G
LTE обеспечивает возможность подключения к
облачной системе управления Centralus через
распределенную сеть связи и является прекрасной
альтернативой для подключения к Интернету
через Wi-Fi и Ethernet.
Для завершения настройки контроллера и
конфигурирования программного обеспечения
требуется наличие учетной записи Hunter
Centralus. Чтобы создать бесплатную учетную
запись, перейдите по ссылке
centralus.hunterindustries.com.
Moduł komunikacji komórkowej służy do łączenia
sterowników ICC2 z platformą zarządzania
nawadnianiem CentralusTM rmy Hunter. Ten moduł
komunikacyjny 4G LTE umożliwia łączność na dużym
obszarze wraz ze sterowaniem z poziomu chmury
dzięki platformie Centralus i stanowi alternatywę dla
połączeń z internetem przez sieć Wi-Fi i Ethernet.
Do ukończenia instalacji i konguracji sterownika w
oprogramowaniu wymagane jest posiadanie konta
Hunter Centralus. Odwiedź stronę
centralus.hunterindustries.com, aby założyć
darmowe konto.
Hücresel İletişim Modülü, ICC2 Kontrol Cihazlarını
Hunter'ın CentralusTM Sulama Yönetim Platformuna
bağlamak için kullanılır. Bu 4G LTE iletişim modülü,
Centralus bulut tabanlı kontrole geniş alan bağlantısı
sağlar ve internete Wi-Fi ve Ethernet bağlantılarına bir
alternatif sağlar.
Yazılımda kontrolör kurulumunu ve kongürasyonunu
tamamlamak için bir Hunter Centralus hesabı
gereklidir. Ücretsiz bir hesap oluşturmak için
centralus.hunterindustries.com adresini ziyaret edin.

4
⑤
⑥
⑧
➊
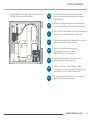
Kit Contents
The Cellular Communication Module includes all
necessary hardware for plastic, metal, and pedestal
ICC2 Controller installations.
1. SyncPort Adapter
2. Inner Module (SIM card included for activation in
North America)
3. Inner Module Mounting Bracket for Plastic
ICC2 Cabinets
4. Shank Nut
5. Inner Module Mounting Bracket for Metal ICC2
Cabinets
6. Screws (M2.6 x 12 mm; qty. 2)
7. External Antenna Adapter for Metal ICC2 Cabinets
8. Antenna Housing
Components
ES
8 1 3 6 4 7 25
ITEMS NOT SHOWN
PACKAGING
1.
LITERATURE
2.
POSSIBLE ADDITIONS
GASKET FOR ANTENNA HOUSING
1.
ZIP TIES TO SECURE THE INNER MODULE
2.
CABLE TO THE CONTROLLER CHASSIS
1
R&D
RELEASED FOR CM EVALUATION
TEV
6/9/2021
REV
ECO REVISION DESCRIPTION
DRFT
DATE
ITEM NO.
PART NUMBER
DESCRIPTION
QTY.
1 10028900
Assy, Inner module, ICC2 Cell-Kit
1
2 10029000
Assy, Antenna housing, ICC2 Cell-Kit
1
3 10029200
Assy, Bracket, For plastic, Inner module, ICC2 Cell-Kit
1
4 10029600
Assy, Bracket, For metal, Inner Module, ICC2 Cell-Kit
1
5 10028500
Adapter, External antenna, ICC2 Cell-kit
1
6 855300
NUT, SHANK, CUSTOM THREAD, NYLON
1
7 671915
SCREW, M2.6, SELF THREADING, 12 MM
2
8 817800
Assy, SYNC Port
1
ICC2 Cell-Kit
MATERIAL:
PRODUCT:
DRAWN
BY:
6/9/2021
SIZE:
B
THIRD ANGLE PROJ.
.XX = ±.01
.XXX = ±.005
.XXXX = ±.0005
SHEET 1 OF 1
Hunter Industries
Engineering
1940 Diamond St.
San Marcos, CA 92078
±1°
ANGLES:
1
CELL-KIT
TEV
Assy, Top Level SKU, Cell-Kit
2:3
DO NOT SCALE DRAWING
ALL DIMENSIONS ARE IN INCHES
SURFACE FINISH:
UNLESS OTHERWISE SPECIFIED:
PRINT
DATE:
REV.
DRAWING NO.
SCALE:
Material
Spec:
Color:
TITLE:
REL.
DATE:
DIMENSIONAL
TOLERANCES:
CONFIDENTIAL AND PROPRIETARY
THIS DRAWING/DOCUMENT CONTAINS TRADE SECRET INFORMATION OF HUNTER INDUSTRIES, INC. USE, PUBLICATION, AND/OR
DISCLOSURE OF THIS INFORMATION TO THIRD PARTIES ARE ALL PROHIBITED EXCEPT AS EXPRESSLY AUTHORIZED IN ADVANCE BY HUNTER.
NO PATENT LICENSE IS GRANTED TO ANY INVENTIONS DESCRIBED AND/OR ILLUSTRATED HEREIN. ©COPYRIGHT HUNTER INDUSTRIES, INC.
B1 FORMAT REVISION 1 / 11 / 2018
DENOTES CRITICAL INSPECTION POINTS
DENOTES FUNCTIONALLY CRITICAL POINTS
➍
②➌
⑦
Contenido del kit
El módulo de comunicación de datos móviles incluye
todo el hardware necesario para instalaciones de los
programadores ICC2 de plástico, metal y pedestal.
1. Adaptador SyncPort
2. Módulo interno (tarjeta SIM incluida para activación
en Norteamérica)
3. Soporte de montaje del módulo interno para
armarios de plástico de ICC2
4. Tuerca de espiga
5. Soporte de montaje del módulo interno para
armarios metálicos de ICC2
6. Tornillos (M2,6 x 12 mm; uds. 2)
7. Adaptador de antena externa para armarios
metálicos de ICC2s
8. Carcasa de la antena

5
hunterindustries.com
DE
FR
IT
PT
Components
Contenu du kit
Le module de communication cellulaire comprend
tout le matériel nécessaire pour installer le
programmateur ICC2, que ce soit dans un boîtier en
plastique, en métal ou sur socle.
1. Adaptateur SyncPort
2. Module interne (carte SIM incluse pour l'activation
en Amérique du Nord)
3. Support de xation du module interne pour les
boîtiers ICC2 en plastique
4. Écrou de tige
5. Support de xation du module interne pour les
boîtiers ICC2 en métal
6. Vis (M2.6 x 12mm ; qté 2)
7. Adaptateur d'antenne externe pour les boîtiers
ICC2 en métal
8. Boîtier de l'antenne
Contenuto del kit
Il modulo di comunicazione dati include tutte le
dotazioni necessarie per l'installazione
con i programmatori ICC2 in plastica e metallo
e su piedistallo.
1. Adattatore SyncPort
2. Modulo interno (include la scheda SIM per
l'attivazione in Nord America)
3. Staa di montaggio del modulo interno per
armadietti ICC2 in plastica
4. Dado a codolo
5. Staa di montaggio del modulo interno per
armadietti ICC2 in metallo
6. Viti (M2,6 x 12 mm; quantità 2)
7. Adattatore per antenna esterna per armadietti
ICC2 in metallo
8. Alloggiamento dell'antenna
Conteúdo do kit
O módulo de comunicação por celular inclui todo
os equipamentos necessários para instalações do
controlador ICC2 de plástico, metal e pedestal.
1. Adaptador SyncPort
2. Módulo interno (cartão SIM incluído para ativação
na América do Norte)
3. Suporte para montagem do módulo interno dos
gabinetes ICC2 de plástico
4. Porca de haste
5. Suporte para montagem do módulo interno dos
gabinetes ICC2 de meta
6. Parafusos (M2,6 x 12mm; quant. 2)
7. Adaptador de antena externa para gabinetes ICC2
de metal
8. Alojamento da antena
Lieferumfang
Das Mobilfunk-Kommunikationsmodul enthält alle
erforderlichen Hardware-Komponenten für die
Installation in ICC2-Steuergeräten aller Ausführungen.
1. SyncPort Adapter
2. Modul (SIM-Karte zur Aktivierung in Nordamerika
enthalten)
3. Modul-Halterung für ICC2-Gehäuse aus Kunststo
4. Schamutter
5. Modul-Halterung für ICC2-Gehäuse aus Metall
6. Schrauben (M2,6 x 12mm; 2Stück)
7. Adapter für externe Antenne für ICC2-Gehäuse
aus Metall
8. Antennengehäuse

6
Kit İçeriği
Hücresel İletişim Modülü, plastik, metal ve ayaklı ICC2
Denetleyici kurulumları için gerekli tüm donanımı içerir.
1. SyncPort Adaptörü
2. İç Modül (Kuzey Amerika'da aktivasyon için
SIM kart dahildir)
3. Plastik ICC2 Kabinetler için İç Modül Montaj Braketi
4. Şa Somunu
5. Metal ICC2 Kabinetler için İç Modül Montaj Braketi2
6. Vidalar (M2,6 x 12 mm; adet. 2)
7. Metal ICC2 Kabinler için Harici Anten Adaptörü
8. Anten Muhafazasıy
TR
RU
PL
Components
Состав комплекта
В состав комплекта коммуникационного
модуля для подключения к сети мобильной
связи входят все необходимые компоненты для
установки контроллеров ICC2 в пластиковом или
металлическом корпусе, а также на стойке.
1. Адаптер SyncPort
2. Внутренний модуль (для активации на
территории Северной Америки требуется
SIM-карта)
3. Кронштейн для крепления внутреннего модуля
в пластиковом корпусе ICC2
4. Гайка с фланцем
5. Кронштейн для крепления внутреннего модуля
в металлическом корпусе ICC2
6. Винты (M2,6 x 12 мм; кол-во: 2)
7. Адаптер внешней антенны для металлического
корпуса ICC2
8. Корпус антенны
Zawartość zestawu
Moduł komunikacji komórkowej zawiera cały
niezbędny sprzęt do instalacji sterownika ICC2
wraz ze wspornikiem plastikowym, metalowym
i postumentem.
1. Adapter SyncPort
2. Moduł wewnętrzny (z dołączoną kartą SIM do
aktywacji w Ameryce Północnej)
3. Wspornik montażowy modułu wewnętrznego do
obudowy sterownika ICC2 z tworzywa sztucznego
4. Nakrętka mocująca
5. Wspornik montażowy modułu wewnętrznego do
metalowej obudowy sterownika ICC2
6. Śruby (M2,6 × 12 mm; 2 szt.)
7. Adapter anteny zewnętrznej do metalowej
obudowy sterownika ICC2
8. Obudowa anteny

7
hunterindustries.com
➊
②
➌➍
⑤
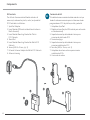
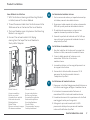
Components
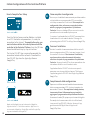
Inner Module
The Inner Module is the main component of the
Cellular Communication Module Kit. It is powered
by the host ICC2 Controller and is installed securely
inside the controller enclosure. The magnetic
mounting bracket allows for quick installation and
removal. The Inner Module connects to an exterior-
mounted cellular antenna via SMA connection.
It also houses the SIM card required for data
activation and provides two screw terminals for a
ow sensor input.
Network Cable
Flow Sensor Input
Status LEDs
(Bluetooth,
Cellular, Cloud)
Bluetooth®
Pairing Button
SIM Card
Receptacle
The Bluetooth® word mark and logos are registered trademarks
owned by Bluetooth SIG Inc. and any use of such marks by Hunter
Industries is under license.

8
ES
FR
IT
PT
Components
Módulo interno
El módulo interno es el componente principal del
kit del módulo de comunicación por datos móviles.
Está alimentado por el programador ICC2 "host" y
está instalado de forma segura dentro del armario
del programador. El soporte de montaje magnético
permite una instalación y extracción rápidas. El
módulo interno se conecta a una antena de telefonía
móvil montada en el exterior mediante una conexión
SMA. También alberga la tarjeta SIM necesaria para la
activación de datos y proporciona dos terminales de
tornillo para una entrada de sensor de caudal.
1. Cable de red
2. Entrada para el sensor de caudal
3. Pilotos LED de estado (Bluetooth, datos
móviles, nube)
4. Bluetooth® Botón de emparejamiento
5. Receptáculo para la tarjeta SIM
Module interne
Le module interne est le composant principal du
kit de module de communication cellulaire. Il est
alimenté par le programmateur ICC2 hôte et installé
à l'abri à l'intérieur du boîtier du programmateur.
Le support de xation magnétique permet de
l'installer et de le retirer rapidement. Le module
interne se connecte à une antenne cellulaire montée
à l'extérieur via une connexion SMA. Il abrite
également la carte SIM nécessaire à l'activation des
données et comporte deux bornes à vis permettant
de le relier à un capteur de débit.
1. Câble réseau
2. Entrée du capteur de débit
3. Voyants LED d'état (Bluetooth, cellulaire, cloud)
4. Bluetooth® Bouton d'appairage
5. Logement de carte SIM
Modulo interno
Il modulo interno è il componente principale del kit
del modulo di comunicazione dati. È alimentato dal
programmatore ICC2 host ed è installato in modo
sicuro nell'alloggiamento del programmatore.
La staa di montaggio magnetica consente
un'installazione e una rimozione rapide. Il modulo
interno si collega a un'antenna per rete cellulare
montata all'esterno tramite una connessione
SMA. Inoltre, ospita la scheda SIM necessaria per
l'attivazione dei dati e dispone di due morsetti per il
collegamento di un sensore di portata.
1. Cavo di rete
2. Ingresso del sensore di portata
3. LED di stato (Bluetooth, rete cellulare, cloud)
4. Bluetooth® Pulsante di abbinamento
5. Alloggiamento per scheda SIM
Módulo interno
O módulo interno é o principal componente do kit do
módulo de comunicação por celular. É alimentado
pelo controlador ICC2 do host e é instalado de forma
segura dentro do gabinete do controlador. O suporte
magnético agiliza a instalação e a remoção. O módulo
interno conecta-se a uma antena celular, montada
no exterior, via conexão SMA. Abriga também o
cartão SIM necessário para a ativação de dados e
disponibiliza dois terminais de parafuso para uma
entrada do sensor de vazão.
1. Cabo de rede
2. Entrada do sensor de vazão
3. LEDs de status (Bluetooth, celular, nuvem)
4. Bluetooth® Botão de pareamento
5. Substituição do cartão SIM

9
hunterindustries.com
DE
TR
RU
PL
Modul
Das Modul ist die Hauptkomponente des Mobilfunk-
Kommunikationssets. Es wird vom ICC2-Steuergerät
mit Strom versorgt und ist sicher im Gehäuse dieses
Steuergeräts untergebracht. Die magnetische
Halterung ermöglicht eine schnelle Montage und
Demontage. Das Modul wird über eine SMA-Buchse mit
einer außen montierten Mobilfunkantenne verbunden.
Es enthält zudem die für die Datenaktivierung
erforderliche SIM-Karte und zwei Klemmen für den
Anschluss eines Durchusssensors.
1. Netzwerkkabel
2. Eingang für Durchusssensor
3. Status-LEDs (Bluetooth, Mobilfunk, Cloud)
4. Bluetooth®
5. Slot für SIM-Karte
Components
Внутренний модуль
Внутренний модуль является основным
компонентом комплекта коммуникационного
Moduł wewnętrzny
Moduł wewnętrzny jest głównym składnikiem
zestawu modułu komunikacji komórkowej. Jest
zasilany przez sterownik ICC2 i jest bezpiecznie
zainstalowany wewnątrz obudowy sterownika.
Magnetyczny wspornik montażowy umożliwia szybki
montaż i demontaż. Moduł wewnętrzny łączy się z
zamontowaną na zewnątrz anteną komórkową za
pomocą połączenia SMA. Zawiera również kartę SIM
wymaganą do aktywacji danych oraz dwa zaciski
śrubowe dla wejścia czujnika przepływu.
1. Kabel sieciowy
2. Wejście czujnika przepływu
3. Kontrolki stanu LED (Bluetooth, sieć komórkowa, chmura)
4. Bluetooth®Przycisk parowania
5. Gniazdo karty SIM
İç Modül
İç Modül, Hücresel İletişim Modülü Kitinin ana
bileşenidir. Ana bilgisayar ICC2 Denetleyicisi
tarafından desteklenir ve denetleyici kasasının içine
güvenli bir şekilde kurulur. Manyetik montaj braketi,
hızlı kurulum ve sökme sağlar. İç Modül, SMA
bağlantısı aracılığıyla harici olarak monte edilmiş bir
hücresel antene bağlanır. Ayrıca, veri aktivasyonu
için gerekli SIM kartı barındırır ve bir akış sensörü
girişi için iki vidalı terminal sağlar.
1. Ağ Kablosul
2. Akış Sensörü Girişi
3. Durum LED'leri (Bluetooth, Hücresel, Bulut))
4. Bluetooth® Eşleştirme Düğmesi
5. SIM Kart Yuvası
модуля для подключения к сети мобильной связи.
Модуль получает питание от контроллера ICC2
и надежно фиксируется в корпусе контроллера.
Магнитный крепежный кронштейн позволяет
быстро выполнять монтаж и демонтаж.
Внутренний модуль подключается к наружной
антенне мобильной связи через разъем SMA.
Кроме того, в модуле устанавливается SIM-карта
для активации функции передачи данных, а
также предусмотрены две клеммы с винтовым
креплением для подключения датчика расхода.
1. Сетевой кабель
2. Вход датчика расхода
3. Светодиодные индикаторы состояния
4. (Bluetooth, мобильная связь, облачное ПО)
5. Bluetooth® Кнопка сопряжения
6. Разъем для SIM-карты

10
Product Installation
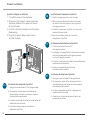
SyncPort Adapter Installation
1. Turn o AC power to the controller.
2. Disconnect the facepack ribbon cable from
the Power Module in the upper le corner
of the controller.
3. Install the SyncPort Adapter onto the Power
Module plug.
4. Plug the facepack ribbon cable into the
SyncPort Adapter.
ES
FR
IT
Instalación del adaptador SyncPort
1. Apague la alimentación AC del programador.
2. Desconecte el cable plano del módulo de
alimentación situado en la esquina superior
izquierda del programador.
3. Instale el adaptador SyncPort en el conector del
módulo de alimentación.
4. Enchufe el cable plano de la carátula al
adaptador SyncPort.
Installation de l'adaptateur SyncPort
1. Mettez le programmateur hors tension.
2. Débranchez le câble ruban reliant la façade
au module d'alimentation en haut à gauche
du programmateur.
3. Installez l'adaptateur SyncPort sur la prise du
module d'alimentation.
4. Branchez le câble ruban de la façade à
l'adaptateur SyncPort.
Installazione dell'adattatore SyncPort
1. Disattivare l'alimentazione CA
del programmatore.
2. Scollegare il cavo piatto del frontalino dal modulo
di alimentazione posto nell'angolo superiore
sinistro del programmatore.
3. Installare l'adattatore SyncPort nel connettore del
modulo di alimentazione.
4. Inserire il cavo piatto del frontalino
nell'adattatore SyncPort.
PT Instalação do adaptador SyncPort
1. Desligue a alimentação CA do controlador.
2. Desconecte a cinta de os do painel frontal
do módulo de alimentação, no canto superior
esquerdo do controlador.
3. Instale o adaptador SyncPort no plugue do
módulo de alimentação.
4. Conecte a cinta de os do painel frontal ao
adaptador SyncPort.
Product Installation

11
hunterindustries.com
Product Installation Product Installation
DE
TR
RU
PL
Installation des SyncPort Adapters
1. Trennen Sie das Steuergerät vom Netz.
2. Entfernen Sie das Flachbandkabel der Bedienfront
vom Anschlussmodul in der oberen linken Ecke
des Steuergeräts.
3. Stecken Sie den SyncPort Adapter in den Steckplatz
des Anschlussmoduls.
4. Stecken Sie das Flachbandkabel der Bedienfront in
den SyncPort Adapter ein.
Установка адаптера SyncPort
1. Отключите контроллер от источника
питания переменного тока.
2. Отсоедините шлейф панели управления
от модуля питания в верхнем левом
углу контроллера.
3. Установите адаптер SyncPort в разъем
модуля питания.
4. Подсоедините шлейф к адаптеру SyncPort.
Instalacja adaptera SyncPort
1. Wyłącz zasilanie sterownika.
2. Odłącz kabel taśmowy interfejsu od modułu
zasilania w lewym górnym rogu sterownika.
3. Zainstaluj adapter SyncPort na wtyczce
modułu zasilania.
4. Podłącz kabel taśmowy interfejsu do
adaptera SyncPort.
SyncPort Adaptör Kurulumu
1. Denetleyiciye giden AC gücünü kapatın.
2. Yüz paketi şerit kablosunu denetleyicinin sol üst
köşesindeki Güç Modülünden çıkarın.
3. SyncPort Adaptörünü Güç Modülü şine takın.
4. Ön yüz şerit kablosunu SyncPort Adaptörüne takın.

12
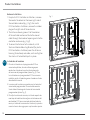
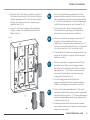
Antenna Installation
1. For plastic ICC2 Controller installations, remove
the conduit knockout on the lower right side of
the controller cabinet (e.g., Fig.1). For metal
ICC2 Controller installations, remove the rubber
plug on the right side of the enclosure.
2. The Antenna Housing mounts to the exterior
of the controller enclosure. Route the coaxial
cable through the knockout opening and into the
controller enclosure (e.g., Fig.1).
3. To secure the Antenna to the cabinet, install
the Inner Module Mounting Bracket (for plastic
ICC2 Controller installations) over the Antenna
Housing thread body and cable, and hand tighten
the shank nut to hold both parts in place.
Product Installation
Fig. 1
ES Instalación de la antena
1. Para la instalación en el programador ICC2 en
armario de plástico, abra el oricio ciego para
conductos situado en la parte inferior derecha
del armario del programador (véase Fig. 1). Para
la instalación en el programador ICC2 en armario
metálico, quite el tapón de goma situado en el lado
derecho del armario.
2. La carcasa de la antena se monta en el exterior del
armario del programador. Pase el cable coaxial a
través del oricio ciego al interior del armario del
programador (véase Fig. 1).
3. Para jar la antena al armario, instale el soporte de
montaje del módulo interno (para instalaciones del
controlador ICC2 con armario de plástico) sobre la
rosca y el cable de la carcasa de la antena y apriete a
mano la tuerca de espiga para sujetar ambas piezas.

13
hunterindustries.com
FR
IT
PT
Product Installation
Installation de l'antenne
1. Pour les installations de programmateurs ICC2
en plastique, ouvrez l'ouverture défonçable
située dans le coin inférieur droit du boîtier du
programmateur (voir g.1). Pour les installations de
programmateurs ICC2 en métal, retirez le bouchon
en caoutchouc situé sur le côté droit du boîtier.
2. Le boîtier de l'antenne se xe sur l'extérieur du
boîtier du programmateur. Faites passer le câble
coaxial à travers l'ouverture défonçable et dans le
boîtier du programmateur (voir g.1).
3. Pour xer l'antenne sur le boîtier, installez le
support de xation pour module interne (pour les
installations de programmateurs ICC2 en plastique)
par dessus le letage et le câble du boîtier de
l'antenne et serrez l'écrou à la main pour bien xer
les deux parties.
Installazione dell'antenna
1. Per le installazioni nei programmatori ICC2 con
armadietto in plastica, rimuovere la chiusura
del foro della canalina sul lato inferiore destro
dell'armadietto (vedere Fig. 1). Per le installazioni
con armadietto in metallo, rimuovere il tappo di
gomma sul lato destro dell'involucro.
2. L'alloggiamento dell'antenna viene montato
all'esterno dell'involucro del programmatore.
Instradare il cavo coassiale attraverso il foro
predisposto nell'involucro del programmatore
(vedere Fig. 1).
3. Per ssare l'antenna all'armadietto, installare la staa
di montaggio del modulo interno (per le installazioni
nei programmatori ICC2 con armadietto in plastica)
sopra il corpo lettato e il cavo dell'alloggiamento
dell'antenna e serrare a mano il dado a codolo per
tenere entrambe le parti in posizione.
DE
Instalação da antena
1. Para instalações plásticas do controlador ICC2,
libere as furações de conduíte no lado inferior
direito do gabinete do controlador (por exemplo,
g. 1). Para instalações de metal dos controladores
ICC2, remova o plugue de borracha no lado direito
do gabinete.
2. O alojamento da antena é montado na parte
externa do gabinete do controlador. Passe o cabo
coaxial através furação e pelo compartimento do
controlador (por exemplo, g. 1).
3. Para prender a antena ao gabinete, instale o
suporte do módulo interno (para instalações
plásticas do controlador ICC2) sobre o corpo e o
cabo da rosca do alojamento da antena e aperte
manualmente a porca de haste para prender as
duas peças no lugar.
Installation der Antenne
1. Bei ICC2-Steuergeräten mit Kunststogehäuse
brechen Sie die vorgestanzte Durchführung an
der unteren rechten Seite des Gehäuses aus (Abb.
1). Bei ICC2-Steuergeräten mit Metallgehäuse
entfernen Sie den Gummistopfen an der rechten
Seite des Gehäuses.
2. Das Antennengehäuse wird an der Außenseite
des Steuergerätes montiert. Führen Sie das
Koaxialkabel durch die Durchführung in das
Gehäuse des Steuergeräts (Abb. 1).
3. Um bei ICC2-Steuergeräten mit Kunststogehäuse
die Antenne am Gehäuse zu befestigen, schieben
Sie die Modul-Halterung über die Gewindehülse
des Antennengehäuses mit dem Kabel und ziehen
die Schamutter von Hand fest, um beide Teile in
Position zu halten.

14
TR
RU
PL
Product Installation
Установка антенны
1. Для установки в контроллере ICC2 в
пластиковом корпусе удалите выбивное
отверстие для кабелепровода в правой нижней
части корпуса контроллера (см. рис. 1). Для
установки в контроллере ICC2 в металлическом
корпусе удалите резиновую заглушку с правой
стороны корпуса.
2. Корпус антенны крепится снаружи к корпусу
контроллера. Протяните коаксиальный
кабель сквозь выбивное отверстие в корпус
контроллера (см. рис. 1).
3. Чтобы прикрепить антенну к корпусу,
установите кронштейн для крепления
внутреннего модуля (для установки в
контроллерах ICC2 с пластиковым корпусом)
на резьбовой выступ на корпусе антенны с
кабелем, а затем затяните от руки гайку с
фланцем для фиксации обеих деталей.
Instalacja anteny
1. W przypadku instalacji sterownika ICC2 z tworzywa
sztucznego należy usunąć przepust kablowy w
prawym dolnym rogu szai sterownika (np. rys.
1). W przypadku instalacji metalowego sterownika
ICC2 należy usunąć gumową zatyczkę po prawej
stronie obudowy.
2. Obudowa anteny jest montowana na zewnątrz
obudowy sterownika. Poprowadź kabel
koncentryczny przez wybity otwór do obudowy
sterownika (Rys. 1).
3. Aby przymocować antenę do szai, zainstaluj
wspornik montażowy modułu wewnętrznego
(w przypadku instalacji sterownika ICC2 z
tworzywa sztucznego) na gwintowanej
obudowie anteny i kablu, a następnie dokręć
ręcznie nakrętkę mocującą.
Anten Kurulumu
1. Plastik ICC2 Denetleyici kurulumları için,
denetleyici kabininin sağ alt tarafındaki kanal
çıkıntısını çıkarın (örn., Şekil 1). Metal ICC2
Denetleyici kurulumları için, muhafazanın sağ
tarafındaki lastik tapayı çıkarın.
2. Anten Muhafazası, denetleyici muhafazasının dışına
monte edilir. Koaksiyel kabloyu itme açıklığından
kontrolör kasasına (örn., Şekil 1) yönlendirin.
3. Anteni kabine sabitlemek için, İç Modül Montaj
Braketini (plastik ICC2 Denetleyici kurulumları için)
Anten Muhafazası dişli gövdesi ve kablosu üzerine
takın ve her iki parçayı da yerinde tutmak için gövde
somununu elle sıkın.

15
hunterindustries.com
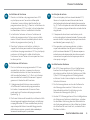
4. For metal ICC2 Controller installations, combine
the Antenna Housing with the External Antenna
Adapter (component #7). Feed the coaxial cable
through the Adapter and screw the housings
together (see Fig. 2).
5. Secure the Antenna Housing to the Controller
using the shank nut and Mounting Bracket for
Metal Cabinets.
ES
FR
IT
PT
Product Installation
Fig. 2
4. Para la instalación de programadores ICC2 en
armario metálico, combine la carcasa de antena
con el adaptador de antena externa (componente
n.º 7). Pase el cable coaxial a través del adaptador
y atornille ambas carcasas juntas (véase Fig. 2).
5. Fije la carcasa de la antena al programador
utilizando la tuerca de espiga y el soporte de
montaje en el caso de armarios metálicos.
4. Pour les installations de programmateurs ICC2
en métal, utilisez le boîtier d'antenne avec
l'adaptateur d'antenne externe (composant n°7).
Faites passer le câble coaxial à travers l'adaptateur
et vissez les boîtiers l'un à l'autre (voir g.2).
5. Fixez le boîtier de l'antenne au programmateur au
moyen de l'écrou et du support de xation pour
boîtiers en métal.
4. Per le installazioni nei programmatori ICC2 con
armadietto in metallo, unire l'alloggiamento
dell'antenna all'adattatore dell'antenna esterna
(componente n. 7). Instradare il cavo coassiale
attraverso l'adattatore e avvitare insieme gli
alloggiamenti (vedere Fig. 2).
5. Fissare l'alloggiamento dell'antenna al
programmatore utilizzando il dado a codolo e la
staa di montaggio per armadietti in metallo.
4. Para a instalação do controlador ICC2 de metal,
combine o alojamento da antena com o adaptador
de antena externa (pela n.º 7). Passe o cabo coaxial
através do adaptador e aparafuse os alojamentos
unindo-os (veja a g. 2).
5. Prenda o alojamento da antena ao controlador
com a porca de haste e o suporte para montagem
de gabinetes de metal.

16
TR
DE 4. Bei ICC2-Steuergeräten mit Metallgehäuse stecken
Sie das Antennengehäuse mit dem externen
Antennenadapter (Komponente Nr. 7) zusammen.
Führen Sie das Koaxialkabel durch den Adapter und
schrauben Sie die Gehäuse zusammen (siehe Abb. 2).
5. Befestigen Sie das Antennengehäuse mit
der Schamutter und Modul-Halterung für
Metallgehäuse am Steuergerät.
RU
PL
4. Для установки в контроллере ICC2 в
металлическом корпусе присоедините к
корпусу антенны адаптер внешней антенны
(компонент № 7). Протяните коаксиальный
кабель сквозь адаптер и с помощью винтов
соедините оба корпуса (см. рис. 2).
5. Прикрепите корпус антенны к контроллеру
с помощью гайки с фланцем и крепежного
кронштейна для металлических корпусов.
4. W przypadku instalacji metalowego sterownika
ICC2 należy połączyć obudowę anteny z
zewnętrznym adapterem anteny (element nr 7).
Przeprowadź kabel koncentryczny przez adapter i
skręć ze sobą obudowy (patrz rys. 2).
5. W przypadku obudowy metalowej zamocuj
obudowę anteny do sterownika za pomocą nakrętki
mocującej i wspornika montażowego.
4. Metal ICC2 Denetleyici kurulumları için, Anten
Muhafazasını Harici Anten Adaptörü (parça #7) ile
birleştirin. Koaksiyel kabloyu Adaptörden geçirin ve
muhafazaları birbirine vidalayın (bkz. Şekil 2).
5. Metal Kabinler için gövde somunu ve Montaj
Braketini kullanarak Anten Muhafazasını
Kontrolöre sabitleyin.

17
hunterindustries.com
Inner Module Installation
1. With the Antenna Housing and Mounting Bracket
installed, connect the Inner Module.
2. Thread the coaxial cable from the Antenna onto the
SMA connector on the back of the Inner Module.
3. The Inner Module snaps into place on the Mounting
Brackets via magnets.
4. Connect the network cable Cat 5/6 plug
coming from the top of the Inner Module to
the SyncPort Adapter.
ES
FR
IT
63.85
Metal Cabinet
Armario metálico
Boîtier en métal
Armadietto in metallo
Gabinete de metal
Metallgehäuse
Metal Dolap
Металлический корпус
Obudowa metalowa
Plastic Cabinet
Armario de plástico
Boîtier en plastique
Armadietto in plastica
Gabinete de plástico
Kunststogehäuse
Plastik Dolap
Пластиковый корпус
Szaa plastikowa
Product Installation
Instalación del módulo interno
1. Con la carcasa de antena y el soporte de montaje
instalados, conecte el módulo interno.
2. Enrosque el cable coaxial de la antena al conector
SMA de la parte posterior del módulo interno.
3. El módulo interno encaja en su lugar en los
soportes de montaje mediante imanes.
4. Conecte la pestaña del cable de red Cat 5/6 que
viene de la parte superior del módulo interno al
adaptador SyncPort.
Installation du module interne
1. Une fois le boîtier de l'antenne et le support de
xation installés, connectez le module interne.
2. Vissez le câble coaxial de l'antenne sur le
connecteur SMA situé à l'arrière du
module interne.
3. Le module intérieur se xe magnétiquement sur
les supports de xation.
4. Connectez la che du câble réseau cat.5/6
provenant du haut du module interne à
l'adaptateur SyncPort.
Installazione del modulo interno
1. Dopo aver installato l'alloggiamento dell'antenna e
la staa di montaggio, collegare il modulo interno.
2. Instradare il cavo coassiale dall'antenna al
connettore SMA sul retro del modulo interno.
3. Il modulo interno scatta in posizione sulle stae di
montaggio tramite punti magnetici.
4. Collegare la spina del cavo di rete Cat 5/6
proveniente dalla parte superiore del modulo
interno all'adattatore SyncPort.

18
PT
DE
TR
Instalação do módulo interno
1. Com o alojamento da antena e o suporte instalados,
conecte o módulo interno.
2. Passe o cabo coaxial da antena pelo conector SMA
na parte traseira do módulo interno.
3. O módulo interno se encaixa nos suportes por
meio de ímãs.
4. Conecte o conector do cabo de rede Cat 5/6
vindo da parte superior do módulo interno ao
adaptador SyncPort.
Installation des Moduls
1. Wenn Sie Antennengehäuse und Halterung
installiert haben, schließen Sie das Modul an.
2. Führen Sie das Koaxialkabel von der Antenne zur
SMA-Buchse auf der Rückseite des Moduls.
3. Das Modul rastet über Magnete in der Halterung ein.
4. Verbinden Sie das Netzwerkkabels Cat 5/6 des
Moduls mit dem SyncPort Adapter.
RU
PL
Установка внутреннего модуля
1. После установки корпуса антенны и крепежного
кронштейна подсоедините внутренний модуль.
2. Подсоедините коаксиальный кабель антенны к
резьбовому разъему SMA на обратной стороне
внутреннего модуля.
3. Внутренний модуль фиксируется на монтажных
кронштейнах с помощью магнитов.
4. Подсоедините штекер сетевого кабеля Cat 5/6,
выходящего из верхней части внутреннего
модуля, к адаптеру SyncPort.
Instalacja modułu wewnętrznego
1. Po zainstalowaniu obudowy anteny i wspornika
montażowego podłącz moduł wewnętrzny.
2. Przeciągnij kabel koncentryczny z anteny do złącza
SMA z tyłu modułu wewnętrznego.
3. Moduł wewnętrzny zatrzaskuje się na wspornikach
montażowych za pomocą magnesów.
4. Podłącz wtyczkę kabla sieciowego Cat 5/6
wychodzącą z górnej części modułu wewnętrznego
do adaptera SyncPort.
İç Modül Kurulumu
1. Anten Muhafazası ve Montaj Braketi takılıyken, İç
Modülü bağlayın.
2. Antenden gelen koaksiyel kabloyu İç Modülün
arkasındaki SMA konektörüne geçirin.
3. İç Modül, mıknatıslar aracılığıyla Montaj Braketleri
üzerindeki yerine oturur.
4. İç Modülün üstünden gelen ağ kablosu Cat 5/6 şini
SyncPort Adaptörüne bağlayın.

19
hunterindustries.com
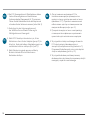
5. Restore power to the controller to initialize the
Cellular Communication Module.
Product Installation
ES 5. Restablezca la alimentación al programador
para inicializar el módulo de comunicación por
datos móviles.
FR 5. Remettez le programmateur sous tension pour
initialiser le module de communication cellulaire.
IT 5. Ripristinare l'alimentazione del programmatore per
inizializzare il modulo di comunicazione dati.
PT 5. Restaure a energia do controlador para inicializar o
módulo de comunicação por celular.
DE 5. Stellen Sie die Stromversorgung des
Steuergerätes wieder her, um das
Mobilfunkmodul zu initialisieren.
5. Подайте питание на контроллер, чтобы
активировать коммуникационный модуль для
подключения к сети мобильной связи.
RU
PL 5. Przywróć zasilanie sterownika, aby zainicjować
moduł komunikacji komórkowej.
TR 5. Hücresel İletişim Modülünü başlatmak için
kontrol cihazına yeniden güç verin.

20
Apple and the Apple logo are trademarks of Apple Inc.,
registered in the U.S. and other countries. App Store is a
service mark of Apple Inc. Google Play and the Google Play
logo are trademarks of Google LLC.
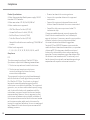
How to Complete Your Setup
hunter.info/cellkit
Once the Cellular Communication Module is installed
in an ICC2 Controller and powered on, it is ready for
connection to the internet. To complete the setup, you
must activate a cellular data subscription and add the
controller to the Centralus Platform. Scan the QR Code
above for additional step-by-step instructions.
The Hunter CELLKIT App is required to complete the
connection to local cellular networks. Download the
free CELLKIT App from the Apple App Store or
Google Play.
ES
FR
IT
Cellular Conguration with the Centralus Platform
Cómo completar la conguración
Una vez que el módulo de comunicación por datos móviles
está instalado en un programador ICC2 y encendido,
está listo para conectarse a Internet. Para completar la
conguración, debe activar una suscripción de datos
móviles y agregar el programador a la plataforma
Centralus. Escanee el código QR que se muestra arriba
para obtener más instrucciones paso a paso.
Se requiere la aplicación Hunter CELLKIT para completar
la conexión a las redes móviles locales. Descargue la
aplicación gratuita CELLKIT de la App Store o Google Play.
Terminer l'installation
Une fois le module de communication cellulaire installé
dans un programmateur ICC2 et mis sous tension, il peut
être connecté à Internet. Pour terminer l'installation,
vous devez activer votre abonnement de données
cellulaires et ajouter le programmateur à la plateforme
Centralus. Scannez le code QR ci-dessus pour obtenir des
instructions détaillées sur la marche à suivre.
L'application Hunter CELLKIT est nécessaire pour la
connexion aux réseaux cellulaires locaux. Téléchargez
l'application gratuite CELLKIT dans l'Apple App Store ou
Google Play.
Completamento della congurazione
Dopo aver installato e acceso il modulo di comunicazione
dati in un programmatore ICC2, il sistema è pronto per la
connessione a Internet. Per completare la congurazione,
è necessario attivare l'abbonamento a un piano dati e
aggiungere il programmatore alla piattaforma Centralus.
Scansionare il codice QR qui sopra per istruzioni dettagliate.
Per completare la connessione alle reti cellulari locali,
è necessaria l'app CELLKIT di Hunter. Scaricare l'app
gratuitamente dall'Apple Store di Apple o dal
Google Play Store.
hunter.info/ios
hunter.info/android
A página está carregando...
A página está carregando...
A página está carregando...
A página está carregando...
A página está carregando...
A página está carregando...
A página está carregando...
A página está carregando...
-
 1
1
-
 2
2
-
 3
3
-
 4
4
-
 5
5
-
 6
6
-
 7
7
-
 8
8
-
 9
9
-
 10
10
-
 11
11
-
 12
12
-
 13
13
-
 14
14
-
 15
15
-
 16
16
-
 17
17
-
 18
18
-
 19
19
-
 20
20
-
 21
21
-
 22
22
-
 23
23
-
 24
24
-
 25
25
-
 26
26
-
 27
27
-
 28
28


em outras línguas
- español: Hunter ICC2 Guía de instalación
- français: Hunter ICC2 Guide d'installation
- italiano: Hunter ICC2 Guida d'installazione
- Deutsch: Hunter ICC2 Installationsanleitung
- polski: Hunter ICC2 Instrukcja instalacji
- Türkçe: Hunter ICC2 Yükleme Rehberi
Artigos relacionados
Outros documentos
-
Rain Bird TBOS-BT Battery-Operated Bluetooth Controllers Manual do usuário
-
 Hach Polymetron 9526 Basic User Manual
-
Danfoss Optyma Plus CU Guia de instalação
-
NEC NP01TM Guia de instalação
-
Comelit ARCHITECTUS-PRO ViP Technical Manual
-
-
 Hach Polymentron 9500 Basic User Manual
-
ABB ACS580-04 Quick Installation Manual

