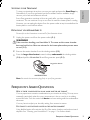
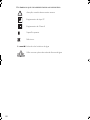
ResMed HumidAire 3i Manual do usuário
- Categoria
- Umidificadores
- Tipo
- Manual do usuário

HumidAire 3i™
User’s Manual
English • Français • Español • Português
338282 Cover.qxp 27/11/2006 9:33 AM Page 1

HumidAire 3i™
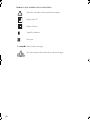
ILLUSTRATIONS
ILLUSTRATIONS
FIGURAS
ILUSTRAÇÕES
Component of 338282/3
Composant du 338282/3
Componente de 338282/3
Componente de 338282/3
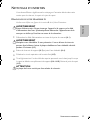
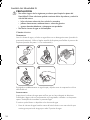
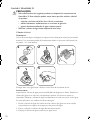
REMOVING THE FRONT CAP (IF FITTED) / RETRAIT DU CAPOT AVANT (LE CAS
ECHEANT) / PARA QUITAR LA CUBIERTA DELANTERA (SI ESTÁ INSTALADA) /
REMOÇÃO DA TAMPA DA FRENTE (NO CASO DESTA SE ENCONTRAR EM POSIÇÃO)
A
B
12
4
Control dial /
Bouton de réglage /
Escala de control /
Botão de controle
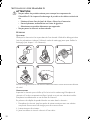
ATTACHING YOUR HUMIDAIRE 3i / FIXATION DE VOTRE HUMIDAIRE 3i / ACOPLE DEL HUMIDAIRE 3i / COMO FIXAR O SEU HUMIDAIRE 3i
D
1 4
1
2
56
Air outlet / Sortie
d'air / Salida de aire /
Saída de ar
Cover / Capot / Cubierta / Tampa
Cover seal / Joint du capot / Junta
de la cubierta / Vedação da tampa
Connector seal / Joint du
connecteur / Junta conectora /
Vedação do conector
Water chamber /
Réservoir / Cámara
de agua / Câmara
de água
Docking station /
Support / Estación
de carga / Estação de
ancoragem
Heater plate / Plaque
chauffante / Placa de
calefacción / Placa de
aquecimento
Front cap /
Capot avant /
Cubierta
delantera /
Tampa da frente
234
Latch / Languette /
Cerrojo / Trinco
3
© 2006 ResMed Ltd.
© 2006 ResMed Ltd. © 2006 ResMed Ltd.
© 2006 ResMed Ltd. © 2006 ResMed Ltd.
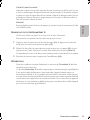
REMOVING AND STORING THE CONNECTOR PLUG / RETRAIT ET RANGEMENT DU
CACHE DU CONNECTEUR / PARA QUITAR Y GUARDAR EL ENCHUFE CONECTOR / REMOÇÃO
E ARMAZENAGEM DO TAMPÃO DO CONECTOR
C
Connector plug / Cache du connecteur /
Enchufe conector / Tampão do conector
FILLING THE WATER CHAMBER / REMPLISSAGE DU RESERVOIR / LLENADO DE LA CÁMARA DE AGUA / ENCHER A CÂMARA DE ÁGUA
E
1
2
3
(a)
(a)
338282 Illos.qxp 10/11/2006 3:43 PM Page 1

RE-ASSEMBLING YOUR HUMIDAIRE 3i / REMONTAGE DE VOTRE HUMIDAIRE 3i /
MONTAJE DEL HUMIDAIRE 3i / COMO VOLTAR A MONTAR O SEU HUMIDAIRE 3i
I
1 2
34
5
© 2006 ResMed Ltd.
6
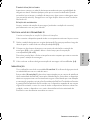
STARTING YOUR TREATMENT / DEBUT DE VOTRE TRAITEMENT / INICIO DEL TRATAMIENTO / INICIAR O TRATAMENTO
F
Right key / Touche de droite /
Tecla Derecha / Tecla Direita
Up/Down keys / Touches de déplacement vers
le haut et vers le bas / Teclas Superior/Inferior /
Teclas Para cima/Para baixo
Start/Stop key / Touche Marche/Arrêt /
Tecla de Inicio/Detención /
Tecla de Iniciar/Parar
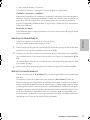
DISSASEMBLING YOUR HUMIDAIRE 3i / DEMONTAGE DE VOTRE HUMIDAIRE 3i / DESMONTAJE DEL HUMIDAIRE 3i /
COMO DESMONTAR O SEU HUMIDAIRE 3i
H
3
56
9
Control dial / Bouton de réglage /
Escala de control / Botão de controle
Indicator light / Témoin lumineux /
Luz indicadora / Indicador luminoso
1
4
Control panel / Panneau de contrôle /
Panel de control / Painel de controle
Left key / Touche de gauche /
Tecla Izquierda / Tecla Esquerda
10 min
DETACHING YOUR HUMIDAIRE 3i / RETRAIT DE VOTRE HUMIDAIRE 3i / DESACOPLAMIENTO DEL HUMIDAIRE 3i /
SEPARANDO O SEU HUMIDAIRE 3i
G
© 2006 ResMed Ltd.© 2006 ResMed Ltd.
© 2006 ResMed Ltd.
2
3
5
4
Large silver
button / Gros
bouton argenté /
Botón plateado
grande / Botão
prateado grande
UNDERSIDE VIEW / VUE DU DESSOUS /
VISTA INFERIOR / VISTA INFERIOR
Press button and pull apart /
Appuyez sur le bouton et tirez
pour détacher / Oprima el botón y
separe / Premir o botão e separar
7
8
1
10 min
2
338282 Illos.qxp 10/11/2006 3:43 PM Page 2

USER’S MANUAL 1
M
ANUAL DEL USUARIO 43
M
ANUEL UTILISATEUR 21
M
ANUAL DO UTILIZADOR 65
HUMIDAIRE 3i™
ENGLISHFRANÇAISPORTUGUÊS ESPAÑOL
338282r3.book Page 1 Friday, November 10, 2006 2:10 PM

Patents and designs pending.
HumidAire, HumidAire 3i, S8 and SmartStart are trademarks of ResMed Ltd and HumidAire is registered in U.S. Patent
and Trademark Office.
© 2006 ResMed Ltd.
ResMed Ltd (Manufacturer) 1 Elizabeth Macarthur Drive Bella Vista NSW 2153 Australia
ResMed Corp (US Designated Agent) 14040 Danielson Street Poway CA 92064-6857 USA
ResMed (UK) Ltd (EU Authorized Representative) 65 Milton Park Abingdon Oxfordshire OX14 4RX UK
ResMed Offices Australia, Austria, Brazil, Finland, France, Germany, Hong Kong, Japan, Malaysia, Netherlands,
New Zealand, Singapore, Spain, Sweden, Switzerland, UK, USA (see www.resmed.com for contact details).
338282r3.book Page 2 Friday, November 10, 2006 2:10 PM

ENGLISH
1
USER’S MANUAL
English
HumidAire 3i™
338282r3.book Page 1 Friday, November 10, 2006 2:10 PM

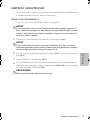
2
CONTENTS
WELCOME . . . . . . . . . . . . . . . . . . . . . . . . . . . . . . . . . . . . . . . . . . . . . . . . . . . 3
WHAT IS THE HUMIDAIRE 3i? . . . . . . . . . . . . . . . . . . . . . . . . . . . . . . . . . . . 3
Y
OUR RESPONSIBILITY 3
MEDICAL INFORMATION . . . . . . . . . . . . . . . . . . . . . . . . . . . . . . . . . . . . . . . 4
I
NTENDED USE 4
C
ONTRAINDICATIONS 4
W
ARNINGS 4
COMPONENTS OF YOUR HUMIDAIRE 3i . . . . . . . . . . . . . . . . . . . . . . . . . . 5
SETTING UP YOUR HUMIDAIRE 3i FOR USE . . . . . . . . . . . . . . . . . . . . . . . 6
R
EMOVING THE FRONT CAP (IF FITTED) 6
R
EMOVING AND STORING THE CONNECTOR PLUG 6
A
TTACHING YOUR HUMIDAIRE 3i 6
F
ILLING THE WATER CHAMBER 7
STARTING AND STOPPING TREATMENT . . . . . . . . . . . . . . . . . . . . . . . . . . . 7
S
TARTING YOUR TREATMENT 7
S
TOPPING YOUR TREATMENT 9
D
ETACHING YOUR HUMIDAIRE 3i 9
FREQUENTLY ASKED QUESTIONS . . . . . . . . . . . . . . . . . . . . . . . . . . . . . . . . 9
CLEANING AND MAINTENANCE . . . . . . . . . . . . . . . . . . . . . . . . . . . . . . . . . 10
D
ISASSEMBLING YOUR HUMIDAIRE 3i 10
C
LEANING YOUR HUMIDAIRE 3i 11
R
EASSEMBLING YOUR HUMIDAIRE 3i 12
S
ERVICING 12
TROUBLESHOOTING . . . . . . . . . . . . . . . . . . . . . . . . . . . . . . . . . . . . . . . . . . 13
TECHNICAL SPECIFICATIONS . . . . . . . . . . . . . . . . . . . . . . . . . . . . . . . . . . . 15
LIMITED WARRANTY . . . . . . . . . . . . . . . . . . . . . . . . . . . . . . . . . . . . . . . . . . 17
INDEX . . . . . . . . . . . . . . . . . . . . . . . . . . . . . . . . . . . . . . . . . . . . . . . . . . . . . . 19
338282r3.book Page 2 Friday, November 10, 2006 2:10 PM

3
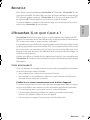
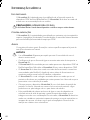
WELCOME
ENGLISH
WELCOME
Thank you for choosing the ResMed HUMIDAIRE 3i™ humidifier. The HUMIDAIRE 3i
is designed to humidify (moisten) the air delivered to your airway during CPAP
(continuous positive airway pressure) therapy. The H
UMIDAIRE 3i attaches to your
ResMed S8™ Series CPAP flow generator with a simple ‘click-in’ mechanism.
This user manual contains the information you need for the correct use of your
H
UMIDAIRE 3i.
WHAT IS THE HUMIDAIRE 3i?
The HUMIDAIRE 3i is designed to form a single unit with a ResMed CPAP flow
generator. The combined unit provides humidification during CPAP therapy, and can
make therapy more comfortable.
You may have experienced nasal congestion or dryness of the nose, mouth, or throat
during CPAP therapy. These symptoms are caused by dry climates, cold air
temperatures, the airflow delivered from your flow generator, or mouth leak. Moist air
may help relieve these symptoms of dryness.
Refer to your flow generator manual to see whether it is compatible with the
H
UMIDAIRE 3i. Contact your equipment supplier or ResMed office if you require
further information.
YOUR RESPONSIBILITY
You or the user of this system shall have sole responsibility and liability for any injury
to persons or damage to property resulting from:
• operation which is not in accordance with the operating instructions supplied
• maintenance or modifications carried out unless in accordance with authorized
instructions and by authorized persons.
Please read this manual carefully before use.
This manual contains special terms and icons that appear in the margins to draw your
attention to specific and important information.
• Warning alerts you to possible injury.
• Caution explains special measures for the safe and effective use of the device.
• Note is an informative or helpful note.
338282r3.book Page 3 Friday, November 10, 2006 2:10 PM

4
MEDICAL INFORMATION
INTENDED USE
The HUMIDAIRE 3i is indicated for humidification of the air delivered from the ResMed
S8 Series CPAP devices. The H
UMIDAIRE 3i is for use only as recommended by a
physician.
!
CAUTION (USA ONLY)
Federal law restricts this device to sale by or on the order of a physician.
CONTRAINDICATIONS
The HUMIDAIRE 3i is contraindicated for use with patients whose upper (supraglottic)
airway has been bypassed. Please also refer to the relevant system manual for
contraindications associated with CPAP therapy.
WARNINGS
The following are general warnings. Specific warnings and cautions appear next to the
relevant instructions in the manual.
!
WARNINGS
• Use the HUMIDAIRE 3i only for its intended use as described in this manual.
• Make sure that the water chamber is empty before transporting the
H
UMIDAIRE 3i.
• The HUMIDAIRE 3i is designed only for use with specific ResMed CPAP devices.
Do not use the H
UMIDAIRE 3i with any other CPAP device.
• The HUMIDAIRE 3i should only be used with delivery tubes or accessories
recommended by ResMed. Connection of other delivery tubes or accessories
could result in injury, or damage to the device.
• The HUMIDAIRE 3i, including the associated tubing, is for single-patient use and
must not be re-used on another person. This is to avoid the risk of cross-infection.
• Always place the HUMIDAIRE 3i device lower than the level of the patient. If it is
placed at or above the level of the patient, heated water may flow down the air
tubing and into the mask.
• There exists the possibility that if the device is placed above the level of the patient
and is tipped over, or if the tubing is filled with condensate, the mask might fill with
water. The H
UMIDAIRE 3i should therefore be used with caution in patients who
are unable to guard their airways, or are unable to pull the mask off, for example
following a stroke. Attention should be given to the relative risks and benefits.
• Do not attempt to dismantle the HUMIDAIRE 3i docking station. There are no
user-serviceable parts inside. Repairs and internal servicing should only be
performed by an authorized service agent.
• Take care when handling the HUMIDAIRE 3i. The heater plate and the water in the
water chamber may be hot.
338282r3.book Page 4 Friday, November 10, 2006 2:10 PM

5
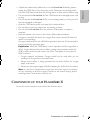
COMPONENTS OF YOUR HUMIDAIRE 3i
ENGLISH
• If liquids are inadvertently spilled into or on the HUMIDAIRE 3i docking station,
unplug the CPAP device from the power outlet. Disconnect the docking station
from the CPAP device and allow the docking station to drain and dry before using.
• Do not operate the HUMIDAIRE 3i if the CPAP device has a damaged power cord
or plug.
• Do not operate the HUMIDAIRE 3i if it is not working properly or if any part of it
has been dropped or damaged.
• Keep the CPAP device power cord away from heated surfaces.
• Do not drop or insert any object into any opening or tubes.
• Do not use the HUMIDAIRE 3i in the presence of flammable or explosive
materials.
• Explosion hazard—do not use in the vicinity of flammable anesthetics.
• If oxygen is used with this device, the oxygen flow must be turned off when the
device is not operating.
If oxygen has been left on, turn off the flow generator, then wait 30 minutes before
turning on the flow generator again.
Explanation: When the CPAP device is not in operation and the oxygen flow is
left on, oxygen delivered into the air delivery tubing may accumulate within the
CPAP machine enclosure and create a risk of fire. This applies to most types of
CPAP machines.
• Oxygen supports combustion. Oxygen should not be used while you are
smoking or in the presence of an open flame.
• Always ensure airflow is being generated by the device before the oxygen
supply is turned on.
• Always turn the oxygen supply off before stopping the airflow from the device.
Note: At a fixed rate of supplemental oxygen flow, the inhaled oxygen concentration
will vary, depending on where the oxygen is introduced, the pressure settings, patient
breathing pattern, mask selection and leak rate.
COMPONENTS OF YOUR HUMIDAIRE 3i
Please refer to the illustrations in section A of the illustration sheet.
338282r3.book Page 5 Friday, November 10, 2006 2:10 PM

6
SETTING UP YOUR HUMIDAIRE 3i FOR USE
!
WARNING
Make sure your flow generator is switched off at the power outlet before
connecting the HumidAire 3i.
REMOVING THE FRONT CAP (IF FITTED)
Please refer to the illustrations in section B of the illustration sheet.
Your flow generator may be fitted with a front cap (B-1). Before you can attach the
H
UMIDAIRE 3i, press the button underneath the front cap (B-2) and pull it away from
the body of your flow generator (B-3 & B-4).
Notes
• To replace the front cap, align it with your flow generator (B-4) and push it firmly until it
clicks into place.
• Remember to take the front cap with you when travelling, in case you need CPAP
therapy without a humidifier.
REMOVING AND STORING THE CONNECTOR PLUG
Please refer to the illustrations in section C of the illustration sheet.
Before attaching the H
UMIDAIRE 3i, remove the connector plug from your flow
generator (C-1) and attach it to the back of the docking station (C-2).
ATTACHING YOUR HUMIDAIRE 3i
Please refer to the illustrations in section D of the illustration sheet.
1 Align your HUMIDAIRE 3i with your flow generator (D-1) and push them together
until they click into place (D-2).
!
WARNING
• The HumidAire 3i docking station should only be connected or disconnected
when the water chamber is empty.
• Water must be prevented from entering your flow generator. Do not transport
the flow generator with the HumidAire 3i attached.
2
Insert the power cord into the socket at the rear of your flow generator. Plug the other
end of the power cord into a power outlet (D-3).
Note: If your flow generator is powered via the DC input, the HumidAire 3i is not powered
and humidification output will be reduced.
3
Place the combined unit on a firm, level surface near your bed at a level lower than
your sleeping position. Ensure the surface is not sensitive to heat and/or moisture, or
use a protective mat.
!
CAUTION
Be careful not to place the unit where it can be bumped into and knocked over.
338282r3.book Page 6 Friday, November 10, 2006 2:10 PM

7
STARTING AND STOPPING TREATMENT
ENGLISH
4
Connect one end of the air tubing firmly onto the air outlet of your HUMIDAIRE 3i
and the other end to your mask (D-4).
FILLING THE WATER CHAMBER
Please refer to the illustrations in section E of the illustration sheet.
!
WARNING
Take care when handling your HumidAire 3i. The water and the water chamber
base may both be hot. Allow ten minutes for the heater plate and any excess water
to cool.
1 Release the cover latch (E-1) and lift the cover until it rests in the upright position (E-2).
2
Remove the water chamber (E-3) and carefully fill it with fresh, clean water (E-4). Make
sure you keep the level of the water under the maximum water level mark (E-4a).
Always ensure that the water chamber is clean. See “Cleaning and Maintenance” on
page 10.
!
WARNING
Do not overfill the water chamber, as water may enter your flow generator and air
tubing.
!
CAUTION
Do not use any additives (eg, scented oils and perfumes). They may reduce the
humidification output of the HumidAire 3i and/or cause deterioration of the water
chamber materials.
3
Carefully place the filled water chamber into the humidifier docking station (E-5) and
latch the cover (E-6).
The H
UMIDAIRE 3i is now ready for use.
STARTING AND STOPPING TREATMENT
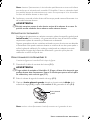
STARTING YOUR TREATMENT
Please refer to the illustration in section F of the illustration sheet.
1 When your HUMIDAIRE 3i is attached and the flow generator is powered, the
indicator light lights up on the H
UMIDAIRE 3i. A prompt for the Warm-Up feature
(not available on all models) may appear.
When activated, this feature allows the water to warm up before you start treatment.
2
If the Warm-Up feature is available, use it to pre-heat the water before starting your
treatment. Skip this step if you wish to start treatment immediately.
RAMP: 10min
menu
warmup
338282r3.book Page 7 Friday, November 10, 2006 2:10 PM

8
W
ARM-UP FEATURE (NOT AVAILABLE IN ALL MODELS)
Note: Check your flow generator user’s manual to see if this feature is available.
To start the Warm-Up feature:
i. Select Warmup by pressing the Right key on the control panel.
The following message is displayed for 2 seconds:
ii. After 2 seconds the WARMING screen is displayed.
iii. While your H
UMIDAIRE 3i is in Warm-Up mode you can:
• Start treatment at any time by pressing the Start/Stop key.
• Access the menus by pressing Menu (Left key).
• Stop the Warm-Up feature at any time by pressing Exit (Right key).
The Warm-Up feature will automatically turn off after 30 minutes if treatment has not
started.
3
Turn the humidity control dial to the desired setting. The setting switches heated
humidification off and delivers minimum humidification. The indicator light will remain
lit to indicate standby mode. A setting of 6 ( ) delivers maximum humidification.
We recommend that you initially set the control dial to 3 ( ). If necessary, adjust the
control dial up or down to find the setting that is most comfortable and effective for
you. You can adjust the humidity setting at any time.
The aim is to have moist air delivered to your mask but to avoid condensation forming
in the air tubing. The temperature and humidity of the surrounding air will affect the
setting you need.
See “Frequently Asked Questions” for further tips on the correct humidity setting.
4
Fit your mask as described in your mask user instructions.
5
Press the Start/Stop key on the control panel. Alternatively, if your flow generator
has the SmartStart function available, simply breathe into your mask and air should
begin to flow.
Note: During operation, the indicator light becomes brighter to indicate that the heating
element is active. Your HumidAire 3i has a rapid heating element which allows very short
heating times. Do not be concerned if the light only brightens very briefly.
6
Lie down and arrange the air tubing so that it is free to move if you turn in your sleep.
!
WARNING
Do not leave an excessive length of air tubing around the top of your bed. It could
twist around your head or neck while you are sleeping.
HUMIDIFIER
WARMING
WARMING
menu exit
338282r3.book Page 8 Friday, November 10, 2006 2:10 PM

9
FREQUENTLY ASKED QUESTIONS
ENGLISH
STOPPING YOUR TREATMENT
To stop your treatment at any time, remove your mask and press the Start/Stop key.
Alternatively, if your flow generator has the SmartStart function available, simply
remove your mask and treatment will end.
Some flow generators continue to blow air gently after you have stopped your
treatment. This can continue for up to one hour to assist the heater plate in cooling.
However, you can unplug the device from the power outlet at any time and allow the
heater plate to cool without airflow.
DETACHING YOUR HUMIDAIRE 3i
Please refer to the illustrations in section G of the illustration sheet.
1 Unplug the power cord from the power outlet (G-1).
!
WARNING
Take care when handling your HumidAire 3i. The water and the water chamber
base may both be hot. Allow ten minutes for the heater plate and any excess water
to cool (G-2).
2
Remove the water chamber from the docking station (G-3).
3
Press the large silver button located midway underneath the docking station
(G-4) and pull the H
UMIDAIRE 3i and flow generator apart (G-5).
Note: Re-attach the connector plug firmly to your flow generator.
FREQUENTLY ASKED QUESTIONS
WHY IS THERE CONDENSATION IN MY MASK AND/OR AIR TUBING?
You may experience excessive condensation in your mask or air tubing. This may occur
seasonally, particularly when the room temperature is low or cool air is circulating
around the tube. Turn the control dial down to a lower setting until the condensation
decreases.
You may have to adjust your humidity setting from season to season.
DO I HAVE TO USE DISTILLED WATER IN THE WATER CHAMBER?
Using distilled water will maximize the life of the water chamber and reduce mineral
deposits. See “Cleaning your HumidAire 3i” on page 11 for further details.
Large silver button
UNDERSIDE VIEW
338282r3.book Page 9 Friday, November 10, 2006 2:10 PM

10
W
HAT IF I STILL HAVE SYMPTOMS OF DRYNESS?
If you still experience symptoms of dryness, then your humidity setting may be set too
low to be effective. Gradually turn the humidity control dial up over a few nights until
the symptoms disappear.
If you are still experiencing symptoms of dryness, even after increasing the humidity
setting, you may be breathing through your mouth. Mouth breathing or mouth leaks
cause drying and irritation of the upper airway. If this is a problem, a full face mask or
chin strap may help. Consult your clinician or equipment supplier for details.
CLEANING AND MAINTENANCE
You should regularly carry out the cleaning and maintenance of the water chamber,
cover and cover seal as described in this section.
DISASSEMBLING YOUR HUMIDAIRE 3i
Please refer to the illustrations in section H of the illustration sheet.
!
WARNING
Beware of electrocution. Do not immerse your flow generator, docking station or
power cord in water. Always unplug the device before cleaning and be sure that it
is dry before plugging it back in.
1 Unplug the power cord from the power outlet (H-1).
!
WARNING
Take care when handling your HumidAire 3i. The water and the water chamber
base may both be hot. Allow ten minutes for the heater plate and any excess water
to cool (H-2).
2
Remove the water chamber from the docking station (H-3) and discard any excess
water (H-4).
3
Detach the air tubing from the air outlet (H-5).
4
Gently flex one cover arm away and up from the docking station until the cover
detaches completely (H-6 to H-8). Peel the cover seal away from the cover (H-9).
!
CAUTION
Do not remove the tub plate from the water chamber.
338282r3.book Page 10 Friday, November 10, 2006 2:10 PM

11
CLEANING AND MAINTENANCE
ENGLISH
CLEANING YOUR HUMIDAIRE 3i
!
CAUTION
• Do not use any of the following to clean any part of the HumidAire 3i. These
solutions may cause damage and reduce the life of the product.
• bleach, chlorine-, alcohol- or ammonia-based solutions
• moisturizing, antibacterial or glycerine based soaps
• water softening and unapproved descaling agents.
• Do not wash the water chamber in a dishwasher.
WATER CHAMBER
DAILY
Wash the water chamber and tubing in warm water, using a mild detergent
(see previous caution). Use the yellow cleaning plug to assist in the cleaning process
(see steps 1 to 5 below).
Rinse them thoroughly with clean water and allow them to dry away from direct
sunlight.
WEEKLY
Inspect the water chamber for wear and deterioration. Replace the water chamber if
any component has cracked, become cloudy or pitted. Replace immediately if there is
any leaking from the water chamber.
If you notice white powder or deposits in the water chamber:
i. Fill the water chamber to the maximum water level mark with a solution of one
part vinegar to ten parts water.
ii. Let the solution soak for ten minutes.
iii. Discard the solution and rinse the water chamber with clean water.
2
45
1
3
338282r3.book Page 11 Friday, November 10, 2006 2:10 PM

12
C
OVER AND COVER SEAL
Inspect the cover and cover seal weekly for wear and deterioration. Replace any
damaged parts. When required, wash the cover and cover seal in warm water, using a
mild detergent (see previous caution). Rinse them thoroughly with clean water and
allow them to dry away from direct sunlight.
DOCKING STATION
Periodically wipe the outside of the docking station (including the connector seal) with
a damp cloth.
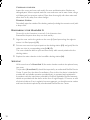
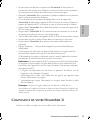
REASSEMBLING YOUR HUMIDAIRE 3i
Please refer to the illustrations in section I of the illustration sheet.
Reassemble the parts when they are clean and dry.
1 Align the cover seal to the guides on the cover (I-1) and press along the edges to
ensure it is fitted properly (I-2).
2
Put one cover arm into its pivot point on the docking station (I-3) and gently flex the
other arm into its corresponding point (I-4 & I-5).
The cover should be able to open and close freely while securely attached to the
docking station.
3
Replace the water chamber in the humidifier docking station (I-6).
SERVICING
With normal use of a HUMIDAIRE 3i, the water chamber needs to be replaced every
two years.
This product (H
UMIDAIRE 3i) should be inspected by an authorized ResMed Service
Center 5 years from the date of manufacture. Prior to this, the device is intended to
provide safe and reliable operation provided that it is operated and maintained in
accordance with the instructions provided by ResMed. Applicable ResMed warranty
details are provided with the device at the time of original supply. Of course, as with
all electrical devices, if any irregularity becomes apparent, you should exercise caution
and have the device inspected by an authorized ResMed Service Center.
338282r3.book Page 12 Friday, November 10, 2006 2:10 PM

13
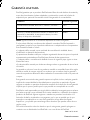
TROUBLESHOOTING
ENGLISH
TROUBLESHOOTING
If there is a problem, try the following suggestions. If the problem cannot be solved,
contact your equipment supplier or ResMed. Do not attempt to open the unit.
!
WARNING
Service and repair should only be performed by an authorized service agent.
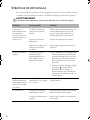
Problem Possible Cause Solution
Device not working
(no display on LCD
screen and/or
indicator light not
lighting up)
Power cord is not plugged
in properly.
Faulty power outlet.
Flow generator and
docking station not
connected correctly.
Check that the power cord is plugged
firmly into the power outlet and the
switch (if available) is on at the outlet.
Try another power outlet.
Check that the docking station is
securely attached to the flow generator.
Indicator light
flickering
Indicator light periodically
becomes brighter to
indicate that the heating
element is active.
• Your HumidAire 3i has a rapid
heating element which allows very
short heating times. Do not be
concerned if the light only brightens
very briefly.
• Turn the dial to the setting to
switch heated humidification off. The
indicator light will remain lit to
indicate standby mode.
Indicator light is
permanently dull
and/or air does not
feel warm
HumidAire 3i reflector (see
illustration C-2a) is dirty.
Clean the reflector with a damp cloth.
Leaking water
chamber
The water chamber may be
damaged or cracked.
Cover is not attached
correctly.
Contact your supplier for a replacement.
Make sure the cover is fitted correctly.
338282r3.book Page 13 Friday, November 10, 2006 2:10 PM

14
No/low air flow The air tubing is not
connected properly.
The air tubing is blocked,
pinched or punctured.
The flow generator is not
working correctly.
The water chamber is
overfilled.
The cover is not latched
correctly.
The cover seal is not fitted
correctly.
Condensation is forming in
the air tube.
Connect the air tubing as described in
“Setting Up your HumidAire 3i For Use”
on page 6.
Unblock or free the air tubing. Check the
air tubing for punctures.
See the Troubleshooting section in the
flow generator manual.
Make sure that the water level is not
above the maximum water level mark.
Make sure the cover is latched onto the
docking station correctly.
Make sure the cover seal is facing the
right way up and fitted securely.
Turn the control dial down.
Insulate the air tubing.
Water splashing on
your face
The water chamber is
overfilled.
Condensation is forming in
the air tube and mask.
Empty some water from the water
chamber.
Turn the control dial down.
Insulate the air tubing.
Air does not feel
moist
The control dial is set too
low.
HumidAire 3i heating
element is not working.
Turn the control dial up.
Contact your equipment supplier.
Air too moist Control dial is set too high.
High relative humidity in
your room.
Turn the control dial down.
Adjust your humidity setting.
White powder or
deposits in the water
chamber
The water leaves scaly
mineral deposits.
Use distilled water.
To remove these mineral deposits, see
“Cleaning your HumidAire 3i” on
page 11.
Problem Possible Cause Solution
338282r3.book Page 14 Friday, November 10, 2006 2:10 PM

15
TECHNICAL SPECIFICATIONS
ENGLISH
TECHNICAL SPECIFICATIONS
PERFORMANCE
Maximum heater plate temperature: 185°F (85°C)
Temperature cut-out: 199°F (93°C)
Maximum output humidity: 95% relative humidity (control dial set to maximum setting,
flow rate 50 L/min, ambient temperature of 68°F [20°C], ambient relative humidity of
40%).
Maximum gas temperature: 106°F (41°C)
DIMENSIONS (H X W X D)
Docking station and water chamber: 4.6" x 6.7" x 8.3" (118 mm x 170 mm x 212 mm)
WEIGHT
Docking station and unfilled water chamber: 1.5 lb. (670 g)
Water capacity to maximum fill line: 415 mL
POWER SUPPLY
Input range for ResMed S8 flow generator with HUMIDAIRE 3i: 100–240V, 50/60Hz;
110V, 400Hz; 2.5A <140 VA (110 W) (maximum power consumption). Instantaneous
peak power consumption <340 VA.
Actual average power consumption will vary, depending on factors such as
temperature setting, set pressure, the use of accessories, height above sea level and
ambient temperature.
Maximum heater element power: 85 W.
HOUSING CONSTRUCTION
Docking station: Flame retardant engineering thermoplastic, plated cast aluminium.
Water chamber: Injection molded plastic, stainless steel.
ENVIRONMENTAL CONDITIONS
Operating temperature: +41°F to +104°F (+5°C to +40°C)
Operating humidity: 10–95% non-condensing
Storage and transport temperature: -4°F to +140°F (-20°C to +60°C)
Storage and transport humidity: 10–95% non-condensing
IEC 60601-1 CLASSIFICATION
Class II (double insulation)
Type CF
ELECTROMAGNETIC COMPATIBILITY
Please refer to your flow generator user's manual for details.
Note: The manufacturer reserves the right to change these specifications without notice.
338282r3.book Page 15 Friday, November 10, 2006 2:10 PM
A página está carregando ...
A página está carregando ...
A página está carregando ...
A página está carregando ...
A página está carregando ...
A página está carregando ...
A página está carregando ...
A página está carregando ...
A página está carregando ...
A página está carregando ...
A página está carregando ...
A página está carregando ...
A página está carregando ...
A página está carregando ...
A página está carregando ...
A página está carregando ...
A página está carregando ...
A página está carregando ...
A página está carregando ...
A página está carregando ...
A página está carregando ...
A página está carregando ...
A página está carregando ...
A página está carregando ...
A página está carregando ...
A página está carregando ...
A página está carregando ...
A página está carregando ...
A página está carregando ...
A página está carregando ...
A página está carregando ...
A página está carregando ...
A página está carregando ...
A página está carregando ...
A página está carregando ...
A página está carregando ...
A página está carregando ...
A página está carregando ...
A página está carregando ...
A página está carregando ...
A página está carregando ...
A página está carregando ...
A página está carregando ...
A página está carregando ...
A página está carregando ...
A página está carregando ...
A página está carregando ...
A página está carregando ...
A página está carregando ...
A página está carregando ...
A página está carregando ...
A página está carregando ...
A página está carregando ...
A página está carregando ...
A página está carregando ...
A página está carregando ...
A página está carregando ...
A página está carregando ...
A página está carregando ...
A página está carregando ...
A página está carregando ...
A página está carregando ...
A página está carregando ...
A página está carregando ...
A página está carregando ...
A página está carregando ...
A página está carregando ...
A página está carregando ...
A página está carregando ...
A página está carregando ...
A página está carregando ...
-
 1
1
-
 2
2
-
 3
3
-
 4
4
-
 5
5
-
 6
6
-
 7
7
-
 8
8
-
 9
9
-
 10
10
-
 11
11
-
 12
12
-
 13
13
-
 14
14
-
 15
15
-
 16
16
-
 17
17
-
 18
18
-
 19
19
-
 20
20
-
 21
21
-
 22
22
-
 23
23
-
 24
24
-
 25
25
-
 26
26
-
 27
27
-
 28
28
-
 29
29
-
 30
30
-
 31
31
-
 32
32
-
 33
33
-
 34
34
-
 35
35
-
 36
36
-
 37
37
-
 38
38
-
 39
39
-
 40
40
-
 41
41
-
 42
42
-
 43
43
-
 44
44
-
 45
45
-
 46
46
-
 47
47
-
 48
48
-
 49
49
-
 50
50
-
 51
51
-
 52
52
-
 53
53
-
 54
54
-
 55
55
-
 56
56
-
 57
57
-
 58
58
-
 59
59
-
 60
60
-
 61
61
-
 62
62
-
 63
63
-
 64
64
-
 65
65
-
 66
66
-
 67
67
-
 68
68
-
 69
69
-
 70
70
-
 71
71
-
 72
72
-
 73
73
-
 74
74
-
 75
75
-
 76
76
-
 77
77
-
 78
78
-
 79
79
-
 80
80
-
 81
81
-
 82
82
-
 83
83
-
 84
84
-
 85
85
-
 86
86
-
 87
87
-
 88
88
-
 89
89
-
 90
90
-
 91
91


ResMed HumidAire 3i Manual do usuário
- Categoria
- Umidificadores
- Tipo
- Manual do usuário
em outros idiomas
- español: ResMed HumidAire 3i Manual de usuario
- français: ResMed HumidAire 3i Manuel utilisateur
- English: ResMed HumidAire 3i User manual
Artigos relacionados
-
ResMed HumidAire 3i Manual do usuário
-
ResMed Humidifier 3I Manual do usuário
-
-
ResMed Humidifier s8 Manual do usuário
-
ResMed C16389 Manual do usuário
-
-
-
-
-