
www.myresmed.com Waking people up to sleep
S8 AutoSet Vantage
™
System
Reorder number: 33887/2 05 06
USER’S MANUAL
English
Français
Español
Português

1
S8 AutoSet Vantage
™
ILLUSTRATIONS / ILLUSTRATIONS /
FIGURAS / ILUSTRAÇÕES
Component of 33887/2 / Partie de 33887/2 /
Componente de 33887/2 / Componente de 33887/2
A
Keypad
Clavier
Teclado
Teclado
Carry handle
Poignée de transport
Asa para el transporte
Pega de transporte
Air filter cover / Couvercle
du logement du filtre à air /
Cubierta del filtro de aire /
Tampa do filtro de ar
Module
Module
Módulo
Módulo
DC input
Entrée CC
Entrada de CC
Entrada CC
AC input
Entrée CA
Entrada de CA
Entrada CA
LCD screen
Écran LCD
Visor
Mostrador LCD
Air outlet
Sortie d'air
Salida de aire
Saída de ar
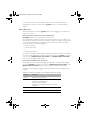
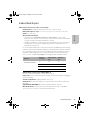
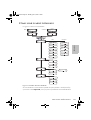
SYSTEM COMPONENTS / COMPOSANTS DU SYSTÈME / COMPONENTES DEL
SISTEMA / COMPONENTES DO SISTEMA
Air inlet
Entrée d'air
Entrada de aire
Entrada de ar
6’6”/2 m
2
34 5
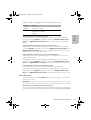
OTHER ACCESSORIES / AUTRES ACCESSOIRES / OTROS ACCESORIOS /
OUTROS ACESSÓRIOS
C
1
5
SETTING UP THE S8
TM
/ INSTALLATION DE LA S8
TM
/
INSTALACIÓN DEL S8
TM
/ MONTAGEM DO S8
TM
D
2
3
4
B
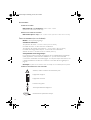
INTEGRATED HUMIDIFIER / HUMIDIFICATEUR INTÉGRÉ / HUMIDIFICADOR
INTEGRADO / HUMIDIFICADOR INTEGRADO
32
9’10”/3 m
1
4
© 2005 ResMed Ltd.
© 2005 ResMed Ltd.
© 2005 ResMed Ltd.
© 2005 ResMed Ltd.
Note: Some products not available in all regions. Remarque : certains de ces produits ne sont pas disponibles dans tous les pays.
Nota: algunos productos no están disponibles en todas las regiones. Nota: alguns produtos não se encontram disponíveis em todas as
regiões.
HumidAire 3i
™

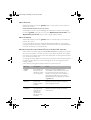
DATA CARD MODULE / MODULE DE CARTE DE DONNÉES /
MÓDULO TARJETA DE DATOS / MÓDULO DE CARTÕES DE DADOS
G
12
© 2005 ResMed Ltd.
H
USING THE DATA CARD / UTILISATION DE LA CARTE DE DONNÉES /
USO DE LA TARJETA DE DATOS / COMO USAR O CARTÃO DE DADOS
1
3
2
© 2005 ResMed Ltd.
Note: Some products not available in all regions. Remarque : certains de ces produits ne sont pas disponibles dans tous les pays.
Nota: algunos productos no están disponibles en todas las regiones. Nota: alguns produtos não se encontram disponíveis em todas as
regiões.
E
HUMIDAIRE 3i AND S8 / HUMIDAIRE 3i ET S8 / EL HUMIDAIRE 3i Y EL S8 /
HUMIDAIRE 3i E S8
© 2005 ResMed Ltd.
BLANK MODULE / MODULE VIERGE / MÓDULO EN BLANCO /
MÓDULO EM BRANCO
F
1
2
© 2005 ResMed Ltd.
Data ccommunications
port
/ Port de
communication des
données / Puerto de
comunicación de
datos / Porta de
comunicação de
dados
HumidAire 3i

USER’S MANUAL 1
M
ANUAL DEL USUARIO 101
M
ANUEL UTILISATEUR 49
M
ANUAL DO UTILIZADOR 153
S8 AUTOSET VANTAGE
™
ENGLISHFRANÇAISPORTUGUÊS ESPAÑOL
33887r2.book Page i Thursday, June 30, 2005 1:36 PM

Protected by patents: AU 691200, AU 697652, AU 709279, AU 724589, AU 730844, AU 736723, AU 750095, AU
750761, AU 764761, EP 0651971, EP 0661071, EP 0920845, EP 0934723, EP 1028769, JP 3580776, NZ 504595, US
4944310, US 5199424, US 5245995, US 5522382, US 5704345, US 6029665, US 6138675, US 6240921, US 6363933,
US 6367474, US 6398739, US 6425395, US 6502572, US 6591834, US 6635021, US 6705315, US 6745768, US
6817361. Other patents pending.
Design registrations pending
S8, HumidAire, HumidAire 3i, AutoSet, S8 AutoSet Vantage, Mirage, Mirage Activa, Mirage Vista, Protégé, Ultra Mirage,
Mirage Swift, and ResScan are trademarks of ResMed Ltd. Papillon is a trademark of MAP Medizin-Technologie GmbH.
© ResMed Ltd 2005.
Manufactured by:
ResMed Ltd 1 Elizabeth Macarthur Drive Bella Vista NSW 2153 Australia
Tel: +61 (2) 8884 1000 or 1 800 658 189 (toll free) Fax: +61 (2) 8883 3114 Email: [email protected]
Distributed by:
ResMed Corp 14040 Danielson Street Poway CA 92064-6857 USA
Tel: +1 (858) 746-2400 or 1-800-424-0737 (toll free) Fax: +1 (858) 746-2900 Email: [email protected]
ResMed (UK) Limited 65 Milton Park Abingdon Oxfordshire OX14 4RX UK
Tel: +44 (1235) 862 997 Fax: +44 (1235) 831 336 Email: [email protected]
ResMed Asia Pacific Ltd 97 Waterloo Road North Ryde NSW 2113 Australia
Tel: +61 (2) 9886 5000 or 1 800 991 900 (toll free) Fax: +61 (2) 9889 1471 Email: [email protected]
ResMed BV Nieuwe Parklaan 86, 2587 BV Den Haag Nederland
Tél: +31 (70) 358 6263 Fax: +31 (70) 358 4333 Email: [email protected]l
ResMed Finland Niittykatu 6 FIN 02200 Espoo Suomi
Puh: +358 9 8676820 Faksi: +358 9 86768222 Sähköposti: rece[email protected]
ResMed GmbH & Co. KG Fraunhoferstraße 16 82152 Martinsried Deutschland
Tel: +49 (0) 89 / 99 01 - 00 or +49 (0) 800 2 777 000 (gebührenfrei) Fax: +49 (0) 89 / 99 01 - 10 55
Email: [email protected]
ResMed Hong Kong Limited Room 1714, Miramar Tower 132-134 Nathan Road Tsim Sha Tsui Hong Kong
Tel: +852 2366 0707 Fax: +852 2366 4546 Email: [email protected]
ResMed Japan Nihonbashi Hisamatsu Bldg. 4F, 2-28-1 Nihonbashi-Hamacho, Chuo-Ku, Tokyo 103-0007, Japan
Tel: +81 (3) 3662 5056 Fax: +81 (3) 3662 5040
ResMed Malaysia Sdn Bhd Suite E-10-20, Plaza Mon’t Kiara No. 2 Jalan 1/70C Mon’t Kiara 50480 Kuala Lumpur
Malaysia Tel: +60 3 6201 7177 Fax: +60 3 6201 2177 Email: reception@resmed.com.my
ResMed NZ Ltd PO Box 51-048 Pakuranga Auckland New Zealand
Tel:+64 274 737 633 Fax:+64 9 239 0193 Email: [email protected]
ResMed SA Parc de la Bandonnière 2, rue Maurice Audibert 69800 Saint-Priest France
Tél: +33 (0) 4 37 251 251 Fax: +33 (0) 4 37 251 260 Email: reception@resmed.fr
ResMed Singapore Pte Ltd 238A Thomson Road # 12-03/04 Novena Square Tower A Singapore 307684
Tel: +65 6284 7177 Fax: +65 6284 7787 Email: [email protected]
ResMed Spain SL C/Arturo Soria, 245 28033 Madrid España
Tel: +34 (93) 5908154 Fax: +34 (93) 5908153 Email: [email protected]
ResMed Sweden AB Industrigatan 2 S-461 37 Trollhättan Sverige
Tel: +46 520 420 110 Fax: +46 520 397 15 Email: [email protected]
Labhardt AG Thannerstrasse 57 CH-4054 Basel Schweiz
Tel: +41 (061) 307 9711 Fax: +41 (061) 307 9722 Email: [email protected]
US DESIGNATED AGENT: ResMed Corp
EU AUTHORIZED REPRESENTATIVE: ResMed (UK) Ltd
www.myresmed.com
33887r2.book Page ii Thursday, June 30, 2005 1:36 PM

ENGLISH
1
USER’S MANUAL
English
S8 AutoSet Vantage
™
System
33887r2.book Page 1 Thursday, June 30, 2005 1:36 PM

2
33887r2.book Page 2 Thursday, June 30, 2005 1:36 PM

3
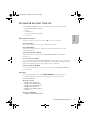
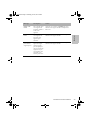
CONTENTS
ENGLISH
CONTENTS
CONTENTS
INTRODUCTION . . . . . . . . . . . . . . . . . . . . . . . . . . . . . . . . . . . . . . . . . . . . . . . 5
Y
OUR RESPONSIBILITY 5
MEDICAL INFORMATION . . . . . . . . . . . . . . . . . . . . . . . . . . . . . . . . . . . . . . . 5
A
BOUT THE S8 AUTOSET VANTAGE 5
C
ONTRAINDICATIONS 5
W
ARNINGS 6
C
AUTIONS 7
A
DVERSE EFFECTS 7
THE S8 AUTOSET VANTAGE SYSTEM . . . . . . . . . . . . . . . . . . . . . . . . . . . . . 9
S8 A
UTOSET VANTAGE 9
M
ASKS 9
H
UMIDIFIER 10
R
ESSCAN™ DATA CARD MODULE 10
A
CCESSORIES 10
HOW TO USE THE S8 AUTOSET VANTAGE . . . . . . . . . . . . . . . . . . . . . . . 11
S
ET UP THE S8 AUTOSET VANTAGE 11
A
SSEMBLE THE MASK 11
S
TART TREATMENT 12
S
TOPPING TREATMENT 13
U
SING THE MASK-FITTING FEATURE 13
HOW TO ATTACH A HUMIDIFIER . . . . . . . . . . . . . . . . . . . . . . . . . . . . . . . 15
A
TTACH A HUMIDAIRE 3I™ HUMIDIFIER 15
HOW TO USE THE KEYPAD . . . . . . . . . . . . . . . . . . . . . . . . . . . . . . . . . . . . . 17
H
OW TO CHANGE THE SETTINGS 18
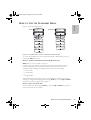
HOW TO USE THE STANDARD MENU . . . . . . . . . . . . . . . . . . . . . . . . . . . 21
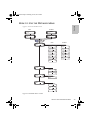
HOW TO USE THE DETAILED MENU . . . . . . . . . . . . . . . . . . . . . . . . . . . . . 23
S
ETTINGS MENU 24
R
ESULTS MENU 25
O
PTIONS MENU 25
S
ERVICING MENU 25
M
ESSAGES ON THE S8 AUTOSET VANTAGE LCD 25
S8 MODULES . . . . . . . . . . . . . . . . . . . . . . . . . . . . . . . . . . . . . . . . . . . . . . . . 27
U
SING A BLANK MODULE 27
U
SING A RESSCAN DATA CARD MODULE 27
33887r2.book Page 3 Thursday, June 30, 2005 1:36 PM

4
CLEANING AND MAINTENANCE . . . . . . . . . . . . . . . . . . . . . . . . . . . . . . . . . 31
D
AILY CLEANING 31
W
EEKLY CLEANING 31
P
ERIODIC CLEANING 31
R
EPLACING THE AIR FILTER 32
S
ERVICING 32
FREQUENTLY ASKED QUESTIONS . . . . . . . . . . . . . . . . . . . . . . . . . . . . . . . 33
TROUBLESHOOTING . . . . . . . . . . . . . . . . . . . . . . . . . . . . . . . . . . . . . . . . . . 35
SYSTEM SPECIFICATIONS . . . . . . . . . . . . . . . . . . . . . . . . . . . . . . . . . . . . . . 39
S8 A
UTOSET VANTAGE (NO ACCESSORIES) 39
A
CCESSORIES 39
A
LL DEVICES (WHERE APPLICABLE) 40
LIMITED WARRANTY . . . . . . . . . . . . . . . . . . . . . . . . . . . . . . . . . . . . . . . . . . 45
INDEX . . . . . . . . . . . . . . . . . . . . . . . . . . . . . . . . . . . . . . . . . . . . . . . . . . . . . . 47
33887r2.book Page 4 Thursday, June 30, 2005 1:36 PM

5
ENGLISH
INTRODUCTION
INTRODUCTION
Thank you for choosing the S8 AUTOSET VANTAGE™ flow generator. The S8 AUTOSET
VANTAGE is a compact, all-in-one package with an inbuilt power supply and the option
of integrated data management and humidification.
This user manual contains the information you need for the correct use of your
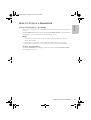
S8 AUTOSET VANTAGE.
YOUR RESPONSIBILITY
The owner or user of this system shall have sole responsibility and liability for any injury
to persons or damage to property resulting from:
• operation which is not in accordance with the operating instructions supplied
• maintenance or modifications carried out unless in accordance with authorized
instructions and by authorized persons.
Please read this manual carefully before use.
This manual contains special terms and icons that appear in the margins to draw your
attention to specific and important information.
• Warning alerts you to possible injury.
• Caution explains special measures for the safe and effective use of the device.
• Note is an informative or helpful note.
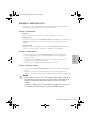
MEDICAL INFORMATION
ABOUT THE S8 AUTOSET VANTAGE
The S8 AUTOSET VANTAGE self-adjusting sleep apnea system is indicated for the
treatment of obstructive sleep apnea (OSA) in adult patients. The
S8 AUTOSET
V
ANTAGE self-adjusting sleep apnea system has two treatment modes: AutoSet and
fixed-pressure CPAP.
The
S8 AUTOSET VANTAGE system is intended for home and hospital use.
!
CAUTION
In the US, Federal law restricts this device to sale by or on the order of a physician.
CONTRAINDICATIONS
The S8 AUTOSET VANTAGE is not a life support device and may stop operating during
power failure or certain fault conditions. It should not be used by patients who are
dependent on continuous therapy.
Positive airway pressure therapy may be contraindicated in some patients with the
following pre-existing conditions:
• severe bullous lung disease
33887r2.book Page 5 Thursday, June 30, 2005 1:36 PM

6
• pneumothorax
• pathologically low blood pressure
• dehydration
• cerebrospinal fluid leak, recent cranial surgery, or trauma.
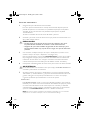
WARNINGS
• The entire manual should be read before using the S8 AUTOSET VANTAGE.
• Advice contained in this manual should not supersede instructions given by the
prescribing physician.
• A patient should not connect a device to the data communication port unless
instructed to do so by their health care provider or physician. Only ResMed
products are designed to be connected to the data communication port.
Connecting other devices could result in injury, or damage to the
S8 AUTOSET
VANTAGE device.
• The S8 AUTOSET VANTAGE should only be used with masks (and connectors)
*
recommended by ResMed, or by a physician or respiratory therapist. A mask
should not be used unless the
S8 AUTOSET VANTAGE device is turned on and
operating properly. The vent hole or holes associated with the mask should never
be blocked.
Explanation: The
S8 AUTOSET VANTAGE is intended to be used with special
masks (or connectors)
*
which have vent holes to allow continuous flow of air out
of the mask.
When the device is turned on and functioning properly, new air from the device
flushes the exhaled air out through the mask vent holes. However, when the
device is not operating, insufficient fresh air will be provided through the mask, and
the exhaled air may be rebreathed. Rebreathing of exhaled air for longer than
several minutes can, in some circumstances, lead to suffocation. This applies to
most models of CPAP devices.
• In the event of power failure or machine malfunction, remove the mask.
• The S8 AUTOSET VANTAGE can be set to deliver pressures up to 20 cm H
2
O. In the
unlikely event of certain fault conditions, pressures up to 30 cm H
2
O are possible.
• If oxygen is used with this device, the oxygen flow must be turned off when the
device is not operating.
Explanation: When the CPAP device is not in operation and the oxygen flow is
left on, oxygen delivered into the air delivery tubing may accumulate within the
CPAP machine enclosure and create a risk of fire. This applies to most types of
CPAP machines.
• Oxygen supports combustion. Oxygen should not be used while you are
smoking or in the presence of an open flame.
* Ports may be incorporated into the mask or in connectors that are near the mask.
33887r2.book Page 6 Thursday, June 30, 2005 1:36 PM

7
ENGLISH
MEDICAL INFORMATION
• Always ensure airflow is being generated by the device before the oxygen
supply is turned on.
• Always turn the oxygen supply off before stopping the airflow from the device.
Note: At a fixed rate of supplemental oxygen flow, the inhaled oxygen concentration
will vary, depending on where the oxygen is introduced, the pressure settings, patient
breathing pattern, mask selection, and leak rate.
• Do not use the S8 AUTOSET VANTAGE if there are obvious external defects or
unexplained changes in performance.
• Do not open the S8 AUTOSET VANTAGE case. There are no user serviceable parts
inside. Repairs and internal servicing should only be performed by an authorized
service agent.
• Explosion hazard—do not use in the vicinity of flammable anesthetics.
CAUTIONS
• At low pressures, the flow through the exhalation ports of your mask may not
clear all exhaled gas from the tubing. Some rebreathing may occur.
• The airflow for breathing produced by this device can be as much as 11
o
F (6
o
C)
higher than the temperature of the room. Caution should be exercised if the room
temperature is warmer than 90
o
F (32
o
C).
• When AC mains power (100/240V AC) is not available, always use a ResMed
DC-12 converter. (The DC-12 converter is available as an optional accessory.)
• If supplied, the RESSCAN™ Data Card module is designed for use with specific
ResMed devices.
• Only use the RESSCAN Data Card module (if supplied) as specified in this manual.
Note: The above are general warnings and cautions. Specific warnings, cautions, and
notes appear with the relevant instructions in the manual.
ADVERSE EFFECTS
Patients should report unusual chest pain, severe headache, or increased
breathlessness to their prescribing physician. An acute upper respiratory tract infection
may require temporary discontinuation of treatment.
The following side effects may arise during the course of therapy with the S8 device:
• drying of the nose, mouth, or throat
• nosebleed
• bloating
• ear or sinus discomfort
• eye irritation
• skin rashes
• chest discomfort.
33887r2.book Page 7 Thursday, June 30, 2005 1:36 PM

8
33887r2.book Page 8 Thursday, June 30, 2005 1:36 PM

9
ENGLISH
THE S8 AUTOSET VANTAGE SYSTEM
THE S8 AUTOSET VANTAGE SYSTEM
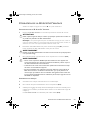
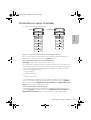
The S8 AUTOSET VANTAGE device is part of a system that consists of five elements:
• S8 AUTOSET VANTAGE self-adjusting flow generator
• Mask
• Humidifier
• Data management products
• Accessories.
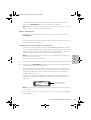
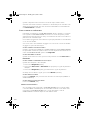
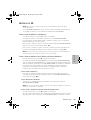
S8 AUTOSET VANTAGE
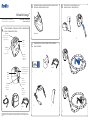
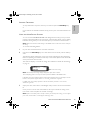
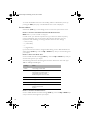
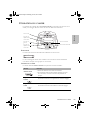
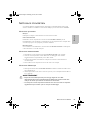
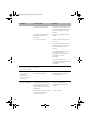
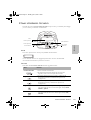
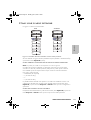
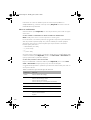
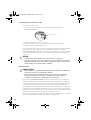
Please refer to the illustrations in section A of the illustration sheet.
FRONT VIEW (A-1)
Shows the keypad and LCD screen, and the air outlet.
REAR VIEW (A-2)
Shows where the module attaches, and the location of the air filter and power sockets.
POWER CORD (A-3)
Power cord to attach the S8 AUTOSET VANTAGE to the AC (mains) power.
CARRY BAG (A-4)
The S8 AUTOSET VANTAGE carry bag contains two pouches: one for storing the S8
device, the other for storing the integrated humidifier. When storing the humidifier,
always put it in the larger, mesh pouch.
AIR TUBING (A-5)
The 6‘6” (2 m) air tubing connects the
S8 AUTOSET VANTAGE to your mask.
MASKS
You will also need a ResMed mask system (supplied separately).
The ResMed mask systems that are recommended for use with the
S8 AUTOSET
V
ANTAGE are:
NASAL MASKS
•
MODULAR NASAL MASK
• MIRAGE VISTA™ NASAL MASK
• ULTRA MIRAGE™ NASAL MASK
• MIRAGE™ NASAL MASK
• MIRAGE ACTIVA™ NASAL MASK
• PAPILLON™.
N
ASAL PILLOWS SYSTEMS
•
MIRAGE SWIFT™ NASAL PILLOWS SYSTEM.
F
ULL FACE MASKS
•
MIRAGE™ FULL FACE MASK
• MIRAGE™ FULL FACE MASK SERIES 2
33887r2.book Page 9 Thursday, June 30, 2005 1:36 PM

10
• ULTRA MIRAGE™ FULL FACE MASK
• RESMED HOSPITAL FULL FACE MASK.
Note: Not all masks are available in all regions.
!
WARNING
In AutoSet mode, only ResMed mask systems are compatible for use with the
S8 AutoSet Vantage. Please refer to “Warnings” on page 6.
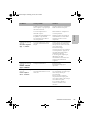
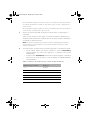
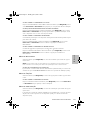
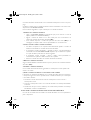
HUMIDIFIER
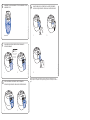
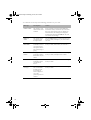
Please refer to the illustration in section B of the illustration sheet.
A humidifier may be required if you are experiencing dryness of the nose, throat, or
mouth. The
S8 AUTOSET VANTAGE is compatible for use with the HUMIDAIRE 3i
integrated heated humidifier (B-1).
RESSCAN
™
DATA CARD MODULE
The RESSCAN Data Card module and RESSCAN Data Card (C-1) may be used with the
S8 AUTOSET VANTAGE either to help your clinician to monitor your treatment or to
provide you with updates to your device settings. See “Using a ResScan Data Card
Module” on page 27 for information about how to use the Data Card module and
Data Card.
ACCESSORIES
Please refer to the illustrations in section C of the illustration sheet.
Other accessories for use with the
S8 AUTOSET VANTAGE:
• Front cap (not available in all regions) (C-2)
• Air tubing 9‘10” (3 m) (C-3)
• DC-12 converter (C-4)
• Blank module (C-5).
Note: ResMed regularly releases new products. Please check our website at
<www.myresmed.com>.
33887r2.book Page 10 Thursday, June 30, 2005 1:36 PM

11
ENGLISH
HOW TO USE THE S8 AUTOSET VANTAGE
HOW TO USE THE S8 AUTOSET VANTAGE
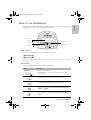
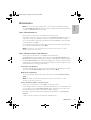
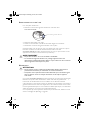
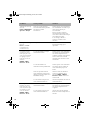
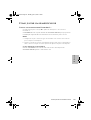
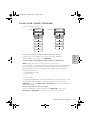
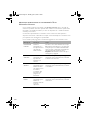
Please refer to the illustrations in section D of the illustration sheet.
SET UP THE S8 AUTOSET VANTAGE
1 Place the S8 AUTOSET VANTAGE on a table near the head of your bed.
!
CAUTION
Be careful not to place the device where it can be bumped or where someone is
likely to trip over the power cord.
Note: You can also place your S8 AutoSet Vantage on the floor beside or underneath your
bed. Ensure that the area is free from dust and clear of bedding, clothes or any other
objects that could block the air inlet.
2 Connect the power cord to the socket at the rear of the flow generator (D-1). Plug
the other end of the power cord into the power outlet.
!
WARNING
Make sure the power cord and plug are in good condition and the equipment is not
damaged.
3 Connect one end of the air tubing firmly onto the air outlet (D-2).
!
WARNING
• Only ResMed air tubing should be used with your flow generator. A different
type of air tubing may alter the pressure you actually receive, reducing the
effectiveness of your treatment.
• Blocking the air inlet or tubing while in operation could lead to overheating of
the device.
• In the clinical environment any personal computer that is used with your CPAP
system must be at least 5’ (1.5 m) away from, or at least 8’ (2.5 m) above, the
patient. It must also comply with the relevant test standard. For personal
computers the international standard is IEC 60950 or equivalent.
ASSEMBLE THE MASK
1 Assemble your mask system according to the mask user instructions.
2 Connect your mask system to the free end of the air tubing (D-3).
3 Check that the mask setting on the MASK screen is the one recommended for the
mask you are using (see the table in “How to Select the Mask Type”).
The
S8 AUTOSET VANTAGE is now ready for use (D-4).
33887r2.book Page 11 Thursday, June 30, 2005 1:36 PM

12
START TREATMENT
1 Make sure the power is on.
A welcome message is displayed briefly on the LCD screen, then the standby screen
appears. In CPAP mode, the standby screen displays the word “RAMP”. In AutoSet
mode, the standby screen displays the word “SETTLING”.
The key and LCD backlights also turn on.
2 Lie down and arrange the air tubing so that it is free to move if you turn in your sleep.
!
CAUTION
• Do not leave long lengths of air tubing around the top of your bed. They could
twist around your head or neck while you are sleeping.
• Make sure the area around the flow generator is dry and clean. It should also be
clear of bedding, clothes, and other potential blockages.
3 Alter the ramp or settling time if required (see “How to Change the Ramp or Settling
Time” on page 19).
To start treatment, press the Start/Stop key, unless your clinician has set up your
device to start delivering therapy automatically. If so, your device will start when you
breathe into your mask (see “SmartStart” for details).
4 Fit your mask as described in the mask user instructions.
!
WARNING
A mask should not be used unless the S8 AUTOSET VANTAGE device is powered and
operating properly.
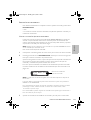
5 When ramping (or settling) begins, the LCD will display the word "RAMPING", (or
“SETTLING”) with the current pressure indicated as dashes. Each dash is
approximately equivalent to 2 cm H
2
O. For example, 6 dashes represents
approximately 12 cm H
2
O pressure.
SMARTSTART™
The S8 AUTOSET VANTAGE has a function called SmartStart™ that your clinician can
enable. If SmartStart is enabled, your device will start automatically when you breathe
into your mask, and will stop automatically when you take your mask off. This means
you do not have to press the Start/Stop key to begin or end treatment.
Note: Do not use SmartStart when using a mask with an anti-asphyxia valve, such as the
Mirage Full Face Mask.
33887r2.book Page 12 Thursday, June 30, 2005 1:36 PM

13
ENGLISH
HOW TO USE THE S8 AUTOSET VANTAGE
STOPPING TREATMENT
To stop treatment at any time, remove your mask and press the Start/Stop key
or
if your clinician has enabled SmartStart, simply remove your mask and treatment will
end.
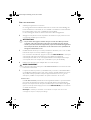
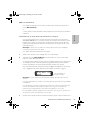
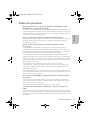
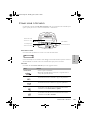
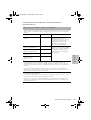
USING THE MASK-FITTING FEATURE
You can use the S8 AUTOSET VANTAGE mask-fitting feature to help you fit your mask
properly. This feature delivers air pressure for a three-minute period, prior to starting
treatment, during which you can check and adjust your mask fit to minimize leaks.
Note: Make sure that the mask setting on the MASK screen is the same as the mask you
are using.
To use the mask-fitting feature:
1 Fit your mask as described in the mask user instructions.
2 Hold down the Start/Stop key for at least three seconds until air pressure delivery
starts.
The following display will appear on the LCD screen indicating that the mask-fitting
feature is operating. Your S8 device will ramp to the mask-fit pressure and will remain
at this pressure for three minutes.
The LCD also displays a mask-fit star rating. See “Definitions of Mask-Fit Star Rating”
on page 14.
Note: The mask-fit star rating display disappears after three minutes.
The mask-fitting feature can only be started from the RAMP or SETTLING screen.
In AutoSet mode, the mask-fit pressure is the highest pressure that you are likely to receive
based on the previous night’s session or 10 cm H
2
O, whichever is greater.
In CPAP mode, the mask-fit pressure is the set treatment pressure or 10 cm H
2
0,
whichever is greater.
3 Adjust your mask, mask cushion, and headgear until you have a secure and comfortable
fit.
Once you have a secure and comfortable fit, check your mask-fit star rating on the
LCD screen. Table 4 explains the mask-fit star ratings.
Note: If there is another person nearby to check your mask-fit star rating, you can adjust
your mask, mask cushion, and headgear while lying down.
MASK FIT:
*****
excelnt
mask-fit star rating
33887r2.book Page 13 Thursday, June 30, 2005 1:36 PM

14
4 After three minutes, the pressure reverts to the set pressure and treatment will begin.
• If you do not wish to wait three minutes, hold down the Start/Stop key for at
least three seconds to start treatment immediately.
• If you press the Start/Stop key for less than three seconds, the unit will return
to standby mode (the RAMP or SETTLING screen is displayed).
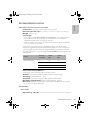
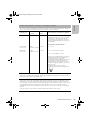
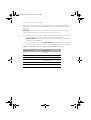
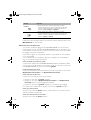
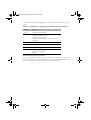
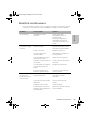
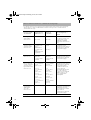
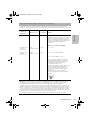
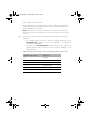
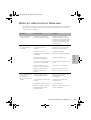
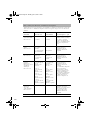
Table 1: Definitions of Mask-Fit Star Rating
Star rating Definition
***** Excellent
****- Very good
***-- Good
**--- Adjust mask
*---- Adjust mask
----- Adjust mask
33887r2.book Page 14 Thursday, June 30, 2005 1:36 PM

15
ENGLISH
HOW TO ATTACH A HUMIDIFIER
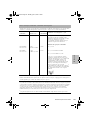
HOW TO ATTACH A HUMIDIFIER
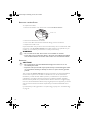
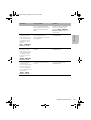
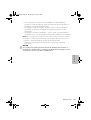
ATTACH A HUMIDAIRE 3
i
™
HUMIDIFIER
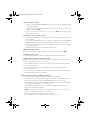
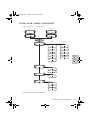
Please refer to the illustrations in section E of the illustration sheet, and your HumidAire 3i
manual.
The
HUMIDAIRE 3
i
attaches to the front of the S8 AUTOSET VANTAGE to provide heated
humidification. No other accessories are required for its use
.
Notes:
a. Make sure the water chamber of the HumidAire 3i is empty before you attach or
detach the humidifier.
b. Remove the connector plug on the S8 AutoSet Vantage before you attach the
HumidAire 3i. Reattach the connector plug firmly after you detach the humidifier.
STORING THE HUMIDAIRE 3
i
Store the HUMIDAIRE 3
i
in the larger, mesh-top pouch of the S8 AUTOSET VANTAGE
carry bag when not in use.
33887r2.book Page 15 Thursday, June 30, 2005 1:36 PM
A página está carregando...
A página está carregando...
A página está carregando...
A página está carregando...
A página está carregando...
A página está carregando...
A página está carregando...
A página está carregando...
A página está carregando...
A página está carregando...
A página está carregando...
A página está carregando...
A página está carregando...
A página está carregando...
A página está carregando...
A página está carregando...
A página está carregando...
A página está carregando...
A página está carregando...
A página está carregando...
A página está carregando...
A página está carregando...
A página está carregando...
A página está carregando...
A página está carregando...
A página está carregando...
A página está carregando...
A página está carregando...
A página está carregando...
A página está carregando...
A página está carregando...
A página está carregando...
A página está carregando...
A página está carregando...
A página está carregando...
A página está carregando...
A página está carregando...
A página está carregando...
A página está carregando...
A página está carregando...
A página está carregando...
A página está carregando...
A página está carregando...
A página está carregando...
A página está carregando...
A página está carregando...
A página está carregando...
A página está carregando...
A página está carregando...
A página está carregando...
A página está carregando...
A página está carregando...
A página está carregando...
A página está carregando...
A página está carregando...
A página está carregando...
A página está carregando...
A página está carregando...
A página está carregando...
A página está carregando...
A página está carregando...
A página está carregando...
A página está carregando...
A página está carregando...
A página está carregando...
A página está carregando...
A página está carregando...
A página está carregando...
A página está carregando...
A página está carregando...
A página está carregando...
A página está carregando...
A página está carregando...
A página está carregando...
A página está carregando...
A página está carregando...
A página está carregando...
A página está carregando...
A página está carregando...
A página está carregando...
A página está carregando...
A página está carregando...
A página está carregando...
A página está carregando...
A página está carregando...
A página está carregando...
A página está carregando...
A página está carregando...
A página está carregando...
A página está carregando...
A página está carregando...
A página está carregando...
A página está carregando...
A página está carregando...
A página está carregando...
A página está carregando...
A página está carregando...
A página está carregando...
A página está carregando...
A página está carregando...
A página está carregando...
A página está carregando...
A página está carregando...
A página está carregando...
A página está carregando...
A página está carregando...
A página está carregando...
A página está carregando...
A página está carregando...
A página está carregando...
A página está carregando...
A página está carregando...
A página está carregando...
A página está carregando...
A página está carregando...
A página está carregando...
A página está carregando...
A página está carregando...
A página está carregando...
A página está carregando...
A página está carregando...
A página está carregando...
A página está carregando...
A página está carregando...
A página está carregando...
A página está carregando...
A página está carregando...
A página está carregando...
A página está carregando...
A página está carregando...
A página está carregando...
A página está carregando...
A página está carregando...
A página está carregando...
A página está carregando...
A página está carregando...
A página está carregando...
A página está carregando...
A página está carregando...
A página está carregando...
A página está carregando...
A página está carregando...
A página está carregando...
A página está carregando...
A página está carregando...
A página está carregando...
A página está carregando...
A página está carregando...
A página está carregando...
A página está carregando...
A página está carregando...
A página está carregando...
A página está carregando...
A página está carregando...
A página está carregando...
A página está carregando...
A página está carregando...
A página está carregando...
A página está carregando...
A página está carregando...
A página está carregando...
A página está carregando...
A página está carregando...
A página está carregando...
A página está carregando...
A página está carregando...
A página está carregando...
A página está carregando...
A página está carregando...
A página está carregando...
A página está carregando...
A página está carregando...
A página está carregando...
A página está carregando...
A página está carregando...
A página está carregando...
A página está carregando...
A página está carregando...
A página está carregando...
A página está carregando...
A página está carregando...
A página está carregando...
A página está carregando...
A página está carregando...
A página está carregando...
A página está carregando...
A página está carregando...
A página está carregando...
A página está carregando...
-
 1
1
-
 2
2
-
 3
3
-
 4
4
-
 5
5
-
 6
6
-
 7
7
-
 8
8
-
 9
9
-
 10
10
-
 11
11
-
 12
12
-
 13
13
-
 14
14
-
 15
15
-
 16
16
-
 17
17
-
 18
18
-
 19
19
-
 20
20
-
 21
21
-
 22
22
-
 23
23
-
 24
24
-
 25
25
-
 26
26
-
 27
27
-
 28
28
-
 29
29
-
 30
30
-
 31
31
-
 32
32
-
 33
33
-
 34
34
-
 35
35
-
 36
36
-
 37
37
-
 38
38
-
 39
39
-
 40
40
-
 41
41
-
 42
42
-
 43
43
-
 44
44
-
 45
45
-
 46
46
-
 47
47
-
 48
48
-
 49
49
-
 50
50
-
 51
51
-
 52
52
-
 53
53
-
 54
54
-
 55
55
-
 56
56
-
 57
57
-
 58
58
-
 59
59
-
 60
60
-
 61
61
-
 62
62
-
 63
63
-
 64
64
-
 65
65
-
 66
66
-
 67
67
-
 68
68
-
 69
69
-
 70
70
-
 71
71
-
 72
72
-
 73
73
-
 74
74
-
 75
75
-
 76
76
-
 77
77
-
 78
78
-
 79
79
-
 80
80
-
 81
81
-
 82
82
-
 83
83
-
 84
84
-
 85
85
-
 86
86
-
 87
87
-
 88
88
-
 89
89
-
 90
90
-
 91
91
-
 92
92
-
 93
93
-
 94
94
-
 95
95
-
 96
96
-
 97
97
-
 98
98
-
 99
99
-
 100
100
-
 101
101
-
 102
102
-
 103
103
-
 104
104
-
 105
105
-
 106
106
-
 107
107
-
 108
108
-
 109
109
-
 110
110
-
 111
111
-
 112
112
-
 113
113
-
 114
114
-
 115
115
-
 116
116
-
 117
117
-
 118
118
-
 119
119
-
 120
120
-
 121
121
-
 122
122
-
 123
123
-
 124
124
-
 125
125
-
 126
126
-
 127
127
-
 128
128
-
 129
129
-
 130
130
-
 131
131
-
 132
132
-
 133
133
-
 134
134
-
 135
135
-
 136
136
-
 137
137
-
 138
138
-
 139
139
-
 140
140
-
 141
141
-
 142
142
-
 143
143
-
 144
144
-
 145
145
-
 146
146
-
 147
147
-
 148
148
-
 149
149
-
 150
150
-
 151
151
-
 152
152
-
 153
153
-
 154
154
-
 155
155
-
 156
156
-
 157
157
-
 158
158
-
 159
159
-
 160
160
-
 161
161
-
 162
162
-
 163
163
-
 164
164
-
 165
165
-
 166
166
-
 167
167
-
 168
168
-
 169
169
-
 170
170
-
 171
171
-
 172
172
-
 173
173
-
 174
174
-
 175
175
-
 176
176
-
 177
177
-
 178
178
-
 179
179
-
 180
180
-
 181
181
-
 182
182
-
 183
183
-
 184
184
-
 185
185
-
 186
186
-
 187
187
-
 188
188
-
 189
189
-
 190
190
-
 191
191
-
 192
192
-
 193
193
-
 194
194
-
 195
195
-
 196
196
-
 197
197
-
 198
198
-
 199
199
-
 200
200
-
 201
201
-
 202
202
-
 203
203
-
 204
204
-
 205
205
-
 206
206
-
 207
207
-
 208
208
-
 209
209


ResMed Humidifier s8 Manual do usuário
- Tipo
- Manual do usuário
- Este manual também é adequado para
em outras línguas
- español: ResMed Humidifier s8 Manual de usuario
- français: ResMed Humidifier s8 Manuel utilisateur
Artigos relacionados
-
ResMed S8 Elite System Manual do usuário
-
ResMed HumidAire 3i Manual do usuário
-
-
-
ResMed S9 series Manual do usuário
-
-
ResMed C16389 Manual do usuário
-
ResMed CRT Television S8 Manual do usuário
-
-