Hamilton KHAKI FLIGHT TIMER Manual do proprietário
- Tipo
- Manual do proprietário

KHAKI FLIGHT TIMER
INSTRUCTION MANUAL


English 2
Français 18
Deutsch 34
Italiano 50
Español 66
Português 82
Nederlands 98
Türkçe 114
Ελληνικά (Greek) 130
Русский (Russian) 146
日本語 (Japanese) 162
한국어 (Korean) 178
简体中文 (Chinese Simplied) 194
繁體中文 (Chinese Traditional) 210
(Arabic) 242

2 © 2011 HAMILTON – INSTRUCTION MANUAL
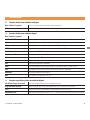
Contents
1. Introduction Page
1.1 Basic functions in analog display
1.2 Basic functions in digital display
1.3 Specific pilot functions in digital display
2.
Care and maintenance
2.1 Recommendations 4
2.2 Water-resistance
2.3 Leather straps
2.4 Batteries
2.5 Magnetic fields
3.
Instructions for use
3.1 General principle of manipulations 5
3.2 Repositioning the hands for digital display view 6
3.3 No function available “NO OPERATION”
3.4 Lighting the digital display
3.5 Date display (On-Off)
3.6 Indication of end of battery life “EOL”
3.7 Main time zone “T1” 7
3.8 “SWAP” function 8
3.9 Perpetual calendar
3.10 Daily alarm “AL” 9
3.11 Testing the alarm ringtone 10
3.12 Reminder alarm “AG” (agenda)
3.13 Chronograph “CHR” 11
3.14 Countdown “TM” 12
3.15 Synchronization of hands to the time “T1” 13
4.
Pilot functions
4.1 Pilot chrono 13
4.2 Data logging
4.3 “Logbook” function 15
4.4 Adjusting the “UTC” time zone 16
4.5 Temperature “ISA” 17

© 2011 HAMILTON – INSTRUCTION MANUAL 3
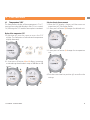
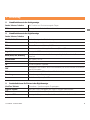
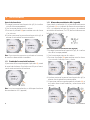
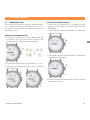
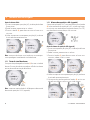
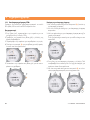
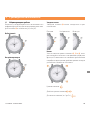
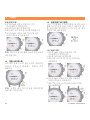
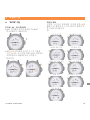
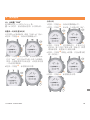
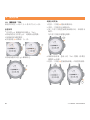
1.1 Basic functions in analog display
Hour / Minute / Second With function to reposition the hands for digital display view
“EOL” “End Of Life” indication of the end of battery life
1.2 Basic functions in digital display
Hour / Minute / Second
“AM-PM” / h/h -hour or -hour time display
“T” Main time zone linked to the display of the hands
“T” Secondary time zone with “SWAP” option
“SWAP” Function for interchange of time zones “T” and “T”
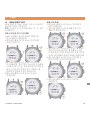
Perpetual calendar Display up to
Date, month, year, name of day With option of name display in English, French, German or Spanish
Week number With On-O option
“AL” Daily alarm
“AG” Reminder alarm (agenda)
“CHR” Timing with total or split times up to hours ’ ’’
“TM” Countdown up to hours, with -second precision
Lighting Illumination of the digital display
Date At o’clock position with On-O option
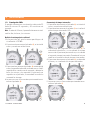
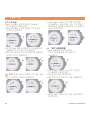
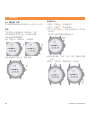
1.3 Specific pilot functions in digital display
“Block Time” Timing / Logging of ight stages
“Logbook” Restoration of key stages of ight in hours and minutes
“UTC” Coordinated Universal Time
Temperature “ISA” Display of the temperature in °F or °C and the altitude in feet or meters
1. Introduction

4 © 2011 HAMILTON – INSTRUCTION MANUAL
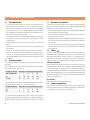
2. Care and maintenance
2.1 Recommendations
• Like all micro-mechanical precision instruments, your
Hamilton watch should be checked at least once
every two years. Entrust your watch to an authorized
Hamilton repair center or to any other professional
watch service.
• To keep your watch water-resistant, make sure that
its sealing features are tested at every check-up.
• Do not move the crown when you are in water.
• Rinse o your watch with fresh water after any immer-
sion in seawater.
• Dry your watch whenever it gets wet.
• Have your watch checked for water-resistance by an
authorized Hamilton retailer or by any other profes-
sional watch service each time the case is opened.
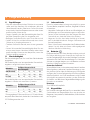
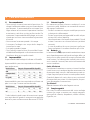
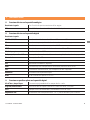
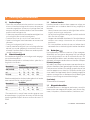
2.2 Water-resistance
The water-resistance of your watch is indicated on the
case back.
Water resistance and equivalent pressure used in Anglo-
Saxon countries:
Unit of measure Water resistance categories available
atm (overpressure) 3 5 10 20 100
psi 44 72,5 145 290 1450
ft * 100 165 330 660 3300
Water resistance and equivalent pressure used in coun-
tries using metric systems:
Unit of measure Water resistance categories available
bar 3 5 10 20 100
m * 30 50 100 200 1000
* The values given in feet or meters of immersion in
water are equivalent to the degree of overpressure
applied during the tests according to the ISO
standard.
2.3 Leather straps
Hamilton recommends that you follow the steps below
in order to preserve the condition of your leather strap
for as long as possible:
• Avoid contact with water and dampness to prevent
discoloration and deformation.
• Avoid prolonged exposure to sunlight to prevent the
color from fading.
• Do not forget that leather is permeable! Therefore
avoid contact with greasy substances and cosmetic
products.
• If you have a problem with your leather strap, please
contact your nearest Hamilton retailer.
2.4 Batteries
Watch batteries can last between two and ve years,
depending on the watch type, its size and the amount
of energy used by the various functions.
Replacing the battery
We recommend that you contact an approved Hamilton
service center or authorised Hamilton retailer, as they
are equipped with the tools and apparatus required to
carry out the work and the necessary checks in a profes-
sional manner. A worn-out battery should be replaced
immediately in order to reduce the risk of leakage and
consequent damage to the movement.
Battery type
Button-type zinc-silver oxide primary battery cell.
2.5 Magnetic fields
To prevent malfunctions of your watch, avoid com-
ing into contact with magnetic elds such as those of
magnets, loudspeakers, cell phones, refrigerators, etc.

© 2011 HAMILTON – INSTRUCTION MANUAL 5
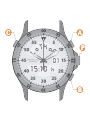
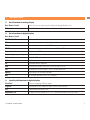
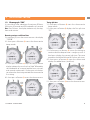
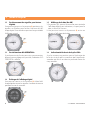
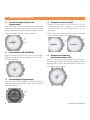
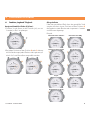
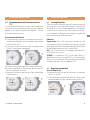
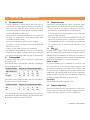
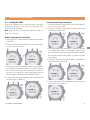
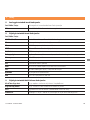
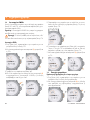
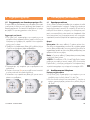
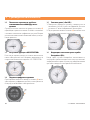
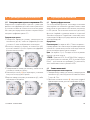
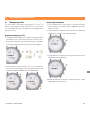
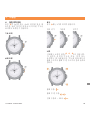
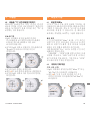
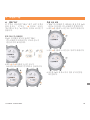
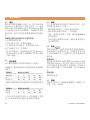
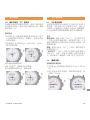
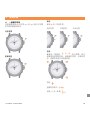
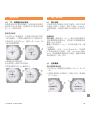
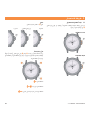
3.1 General principle of manipulations
The display and adjustment of the various analog or
digital functions is accomplished by turning the crown
P when it is in position (p) or (p).
Selection of functions
Adjustment of data
Crown
The crown P has three functioning positions
Pushed in Neutral Pulled out
Buttons
The watch has three buttons,
A
,
B
and
C
, which allow
activation, setting or adjustment of the selected func-
tions. According to the desired action, a short press, a
double short press or a long press is necessary.
Short press:
Double short press:
Long press ( to sec.):
3. Instructions for use

6 © 2011 HAMILTON – INSTRUCTION MANUAL
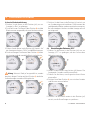
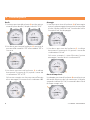
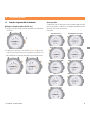
3. Instructions for use
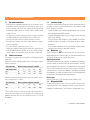
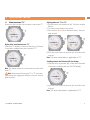
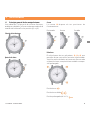
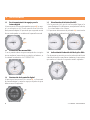
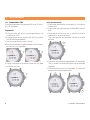
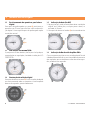
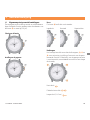
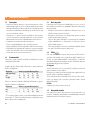
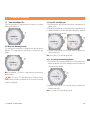
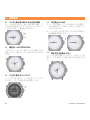
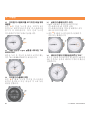
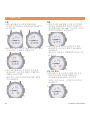
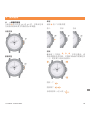
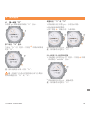
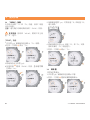
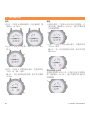
3.2 Repositioning the hands for digital
display view
A long press of the crown P repositions the hands at
9 o’clock to make it easier to read the digital display. A
further long press returns the display to its normal state.
3.3 No function available “NO OPERATION”
If no manipulation or adjustment is possible after press-
ing one of the buttons, “NO OPERATION” is displayed.
3.4 Lighting the digital display
A short press of the crown
P
lights up the digital display
and all the hands stop turning for around 6 seconds.
3.5 Date display (On-Off)
. In position (p1) turn the crown to access the digital
display with no values indicated except for the date
display (if activated) at 3 o’clock.
. A short press of the button
A
activates or deactivates
the date display.
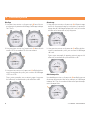
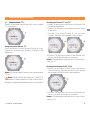
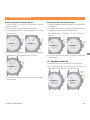
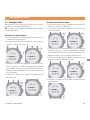
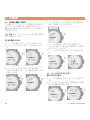
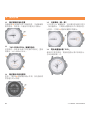
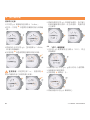
3.6 Indication of end of battery life “EOL”
With the crown in the neutral position, the indication of
the end of life of the battery is shown by the seconds
hand, which jumps ve seconds every ve seconds.

© 2011 HAMILTON – INSTRUCTION MANUAL 7
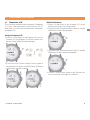
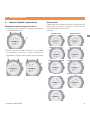
3. Instructions for use
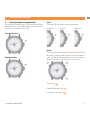
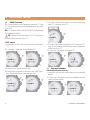
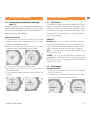
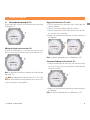
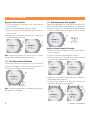
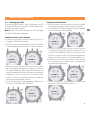
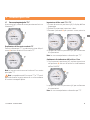
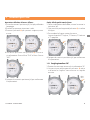
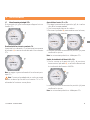
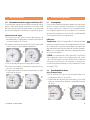
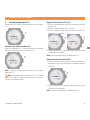
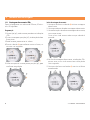
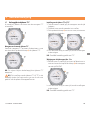
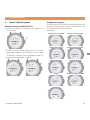
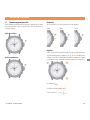
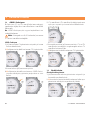
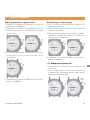
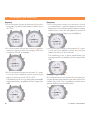
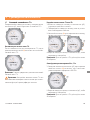
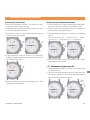
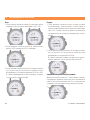
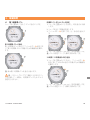
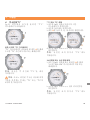
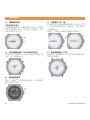
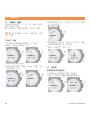
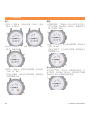
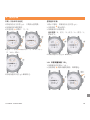
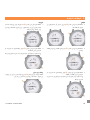
3.7 Main time zone “T1”
In position (p1) turn the crown to access the display “T1”.
Display of the secondary time zone “T”
When the “T1” display is shown, a short press of button
B activates or deactivates the time zone “T2”.
Note: The hands continue to indicate the main time
zone “T1”.
Note: Adjustment of time zone “T1” or “T2” is not pos-
sible during the logging of a ight using the chrono
pilot functions.
Adjusting time zone “T1” or “T2”
. Pull the crown out to position (p2). The hours display
ashes.
. Turn the crown to adjust the values.
. Press button B to switch between hours, minutes
and seconds.
. Push the crown back to position (p1) to conrm the
settings.
Note: The same manipulation is applicable to “T2”.
Switching between the -hour and -hour displays
. With the crown in position (p2), a short press of button
A activates or deactivates the “AM-PM” display.
. Push the crown back to position (p1) to conrm the
settings.
Note: The same manipulation is applicable to “T2”.

8 © 2011 HAMILTON – INSTRUCTION MANUAL
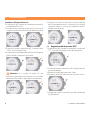
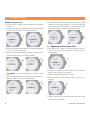
3. Instructions for use
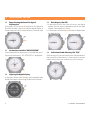
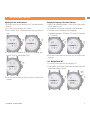
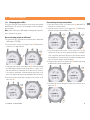
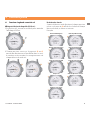
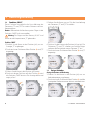
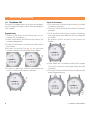
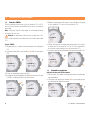
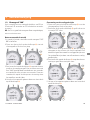
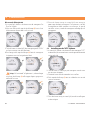
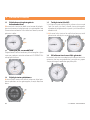
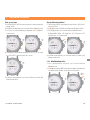
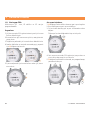
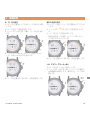
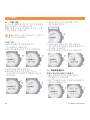
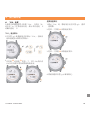
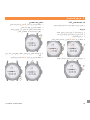
3.8 “SWAP” function
This function allows interchanging time zones “T1” and
“T2”, so that the secondary time zone becomes the main
time zone.
Note: It is not possible to use the “SWAP” function during
the logging of a ight.
NB: The hands and the alarms “AL/AG” are always
linked to the main time zone “T1”.
“SWAP” function
. In position (p1) turn the crown to access the display
“T1”.
. A short press of button B will display “T2”.
. Pull the crown out to position (p2).
. A long press on button A activates the “SWAP” func-
tion. The display ashes and indicates “no”.
. Turn the crown to choose “yes” to interchange time
zone “T1” with time zone “T2”.
. Push the crown back to position (p1). Time zones “T1”
and “T2” interchange and the hands take the position
of the new time “T1”.
. A short press of button B displays “T1”.
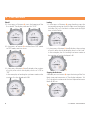
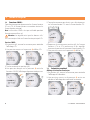
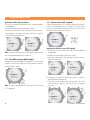
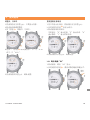
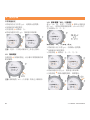
3.9 Perpetual calendar
Date display with name of the day
. In position (p1) turn the crown to access the calendar
display.
. A short press of button
A
activates or deactivates the
week number display.

© 2011 HAMILTON – INSTRUCTION MANUAL 9
3. Instructions for use
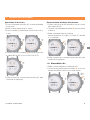
Adjusting the date, month and year
. Pull the crown out to position (p2). The date display
ashes.
. Turn the crown to adjust the values.
. Press button
B
to switch between day, month and
year.
. A short press of button A inverts the display: day-
month “D-M” or month-day “M-D”.
. Push the crown back to position (p1) to conrm the
settings.
Changing the language of the name of the day
. When the calendar display is shown, pull the crown
out to position (p2).
. A long press on button A displays the language.
. Turn the crown to change the language.
Available languages: “E” English, “F” French, “D” German
or “S” Spanish.
. Push the crown back to position (p1) to conrm the
settings.
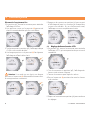
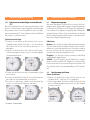
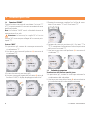
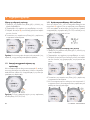
3.10 Daily alarm “AL”
. Turn the crown to access the display “AL”.
. A long press on button
A
activates or deactivates the
alarm and a beep sounds.

10 © 2011 HAMILTON – INSTRUCTION MANUAL
3. Instructions for use
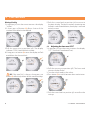
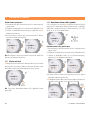
Adjusting the daily alarm
. Pull the crown out to position (p2). The time display
ashes.
. Turn the crown to adjust the values.
. Press button
B
to switch between hours and minutes.
. Push the crown back to position (p1). The alarm is
automatically activated.
Note: A short press on a button or on the crown imme-
diately stops the ringtone.
3.11 Testing the alarm ringtone
A long press on button B sounds the alarm ringtone.
This has no inuence on the activation or deactivation
of the alarm.
Note: The same manipulation is applicable to the
reminder alarm (agenda) “AG”.
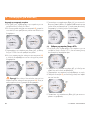
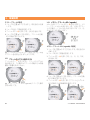
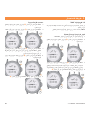
3.12 Reminder alarm “AG” (agenda)
When the “AL” display is shown, a short press of button
B
displays the reminder alarm “AG” and indicates the hours,
the minutes and the mode of activation of the alarm
(On-O) in alternation with the date, month and year.
Adjusting the “AG” alarm
. Pull the crown out to position (p2). The hours display
ashes.
. Turn the crown to adjust the values.
. Press button
B
to switch between hours and minutes,
date, month and year.
. Push the crown back to position (p1). The alarm is
automatically activated .
. A long press on button
A
activates or deactivates the
alarm and a beep sounds.

© 2011 HAMILTON – INSTRUCTION MANUAL 11
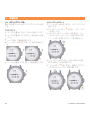
3. Instructions for use
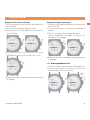
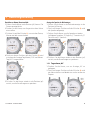
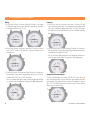
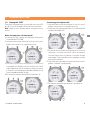
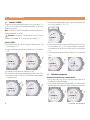
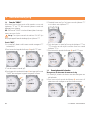
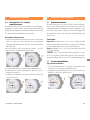
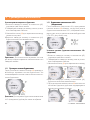
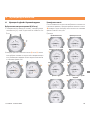
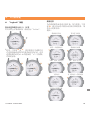
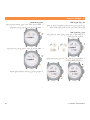
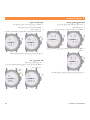
3.13 Chronograph “CHR”
It is possible to time a duration of maximum 99 hours
59 minutes 59 seconds and 99 hundredths of a second.
Note: After 24 hours, the display indicates only the days,
hours and minutes.
Measuring a unique or additional time
. In position (p1) turn the crown to access the display
“CHR’ 00”.
. A short press of button
A
starts the chrono and a
beep sounds.
. A short press of button A stops the chrono and the
display indicates the result with an “Add’” followed by
the hundredths of a second and the hours, minutes
and seconds underneath. A further press on the but-
ton relaunches the timing and adds the time onto the
rst timing.
. A short press of button B resets the chrono to zero.
Timing split times
. A short press of button A starts the chrono and a
beep sounds.
. A short press of button B displays the rst split time
“SPL”.
. A further press on button B causes the timing to
continue and the elapsed time is caught up with. A
third press displays the second split time. The same
procedure should be followed for further split times.
. A short press of button A stops the chrono and
displays the added times (total time).
. A short press of button B resets the chrono to zero.

12 © 2011 HAMILTON – INSTRUCTION MANUAL
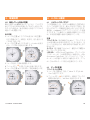
3. Instructions for use
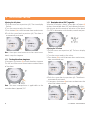
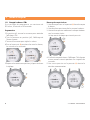
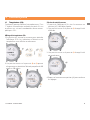
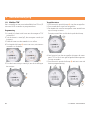
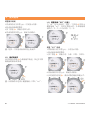
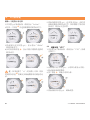
3.14 Countdown “TM”
The maximum countdown time it is possible to program
is 99 hours, 59 minutes and 59 seconds.
Programing
. In position (p1) turn the crown to access the display
“ TM”.
. Pull the crown out to position (p2). The time display
ashes.
. Turn the crown to adjust the values.
. Press button
B
to switch between hours, minutes
and seconds.
. Push the crown back to position (p1) to conrm the
settings.
Starting the countdown
. A short press on button A starts the countdown.
. A further press on button A stops the countdown.
. A third press on button A restarts the countdown
without resetting it to zero.
A beep sounds at each press on the button.
. At the end of the countdown, the display “TM” ashes
and a ringtone sounds for twenty seconds.
. A short press on button B reactivates the last
programing.

© 2011 HAMILTON – INSTRUCTION MANUAL 13
3. Instructions for use 4. Pilot functions
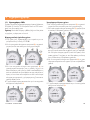
3.15 Synchronization of the hands with time
zone “T1”
Desynchronization of the hands and the digital time is
possible when the battery is changed or with a violent
shock. It is recommended to adjust the digital time “T1”
before synchronizing the hands.
Synchronizing the hands
. In position (p1) turn the crown to access the digital
display with no values indicated except for the date
display (if activated) at 3 o’clock.
. Pull the crown out to position (p2). The display
indicates “Synch” and the digital time ashes.
. Turn the crown to adjust the hours hand.
. Press button
B
to switch to the minutes hand and
the seconds hand.
. Push the crown back to position (p1) to conrm the
settings.
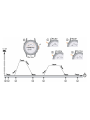
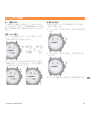
4.1 Pilot chrono
This specic function logs the key stages of a ight or
ights. It is possible to memorize up to 20 ights of 99
cycles each. After the operations, a “Logbook” allows
restoration of the data. A simplied illustration of the
functioning of these operations is presented on the
cover of this manual.
Denitions
Block time (“bloc” on the screen): The block time starts
when the airplane moves for the rst time from a sta-
tionary position, and nishes when the airplane reaches
a nal stationary position with all motors stopped.
Cycle (“Cyc” on the screen): Landing and takeo within
the same block time.
“VFR/IFR”: The “VFR” (Visual Flight Rules) conditions are
applicable to visual ight, “IFR” (Instrument Flight Rules)
to ying on instruments. By default, the watch logs the
ight in “VFR” mode.
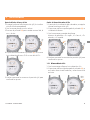
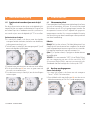
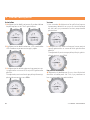
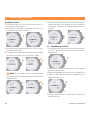
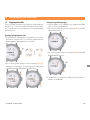
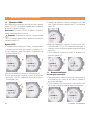
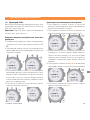
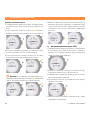
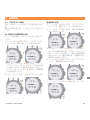
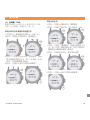
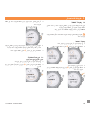
4.2 Data logging
Starting a block time
. In position (p1) turn the crown to access the display
“bLoc T” or “bL CLo”.
. A double press on button C starts the rst block
timing and the display indicates “bL Run”.

14 © 2011 HAMILTON – INSTRUCTION MANUAL
4. Pilot functions
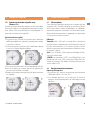
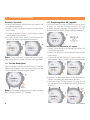
Takeo
. A short press of button
C
starts the logging of the
rst takeo. The display indicates “bL TK oF”.
. A short press of button A switches from “VFR” mode
to “IFR” mode, and vice versa.
. A short press of button B briey displays the number
of cycles, after which the display returns to “VFR” or
“IFR”.
In the example, no landing has yet been made so the
number of cycles displayed is 00.
Landing
. A short press of button C upon landing stops the
timing and memorizes the rst ight time. the display
indicates “bL Lnd”, the block number and the ight
time, which ashes.
. A short press of button B briey displays the number
of cycles, after which the display returns to “bL Lnd”.
In the example, the rst landing has been made so
the number of cycles displayed is 01.
Stopping the block time
A double press on button C stops the timing of the rst
block time and memorizes it. The display indicates “bL
CLo”, the block number and the time elapsed between
block 01, 02, etc.

© 2011 HAMILTON – INSTRUCTION MANUAL 15
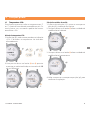
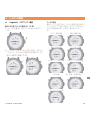
4. Pilot functions
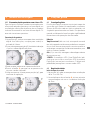
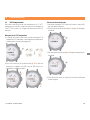
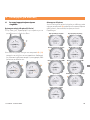
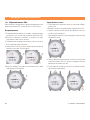
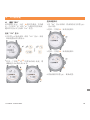
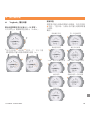
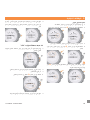
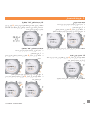
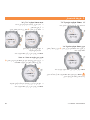
4.3 “Logbook” function
Display and selection of block , , etc.
. In position (p) turn the crown to access the display
“Lo Run”.
. A short press of button A or B allows selection and
scrolling in ascending or descending order of the logs
of each block, and of the total “to” made up by blocks
, , etc.
Restoration of data
Starting with the block or total selected, each short press
on button
C
displays the results of each block or the
total, in hours and minutes.
Example:
Starting time of block Time of rst takeo
Time of last landing Ending time of block
Flight time in “VFR” mode Flight time in “IFR” mode
Flight time Total ight + waiting time
Number of block cycles

16 © 2011 HAMILTON – INSTRUCTION MANUAL
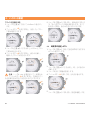
4. Pilot functions
Deleting a block log
. In position (p1) turn the crown to access the display
“Lo Run”.
. A short press of button A allows choice of the
number of the block to be deleted.
. Pull the crown out to position (p2). The display
indicates “CLEAr” and the block number.
. A long press on button A causes the display to ash
and deletes the chosen block.
NB: If the total “to” is chosen, a long press on
button A denitively deletes all the memorized logs.
. Push the crown back to position (p1) to return to
the basic display. The block numbers remaining are
shifted. In case of total deletion, the display is returned
entirely to zero.
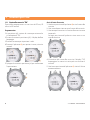
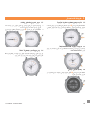
4.4 Adjusting the time zone “UTC”
. In position (p1) turn the crown to access the display
“UTC” (Universal Coordinated Time).
. Pull the crown out to position (p2). The hours and
minutes display ashes.
. Turn the crown to adjust the values.
. Press button
B
to switch between hours and minutes.
. Push the crown back to position (p1) to conrm the
settings.

© 2011 HAMILTON – INSTRUCTION MANUAL 17
4. Pilot functions
4.5 Temperature “ISA”
This feature allows display of the temperature in °F or °C,
starting from a desired altitude in feet “Ft” or in meters
“m”, following the “ISA” model of atmospheric standards.
Display of the temperature “ISA”
. In position (p1) turn the crown to access the “ISA”
display. The indications of altitude and temperature
display alternately.
. A short press of button A or B allows increasing
or decreasing the altitude in steps of 500 feet or 150
meters.
Selection of units of measurement
. When the “ISA” display is shown, pull the crown out
to position (p2). The display ashes.
. A short press of button A changes the altitude unit.
. A short press of button B changes the temperature
unit.
. Push the crown back to position (p1) to conrm the
settings.
A página está carregando...
A página está carregando...
A página está carregando...
A página está carregando...
A página está carregando...
A página está carregando...
A página está carregando...
A página está carregando...
A página está carregando...
A página está carregando...
A página está carregando...
A página está carregando...
A página está carregando...
A página está carregando...
A página está carregando...
A página está carregando...
A página está carregando...
A página está carregando...
A página está carregando...
A página está carregando...
A página está carregando...
A página está carregando...
A página está carregando...
A página está carregando...
A página está carregando...
A página está carregando...
A página está carregando...
A página está carregando...
A página está carregando...
A página está carregando...
A página está carregando...
A página está carregando...
A página está carregando...
A página está carregando...
A página está carregando...
A página está carregando...
A página está carregando...
A página está carregando...
A página está carregando...
A página está carregando...
A página está carregando...
A página está carregando...
A página está carregando...
A página está carregando...
A página está carregando...
A página está carregando...
A página está carregando...
A página está carregando...
A página está carregando...
A página está carregando...
A página está carregando...
A página está carregando...
A página está carregando...
A página está carregando...
A página está carregando...
A página está carregando...
A página está carregando...
A página está carregando...
A página está carregando...
A página está carregando...
A página está carregando...
A página está carregando...
A página está carregando...
A página está carregando...
A página está carregando...
A página está carregando...
A página está carregando...
A página está carregando...
A página está carregando...
A página está carregando...
A página está carregando...
A página está carregando...
A página está carregando...
A página está carregando...
A página está carregando...
A página está carregando...
A página está carregando...
A página está carregando...
A página está carregando...
A página está carregando...
A página está carregando...
A página está carregando...
A página está carregando...
A página está carregando...
A página está carregando...
A página está carregando...
A página está carregando...
A página está carregando...
A página está carregando...
A página está carregando...
A página está carregando...
A página está carregando...
A página está carregando...
A página está carregando...
A página está carregando...
A página está carregando...
A página está carregando...
A página está carregando...
A página está carregando...
A página está carregando...
A página está carregando...
A página está carregando...
A página está carregando...
A página está carregando...
A página está carregando...
A página está carregando...
A página está carregando...
A página está carregando...
A página está carregando...
A página está carregando...
A página está carregando...
A página está carregando...
A página está carregando...
A página está carregando...
A página está carregando...
A página está carregando...
A página está carregando...
A página está carregando...
A página está carregando...
A página está carregando...
A página está carregando...
A página está carregando...
A página está carregando...
A página está carregando...
A página está carregando...
A página está carregando...
A página está carregando...
A página está carregando...
A página está carregando...
A página está carregando...
A página está carregando...
A página está carregando...
A página está carregando...
A página está carregando...
A página está carregando...
A página está carregando...
A página está carregando...
A página está carregando...
A página está carregando...
A página está carregando...
A página está carregando...
A página está carregando...
A página está carregando...
A página está carregando...
A página está carregando...
A página está carregando...
A página está carregando...
A página está carregando...
A página está carregando...
A página está carregando...
A página está carregando...
A página está carregando...
A página está carregando...
A página está carregando...
A página está carregando...
A página está carregando...
A página está carregando...
A página está carregando...
A página está carregando...
A página está carregando...
A página está carregando...
A página está carregando...
A página está carregando...
A página está carregando...
A página está carregando...
A página está carregando...
A página está carregando...
A página está carregando...
A página está carregando...
A página está carregando...
A página está carregando...
A página está carregando...
A página está carregando...
A página está carregando...
A página está carregando...
A página está carregando...
A página está carregando...
A página está carregando...
A página está carregando...
A página está carregando...
A página está carregando...
A página está carregando...
A página está carregando...
A página está carregando...
A página está carregando...
A página está carregando...
A página está carregando...
A página está carregando...
A página está carregando...
A página está carregando...
A página está carregando...
A página está carregando...
A página está carregando...
A página está carregando...
A página está carregando...
A página está carregando...
A página está carregando...
A página está carregando...
A página está carregando...
A página está carregando...
A página está carregando...
A página está carregando...
A página está carregando...
A página está carregando...
A página está carregando...
A página está carregando...
A página está carregando...
A página está carregando...
A página está carregando...
A página está carregando...
A página está carregando...
A página está carregando...
A página está carregando...
A página está carregando...
A página está carregando...
A página está carregando...
A página está carregando...
A página está carregando...
A página está carregando...
A página está carregando...
A página está carregando...
A página está carregando...
A página está carregando...
A página está carregando...
A página está carregando...
-
 1
1
-
 2
2
-
 3
3
-
 4
4
-
 5
5
-
 6
6
-
 7
7
-
 8
8
-
 9
9
-
 10
10
-
 11
11
-
 12
12
-
 13
13
-
 14
14
-
 15
15
-
 16
16
-
 17
17
-
 18
18
-
 19
19
-
 20
20
-
 21
21
-
 22
22
-
 23
23
-
 24
24
-
 25
25
-
 26
26
-
 27
27
-
 28
28
-
 29
29
-
 30
30
-
 31
31
-
 32
32
-
 33
33
-
 34
34
-
 35
35
-
 36
36
-
 37
37
-
 38
38
-
 39
39
-
 40
40
-
 41
41
-
 42
42
-
 43
43
-
 44
44
-
 45
45
-
 46
46
-
 47
47
-
 48
48
-
 49
49
-
 50
50
-
 51
51
-
 52
52
-
 53
53
-
 54
54
-
 55
55
-
 56
56
-
 57
57
-
 58
58
-
 59
59
-
 60
60
-
 61
61
-
 62
62
-
 63
63
-
 64
64
-
 65
65
-
 66
66
-
 67
67
-
 68
68
-
 69
69
-
 70
70
-
 71
71
-
 72
72
-
 73
73
-
 74
74
-
 75
75
-
 76
76
-
 77
77
-
 78
78
-
 79
79
-
 80
80
-
 81
81
-
 82
82
-
 83
83
-
 84
84
-
 85
85
-
 86
86
-
 87
87
-
 88
88
-
 89
89
-
 90
90
-
 91
91
-
 92
92
-
 93
93
-
 94
94
-
 95
95
-
 96
96
-
 97
97
-
 98
98
-
 99
99
-
 100
100
-
 101
101
-
 102
102
-
 103
103
-
 104
104
-
 105
105
-
 106
106
-
 107
107
-
 108
108
-
 109
109
-
 110
110
-
 111
111
-
 112
112
-
 113
113
-
 114
114
-
 115
115
-
 116
116
-
 117
117
-
 118
118
-
 119
119
-
 120
120
-
 121
121
-
 122
122
-
 123
123
-
 124
124
-
 125
125
-
 126
126
-
 127
127
-
 128
128
-
 129
129
-
 130
130
-
 131
131
-
 132
132
-
 133
133
-
 134
134
-
 135
135
-
 136
136
-
 137
137
-
 138
138
-
 139
139
-
 140
140
-
 141
141
-
 142
142
-
 143
143
-
 144
144
-
 145
145
-
 146
146
-
 147
147
-
 148
148
-
 149
149
-
 150
150
-
 151
151
-
 152
152
-
 153
153
-
 154
154
-
 155
155
-
 156
156
-
 157
157
-
 158
158
-
 159
159
-
 160
160
-
 161
161
-
 162
162
-
 163
163
-
 164
164
-
 165
165
-
 166
166
-
 167
167
-
 168
168
-
 169
169
-
 170
170
-
 171
171
-
 172
172
-
 173
173
-
 174
174
-
 175
175
-
 176
176
-
 177
177
-
 178
178
-
 179
179
-
 180
180
-
 181
181
-
 182
182
-
 183
183
-
 184
184
-
 185
185
-
 186
186
-
 187
187
-
 188
188
-
 189
189
-
 190
190
-
 191
191
-
 192
192
-
 193
193
-
 194
194
-
 195
195
-
 196
196
-
 197
197
-
 198
198
-
 199
199
-
 200
200
-
 201
201
-
 202
202
-
 203
203
-
 204
204
-
 205
205
-
 206
206
-
 207
207
-
 208
208
-
 209
209
-
 210
210
-
 211
211
-
 212
212
-
 213
213
-
 214
214
-
 215
215
-
 216
216
-
 217
217
-
 218
218
-
 219
219
-
 220
220
-
 221
221
-
 222
222
-
 223
223
-
 224
224
-
 225
225
-
 226
226
-
 227
227
-
 228
228
-
 229
229
-
 230
230
-
 231
231
-
 232
232
-
 233
233
-
 234
234
-
 235
235
-
 236
236
-
 237
237
-
 238
238
-
 239
239
-
 240
240
-
 241
241
-
 242
242
-
 243
243
-
 244
244
-
 245
245


Hamilton KHAKI FLIGHT TIMER Manual do proprietário
- Tipo
- Manual do proprietário
em outras línguas
- español: Hamilton KHAKI FLIGHT TIMER El manual del propietario
- français: Hamilton KHAKI FLIGHT TIMER Le manuel du propriétaire
- italiano: Hamilton KHAKI FLIGHT TIMER Manuale del proprietario
- English: Hamilton KHAKI FLIGHT TIMER Owner's manual
- русский: Hamilton KHAKI FLIGHT TIMER Инструкция по применению
- Nederlands: Hamilton KHAKI FLIGHT TIMER de handleiding
- Deutsch: Hamilton KHAKI FLIGHT TIMER Bedienungsanleitung
- 日本語: Hamilton KHAKI FLIGHT TIMER 取扱説明書
- Türkçe: Hamilton KHAKI FLIGHT TIMER El kitabı
Artigos relacionados
Outros documentos
-
Breitling EXOSPACE B55 Guia de usuario
-
-
-
-
 Hamilton Watch Automatic and Quartz Chronograph Manual do usuário
-
LOUIS VUITTON LV 87 Manual do proprietário
-
Victorinox Night Vision Guia rápido
-
Lotus 15615 Manual do proprietário
-
 Piaget Polo Date High Jewelry watch Guia de usuario
-
 Piaget Altiplano Origin watch Guia de usuario


