Hamilton KHAKI CHRONO WORLDTIMER Manual do usuário
- Tipo
- Manual do usuário

KHAKI CHRONO WORLDTIMER | INSTRUCTION MANUAL


M042 INSTRUCTION MANUAL 1
ENGLISH 2
FRANÇAIS 8
DEUTSCH 14
ITALIANO 20
ESPAÑOL 26
PORTUGUÊS 32
NEDERLANDS 38
TÜRKÇE 44
ΕΛΛΗΝΙΚΑ 50
56
日本語
62
한국어
68
简体中文
74
繁體中文
80
91
2 Click on the language
for direct access

2 © HAMILTON AUGUST 2015
INTRODUCTION
Hamilton is delighted that you have chosen a timepiece from its collection. You have acquired a small tech-
nological marvel that will serve you faithfully for many years. The most advanced technologies were used
throughout its manufacture and it underwent stringent controls before it was released for sale.
In order to guarantee the perfect running order of your Hamilton watch for years to come, please carefully
follow the advice and information contained in this manual.
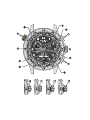
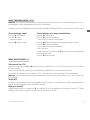
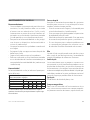
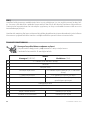
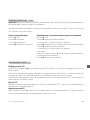
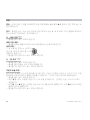
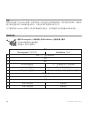
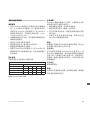
DESCRIPTIONS AND FUNCTIONS
Selection of Chronograph or Worldtimer mode
Press button
D for two seconds to change the mode.
The active mode is indicated by the disk 7.
Modes
Chronograph (CHRONO) Worldtimer (TIME)
1
Local time in hours hand “T1”
2
Minutes hand
3
Seconds hand
4
60-seconds-counter hand “T2” 12-hour hand in the selected location
5
12-minutes-counter hand “T2” hand for the selected location
6
120-minutes-counter hand “T2” 24-hours hand + day/night indication for
the selected location
7
Disk for indication of mode
8
Date
A
Crown
B
Start / Stop button Selection of location
C
Reset to zero / Intermediate time button Selection of location

M042 INSTRUCTION MANUAL 3
CHRONOGRAPH MODE (CHRONO)
NB: you can change the mode at any time without disturbing a timing in progress, as the chronograph is
independent of the Worldtimer function.
The time measured is displayed by the hands of counters 4 60 seconds, 5 12 minutes and 6 120 minutes.
Simple timing
Button
B: Start
Button
B: Stop
> Read time
Button
C: Reset to zero
Timing with intermediate times
Button
B: Start
Button
C: Intermediate stop
> Read 1st intermediate time
Button
C: Restart with catch-up of elapsed time
Button
C: Intermediate stop
> Read 2nd intermediate time
And so on...
Finally, press button
B to stop the timing and read the total time.
Button
C: Reset to zero
WORLDTIMER MODE (TIME)
Selection of location “T2”
Press Button B or C to position hand 5 on one of the 24 locations given on the sloping outer ring of the dial.
The current time at the selected location is displayed by hand 4 (hours) and hand 2 (minutes).
The position of hand 6 tells you if it is daytime or nighttime at the selected location.
NB: your watch automatically takes summer/winter time (DST) into account for each of the given locations.
UTC time
Coordinated Universal Time (UTC) is the time standard used in the civilian sector and in professional aviation.
Display of UTC time
Briey press button
D: hands 4 and 6 will move and display UTC time. After a few seconds, the hands will
return to their initial positions.

4 © HAMILTON AUGUST 2015
ADJUSTMENTS
Important: in order to guarantee the water-resistance of your watch, always return the crown
A
to its normal,
screwed-in position (p0) after any adjustment has been made.
NB: each time the crown is pulled out to position (p2) or (p3), hands 4, 5 and 6 position themselves at 12
o’clock and the disk 7 at “CHRONO”.
ADJUSTMENT OF HOURS AND DATE “T1”
• Unscrew the crown and pull it out to position (p2).
Rapid adjustment of the hours hand:
• Turn the crown in the desired direction to position hand 1 to the required hour.
Adjustment of the date:
• Turn the crown clockwise until
the desired date is displayed in
the window.
• Push the crown back in and screw it in to position (p0).
ADJUSTMENT OF HOURS AND MINUTES “T1”
• Unscrew the crown and pull it out to position (p3).
• Turn the crown to adjust to the hour and minute desired.
• Push the crown back in and screw it in to position (p0).
ADJUSTMENT OF THE COUNTER HANDS
After a battery change or a violent shock, it is possible that one or more counter hands or a disk are no longer
exactly at zero or aligned. If this is the case, proceed as follows to adjust them:
• Unscrew the crown and pull it out to position (p2).
• Press button
D to select the hand or disk to be adjusted. The hand/disk selected will rotate 360°.
• Press button B or C to move the selected hand (or disc) back or forward. A long press of button C results
in rapid forward movement
• Push the crown back in and screw it in to position (p0).

M042 INSTRUCTION MANUAL 5
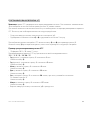
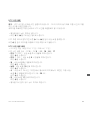
PROGRAMMING UTC TIME
NB: UTC time is preprogrammed in your watch. It allows automatic change between summer and winter
time, in synchronization with the 24 locations available.
In case of battery change, for instance, it might be necessary to reprogram UTC time by performing the
following operations:
• Unscrew the crown and pull it out to position (p3).
• Press buttons
B and C simultaneously for 2 seconds.
Having accessed the UTC adjustment mode, press button
B or C to move hand 4.
Press button
D to save the data and go on to the next adjustment.
Example of UTC time to program
• 19 February 2015, 20:17 (8.17 p.m.)
Program the UTC time in the following order: 2015 / 2015 / 02 / 19 / 20 / 17
• Year (tens): position hand 4 at 1 o’clock
Press button
D
• Year (units): position hand 4 at 5 o’clock
Press button
D
• Month: position hand 4 at 2 o’clock
Press button
D
• Date: position hand 4 at 19 minutes
Press button
D
• Hour: check that hand 6 on the 24-hour dial is positioned accordingly, then position hand 4 at 8 o’clock
(i.e. 20:00).
Press button
D
• Minute: position the hand 4 at 17 minutes
Press button
D
• Push the crown back in and screw it in to position (p0).

6 © HAMILTON AUGUST 2015
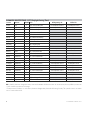
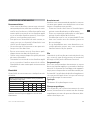
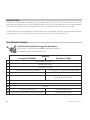
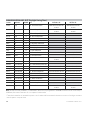
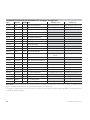
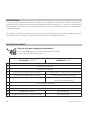
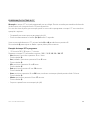
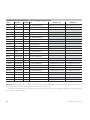
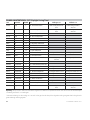
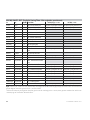
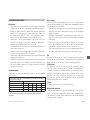
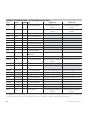
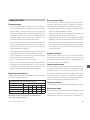
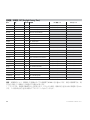
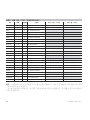
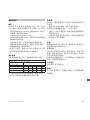
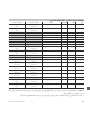
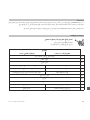
SUMMER / WINTER TIME DST Daylight Saving Time
Location Continent UTC/GMT Zone DST Beginning +1h DST End -1h
London Europe 0 GMT - Greenwich Mean Time Last Sunday March at 02:00 Last Sunday Oct. at 02:00
Paris Europe +1 CET - Central European Time Last Sunday March at 02:00 Last Sunday Oct. at 02:00
Cairo Africa +2 EET - Eastern European Time
Moscow Europe +3 MSK - Moscow Standard Time
Dubai Asia +4 GST - Gulf Standard Time
Karachi Asia +5 PKT - Pakistan Standard Time
Dhaka Asia +6 BST - Bangladesh Standard Time
Bangkok Asia +7 ICT - Indochina Time
Hong Kong Asia +8 HKT - Hong Kong Time
Tokyo Asia +9 JST - Japan Standard Time
Sydney Oceania +10 AEST - Australian Eastern Standard Time 1st Sunday Oct. at 02:00 1st Sunday April at 02:00
Noumea Oceania +11 NCT - New Caledonia Time
Auckland Oceania +12 NZST - New Zealand Standard Time Last Sunday Sept. at 02:00 1st Sunday April at 02:00
Midway North America -11 SST - Samoa Standard Time
Honolulu North America -10 HAST - Hawaii-Aleutian Standard Time
Anchorage North America -9 AKST - Alaska Standard Time 2nd Sunday March at 02:00 1st Sunday Nov. at 02:00
Los Angeles North America -8 PST - Pacic Standard Time 2nd Sunday March at 02:00 1st Sunday Nov. at 02:00
Denver North America -7 MST - Mountain Standard Time 2nd Sunday March at 02:00 1st Sunday Nov. at 02:00
Chicago North America -6 CST - Central Standard Time 2nd Sunday March at 02:00 1st Sunday Nov. at 02:00
New York North America -5 EST - Eastern Standard Time 2nd Sunday March at 02:00 1st Sunday Nov. at 02:00
Puerto Rico North America -4 AST - Atlantic Standard Time
Rio South America -3 BRT - Brasília time 3rd Sunday Oct. at 02:00* 3rd Sunday Feb. at 02:00*
South Georgia South America -2 GST - South Georgia Time
Azores Europe -1 AZOT - Azores Time Last Sunday March at 02:00 Last Sunday Oct. at 02:00
NB: by default, the time change has been positioned at 02:00 in all the time zones. In certain zones, this may dier by maximum
1 hour in relation to the actual change.
* Except carnival Sundays. In such cases, the time change takes place the following Sunday. This specic case is not taken
into account in the watch.

M042 INSTRUCTION MANUAL 7
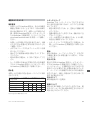
MAINTENANCE OF YOUR WATCH
Recommendations
• Like all micro-mechanical precision instruments,
your Hamilton watch should be checked at least
once every two years. Entrust your watch only to
an authorized Hamilton service center or an ocial
Hamilton retailer (list available on
www.hamiltonwatch.com).
• To keep your watch water-resistant, make sure that
its sealing features are tested at every check-up.
• Do not move the crown or press the buttons when
you are in water.
• Rinse o your watch with fresh water after any
immersion in seawater.
• Dry your watch whenever it gets wet.
• Have your watch checked for water-resistance by
an authorized Hamilton service center or an ocial
Hamilton retailer each time the case is opened.
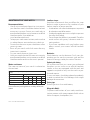
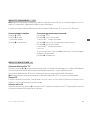
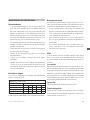
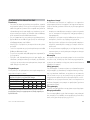
Water-resistance
The water-resistance of your watch is indicated on
the case back.
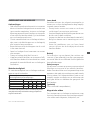
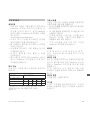
Metric system and imperial system equivalents of water-resistance and
pressure
Unit of measurement Categories of water-resistance
bar / atm (pressure) 3 5 10 20 100
m * (meters) 30 50 100 200 1000
psi 44 72.5 145 290 1450
ft * (feet) 100 165 330 660 3300
* The values given in feet or meters of immersion in water are equivalent
to the measurement of pressure applied in tests according to the ISO 22810
standard.
Leather straps
Hamilton recommends that you follow the steps
below in order to preserve the condition of your
leather strap for as long as possible:
• Avoid contact with water and dampness to prevent
discoloration and deformation.
• Avoid prolonged exposure to sunlight to prevent
the color from fading.
• Do not forget that leather is permeable. Therefore
avoid contact with greasy substances and cos-
metic products.
• If you have a problem with your leather strap,
please contact your nearest official Hamilton
retailer.
Batteries
Watch batteries can last between 2 to 5 years, de
-
pending on the watch-movement type and the
amount of energy used by the various functions.
Replacing the battery
We recommend that you contact an authorized
Hamilton service center or an official Hamilton
retailer, as they are equipped with the tools and
apparatus required to carry out the work in a pro-
fessional manner.
A worn-out battery should be replaced immediately
in order to reduce the risk of leakage, which might
damage the movement.
Battery type
Button-type zinc-silver oxide battery.
Magnetic elds
To prevent malfunctions of your watch, avoid com-
ing into contact with strong magnetic elds such as
those of magnets, loudspeakers, etc.

8 © HAMILTON AUGUST 2015
INTRODUCTION
Hamilton vous remercie d’avoir porté votre choix sur un modèle de sa collection. Vous avez acquis une
petite merveille de technologie qui vous servira dèlement pendant de longues années. Les techniques
les plus avancées ont été appliquées tout au long de sa fabrication et des contrôles très stricts ont précédé
sa mise en vente.
An de vous garantir pendant longtemps le parfait état de marche de votre montre Hamilton, nous vous
saurions gré de suivre attentivement les conseils et informations contenus dans ce mode d’emploi.
DESCRIPTION ET FONCTIONS
Sélection du mode Chronographe ou Worldtimer
Appuyez 2 secondes sur le poussoir
D pour changer de mode.
Le mode actif est indiqué par le disque 7.
Modes
Chronographe (CHRONO) Worldtimer (TIME)
1
Aiguille heure locale «T1»
2
Aiguille minutes
3
Aiguille secondes
4
Aiguille compteur 60 secondes «T2» Aiguille 12 heures dans le lieu sélectionné
5
Aiguille compteur 12 minutes «T2» Aiguille lieu sélectionné
6
Aiguille compteur 120 minutes «T2» Aiguille 24 heures + indication jour/nuit
dans le lieu sélectionné
7
Disque indicateur du mode
8
Date
A
Couronne
B
Poussoir Démarrage /Arrêt Sélection du lieu
C
Poussoir Remise à zéro / Temps intermédiaire Sélection du lieu

M042 INSTRUCTION MANUAL 9
MODE CHRONOGRAPHE CHRONO
Remarque: vous pouvez à tout moment changer de mode sans perturber le chronométrage en cours, le
chronographe étant indépendant de la fonction Worldtimer.
Le temps mesuré est indiqué par les aiguilles des compteurs 4 60 secondes, 5 12 minutes et 6 120 minutes.
Chronométrage simple
Poussoir
B: Démarrage
Poussoir
B: Arrêt
> Lecture du temps
Poussoir
C: Remise à zéro
Chronométrage avec temps intermédiaires
Poussoir
B: Démarrage
Poussoir
C: Arrêt intermédiaire
> Lecture du 1er temps intermédiaire
Poussoir
C: Redémarrage avec rattrapage du temps écoulé
Poussoir
C: Arrêt intermédiaire
> Lecture du 2e temps intermédiaire
et ainsi de suite...
A la n, appuyez sur le poussoir
B
pour arrêter le chronométrage
et lire le temps total.
Poussoir
C: Remise à zéro
MODE WORLDTIMER TIME
Sélection du lieu «T2»
Appuyez sur le poussoir B ou C pour positionner l’aiguille 5 sur l’un des 24 lieux présents sur le rehaut
de votre montre.
L’heure actuelle du lieu sélectionné est achée par l’aiguille 4, les minutes par l’aiguille 2.
La position de l’aiguille 6 vous indique si c’est l’heure du jour ou de la nuit dans le lieu sélectionné.
Remarque: votre montre tient compte automatiquement des heures d’été/d’hiver (DST) pour chacun des
lieux achés.
Temps UTC
Le temps universel coordonné (Coordinated Universal Time) est une référence de temps standard utilisée
dans le civil ainsi que dans l’aviation professionnelle.
Achage de l’heure UTC
Appuyez brièvement sur le poussoir D: les aiguilles 4 et 6 se déplacent et indiquent l’heure UTC. Après
quelques secondes, les aiguilles retournent à leurs positions initiales.
Sélection du lieu

10 © HAMILTON AUGUST 2015
RÉGLAGES
IMPORTANT: an de garantir l’étanchéité de votre montre, après tout réglage, ramenez toujours la couronne
A en position normale (p0), vissée.
Remarque: à chaque fois que la couronne est tirée en position (p2) ou (p3), les aiguilles 4, 5 et 6 se posi-
tionnent à 12 heures et le disque 7 sur «CHRONO».
RÉGLAGE HEURE ET DATE T1
• Dévissez la couronne et tirez-la en position (p2).
Réglage rapide de l’aiguille des heures:
• Tournez la couronne dans le sens désiré pour positionner l’aiguille 1 à l’heure souhaitée.
Réglage de la date:
• Tournez la couronne dans le sens horaire
jusqu’à ce que la date désirée s’ache
dans le guichet.
• Repoussez et revissez la couronne en position (p0).
RÉGLAGE HEURES ET MINUTES T1
• Dévissez la couronne et tirez-la en position (p3).
• Tournez la couronne pour régler l’heure et la minute souhaitées.
• Repoussez et revissez la couronne en position (p0).
AJUSTEMENT DES AIGUILLES DES COMPTEURS
Après un changement de pile ou un choc violent, il est possible qu’une ou plusieurs aiguilles des compteurs
ou qu’un disque ne soient plus exactement à zéro ou alignés. Si c’est le cas, procédez de la manière suivante
pour les ajuster:
• Dévissez la couronne et tirez-la en position (p2).
• Appuyez sur le poussoir
D
pour sélectionner l’aiguille ou le disque à ajuster. L’aiguille/disque sélectionné
pivote de 360°.
• Appuyez sur le poussoir
B ou C pour reculer ou avancer l’aiguille ou le disque à ajuster. Avance rapide
par une longue pression sur le poussoir
C.
• Repoussez et revissez la couronne en position (p0).

M042 INSTRUCTION MANUAL 11
PROGRAMMATION DU TEMPS UTC
Remarque: le temps UTC est préprogrammé dans votre montre. Il permet le changement automatique de
l’heure d’été/hiver, en synchronisation avec les 24 lieux disponibles.
En cas de changement de pile par exemple, il peut être nécessaire de reprogrammer le temps UTC à l’aide
des opérations suivantes:
• Dévissez la couronne et tirez-la en position (p3).
• Appuyez simultanément sur les poussoirs
B et C pendant 2 secondes.
Une fois en mode réglage UTC, appuyez sur le poussoir
B ou C pour déplacer l’aiguille 4.
Appuyez sur le poussoir
D pour enregistrer les données et passer au prochain réglage.
Exemple de temps UTC à programmer
• 19 février 2015, 20 heures et 17 minutes
Programmez le temps UTC dans l’ordre suivant: 2015 / 2015 / 02 / 19 / 20 / 17
• Année (dizaines): positionnez l’aiguille 4 sur 1 heure
Appuyez sur le poussoir
D
• Année (unités): positionnez l’aiguille 4 sur 5 heures
Appuyez sur le poussoir
D
• Mois: positionnez l’aiguille 4 sur 2 heures
Appuyez sur le poussoir
D
• Date: positionnez l’aiguille 4 sur 19 minutes
Appuyez sur le poussoir
D
• Heure: positionnez l’aiguille 4 sur 20 heures en tenant compte de la position de l’aiguille 6 des 24 heures.
Appuyez sur le poussoir D
• Minute: positionnez l’aiguille 4 sur 17 minutes
Appuyez sur le poussoir
D
• Repoussez et revissez la couronne en position (p0).

12 © HAMILTON AUGUST 2015
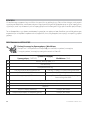
HEURES D’ÉTÉ / D’HIVER DST Daylight Saving Time
Lieu Continent UTC/GMT Zone DST Début +1h DST Fin -1h
London Europe 0 GMT - Greenwich Mean Time dernier dimanche Mars à 02:00 dernier dimanche Oct. à 02:00
Paris Europe +1 CET - Central European Time dernier dimanche Mars à 02:00 dernier dimanche Oct. à 02:00
Cairo Afrique +2 EET - Eastern European Time
Moscow Europe +3 MSK - Moscow Standard Time
Dubai Asie +4 GST - Gulf Standard Time
Karachi Asie +5 PKT - Pakistan Standard Time
Dhaka Asie +6 BST - Bangladesh Standard Time
Bangkok Asie +7 ICT - Indochina Time
Hong Kong Asie +8 HKT - Hong Kong Time
Tokyo Asia +9 JST - Japan Standard Time
Sydney Oceanie +10 AEST - Australian Eastern Standard Time 1
er
dimanche Octobre à 02:00 1
er
dimanche Avril à 02:00
Noumea Oceanie +11 NCT - New Caledonia Time
Auckland Oceanie +12 NZST - New Zealand Standard Time dernier dimanche Sept. à 02:00 1
er
dimanche Avril à 02:00
Midway Amérique du Nord -11 SST - Samoa Standard Time
Honolulu Amérique du Nord -10 HAST - Hawaii-Aleutian Standard Time
Anchorage Amérique du Nord -9 AKST - Alaska Standard Time 2
e
dimanche Mars à 02:00 1
er
dimanche Nov. à 02:00
Los Angeles Amérique du Nord -8 PST - Pacic Standard Time 2
e
dimanche Mars à 02:00 1
er
dimanche Nov. à 02:00
Denver Amérique du Nord -7 MST - Mountain Standard Time 2
e
dimanche Mars à 02:00 1
er
dimanche Nov. à 02:00
Chicago Amérique du Nord -6 CST - Central Standard Time 2
e
dimanche Mars à 02:00 1
er
dimanche Nov. à 02:00
New York Amérique du Nord -5 EST - Eastern Standard Time 2
e
dimanche Mars à 02:00 1
er
dimanche Nov. à 02:00
Puerto Rico Amérique du Nord -4 AST - Atlantic Standard Time
Rio Amérique du Sud -3 BRT - Brasília time 3
e
dimanche Octobre à 02:00* 3
e
dimanche Février à 02:00*
South Georgia Amérique du Sud -2 GST - South Georgia Time
Azores Europe -1 AZOT - Azores Time dernier dimanche Mars à 02:00 dernier dimanche Oct. à 02:00
Remarque: par défaut, le changement d’heure a été positionné à 02:00 dans toutes les zones. Dans certaines zones, la diérence
peut être de maximum 1h par rapport au changement réel.
* Sauf les dimanches de carnaval. Dans ce cas, le changement d'heure a lieu le dimanche suivant. Cette spécicité n'est pas
prise en compte dans la montre.

M042 INSTRUCTION MANUAL 13
ENTRETIEN DE VOTRE MONTRE
Recommandations
• Votre montre Hamilton, comme toute micromé-
canique de précision, doit être contrôlée au moins
une fois tous les deux ans. Veillez à ne coner votre
montre qu’à un centre de service Hamilton agréé
ou un revendeur Hamilton autorisé (liste dispo-
nible sur www.hamiltonwatch.com).
• Pour préserver l’étanchéité de votre montre, as
-
surez-vous que ses dispositifs d’étanchéité sont
vériés lors de chaque contrôle.
• Ne touchez pas à la couronne ou aux poussoirs
lorsque vous êtes dans l’eau.
• Rincez votre montre avec de l’eau douce après
chaque immersion dans de l’eau de mer.
• Séchez votre montre chaque fois qu’elle présente
des traces d’humidité.
• Demandez à un centre de service Hamilton agréé
ou un revendeur Hamilton autorisé de vérier
l’étanchéité de votre montre après toute ouverture
du boîtier.
Étanchéité
L’étanchéité de votre montre est indiquée au dos
du boîtier.
Équivalences d’étanchéité et de pression utilisées dans les pays utilisant le
système métrique ou anglo-saxon:
Unité de mesure Catégories d’étanchéité
bar / atm (pression) 3 5 10 20 100
m * (mètres) 30 50 100 200 1000
psi 44 72,5 145 290 1450
ft * (pieds) 100 165 330 660 3300
* Les valeurs données en pieds ou en mètres d’immersion dans l’eau sont
équivalentes à la mesure de la pression appliquée lors des essais selon la
norme ISO 22810.
Bracelet en cuir
Hamilton vous recommande de prendre les mesures
suivantes pour garder votre bracelet en cuir en bon
état aussi longtemps que possible:
• Évitez tout contact avec l’eau et l’humidité pour
prévenir toute décoloration et déformation.
• Évitez une exposition prolongée au soleil pour
prévenir la perte d’éclat de la couleur.
• N’oubliez pas que le cuir est perméable! Évitez
donc tout contact avec des matières grasses et
des cosmétiques.
• En cas de problème avec votre bracelet en cuir,
veuillez prendre contact avec votre revendeur
Hamilton autorisé le plus proche.
Pile
La durée de vie d’une pile peut varier de deux à cinq
ans, suivant le type de mouvement et la quantité
d’énergie utilisée par les diérentes fonctions.
Changement de pile
Nous vous recommandons de contacter un centre
de service Hamilton agréé ou un revendeur Hamilton
autorisé. Ils disposent de l’outillage et des appareils
requis pour entreprendre ce travail de manière pro-
fessionnelle. Une pile épuisée doit être changée aussi
vite que possible pour éviter le risque de fuite qui
peut endommager le mouvement.
Type de pile
Pile bouton à l’oxyde d’argent et zinc.
Champs magnétiques
An de prévenir des dysfonctionnements de votre
montre, évitez d’entrer en contact avec des champs
magnétiques puissants tels que ceux d’aimants, d’en-
ceintes acoustiques, etc.

14 © HAMILTON AUGUST 2015
VORWORT
Hamilton bedankt sich, dass Sie sich für ein Modell aus unserer Kollektion entschieden haben. Sie besitzen
damit ein kleines technisches Wunder, das Ihnen über viele Jahre ein treuer Begleiter sein wird. Bei der
gesamten Herstellung der Uhr wurden modernste Techniken angewandt und bevor sie in den Verkauf ging,
wurde sie strengsten Kontrollen unterworfen.
Damit Ihre Hamilton-Uhr möglichst lange reibungslos funktioniert, bitten wir Sie, die Ratschläge und
Informationen in dieser Gebrauchsanleitung sorgfältig zu studieren.
BESCHREIBUNG UND FUNKTIONEN
Wahl zwischen den Betriebsarten Chronograph und Worldtimer
Betätigen Sie den Drücker
D 2 Sekunden lang, um die Betriebsart zu wechseln.
Die aktive Betriebsart wird von der Scheibe 7 angezeigt.
Betriebsarten
Chronograph (CHRONO) Worldtimer (TIME)
1
Stundenzeiger, Ortszeit «T1»
2
Minutenzeiger
3
Sekundenzeiger
4
Zeiger 60-Sekundenzähler «T2» 12-Stundenzeiger am gewählten Ort
5
Zeiger 12-Minutenzähler «T2» Zeiger für den gewählten Ort
6
Zeiger 120-Minutenzähler «T2» 24-Stundenzeiger
+ Tag/Nacht-Anzeige am gewählten Ort
7
Anzeige der Betriebsart
8
Datum
A
Krone
B
Start-/Stopp-Drücker Auswahl des Ortes
C
Drücker für Reset / Zwischenzeit Auswahl des Ortes

14 © HAMILTON AUGUST 2015
VORWORT
Hamilton bedankt sich, dass Sie sich für ein Modell aus unserer Kollektion entschieden haben. Sie besitzen
damit ein kleines technisches Wunder, das Ihnen über viele Jahre ein treuer Begleiter sein wird. Bei der
gesamten Herstellung der Uhr wurden modernste Techniken angewandt und bevor sie in den Verkauf ging,
wurde sie strengsten Kontrollen unterworfen.
Damit Ihre Hamilton-Uhr möglichst lange reibungslos funktioniert, bitten wir Sie, die Ratschläge und
Informationen in dieser Gebrauchsanleitung sorgfältig zu studieren.
BESCHREIBUNG UND FUNKTIONEN
Wahl zwischen den Betriebsarten Chronograph und Worldtimer
Betätigen Sie den Drücker
D 2 Sekunden lang, um die Betriebsart zu wechseln.
Die aktive Betriebsart wird von der Scheibe 7 angezeigt.
Betriebsarten
Chronograph (CHRONO) Worldtimer (TIME)
1
Stundenzeiger, Ortszeit «T1»
2
Minutenzeiger
3
Sekundenzeiger
4
Zeiger 60-Sekundenzähler «T2» 12-Stundenzeiger am gewählten Ort
5
Zeiger 12-Minutenzähler «T2» Zeiger für den gewählten Ort
6
Zeiger 120-Minutenzähler «T2» 24-Stundenzeiger
+ Tag/Nacht-Anzeige am gewählten Ort
7
Anzeige der Betriebsart
8
Datum
A
Krone
B
Start-/Stopp-Drücker Auswahl des Ortes
C
Drücker für Nullstellung / Zwischenzeit Auswahl des Ortes

M042 INSTRUCTION MANUAL 15
BETRIEBSART CHRONOGRAPH CHRONO
Hinweis: Sie können die Betriebsart jederzeit wechseln, ohne die aktuelle Zeitmessung zu stören, da die
Chronographenfunktion von der Worldtimerfunktion unabhängig ist.
Die gemessene Zeit wird von den Zählerzeigern 4, 60 Sekunden, 5, 12 Minuten, und 6, 120 Minuten,
angezeigt.
Einfache Zeitnahme
Drücker
B: Start
Drücker
B: Stopp
> Zeit ablesen
Drücker
C: Nullstellen
Zeitnahme mit Zwischenzeiten
Drücker
B: Start
Drücker
C: Zwischenstopp
> 1. Zwischenzeit ablesen
Drücker
C: Fortsetzung, die vergangene Zeit wird aufgeholt
Drücker
C: Zwischenstopp
> 2. Zwischenzeit ablesen
und so weiter...
Betätigen Sie zum Schluss den Drücker
B
, um die Zeitnahme zu
beenden und die Gesamtzeit abzulesen.
Drücker
C: Nullstellen
BETRIEBSART WORLDTIMER TIME
Auswahl des Ortes für «T2»
Betätigen Sie den Drücker B oder C, um den Zeiger 5 auf einen der 24 Orte einzustellen, die auf dem
Höhenring eingetragen sind.
Die aktuelle Zeit am gewählten Ort wird vom Zeiger 4 angezeigt, die Minuten vom Zeiger 2.
An der Position des Zeigers 6 können Sie erkennen, ob am gewählten Ort Tag oder Nacht ist.
Hinweis: Ihre Uhr berücksichtigt bei jedem der angegebenen Orte automatisch die Sommer- und Winterzeit
(DST).
UTC-Zeit
Die koordinierte Weltzeit (Coordinated Universal Time) ist eine Standardzeit, die im Zivilbereich und in der
professionellen Luftfahrt verwendet wird.
Anzeige der UTC-Zeit
Betätigen Sie kurz den Drücker
D
: Die Zeiger 4 und 6 bewegen sich und zeigen die UTC-Zeit an. Nach
einigen Sekunden kehren die Zeiger in ihre Ausgangsposition zurück.

16 © HAMILTON AUGUST 2015
EINSTELLUNGEN
Wichtig: Bringen Sie die Krone A, um die Dichtheit Ihrer Uhr zu erhalten, nach jeder Einstellung wieder in die
normale, eingeschraubte Position (p0).
Hinweis: Jedesmal, wenn die Krone in Position (p2) oder (p3) gezogen wird, stellen sich die Zeiger 4, 5 und
6 auf 12 Uhr ein und die Scheibe 7 auf «CHRONO».
EINSTELLEN VON UHRZEIT UND DATUM „T1“
• Schrauben Sie die Krone auf und ziehen Sie sie in Position (p2).
Schnelleinstellen der Stundenzeiger:
• Drehen Sie an der Krone in der erforderlichen Richtung, um den Zeiger 1 auf die gewünschte Uhrzeit
einzustellen.
Einstellen des Datums:
• Drehen Sie die Krone im Uhrzeigersinn,
bis das gewünschte Datum im Fenster
angezeigt wird.
• Bringen Sie die Krone durch Drücken und Schrauben wieder in Position (p0).
EINSTELLEN DER STUNDEN UND MINUTEN VON T1
• Schrauben Sie die Krone auf und ziehen Sie sie in Position (p3).
• Drehen Sie die Krone, um die gewünschte Stunde und die Minuten einzustellen.
• Bringen Sie die Krone durch Drücken und Schrauben wieder in Position (p0).
EINSTELLUNG DER ZÄHLERZEIGER
Nach dem Austausch der Batterie oder einem harten Schlag kann es vorkommen, dass einer oder mehrere
Zählerzeiger oder eine Scheibe nicht mehr genau auf 0 stehen oder ausgerichtet sind. Ist dies der Fall, können
Sie die Position wie folgt korrigieren:
• Schrauben Sie die Krone auf und ziehen Sie sie in Position (p2).
• Betätigen Sie den Drücker
D
, um den einzustellenden Zeiger bzw. die Scheibe auszuwählen. Der gewählte
Zeiger bzw. die Scheibe dreht sich um 360°.
• Betätigen Sie den Drücker
B
oder
C
, um den einzustellenden Zeiger bzw. die Scheibe vorwärts oder
rückwärts zu bewegen. Durch langen Druck auf den Drücker
C
können Sie die Bewegung beschleunigen.
• Bringen Sie die Krone durch Drücken und Schrauben wieder in Position (p0).

M042 INSTRUCTION MANUAL 17
PROGRAMMIEREN DER UTCZEIT
Hinweis: Die UTC-Zeit ist in Ihrer Uhr vorprogrammiert. Dies ermöglicht die automatische Sommer-/
Winterzeitumstellung und die Synchronisierung der 24 verfügbaren Orte. Nach dem Austausch der Batterie
kann es erforderlich sein, die UTC-Zeit neu zu programmieren. Gehen Sie dabei wie folgt vor:
• Schrauben Sie die Krone auf und ziehen Sie sie in Position (p3).
• Betätigen Sie die Drücker
B und C gleichzeitig 2 Sekunden lang.
Betätigen Sie, sobald der UTC-Einstellmodus aktiv ist, die Drücker
B
oder
C
, um den Zeiger 4 zu verstellen.
Betätigen Sie den Drücker D, um die Daten zu speichern und fahren Sie mit der nächsten Einstellung fort.
Beispiel für die Programmierung einer UTC-Zeit
• 19. Februar 2015, 20 Uhr und 17 Minuten
Programmieren Sie die UTC-Zeit in folgender Reihenfolge: 2015 / 2015 / 02 / 19 / 20 / 17
• Jahr (Zehner): Stellen Sie den Zeiger 4 auf 1 Uhr
Betätigen Sie den Drücker
D
• Jahr (Einer): Stellen Sie den Zeiger 4 auf 5 Uhr
Betätigen Sie den Drücker
D
• Monat: Stellen Sie den Zeiger 4 auf 2 Uhr
Betätigen Sie den Drücker
D
• Datum: Stellen Sie den Zeiger 4 auf 19 Minuten
Betätigen Sie den Drücker
D
• Stunde: Stellen Sie den Zeiger 4 auf 20 Uhr, beachten Sie dabei die Stellung des Zeigers 6 (24 Stunden).
Betätigen Sie den Drücker
D
• Minuten: Stellen Sie den Zeiger 4 auf 17 Minuten
Betätigen Sie den Drücker
D
• Bringen Sie die Krone durch Drücken und Schrauben wieder in Position (p0).
A página está carregando...
A página está carregando...
A página está carregando...
A página está carregando...
A página está carregando...
A página está carregando...
A página está carregando...
A página está carregando...
A página está carregando...
A página está carregando...
A página está carregando...
A página está carregando...
A página está carregando...
A página está carregando...
A página está carregando...
A página está carregando...
A página está carregando...
A página está carregando...
A página está carregando...
A página está carregando...
A página está carregando...
A página está carregando...
A página está carregando...
A página está carregando...
A página está carregando...
A página está carregando...
A página está carregando...
A página está carregando...
A página está carregando...
A página está carregando...
A página está carregando...
A página está carregando...
A página está carregando...
A página está carregando...
A página está carregando...
A página está carregando...
A página está carregando...
A página está carregando...
A página está carregando...
A página está carregando...
A página está carregando...
A página está carregando...
A página está carregando...
A página está carregando...
A página está carregando...
A página está carregando...
A página está carregando...
A página está carregando...
A página está carregando...
A página está carregando...
A página está carregando...
A página está carregando...
A página está carregando...
A página está carregando...
A página está carregando...
A página está carregando...
A página está carregando...
A página está carregando...
A página está carregando...
A página está carregando...
A página está carregando...
A página está carregando...
A página está carregando...
A página está carregando...
A página está carregando...
A página está carregando...
A página está carregando...
A página está carregando...
A página está carregando...
A página está carregando...
A página está carregando...
A página está carregando...
A página está carregando...
A página está carregando...
A página está carregando...
A página está carregando...
-
 1
1
-
 2
2
-
 3
3
-
 4
4
-
 5
5
-
 6
6
-
 7
7
-
 8
8
-
 9
9
-
 10
10
-
 11
11
-
 12
12
-
 13
13
-
 14
14
-
 15
15
-
 16
16
-
 17
17
-
 18
18
-
 19
19
-
 20
20
-
 21
21
-
 22
22
-
 23
23
-
 24
24
-
 25
25
-
 26
26
-
 27
27
-
 28
28
-
 29
29
-
 30
30
-
 31
31
-
 32
32
-
 33
33
-
 34
34
-
 35
35
-
 36
36
-
 37
37
-
 38
38
-
 39
39
-
 40
40
-
 41
41
-
 42
42
-
 43
43
-
 44
44
-
 45
45
-
 46
46
-
 47
47
-
 48
48
-
 49
49
-
 50
50
-
 51
51
-
 52
52
-
 53
53
-
 54
54
-
 55
55
-
 56
56
-
 57
57
-
 58
58
-
 59
59
-
 60
60
-
 61
61
-
 62
62
-
 63
63
-
 64
64
-
 65
65
-
 66
66
-
 67
67
-
 68
68
-
 69
69
-
 70
70
-
 71
71
-
 72
72
-
 73
73
-
 74
74
-
 75
75
-
 76
76
-
 77
77
-
 78
78
-
 79
79
-
 80
80
-
 81
81
-
 82
82
-
 83
83
-
 84
84
-
 85
85
-
 86
86
-
 87
87
-
 88
88
-
 89
89
-
 90
90
-
 91
91
-
 92
92
-
 93
93
-
 94
94
-
 95
95
-
 96
96


Hamilton KHAKI CHRONO WORLDTIMER Manual do usuário
- Tipo
- Manual do usuário
em outras línguas
- español: Hamilton KHAKI CHRONO WORLDTIMER Manual de usuario
- français: Hamilton KHAKI CHRONO WORLDTIMER Manuel utilisateur
- italiano: Hamilton KHAKI CHRONO WORLDTIMER Manuale utente
- English: Hamilton KHAKI CHRONO WORLDTIMER User manual
- русский: Hamilton KHAKI CHRONO WORLDTIMER Руководство пользователя
- Nederlands: Hamilton KHAKI CHRONO WORLDTIMER Handleiding
- Deutsch: Hamilton KHAKI CHRONO WORLDTIMER Benutzerhandbuch
- 日本語: Hamilton KHAKI CHRONO WORLDTIMER ユーザーマニュアル
- Türkçe: Hamilton KHAKI CHRONO WORLDTIMER Kullanım kılavuzu
Artigos relacionados
-
Hamilton PULSOMATIC Manual do usuário
-
Hamilton Caliber H-21 General Instruction Manual
-
-
Hamilton Sub Manual do usuário
-
-
-
-
-
-
Outros documentos
-
 Oregon Scientific BAR966HG Manual do usuário
-
LOUIS VUITTON LV 87 Manual do proprietário
-
Breitling Cockpit B50 Guia de usuario
-
 Hamilton Watch Automatic and Quartz Chronograph Manual do usuário
-
Bison BI 0006 Manual do usuário
-
 Piaget Altiplano Origin watch Guia de usuario
-
 Piaget Polo Date High Jewelry watch Guia de usuario
-
 Piaget Altiplano Ultimate Automatic watch Guia de usuario


