
Quick start guide
Guide d'utilisation rapide
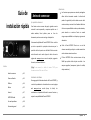
Guía de instalación rápida
Bedienungsanleitung
Guida all'uso
Gebruikershandleiding
Manual do utilizador
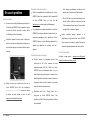
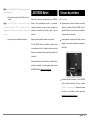
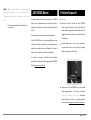
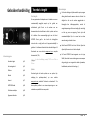
Parrot ASTEROID
Classic

www.parrot.com
Parrot ASTEROID Classic
..............................................................................................2English
..............................................................................................12Français
..............................................................................................22Español
..............................................................................................32Deutsch
..............................................................................................42Italiano
..............................................................................................52Dutch
..............................................................................................62Português


English 2
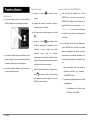
Quick start
guide
Content
Before you begin
p.2
Getting started
p.3
Phone
p.4
Music
p.5
Internet
p.7
ASTEROID Market
p.8
Troubleshooting
p.8
General information
p.9
Before you begin
About this guide
In order to limit our paper consumption, and as part of our
environmentally friendly and responsible approach, Parrot
prefers to put user documents online rather than print them
out. This simplified guide to the Parrot ASTEROID Classic is
therefore limited to providing you with the main instructions
that will make it easy for you to use the device. More
information can be found on the Support section of our
website, www.parrot.com: the full manual, FAQs, tutorials, and
more.
Note: iPod a nd iPhone (in iPod mode) will be referred to a s an
"iPod" in this ma nua l.
Software updates
Download the latest update for free (and consult the update
procedure) on the Parrot ASTEROID Classic support page on
our website www.parrot.com/asteroid-alfa-romeo. These
updates will enable you to receive new features and improve
the product’s compatibility.
Warnings
All functions requiring an increased attention should
only be used while the vehicle is stationary. Your safety
and the one of the other road users prevails over phone
calls, music and navigation instructions. Be responsible:
drive carefully and pay full attention to your
surrounding. Parrot denies any liability should you
choose not to respect this warning.
Use the Parrot ASTEROID Classic with a reasonable
volume level so that you can hear all external noises
while driving.
The Parrot ASTEROID Classic includes NdFeB magnets
which can damage objects sensitive to magnetic fields
(pacemakers, credit cards, mechanical clocks…).

3 English
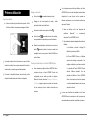
Getting started
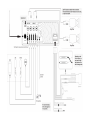
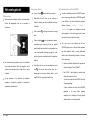
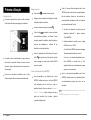
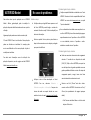
Basic operations
To remove the faceplate, press the eject button on its
left. Place the faceplate into the provided carrying case
in order to protect it from scratches and dust.
To attach the faceplate, put it on the right side of the car
stereo. Once the faceplate and the car stereo magnets
connect, press the left side.
To remove the car stereo from the dashboard, insert the
provided extraction key until they click into place.
Navigating through the menus
Press the button to access the main menu.
Browse through the menus by turning the wheel and
confirm by pressing the wheel.
Press the button to get back to previous menu.
Press the button to access the pop-up menu
corresponding to the current application. The pop-up
menu allows you to change several settings or browse
more easily through the content of your audio source
or phonebook.
Press the button to get to the track list if a song is
currently being played. While navigating through the
menus, press the SOURCE button to get to the Now
Playing screen.
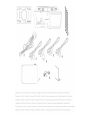
Connecting a phone to the Parrot ASTEROID Classic
Before pairing your phone with the Parrot ASTEROID
Classic, make sure that it is visible by all Bluetooth
devices. To do so, select Settings > Telephony > Visibility
then make sure the option is checked. If it is not the
case, check it by pressing the jogwheel.
Prior to using the Parrot ASTEROID Classic with your
phone for the very first time, you must initially pair both
devices. To do so:
1. From your phone, search for Bluetooth®
peripherals and select “Parrot ASTEROID Classic ".
2. The pairing procedure depends on which telephone
model you have:
- If the phone asks you to enter the Bluetooth
PIN code, enter “0000”.
- If the Parrot ASTEROID Classic and your
telephone display two codes, verify that the
codes are identical, then either confirm or
invalidate.
> The Parrot ASTEROID Classic screen will
display “Pairing successful”.
Once your telephone is paired with the Parrot ASTEROID
Classic, the 2 devices will automatically connect when
they are turned on and in proximity of each other.
You can pair up to 10 devices with the Parrot ASTEROID
Classic. If you attempt to pair an 11th phone, you will
get the « Memory full » message. You must then delete
a phone from the paired devices list. To do so:
1. Select Settings > Telephony > Paired devices.
2. Select the phone then select Delete.
Note: The problem of full memory ma y a lso be rela ted to a n
installa tion problem: inversion of ignition 12V a nd perma nent
12V or absence of a fter-contact 12V.

English 4
Connecting two phones
To activate Dual Mode (multipoint) and connect two phones :
1. Tap Settings > Bluetooth.
2. Activate the Dual Mode option.
When the Parrot ASTEROID Classic is switched on, it attempts
to connect to all paired phones in the vehicle. If there are more
than two paired phones in the vehicle, the device connects to
the two phones with the oldest pairing.
When two phones are connected to the Parrot ASTEROID
Classic, one of them becomes the main phone and the other is
the secondary phone. By default, the main phone is the one
with the oldest pairing to the Parrot ASTEROID Classic.
You can receive calls (manually or through voice recognition)
to the main or secondary phones.
Only the phonebook for your main phone may be accessed
through the Parrot ASTEROID Classic. You can only make calls
using the main phone. However, you can easily switch between
the connected phones. To do so :
1. Tap Settings > Telephone > Connect phone.
2. Select the main phone.
You can also switch between the connected phones from the
main menu by tapping
Synchronising the phonebook
With most of the Bluetooth phones, the phonebook is
automatically synchronized in the system’s memory.
W arning: Only the conta cts stored in the phone memory a re
synchronized. If your conta cts a re stored in your SIM ca rd
memory, transfer them onto your phone memory.
Phone
Receiving a call
An incoming call is indicated by a ringtone. The name of the
caller is announced if his number is recorded in the
phonebook of the phone connected to the Parrot ASTEROID
Classic.
- If you want to answer the call, press the button.
Then press the button to end the call.
- If you want to refuse this call, press the button.
If the magic words are activated, you can use the voice
recognition feature to pick up and reject a call:
- The magic word « Accept » allows you to accept an
incoming call.
- The magic word « Reject » allows you to reject an
incoming call.
Magic words are activated by default. To deactivate /
activate them:
1. Press the jog wheel and select Telephone > Voice
commands > Magic words.
2. Press the jog wheel to activate/deactivate the magic
words.

5 English
Making a call
To make a call via voice recognition:
1. Press the button to launch the voice
recognition feature.
> The Parrot ASTEROID Classic asks you the name
of the contact you want to call.
2. Say the name of the contact and the type of
number («Work», «Cellphone»...) if there are
several numbers associated to your contact.
> The call is automatically launched if the voice tag
is correctly understood. If it is not the case, a
confirmation message is asked. Confirm by saying
«Yes» or «Call».
Note: At a ny time, press the button to exit voice recognition
mode.
Hold down the button to redial the last dialled
number.
Using the Parrot ASTEROID Classic while on a call
Use the jog wheel during a call to adjust the
communication volume. The volume setting is saved for
subsequent calls.
During a call, if you want to continue the conversation
on your phone (private conversation), press the
button.
The Parrot ASTEROID Classic allows you to send DTMF
while on call. To do so, press the jogwheel.
Music
Using the voice recognition function
The voice recognition function allows you to select the
artist / album you want to hear via voice recognition.
This function is only available if you are using the Parrot
ASTEROID Classic with a USB / SD / iPod peripheral.
Note : Severa l minutes of loading ma y be necessa ry when
connecting your a udio periphera l (U SB / SD / iPod) to the
Pa rrot ASTEROID Cla ssic for the first time, particula rly if you
are using a udio periphera l with a la rge ca pacity or conta ining
many a udio files. This loa ding time will allow your audio files to
be accessible via voice recognition.
Press the button then say the name of the artist /
album.
Check the albums and artists names in the metadatas of
your music files. These names may be different from the
ones displayed on your music files titles.
The list of audio sources connected to the Parrot
ASTEROID Classic which contain the artist / album that
you selected will appear.

English 6
Radio
To select a frequency:
1. Press the SOURCE button until the Radio source is
selected.
2. Press briefly the buttons to change
manually the radio station. Hold down the
buttons to tune to the next available
radio station.
To get the list of all available stations:
1. Press the SOURCE button until the Radio source is
selected.
2. Press the button and select Fullscan.
To memorize a station:
1. Press the SOURCE button until the Radio source is
selected.
2. Select the frequency manually or in Fullscan mode.
3. Press the button then select Add to presets.
> To select a stored station, select the Presets
mode.
iPod
Connect your iPod using the iPod connector then press the
SOURCE button until the iPod source is selected.
USB storage device
1. Connect your USB storage device to the Parrot
ASTEROID Classic using the USB cable or the USB
connectors on the back of the car stereo
2. Press the button until the USB source is
selected.
SD card
1. Remove the Parrot ASTEROID Classic faceplate.
2. Insert the SD card into the appropriate slot with
the contact surface facing down.
3. Reattach the faceplate.
4. Press the button until the SD source is selected.
Analogue audio player
1. Connect the audio player using the Jack connector.
2. Press the button until the Line in source is
selected.
3. Start playing a song on your audio player.
Audio player connected via Bluetooth
You can use the Parrot ASTEROID Classic to listen to
songs stored on your mobile phone or Bluetooth audio
device. To do so, your phone / audio device must
support the Bluetooth A2DP profile (Advanced Audio
Distribution Profile).
If you are using a Bluetooth audio player for the first
time, you have to pair both devices.
If both devices are already paired:
1. Press the button until the Bluetooth Audio
source is selected.
2. Start playing a song on your audio player.

7 English
Internet
Sharing a phone 3G connection via USB
Note: Refer to the compa tibility page of our website to check if
your phone a llows 3G connection sharing via U SB a nd to
consult the corresponding procedure :
www.parrot.com/uk/
compatibility
.
1. Make sure the USB sharing option is activated. To
do so, select Settings > Network > USB sharing >
Activate.
2. Make sure that your phone’s keypad is unlocked
and connect the phone to the Parrot ASTEROID
Classic using a USB cable/micro-USB and the USB
extension cable provided with the Parrot ASTEROID
Classic.
Note : This connection a lso ena bles you to recharge your
phone’s battery.
3. Select your APN (Access Point Name) from the
suggested list if necessary.
Note : If your APN is not in the list, you can a dd it by selecting
Settings > Network > USB sha ring > Configura tion.
Sharing a phone 3G connection via Bluetooth
Note: Refer to the compa tibility page of our website to check if
your phone a llows 3G connection sharing via Bluetooth and to
consult the corresponding procedure :
www.parrot.com/uk/
compatibility
.
If you have a phone that supports the DUN (Dial-Up
Networking) or PAN (Personal Area Network) Bluetooth
profiles, the Bluetooth connecting your phone to the Parrot
ASTEROID Classic will allow for sharing of the phone's 3G
connection.
1. Make sure the Bluetooth sharing option is
activated. To do so, select Settings > Network >
Bluetooth sharing > Activate.
2. Allow connection sharing on your phone. This
procedure will vary according to your phone
model.
3. Connect your phone to the Parrot ASTEROID
Classic via Bluetooth.
4. If necessary, select your APN (Access Point Name)
from the suggested list.
Note : If your APN is not in the list, you can a dd it by selecting
Settings > Network > Bluetooth sharing > Configura tion.
Connecting a 3G / 4G key
Note: Refer to the compatibility section of the Parrot
ASTEROID Classic on our website to get the list of 3G / 4G keys
compatible with the Parrot ASTEROID Classic:
www.parrot.com/fr/compatibility/3g
.
Note: To guara ntee an optimal reception qua lity we
recommend you do not connect your internet U SB key 3G on
the Parrot ASTEROID Cla ssic directly : use the U SB cable to
install your device on the dashboard (or any other open area ).
1. Connect a 3G key to the Parrot ASTEROID Classic
using a USB cable.
2. Select OK to activate the 3G connection.
3. Enter your PIN code using the jog wheel (if
required), then select OK.
4. Select your APN (Access Point Name) from the
suggested list. This information is available in the
documentation provided with your 3G key.
Note: If your APN is not in the list, you ca n a dd it by selecting
Settings > Network > USB modem > Configura tion.
5. Wait approximately 30 seconds until the
connection is established.

English 8
ASTEROID Market
Several types of applications are available with the ASTEROID
Market : music, geolocation, driver assistance...
All applications may not be available in all countries. The use of
some applications may need prior subscription.
The Parrot ASTEROID Classic is a multitasking device: several
applications can run simultaneously. For example, you can
listen to a Webradio station and use a driver assistance
application at the same time.
For more information about installing and using the available
applications, refer to the ASTEROID Market web page :
www.parrotasteroid.com/asteroidmarket.
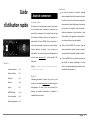
Troubleshooting
Before you begin
Make sure the Alfa Romeo logo is displayed on the
Parrot ASTEROID Classic screen when you turn the
ignition off. Refer to the Checking the wiring section for
more information.
Reset the Parrot ASTEROID Classic. To do so, remove the
faceplate then use a paper clip to press the Reset
button. Hold down the Reset button for 3 seconds.
Make sure you have the latest software update on your
Parrot ASTEROID Classic. To do so, select Settings >
About > Version. Compare this number with the one on
our website www.parrot.com/asteroid-alfa-romeo.
Problems while using the phone function
Make sure your phone is compatible with the Parrot
ASTEROID Classic. To do so, refer to the compatibility
list of the Parrot ASTEROID Classic available on our
website www.parrot.com, in the Support & Downloads
section.
If your phone is compatible with the Parrot ASTEROID
Classic and if you already have the latest software
update:
1. Erase the memory of the Parrot ASTEROID Classic.
To do so, select Settings > Advanced settings >
Factory settings.
2. On your telephone, erase the Parrot system from
the list of Bluetooth peripherals (or reboot your
iPhone®).
3. Repeat the pairing procedure for the 2 devices.
Problems while using the music function
Several minutes of loading may be necessary when
connecting your audio peripheral (USB / SD / iPod) to
the Parrot ASTEROID Classic for the first time,
particularly if you are using audio peripheral with a large
capacity or containing many audio files. This loading
time will allow your audio files to be accessible via voice
recognition.

9 English
Reboot your iPod / iPhone before connecting it to the
Parrot ASTEROID Classic. To reboot your iPod / iPhone
(this procedure will not erase any of your data) :
- iPod: press Menu and the centre button
simultaneously until the iPod reboots.
- iPhone: Press the On/Off button and the Home
button simultaneously until the iPhone reboots. Do
not touch the screen when the message “Slide to
shutdown” appears.
Some problems may occur if the iPod / SD card / USB
device is already connected to the Parrot ASTEROID
Classic before you turn on the ignition. Connect the
iPod / SD card / USB device once the ignition is turned
on.
For more information
Refer to our online troubleshooting page : www.parrot.com/
uk/support/frequently-asked-questions/faq_asteroid.
General information
Warranty
Without prejudice of legal warranty, Parrot products are
warranted during 1 year from the date of purchase for defects
in materials and workmanship, provided that no deterioration
to the product has been made, and upon presentation of
proof of purchase (invoice) to the retailer. Warranty does not
cover: upgrading of the software items of the Parrot products
with Bluetooth cell phones for compatibility purpose, data
recovery, deterioration of the external aspect due to normal
wear of the product, any damage caused by accident, misuse,
misapplication, or non-Parrot products. Parrot is not
responsible for storage, loss or damaged to data during transit
or repair. Any product wrongfully declared to be defective will
be returned to sender and inspection, process and carriage
costs will be invoiced to him.
Correct disposal of This Product (Waste Electrical & Electronic
Equipment)
This marking shown on the product or its literature, indicates
that it should not be disposed with other household wastes at
the end of its working life. To prevent possible harm to the
environment or human health from uncontrolled waste
disposal, please separate this from other types of wastes and
recycle it responsibly to promote the sustainable reuse of
material resources.
Household users should contact either the retailer where they
purchased this product, or their local government office, for
details of where and how they can take this item for
environmentally safe recycling. Business users should contract
their supplier and the terms and conditions of the purchase
contract. This product should not be mixed with other
commercial wastes for disposal.
Modifications
The explanations and specifications in this guide are given for
information purposes only and may be modified without prior
notice. They are deemed to be correct at time of going to press.
The utmost care has been taken when writing this guide,as part
of the aim to provide you with accurate information. However,
Parrot shall not be held responsible for any consequences
arising from any errors or omissions in the guide, nor for any

English 10
damage or accidental loss of data resulting directly or indirectly
from the use of the information herein. Parrot reserves the
right to amend or improve the product design or user guide
without any restrictions and without any obligation to notify
users. As part of our ongoing concern to upgrade and improve
our products, the product that you have purchased may differ
slightly from the model described in this guide. If so, a later
version of this guide might be available in electronic format at
Parrot’s website at www.parrot.com.
FCC Compliance Statement
This device complies with part 15 of the FC C rules. Operation
is subject to the following two conditions:
(1). this device may not cause harmful interference, and
(2). this device must accept any interference received,
including interference that may cause undesired operation.
Note: The manufacturer is not responsible for any radio or tv
interference caused by unauthorized modifications to this
equipment. Such modifications could void the user’s authority
to operate the equipment.
Canada Class B statement: This Class B digital apparatus
complies with Canadian ICES-003
Copyrights
Copyright © 2011 Parrot. All Rights Reserved
Declaration of Conformity
We, Parrot S.A. 174 quai de Jemmapes, 75010 Paris, France,
declare under our sole responsibility that our product, the
Parrot ASTEROID Classic to which this declaration relates is in
conformity with appropriate standards EN 60065 :2002/
A1 :2006/A11 :2008, EN 50371 (2002), EN 300328 v1.7.1
and EN 301 489-17 v1.3.2 following the provision of Radio
Equipment and Telecommunication Equipment directive
1999/5/EC R&TTE and 2004/104/CE Automotive directive
amended by the 2009/19/CE directive.
http://www.parrot.com/fr/support/guidesdaideenligne/parrot-
asteroid/asteroid_ce_conformity_declaration.pdf


Français 12
Guide
d'utilisation rapide
Sommaire
Avant de commencer
p.12
Première utilisation
p.13
Téléphone
p.15
Musique
p.16
Internet
p.17
ASTEROID Market
p.18
En cas de problème
p.19
Informations générales
p.20
Avant de commencer
A propos de ce guide
Afin de limiter notre consommation de papier et dans le cadre
de notre démarche aussi responsable et respectueuse que
possible de l’environnement, Parrot privilégie la mise en ligne
des documents utilisateurs plutôt que leur impression. Ce
guide simplifié du Parrot ASTEROID Classic se limite donc à
vous fournir les principales instructions qui vous permettront
d’utiliser facilement cet appareil. Vous trouverez plus
d’informations sur la section Support et téléchargement de
notre site web www.parrot.com : notice complète, FAQ,
didacticiels...
Note :
iPod et iPhone (en mode iPod) seront désignés par le
terme "iPod" dans ce manuel.
Mises à jour
Téléchargez gratuitement la dernière mise à jour de votre
produit sur notre site web www.parrot.com section Support et
téléchargements. Ces mises à jour vous permettront de
bénéficier de nouvelles fonctionnalités et d’améliorer la
compatibilité de votre produit.
Avertissements
Les fonctions requérant une attention prolongée
doivent uniquement être utilisées lorsque le véhicule est
à l’arrêt. Votre sécurité et celle des autres usagers de la
route prime sur les appels téléphoniques, la musique ou
les applications de navigation. Soyez responsable :
conduisez prudemment et prêtez attention à votre
environnement. Parrot dégage toute responsabilité si
vous choisissez d’ignorer cette mise en garde.
Utilisez le Parrot ASTEROID Classic avec un niveau de
volume raisonnable, de manière à pouvoir entendre à
tout moment les bruits extérieurs pendant la conduite.
Le Parrot ASTEROID Classic comporte des aimants de
type NdFeB qui peuvent endommager les objets
sensibles aux champs magnétiques (pacemaker, cartes
de crédit, montres mécaniques...).

13 Français
Première utilisation
Opérations de base
Pour retirer la façade, appuyez sur le bouton d’éjection.
Utilisez la pochette fournie pour protéger votre façade.
Pour remettre la façade en place, placez d'abord son côté
droit sur l’autoradio. Une fois les aimants de la façade et de
l’autoradio en contact, appuyez sur le côté gauche.
Pour retirer l’autoradio de l’habitacle, retirez la façade puis
utilisez la clé d’extraction fournie.
Naviguer dans les menus
Appuyez sur la touche pour accéder au menu
principal.
Naviguez dans les menus en tournant la molette, et
validez en appuyant sur la molette.
Pour revenir au menu précédent, appuyez sur la touche
.
Appuyez sur la touche pour accéder au menu
contextuel, correspondant à l’application en cours
d’utilisation. Le menu contextuel vous permet
notamment d'avoir accès aux fonctions
supplémentaires de l'application, de modifier certains
réglages, ou de parcourir plus rapidement le contenu de
votre répertoire ou de votre source audio.
Pendant la lecture d’un fichier musical, appuyez sur la
touche pour revenir au menu. A l’inverse, lorsque
vous naviguez dans les menus, appuyez sur la touche
SOURCE pour revenir au lecteur.
Connecter un téléphone au Parrot ASTEROID Classic
Avant de jumeler votre téléphone avec le Parrot
ASTEROID Classic, assurez-vous que votre Parrot
ASTEROID Classic est réglé pour être visible par tous les
appareils Bluetooth. Pour cela, sélectionnez Paramètres
> Téléphonie > Visibilité puis assurez-vous que l’option
est cochée. Dans le cas contraire, cochez-la en appuyant
sur la molette.
Si c’est la 1ère fois que vous utilisez un téléphone avec
le Parrot ASTEROID Classic, vous devez tout d’abord
effectuer un jumelage des deux appareils. Lorsque les
deux appareils se seront détectés mutuellement, il ne
sera plus nécessaire de procéder à cette opération. Pour
cela:
1. Depuis votre téléphone, lancez une recherche de
périphériques Bluetooth® puis sélectionnez
«Parrot ASTEROID Classic».
2. La procédure de jumelage dépend alors du modèle
de votre téléphone :
- Si le téléphone vous invite à entrer le code
PIN Bluetooth, entrez «0000».

Français 14
- Si le Parrot ASTEROID Classic et votre
téléphone affichent deux codes, vérifiez si
ces codes sont identiques puis confirmez
ou infirmez.
> L’écran du Parrot ASTEROID Classic affiche «
Jumelage réussi».
Une fois votre téléphone jumelé avec le Parrot ASTEROID
Classic, la connexion entre les 2 appareils sera
automatique dès que les 2 appareils seront allumés et à
proximité.
Vous pouvez jumeler jusqu’à 10 appareils au Parrot
ASTEROID. Si vous tentez de jumeler un 11
ème
téléphone, le message « mémoire pleine » apparait :
vous devez alors supprimer un téléphone jumelé. Pour
cela:
1. Sélectionnez Paramètres > Téléphonie > Appareils
jumelés.
2. Sélectionnez le téléphone puis sélectionnez
Supprimer.
Connecter deux téléphones
Pour activer le mode permettant la connexion de 2
téléphones :
1. Sélectionnez Paramètres > Bluetooth.
2. Activez l'option Dual Mode.
Lorsque le Parrot ASTEROID Classic s’allume, il tente d’établir la
connexion avec tous les téléphones appairés et présents dans
le véhicule. Si plus de 2 téléphones appairés sont présents
dans le véhicule, il établit la connexion avec les 2 téléphones
dont l'appairage est le plus ancien.
Lorsque 2 téléphones sont connectés au Parrot ASTEROID
Classic, l’un est considéré comme téléphone principal, l’autre
comme téléphone secondaire. Par défaut, le téléphone
principal correspond au téléphone dont l'appairage avec le
Parrot ASTEROID Classic est le plus ancien.
Vous avez la possibilité de recevoir des appels (manuellement
ou via reconnaissance vocale) provenant du téléphone
principal et du téléphone secondaire.
Seul le répertoire du téléphone principal est disponible sur le
Parrot ASTEROID Classic. Vous pourrez uniquement émettre
des appels à partir du téléphone principal. Pour basculer d'un
téléphone connecté à l'autre :
1. Sélectionnez Paramètres > Téléphonie > Connecter le
téléphone.
2. Sélectionnez le téléphone principal.
Vous pouvez également basculer d'un téléphone connecté à
l'autre à partir du menu principal en appuyant sur .
Synchroniser le répertoire du téléphone
Avec la plupart des téléphones Bluetooth, le répertoire est
automatiquement synchronisé avec la mémoire du système.
Avertissement: Seuls les conta cts enregistrés da ns la mémoire
du téléphone se synchronisent. Si vos conta cts sont enregistrés
dans la mémoire de la carte SIM , tra nsférez-les dans la
mémoire du téléphone. Consultez le guide utilisateur de votre
téléphone pour plus d'informations.

15 Français
Téléphone
Recevoir un appel
Un appel entrant est indiqué par une sonnerie. Le nom
et le numéro du contact sont énoncés si le numéro de
ce contact est enregistré dans le répertoire du téléphone
connecté au Parrot ASTEROID Classic.
- Si vous souhaitez accepter cet appel, appuyez sur la
touche . Appuyez ensuite sur la touche
pour terminer l’appel.
- Si vous souhaitez refuser cet appel, appuyez sur la
touche .
Si vous avez activé les mots magiques, vous pouvez
utiliser les commandes vocales pour décrocher ou
rejeter un appel entrant.
- Le mot magique « Accepter » vous permet d’accepter
un appel entrant.
- Le mot magique « Rejeter » vous permet de refuser un
appel entrant.
Les mots magiques sont activés par défaut. Pour les
activer ou les désactiver :
1. Sélectionnez Réglages > Téléphone > Commandes
vocales > Mots magiques.
2. Appuyez sur la molette pour activer/désactiver les
mots magiques.
Emettre un appel
Pour émettre un appel par reconnaissance vocale:
1. Appuyez sur la touche pour initier le
processus de reconnaissance vocale.
> Le Parrot ASTEROID Classic vous demande le nom
du contact que vous souhaitez appeler.
2. Prononcez le nom du contact suivi du type de
numéro («Bureau», «Portable»...) si ce contact
dispose de plusieurs numéros.
> L’appel vers ce contact est automatiquement
initié si la commande vocale a été bien comprise.
> Dans le cas contraire, le système mains libres
diffuse un message de confirmation. Confirmez en
prononçant «oui», «appelle» ou «appeler».
Note: A tout moment, a ppuyez sur la touche pour annuler
la procédure d'a ppel.
Si vous souhaitez rappeler le dernier numéro composé,
appuyez deux secondes sur la touche .
Utilisation pendant un appel
Pour régler le volume sonore lors d’une communication,
utilisez la molette. Le volume est sauvegardé pour les
communications suivantes.
Si vous souhaitez transférer une communication en
cours sur votre téléphone, appuyez sur la touche .
Le Parrot ASTEROID Classic vous permet d’envoyer des
DTMF en communication. Pour cela, appuyez sur la
molette au cours de la communication.

Français 16
Musique
Utiliser la fonction reconnaissance vocale musicale
La fonction reconnaissance vocale musicale vous
permet de sélectionner via reconnaissance vocale les
artistes ou albums que vous souhaitez écouter. Cette
fonction est disponible si vous utilisez le Parrot
ASTEROID Classic avec un périphérique de type iPod /
USB / SD, ou si vous utilisez l'application Deezer.
Note : Plusieurs minutes de chargement peuvent être
nécessaires lors de la 1ère connexion de votre périphérique a udio
(iPod /
USB / SD) sur le Pa rrot ASTEROID Cla ssic,
particulièrement da ns le cas de périphériques contena nt une
qua ntité importa nte de fichiers musica ux. Ce temps de
chargement permet de rendre ces morceaux a ccessibles via
reconnaissance vocale.
Appuyez sur la touche puis énoncez le nom de
l’artiste ou de l’album que vous souhaitez écouter.
Vérifiez les noms des artistes et albums dans les tags
(métadonnées) de vos fichiers musicaux. Ceux-ci
peuvent être différents de ceux affichés dans le titre de
votre morceau.
Utiliser la fonction radio
Pour sélectionner une fréquence :
1. Appuyez sur la touche jusqu’à sélectionner
Radio.
2. Utilisez les touches pour sélectionner une
fréquence manuellement.Vous pouvez également
appuyer 2 secondes sur les touches pour
lancer une recherche automatique vers la
précédente / prochaine station.
Pour obtenir la liste de l’ensemble des stations
disponibles:
1. Appuyez sur la touche jusqu’à sélectionner
Radio.
2. Appuyez sur la touche et sélectionnez
Fullscan.
Pour mémoriser une station:
1. Appuyez sur la touche jusqu’à sélectionner
Radio.
2. Sélectionnez la fréquence manuellement ou en
utilisant le mode Fullscan.
3. Appuyez sur la touche puis sélectionnez
l’option Ajouter aux présélections.
> Vous pourrez ensuite retrouver cette station en
sélectionnant le mode Présélections.
Utilisation avec un iPod
Connectez votre iPod sur le câble iPod puis appuyez sur la
touche SOURCE jusqu’à sélectionner iPod.
Utilisation avec une clé USB
1. Connectez votre périphérique USB sur le câble USB
ou au dos de l’autoradio.
2. Appuyez sur la touche jusqu’à sélectionner
USB.
Utilisation avec une carte SD
1. Retirez la façade du Parrot ASTEROID Classic.
2. Insérez la carte SD dans l’emplacement prévu à cet
effet, en orientant la surface de contact vers le bas.
3. Remettez la façade en place.
4. Appuyez sur la touche jusqu’à sélectionner SD.
Utilisation avec un lecteur audio analogique

17 Français
Le Parrot ASTEROID Classic vous permet d’écouter les fichiers
provenant d’un lecteur audio non compatible Bluetooth et
n’étant pas équipé d’une sortie USB (ex : lecteur CD). Pour cela:
1. Connectez le lecteur audio en utilisant le
connecteur Jack.
2. Appuyez sur la touche jusqu’à sélectionner
Entrée ligne.
3. Lancez la lecture depuis votre lecteur audio.
Utilisation avec un lecteur audio Bluetooth
Vous pouvez utiliser le Parrot ASTEROID Classic pour
écouter des fichiers musicaux stockés sur un lecteur
audio Bluetooth, si celui-ci supporte le profil A2DP
(Advanced Audio Distribution Profile).
Si vous utilisez le lecteur audio pour la 1ère fois, vous
devez tout d’abord le jumeler au Parrot ASTEROID
Classic.
Si le lecteur audio est déjà jumelé au Parrot ASTEROID
Classic :
1. Appuyez sur la touche jusqu’à sélectionner
Bluetooth Audio.
2. Lancez la lecture d’un morceau sur votre lecteur
audio.
Internet
Connexion avec une clé 3G / 4G
Note : Consultez la page compatibilité 3G sur notre site web pour
afficher la liste des clés 3G / 4G compatibles avec le Pa rrot
ASTEROID Classic :
www.parrot.com/fr/compatibility/3G
.
Note : Afin de ga rantir une qua lité de réception optima le, ne
connectez pas votre clé 3G/4G directement sur le Pa rrot
ASTEROID Classic : utilisez un câ ble U SB a fin de l'insta ller sur
le ta blea u de bord (ou toute a utre zone dégagée).
1. Connectez une clé 3G au Parrot ASTEROID Classic
par l’intermédiaire d’un câble USB.
> Un pop-up apparait.
2. Sélectionnez OK pour activer la connexion 3G.
3. Entrez votre code PIN en utilisant la molette puis
sélectionnez OK.
4. Si nécessaire, sélectionnez votre APN (Access Point
Name). Cette information est disponible dans la
documentation fournie avec votre clé 3G.
Note : Si votre APN ne figure pas da ns la liste proposée, vous
pouvez l'ajouter en sélectionnant Paramètres > Résea u > Clé 3G
> Configura tion > Point d'a ccès personna lisé > Nouvea u point
d'a ccès.
5. Patientez jusqu'à ce que la connexion soit établie.
Partage de connexion 3G via Bluetooth
Si vous disposez d’un téléphone supportant le profil
Bluetooth DUN (Dial-Up Networking) ou PAN (Personal Area
Network), la connexion via Bluetooth de votre téléphone au
Parrot ASTEROID Classic vous permettra de partager la
connexion 3G du téléphone.
Note : Consultez la page compatibilité sur notre site web pour
vérifier si votre téléphone permet le parta ge de connexion 3G via
Bluetooth et consulter la procédure corresponda nte:
www.parrot.com/fr/compatibility
.
1. Vérifiez que le partage de connexion Bluetooth sur
le Parrot ASTEROID Classic est activé. Pour cela,
sélectionnez Paramètres > Réseau > Partage
Bluetooth > Activer.
2. Vérifiez que le partage de connexion sur votre
téléphone est autorisé. Cette procédure diffère
selon le modèle de votre téléphone.
3. Connectez votre téléphone au Parrot ASTEROID
Classic via Bluetooth.
4. Si nécessaire, sélectionnez votre APN (Access Point
Name) dans la liste proposée.
A página está carregando...
A página está carregando...
A página está carregando...
A página está carregando...
A página está carregando...
A página está carregando...
A página está carregando...
A página está carregando...
A página está carregando...
A página está carregando...
A página está carregando...
A página está carregando...
A página está carregando...
A página está carregando...
A página está carregando...
A página está carregando...
A página está carregando...
A página está carregando...
A página está carregando...
A página está carregando...
A página está carregando...
A página está carregando...
A página está carregando...
A página está carregando...
A página está carregando...
A página está carregando...
A página está carregando...
A página está carregando...
A página está carregando...
A página está carregando...
A página está carregando...
A página está carregando...
A página está carregando...
A página está carregando...
A página está carregando...
A página está carregando...
A página está carregando...
A página está carregando...
A página está carregando...
A página está carregando...
A página está carregando...
A página está carregando...
A página está carregando...
A página está carregando...
A página está carregando...
A página está carregando...
A página está carregando...
A página está carregando...
A página está carregando...
A página está carregando...
A página está carregando...
A página está carregando...
A página está carregando...
A página está carregando...
A página está carregando...
A página está carregando...
-
 1
1
-
 2
2
-
 3
3
-
 4
4
-
 5
5
-
 6
6
-
 7
7
-
 8
8
-
 9
9
-
 10
10
-
 11
11
-
 12
12
-
 13
13
-
 14
14
-
 15
15
-
 16
16
-
 17
17
-
 18
18
-
 19
19
-
 20
20
-
 21
21
-
 22
22
-
 23
23
-
 24
24
-
 25
25
-
 26
26
-
 27
27
-
 28
28
-
 29
29
-
 30
30
-
 31
31
-
 32
32
-
 33
33
-
 34
34
-
 35
35
-
 36
36
-
 37
37
-
 38
38
-
 39
39
-
 40
40
-
 41
41
-
 42
42
-
 43
43
-
 44
44
-
 45
45
-
 46
46
-
 47
47
-
 48
48
-
 49
49
-
 50
50
-
 51
51
-
 52
52
-
 53
53
-
 54
54
-
 55
55
-
 56
56
-
 57
57
-
 58
58
-
 59
59
-
 60
60
-
 61
61
-
 62
62
-
 63
63
-
 64
64
-
 65
65
-
 66
66
-
 67
67
-
 68
68
-
 69
69
-
 70
70
-
 71
71
-
 72
72
-
 73
73
-
 74
74
-
 75
75
-
 76
76


em outras línguas
- español: Parrot ASTEROID Classic Guía de inicio rápido
- français: Parrot ASTEROID Classic Guide de démarrage rapide
- italiano: Parrot ASTEROID Classic Guida Rapida
- English: Parrot ASTEROID Classic Quick start guide
- Nederlands: Parrot ASTEROID Classic Snelstartgids
- Deutsch: Parrot ASTEROID Classic Schnellstartanleitung
Artigos relacionados
-
Parrot MKi9200 RU Guia rápido
-
Parrot ASTEROID Manual do proprietário
-
-
Parrot Zik Guia rápido
-
-
-
-
-
-