Hamilton Beach 45237R Manual do usuário
- Categoria
- Cafeteiras
- Tipo
- Manual do usuário

English ...................... 2
Français .................. 14
Español .................. 27
Stay or Go
™
Thermal Coffeemaker
Cafetière à carafe thermale
Cafetera de jarra térmica
READ BEFORE USE
LIRE AVANT UTILISATION
LEA ANTES DE USAR
Questions?
Please call us – our friendly
associates are ready to help.
USA: 1.800.851.8900
¿Preguntas?
Por favor llámenos – nuestros
amables representantes están
listos para ayudar.
MEX: 01 800 71 16 100
Le invitamos a leer cuidadosamente
este instructivo antes de usar su
aparato.
Visit hamiltonbeach.com for
delicious recipes, tips, and to register
your product online!
Consultez hamiltonbeach.ca pour
de délicieuses recettes, des conseils
pratiques et pour enregistrer votre produit !
¡Visite hamiltonbeach.com.mx para
recetas deliciosas, consejos, y para
registrar su producto en línea!
Questions ?
N’hésitez pas à nous appeler –
nos associés s’empresseront
de vous aider.
CAN : 1.800.267.2826
840168002 ENv04.qxd:Layout 1 3/9/10 3:23 PM Page 1

2
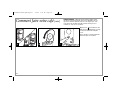
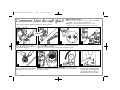
OTHER CONSUMER SAFETY INFORMATION
This appliance is intended for household use only.
WARNING! Shock Hazard: This appliance has a polarized plug (one wide
blade) that reduces the risk of electric shock. The plug fits only one way
into a polarized outlet. Do not defeat the safety purpose of the plug by
modifying the plug in any way or by using an adapter. If the plug does
not fit, reverse the plug. If it still does not fit, have an electrician replace
the outlet.
The length of the cord used on this appliance was selected to reduce
the hazards of becoming tangled in or tripping over a longer cord. If a
longer cord is necessary, an approved extension cord may be used. The
electrical rating of the extension cord must be equal to or greater than
the rating of the appliance. Care must be taken to arrange the extension
cord so that it will not drape over the countertop or tabletop where it can
be pulled on by children or accidentally tripped over.
To avoid an electrical circuit overload, do not use another high-wattage
appliance on the same circuit with this appliance.
SAVE THESE INSTRUCTIONS!
IMPORTANT SAFEGUARDS
1. Read all instructions.
2. Do not touch hot surfaces. Use handles or knobs. Care must be taken,
as burns can occur from touching hot parts or from spilled, hot liquid.
3. To protect against electric shock, do not place cord, plug, or
coffeemaker in water or other liquid.
4. Close supervision is necessary when any appliance is used by
or near children.
5. Unplug from outlet by firmly grasping the plug when either the
coffeemaker or clock is not in use and before cleaning. Allow to
cool before putting on or taking off parts and before cleaning the
appliance.
6. Coffeemaker must be operated on a flat surface away from the edge
of counter to prevent accidental tipping.
7. Do not operate any appliance with a damaged cord or plug, or after
the appliance malfunctions or is dropped or damaged in any manner.
Call our toll-free customer service number for information on
examination, repair, or adjustment.
8. The use of accessory attachments not recommended by the appliance
manufacturer may cause injuries.
9. Do not use outdoors.
10. Do not let cord hang over edge of table or counter or touch hot
surfaces, including stove.
11. The carafe is designed for use with this coffeemaker. It must never
be used on a range top or in a microwave or conventional oven.
12. Do not use carafe with loose or weakened handle.
13. To avoid accidents, do not pour in direction of people.
14. Be certain carafe lid is securely in place during brew cycle and when
pouring coffee. Do not use force when placing lid on carafe.
15. To disconnect coffeemaker, turn controls to OFF and then remove
plug from wall outlet.
16. Do not place coffeemaker on or near a hot gas or electric burner or
in a heated oven.
17. WARNING: To reduce the risk of fire or electric shock, do not remove
the bottom cover. No user-serviceable parts are inside. Repair should
be done by authorized service personnel only.
18. Do not use appliance for other than intended use.
When using electrical appliances, basic safety precautions should always be followed to reduce the risk of fire, electric shock, and/or injury to persons,
including the following:
840168002 ENv04.qxd:Layout 1 3/9/10 3:23 PM Page 2

3
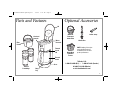
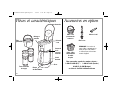
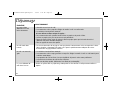
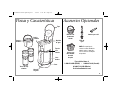
Parts and Features
Thermal
Carafe
Clock and
Controls
Water
Reservoir
Coffee Scoop
Base
Lid
To Order, Call:
1-800-851-8900 (U.S.) • 1-800-267-2826 (Canada)
01-800-71-16-100 (Mexico)
or visit hamiltonbeach.com
Optional Accessories
Water Filter
Filter
Basket
Thermal
Carafe
Lid
Thermal
Travel Mugs
Gold-Tone
Permanent
Coffee Filter
Drip
Tray
Nylon Mesh
Split-Filter
Basket
NOTE: Staining of the nylon
mesh split-filter basket is
normal and does not affect
product performance.
840168002 ENv04.qxd:Layout 1 3/9/10 3:23 PM Page 3

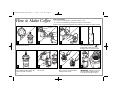
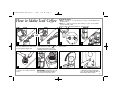
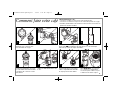
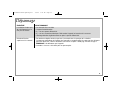
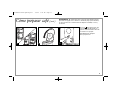
How to Make Coffee
1 2 3
5 6
Remove thermal carafe lid or lid
of thermal travel mug.
WARNING: Do not fill beyond
for brewing one mug or for
brewing two mugs. Hot over-
flowing coffee is a burn hazard.
Replace lids on travel mugs.
Coffee will brew directly into the
lid opening and stay hotter.
Brew one mug in center, two mugs
side by side.
Paper filter, optional permanent
filter, or nylon mesh split-filter
basket may be used.
4
Lock filter basket into place.
IMPORTANT: Lid will not close all
the way if filter basket handle is
not locked securely into place.
7
8
Coffee Usage Chart:
• 1 scoop* or level tablespoon ground coffee per cup
• 3 scoops* or level tablespoons ground coffee per travel mug
*Coffee scoop and permanent filters are optional accessories on select models.
4
840168002 ENv04.qxd:Layout 1 3/9/10 3:23 PM Page 4

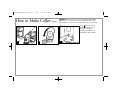
How to Make Coffee (cont.)
WARNING: Do not remove carafe or thermal travel mugs until
light goes out. If coffeemaker overflows, allow the unit, coffee,
and grounds to cool before cleaning the unit, coffee, or grounds.
11
10
Press to brew coffee in
thermal travel mugs or for
stronger coffee flavor.
Coffeemaker will shut off
immediately after brewing.
9
5
840168002 ENv04.qxd:Layout 1 3/9/10 3:23 PM Page 5

6
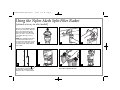
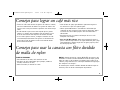
Using the Nylon Mesh Split-Filter Basket
(optional accessory on select models)
1 2 3
5
Remove lid of thermal travel mug.
WARNING: Do not fill beyond
for brewing one mug or for
brewing two mugs. Hot over-
flowing coffee is a burn hazard.
4
6 7
NOTE: See “Tips When Using the
Nylon Mesh Split-Filter Basket.”
The nylon mesh split-filter basket
allows you to brew two different
types of hot beverages at the
same time. Brew two different
flavors of coffee, one decaf and
one regular, two types of hot
tea, etc.
NOTE: The split filter works best
for brewing two different hot
beverages. If brewing all one type
of coffee or tea, use the regular
brew basket with paper filter for
best results.
840168002 ENv04.qxd:Layout 1 3/9/10 3:23 PM Page 6

7
6
IMPORTANT: Do not remove carafe
or thermal travel mugs until light
goes out. Coffeemaker will shut off
immediately after brewing.
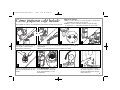
How to Make Iced Coffee
31 1 2
Fill water reservoir to a maximum
of 5 cups and thermal carafe with
ice to just below inside rim.
Align with open lock and twist to
lock in place.
7
4
Brew double-strength coffee for
iced coffee. For a full pot, use 10
scoops.
Lock filter basket into place.
IMPORTANT: Lid will not close all
the way if filter basket handle is
not locked securely into place.
5
OR
Coffee Usage Chart:
1 mug =
1
/2 mug ice, 1
1
/2 cups water, 3 scoops* or level tablespoons
ground coffee
2 mugs =
1
/2 mug ice (each), 3 cups water, 6 scoops* or level table-
spoons ground coffee
*Coffee scoop is optional feature on select models.
WARNING: Do not fill beyond
for brewing one mug or for
brewing two mugs. Hot over-
flowing coffee is a burn hazard.
840168002 ENv04.qxd:Layout 1 3/9/10 3:24 PM Page 7

8
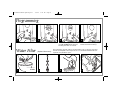
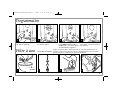
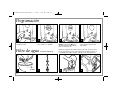
Programming
1 2 3 4
Press H and then M to set clock. Hold PROG until clock flashes. Continue holding PROG button;
press H and M until the desired
brewing start time is reached.
Press PROG momentarily to
activate automatic brewing.
Water Filter
1
(Optional Accessory)
2
3
15 min.
The water filter can help achieve a better-tasting cup of coffee by removing
chlorine and impurities from tap water. It is recommended that this filter be
replaced every 60 brew cycles.
4
840168002 ENv04.qxd:Layout 1 3/9/10 3:24 PM Page 8

9
Tips for Best-Tasting Coffee
• All coffees are made from either arabica beans or robusta
beans, or some combination of both. Arabica beans are slightly
more expensive, but tend to produce better-tasting coffee.
• Ground coffee will become stale much faster than whole beans.
If buying preground coffee, choose a package with the latest
expiration date or a smaller quantity.
• If grinding whole beans, set your coffee grinder on a fine/
medium grind. This will yield the best-tasting grounds. Try to
use freshly ground coffee within about a week of grinding.
• Using a water filter, filtered water, or bottled water will yield
better-tasting coffee than tap water.
• Use approximately 1 tablespoon of grounds for each cup of
coffee being made. To avoid overflow, use slightly less grounds
when brewing decaf or flavored coffees.
• Make sure your coffeemaker is clean. See “Cleaning With
Vinegar” section.
• For Hotter Coffee: Before brewing, fill carafe or thermal travel
mug with hot tap water and let stand 1 minute; then empty water
and follow steps in “How to Make Coffee.”
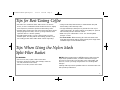
Tips When Using the Nylon Mesh
Split-Filter Basket
TRY BREWING:
• Decaf on one side, regular coffee on the other
• Two types of flavored coffees (for example, vanilla on
one side, hazelnut on the other)
• Coffee on one side, hot tea on the other
NOTES: When brewing hot tea AFTER brewing coffee using the
nylon mesh split-filter basket, a residual coffee flavor may be
present. To remove this, leave the filter in the coffeemaker and
then run a clean cycle using vinegar/water. See “Cleaning With
Vinegar.”
Staining of the nylon mesh split-filter basket is normal and does not
affect product performance.
840168002 ENv04.qxd:Layout 1 3/11/10 9:22 AM Page 9

10
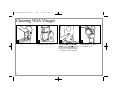
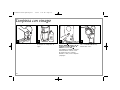
Cleaning With Vinegar
1 2 3
Remove optional water filter. Pour 1 pint (2 cups/500 ml)
vinegar into water reservoir.
Press ON ( ). Turn OFF ( )
after 20 seconds and wait 30
minutes. Press ON ( ). The unit
will automatically turn off when
brew cycle is completed. When
cool, empty reservoir and rinse.
4
Run 2–3 more brew cycles with
CLEAN WATER only. Allow to
cool between cycles.
840168002 ENv04.qxd:Layout 1 3/9/10 3:24 PM Page 10

11
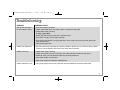
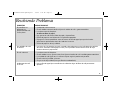
PROBLEM
Filter basket overflows
or coffee brews slowly.
Coffee leaks onto base.
Coffee tastes bad.
Coffee sediment in cup.
PROBABLE CAUSE
• Excessive amounts of coffee.
• Coffee ground too finely. Set coffee grinder to automatic drip grind.
• Coffeemaker needs cleaning.
If using a paper filter:
• Coffee grounds between paper filter and filter basket.
• Paper filter not open and in proper position.
• Rinse filter basket before inserting paper filter so the edges will remain pressed against the
sides of the basket.
• Poor-quality paper filter.
•Thermal travel mugs not properly seated in position indicators on base. Refer to How to Make
Coffee for correct position of thermal travel mugs during brewing.
• Coffeemaker needs cleaning.
• Coffee ground too coarsely or too finely. Set coffee grinder to automatic drip grind.
• Coffee-to-water ratio unbalanced. Adjust for personal preference.
• Poor coffee quality and freshness.
• Poor water quality (use filtered or bottled water).
• Use a high-quality, basket-style paper filter instead of optional permanent coffee filter.
Troubleshooting
840168002 ENv04.qxd:Layout 1 3/9/10 3:24 PM Page 11

12
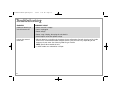
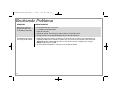
PROBLEM
Coffee not brewing or
unit will not turn on.
Longer than normal
brew time.
PROBABLE CAUSE
• Water reservoir is empty.
• Unit is unplugged.
• Power outage.
• Power surge. Unplug; then plug the unit back in.
• Clock requires reset after power outage.
• Mineral deposits can build up in the pump of your coffeemaker. Periodic cleaning of the inside
of the unit is recommended. More frequent cleaning may be necessary, depending on the
hardness of your water. See Cleaning With Vinegar section.
NOTE: Do not disassemble the unit.
• 1–4 CUP mode was selected for a full pot.
Troubleshooting
840168002 ENv04.qxd:Layout 1 3/9/10 3:24 PM Page 12

13
This warranty applies to products purchased in the U.S. and Canada. This is the only express warranty for this product and is in lieu of
any other warranty or condition.
This product is warranted to be free from defects in material and workmanship for a period of one (1) year from the date of original
purchase. During this period, your exclusive remedy is repair or replacement of this product or any component found to be defective,
at our option; however, you are responsible for all costs associated with returning the product to us and our returning a product or
component under this warranty to you. If the product or component is no longer available, we will replace with a similar one of equal
or greater value.
This warranty does not cover glass, filters, wear from normal use, use not in conformity with the printed directions, or damage to the
product resulting from accident, alteration, abuse, or misuse. This warranty extends only to the original consumer purchaser or gift
recipient. Keep the original sales receipt, as proof of purchase is required to make a warranty claim. This warranty is void if the product
is used for other than single-family household use.
We exclude all claims for special, incidental, and consequential damages caused by breach of express or implied warranty. All liability
is limited to the amount of the purchase price. Every implied warranty, including any statutory warranty or condition of
merchantability or fitness for a particular purpose, is disclaimed except to the extent prohibited by law, in which case such
warranty or condition is limited to the duration of this written warranty. This warranty gives you specific legal rights. You may have
other legal rights that vary depending on where you live. Some states or provinces do not allow limitations on implied warranties or
special, incidental, or consequential damages, so the foregoing limitations may not apply to you.
To make a warranty claim, do not return this appliance to the store. Please call 1.800.851.8900 in the U.S. or 1.800.267.2826 in Canada
or visit hamiltonbeach.com in the U.S. or hamiltonbeach.ca in Canada. For faster service, locate the model, type, and series numbers
on your appliance.
Limited Warranty
840168002 ENv04.qxd:Layout 1 3/9/10 3:24 PM Page 13

14
DIRECTIVES IMPORTANTES DE SÉCURITÉ
1. Lisez toutes les instructions.
2. Ne touchez pas aux surfaces chaudes. Utilisez les poignées ou les
boutons. Vous devez être très prudent car vous pourriez vous brûler
en touchant des pièces chaudes ou en renversant un liquide chaud.
3. Afin de vous prémunir contre les chocs électriques, ne plongez pas
le cordon d’alimentation, la fiche ou la cafetière dans l’eau ou tout
autre liquide.
4. Surveillez attentivement les enfants lorsque ceux-ci utilisent
l’appareil ou lorsqu’il est utilisé à proximité d’eux.
5. Débranchez l’appareil de la prise de courant lorsque vous ne vous
servez pas de la cafetière ou de l’horloge ou avant de le nettoyer.
Laissez-le refroidir avant d’enlever ou de remettre en place des
pièces ou de nettoyer l’appareil.
6. Lorsque la cafetière est en fonctionnement, elle doit toujours se
trouver sur une surface plate et loin du bord du comptoir pour
éviter tout renversement accidentel.
7. Ne faites pas fonctionner un appareil avec un cordon ou une fiche
endommagé, ou lorsque l’appareil ne fonctionne pas correctement,
qu’il est tombé ou qu’il a été endommagé d’une manière quelconque.
Veuillez composer notre numéro d’assistance à la clientèle pour des
renseignements concernant un examen, une réparation ou un
réglage.
8. L’utilisation d’accessoires qui ne sont pas recommandés par le
fabricant de l’appareil peut causer des blessures.
9. N’utilisez pas la cafetière à l’extérieur.
10. Ne laissez pas le cordon pendre au bord d’une table ou d’un
comptoir ou entrer en contact avec une surface chaude, y compris
la cuisinière.
11. La verseuse est conçue pour être utilisée avec cette cafetière.
Elle ne doit jamais être utilisée sur la cuisinière ou dans un four
à micro-ondes.
12. N’utilisez pas une verseuse fêlée ou dont la poignée est desserrée
ou endommagée.
13. Afin d’éviter des accidents, ne versez pas dans la direction des
personnes.
14. Assurez-vous que le couvercle est bien fermé durant la
préparation du café et lorsque vous le versez. Ne forcez pas
en plaçant le couvercle sur la verseuse.
15. Pour débrancher la cafetière, placez l’interrupteur à la position
ARRÊT (OFF), puis enlevez la fiche de la prise de courant.
16. Ne placez pas la cafetière près d’un brûleur électrique ou à gaz
chaud ou dans un four chaud.
17. AVERTISSEMENT : Afin de diminuer le risque d’incendie ou de
choc électrique, n’enlevez pas le couvercle du dessous. Il ne s’y
trouve aucune pièce réparable. Les réparations ne doivent être
effectuée que par un technicien autorisé.
18. N’utilisez cet appareil qu’aux fins pour lesquelles il a été conçu.
Pour utiliser un appareil électroménager, vous devez toujours prendre des mesures élémentaires de sécurité pour réduire le risque d’incendie,
d’électrocution et/ou de blessure corporelle, en particulier les mesures suivantes :
CONSERVEZ CES INSTRUCTIONS !
840168002 FRv02.qxd:Layout 1 3/9/10 3:25 PM Page 14

15
AUTRES RENSEIGNEMENTS RELATIFS À LA SÉCURITÉ DU CONSOMMATEUR
Cet appareil est conçu uniquement pour l’usage domestique.
AVERTISSEMENT ! Risque d’électrocution : Cet appareil est doté
d’une fiche polarisée (lame large) qui réduit le risque d’électrocution.
Cette fiche s’insère d’une seule manière dans une prise polarisée.
Ne pas transformer le dispositif de sécurité de la fiche en modifiant
celle-ci de quelconque façon ou en utilisant un adaptateur. Si la fiche
refuse de s’insérer, inversez-la. Si elle refuse toujours de s’insérer,
faire remplacer la prise par un électricien.
La longueur du cordon de cet appareil a été choisie de façon
à réduire le risque de s’y accrocher ou de de trébucher dessus.
Si un cordon plus long est nécessaire, utiliser une rallonge
homologuée. Le calibre de la rallonge doit être le même que celui
de la cafetière ou supérieur. Lorsqu’on utilise une rallonge, elle doit
être disposée de manière à ne pas pendre du comptoir ou du bord
de la table de travail, car des enfants pourraient tirer dessus par
inadvertance, et elle pourrait faire trébucher quelqu’un.
Afin d’éviter une surcharge électrique, évitez d’utiliser un autre
appareil à haute puissance sur le même circuit que la cafetière.
840168002 FRv02.qxd:Layout 1 3/9/10 3:25 PM Page 15

16
Mesure à café
Pour commander, appelez les numéros suivants :
1-800-851-8900 (U.S.) • 1-800-267-2826 (Canada)
01-800-71-16-100 (Mexique)
ou visitez le site Web hamiltonbeach.com
Accessoires en option
Filtre à eau
Filtre à café
permanent de
couleur or
Panier à filtre
compartimenté
en maille
de nylon
Pièces et caractéristiques
Carafe
thermale
Horloge et
contrôles
Réservoir
à eau
Base
Couvercle
Filtre
permanent
Couvercle
de la
verseuse
thermale
Tasses thermales
de voyage
Plateau
de débordement
REMARQUE : Les taches du
panier à filtre compartimenté en
maille de nylon sont normales
et n’affectent pas le fonctionne-
ment de l’appareil.
840168002 FRv02.qxd:Layout 1 3/9/10 3:25 PM Page 16

17
Comment faire votre café
1 2 3
5 6
Retirer le couvercle de la verseuse
thermale ou le couvercle de la
tasse thermale de voyage.
Remettez en place les couvercles
sur les tasses thermales de voyage.
Le café s’infuse directement dans
l’ouverture du couvercle et reste
plus chaud.
Infusez le café dans une tasse
centrée ou dans deux tasses côte
à côte.
Un filtre en papier, un filtre per-
manent optionnel ou un panier
à filtre compartimenté en maille
de nylon peuvent être utilisés.
4
Verrouillez en place le panier à
filtre. IMPORTANT : Le couvercle
ne se ferme pas complètement
si l’anse du panier à filtre n’est pas
solidement verrouillée en place.
7
8
Tableau d’infusion de café :
• 1 mesure* ou cuillère à soupe rase de café moulu par tasse
• 3 mesures* ou cuillères à soupe rases de café moulu par tasse de voyage
*Les filtres permanents et la mesure de café sont des accessoires en
option sur certains modèles.
AVERTISSEMENT : Ne pas remplir au-delà de pour l’infusion d’une
tasse ou de _ pour l’infusion de deux tasses. Le café chaud qui
déborde représente un risque de brûlure.
840168002 FRv02.qxd:Layout 1 3/9/10 3:25 PM Page 17

18
Comment faire votre café
(suite)
AVERTISSEMENT : Attendre que le témoin s’éteigne avant
de retirer la verseuse thermale ou les tasses thermales de voy-
age. Si la cafetière déborde, laissez votre appareil, le café
et la surface de la table refroidir avant de nettoyer votre
cafetière, le café ou les moutures.
11
10
Appuyer sur pour infuser le café
dans les tasses thermales de voyage
ou sur pour obtenir un café plus
corsé.
Votre cafetière s’arrêtera immédi-
atement après avoir infusé.
9
840168002 FRv02.qxd:Layout 1 3/9/10 3:25 PM Page 18

19
Utilisation du panier à filtre compartimenté en maille de nylon
(accessoire en option sur certains modèles)
1 2 3
5
Retirer le couvercle de la tasse
thermale de voyage.
4
6 7
REMARQUE : Reportez-vous à
« Conseils d’utilisation du panier à
filtre compartimenté en maille de
nylon ».
Le panier à filtre compartimenté en
maille de nylon permet d’infuser
deux types différents de boissons
chaudes en même temps. Infusez
deux arômes différents de café, un
décaféiné et l’autre ordinaire, deux
types de thé chaud, etc.
REMARQUE : Le filtre compartimenté
est idéal pour infuser deux boissons
chaudes différentes. Pour infuser un
seul type de café ou de thé, utilisez
le panier à filtre ordinaire avec un
filtre en papier pour obtenir de
meilleurs résultats.
AVERTISSEMENT : Ne pas remplir au-delà de pour l’infusion d’une
tasse ou de _ pour l’infusion de deux tasses. Le café chaud qui
déborde représente un risque de brûlure.
840168002 FRv02.qxd:Layout 1 3/9/10 3:25 PM Page 19

20
6
IMPORTANT : Attendre que le témoin
s’éteigne avant de retirer la verseuse
thermale ou les tasses thermales de
voyage. Votre cafetière s’arrêtera
immédiatement après avoir infusé.
Comment faire du café glacé
*La mesure à café est offerte en option sur certains modèles.
31 1 2
Remplissez le réservoir d’eau de 5
tasses au maximum et la carafe
thermique de glace juste en-dessous
de la bordure intérieure.
7
4
Infusez du café doublement fort pour
du café glacé. Pour une carafe entière,
utilisez 10 mesures de café moulu.
Verrouillez en place le panier à filtre. IMPORTANT : Le couvercle ne se
ferme pas complètement si l’anse du panier à filtre n’est pas solidement
verrouillée en place.
5
OU
Tableau d’infusion de café :
1 tasse =
1
/2 tasse de glace, 1
1
/2 tasse d’eau, 3 mesures*
ou cuillères à soupe rase de café moulu
2 tasses =
1
/2 tasse (chacune) de glace, 3 t. d’eau,
6 mesures* ou cuillères à soupe rase de café moulu
AVERTISSEMENT : Ne pas remplir au-delà de pour l’infusion d’une
tasse ou de pour l’infusion de deux tasses. Le café chaud qui déborde
représente un risque de brûlure.
Alignez avec le verrou ouvert et tournez pour verrouiller en place.
840168002 FRv02.qxd:Layout 1 3/9/10 3:25 PM Page 20
A página está carregando...
A página está carregando...
A página está carregando...
A página está carregando...
A página está carregando...
A página está carregando...
A página está carregando...
A página está carregando...
A página está carregando...
A página está carregando...
A página está carregando...
A página está carregando...
A página está carregando...
A página está carregando...
A página está carregando...
A página está carregando...
A página está carregando...
A página está carregando...
A página está carregando...
A página está carregando...
-
 1
1
-
 2
2
-
 3
3
-
 4
4
-
 5
5
-
 6
6
-
 7
7
-
 8
8
-
 9
9
-
 10
10
-
 11
11
-
 12
12
-
 13
13
-
 14
14
-
 15
15
-
 16
16
-
 17
17
-
 18
18
-
 19
19
-
 20
20
-
 21
21
-
 22
22
-
 23
23
-
 24
24
-
 25
25
-
 26
26
-
 27
27
-
 28
28
-
 29
29
-
 30
30
-
 31
31
-
 32
32
-
 33
33
-
 34
34
-
 35
35
-
 36
36
-
 37
37
-
 38
38
-
 39
39
-
 40
40


Hamilton Beach 45237R Manual do usuário
- Categoria
- Cafeteiras
- Tipo
- Manual do usuário
em outras línguas
- español: Hamilton Beach 45237R Manual de usuario
- français: Hamilton Beach 45237R Manuel utilisateur
- English: Hamilton Beach 45237R User manual
Artigos relacionados
-
Hamilton Beach 46290 Guia de usuario
-
Hamilton Beach 46240 Guia de usuario
-
Hamilton Beach 48577 Manual do usuário
-
Hamilton Beach 47900 Guia de usuario
-
Hamilton Beach 80396RC Manual do usuário
-
Hamilton Beach FlexBrew Manual do proprietário
-
Hamilton Beach 80350RV Guia de usuario
-
-
Hamilton Beach 80335R Guia de usuario
-
Outros documentos
-
Proctor Silex 43574PS Guia de usuario
-
-
-
Proctor Silex 48524PS Manual do usuário
-
Proctor Silex 48138 Guia de usuario
-
BLACK+DECKER DCM18 Guia de usuario
-
-
Black & Decker CM2030B Manual do usuário
-
 Black and Decker Appliances CM2045B Guia de usuario
-
BLACK DECKER CM2046 Manual do usuário
