Hamilton Beach FlexBrew Manual do proprietário
- Categoria
- Cafeteiras
- Tipo
- Manual do proprietário

2-Way FlexBrew
®
Coffee Maker
Cafetière à double
usage FlexBrew
MD
Cafetera Doble
FlexBrew
®
English ....................... 2
Français .................... 17
Español .................... 33
READ BEFORE USE
LIRE AVANT UTILISATION
LEA ANTES DE USAR
Visit www.hamiltonbeach.com for our
complete line of products and Use and
Care Guides – as well as delicious recipes,
tips, and to register your product online!
Rendez-vous sur www.hamiltonbeach.ca
pour notre liste complète de produits et de
nos manuels utilisateur – ainsi que nos
délicieuses recettes et nos conseils !
¡Visite www.hamiltonbeach.com (
EE. UU.)
o
www.hamiltonbeach.com.mx (México)
para ver otros productos de Hamilton Beach
o para contactarnos!
Questions?
Please call us – our friendly
associates are ready to help.
USA: 1.800.851.8900
¿Preguntas?
Por favor llámenos – nuestros
amables representantes están
listos para ayudar.
EE. UU.: 1.800.851.8900
MEX: 01 800 71 16 100
Le invitamos a leer cuidadosamente este
instructivo antes de usar su aparato.
Questions ?
N’hésitez pas à nous appeler –
nos associés s’empresseront
de vous aider.
CAN : 1.800.267.2826

2
IMPORTANT SAFEGUARDS
1. Read all instructions.
2. This appliance is not intended for use by persons (including
children) with reduced physical, sensory, or mental
capabilities, or lack of experience and knowledge, unless
they are closely supervised and instructed concerning use
of the appliance by a person responsible for their safety.
3. Close supervision is necessary when any appliance is
used by or near children. Children should be supervised to
ensure that they do not play with the appliance.
4. Do not touch hot surfaces. Use handles or knobs. Care
must be taken, as burns can occur from touching hot parts
or from spilled, hot liquid.
5. To protect against electric shock, do not place cord, plug,
or coffee maker in water or other liquid.
6. Unplug from outlet when either the coffee maker or clock is
not in use and before cleaning. Allow to cool before putting
on or taking off parts and before cleaning the appliance.
7. Coffee maker must be operated on a flat surface away from
the edge of counter to prevent accidental tipping.
8. Do not operate any appliance with a damaged cord or
plug, or after the appliance malfunctions or is dropped
or damaged in any manner. Call our toll-free customer
service number for information on examination, repair,
or adjustment.
9. The use of accessory attachments not recommended
by the appliance manufacturer may cause injuries.
10. Do not use outdoors.
11. Do not let cord hang over edge of table or counter or touch
hot surfaces, including stove.
12. Do not place coffee maker on or near a hot gas or electric
burner or in a heated oven.
13. The carafe is designed for use with this coffee maker. It
must never be used on a range top or in a microwave
oven.
14. Do not set a hot carafe on a wet or cold surface.
15. Do not use a cracked carafe or one with loose or weakened
handle.
16. Do not clean carafe with cleansers, steel wool pads, or
other abrasive materials.
17. Be certain carafe lid is securely in place during brew cycle
and when pouring coffee. Do not use force when placing
lid on carafe.
18. To disconnect coffee maker, turn controls to OFF (O) and
then remove plug from wall outlet.
19. WARNING! To reduce the risk of fire or electric shock, do
not remove the bottom cover. No user-serviceable parts
are inside. Repair should be done by authorized service
personnel only.
20. Do not use appliance for other than intended use.
21. CAUTION! Cut Hazard: Removable single-serve pack
holder contains a sharp blade. Use caution when handling.
22. CAUTION! Cut Hazard: Piercing nozzle is sharp. Use caution
when cleaning.
When using electrical appliances, basic safety precautions should always be followed to reduce the risk of fire, electric shock,
and/or injury to persons, including the following:
SAVE THESE INSTRUCTIONS!

3
Other Consumer Safety Information
This product is intended for household use only.
w WARNING
Electrical Shock Hazard: This product is provided
with a polarized plug (one wide blade) to reduce the risk of electric
shock. The plug fits only one way into a polarized outlet. Do not
defeat the safety purpose of the plug by modifying the plug in any
way or by using an adapter. If the plug does not fit fully into the
outlet, reverse the plug. If it still does not fit, have an electrician
replace the outlet.
The length of the cord used on this appliance was selected to
reduce the hazards of becoming tangled in or tripping over a
longer cord. If a longer cord is necessary, an approved extension
cord may be used. The electrical rating of the extension cord must
be equal to or greater than the rating of the appliance. Care must
be taken to arrange the extension cord so that it will not drape over
the countertop or tabletop where it can be pulled on by children or
accidentally tripped over.
To avoid an electrical circuit overload, do not use another high-
wattage appliance on the same circuit with this appliance.

4
Parts and Features
Carafe*
Cord Stuff Storage
Piercing Nozzle
(punches hole in top of
single-serve pack)
Water Window
Brew Basket
Handle
Removable Single-Serve Pack Holder*
(punches hole on bottom of pack)
Control
Panel
Water
Window
Brew
Selector
Dial
Brew
Basket*
Single-Serve Brew
Basket With Hinged
Lid (for ground
coffee and soft pod)
Brew
Basket*
Display
Multilevel Cup Rest*
Water Reservoir
Warming Plate
HOT Indicator
(turns red when hot)
*To order parts:
US: 1.800.851.8900
www.hamiltonbeach.com
Canada: 1.800.267.2826
Mexico:
01 800 71 16 100
BEFORE FIRST USE: Wash all removable parts in hot, soapy water. Rinse
and dry. Brew one cycle with water on each side and discard water.

5
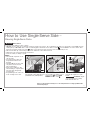
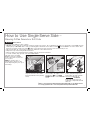
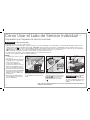
How to Use Single-Serve Side –
Brewing Single-Serve Packs
2
Plug in coffee maker. Rotate brew
selector dial to the right to select
Single-Serve ( ). Press BREW
OPTIONS button to select .
w CAUTION
Burn Hazard.
To avoid contact with hot coffee or water:
• DO NOT use more than 10 oz. (296 ml) of water for single-serve pack or 14 oz. (414 ml) for grounds. Too much water causes ERR message
and long beep. SOLUTION: Place carafe on warming plate. Turn brew selector dial to Carafe (
). Press l/O button to remove water. Turn
brew selector dial to single-serve side ( ). Add correct amount of water to water reservoir. Start brew process.
• Fill reservoir with cup or travel mug of water into which the coffee will be brewed.
• Fully insert cup or travel mug under brew basket.
• For best results, use K-Cup
®
* packs.
NOTES:
• The unit will only brew on one
side at a time.
• For Hotter Coffee: Rinse the
mug with hot water before
brewing.
• The Brew Mode selection will
stay in the last mode used,
unless unplugged.
• Coffee may continue to drip
after brewing is complete (after
3 beeps) when using finely
ground coffee.
• Programming mode cannot be
used on Single-Serve side.
3
Remove brew basket. Place a
pack into the single-serve pack
holder.
w CAUTION
Cut Hazard: Single-
serve pack holder has a sharp
blade. Handle with care.
*K-Cup is a registered trademark of Keurig, Inc. Use of the K-Cup trademark does not imply any affiliation with or
endorsement by Keurig, Inc.
1
Fill reservoir with cup or travel mug
into which the coffee will be brewed
(maximum 10 oz. [296 ml] water).

6
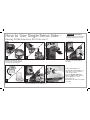
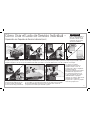
How to Use Single-Serve Side –
Brewing Single-Serve Packs (cont.)
8
65
97
6
Ensure the multilevel/flip cup rest is firmly secured and snapped into
place.
Coffee maker will shut off
automatically and light will go off
when brew cycle is completed
(3 beeps will sound).
Allow 2 minutes to cool in
between brews.
Brew basket and single-serve
pack holder should be rinsed after
every use. Pressing down on the
brew basket handle punctures the
pack before brewing.
Press ON/OFF (I/O) button. The blue power ON indicator light will light
up to show that the coffee maker is on. After brewing, pull up on brew
basket handle to unlock and remove.
For removal of cup rest: Push up
cup rest; tilt up. Push down to
release.
OR
4
Press down on edge of the pack until the pack snaps into place and
hole is punched in the bottom. Do not remove foil. Press down on
brew basket handle to lock and puncture the foil lid on the pack.
w CAUTION
Burn Hazard:
Warming plate is hot even when
brewing on Single-Serve side.

7
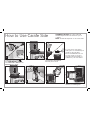
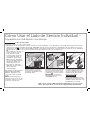
How to Use Single-Serve Side –
Brewing Coffee Grounds or Soft Pods
w CAUTION
Burn Hazard.
To avoid contact with hot coffee or water:
• DO NOT use more than 10 oz. (296 ml) of water for single-serve pack or 14 oz. (414 ml) for grounds. Too much water causes ERR message
and long beep. SOLUTION: Place carafe on warming plate. Turn brew selector dial to Carafe (
). Press l/O button to remove water. Turn
brew selector dial to single-serve side ( ). Add correct amount of water to water reservoir. Start brew process.
• Fill reservoir with cup or travel mug of water into which the coffee will be brewed.
• Fully insert cup or travel mug under brew basket.
• Remove single-serve pack holder before adding coffee grounds to brew basket.
• To avoid overflow, keep ground coffee below MAX fill line.
This unit can be used with
Melitta
®
†
soft pods, available
in the coffee aisle of your local
grocery store.
NOTE: It can take up to 2
minutes before brewed coffee
starts dispensing into your cup or
travel mug.
32
To remove single-serve pack
holder, grasp the single-serve
pack holder cup; slide towards
the back and then lift out.
w CAUTION
Cut Hazard:
Removable single-serve pack
holder has a sharp blade. Handle
with care.
Plug in coffee maker. Rotate brew
selector dial to the right to select
Single-Serve ( ). Press BREW
OPTIONS button to select GROUND
mode.
Fill reservoir with cup or travel
mug into which the coffee will be
brewed (maximum 14 oz. [414 ml]
water).
1
Melitta is a registered trademark of Melitta Haushaltsprodukte GmbH & CoKG. Use of the Melitta trademark
does not imply any affiliation with or endorsement by Melitta Haushaltsprodukte GmbH & CoKG.
†

8
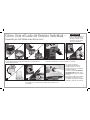
How to Use Single-Serve Side –
Brewing Coffee Grounds or Soft Pods (cont.)
8 9
7
10
Coffee maker will shut off
automatically and light will go off
when brew cycle is completed
(3 beeps will sound).
Press the ON/OFF (I/O) button
again to STOP brewing midcycle.
Allow 2 minutes to cool in
between brews.
Brew basket should be rinsed after
every use.
Ensure the multilevel/flip cup rest
is firmly secured and snapped
into place.
Press ON/OFF (I/O) button. The blue power ON indicator light will light
up to show that the coffee maker is on.
654
Add ground coffee (3 tablespoons
[44 ml] is the MAX amount of
ground coffee for brew basket)
or soft pod to brew basket.
w CAUTION
Burn Hazard:
Warming plate is hot even when
brewing on Single-Serve side.

9
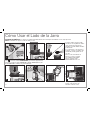
How to Use Carafe Side
2
6
1
5
Plug in coffee maker. Rotate dial
to the left to select carafe ( ).
Press BREW OPTIONS button to
select REGULAR or BOLD modes.
REGULAR is the default.
3
74
Place a cupcake-style paper filter
in brew basket. A permanent
filter may also be used.
For each cup of coffee being
made, place one level tablespoon
(15 ml) of coffee into filter.
Please visit hamiltonbeach.com
for a list of parts, accessories,
and replacement parts that are
available for your coffee maker.
Place carafe, with carafe lid
attached, on warming plate.
AUTOMATIC SHUTOFF: The coffee maker will
automatically shut off 2 hours after brew cycle is
complete.
NOTE: The unit will only brew on one side at a time.

10
9
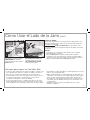
How to Use Carafe Side (cont.)
PAUSE AND SERVE:
To serve coffee during the brewing cycle, remove carafe and pour a
cup. By removing the carafe, the flow of coffee from the bottom of
the filter basket will stop.
w CAUTION
Burn Hazard: The carafe must be replaced within
20 seconds of being removed to prevent overflow.
NOTES:
• If the coffee maker is not turned off manually, it will automatically
shut off in 2 hours.
• BOLD mode will require additional time to complete a brewing
cycle. Coffee maker remembers last brew option selected. If
unplugged, coffee maker defaults to REGULAR.
Tips for Best-Tasting Coffee
• All coffees are made from either arabica beans or robusta beans,
or some combination of both. Arabica beans are slightly more
expensive, but tend to produce better-tasting coffee.
• Ground coffee will become stale much faster than whole beans. If
buying preground coffee, choose a package with the latest expiration
date or a smaller quantity.
• If grinding whole beans, set your coffee grinder on a fine/medium
grind. This will yield the best-tasting grounds. Try to use freshly
ground coffee within about a week of grinding.
• Using a water filter, filtered water, or bottled water will yield better-
tasting coffee than tap water.
• Use approximately 1 tablespoon (15 ml) of grounds for each cup of
coffee being made. To avoid overflow, use slightly less grounds
(3/4 tablespoon [11.2 ml]) when brewing decaf or flavored coffees.
Also, be aware that using coffee that is ground too finely may also
cause the filter basket to overflow.
• Make sure your coffee maker is clean. See “Care and Cleaning”
sections.
8
For enhanced full/strong-flavored
coffee, press BREW OPTIONS
button until BOLD is displayed.
Press I/O (ON/OFF) button to
start. Press I/O (ON/OFF) button
again to turn off.

11
3
5
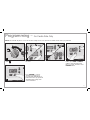
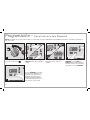
Programming – For Carafe Side Only
21 4
Press HOUR and then MINUTE to
set clock.
Rotate dial to the left to select
carafe (
).
Continue holding PROGRAM
button, press HOUR and MINUTE
until the desired brewing start
time is reached, and then release
PROGRAM button.
Hold PROGRAM until clock flashes.
Press PROGRAM to activate
automatic brewing. Green
program light will illuminate to
indicate the unit is programmed
and will begin brewing at the
selected start time.
NOTE: The unit will only brew on one side at a time. Single-Serve side cannot be used while Carafe side is programmed.

12
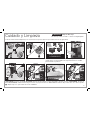
Care and Cleaning
All coffee makers should be cleaned at least once a month (once a week for areas with hard water).
Pour 1/2 cup (118 ml) of plain white vinegar and 1/2 cup (118 ml) of cold water into water reservoir. Press I (ON) button. Press O (OFF) button
after 30 seconds and wait 30 minutes. Press I (ON) button. Press O (OFF) button when finished. Run 2–3 more brew cycles with CLEAN WATER
only. Allow to cool between cycles. Turn dial to (
). Repeat process for single-serve side.
DO NOT use the “SANI” setting when washing in the dishwasher.
“SANI” cycle temperatures could damage your product.
2 3
5 7
TOP-RACK
DISHWASHER-SAFE
1
6
w WARNING
Shock Hazard.
Do not immerse cord, plug, or coffee maker in any liquid.
OR
4

13
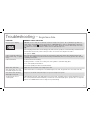
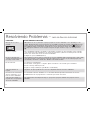
Troubleshooting – Single-Serve Side
PROBLEM PROBABLE CAUSE/SOLUTION
Err message on display.
K-CUP
• DO NOT use more than 10 oz. (296 ml) of water for single-serve pack or 14 oz. (414 ml) for grounds. Too
much water causes ERR message and long beep. SOLUTION: Place carafe on warming plate. Turn brew
selector dial to Carafe (
). Press l/O button to remove water. Turn brew selector dial to single-serve side
(
). Add correct amount of water to water reservoir. Start brew process.
Weak coffee. • Not enough ground coffee used. If using pods, make sure the pod(s) are centered in the pod basket and/or
brew basket and use two pods for stronger coffee. See “How to Use Single-Serve Side.”
• Set option to BOLD.
Coffee overflows from brew
basket, travel mug, or regular
mug.
• Excessive amount of water in reservoir. Use travel mug or mug into which coffee will be brewed to fill
reservoir. Use slightly less grounds when brewing decaffeinated, flavored, or finely ground coffee. Or use
medium ground coffee.
Coffee tastes bad. • Coffee maker needs cleaning.
• Coffee ground too coarsely or too finely. Set coffee grinder to automatic drip grind.
• Poor coffee quality and freshness.
• Poor water quality (use filtered or bottled water).
Water exits carafe side. • Make sure selector dial is set to Single-Serve side.
Auto-start feature does not
work with Single-Serve side.
• Auto-start feature is not designed to work with Single-Serve side. Program mode is for Carafe side only.
Clear water when brewing
with single-serve pack.
• Forgot to lock handle down, which pierces top foil of single-serve packs.
Steam flows up across
control panel.
• When brewing ground coffee with single-serve pack holder assembly removed, steam will travel up across
the control panel if the basket handle is pressed down. Leave the handle up for ground coffee or soft pods.
• Do not exceed MAX water level for single-serve pack brewing.

14
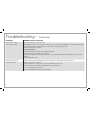
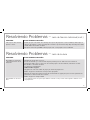
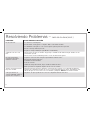
Troubleshooting – Carafe Side
PROBLEM PROBABLE CAUSE/SOLUTION
Brew basket overflows or
coffee brews slowly.
• Excessive amounts of ground coffee.
• Decaffeinated and/or coffee ground too finely can cause overflow. Use slightly less grounds when brewing
decafeinated, flavored, or finely ground coffee. Or use medium ground coffee.
• Coffee maker needs cleaning.
If using a paper filter:
• Coffee grounds between paper filter and brew basket.
• Paper filter not open and in proper position.
• Rinse brew basket before inserting paper filter so the edges will remain pressed against the sides of the
basket.
• Poor-quality paper filter.
Coffee leaks onto base. • Carafe removed from warming plate for more than 20 seconds during the brewing cycle.
Coffee tastes bad. • Coffee maker needs cleaning.
• Coffee ground too coarsely or too finely. Use medium ground coffee.
• Coffee-to-water ratio unbalanced. Adjust for personal preference.
• Poor coffee quality and freshness.
• Poor water quality (use filtered or bottled water).

15
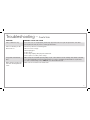
Troubleshooting – Carafe Side
PROBLEM PROBABLE CAUSE/SOLUTION
Coffee sediment in cup. • For Carafe side, use a high-quality, basket-style paper filter instead of optional permanent coffee filter.
• For Single-Serve side, try a more coarsely ground coffee.
Coffee not brewing or unit
will not turn on.
• Carafe not positioned on warming plate.
• Water reservoir is empty.
• Unit is unplugged.
• Power outage.
• Power surge. Unplug; then plug the unit back in.
• Clock requires reset after power outage.
Longer than normal brew
time.
• Mineral deposits can build up in the pump of your coffee maker. Periodic cleaning of the inside of the unit
is recommended. More frequent cleaning may be necessary, depending on the hardness of your water.
See “Care and Cleaning” section. NOTE: Do not disassemble the unit.
Water exits the Single-Serve
side when brewing with the
carafe.
• Make sure selector dial is set to Carafe side.

16
This warranty applies to products purchased and used in the U.S. and Canada. This is the only express warranty for this product and
is in lieu of any other warranty or condition.
This product is warranted to be free from defects in material and workmanship for a period of five (5) years from the date of original
purchase in Canada and one (1) year from the date of original purchase in the U.S. During this period, your exclusive remedy is repair
or replacement of this product or any component found to be defective, at our option; however, you are responsible for all costs
associated with returning the product to us and our returning a product or component under this warranty to you. If the product or
component is no longer available, we will replace with a similar one of equal or greater value.
This warranty does not cover glass, filters, wear from normal use, use not in conformity with the printed directions, or damage to
the product resulting from accident, alteration, abuse, or misuse. This warranty extends only to the original consumer purchaser or
gift recipient. Keep the original sales receipt, as proof of purchase is required to make a warranty claim. This warranty is void if the
product is used for other than single-family household use or subjected to any voltage and waveform other than as specified on the
rating label (e.g., 120V ~ 60 Hz).
We exclude all claims for special, incidental, and consequential damages caused by breach of express or implied warranty. All
liability is limited to the amount of the purchase price. Every implied warranty, including any statutory warranty or condition
of merchantability or fitness for a particular purpose, is disclaimed except to the extent prohibited by law, in which case such
warranty or condition is limited to the duration of this written warranty. This warranty gives you specific legal rights. You may have
other legal rights that vary depending on where you live. Some states or provinces do not allow limitations on implied warranties or
special, incidental, or consequential damages, so the foregoing limitations may not apply to you.
To make a warranty claim, do not return this appliance to the store. Please call 1.800.851.8900 in the U.S. or 1.800.267.2826 in Canada
or visit hamiltonbeach.com in the U.S. or hamiltonbeach.ca in Canada. For faster service, locate the model, type, and series numbers
on your appliance.
Limited Warranty

17
PRÉCAUTIONS IMPORTANTES
1. Lire toutes les instructions.
2. Cet appareil n’est pas destiné à être utilisé par des personnes (y
compris les enfants) dont les capacités physiques, sensorielles
ou mentales sont réduites, ou manquant d’expérience et
de connaissance, sauf si elles sont étroitement surveillées
et instruites sur l’utilisation de l’appareil par une personne
responsable de leur sécurité.
3. Une surveillance étroite est requise pour tout appareil utilisé
par ou près des enfants. Surveiller que les enfants ne jouent
pas avec l’appareil.
4. Ne pas toucher les surfaces chaudes. Utiliser les poignées ou
les boutons. La prudence s’impose car des brûlures peuvent
survenir si on touche des pièces chaudes ou si on renverse des
liquides chauds.
5. Pour protéger contre le choc électrique, ne pas placer le cordon,
la fiche du cordon ou la cafetière dans l’eau ou autre liquide.
6. Débrancher l’appareil de la prise de courant lorsque la cafetière
ou la minuterie n’est pas utilisée et avant le nettoyage. Laisser
refroidir l’appareil avant de placer ou de retirer des pièces, et
avant de le nettoyer.
7. La cafetière doit être utilisée sur une surface droite loin du bord
du comptoir, pour empêcher le basculement accidentel.
8. Ne pas faire fonctionner un appareil avec un cordon ou
une fiche endommagé, ou lorsque l’appareil ne fonctionne
pas bien ou a été endommagé d’une manière quelconque.
Appeler notre numéro sans frais de service à la clientèle pour
des renseignements concernant l’examen, la réparation ou
l’ajustement.
9. L’utilisation d’accessoires non recommandés par le fabricant
d’électroménagers peut causer des blessures.
10. Ne pas utiliser à l’extérieur.
11. Ne pas laisser le cordon pendre par dessus le bord d’une table
ou d’un comptoir, ou toucher des surfaces chaudes, y compris
la cuisinière.
12. Ne placez jamais votre appareil sur ou à proximité d’un brûleur
électrique ou à gaz chaud, ou dans un four chaud.
13. La verseuse à café est conçue exclusivement pour cette
cafetière. Elle ne doit jamais être utilisée sur une table de
cuisson ou dans un four à micro-ondes.
14. Ne pas placer la verseuse à café chaude sur une surface
mouillée ou froide.
15. Ne pas utiliser une verseuse à café fissurée ou avec une poignée
lâche ou usée.
16. Ne pas nettoyer la verseuse à café avec de la poudre à nettoyer,
des tampons métalliques ou autres matériaux abrasifs.
17. Assurez-vous que le couvercle est bien fermé durant la
préparation du café et lorsque vous le versez. Ne forcez pas
en plaçant le couvercle sur la verseuse.
18. Pour débrancher la cafetière, placer l’interrupteur à la position
ARRÊT (O), puis enlever la fiche de la prise de courant.
19. AVERTISSEMENT ! Pour réduire le risque d’incendie ou de
choc électrique, ne pas enlever le dessous de la cafetière. Aucune
pièce à l’intérieur n’est réparable par l’utilisateur. Les réparations
doivent être faites par du personnel d’entretien autorisé
seulement.
20. Ne pas utiliser cet appareil pour un autre usage que celui auquel
il est destiné.
21. MISE EN GARDE ! Risque de coupures. Le support amovible de
la dosette 1 tasse contient une lame coupante. Manipuler avec
soin.
22. MISE EN GARDE ! Risque de coupures. Le perforateur est
coupant. Nettoyer avec prudence.
Pour utiliser un appareil électroménager, vous devez toujours prendre des mesures élémentaires de sécurité pour réduire le risque
d’incendie, d’électrocution et/ou de blessure corporelle, en particulier les mesures suivantes :
CONSERVER CES INSTRUCTIONS !

18
Autres consignes de sécurité pour le consommateur
Cet appareil est destiné à un usage domestique uniquement.
w AVERTISSEMENT
Risque de choc électrique : Ce produit est
fourni avec une fiche polarisée (une broche large) pour réduire le
risque d’électrocution. Cette fiche n’entre que dans un seul sens
dans une prise polarisée. Ne contrecarrez pas l’objectif sécuritaire
de cette fiche en la modifiant de quelque manière que ce soit
ou en utilisant un adaptateur. Si vous ne pouvez pas insérer
complètement la fiche dans la prise, inversez la fiche. Si elle refuse
toujours de s’insérer, faire remplacer la prise par un électricien.
La longueur du cordon installé sur cet appareil a été sélectionnée
afin de réduire les risques d’enchevêtrement ou de faux pas
causés par un fil trop long. L’utilisation d’une rallonge approuvée
est permise si le cordon est trop court. Les caractéristiques
électriques de la rallonge doivent être équivalentes ou supérieures
aux caractéristiques de l’appareil. Prendre toutes les précautions
nécessaires pour installer la rallonge de manière à ne pas la faire
courir sur le comptoir ou sur une table pour éviter qu’un enfant ne
tire sur le cordon ou trébuche accidentellement.
Pour éviter la surcharge du circuit électrique, ne pas utiliser un
autre appareil à haute puissance sur le même circuit que cet
appareil.

19
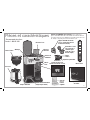
Pièces et caractéristiques
Verseuse*
Rangement interne
du cordon
Perforateur
(perfore un trou sur le
dessus de la dosette 1 tasse)
Niveau d’eau
Poignée du panier-filtre
Support amovible de dosette
1 tasse* (perforateur de trou
au fond de la dosette)
Panneau de
commande
Niveau
d’eau
Sélecteur
d’infusion
Panier
à filtre*
Panier-filtre 1 tasse
avec couvercle à
charnière (pour
grains de café et
dosette souple)
Panier à filtre*
Affichage
Socle de
tasse à
hauteur
réglable*
Réservoir à eau
Plaque chauffante
Témoin de fonctionnement
(rouge lorsque chaud)
*Pour commander des pièces :
Canada : 1.800.267.2826
AVANT LA PREMIÈRE UTILISATION : Laver toutes les
pièces amovibles dans de l’eau chaude savonneuse. Rincer
et sécher. Faire un cycle d’infusion en ayant ajouter de l’eau
de chaque côté puis jeter l’eau à la fin du cycle.

20
1
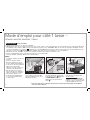
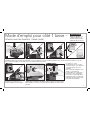
Mode d’emploi pour côté 1 tasse –
Infusion avec les dosettes 1 tasse
Brancher la cafetière. Tourner le
sélecteur d’infusion vers la droite
pour infuser 1 tasse ( ). Appuyer
sur BREW OPTIONS (options
d’infusion) pour sélectionner le
mode .
Risque de brûlure.
Pour éviter tout contact avec le café ou l’eau brûlant :
• NE PAS utiliser plus de 10 oz (296 ml) d’eau avec une dosette 1 tasse ou 14 oz (414 ml) avec du café moulu. Une trop grande quantité d’eau
sera indiquée par les lettres « ERR » (erreur) suivi d’un long signal sonore. SOLUTION : Déposer la carafe sur la plaque chauffante. Tourner
le sélecteur d’infusion sur « Carafe » (
). Appuyer sur le bouton I/O (marche/arrêt) pour enlever l’eau. Tourner le sélecteur d’infusion pour
obtenir le côté une tasse ( ). Ajouter la bonne quantité d’eau dans le réservoir. Commencer le cycle d’infusion.
• Remplir le réservoir d’eau avec la tasse ou le gobelet à emporter dans lequel sera infusé le café.
• Insérer complètement la tasse ou le gobelet à emporter sous le panier-filtre.
• Pour des rèsultats optimaux, utiliser les dosettes K-Cup
MD
*.
NOTES :
• La cafetière n’infuse qu’un côté
à la fois.
• Pour un café plus chaud :
Rincer la grande tasse à café
à l’eau chaude avant l’infusion.
• Le mode de sélection d’infusion
utilisé lors de la dernière
infusion se répétera, sauf si la
cafetière a été débranchée.
• Du café peut encore couler
après la fin du cycle d’infusion
(après les 3 bips) si l’on utilise
une mouture fine de café.
• Le mode de programmation
ne peut pas être utilisé pour
le côté 1 tasse.
w MISE EN GARDE
*K-Cup est une marque déposée de Keurig, Inc. L’usage du nom de la marque déposée K-Cup n’implique aucune affiliation et
aucun endossement par Keurig, Inc.
2 3
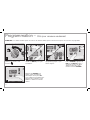
Retirer le panier à filtre. Déposer
la dosette dans le support de la
dosette 1 tasse.
w MISE EN GARDE
Risque de
coupures : Le support amovible de
la dosette 1 tasse contient une lame
coupante. Manipuler avec soin.
Remplir le réservoir avec la tasse
ou le gobelet à emporter dans
lequel sera infusé le café (10 oz
[296 ml] d’eau max.).
A página está carregando...
A página está carregando...
A página está carregando...
A página está carregando...
A página está carregando...
A página está carregando...
A página está carregando...
A página está carregando...
A página está carregando...
A página está carregando...
A página está carregando...
A página está carregando...
A página está carregando...
A página está carregando...
A página está carregando...
A página está carregando...
A página está carregando...
A página está carregando...
A página está carregando...
A página está carregando...
A página está carregando...
A página está carregando...
A página está carregando...
A página está carregando...
A página está carregando...
A página está carregando...
A página está carregando...
A página está carregando...
-
 1
1
-
 2
2
-
 3
3
-
 4
4
-
 5
5
-
 6
6
-
 7
7
-
 8
8
-
 9
9
-
 10
10
-
 11
11
-
 12
12
-
 13
13
-
 14
14
-
 15
15
-
 16
16
-
 17
17
-
 18
18
-
 19
19
-
 20
20
-
 21
21
-
 22
22
-
 23
23
-
 24
24
-
 25
25
-
 26
26
-
 27
27
-
 28
28
-
 29
29
-
 30
30
-
 31
31
-
 32
32
-
 33
33
-
 34
34
-
 35
35
-
 36
36
-
 37
37
-
 38
38
-
 39
39
-
 40
40
-
 41
41
-
 42
42
-
 43
43
-
 44
44
-
 45
45
-
 46
46
-
 47
47
-
 48
48


Hamilton Beach FlexBrew Manual do proprietário
- Categoria
- Cafeteiras
- Tipo
- Manual do proprietário
em outras línguas
Artigos relacionados
-
Hamilton Beach 46310 Guia de usuario
-
Hamilton Beach 46220 Guia de usuario
-
-
-
Hamilton Beach 46110 Guia de usuario
-
-
-
-
Hamilton Beach 49901 Guia de usuario
-
Hamilton Beach 46899A Guia de usuario
Outros documentos
-
Proctor Silex 43685 Guia de usuario
-
Proctor Silex 49961PS Guia de usuario
-
Tefal CM600840 Manual do usuário
-
-
-
-
Tefal Smart&Light CM600810 Manual do usuário
-
Sunbeam 32863281 Manual do usuário
-
Oster 3265 Manual do usuário
-