Logitech G923 - Setup Guide Guia de instalação
- Tipo
- Guia de instalação

G923
Racing Wheel and Pedals For PlayStation
®
4
Volant de course et pédales pour PlayStation
®
4
SETUP GUIDE
|
GUIDE D’INSTALLATION

ENGLISH . . . . . . . . . . . . . . . . . . . . . . . . .3
FRANÇAIS . . . . . . . . . . . . . . . . . . . . . . . 14
ESPAÑOL . . . . . . . . . . . . . . . . . . . . . . . .25
PORTUGUÊS . . . . . . . . . . . . . . . . . . . . . . 36
G923 RACING WHEEL AND PEDALS FOR PLAYSTATION
®
4
620-008913.002
USB
1
3
PS4
™
logitechG.com/support/g923-ps4
2
USB
PC

3 ENGLISH
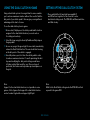
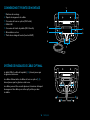
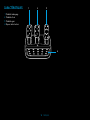
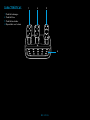
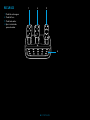
CONNECTIONS AND MOUNT POINTS
1 Mounting clamps
2 Cable management cleat
3 Optional shifter connection (DB-9 male)
4 USB cable
5 Pedal unit connection (DB-9 female)
6 Power connection
7 Bolt mounting points (uses M6X1 bolts)
OPTIMAL CABLE ROUTING
USB and pedal cables (1, 2) should be routed
throughinnerchannels.
Power and optional shifter cables (3, 4) should be routed
throughouter channels.
Cables may be wrapped multiple times around cable
management cleat to take in slack.
2
3
4
1
5
6
7
14 2 3
4
3
2
1

4 ENGLISH
USB
PS4
USB
PC
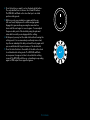
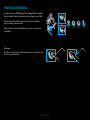
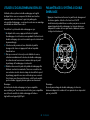
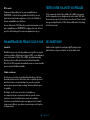
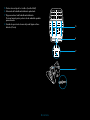
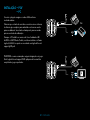
INSTALLATION — PS4
™
— PC
Attach power adapter and USB cables as shown.
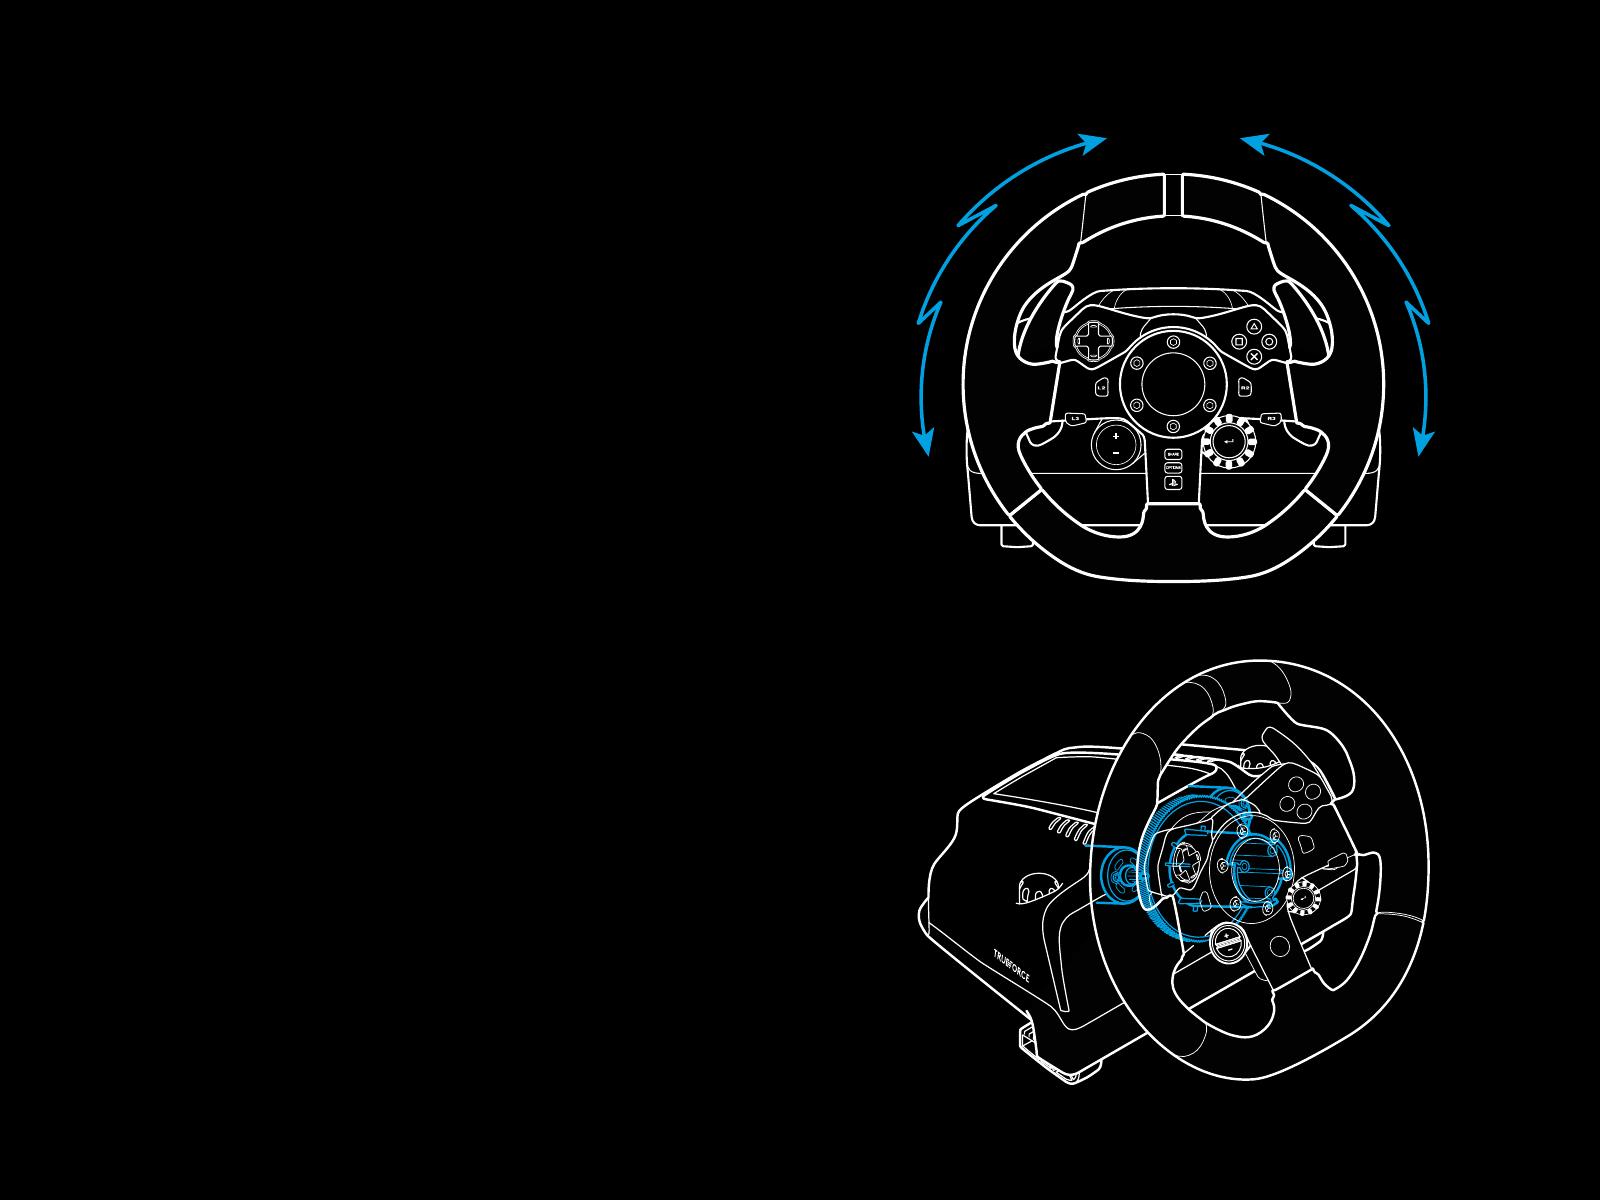
Every time your racing wheel connects with your system,
itwillrotate fully to each side and then to the center to calibrate.
Your wheel will be ready once this calibration is completed.
For PC to enable the force feedback and RPM LED features
onyour G923 Wheel and Pedals you must install the Logitech
G HUB software. This can be found at logitechG.com/
support/g923-ps4.
TRUEFORCE and advanced features require game integration.
Visit logitechG.com/support/G923-ps4 for a complete list
ofsupported games.

5 ENGLISH
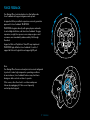
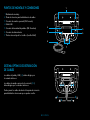
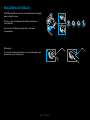
MOUNTING CLAMPS
G923 Racing Wheel is equipped with
a built in clamping system for mounting to a table.
Push down and rotate clamp knobs to lock or unlock.
Rotate clamp knobs to tighten or loosen clamps.
Note:
Clamp extenders should be removed for attachment
tothickertables.

6 ENGLISH
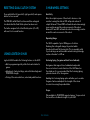
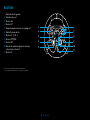
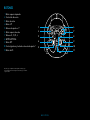
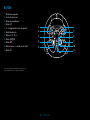
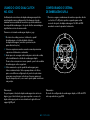
BUTTONS
1 Left bumper
2 Directional pad
3 View button
4 L3 button*
5 +/- Setting Adjustment buttons*
6 Right bumper
7 X, ¡, o, r buttons
8 OPTIONS button
9 R3 button*
10 Setting Selection Dial and Select button*
11 PS button
2
3
5
4
1 6
7
8
10
11
9
* Requires supported games on PS4. Assignable in any game on PC using either
in game assignment or Logitech G HUB software.

7 ENGLISH
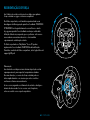
FORCE FEEDBACK
Your Racing Wheel contains dual motors that will provide
forcefeedback with supported games and systems.
In supported titles you will also experience our next generation
approach to force feedback: TRUEFORCE.
TRUEFORCE integrates directly with game physics and audio
to unlock high-denition, real-time force feedback. Tire grip,
suspension, weight, horsepower—even unique engine sound
resonance—are immediately and accurately felt through
thewheel.
Supported titles on PlayStation
®
4 and PC may implement
TRUEFORCE high-denition force feedback. For a list of
supported titles visit logitechG.com/support/g923-ps4
Note:
Your Racing Wheel has an overheat protection circuit safeguard
to protect it under high-temperature operating conditions.
Inrare instances, force feedback features may shut down
duringuse while controls continue to operate.
If this occurs, allow the wheel to cool down and power
itdownbyunplugging it. If this occurs frequently,
contactproduct support.

8 ENGLISH
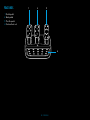
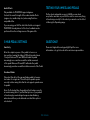
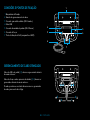
FEATURES
1 Clutch pedal
2 Brake pedal
3 Throttle pedal
4 Textured heel rest
1 2 3
4

9 ENGLISH
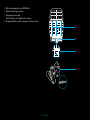
5 Bolt mounting points (uses M6X1 bolts)
6 Patented carpet grip system
7 Carpet grip release clip
Push towards rear of pedal unit to release
8 Change pedal face position (requires 2.5mm hex key)
5
6
7
8

10 ENGLISH
USING THE DUAL CLUTCH IN-GAME
Using a dual clutch system from a grid start in a race enables
you to achieve maximum traction without the need to nd the
bite point of your clutch pedal - this can give you a signicant
advantage at the start of a race.
To use the dual clutch system in-game:
1 At race start, fully depress the clutch pedal and the button
assigned to the dual clutch function (see next section
forsetting instructions).
2 Select rst gear using the Gear Up Paddle and fully depress
the gas pedal.
3 As soon as you get the green light for race start, immediately
release the Dual Clutch button. The car should start moving
as the bite point of the clutch is engaged.
4 Smoothly release your foot from the clutch pedal in order
toachieve maximum traction. It’s worth practicing this last
step and modifying the bite point setting several times
to nd amethod that works for you. Once you have it
perfected, thisfeature can help make up several places on
the grid.
Note:
Support for the dual clutch function is not possible in some
games. A list of games that support the dual clutch feature
canbe found at logitechG.com/support/g923-ps4
Note:
Whilst in the Dual Clutch setting mode the RPM LEDs will not
respond to the game/SDK
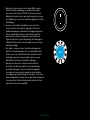
SETTING UP THE DUAL CLUTCH SYSTEM
1 Press and hold the left and right gear paddle L3
andR3buttons together for two seconds to enter
dualclutchsettingmode. The RPM LEDs will illuminate blue
and ashslowly:

11 ENGLISH
2 Press the button you want to set as the dual clutch button.
The only valid buttons for this are the L3 and R3 buttons.
TheRPM LEDs will ash red to show that you’re in clutch
position setting mode.
3 While in your chosen simulation or game with the car
still ona track, fully depress the clutch and gas pedals.
Engagerst gear and keep pressing the minus button
down until the car begins to move in-game. You can adjust
theprecise bite point of the clutch by using the plus and
minus buttons until youare happy with the setting.
4 At this point you may test the dual clutch without leaving the
setting mode. It is recommended you attempt a race start,
stop the car and adjust the bite point and then try again until
you are satised with the performance of the dual clutch.
5 Press the Select button in the middle of the dial on the wheel
to exit dual clutch setting mode. The RPM LEDs will ash
ina sequence from green to blue to show that the setting
issaved. The RPM LEDs will then go out and begin responding
again to RPM output from supported games.

12 ENGLISH
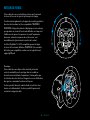
RESETTING DUAL CLUTCH SYSTEM
Press and hold the left gear shift, right gear shift, and square
button for two seconds.
The RPM LEDs will all ash four times and then extinguish
toindicate that the Dual Clutch system has been reset.
The button assigned to the Dual Clutch system (L3 or R3)
willrevert to its normal function.
USING LOGITECH G HUB
Logitech G HUB enables the following features on the G923:
• Button programming with proles that can be linked to
games.
• Adjustment of wheel settings, such as Rotation Angle and
TRUEFORCE strength.
• Testing of the various buttons, wheel and pedal functions.
G HUB WHEEL SETTINGS
Sensitivity
Alters the output response of the wheel to be more or less
sensitive. Leaving this slider at 50% will provide a linear 1:1
output. Between 51% and 100% will make the wheel increasingly
more sensitive around the centre movement of the wheel.
Between 0% and 49% will make the wheel decreasingly sensitive
around the centre movement of the wheel.
Operating Range
The G923 is capable of up to 900 degrees of rotation.
Reducingthis setting will change the point at which
thewheelwill reach full steering lock. This is especially useful
if you’re driving a car with a smaller actual steering lock angle,
suchasaFormula 1 orGT3 car.
Centering Spring (for games without force feedback)
Most games that support force feedback already model
thecorrect return to center function of the G923 based on
thevirtual car. It is recommended that the Centering Spring
option be turned o for these games.
Enabling the Centering Spring option will allow you to override
the game features and adjust the strength of the return
tocenter force using the provided slider.
Torque
Only available for TRUEFORCE supported games. Torque controls
the overall force feedback strength for your G923.

13 ENGLISH
Audio Eects
Only available for TRUEFORCE supported games.
Controlstheoverall strength of the audio-related eects
(enginenote, rumble strips etc.) when using TrueForce-
compatible titles.
If you are using your G923 in older titles that do not support
TRUEFORCE then adjustment of the force feedback can be
performed from the settings menus of the game title.
G HUB PEDALS SETTINGS
Sensitivity
Alters the output response of the pedals to be more or
lesssensitive. Leaving this slider at 50% will provide a linear
1:1output. Between 51% and 100% will make the pedal
increasingly more sensitive around the initial movement
of thepedal. Between 0% and 49% will make the pedal
decreasingly sensitive around the initial movement of the Pedal.
Combined Pedals
If checked, this will set the gas and brake pedals to become
twohalves of a single axis. This will help the pedals operate
correctly in older racing titles that do not support separate axes
for pedals.
Note: if left checked then the pedals will not behave correctly
in modern racing titles. If you nd that just one of your pedals
is functioning by accelerating when pressed and braking
whenreleased then you should make sure that this option is
notchecked.
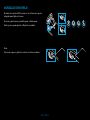
QUESTIONS?
Please visit logitechG.com/support/g923-ps4 for more
information or to get in touch with a customer representative.
TESTING YOUR WHEEL AND PEDALS
On the wheel and pedals screens in G HUB you can check
everybutton and axis on your G923 in order to ensure everything
is functioning correctly. For the wheel you can also see the eect
of altering the Operating range.

14 FRANÇAIS
CONNEXIONS ET POINTS DE MONTAGE
1 Fixations de montage
2 Taquet de rangement des câbles
3 Connexion de levier en option (DB-9 mâle)
4 Câble USB
5 Connexion de l'unité de pédale (DB-9 femelle)
6 Alimentation secteur
7 Points de montage de boulon (boulons M6X1)
SYSTÈME DE PASSAGE DE CÂBLE OPTIMAL
Le câble USB et le câble de la pédale (1, 2) doivent passer par
lesglissières intérieures.
Les câbles d'alimentation et câbles de levier en option (3, 4)
doivent passer par les glissières extérieures.
Les câbles peuvent être enroulés plusieurs fois autour du taquet
de rangement des câbles pour éviter qu'il y ait du jeu dans
lescâbles.
2
3
4
1
5
6
7
14 2 3
4
3
2
1

15 FRANÇAIS
USB
PS4
USB
PC
INSTALLATION — PS4
™
— PC
Installez l'adaptateur secteur et les câbles USB comme indiqué.
À chaque fois que votre volant de course se connecte
àvotresystème, il tourne entièrement de chaque côté,
puisserepositionne au centre pour le calibrage. Votre volant
estprêt une fois le calibrage terminé.
Pour que le PC active les fonctions de retour de force et
dutémoin lumineux indiquant le nombre de tours par minute
sur votre volant et pédales G923, vous devez installer le logiciel
Logitech G HUB. Il est disponible à l'adresse logitechG.com/
support/g923-ps4.
TRUEFORCE et les fonctions avancées nécessitent l'intégration
du jeu. Rendez-vous sur logitechG.com/support/G923-ps4 pour
connaître la liste complète des jeux pris en charge.

16 FRANÇAIS
FIXATIONS DE MONTAGE
Le volant de course G923 Driving Force Racing Wheel est équipé
d'un système de xation intégré pour le montage sur une table.
Poussez vers le bas et faites tourner les boutons de xation
pourverrouiller ou déverrouiller.
Faites tourner les boutons de xation pour serrer ou desserrer
lesxations.
Remarque:
Pour xer le volant sur des tables plus épaisses, vous devez retirer
les extenseurs de xation.

17 FRANÇAIS
BOUTONS
1 Gâchette haute gauche
2 Pavé directionnel
3 Bouton Vue
4 Bouton L3*
5 Paramétrage des boutons de réglage +/-*
6 Gâchette haute droite
7 Boutons X, ¡, o, r
8 Bouton OPTIONS
9 Bouton R3*
10 Molette de paramétrage de la sélection
etboutonde sélection*
11 Bouton PS
2
3
5
4
1 6
7
8
10
11
9
* Nécessite des jeux PS4 compatibles. Aectation possible dans tous
lesjeuxPC utilisant soit l'aectation en jeu, soit le logiciel Logitech G HUB.
18 FRANÇAIS
RETOUR DE FORCE
Votre volant de course contient deux moteurs qui fournissent
leretour de force sur les jeux et systèmes pris en charge.
Vous découvrirez également notre approche nouvelle génération
du retour de force dans les titres compatibles: TRUEFORCE.
TRUEFORCE s'intègre directement à la physique et au son dujeu
pour produire un retour de force haute dénition en temps réel.
L'adhérence des pneus, la suspension, le poids, la puissance
du moteur, même la résonance du son du moteur, sont
immédiatement et précisément ressentis via le volant.
Les titres PlayStation
®
4 et PC compatibles peuvent intégrer
leretour de force haute dénition TRUEFORCE. Pour connaître
la liste des jeux compatibles, rendez-vous sur logitechG.com/
support/g923-ps4
Remarque:
Votre volant de course dispose d'un circuit de protection
contre la surchaue pour le protéger dans les conditions
defonctionnement à haute température. Il arrive parfois que
lesfonctions de retour de force s'éteignent en cours d'utilisation
bien que les commandes fonctionnent toujours.
Si cela se produit, laissez le volant refroidir et mettez-le hors
tension en le débranchant. Si cela se produit fréquemment,
contactez le support produit.

19 FRANÇAIS
CARACTÉRISTIQUES
1 Pédale d'embrayage
2 Pédale de frein
3 Pédale de gaz
4 Repose talon texturé
1 2 3
4

20 FRANÇAIS
5 Points de montage de boulon (boulons M6X1)
6 Système antidérapant breveté
7 Attache antidérapante
Poussez vers l'arrière ou sur la pédale pour détacher
8 Changement de position de la face de la pédale
(clé Allen de 2,5 mm requise)
5
6
7
8
A página está carregando...
A página está carregando...
A página está carregando...
A página está carregando...
A página está carregando...
A página está carregando...
A página está carregando...
A página está carregando...
A página está carregando...
A página está carregando...
A página está carregando...
A página está carregando...
A página está carregando...
A página está carregando...
A página está carregando...
A página está carregando...
A página está carregando...
A página está carregando...
A página está carregando...
A página está carregando...
A página está carregando...
A página está carregando...
A página está carregando...
A página está carregando...
A página está carregando...
A página está carregando...
A página está carregando...
-
 1
1
-
 2
2
-
 3
3
-
 4
4
-
 5
5
-
 6
6
-
 7
7
-
 8
8
-
 9
9
-
 10
10
-
 11
11
-
 12
12
-
 13
13
-
 14
14
-
 15
15
-
 16
16
-
 17
17
-
 18
18
-
 19
19
-
 20
20
-
 21
21
-
 22
22
-
 23
23
-
 24
24
-
 25
25
-
 26
26
-
 27
27
-
 28
28
-
 29
29
-
 30
30
-
 31
31
-
 32
32
-
 33
33
-
 34
34
-
 35
35
-
 36
36
-
 37
37
-
 38
38
-
 39
39
-
 40
40
-
 41
41
-
 42
42
-
 43
43
-
 44
44
-
 45
45
-
 46
46
-
 47
47


Logitech G923 - Setup Guide Guia de instalação
- Tipo
- Guia de instalação
em outras línguas
Artigos relacionados
Outros documentos
-
 Joytech NITRO TRI-FORCE 3IN1 RACING WHEEL Manual do proprietário
-
Thrustmaster T150 RS Volant Racing Retour de Force Manual do usuário
-
Thrustmaster 2969097 2961061 Manual do usuário
-
Electronic Arts GT Edition Manual do usuário
-
Thrustmaster 4169087 Manual do usuário
-
Thrustmaster t150 Manual do usuário
-
-
-
 MSA G1 G1 SCBA Integrated TIC Guia rápido
-
Rockstar Midnight Club L.A. Complete Edition Manual do proprietário

