A página está carregando...

Xip Porter & Soft receiver
FA01379M09
Installazione e setup
Installation and Setup
Installation et configuration
Installation und Einrichtung
Instalación y configuración
Installatie en set-up
Instalação e configuração
Instalacja i ustawienia
Установка и настройка
RU
Русский
PL
Polski
PT
Portugûes
NL
Nederlands
ES
Español
DE
Deutsch
FR
Français
EN
English
IT
Italiano

2
Operazioni da svolgere prima di avviare l’installazione
Requisiti minimi del sistema
CPU Pentium 2GHz
Schermo 1024x768
RAM 1GB
Disco 350MB disponibili
OS Windows XP/VISTA/Win7
Dispositivi audio/video necessari
Audio Microfono + altoparlante
Video Telecamera (facoltativa)
Software di terze parti richiesto
Adobe Flash Player 10
Nota: Assicurarsi che il PC sia impostato in modo da non andare mai in “Stand-by”.
Impostazioni “Proprietà - Internet”
Dal menù “Impostazioni” del PC, individuare ed accedere alla sezione “Impostazione LAN”; verrà
visualizzata la finestra “Impostazione Rete Locale (LAN)”.
Se è abilitato l’utilizzo di un server proxy, premere il pulsante “Avanzate”; verrà visualizzata la finestra
“Impostazioni proxy”; nell’area “Eccezioni” o “Nessun proxy per” aggiungere la classe (sottorete) del
server ET/SER-Xip (es. 192.168.1.*).
Se non è abilitato l’utilizzo di un server proxy non è necessario apportare alcuna modifica alle
impostazioni.

3
2
1
Installazione e setup del software
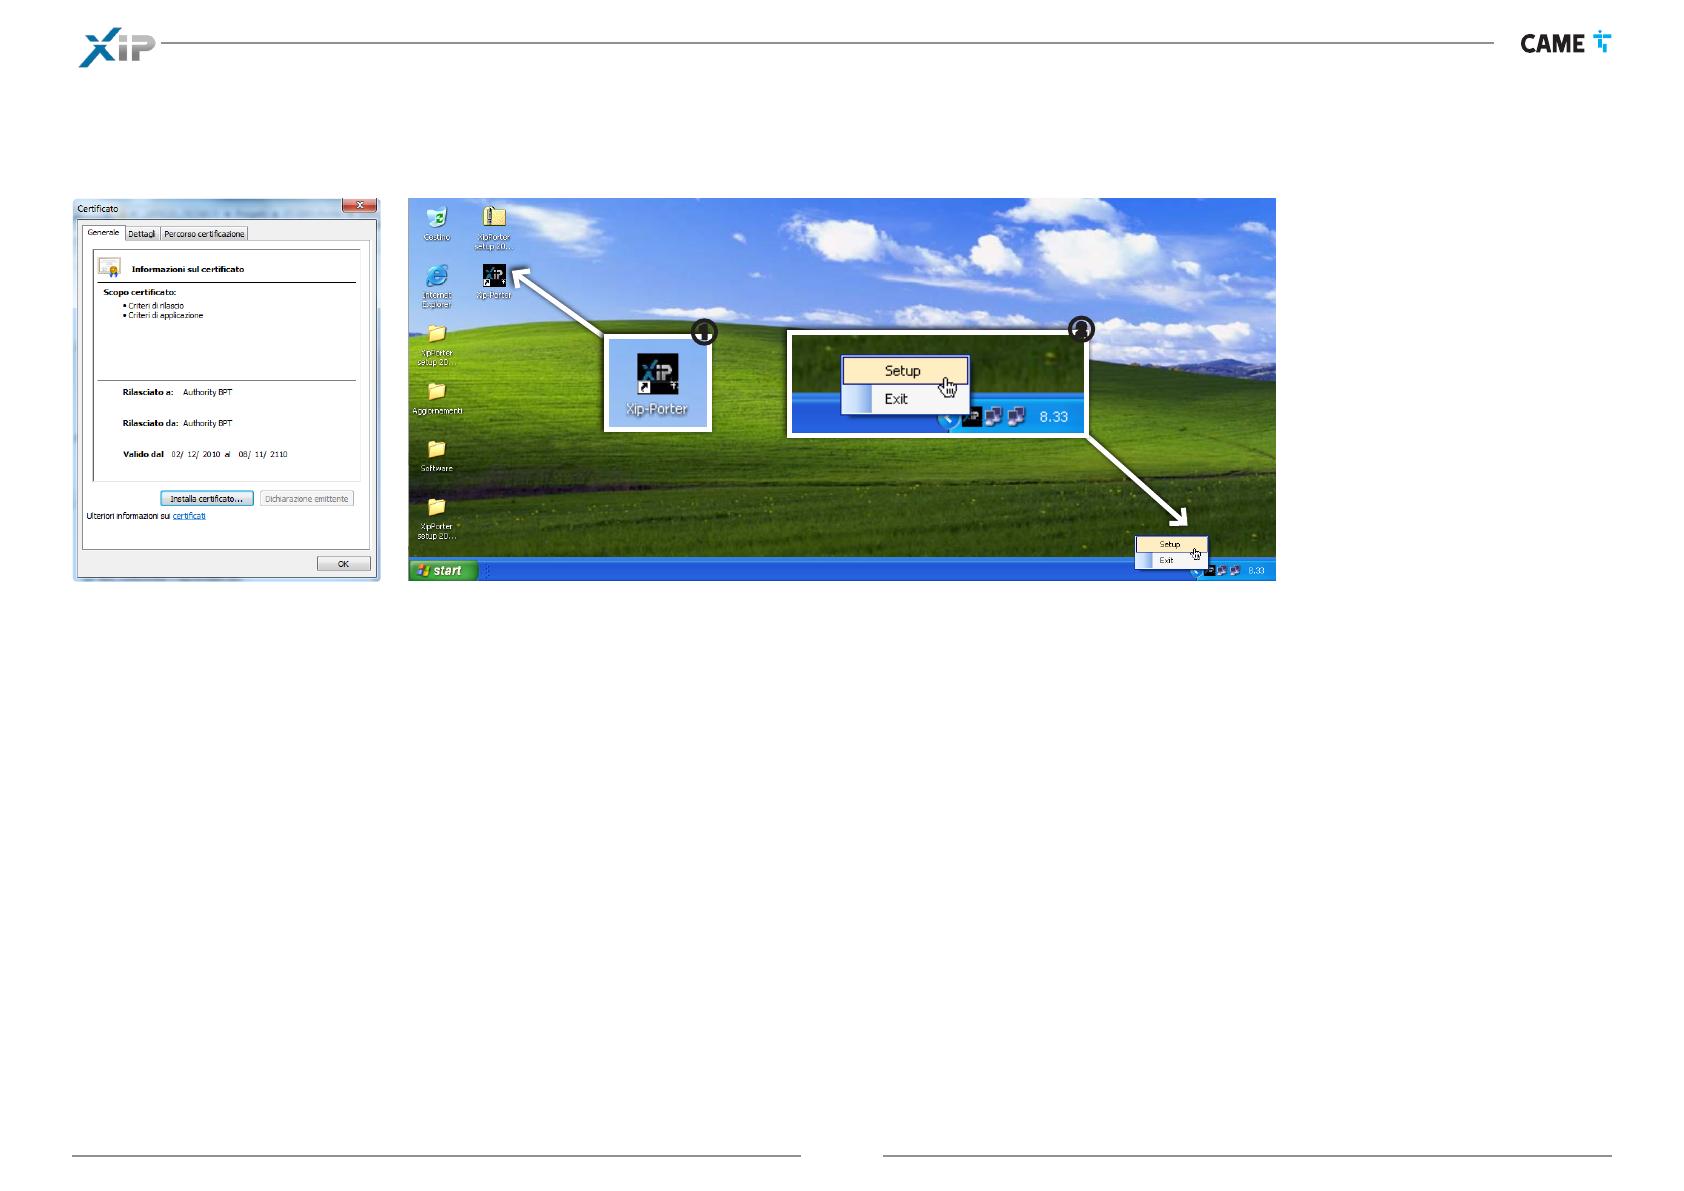
Avviare l’installazione del software; seguire le istruzioni che appaiono sulle finestre di dialogo; installare i certificati all’interno della cartella “Autorità di certificazione radice attendibili”.
Al termine della procedura viene creata sulla scrivania un’icona di collegamento per il lancio rapido del programma A.
Prima di lanciare il programma, premere con il tasto destro del mouse sull’icona in basso a destra sulla barra delle applicazioni 2, e selezionare “Setup” per accedere alla finestra di setup dell’applica-
zione.

4
3
4
6
7 8
Network
Nello spazio 3 digitare l’indirizzo IP del ET/SER Xip (la porta di default è “80”).
Abilitando HTTPS 4 si attiva la crittazione della comunicazione tra client e server
(questa impostazione deve essere la stessa anche su ETI/SERXip).
Attenzione: questa funzione è disponibile solo per alcune tipologie di impianto;
normalmente non è necessario attivarla.
Dispositivi
Selezionare dagli elenchi le sorgenti audio e video che devono essere utilizzate
dall’applicazione.
Per il microfono, è importante testare il volume in uscita sui posti esterni del
sistema; qualora il volume risulti troppo basso potrebbe essere necessario attivare
la preamplificazione.
Disattivare il monitor del microfono per evitare fastidiosi rientri di suono sugli
altroparlanti.
Suoni
Selezionare dall’elenco F l’evento al quale abbinare uno dei suoni disponibili,
visualizzabili premendo il pulsante G; premere il pulsante 8 per ascoltare il
suono scelto.
Nota: È possibile abbinare suoni personalizzati agli eventi
(file di tipo wave PCM 16bit Signed LE, 8KHz).

5
J
K
L
M
9
N
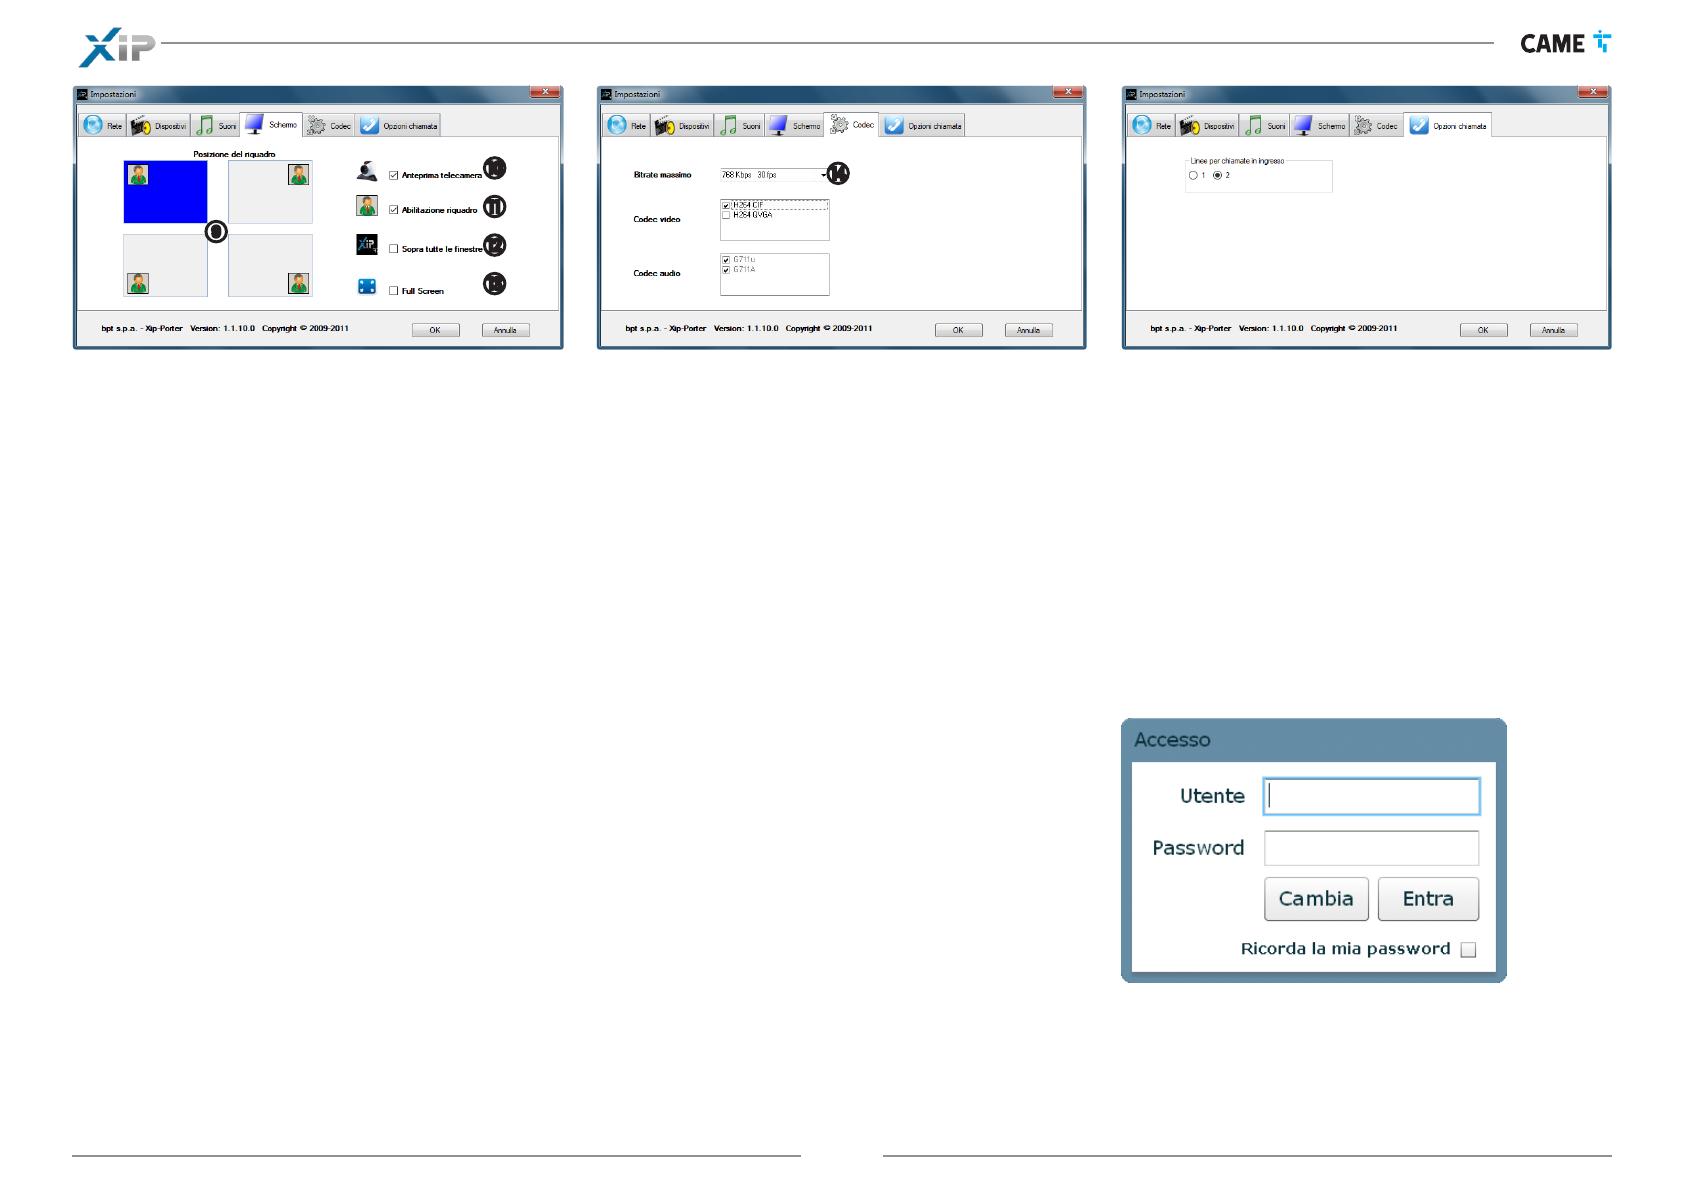
Schermo
9 Selezionare la disposizione preferita delle immagini sullo schermo in caso di
“picture in picture”.
J In caso di presenza di una webcam sulla postazione del portiere, l’immagine
ripresa rimane sempre presente sul video anche senza conversazioni in corso.
K Abilita la presenza del riquadro “picture in picture”.
L La finestra del software rimane sempre in primo piano, davanti a qualsiasi
altro programma in esecuzione.
M La finestra del programma si estende alla dimensione dello schermo del PC.
Codec
Impostare il bitrate massimo supportato dalla rete N.
Le caselle successive mostrano i codec video e audio utilizzati dal sistema.
Selezionare codec H264 CIF, in sistemi con video analogico PAL.
Selezionare codec H264 QVGA, in sistemi con video analogico NTSC.
Opzioni chiamata
Consente di scegliere quante sono le linee in ingresso attive.
Abilitando una sola linea in ingresso, è possibile gestire una sola chiamata in
ingresso, la seconda chiamata entrante troverà la linea occupata.
Con una chiamata entrante, il posto di portineria può comunque effettuare una
chiamata.
Avvio dell’applicazione
Avviare l’applicazione ed inserire Utente e Password assegnate
dall’amministratore del sistema.

6
Tipo di problema e possibile causa Possibili soluzioni
L’applicazione XIP-Porter non si avvia
Problemi di privilegi di esecuzione o di
componenti software aggiuntivi
1- L’esecuzione del programma Xip-Porter deve avvenire come
“Amministratore”: l’utente deve avere i privilegi di amministratore
oppure sulle Proprietà del file eseguibile Xip-Porter.exe, attivare
l’opzione “Esegui questo programma come amministratore”
Nei pc con SO Windows 7 o successivi, non deve essere attiva
l’opzione di compatibilità “esegui il programma in modalità
compatibilità per: Windows XP (service pack 3)”.
2- Verificare che l’antivirus non stia bloccando l’applicazione XIP-Porter:
in tal caso configurare opportunamente l’antivirus
3- Verificare la corretta installazione di Adobe FlashPlayer ActiveX,
versione minima 10.0.x (si veda Pannello di controllo, Installazione
applicazioni - o Programmi e funzionalità)
4- Verificare che sia installato Microsoft .NET Framework, almeno
versione 3.5 o successivo (si veda Pannello di controllo, Installazione
applicazioni - o Programmi e funzionalità)
5- Verificare con TaskManager che non ci sia in esecuzione un’altra
istanza del programma Xip-Porter.exe: in tal caso terminare il
processo attivo e rilanciare lo Xip-Porter
6- Disinstallare e reinstallare il programma XIP-Porter
L’applicazione rimane nella schermata iniziale
di ricerca del server
Mancata comunicazione con ETI/SERXip
1- Verificare nelle impostazioni del programma XIP-Porter che indirizzo IP
e Porta del Server siano corrette; verificare che l’impostazione HTTPS
sia come configurata su ETI/SERXip.
2- Verificare connettività a livello rete (ping dal PC all’indirizzo IP del
server)
3- Verificare le impostazioni di rete per il proxy (devono consentire il
traffico verso l’ETI/SERXip).
• Dal menù “Impostazioni” del PC, individuare ed accedere alla sezio-
ne “Impostazione LAN”; viene visualizzata la finestra “Impostazione
Rete Locale (LAN)”.
Se è abilitato l’utilizzo di un server proxy, premere il pulsante “Avan-
zate”; viene visualizzata la finestra “Impostazioni proxy”; nell’area
“Eccezioni” o “Nessun proxy per” aggiungere la classe (sottorete) del
server ET/SER-Xip (es. 192.168.1.*).
Se non è abilitato l’utilizzo di un server proxy non è necessario appor-
tare alcuna modifica alle impostazioni.
• Dal browser predefinito del PC (Chrome, Firefox, Explorer, ...) aprire
la sezione di “impostazioni”, individuare ed accedere alla sezione “Im-
postazione LAN”; viene visualizzata la finestra “Impostazione Rete
Locale (LAN)”. Seguire le stesse indicazioni del punto sopra.
4- Verificare l’allineamento tra le versioni fw del server e dell’applicativo
Xip/Porter”
Malfunzionamenti e possibili soluzioni
NOTA: In caso di errori con finestra di popup con dettagli errore, espandere i dettagli, copiare ed inviare al servizio
tecnico, assieme alla descrizione dettagliata del problema visto.
Tipo di problema e possibile causa Possibili soluzioni
Dopo aver digitato il nome utente, il login non
viene completato e successivamente compare
il messaggio “ERRORE su Server o Rete” e la
schermata indica che il login non è avvenuto
Mancata registrazione VoIP
1- Sul PC dove è installato XIP-Porter, non devono essere in esecuzione
altri programmi che utilizzano tecnologie VoIP SIP (alcuni esempi tra i
più diffusi: Linphone, CounterPath X-Lite, Cisco Jabber - in particolare
non deve essere occupata la porta UDP 5060): in tal caso chiudere
tali applicazioni e rilanciare il programma XIP-Porter e poi rilanciare le
applicazioni chiuse se necessario
2- Verificare che l’antivirus non stia bloccando la porta 5060 o
l’applicazione XIP-Porter: in tal caso configurare opportunamente
l’antivirus
3- Verificare che il firewall non stia bloccando la porta 5060 o
l’applicazione XIP-Porter: in tal caso configurare opportunamente il
firewall
Durante la normale operatività del sistema,
appare il messaggio “ERRORE su Server o
Rete”
Mancata comunicazione con server ETI/SERXip
1- Verificare che non sia stato staccato il cavo di rete che collega il
sistema al pc
2- Verificare che non ci siano problemi di connettività di rete
3- Se si sta programmando il sistema (o il solo ETI/SERXip) con il PCS/XIP,
eseguire prima il logout da/dai portiere/i collegato/i
Il portiere visualizza lo stato “non disponibile”
per alcuni oggetti del sistema
Mancata registrazione di altri dispositivi o
disallineamento dello stato Xip-Porter
1- Verificare che il blocco di appartenenza dell’oggetto non disponibile
(ETI/XIP) sia correttamente registrato (pallino VERDE) nella lista
degli slaves (pagina web dell’ETI/SERXip) - verificare connettività e
configurazione ETI/XIP dell’oggetto non disponibile
2- L’applicazione XIP-Porter potrebbe essersi connessa all’ETI/SERXip
durante una programmazione del sistema con PCS/XIP: effettuare
Logout e rieffettuare il Login.
Le deviazioni di chiamata non avvengono
(anche chiamate panico), il portiere squilla
ma se non risponde le chiamate non vengono
deviate
Il time-out di chiamata impostato da PCS
sull’ETI/XIP dell’utente che ha fatto la chiamata
è minore del time-out di squillo con deviazione
dell’ETI/SERXip.
1- aumentare il time-out di chiamata sull’ETI o diminuire il time-out di
squillo sul ETI/SERXip

7

CAME S.p.A.
Via Martiri Della Libertà, 15
31030 Dosson di Casier - Treviso - Italy
tel. (+39) 0422 4940 - fax. (+39) 0422 4941
Eventuali aggiornamenti del presente documento sono disponibili sul sito www.came.com
Il produttore si riserva il diritto di apportare qualsiasi modifica al prodotto al fine di migliorarne le funzionalità.

Xip Porter & Soft receiver
Installation and setup
EN
English
FA01379-EN

2
Pre-installation operations
Minimum system requirements
CPU Pentium 2GHz
Screen 1024x768
RAM 1GB
Disk 350MB available
OS Windows XP/VISTA/Win7
Required audio/video devices
Audio Microphone + speaker
Video Video camera (optional)
Required third-party software
Adobe Flash Player 10
Note: Make sure that your computer is set up so that it will not go into stand-by mode.
Settings: Internet Properties
From the “Settings” menu on your PC, locate and access the “LAN Settings” section; the “Local Area
Network (LAN) settings” window will be displayed.
If the use of a proxy server is enabled, click on the “Advanced” tab; the “Proxy Settings” window will
appear; under “Exceptions” or “No proxy for” add the class (subnetwork) of the server ET/SER-Xip (e.g.
192.168.1.*).
If the use of a proxy server is not enabled, no changes need to be made to the settings.

3
2
1
Software installation and setup
Start software installation; follow the instructions that appear in the dialogue window; install the certificates in the “Trusted Root Certification Authorities” folder.
When the procedure is complete, a shortcut will be created on your desktop to launch the program quickly A.
Before launching the program, right click on the icon at the bottom right of the taskbar 2, and select “Setup” to access the application setup window.

4
3
4
6
7 8
Network
In area 3, type in the IP address of the ET/SER Xip (the default port is “80”).
By enabling HTTPS 4, the communication between the client and server is
encrypted (this setting must be the same on the ETI/SERXip).
Note: this function is only available for certain types of system; normally it does
not need to be activated.
Devices
Select the audio and video sources to be used by the application from the lists.
It is important to test the microphone output volume on the system entry panels;
if the volume is too low, you may need to activate the boost.
Deactivate the microphone monitor to prevent unwanted reverberations through
the speakers.
Sounds
From the list F, select the event to which you want to associate one of the
available sounds, which can be displayed by pressing button G; press button 8
to listen to the selected sound.
Note: You can associate custom sounds to the events
(file type: wave PCM 16bit Signed LE, 8KHz).
5
J
K
L
M
9
N
Screen
9 Select the preferred image arrangement on the screen for picture-in-picture
setups.
J If there is a webcam at the porter’s desk, the image remains on the video even
when there is no conversation in progress.
K This enables the picture-in-picture box.
L The software window always remains in the foreground, in front of any other
program running.
M The program window maximises to the size of the computer screen.
Codec
Set the maximum bit rate supported by the network N.
The following boxes show the video and audio codecs used by the system.
Select codec H264 CIF in systems with PAL analogue video.
Select codec H264 QVGA in systems with NTSC analogue video.
Call options
This allows you to choose how many input lines are active.
By enabling only one incoming line, only one incoming call can be managed; for
the second incoming call the line will be busy.
With an incoming call, the porter can still make another call.
Starting the application
Start the application and enter the username and password assigned by the
system administrator.

6
Type of problem and possible cause Possible solutions
The XIP-Porter application will not start
Problems related to usage or additional software
component rights
1- The Xip-Porter program must be run by an “Administrator”: the user
must have administrator rights or, from the executable Xip-Porter.exe
file properties, you must activate the option “Run as administrator”.
For OS Windows 7 or later, do not activate the compatibility option
“Run this program in compatibility mode for: Windows XP (service pack
3)”.
2- Check to ensure that the anti-virus software is not blocking the
XIP-Porter application. If it is, configure the anti-virus software
accordingly
3- Check that Adobe FlashPlayer ActiveX has been correctly installed
(version 10.0.x or later). To check this, see the Control Panel for the
programs installed under Programs and Features)
4- Check that Microsoft .NET Framework has been installed (version
3.5 or later). To check this, see the Control Panel for the programs
installed under Programs and Features)
5- Use Task Manager to check that the Xip-Porter.exe program is not
already running. If it is, end the current task and relaunch the Xip-
Porter
6- Uninstall and reinstall the XIP-Porter program
The initial server search screen is still
displaying the application
Failed communication with ETI/SERXip
1- Check that the IP address and server port are correct in the XIP-Porter
program settings; check that the HTTPS setting is configured as it is on
the ETI/SERXip.
2- Check the network connection (ping from computer to server IP
address)
3- Check the proxy network settings (they must allow traffic to the ETI/
SERXip).
• From the “Settings” menu on your computer, locate and access the
“LAN Settings” section; the “Local Area Network (LAN) settings”
window will be displayed.
If the use of a proxy server is enabled, click on the “Advanced” tab;
the “Proxy Settings” window will appear; under “Exceptions” or “No
proxy for” add the class (subnetwork) of the server ET/SER-Xip (e.g.
192.168.1.*).
If the use of a proxy server is not enabled, no changes need to be
made to the settings.
• From the preset browser on your computer (Chrome, Firefox, Explor-
er, etc.), open the “Settings” menu, and locate and access the “LAN
Settings” section; the “Local Area Network (LAN) settings” window
will be displayed. Follow the instructions in the point above.
4- Check that the firmware versions on the server and the Xip/Porter
application are aligned
Malfunctions and possible solutions
NOTE: Where an error message appears in a pop-up window, copy the error message details and send them to the
technical support service, together with a detailed description of the problem encountered.
Type of problem and possible cause Possible solutions
After entering your username, login is
unsuccessful and subsequently the message
“Server or Network ERROR” appears; the
display indicates that login has failed
Failed VoIP registration
1- On the computer where the XIP-Porter is installed, no other programs
which use VoIP SIP technology must be running (some of the most
common examples: Linphone, CounterPath, X-Lite and Cisco Jabber.
Note that the UDP 5060 port must be free). If there are, close these
applications and relaunch the XIP-Porter program; then relaunch the
closed applications if necessary
2- Check to ensure that the anti-virus software is not blocking the 5060
port or the XIP-Porter application. If it is, configure the anti-virus
software accordingly
3- Check to ensure that the firewall is not blocking the 5060 port or the
XIP-Porter application. If it is, configure the firewall accordingly
During normal system operation, the message
“Server or Network ERROR” appears
Failed communication with the ETI/SERXip server
1- Check to ensure that the network cable connecting the system to the
computer has not been disconnected
2- Check that there are no network connection problems
3- If the system is being programmed (or just the ETI/SERXip) with the
PCS/XIP, first ensure any connected porter(s) have logged out
The porter will see the status “unavailable”
attributed to some system components
Failed registration of other devices or
misalignment of Xip-Porter status
1- Check that the block that the unavailable component belongs to (ETI/
XIP) has been correctly registered (GREEN indicator) in the list of
slaves (ETI/SERXip webpage) - check the ETI/XIP configuration and
connectivity of the unavailable component
2- The XIP-Porter application may be connected to the ETI/SERXip when
programming the system with PCS/XIP: log out and then log back in
again.
Calls cannot be diverted (even emergency
calls); the porter device rings but if the call is
not answered, calls are not diverted
The call timeout set from the PCS on the ETI/XIP
of the user who made the call is quicker than the
ringing timeout with ETI/SERXip diversion.
1- Increase the call timeout on the ETI or decrease the ringing timeout on
the ETI/SERXip

7

CAME S.p.A.
Via Martiri Della Libertà, 15
31030 Dosson di Casier - Treviso - Italy
tel. (+39) 0422 4940 - fax. (+39) 0422 4941
Any updates made to this document can be found on our website www.came.com
The manufacturer reserves the right to make changes to improve the product and its functions.

Xip Porter & Soft receiver
Installation et configuration
FR
Français
FA01379-FR

2
Opérations à effectuer avant de mettre en marche l’installation
Conditions minimum requises du système
CPU Pentium 2GHz
Écran 1024x768
RAM 1GB
Disque 350MB disponibles
OS Windows XP/VISTA/Win7
Dispositifs audio/vidéo nécessaires
Audio Micro + haut-parleur
Vidéo Caméra (facultative)
Logiciel tiers requis
Adobe Flash Player 10
Remarque: S’assurer que le PC est configuré de manière à ne jamais se mettre en «Stand-by».
Configurations “Propriétés - Internet”
Depuis le menu «Configurations» du PC, repérer et accéder à la section «Configuration LAN»; la
fenêtre «Configuration Réseau Local (LAN)» apparaîtra.
Si l'utilisation d'un server proxy est activée, appuyer sur la touche «Avancées»; la fenêtre
«Configurations proxy» apparaîtra; dans la zone «Exceptions», ou «Aucun proxy pour» ajouter la
classe (sous-réseau) du server ET/SER-Xip (ex. 192.168.1.*).
Si l’utilisation d’un server proxy n’est pas activée, il n’est nécessaire d’apporter aucune modification
aux configurations.
3
2
1
Installation et configuration du logiciel
Mettre en marche l’installation du logiciel; suivre les instructions qui apparaissent sur les fenêtres de dialogue; installer les certificats à l’intérieur du dossier «Autorités de certification racine de
confiance».
À la fin de la procédure, une icône de liaison pour le lancement rapide du programme est créée sur le bureau A.
Avant de lancer le programme, appuyer sur la touche droite de la souris sur l’icône en bas à droite sur la barre des applications 2 et sélectionner «Configuration» pour accéder à la fenêtre de confi-
guration de l’application.

4
3
4
6
7 8
Network (réseau)
Dans l'espace 3 , taper l'adresse IP du ET/SER Xip (la porte par défaut est «80»).
En activant HTTPS 4 , on active le cryptage de la communication entre client et
server (cette configuration doit être la même aussi sur ETI/SERXip).
Attention: cette fonction n'est disponible que pour certaines typologies
d'installation; il n'est normalement pas nécessaire de l'activer.
Dispositifs
Sélectionner depuis les listes les sources audio et vidéo qui doivent être utilisées
par l’application.
Pour le micro, il est important de tester le volume en sortie sur les postes
externes du système; si le volume est trop bas, il pourrait s’avérer nécessaire
d’activer la pré-amplification.
Désactiver l’écran du micro pour éviter de désagréables retours de son sur les
haut-parleurs.
Sons
Depuis la liste F, sélectionner l’évènement auquel associer un des sons
disponibles, visualisables en appuyant sur la touche G; appuyer sur la touche
8 pour écouter le son choisi.
Remarque: Il est possible d’associer des sons personnalisables aux évènements
(fichier de type wave PCM 16bit Signed LE, 8KHz).
1/72