Lantronix xPrintServer Office: Enterprise Mobile Printing Guia rápido
- Categoria
- Roteadores
- Tipo
- Guia rápido

Ofce Edition
Quick Start Guide
AirPrint™ AirPrint enables you to wirelessly print photos,
e-mail, web pages, and documents from your iPad, iPhone,
and iPod touch without the need to install a driver.

Ofce Edition Quick Start Guide
English ..................................................................................................................................................... 1
Nederlands ............................................................................................................................................. 7
Français ................................................................................................................................................. 13
Deutsch .................................................................................................................................................. 19
Italiano ................................................................................................................................................. 25
Português .............................................................................................................................................. 31
Español ................................................................................................................................................. 37
中文 ..................................................................................................................................................... 43
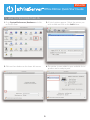
TABLE OF CONTENTS

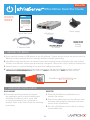
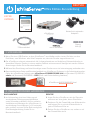
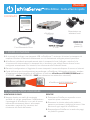
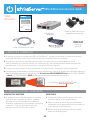
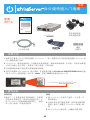
WHAT’S
INSIDE
Power supply
3’ Ethernet Cable
Mounting Bracket
& 2 Screws
xPrintServerQuick Start Guide
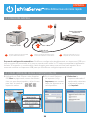
1 BEFORE YOU BEGIN
2 HARDWARE INSTALLATION
1. If you intend to connect a USB printer to the xPrintServer™, please be sure to test the printer from the
Windows or Mac computer that it is directly attached to before proceeding.
2. xPrintServer will auto-discover all network (wired and wireless) printers located on the same subnet.
Printers on a different subnet must be manually configured. Refer to the User’s Guide for instructions.
3. Internet access is required during set-up and when adding new printers.
4.
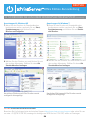
Custom Set-Up & xPrintServer User Guide: Using a web browser log into your xPrintServer admin interface at
xPrintServer-XXXXXXXXXXXX.local with USER ID = admin and PASSWORD = PASS (both case sensitive)
RACK MOUNT
1. A versatile mounting bracket and screws
are supplied to assist in easily installing and
mounting xPrintServer into a server rack
in various orientations (e.g., horizontal or
vertical). Refer to the User’s Guide for mounting
instructions.
DESKTOP
1. Place the xPrintServer upside down on a
smooth, flat surface.
2. Peel off the rubber feet from the adhesive strip
and place them adhesive-side down onto each
corner of the xPrintServer.
3. Turn the xPrintServer over so that it is resting
on the rubber feet.
Ofce Edition
Quick Start Guide
AirPrint AirPrint enables you to wirelessly print photos,
e-mail, web pages, and documents from your iPad, iPhone,
and iPod touch without the need to install a driver.
13266xPrintQSG_OfficeEd_resize_16.indd 1 9/30/13 9:23 AM
Of ce Edition Quick Start Guide
Mounting Bracket
xPrintServer
Rubber
Feet (4)
ENGLISH
1
xPrintServer-XXXXXXXXXXXX.local

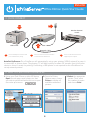
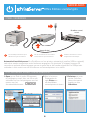
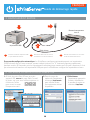
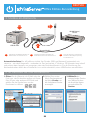
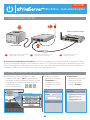
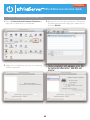
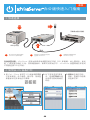
3 QUICK CONNECT
1
USB Printer
Network Cable
Wireless Router/
Switch
2
3
1
Connect USB printer cable to USB
port of xPrintServer (if any).
2
Connect network cable from wireless
router/switch to xPrintServer.
3
Power on the xPrintServer with
supplied power adapter.
Auto Set-Up Process: The xPrintServer will automatically set-up your printers (USB & network) as soon it
is connected, as shown above. The glowing “X” will blink quickly for about 30 seconds, then it will pulse
slowly to show it’s ready for printing. Connecting a USB printer is not required for the xPrintServer to
set-up network printers.
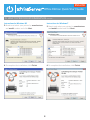
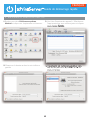
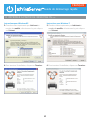
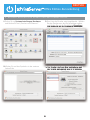
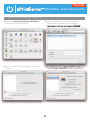
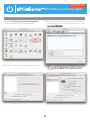
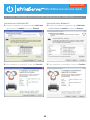
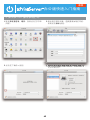
2. From the Printer
Options menu, choose
Printer to display all
available networked
printers.
1. Using your iPad, iPhone or other iOS device,
Open the web page, email, photo, etc. that
you wish to print and choose the icon to open
the native print menu:
3. Select the appropriate
printer. Then, select
the number of copies
and choose Print.
4 HOW TO PRINT FROM iOS DEVICES
Of ce Edition Quick Start Guide
ENGLISH
2

3
Of ce Edition Quick Start Guide
ENGLISH
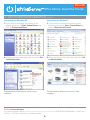
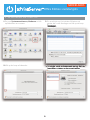
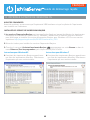
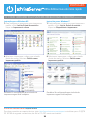
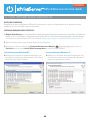
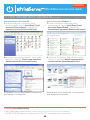
5 HOW TO PRINT FROM MAC OS
1. Go to System Preferences, Hardware and click
on Print & Scan.
2. Click on the + button on the lower left corner
3. A list of printers appear. Select the printer you
wish to add and click on the Add button.
4. The printer is now added in your available list of
printers and is ready to print.

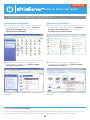
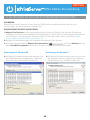
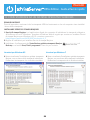
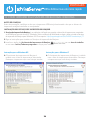
Instructions for Windows XP
4. The Bonjour Printer Wizard appears with a list
of discovered printers. Highlight the printer you
wish to install.
Instructions for Windows 7
4. The Bonjour Printer Wizard appears with a list
of discovered printers. Highlight the printer you
wish to install.
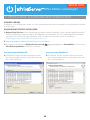
6 HOW TO PRINT FROM WINDOWS OS
BEFORE YOU BEGIN
Ensure the USB printer is working and the printer drivers are installed on the computer before proceeding.
INSTALL BONJOUR PRINT SERVICES
1. Bonjour Print Services is an Apple application that allows discovery of printers connected to the
xPrintServer from a Windows PC. Go to the web address below to download and install Bonjour Print
Services for Windows v2.0.2 or higher
http://support.apple.com/kb/DL999
2. Follow the prompts to install Bonjour Print Services
3. Find the Bonjour Printer Wizard shortcut on your Desktop or in the Start/All
programs menu and click to launch
Ofce Edition Quick Start Guide
ENGLISH
4

Ofce Edition Quick Start Guide
ENGLISH
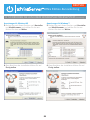
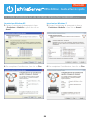
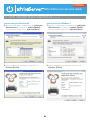
Instructions for Windows XP
5. Search and select your printer by manufacturer
and model number and click Next.
6. To complete the installation, click Finish.
Instructions for Windows 7
5. Search and select your printer by manufacturer
and model number and click Next.
6. To complete the installation, click Finish.
6 HOW TO PRINT FROM WINDOWS OS continued
5

Contact Technical Support
For technical support queries, visit http://www.lantronix.com/support or call (800) 422-7044 Monday – Friday from
6:00 a.m. – 5:00 p.m. Pacific Time, excluding holidays.
Ofce Edition Quick Start Guide
ENGLISH
6
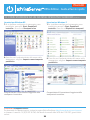
Instructions for Windows XP
7. If you wish to configure the printer as the
default printer go to: Start, Control Panel and
click on Printers and Faxes
8. Select the printer and right click and select Set
as default printer
Congratulations! Add printer setup is now
complete.
Instructions for Windows 7
7. If you wish to configure the printer as the
default printer go to: Start, Control Panel and
click on Devices and Printers
8. Select the printer and right click and select Set
as default printer
Congratulations! Add printer setup is now
complete.
6 HOW TO PRINT FROM WINDOWS OS continued

WAT
ZIT ER
BINNENIN
Stroomvoorziening
met regionale adapters
Ethernet-kabel
van 3 inch
Montagehaak
en 2 schroeven
xPrintServerSnelstartgids
1 VOORDAT U BEGINT
2 INSTALLATIE VAN DE HARDWARE
1. Als u van plan bent om een USB-printer met de xPrintServer™ te verbinden, test dan eerst de printer
met de Windows- of Mac-computer waarmee de printer is verbonden voordat u verder gaat.
2. xPrintServer vindt automatisch alle netwerkprinters (bedraad en draadloos) die op hetzelfde subnet
zitten. Printers die op een ander subnet zitten moeten handmatig worden geconfigureerd. Refereer
naar de gebruikershandleiding voor instructies.
3. Internettoegang is vereist tijdens het opstellen en het toevoegen van nieuwe printers.
4.
Gebruikershandleiding Aangepaste installatie en xPrintServer: Meld u met gebruik van een
webbrowser aan bij uw xPrintServer-beheerinterface op xPrintServer-XXXXXXXXXXXX.local met
GEBRUIKERSID = admin en WACHTWOORD = PASS (beide hoofdlettergevoelig)
REKMONTAGE
1. Een veelzijdige montagehaak en schroeven
zijn geleverd voor een gemakkelijke installatie
en om de xPrintServer in een serverrek te
plaatsen op verschillende manieren (bijv.
horizontaal of verticaal). Refereer naar de
gebruikershandleiding voor montageinstructies.
DESKTOP
1. Plaats de xPrintServer ondersteboven op een
effen en vlak oppervlak.
2. Verwijder de plakstrip van de rubberen voetjes
en plaats ze met het plakgedeelte naar beneden
in elke hoek van de xPrintServer.
3. Draai de xPrintServer om zodat deze steunt op
de rubberen voetjes.
Of ce Edition snelstartgids
Montagehaak
xPrintServer
Rubberen
voetje (4)
NEDERLANDS
7
Ofce Edition
Quick Start Guide
AirPrint AirPrint enables you to wirelessly print photos,
e-mail, web pages, and documents from your iPad, iPhone,
and iPod touch without the need to install a driver.
13266xPrintQSG_OfficeEd_resize_16.indd 1 9/30/13 9:23 AM
xPrintServer-XXXXXXXXXXXX.local

3 SNEL VERBINDEN
Automatisch installatieproces: De xPrintServer zal uw printers automatisch instellen (USB en netwerk)
zodra deze worden aangesloten zoals hierboven aangegeven. De gloeiende ‘X’ knippert ongeveer 30
seconden en pulseert daarna langzaam om aan te geven dat er kan worden afgedrukt. Een USB-printer
verbinden is niet vereist voor de xPrintServer om netwerkprinters in te stellen
2. Kies in het menu
Printeropties de
optie Printer om
alle beschikbare
netwerkprinters te tonen.
1. Open op uw iPad of ander iOS-apparaat
de webpagina, e-mail, foto, etc. die u wilt
afdrukken en kies het pictogram voor het
openen van het
standaardafdrukmenu:
3. Selecteer de juiste
printer. Selecteer
daarna het aantal
kopieën en kies
Afdrukken.
4 AFDRUKKEN VANAF iOS-APPARATEN
1
2
3
1 2 3
USB-printer
Netwerkkabel
Draadloze router/
switch
Sluit de USB-printerkabel aan op de
USB-aansluiting van xPrintServer.
Sluit de netwerkkabel van de draadloze
router/switch aan op de xPrintServer.
Schakel de xPrintServer in met de
meegeleverde stroomadapter.
NEDERLANDS
Of ce Edition snelstartgids
8

1. Ga naar Systeemvoorkeuren, Hardware en klik
op Afdrukken en scannen.
2. Klik op de knop + linksonder
3. Er verschijnt een lijst printers.Selecteer de
printer die u wilt toevoegen en klik op de knop
Toevoegen.
4. De printer wordt nu toegevoegd aan uw lijst van
beschikbare printers en kan nu afdrukken.
Toevoegen
.
4.
De printer wordt nu toegevoegd aan uw lijst van
beschikbare printers en kan nu afdrukken.
beschikbare printers en kan nu afdrukken.
5 AFDRUKKEN MET MAC OS
NEDERLANDS
Of ce Edition snelstartgids
9

Instructies voor Windows XP
4. De Bonjour Printer-wizard verschijnt met een
lijst van gevonden printers. Geef de printer aan
die u wilt installeren.
Instructies voor Windows 7
4. De Bonjour Printer-wizard verschijnt met een
lijst van gevonden printers. Geef de printer aan
die u wilt installeren.
6 PRINTEN VANAF EEN WINDOWS-BESTURINGSSYSTEEM
VOORDAT U BEGINT
Controleer of de USB-printer werkt en of de stuurprogramma’s op de computer zijn geïnstalleerd voordat
u verder gaat.
BONJOUR PRINT SERVICES INSTALLEREN
1. Bonjour Print Services is een toepassing van Apple waarmee printers kunnen worden gedetecteerd die
vanaf een Windows-computer met de xPrintServer zijn verbonden. Ga naar onderstaand internetadres
om Bonjour Print Services voor Windows v2.0.2 of voor een recentere versie te installeren
http://support.apple.com/kb/DL999?viewlocale=nl_NL
2. Volg de prompts om Bonjour Print Services te installeren
3. Ga naar de snelkoppeling Bonjour Printer-wizard op uw Bureaublad of in het menu
Start/Alle programma’s en klik om te starten
NEDERLANDS
Ofce Edition snelstartgids
10

NEDERLANDS
Ofce Edition snelstartgids
Instructies voor Windows XP
5. Zoek en selecteer uw printer op fabrikant en
modelnummer en klik op Volgende.
6. Klik op Voltooien om de installatie te voltooien.
Instructies voor Windows 7
5. Zoek en selecteer uw printer op fabrikant en
modelnummer en klik op Volgende.
6. Klik op Voltooien om de installatie te voltooien.
6 PRINTEN VANAF EEN WINDOWS-BESTURINGSSYSTEEM vervolgd
11

Neem contact op met Technische ondersteuning
Ga voor technische ondersteuning naar http://www.lantronix.com/support of bel met +31 (0)76 52 36 740
maandag – vrijdag van 9.00 tot 17.00 CET met uitzondering van feestdagen.
NEDERLANDS
Ofce Edition snelstartgids
12
6 PRINTEN VANAF EEN WINDOWS-BESTURINGSSYSTEEM vervolgd
Instructies voor Windows XP
7. Om de printer als standaardprinter in te stellen
gaat u naar: Start, Configuratiescherm en klikt
u op Printers en faxapparaten
8. Selecteer de printer, klik met de rechter
muisknop en selecteer Als standaardprinter
instellen
Gefeliciteerd! U bent klaar met het toevoegen van
printerinstellingen.
Instructies voor Windows 7
7. Om de printer als standaardprinter in te stellen
gaat u naar: Start, Configuratiescherm en klikt
u op Apparaten en printers
8. Selecteer de printer, klik met de rechter
muisknop en selecteer Als standaardprinter
instellen
Gefeliciteerd! U bent klaar met het toevoegen van
printerinstellingen.
6 PRINTEN VANAF EEN WINDOWS-BESTURINGSSYSTEEM vervolgd

Guide de démarrage rapide
FRANÇAIS
CONTENU
Alimentation avec
adaptateurs régionaux
Câble Ethernet 3’
Support de fixation
& 2 vis
xPrintServer
Guide de démarrage
rapide
1 AVANT DE COMMENCER
2 INSTALLATION DU MATÉRIEL
1. Si vous prévoyez de brancher une imprimante USB au xPrintServer™, veuillez vous assurer de tester l’imprimante
à partir de l’ordinateur Windows ou Mac auquel elle est directement connectée avant de continuer.
2. xPrintServer détectera automatiquement toutes les imprimantes réseau (câblées et sans fil) situées sur le même
sous-réseau. Les imprimantes se trouvant sur un sous-réseau différent devront être configurées manuellement.
Consultez les instructions du guide d’utilisation.
3. Un accès à Internet est nécessaire pendant la configuration et lors de l’ajout de nouvelles imprimantes.
4.
Configuration personnalisée & guide d’utilisation de xPrintServer: À l’aide d’un navigateur Internet,
connectez-vous à votre interface d’administrateur xPrintServer à l’adresse xPrintServer-XXXXXXXXXXXX.
local avec ID D’UTILISATEUR = admin et MOT DE PASSE = PASS (tous deux sont sensibles à la casse)
MONTAGE EN RACK
1. Un support de fixation polyvalent et des vis
sont fournis pour vous aider à installer et
fixer facilement xPrintServer dans un rack
de serveurs sous différentes orientations
(ex : horizontale ou verticale). Consultez les
instructions de fixation du guide d’utilisation.
BUREAU
1. Posez le xPrintServer à l’envers sur une surface
lisse et plane.
2. Retirez la bande adhésive des pieds en
caoutchouc et posez ces derniers, du côté
adhésif, à chaque coin du xPrintServer.
3. Retournez le xPrintServer de manière à ce qu’il
repose sur les pieds en caoutchouc.
Support de fixation
xPrintServer
Pieds en
caoutchouc (4)
13
Ofce Edition
Quick Start Guide
AirPrint AirPrint enables you to wirelessly print photos,
e-mail, web pages, and documents from your iPad, iPhone,
and iPod touch without the need to install a driver.
13266xPrintQSG_OfficeEd_resize_16.indd 1 9/30/13 9:23 AM
xPrintServer-XXXXXXXXXXXX.local

Guide de démarrage rapide
FRANÇAIS
3 BRANCHEMENT RAPIDE
Processus de configuration automatique : Le xPrintServer configurera automatiquement vos imprimantes
(USB & réseau) dès qu’il sera connecté, comme indiqué ci-dessus. Le “X” lumineux clignotera rapidement
pendant environ 30 secondes, puis les clignotements ralentiront pour montrer qu’il est prêt à imprimer. Il n’est
pas nécessaire de brancher une imprimante USB pour que le xPrintServer configure les imprimantes réseau.
2. Dans le menu des
options de l’imprimante,
choisissez Imprimante
pour afficher toutes
les imprimantes réseau
disponibles.
1. À l’aide de votre iPad, iPhone ou autre
appareil iOS, ouvrez la page Web, l’e-mail,
la photo, etc. que vous voulez imprimer et
choisissez l’icône
pour ouvrir le menu
d’impression natif :
3. Sélectionnez
l’imprimante appropriée.
Ensuite, sélectionnez
le nombre de copies et
choisissez Imprimer.
4 IMPRIMER À PARTIR D’UN APPAREIL iOS
1
2
3
1 2 3
Imprimante USB
Câble réseau
Branchez le câble de l'imprimante USB
au port USB de xPrintServer.
Branchez le câble réseau du routeur/
commutateur sans fil à xPrintServer.
Branchez le xPrintServer sur le courant
à l'aide de l'alimentation fournie.
Routeur/commutateur
sans fil
14

Guide de démarrage rapide
FRANÇAIS
1. Rendez-vous dans Préférences système,
Matériel et cliquez sur Imprimantes et scanners.
2. Cliquez sur le bouton + dans le coin inférieur
gauche
3. Une liste d’imprimantes apparaît. Sélectionnez
l’imprimante que vous voulez ajouter et cliquez
sur le bouton Ajouter.
4. L’imprimante est maintenant ajoutée à votre
liste des imprimantes disponibles et elle est
prête à imprimer.
sur le bouton
Ajouter
.
4.
L’imprimante
est
maintenant ajoutée à votre
liste des imprimantes disponibles et elle est
prête à imprimer.
5 IMPRIMER À PARTIR DE MAC OS
15

Guide de démarrage rapide
FRANÇAIS
Instructions pour Windows XP
4. L’assistant des imprimantes Bonjour apparaît avec
une liste des imprimantes détectées. Sélectionnez
l’imprimante que vous voulez installer.
Instructions pour Windows 7
4. L’assistant des imprimantes Bonjour apparaît avec
une liste des imprimantes détectées. Sélectionnez
l’imprimante que vous voulez installer.
6 IMPRIMER À PARTIR DE WINDOWS OS
AVANT DE COMMENCER
Avant de continuer, assurez-vous que l’imprimante USB fonctionne et que les pilotes de l’imprimante
sont installés sur l’ordinateur.
INSTALLEZ LES SERVICES D’IMPRESSION BONJOUR
1. Les services d’impression Bonjour sont une application Apple qui permet de détecter les imprimantes
connectées au xPrintServer à partir d’un PC Windows. Rendez-vous à l’adresse Internet ci-dessous
pour télécharger et installer les services d’impression Bonjour pour Windows v2.0.2 ou une version
supérieure http://support.apple.com/kb/DL999?viewlocale=fr_FR 9
2. Suivez les invites pour installer les services d’impression Bonjour
3. Cherchez le raccourci Assistant Imprimante Bonjour sur votre Bureau ou dans le
menu Démarrer/Tous les programmes, puis cliquez dessus pour le lancer
16

Guide de démarrage rapide
FRANÇAIS
Instructions pour Windows XP
5. Cherchez votre imprimante par fabricant et
numéro de modèle, sélectionnez-la, puis cliquez
sur Suivant.
6. Pour terminer l’installation, cliquez sur Terminer.
Instructions pour Windows 7
5. Cherchez votre imprimante par fabricant et
numéro de modèle, sélectionnez-la, puis cliquez
sur Suivant.
6. Pour terminer l’installation, cliquez sur Terminer.
6 IMPRIMER À PARTIR DE WINDOWS OS suite
17

Guide de démarrage rapide
FRANÇAIS
Contactez l’assistance technique
Si vous avez des questions pour l’assistance technique, rendez-vous à l’adresse http://www.lantronix.com/
support ou appelez le +31 (0)76 52 36 740 du lundi au vendredi, de 9h à 17h, CET, hors vacances.
18
6 IMPRIMER À PARTIR DE WINDOWS OS suite
Instructions pour Windows XP
7. Si vous voulez configurer l’imprimante en tant
qu’imprimante par défaut, allez à : Démarrer,
Panneau de configuration, puis cliquez sur
Imprimantes et télécopies
8. Sélectionnez l’imprimante, cliquez avec le
bouton droit et sélectionnez Définir comme
imprimante par défaut
Félicitations ! L’ajout d’imprimante est maintenant
terminé.
Instructions pour Windows 7
7. Si vous voulez configurer l’imprimante en tant
qu’imprimante par défaut, allez à : Démarrer,
Panneau de configuration, puis cliquez sur
Périphériques et imprimantes
8. Sélectionnez l’imprimante, cliquez avec le
bouton droit et sélectionnez Définir comme
imprimante par défaut
Félicitations ! L’ajout d’imprimante est maintenant
terminé.
A página está carregando...
A página está carregando...
A página está carregando...
A página está carregando...
A página está carregando...
A página está carregando...
A página está carregando...
A página está carregando...
A página está carregando...
A página está carregando...
A página está carregando...
A página está carregando...
A página está carregando...
A página está carregando...
A página está carregando...
A página está carregando...
A página está carregando...
A página está carregando...
A página está carregando...
A página está carregando...
A página está carregando...
A página está carregando...
A página está carregando...
A página está carregando...
A página está carregando...
A página está carregando...
A página está carregando...
A página está carregando...
A página está carregando...
A página está carregando...
A página está carregando...
A página está carregando...
-
 1
1
-
 2
2
-
 3
3
-
 4
4
-
 5
5
-
 6
6
-
 7
7
-
 8
8
-
 9
9
-
 10
10
-
 11
11
-
 12
12
-
 13
13
-
 14
14
-
 15
15
-
 16
16
-
 17
17
-
 18
18
-
 19
19
-
 20
20
-
 21
21
-
 22
22
-
 23
23
-
 24
24
-
 25
25
-
 26
26
-
 27
27
-
 28
28
-
 29
29
-
 30
30
-
 31
31
-
 32
32
-
 33
33
-
 34
34
-
 35
35
-
 36
36
-
 37
37
-
 38
38
-
 39
39
-
 40
40
-
 41
41
-
 42
42
-
 43
43
-
 44
44
-
 45
45
-
 46
46
-
 47
47
-
 48
48
-
 49
49
-
 50
50
-
 51
51
-
 52
52


Lantronix xPrintServer Office: Enterprise Mobile Printing Guia rápido
- Categoria
- Roteadores
- Tipo
- Guia rápido
em outras línguas
- español: Lantronix xPrintServer Office: Enterprise Mobile Printing Guía de inicio rápido
- français: Lantronix xPrintServer Office: Enterprise Mobile Printing Guide de démarrage rapide
- italiano: Lantronix xPrintServer Office: Enterprise Mobile Printing Guida Rapida
- Nederlands: Lantronix xPrintServer Office: Enterprise Mobile Printing Snelstartgids
- Deutsch: Lantronix xPrintServer Office: Enterprise Mobile Printing Schnellstartanleitung
Outros documentos
-
HP Color LaserJet Pro MFP M277 series Manual do usuário
-
-
HP Color LaserJet Pro MFP M477 series Manual do usuário
-
HP Printer LaserJet Printer Manual do usuário
-
-
HP Color LaserJet Pro MFP M476 series Manual do usuário
-
Brother QL-1110NWB Guia de usuario
-
HP ENVY 7640 e series Manual do proprietário
-
-