Nikon NIKKOR Z 50mm f/1.2 S Manual do usuário
- Categoria
- Lentes de câmera
- Tipo
- Manual do usuário

En
User’s Manual
Fr
Manuel d’utilisation
Sc
ҋᅶᢪϷ
Pt
Manual do Utilizador
Tc
͐ᮢ⦦ᆙሬ
Id
Manual bagi Pengguna
Ar
En
User’s Manual
Before using this product, please read these instructions carefully. You will also need to consult the cam-
era manual.
• This lens is intended exclusively for use with mirrorless cameras featuring a Nikon Z mount.
• Update the camera fi rmware to the latest version. With earlier versions, the camera may fail to detect the lens
correctly and some features may not be available. The latest version of the camera fi rmware can be down-
loaded from the Nikon Download Center at the URL below.
https://downloadcenter.nikonimglib.com/
For Your Safety
For Your Safety
To prevent damage to property or injury to yourself or to others, read “For Your Safety” in its
entirety before using this product.
Keep these safety instructions where all those who use this product will read them.
A WARNING: Failure to observe the precautions marked with this icon could result in
death or severe injury.
A CAUTION: Failure to observe the precautions marked with this icon could result in injury
or property damage.
A
A
WARNING
WARNING
•
•
Do not disassemble or modify this product.
Do not disassemble or modify this product.
Do not touch internal parts that become exposed as the result of a fall or other accident.
Do not touch internal parts that become exposed as the result of a fall or other accident.
Failure to observe these precautions could result in electric shock or other injury.
•
•
Should you notice any abnormalities such as the product producing smoke, heat, or
Should you notice any abnormalities such as the product producing smoke, heat, or
unusual odors, immediately disconnect the camera power source.
unusual odors, immediately disconnect the camera power source.
Continued operation could result in fi re, burns or other injury.
•
•
Keep dry.
Keep dry.
Do not handle with wet hands.
Do not handle with wet hands.
Failure to observe these precautions could result in fi re or electric shock.
•
•
Do not use this product in the presence of fl ammable dust or gas such as propane,
Do not use this product in the presence of fl ammable dust or gas such as propane,
gasoline or aerosols.
gasoline or aerosols.
Failure to observe this precaution could result in explosion or fi re.
•
•
Do not directly view the sun or other bright light source through the lens.
Do not directly view the sun or other bright light source through the lens.
Failure to observe this precaution could result in visual impairment.
•
•
Keep this product out of reach of children.
Keep this product out of reach of children.
Failure to observe this precaution could result in injury or product malfunction. In addition, note
that small parts constitute a choking hazard. Should a child swallow any part of this product, seek
immediate medical attention.
•
•
Do not handle with bare hands in locations exposed to extremely high or low temperatures.
Do not handle with bare hands in locations exposed to extremely high or low temperatures.
Failure to observe this precaution could result in burns or frostbite.
A
A
CAUTION
CAUTION
•
•
Do not leave the lens pointed at the sun or other strong light sources.
Do not leave the lens pointed at the sun or other strong light sources.
Light focused by the lens could cause fi re or damage to product’s internal parts. When shooting
backlit subjects, keep the sun well out of the frame. Sunlight focused into the camera when the
sun is close to the frame could cause fi re.
•
•
Do not leave the product where it will be exposed to extremely high temperatures, for an
Do not leave the product where it will be exposed to extremely high temperatures, for an
extended period such as in an enclosed automobile or in direct sunlight.
extended period such as in an enclosed automobile or in direct sunlight.
Failure to observe this precaution could result in fi re or product malfunction.
•
•
Do not transport cameras or lenses with tripods or similar accessories attached.
Do not transport cameras or lenses with tripods or similar accessories attached.
Failure to observe this precaution could result in injury or product malfunction.
Using the Lens
Using the Lens
Parts of the Lens: Names and Functions
Parts of the Lens: Names and Functions
Refer to the diagram on the left edge of this sheet.
q
Lens hood mounting
mark
Use when attaching the lens hood.
See
D
w
Rubber grip
——
e
Focus ring
Use for manual focus.
• When focusing using autofocus, you can adjust focus
manually by rotating the ring while the shutter-release
button is pressed halfway; after focusing, press the
shutter-release button the rest of the way down to
shoot.
—
r
Lens info panel
View focus distance, depth of fi eld, and other informa-
tion.
See
B
,
C
t
Control ring
Rotate to adjust a setting such as [Aperture] or [Exposure
compensation] assigned using the camera. For more infor-
mation, see the description of [Custom control assignment],
[Custom controls], or [Custom controls (shooting)] in the
camera manual.
—
y
Lens mounting mark
Use when mounting the lens on the camera.
See
A
u
Rubber lens-mount
gasket
——
i
CPU contacts
Used to transfer data to and from the camera. —
o
L-Fn button
Press to perform a function assigned using the camera.
For more information, see the description of [Custom
control assignment], [Custom
controls], or [Custom controls (shooting)] in the camera
manual.
—
!0
Display button
Save settings or choose the information shown in the
lens info panel.
See
B
,
C
!1
Focus-mode switch
Choose a focus mode.
• A: Autofocus
• M: Manual focus
Note that regardless of the setting chosen, focus must
be adjusted manually when manual focus mode is se-
lected using camera controls.
—
!2
Lens hood
Lens hoods block stray light that would otherwise cause
fl are or ghosting. They also serve to protect the lens.
See
D
!3
Lens hood lock mark
Use when attaching the lens hood.
!4
Lens hood alignment
mark
!5
Lens hood lock release
button
Use when removing the lens hood.
!6
Lens cap (front cap)
——
!7
Lens cap (rear cap)
——
A
Attachment and Removal
Attachment and Removal
Attaching the Lens
z
Turn the camera o , remove the body cap, and detach the rear lens cap.
x
Position the lens on the camera body, keeping the mounting mark on the
lens aligned with the mounting mark on the camera body, and then rotate
the lens counterclockwise until it clicks into place.
Removing the Lens
z
Turn the camera o .
x
Press and hold the lens release button while turning the lens clockwise.
B
The Lens Info Panel
The Lens Info Panel
The lens Info panel lights when the lens is attached to a camera and the camera is on.
• Press the lens display button to cycle the display as shown:
Aperture
Depth of eld
Focus distance
1 Depth of eld is displayed when the camera is in mode A or M.
2 Aperture is displayed only when the camera is in
mode A or M. The display for other modes is shown in
the illustration.
• The focus mode (AF or MF) is briefl y displayed when chosen using the focus-mode switch.
• The panel turns off automatically when the camera standby timer expires or if no lens operations
are performed for about 10 seconds. Press the display button to reactivate the display.
A
The Lens Info Panel
The focus distance, depth of eld, and other information displayed in the lens Info panel are approximations only.
A
Irregular Bokeh
With fast shutter speeds and/or wide apertures, you may notice irregularities in how bokeh is shaped. The e ect can be
mitigated by choosing slower shutter speeds and/or higher f-numbers.
C
Panel Options
Panel Options
Follow the steps below to choose the units for focus distance from meters (m) or feet (ft) or adjust
the brightness of the lens Info panel.
z Press and hold the display button to view settings.
• Unit or brightness selection options will be displayed. The currently selected item will fl ash.
• Press the display button to toggle between displays.
Units Brightness
x Choose a setting using the lens control ring.
Units
- Rotate the control ring to choose from meters (m)
or feet (ft).
Brightness
- Rotate the control ring in the “+” (brighter) or “−”
(darker) direction.
- Choose from 6 levels of brightness.
- To turn the lens info panel off , rotate the ring in the
“−” direction until the
icon changes to .
• Press the display button to save changes and toggle the display.
• If no operations are performed using lens controls for about 5 seconds, panel options
will clear from the display. Any changes will be lost.
c Press and hold the display button to return to the lens information display.
• Choosing for brightness turns the lens info panel off . To turn the display on again, press
and hold the display button.
D
Attaching and Removing the Lens Hood
Attaching and Removing the Lens Hood
Attaching the Lens Hood
• Align the lens hood mounting mark with the lens hood alignment mark (
q
) and then rotate the
lens hood (
w
) until the mounting mark is aligned with the lens hood lock mark (
e
).
Lens hood lock mark
Lens hood alignment mark
Lens hood mounting mark
• Gripping the front too tightly makes the lens hood diffi cult to attach or remove. When rotating
the lens hood, hold it near the lens hood alignment mark (●) on its base.
• T
he lens hood can be reversed and mounted on the lens when not in use.
Removing the Lens Hood
• Keeping the lens hood lock release button pressed (
q
), rotate the lens hood in the direction
shown (
w
) and remove it from the lens (
e
).
Lens hood lock release button
• The
same procedure can be used when the lens hood is reversed.
When the Lens Is Attached
When the Lens Is Attached
The focus position may change if you turn the camera off and then on again after focusing. If you have
focused on a pre-selected location while waiting for your subject to appear, we recommend that you do
not turn the camera off until the picture is taken.
Cameras with AF-Assist Illuminators
Cameras with AF-Assist Illuminators
The lens or lens hood may block the light from the camera AF-assist illuminator.
• For the latest information on using the lens with cameras that have built-in AF-assist illuminators, visit
the site below.
https://downloadcenter.nikonimglib.com/
Using the Lens on Cameras with a Built-in Flash
Using the Lens on Cameras with a Built-in Flash
Shadows will be visible in photos where light from the built-in fl ash is obscured by the lens or lens hood.
Remove the lens hood before shooting. Note, however, that depending on lens focal length and the
distance to the subject, shadows may appear even when the lens hood is removed.
• Shadows will be visible in photos taken when this lens is mounted on a Z 50.
• For the latest information on focal lengths and subject distances at which shadows will not appear in
photos taken with a built-in fl ash, visit the site below.
https://downloadcenter.nikonimglib.com/
Precautions for Use
Precautions for Use
• Do not pick up or hold the lens or camera using only the lens caps or lens hood.
• Keep the CPU contacts clean.
• Should the rubber lens-mount gasket be damaged, cease use immediately and take the lens to a
Nikon-authorized service center for repair.
• Replace the lens caps when the lens is not in use.
• Do not leave the lens in humid locations or in locations in which it may be exposed to moisture. Rust-
ing of the internal mechanism can cause irreparable damage.
• Do not leave the lens next to open fl ames or in other extremely hot locations. Extreme heat could
damage or warp the reinforced plastic exterior.
• Rapid changes in temperature may cause damaging condensation inside and outside the lens. Before
taking the lens from a warm to a cold environment or vice versa, place it in a bag or plastic case to slow
the change in temperature.
• We recommend that you place the lens in its case to protect it from scratches during transport.
Lens Care
Lens Care
• Removing dust is normally suffi cient to clean the glass surfaces of the lens.
• Smudges, fi ngerprints, and other oily stains can be removed from the lens surface using a soft, clean
cotton cloth or third-party lens cleaning tissue lightly dampened with a small amount of ethanol or lens
cleaner. Wipe gently from the center outwards in a circular motion, taking care not to leave smears or
touch the lens with your fi ngers.
• Never use organic solvents such as paint thinner or benzene to clean the lens.
• Neutral Color (NC) fi lters (available separately) and the like can be used to protect the front lens ele-
ment.
• Do not store with naphtha or camphor moth balls or in direct sunlight. If the lens will not be used for an
extended period, store it in a cool, dry location to prevent mold and rust.
Accessories
Accessories
Supplied Accessories
Supplied Accessories
• LC-82B Lens Cap (front cap)
• LF-N1 Lens Cap (rear cap)
• HB-94 Lens Hood
• CL-C2 Lens Case
D
Using the Lens Case
• The case is intended to protect the lens from scratches, not from falls or other physical shocks.
• The case is not water resistant.
• The material used in the case may fade, bleed, stretch, shrink, or change color when rubbed or wet.
• Remove dust with a soft brush.
• Water and stains can be removed from the surface with a soft, dry cloth. Do not use alcohol, benzene, thinner, or other volatile
chemicals.
• Do not store in locations exposed to direct sunlight or high temperatures or humidity.
• Do not use the case to clean the monitor or lens elements.
• Be careful that the lens does not fall from the case during transport.
Material: Polyester
Compatible Accessories
Compatible Accessories
82 mm screw-on fi lters
D
Filters
• Use only one lter at a time.
• Remove the lens hood before attaching lters or rotating circular polarizing lters.
Speci cations
Speci cations
Mount
Mount Nikon Z mount
Focal length
Focal length 50 mm
Maximum aperture
Maximum aperture
f/1.2
Lens construction
Lens construction 17 elements in 15 groups (including 2 ED elements, 3 aspherical elements, and elements
with Nano Crystal and ARNEO coats)
Angle of view
Angle of view • FX format: 47°
• DX format: 31°
30’
Focusing system
Focusing system Internal focusing system
Minimum focus distance
Minimum focus distance 0.45 m (1.48 ft) from focal plane
Maximum reproduction
Maximum reproduction
ratio
ratio
0.15×
Diaphragm blades
Diaphragm blades 9 (rounded diaphragm opening)
Aperture range
Aperture range f/1.2 – 16
Filter-attachment size
Filter-attachment size 82 mm (P = 0.75 mm)
Dimensions
Dimensions Approx. 89.5 mm/3.6 in. maximum diameter × 150 mm/6 in.
(distance to end of lens from camera lens mount ange)
Weight
Weight Approx. 1090 g (2 lb 6.5 oz )
Nikon reserves the right to change the appearance, specifi cations, and performance of this product at any
time and without prior notice.
Fr
Manuel d’utilisation
Avant d’utiliser ce produit, veuillez lire ces instructions attentivement. Vous devrez également consulter
le manuel de l’appareil photo.
• Cet objectif est destiné exclusivement aux appareils photo hybrides dotés d’une monture Nikon Z.
• Mettez à jour le fi rmware de l’appareil photo vers la dernière version. Avec les versions antérieures,
l’appareil photo risque de ne pas pouvoir détecter correctement l’objectif et certaines fonctionnalités
peuvent être indisponibles. La dernière version du fi rmware de l’appareil photo peut être téléchargée
depuis le Centre de téléchargement Nikon via l’URL ci-dessous.
https://downloadcenter.nikonimglib.com/
Pour votre sécurité
Pour votre sécurité
Afi n d’éviter de provoquer des dommages matériels ou de vous blesser ou de blesser un tiers, lisez
intégralement «Pour votre sécurité» avant d’utiliser ce produit.
Conservez ces consignes de sécurité dans un endroit facilement accessible à tous ceux qui pourraient
se servir de ce produit.
A AVERTISSEMENT: le non-respect des consignes indiquées par cette icône peut vous exposer à
un danger de mort ou à de graves blessures.
A ATTENTION: le non-respect des consignes indiquées par cette icône peut vous exposer à des
blessures ou provoquer des dommages matériels.
A
A
AVERTISSEMENT
AVERTISSEMENT
•
•
Ne démontez pas ou ne modifi ez pas ce produit.
Ne démontez pas ou ne modifi ez pas ce produit.
Ne touchez pas les composants internes qui sont exposés suite à une chute ou à un autre
Ne touchez pas les composants internes qui sont exposés suite à une chute ou à un autre
accident.
accident.
Le non-respect de ces consignes peut provoquer un choc électrique ou d’autres blessures.
•
•
Si vous observez des anomalies provenant du produit comme de la fumée, de la chaleur
Si vous observez des anomalies provenant du produit comme de la fumée, de la chaleur
ou des odeurs inhabituelles, débranchez immédiatement la source d’alimentation de
ou des odeurs inhabituelles, débranchez immédiatement la source d’alimentation de
l’appareil photo.
l’appareil photo.
Continuer d’utiliser le matériel risque de provoquer un incendie, des brûlures ou d’autres blessures.
•
•
Gardez votre matériel au sec.
Gardez votre matériel au sec.
Ne le manipulez pas avec les mains mouillées.
Ne le manipulez pas avec les mains mouillées.
Le non-respect de ces consignes de sécurité peut provoquer un incendie ou un choc électrique.
•
•
N’utilisez pas ce produit en présence de poussières ou de gaz infl ammables comme du
N’utilisez pas ce produit en présence de poussières ou de gaz infl ammables comme du
propane, de l’essence ou des aérosols.
propane, de l’essence ou des aérosols.
Le non-respect de cette consigne peut provoquer une explosion ou un incendie.
•
•
N’observez pas directement le soleil ou toute autre source lumineuse puissante à travers
N’observez pas directement le soleil ou toute autre source lumineuse puissante à travers
l’objectif.
l’objectif.
Le non-respect de cette consigne peut provoquer des troubles visuels.
•
•
Conservez ce produit hors de portée des enfants.
Conservez ce produit hors de portée des enfants.
Le non-respect de cette consigne peut provoquer des blessures ou le dysfonctionnement du produit. En
outre, notez que les petites pièces présentent un risque d’étouff ement. Si jamais un enfant avalait une pièce
de ce produit, consultez immédiatement un médecin.
•
•
Ne manipulez pas le matériel à mains nues dans des lieux exposés à des températures
Ne manipulez pas le matériel à mains nues dans des lieux exposés à des températures
extrêmement basses ou élevées.
extrêmement basses ou élevées.
Le non-respect de cette consigne peut provoquer des brûlures ou des engelures.
A
A
ATTENTION
ATTENTION
•
•
Ne pointez pas l’objectif en direction du soleil ou d’autres sources très lumineuses.
Ne pointez pas l’objectif en direction du soleil ou d’autres sources très lumineuses.
La lumière focalisée par l’objectif peut provoquer un incendie ou endommager les composants
internes du produit. Lorsque vous photographiez un sujet à contre-jour, veillez à garder toujours
le soleil à l’extérieur du cadre. Lorsque le soleil se trouve près du cadre, sa lumière risque de se
concentrer dans l’appareil photo et de provoquer un incendie.
•
•
Ne laissez pas le produit exposé à des températures excessivement chaudes pendant une période
Ne laissez pas le produit exposé à des températures excessivement chaudes pendant une période
prolongée, comme dans une voiture fermée ou en plein soleil.
prolongée, comme dans une voiture fermée ou en plein soleil.
Le non-respect de cette consigne peut provoquer un incendie ou le dysfonctionnement du produit.
•
•
Ne transportez pas les appareils photo ou les objectifs si des trépieds ou accessoires
Ne transportez pas les appareils photo ou les objectifs si des trépieds ou accessoires
similaires sont fi xés.
similaires sont fi xés.
Le non-respect de cette consigne peut provoquer des blessures ou le dysfonctionnement du produit.
Utilisation de l’objectif
Utilisation de l’objectif
Descriptif de l’objectif: noms et fonctions
Descriptif de l’objectif: noms et fonctions
Reportez-vous aux fi gures situées à gauche.
q
Repère de montage du
parasoleil
Référez-vous à ce repère lorsque vous fi xez le parasoleil.
Voir
D
w
Grip en caoutchouc — —
e
Bague de mise au point
Utilisez cette bague pour faire le point manuellement.
• Lorsque vous utilisez l’autofocus, vous pouvez ajuster la
mise au point manuellement en tournant cette bague
tout en appuyant sur le déclencheur à mi-course; une fois
la mise au point eff ectuée, appuyez sur le déclencheur
jusqu’en fi n de course pour prendre la photo.
—
r
Écran d’informations sur
l’objectif
Affi chez la distance de mise au point, la profondeur de
champ et d’autres informations.
Voir
B
,
C
t
Bague de réglage
Tournez cette bague pour modifi er un réglage comme
l’[Ouverture] ou la [Correction d’exposition], attribué à l’aide
de l’appareil photo. Pour en savoir plus, reportez-vous à la
description de [Défi nition réglages perso.], [Commandes
personnalisées] ou [Commandes perso (prise de vue)] dans
le manuel de l’appareil photo.
—
y
Repère de montage de
l’objectif
Référez-vous à ce repère lorsque vous fi xez l’objectif sur
l’appareil photo.
Voir
A
u
Joint en caoutchouc de
la monture d’objectif
——
i
Contacts du
microprocesseur
Utilisés pour transférer les données depuis ou vers
l’appareil photo.
—
o
Commande L-Fn
Appuyez sur cette commande pour eff ectuer une fonction
attribuée à l’aide de l’appareil photo. Pour en savoir plus,
reportez-vous à la description de [Défi nition réglages
perso.], [Commandes personnalisées] ou [Commandes
perso (prise de vue)] dans le manuel de l’appareil photo.
—
!0
Commande d’affi chage
Enregistrez les réglages ou choisissez les informations
affi chées sur l’écran d’informations sur l’objectif.
Voir
B
,
C
!1
Commutateur du mode
de mise au point
Choisissez un mode de mise au point.
• A: autofocus
• M: mise au point manuelle
Notez qu’indépendamment du réglage choisi, vous
devez modifi er la mise au point manuellement lorsque
le mode de mise au point manuelle est sélectionné à
l’aide des commandes de l’appareil photo.
—
!2
Parasoleil
Le parasoleil bloque la lumière diff use pouvant
provoquer de la lumière parasite ou une image
fantôme. Il permet aussi de protéger l’objectif.
Voir
D
!3
Repère de verrouillage
du parasoleil
Référez-vous à ces repères vous fi xez le parasoleil.
!4
Repère d’alignement du
parasoleil
!5
Bouton de déverrouillage
du parasoleil
Utilisez ce bouton pour retirer le parasoleil.
!6
Bouchon d’objectif
(avant)
——
!7
Bouchon d’objectif
(arrière)
——
A
Fixation et retrait
Fixation et retrait
Fixation de l’objectif
z
Mettez l’appareil photo hors tension, retirez le bouchon du boîtier et détachez le
bouchon arrière de l’objectif.
x
Placez l’objectif sur le boîtier de l’appareil photo, en maintenant le repère de
montage de l’objectif aligné sur le repère de montage du boîtier de l’appareil
photo, puis faites pivoter l’objectif dans le sens inverse des aiguilles d’une montre
jusqu’au déclic.
Retrait de l’objectif
z
Mettez l’appareil photo hors tension.
x
Maintenez appuyée la commande de déverrouillage de l’objectif tout en faisant
pivoter ce dernier dans le sens des aiguilles d’une montre.
B
Écran d’informations sur l’objectif
Écran d’informations sur l’objectif
L’écran d’informations sur l’objectif s’allume lorsque vous fi xez l’objectif sur un appareil photo et que
ce dernier est sous tension.
• Appuyez sur la commande d’affi chage de l’objectif pour parcourir l’affi chage de la façon
indiquée ci-dessous:
Ouverture
2
Profondeur de champ
1
Distance de mise au point
1 La profondeur de champ s’a che lorsque l’appareil photo est en mode A ou M.
2 L’ouverture s’a che uniquement lorsque l’appareil
photo est en mode A ou M. L’a chage des autres
modes est indiqué sur l’illustration.
• Le mode de mise au point (AF ou MF) s’affi che brièvement lors de sa sélection à l’aide du
commutateur du mode de mise au point.
• L’écran s’éteint automatiquement lorsque l’appareil photo entre en mode veille ou si vous
n’eff ectuez aucune opération avec l’objectif pendant 10 secondes environ. Appuyez sur la
commande d’affi chage pour activer à nouveau l’écran.
A
Écran d’informations sur l’objectif
La distance de mise au point, la profondeur de champ et les autres informations a chées sur l’écran d’informations sur
l’objectif ne sont que des approximations.
A
Bokeh irrégulier
Avec des vitesses d’obturation rapides et/ou de grandes ouvertures, il se peut que vous observiez des irrégularités dans le
rendu du bokeh ( ou d’arrière-plan). Vous pouvez atténuer cet e et en choisissant des vitesses d’obturation plus lentes et/ou
des ouvertures plus petites (valeurs f/ plus grandes).
C
Options de l’écran
Options de l’écran
Suivez les étapes ci-dessous pour choisir l’unité de la distance de mise au point, à savoir mètres (m)
ou pieds (ft), ou pour régler la luminosité de l’écran d’informations sur l’objectif.
z Maintenez appuyée la commande d’affi chage pour affi cher les réglages.
• Les options de sélection de l’unité ou de la luminosité s’affi chent. L’élément en cours de
sélection clignote.
• Appuyez sur la commande d’affi chage pour commuter entre les affi chages.
Unités Luminosité
x Choisissez un réglage à l’aide de la bague de réglage de l’objectif.
Unités
- Tournez la bague de réglage pour choisir entre
mètres (m) et pieds (ft).
Luminosité
- Tournez la bague de réglage dans le sens «+» (plus
clair) ou «−» (plus sombre).
- Vous avez le choix entre 6 niveaux de luminosité.
- Pour éteindre l’écran d’informations, tournez la
bague dans le sens «−» jusqu’à ce que l’icône
devienne
.
• Appuyez sur la commande d’affi chage pour enregistrer les modifi cations et changer
d’affi chage.
• Si vous n’eff ectuez aucune opération à l’aide des commandes de l’objectif pendant 5
secondes environ, les options disparaissent de l’écran. Toute modifi cation sera perdue.
c Maintenez appuyée la commande d’affi chage pour revenir à l’écran d’informations
sur l’objectif.
• Si vous choisissez le réglage de luminosité , l’écran d’informations sur l’objectif s’éteint.
Pour activer à nouveau l’écran, maintenez appuyée la commande d’affi chage.
D
Fixation et retrait du parasoleil
Fixation et retrait du parasoleil
Fixation du parasoleil
• Alignez le repère de montage du parasoleil sur le repère d’alignement du parasoleil (
q
), puis
tournez ce dernier (
w
) jusqu’à ce que le repère de montage s’aligne sur le repère de verrouillage
du parasoleil (
e
).
Repère de verrouillage du
parasoleil
Repère d’alignement du parasoleil
Repère de montage du parasoleil
• Si vous saisissez l’avant trop fermement, le parasoleil peut être diffi cile à fi xer ou à retirer. Lorsque
vous tournez le parasoleil, tenez-le près du repère d’alignement (
●
) situé sur sa base.
• Le parasoleil peut être retourné et monté sur l’objectif lorsqu’il n’est pas utilisé.
Retrait du parasoleil
• En maintenant appuyé le bouton de déverrouillage du parasoleil (
q
), tournez le parasoleil dans
le sens indiqué (
w
) et retirez-le de l’objectif (
e
).
Bouton de déverrouillage du parasoleil
• Il est possible d’eff ectuer la même procédure lorsque le parasoleil est retourné.
Lorsque l’objectif est fi xé
Lorsque l’objectif est fi xé
Le réglage de mise au point risque de changer si vous mettez l’appareil photo hors tension puis à
nouveau sous tension après avoir fait le point. Si vous avez fait le point sur un emplacement sélectionné
au préalable en attendant que votre sujet apparaisse, nous vous recommandons de ne pas mettre
l’appareil photo hors tension tant que vous n’avez pas pris la photo.
Appareils photo dotés d’illuminateurs d’assistance AF
Appareils photo dotés d’illuminateurs d’assistance AF
L’objectif ou le parasoleil risque de bloquer la lumière émise par l’illuminateur d’assistance AF de
l’appareil photo.
• Pour obtenir les dernières informations sur l’utilisation de l’objectif avec des appareils photo dotés
d’illuminateurs d’assistance AF intégrés, consultez le site ci-dessous.
https://downloadcenter.nikonimglib.com/
Utilisation de l’objectif avec des appareils photo équipés d’un fl ash intégré
Utilisation de l’objectif avec des appareils photo équipés d’un fl ash intégré
Des ombres seront visibles sur les photos si la lumière provenant du fl ash intégré est occultée par
l’objectif ou le parasoleil. Retirez le parasoleil avant la prise de vue. Notez cependant que selon la focale
de l’objectif et la distance au sujet, des ombres peuvent être visibles même si le parasoleil est retiré.
• Des ombres seront visibles sur les photos si cet objectif est fi xé sur un Z50.
• Pour obtenir les dernières informations sur les focales et les distances au sujet avec lesquelles aucune
ombre ne sera visible sur les photos prises avec un fl ash intégré, consultez le site ci-dessous.
https://downloadcenter.nikonimglib.com/
Précautions d’utilisation
Précautions d’utilisation
• Ne prenez pas, ni ne tenez l’objectif ou l’appareil photo uniquement par les bouchons ou par le parasoleil.
• Maintenez les contacts du microprocesseur propres.
• Si le joint en caoutchouc de la monture d’objectif est endommagé, cessez immédiatement l’utilisation
et confi ez l’objectif à un centre Nikon agréé pour le faire réparer.
• Remettez les bouchons en place lorsque vous n’utilisez pas l’objectif.
• Ne laissez pas l’objectif dans des endroits humides ou dans des lieux où il risque d’être exposé à l’humidité.
La formation de rouille sur les mécanismes internes peut provoquer des dommages irréparables.
• Ne laissez pas l’objectif à proximité d’un feu ou dans d’autres endroits extrêmement chauds. La chaleur
extrême peut endommager ou déformer l’extérieur en plastique renforcé.
• Les changements brusques de température peuvent être à l’origine d’une condensation préjudiciable à
l’intérieur et à l’extérieur de l’objectif. Avant de faire passer l’objectif d’un environnement chaud à froid ou vice
versa, rangez-le dans un sac ou dans une boîte en plastique pour ralentir le changement de température.
• Nous vous recommandons de ranger l’objectif dans son étui afi n de le protéger des rayures lors du transport.
Entretien de l’objectif
Entretien de l’objectif
• Normalement, enlever la poussière suffi t pour nettoyer les surfaces en verre de l’objectif.
• Les taches, les traces de doigt et autres taches d’huile peuvent être retirées de la surface de l’objectif
avec un tissu propre et doux en coton ou un chiff on optique (disponible auprès d’autres fabricants)
légèrement imbibé d’une petite quantité d’éthanol ou de nettoyant pour objectif. Essuyez délicatement
avec un mouvement circulaire à partir du centre vers l’extérieur, en prenant soin de ne pas laisser de
traces, ni de toucher le verre avec les doigts.
• N’utilisez jamais de solvants organiques comme un diluant à peinture ou du benzène pour nettoyer l’objectif.
• Les fi ltres neutres (NC, disponibles séparément) et autres accessoires similaires permettent de protéger la lentille avant.
• Ne rangez pas l’objectif avec des boules antimites de naphtaline ou de camphre ou à la lumière directe
du soleil. Si vous n’avez pas l’intention d’utiliser l’objectif avant longtemps, rangez-le dans un endroit
frais et sec pour éviter la moisissure et la rouille.
Accessoires
Accessoires
Accessoires fournis
Accessoires fournis
• Bouchon d’objectif LC-82B (avant)
• Bouchon d’objectif LF-N1 (arrière)
• Parasoleil HB-94
• Étui pour objectif CL-C2
D
Utilisation de l’étui pour objectif
• L’étui est destiné à protéger l’objectif des rayures et non des chutes ou autres chocs physiques.
• L’étui n’est pas résistant à l’eau.
• La matière utilisée dans cet étui peut se décolorer, déteindre, s’étirer, rétrécir ou changer de couleur en cas de frottement ou d’humidité.
• Retirez la poussière avec une brosse à poils doux.
• L’eau et les taches peuvent être retirées de la surface avec un chi on doux et sec. N’utilisez pas d’alcool, de benzène, de diluant ou
d’autres substances chimiques volatiles.
• Ne rangez pas l’étui dans des lieux exposés à la lumière directe du soleil, à des températures élevées ou à l’humidité.
• N’utilisez pas l’étui pour nettoyer le moniteur ou les lentilles.
• Veillez à ce que l’objectif ne tombe pas de l’étui lorsque vous le transportez.
Matière: polyester
Accessoires compatibles
Accessoires compatibles
Filtres à visser 82mm
D
Filtres
• N’utilisez qu’un seul ltre à la fois.
• Retirez le parasoleil avant de xer un ltre ou de faire pivoter un ltre polarisant circulaire.
Caractéristiques
Caractéristiques
Monture
Monture Monture Nikon Z
Focale
Focale 50 mm
Ouverture maximale
Ouverture maximale f/1.2
Construction optique
Construction optique
17 lentilles en 15 groupes (dont 2 lentilles en verre ED, 3 lentilles asphériques et des
lentilles béné ciant du Traitement nanocristal et du Traitement ARNEO)
Angle de champ
Angle de champ • Format FX: 47°
• Format DX: 31° 30’
Système de mise au point
Système de mise au point Système de mise au point interne
Distance minimale de mise au point
Distance minimale de mise au point 0,45 m à partir du plan focal
Rapport de reproduction maximal
Rapport de reproduction maximal 0,15×
Lamelles de diaphragme
Lamelles de diaphragme 9 (diaphragme circulaire)
Plage des ouvertures
Plage des ouvertures f/1.2 – 16
Diamètre de xation pour ltre
Diamètre de xation pour ltre 82 mm (P = 0,75 mm)
Dimensions
Dimensions Environ 89,5 mm de diamètre maximum × 150 mm (distance entre
l’extrémité de l’objectif et le plan d’appui de la monture d’objectif de l’appareil photo)
Poids
Poids Environ 1090g
Nikon se réserve le droit de modifi er à tout moment l’apparence, les caractéristiques et les performances de ce
produit sans avis préalable.
Sc
ҋᅶᢪϷ
ҋᅶДڳ֏аᐷᯛᢱലҋᅶᢪϷƥৰܐұᎫˊ
ޗҋᅶലДڳ֏ƥаᐷᯛᢱലҋᅶᢪϷˊૣᨄ᱇ᠳඇᯛၯሮ
സᢪϷˊ
•
ലᮨ࠽ρҖണॆ
Z
ײحሇ੯߉תᆀሮസҋᅶˊ
•
यၯሮസފхഛಱᖭഡಱႝലˊҋᅶഛೇഭႝലƥၯሮസ
ظᕜುՋኵқ༻ᮨ࠽ςൺЌ֧ᕜظᕜುҋᅶˊၯሮസފх
ሇഡಱႝലظЭмλ
URL
ϔሇॆλϔੴᨆλˊ
https://downloadcenter.nikonimglib.com/
ࣴԘቹ
ࣴԘቹ
ϛᲒनૣୈвОᨲୄОᦳћऌୈᤆД௬࠼ƥޗҋᅶ֏аᐷᯛ
ᢱǼࣴԘቹǽƥৰмኵሇಲҋᅶˊ
ޗᯛᢱϥَܐұᎫലҋᅶᢪϷƥмҤᰡඇᯛˊ
A
ᡚٴ
៨ዥǼണظᕜᨲୄОٽЏୈᤄћሇԬऑǽˊ
A
༉ଐ
៨ዥǼണظᕜᨲୄОٽᤄћୈᤆД௬࠼ሇԬऑǽˊ
ലᗩҋᅶмλތዥڔؿन੶ᩓࣳሇԬऑѸмթᏚˊ
F
៨ዥνԇᡲᨆሇϛ
ˊ
C
៨ዥ੶ᨆሇϛ
ˊ
A
ᡚٴ
E
ጂ
ஜᡊ
ժׅᖪஜᡊˉһᄮୈಅ᠆ˊ
ДڳᅽЃᥥᚽᎋؑݿᓨኞ௬ҋ੧Ԭ᪇᱘ƥժׅ
ᡌዉ᱘᪇թˊ
ٞմयफᖮᡌᆀୈاћˊ
C
୭
ؤᄕДڳبၔˉԱ၌ୈؤՠၢڇᎋਧয়ƥ፞ֆ
ժಯၯሮസᆀྶˊ
ᘧಇчνᎫƥयफᖮ᥎ဟୈၒћˊ
F
ጂ
ժׅҋДڳາཱུྰˊ
ժׅᅶྰୡᡌዉДڳˊ
ٞմयफᖮᡌᆀୈ᥎ဟˊ
F
ጂ
ժׅޗണظᕜ᥎ဟˉႍှሇޡҋᅶˊ
ᘧޗണφၖພˉ໑ˉظႄપܢ᱆ᎋႄપພѱˉ
ᏝषሇޡҋᅶДڳƥयफᖮႍှୈဟဨˊ
F
ጂ
ժׅᨦ᧼ᮨ࠽ርఉᠷሷ࠷ୈԢвਿԍˊ
ٞմयफᖮ࠼ୈᠺᠽ௬ћˊ
F
ጂ
ժׅޗࢬ৴ԅѦୡظؠϥࠨᨆұᎫˊ
ٞմयफᖮಉᰧୈاћˊᘧᢥٙᐷल᪇хƥयѕनᦳ
ѱᨲୄћऌˊηδଐٙԗحϔƥ፞ఉاכᅴᢂᆢˊ
G
ጂ
ޗᴱྛᄔࠏୈѭྛᄔࠏϔƥժׅርఉఉᡌДڳˊ
ٞմयظᕜफᖮၒћˉѭྛၒћୈՆћˊ
A
༉ଐ
F
ጂ
ժׅयᮨ࠽न࠷ୈਿԍˊ
ٞմयണظᕜᔎԍƥҋԬ᪇᱃хኞ௬ୈफᖮ᥎ဟˊᨆ
ᔽԍేƥҋ࠷ԊթӝጌᠺᡅˊᘧЦҋ࠷
ጬ੯ӝጌᠺᡅƥϴظᕜफᖮ᥎ဟˊ
F
ጂ
ժׅಇᒳЃࠫ࠶भᯄሇᦹԬୈርमԍλᎋᴱྛᄔࠏϔˊ
ٞմयफᖮಉᰧୈ᥎ဟˊ
F
ጂ
ժׅጥ֬ࣴ᠆ണၯሮസୈᮨ࠽ሇιᕫ൳ˊ
ٞմयफᖮಉᰧୈاћˊ
ҋᅶᮨ࠽
ҋᅶᮨ࠽
ᮨ࠽᪇хƳٍጣڔ֧ᕜ
ᮨ࠽᪇хƳٍጣڔ֧ᕜ
؝ᯛലᲃᱤস᧵ሇތ៨ˊ
q
ᮨ࠽ᩑԍᒱࣴ
᠆ඓᡫ
ࣴ᠆ᮨ࠽ᩑԍᒱҋᅶˊ
؝ᯛ
D
w
เᕘୡ൸
—
Ǹ
e
नၢᄔ
ᅶЃୡ֬नၢˊ
•
ҋᅶᖪ֬नၢᨆनၢƥૣظ
ᨭ᧼ᦾनၢᄔৰٌפைઉᯀ
ಇைᬋୡ֬ᢹಜनၢ ƴनၢَƥ
ࣶԘைλઉᯀಇைᬋظᨆ
ేˊ
Ǹ
r
ᮨ࠽Ҵૉᱤ൙
ඇሷनၢᥭጌˉ྄ڔԢвҴૉˊ
؝ᯛ
B
,
C
t
ఊցᄔ
ᦾظᢹಜҋᅶၯሮസெࣽሇ
[
ԍ
ޑ
]
ୈ
[
കԍ៧ӧ
]
ᎋᡷࣽˊണԟᢝ
ᐷҴૉƥ؝ᯛၯሮസᢪϷϔ
[
ᖪ
ࣽϤఊց֧ᕜ
]
ˉ
[
ᖪࣽϤఊց
]
ୈ
[
ᖪࣽϤఊցơేƢ
]
ሇሮԟᢪˊ
Ǹ
y
ᮨ࠽ࣴ᠆ඓᡫ
यᮨ࠽ࣴ᠆ᖭၯሮസҋᅶˊ
؝ᯛ
A
u
ᮨ࠽ײحเᕘߖ
ޑ
ǸǸ
i
CPU
ఉဿ
ᅶЃयಚ௳љᖭၯሮസୈЭၯሮ
സϔљಚ௳ˊ
Ǹ
o
L-Fn
ைᬋ
ைλظ୭ҋᅶၯሮസெࣽሇ֧
ᕜˊണԟᢝᐷҴૉƥ؝ᯛၯሮസ
ᢪϷϔ
[
ᖪࣽϤఊց֧ᕜ
]
ˉ
[
ᖪࣽ
Ϥఊց
]
ୈ
[
ᖪࣽϤఊցơేƢ
]
ሇሮԟᢪˊ
Ǹ
!0
೪ዥைᬋ
ұࣘᡷࣽୈᨢஶᮨ࠽Ҵૉᱤ൙ϔ
ዥሇҴૉˊ
؝ᯛ
B
,
C
!1
नၢาਭժ௮
ݥ
ᨢஶनၢาਭˊ
• A
:
ᖪ֬नၢ
• M
:
ୡ֬नၢ
༉ଐƥುᡴᨢஶϽѲጕᡷࣽƥ
ҋᅶၯሮസఊցᨢஶϽୡ֬नၢา
ਭƥनၢ੶ୡ֬ᨆᢹಜˊ
Ǹ
!2
ᮨ࠽ᩑԍᒱ
ᮨ࠽ᩑԍᒱظظᕜफᖮ഻ԍୈ
ᵃሇಖमԍᐰˊ࣯рᨄظᅶЃұ
ᮨ࠽ˊ
؝ᯛ
D
!3
ᮨ࠽ᩑԍᒱ᭗
ࣽඓᡫ
ࣴ᠆ᮨ࠽ᩑԍᒱҋᅶˊ
!4
ᮨ࠽ᩑԍᒱन
Ḍඓᡫ
!5
ᮨ࠽ᩑԍᒱ᭗
ࣽᡊᰑைᬋ
ئλᮨ࠽ᩑԍᒱҋᅶˊ
!6
ᮨ࠽ሣơ֏ሣƢ
ǸǸ
!7
ᮨ࠽ሣơَሣƢ
ǸǸ
A
ࣴ᠆ξئλ
ࣴ᠆ξئλ
ࣴ᠆ᮨ࠽
z
ԟᯄၯሮസƥئλസᦳሣƥၦَئλᮨ࠽َሣˊ
x
यᮨ࠽κሇࣴ᠆ඓᡫξၯሮസസᦳκሇࣴ᠆ඓᡫनḌƥٌ
यᮨ࠽ᒳЃၯሮസസᦳκƥၦَᨡᦾᮨ࠽ርᖭԢ
ײԗኵѬᒳؤՠڙܭࠣˊ
ئλᮨ࠽
z
ԟᯄၯሮസˊ
x
ைѮᮨ࠽ಇைᬋৰٌᲈᦾᮨ࠽ˊ
B
ᮨ࠽Ҵૉᱤ൙
ᮨ࠽Ҵૉᱤ൙
ᮨ࠽ࣴ᠆ЃၯሮസςၯሮസࠨЃਥ٦Ⴡઔƥᮨ࠽Ҵૉᱤ
൙ѕဿКˊ
•
ைλᮨ࠽೪ዥைᬋظλዥ੭ᄔ೪ዥ Ƴ
ԍޑ
2
྄
1
नၢᥭጌ
1
ၯሮസޗาਭ
A
ୈ
M
λ೪ዥ྄ˊ
2
ЦၯሮസࠨЃาਭ
A
ୈ
M
ԍޑୣ
ѕ೪ዥˊԢвาਭሇ೪ዥތዥˊ
•
ᨭ᧼नၢาਭժ௮ݥᨢஶϽनၢาਭơ
AF
ୈ
MF
Ƣƥѕቾ
ഄ೪ዥनၢาਭˊ
•
ၯሮസസࣽݥᯋᓯेୈ࠵ᐛ
10
രᨆᮨ࠽౯Ѹ
ƥᱤ൙ѕᖪ֬ԟᯄˊைλ೪ዥைᬋظಱဌ༰೪ዥˊ
A
ᮨ࠽Ҵૉᱤ൙
ᮨ࠽Ҵૉᱤ൙ϔዥሇनၢᥭጌˉ྄ڔԢвҴૉЦϛᨀѨӖˊ
A
νᠸմಖ
ҋᅶᴱᨱઉᯀڔ
/
ୈ࠵ԍޑƥૣظᕜѕ༉ଐտಖੋჁν
ᠸմˊᨭ᧼ᨢஶ᧔ѭሇઉᯀᨱڔ
/
ୈ᧔ᴱሇ
f
ӖظмՐ
ᨅጕڻˊ
C
ᱤ൙ᨢᲇ
ᱤ൙ᨢᲇ
ைၯмλᴞظЭᏘơ
m
Ƣୈᘫॄơ
ft
Ƣϔᨢஶनၢᥭጌሇת
Ѭୈᓥᢹಜᮨ࠽Ҵૉᱤ൙ሇКˊ
z
ைѮ೪ዥைᬋඇሷᡷࣽˊ
•
॓২ϔय೪ዥתѬୈКᨢஶᨢᲇˊ֏ᨢᲇयѕᯂ
၄ˊ
•
ைλ೪ዥைᬋظժ௮೪ዥˊ
תѬ К
x
ҋᅶᮨ࠽ఊցᄔᨢஶδϑᡷࣽˊ
תѬ
-
ᦾఊցᄔظЭᏘơ
m
Ƣୈᘫॄ
ơ
ft
Ƣϔᨆᨢஶˊ
К
-
ബǼ
+
ǽơഛКƢୈǼ
–
ǽơഛഊƢ
ಲّᦾఊցᄔˊ
-
ЭКሇ
6
ϑᐜռϔᨆᨢஶˊ
-
ᘧᠳԟᯄᮨ࠽Ҵૉᱤ൙ƥബǼ
–
ǽ
ಲّᦾఊցᄔርᖭ ތඓبϛ
ˊ
•
ைλ೪ዥைᬋظұࣘഛಅৰժ௮೪ዥˊ
•
ᘧ࠵ᐛ
5
രҋᅶᮨ࠽ఊց୭чѲ౯Ѹƥᱤ൙ᨢᲇ
यЭ೪ዥϔཔ࠼ˊണഛಅयό࠼ˊ
c
ைѮ೪ዥைᬋᨂݽᮨ࠽Ҵૉᱤ൙ˊ
•
यКᨢϛ
ѕԟᯄᮨ࠽Ҵૉᱤ൙ˊᘧᠳ๐ਥ٦೪ዥƥ
ைѮ೪ዥைᬋˊ
D
ࣴ᠆ڔئλᮨ࠽ᩑԍᒱ
ࣴ᠆ڔئλᮨ࠽ᩑԍᒱ
ࣴ᠆ᮨ࠽ᩑԍᒱ
•
यᮨ࠽ᩑԍᒱࣴ᠆ඓᡫξᮨ࠽ᩑԍᒱनḌඓᡫơ
q
ƢनḌƥ
ၦَᦾᮨ࠽ᩑԍᒱơ
w
Ƣርᖭࣴ᠆ඓᡫξᮨ࠽ᩑԍᒱ᭗ࣽ
ඓᡫơ
e
ƢनḌˊ
ᮨ࠽ᩑԍᒱ᭗ࣽඓᡫ
ᮨ࠽ᩑԍᒱनḌඓᡫ
ᮨ࠽ᩑԍᒱࣴ᠆ඓᡫ
•
यᮨ࠽ᩑԍᒱ֏᪇త੧࠷ᐈѕҋԢᰯмࣴ᠆ୈئλˊᦾᮨ
࠽ᩑԍᒱƥޗԢਂ᪇ሇᮨ࠽ᩑԍᒱनḌඓᡫơ˃Ƣᰁᨀ
यԢతѮˊ
•
νҋᅶƥظयᮨ࠽ᩑԍᒱأᦾৰފࣽޗᮨ࠽κˊ
ئλᮨ࠽ᩑԍᒱ
•
ைѮᮨ࠽ᩑԍᒱ᭗ࣽᡊᰑைᬋơ
q
Ƣƥٌைၯތዥಲّ
ᦾᮨ࠽ᩑԍᒱơ
w
ƢƥၦَЭᮨ࠽यԢئλơ
e
Ƣˊ
ᮨ࠽ᩑԍᒱ᭗ࣽᡊᰑைᬋ
•
ᮨ࠽ᩑԍᒱأᦾފࣽЃᮨ࠽ظмҋᅶሮٌᴞˊ
ࣴ᠆ᮨ࠽َ
ࣴ᠆ᮨ࠽َ
ᘧૣޗनၢَԟᯄၯሮസৰಱਥ٦ƥनၢѬᒳظᕜѕؤᅴಅ
بˊᘧૣޗᎋేनᣳՠᄕഭᯋীनၢЃᲒᨢѬᒳƥਢᡩૣޗ
ၯႜే֏νᠳԟᯄၯሮസˊ
NIKKOR Z 50mm f/1.2 S
AF
᧖֭ၯݥሇၯሮസ
AF
᧖֭ၯݥሇၯሮസ
ᮨ࠽ୈᮨ࠽ᩑԍᒱظᕜѕᩑൌᖪၯሮസ
AF
᧖֭ၯݥሇԍᐰˊ
•
ണԟޗണԬᒳ
AF
᧖֭ၯݥሇၯሮസκҋᅶᮨ࠽ሇഡಱҴ
ૉƥᡸᯅмλᒧ፠ˊ
https://downloadcenter.nikonimglib.com/
ޗࠩԬᒳᯂԍဢሇၯሮസκҋᅶᮨ࠽
ޗࠩԬᒳᯂԍဢሇၯሮസκҋᅶᮨ࠽
Ԭᒳᯂԍဢؤՠሇԍᐰᮨ࠽ୈᮨ࠽ᩑԍᒱᩑƥၯႜ
ϔयѕՠᄕˊޗే֏ئλᮨ࠽ᩑԍᒱˊѫ༉ଐƥට
௳ᮨ࠽ၢᥭڔξేनᣳϥᯋᥭጌሇνٌƥҋئλᮨ࠽ᩑԍᒱ
ϴظᕜѕՠᄕˊ
•
ᮨ࠽ࣴ᠆Ѓ
Z
50
ƥၯႜϔयѕՠᄕˊ
•
ണԟҋᅶԬᒳᯂԍဢၯႜϔνѕՠᄕሇၢᥭڔే
नᣳᥭጌሇഡಱҴૉƥᡸᯅмλᒧ፠ˊ
https://downloadcenter.nikonimglib.com/
ҋᅶ༉ଐЀᲇ
ҋᅶ༉ଐЀᲇ
•
᥎ୈతᮨ࠽ୈၯሮസƥժׅЦᮨ࠽ሣୈᮨ࠽ᩑԍᒱˊ
•
ұ
CPU
ఉဿྊ༚ˊ
•
ᘧᮨ࠽ײحเᕘߖޑ௬ޫƥ፞Ӡҋᅶৰयᮨ࠽ᖭॆ
۩َദ֩ϔੴୈॆႯᐛᑢһᨆᑢһˊ
•
νҋᅶᮨ࠽ƥಱሣκᮨ࠽ሣˊ
•
ժׅयᮨ࠽ᒳЃྰሇޞಲୈظᕜൽྰພሇޡˊԬ᪇᠆ᒳ
ᅴ᭞यफᖮುݽሇ௬ޫˊ
•
ժׅयᮨ࠽ᱢᨀဟୈᒳЃԢв᧼ၔሇޡˊ᧼ၔظᕜѕҋਿ
ࠅಥ៨ᱤا௬ୈبੋˊ
•
ྛሇፇبظᕜफᖮᮨ࠽Ԭ᪇ᑄ᱘мᖮ௬ޫˊयᮨ࠽Эྛഉ
ሇᄔࠏԗजՅሇᄔࠏୈЭजՅሇᄔࠏԗྛഉሇᄔࠏϥ֏ƥ
ԌयԢᒳЃׇԬୈࠅಥሡϔмᑾڔྛሇبˊ
•
᧿᧢Дڳƥޗׇ᠆ᎵԬ᠆ԗᥙ࠲࠰ሇᑾՁൃಥƥмՐळ
ơᩕ
ԏƢ
ᅽЃՁաफᖮДڳ௬ޫˊ
ᮨ࠽ұԦ
ᮨ࠽ұԦ
•
δᗇ૮Ճλƥྊ༚ᮨ࠽ሇᄚᅒ៨ᱤؚᰑဣषظˊ
•
ᮨ࠽៨ᱤሇဿˉெᐬڔԢвྍظҋᅶδޮ৭Չሇᧁොৈୈ
ᎁιಲᮨ࠽ྊ༚ᐫጬ੯κळᡲϰ᪾ୈᮨ࠽ྊ༚ൌྊᰑˊ
мސڄ᧿֬ಲਭЭّ౸ஸƥ༉ଐνᠳᆎλྍƥϴν
ᠳᅶୡெᡌዉᮨႜˊ
•
ժׅҋᅶདྷಥጧୈᘪᎋണസ࿂ྊ༚ᮨ࠽ˊ
•
ϔપᗡơ
NC
Ƣ࿗ᮨơذᤑƢᎋظᅶЃұ֏᪇ᮨႜˊ
•
ժνظξኀᕥୈัᕥϙδ᥎ࣘಇƥϴνظࣘಇޗርमԍλˊ
ᘧૣयޗ᧔ᮿᯋԬνҋᅶᮨ࠽ƥयԢࣘಇޗՍ৭ႉሇޞ
ಲмؤᱍڔᅴ᭞ˊ
х
х
ᰡᰁх
ᰡᰁх
•
ᮨ࠽ሣ
LC-
82
B
ơ֏ሣƢ
•
ᮨ࠽ሣ
LF-N
1
ơَሣƢ
•
ᮨ࠽ᩑԍᒱ
HB-
94
•
ᮨ࠽ׇৈ
CL-C
2
D
ҋᅶᮨ࠽ׇৈ
•
ᮨ࠽ׇৈೆޗұᮨ࠽ԏاվћƥᓨνұԢԏاݿᥥᚽ
ୈԢвਿ၇ዉౠᨲୄሇڻˊ
•
ᮨ࠽ׇৈνາˊ
•
ᮨ࠽ׇৈᅶሇൃᤌޗ౸ୈྰظᕜѕᠧᗡˉᗡˉ
டᮿˉሓᒓୈبᗡˊ
•
ҋᅶᧁւؚᰑဣषˊ
•
៨ᱤᰁሇາڔྍظҋᅶδޮ৭ሇᧁৈᨆྊᰑˊժׅҋ
ᅶ᪢ᏲˉᘪˉጧୈԢвؤપࣣႪᤌˊ
•
ժׅयԢࣘಇޗԍርमˉᴱྛୈᴱྰሇᄔࠏϔˊ
•
ժׅҋᅶᮨ࠽ׇৈྊ༚ᮨႜڔၯሮസ೪ዥ॓ˊ
•
ޗ᧿᧢᧼ጫϔƥ༉ଐνᠳᡥᮨ࠽Эᮨ࠽ׇৈϔՠˊ
ൃᤌ Ƴᔎ᪰ᐙᑢ
ԧऑሇх
ԧऑሇх
82
mm
ԗਭ࿗ᮨ
D
࿗ᮨ
•
δ๐Цظҋᅶδϑ࿗ᮨˊ
•
ࣴ᠆࿗ᮨୈᦾސੋӝ࿗ᮨ֏ƥԌئλᮨ࠽ᩑԍᒱˊ
ഴᠸඨ
ഴᠸඨ
ײح
ײح
ॆ
Z
ײح
ၢᥭ
ၢᥭ
50
mm
ഡ࠵ԍޑ
ഡ࠵ԍޑ
f/
1
.
2
ᮨ࠽ᑄ൛
ᮨ࠽ᑄ൛
15
ᐵ
17
ႜơׇஷ
2
ൣѭᗡಖ
ED
ᮨႜˉ
3
ൣᱡᄬ
ᱤᮨႜмؠᐧᏘᑄഀདྷौڔஅأमᴱྊདྷौ
ሇᮨႜƢ
ᠺᡅ
ᠺᡅ
•
FX
ඨਭ Ƴ
47
ă
•
DX
ඨਭ Ƴ
31
ă
30
Ȁ
नၢᐄᑏ
नၢᐄᑏ
Ԭ᪇नၢᐄᑏ
ഡᨀनၢᥭጌ
ഡᨀनၢᥭጌ
0
.
45
m
ơᖭၢ৮ᱤƥണبၢѬᒳƢ
ഡ࠵ࠪցຈᄈ
ഡ࠵ࠪցຈᄈ
0
.
15
Ӄ
ԍޑؾႜ
ԍޑؾႜ
9
ႜơސੋԍޑࣕƢ
ԍޑᘲއ
ԍޑᘲއ
f/
1
.
2
–
16
࿗ᮨᰁхॄध
࿗ᮨᰁхॄध
82
mm
ơ
P =
0
.
75
mm
Ƣ
ॄध
ॄध
ᐛ
89
.
5
mm
ơഡ࠵ርੜƢĆ
150
mm
ơЭၯሮസ
ᮨ࠽ײح᧵ᒃտᮨ࠽റ፨ሇᥭጌƢ
ᐛ
1090
g
ॆԚـұᆎظᰡഛಅലДڳሇᠷˉഴᠸඨڔપᕜሇ഼ջˊ
Printed in Thailand
7MMA427K-02

©
2020 Nikon Corporation
Id
Manual bagi Pengguna
Sebelum menggunakan produk ini, mohon membaca dengan seksama petunjuk ini. Anda akan juga
perlu untuk merujuk ke buku petunjuk kamera.
• Lensa ini ditujukan khusus bagi penggunaan dengan kamera mirrorless dengan fi tur dudukan Z Nikon.
• Update fi rmware kamera ke versi terbarunya. Dengan versi pendahulunya, kamera dapat gagal
mendeteksi lensa dengan tepat dan beberapa fi tur mungkin tidak tersedia. Versi terbaru dari fi rmware
kamera dapat didownload dari Pusat Download Nikon pada URL di bawah ini.
https://downloadcenter.nikonimglib.com/
Demi Keamanan Anda
Demi Keamanan Anda
Untuk mencegah kerusakan pada harta benda atau cedera pada diri Anda atau orang lain, bacalah “Demi
Keamanan Anda” secara menyeluruh sebelum menggunakan produk ini.
Simpan petunjuk keselamatan ini di mana semua pihak yang menggunakan produk ini dapat membacanya.
A PERINGATAN: Gagal mematuhi pencegahan dengan ikon bertanda ini dapat menyebabkan
kematian atau cedera berat.
A PERHATIKAN: Gagal mematuhi pencegahan dengan ikon bertanda ini dapat menyebabkan
cedera atau kerusakan harta benda.
A
A
PERINGATAN
PERINGATAN
•
•
Jangan membongkar atau memodifikasi produk ini.
Jangan membongkar atau memodifikasi produk ini.
Jangan menyentuh bagian dalam yang menjadi tidak terlindung akibat dari terjatuh atau
Jangan menyentuh bagian dalam yang menjadi tidak terlindung akibat dari terjatuh atau
kecelakaan lainnya.
kecelakaan lainnya.
Gagal mematuhi pencegahan ini dapat menimbulkan sengatan listrik atau cedera lainnya.
•
•
Apabila Anda mengamati ketidakwajaran apapun seperti keluar asap, panas, atau bau
Apabila Anda mengamati ketidakwajaran apapun seperti keluar asap, panas, atau bau
tidak biasa dari produk, putuskan segera hubungan sumber daya kamera.
tidak biasa dari produk, putuskan segera hubungan sumber daya kamera.
Melanjutkan pengoperasian dapat menyebabkan kebakaran, luka bakar atau cedera lainnya.
•
•
Jaga agar tetap kering.
Jaga agar tetap kering.
Jangan menangani dengan tangan basah.
Jangan menangani dengan tangan basah.
Gagal mematuhi pencegahan ini dapat menyulut api atau sengatan listrik.
•
•
Jangan gunakan produk ini saat hadirnya debu atau gas yang mudah terbakar seperti
Jangan gunakan produk ini saat hadirnya debu atau gas yang mudah terbakar seperti
propana, bensin atau erosol.
propana, bensin atau erosol.
Gagal mematuhi pencegahan ini dapat menyebabkan ledakan atau kebakaran.
•
•
Jangan memandang matahari atau sumber cahaya terang lainnya secara langsung melalui lensa.
Jangan memandang matahari atau sumber cahaya terang lainnya secara langsung melalui lensa.
Gagal mematuhi pencegahan ini dapat menyebabkan kebutaan.
•
•
Jauhkan produk ini dari jangkauan anak-anak.
Jauhkan produk ini dari jangkauan anak-anak.
Gagal mematuhi pencegahan ini dapat menyebabkan cedera atau gagal fungsi pada produk.
Sebagai tambahan, catat bahwa onderdil kecil merupakan bahaya tersedak. Apabila onderdil
apapun dari produk ini tertelan oleh anak, segera minta bantuan medis.
•
•
Jangan menangani dengan tangan kosong di tempat yang terpapar pada suhu teramat
Jangan menangani dengan tangan kosong di tempat yang terpapar pada suhu teramat
tinggi atau teramat rendah.
tinggi atau teramat rendah.
Gagal mematuhi pencegahan ini dapat menyebabkan luka bakar atau radang dingin.
A
A
PERHATIKAN
PERHATIKAN
•
•
Jangan meninggalkan lensa mengarah ke matahari atau ke sumber cahaya kuat lainnya.
Jangan meninggalkan lensa mengarah ke matahari atau ke sumber cahaya kuat lainnya.
Cahaya yang terpusat oleh lensa dapat menyebabkan kebakaran atau merusak bagian dalam produk.
Saat pemotretan subjek dengan cahaya latar, jauhkan cahaya matahari dari frame. Cahaya matahari
yang terfokus ke kamera saat matahari dekat ke frame dapat menimbulkan api.
•
•
Jangan tinggalkan produk di tempat di mana ia akan terpapar pada suhu yang teramat tinggi,
Jangan tinggalkan produk di tempat di mana ia akan terpapar pada suhu yang teramat tinggi,
selama jangka panjang seperti dalam kendaraan tertutup atau di bawah sinar matahari langsung.
selama jangka panjang seperti dalam kendaraan tertutup atau di bawah sinar matahari langsung.
Gagal mematuhi pencegahan ini dapat menyebabkan kebakaran atau gagal fungsi produk.
•
•
Jangan memindahkan kamera atau lensa dengan tripod atau aksesori sejenisnya terpasang.
Jangan memindahkan kamera atau lensa dengan tripod atau aksesori sejenisnya terpasang.
Gagal mematuhi pencegahan ini dapat menyebabkan cedera atau gagal fungsi pada produk.
Menggunakan Lensa
Menggunakan Lensa
Bagian-bagian dari Lensa: Nama dan Fungsi
Bagian-bagian dari Lensa: Nama dan Fungsi
Kembalilah ke diagram pada sisi kiri dari lembaran ini.
q
Tanda pemasangan
tudung lensa
Gunakan saat memasang tudung lensa.
Simak
D
w
Pegangan karet — —
e
Cincin fokus
Gunakan bagi fokus manual.
• Saat memfokus menggunakan fokus otomatis,
Anda dapat menyetel fokus secara manual dengan
memutar cincinnya sementara tombol pelepas rana
ditekan setengah; setelah memfokus, tekan tombol
pelepas rana ke bawah penuh untuk memotret.
—
r
Panel info lensa
Meninjau jarak fokus, kedalaman bidang, dan informasi
lainnya.
Simak
B
,
C
t
Cincin kontrol
Putar untuk menyetel pengaturan seperti [Apertur] atau
[Kompensasi pencahayaan] yang ditentukan menggunakan
kamera. Untuk informasi selengkapnya, simak penjelasan dari
[Penentuan kontrol kustom], [Kontrol kustom], atau [Kontrol
kustom (pemotretan)] dalam buku petunjuk kamera.
—
y
Tanda pemasangan
lensa
Gunakan saat mendudukkan lensa pada kamera.
Simak
A
u
Gasket karet
pemasangan lensa
——
i
Kontak CPU Digunakan untuk mentransfer data ke dan dari kamera. —
o
Tombol L-Fn
Tekan untuk menjalankan fungsi yang ditentukan
menggunakan kamera. Untuk informasi selengkapnya,
simak penjelasan dari [Penentuan kontrol kustom],
[Kontrol kustom], atau [Kontrol kustom (pemotretan)]
dalam buku petunjuk kamera.
—
!0
Tombol tampilan
Simpan pengaturan atau pilih informasi yang
ditunjukkan di Panel info lensa.
Simak
B
,
C
!1
Switch mode fokus
Pilih mode fokus.
• A: Fokus otomatis
• M: Fokus manual
Catat bahwa terlepas dari pengaturan terpilih, fokus
harus disetel secara manual saat mode fokus manual
dipilih menggunakan kontrol kamera.
—
!2
Tudung lensa
Tudung lensa menghalangi cahaya menyimpang yang
dapat menyebabkan silau atau gambar ganda. Tudung
juga berfungsi untuk melindungi lensa.
Simak
D
!3
Tanda kunci tudung
lensa
Gunakan saat memasang tudung lensa.
!4
Tanda kesejajaran
tudung lensa
!5
Tombol pelepas kunci
tudung lensa
Gunakan saat melepaskan tudung lensa.
!6
Penutup lensa
(penutup depan)
——
!7
Penutup lensa (penutup
belakang)
——
A
Pemasangan dan Pelepasan
Pemasangan dan Pelepasan
Memasang Lensa
z
Matikan kamera, lepaskan tutup badan, dan pisahkan tutup lensa belakang.
x
Tempatkan lensa pada badan kamera, sambil menjaga tanda pemasangan pada
lensa sejajar dengan tanda pemasangan pada badan kamera, lalu putar lensa
berlawanan arah jarum jam hingga klik di tempat.
Melepas Lensa
z
Matikan kamera.
x
Tekan dan tahan tombol pelepas lensa sambil memutar lensa searah jarum jam.
B
Panel Info Lensa
Panel Info Lensa
Panel info lensa bersinar saat lensa dipasang ke kamera dan kamera hidup.
• Tekan tombol tampilan lensa untuk mengayuh tampilan seperti ditunjukkan:
Apertur
2
Kedalaman bidang
1
Jarak fokus
1 Kedalaman bidang ditampilkan saat kamera ada di mode A atau M.
2 Apertur ditampilkan hanya saat kamera dalam mode A
atau M. Tampilan bagi mode lainnya ditunjukkan dalam
ilustrasi.
• Mode fokus (AF atau MF) ditampilkan sejenak saat dipilih menggunakan switch mode-fokus.
• Panel mati secara otomatis saat pewaktu siaga kamera berakhir atau jika tiada pengoperasian lensa
dilakukan selama sekitar 10 detik. Tekan tombol tampilan untuk mengaktifkan ulang tampilan.
Pt
Manual do Utilizador
Antes de utilizar este produto, por favor leia com atenção estas instruções. Também terá de consultar o
manual da câmara.
• Esta objetiva destina-se exclusivamente a ser utilizada com câmaras sem espelho de encaixe Z da Nikon.
• Atualize o fi rmware da câmara para a versão mais recente. Com as versões anteriores, a câmara
pode não ser capaz de detetar corretamente a objetiva e algumas funcionalidades podem não
estar disponíveis. A versão do fi rmware da câmara mais recente pode ser transferida do Centro de
Transferências da Nikon no URL abaixo.
https://downloadcenter.nikonimglib.com/
Para Sua Segurança
Para Sua Segurança
Para evitar danos a propriedade ou danos a si ou outros, leia integralmente “Para Sua Segurança” antes
de utilizar este produto.
Mantenha estas instruções de segurança onde todos os que usam o produto as possam ler.
A AVISO: A não observância das precauções marcadas com este ícone pode resultar em morte
ou lesões graves.
A ATENÇÃO: A não observância das precauções marcadas com este ícone pode resultar em
lesões ou danos a propriedade.
A
A
AVISO
AVISO
•
•
Não desmontar nem modifi car este produto.
Não desmontar nem modifi car este produto.
Não toque nas peças internas que fi quem expostas como resultado de queda ou outro acidente.
Não toque nas peças internas que fi quem expostas como resultado de queda ou outro acidente.
A não observância destas precauções pode resultar em choque elétrico ou outras lesões.
•
•
Se notar quaisquer anomalias, tais como produção de fumo, calor ou cheiros incomuns,
Se notar quaisquer anomalias, tais como produção de fumo, calor ou cheiros incomuns,
desconectar imediatamente a fonte de alimentação câmara.
desconectar imediatamente a fonte de alimentação câmara.
A operação continuada pode resultar em incêndio, queimaduras ou outras lesões.
•
•
Manter seco.
Manter seco.
Não manuseie com as mãos molhadas.
Não manuseie com as mãos molhadas.
A não observância destas precauções pode resultar em incêndio ou choque elétrico.
•
•
Não utilizar este produto na presença de pó ou gás infl amável como propano, gasolina ou aerossóis.
Não utilizar este produto na presença de pó ou gás infl amável como propano, gasolina ou aerossóis.
A não observância desta precaução pode resultar em explosão ou incêndio.
•
•
Não olhar diretamente para o sol ou outra fonte de iluminação forte através da objetiva.
Não olhar diretamente para o sol ou outra fonte de iluminação forte através da objetiva.
A não observância desta precaução pode resultar em perda de visão.
•
•
Manter este produto fora do alcance das crianças.
Manter este produto fora do alcance das crianças.
A não observância desta precaução pode resultar em lesões ou avaria do produto. Para
além disso, note que as peças pequenas constituem um risco de as xia. Se uma criança
engolir qualquer peça deste produto, procure imediatamente cuidados médicos.
•
•
Não manusear com as mãos desprotegidas em locais expostos a temperaturas extremamente
Não manusear com as mãos desprotegidas em locais expostos a temperaturas extremamente
altas ou baixas.
altas ou baixas.
A não observância desta precaução pode resultar em queimaduras ou frieiras.
A
A
ATENÇÃO
ATENÇÃO
•
•
Não deixar a objetiva apontada para o sol ou outras fontes de iluminação fortes.
Não deixar a objetiva apontada para o sol ou outras fontes de iluminação fortes.
A luz focada pela objetiva pode causar fogo ou danos às peças internas do produto. Ao fotografar motivos em
contraluz, mantenha o sol bem fora do enquadramento. A luz solar focada dentro da câmara quando o sol está
perto do enquadramento pode causar um incêndio.
•
•
Não deixar o produto onde este será exposto a temperaturas extremamente altas por um
Não deixar o produto onde este será exposto a temperaturas extremamente altas por um
longo período de tempo tal como num automóvel fechado ou sob luz solar direta.
longo período de tempo tal como num automóvel fechado ou sob luz solar direta.
A não observância desta precaução pode resultar em incêndio ou avaria do produto.
•
•
Não transportar câmaras nem lentes com tripés ou acessórios semelhantes montados.
Não transportar câmaras nem lentes com tripés ou acessórios semelhantes montados.
A não observância desta precaução pode resultar em lesões ou avaria do produto.
Usar a Objetiva
Usar a Objetiva
Peças da Objetiva: Nomes e Funções
Peças da Objetiva: Nomes e Funções
Consulte o diagrama na extremidade esquerda desta folha.
q
Marca de montagem do
para-sol da objetiva
Utilize quando montar o para-sol da objetiva.
Consultar
D
w
Punho de borracha — —
e
Anel de focagem
Use para focagem manual.
• Quando focar utilizando a focagem automática, pode
ajustar a focagem manualmente rodando o anel de
focagem enquanto o botão de disparo do obturador for
ligeiramente premido; após focar, prima completamente
o botão de disparo do obturador até ao fi m para disparar.
—
r
Painel de informações na
objetiva
Visualize a distância de focagem, profundidade de
campo e outras informações.
Consultar
B
,
C
t
Anel de controlo
Rode para ajustar uma defi nição como [Abertura] ou
[Compensação de exposição] atribuída usando a câmara.
Para obter mais informações, consulte a descrição de [Atrib.
de controlo personaliz.], [Controlos personalizados] ou
[Contr. personalizs. (disparo)] no manual da câmara.
—
y
Marca de montagem da
objetiva
Utilize quando montar a objetiva na câmara.
Consultar
A
u
Junta de borracha da
montagem da objetiva
——
i
Contactos CPU
Utilizado para transferir dados para e da
câmara.
—
o
Botão L-Fn
Prima para executar uma função atribuída usando
a câmara. Para obter mais informações, consulte a
descrição de [Atrib. de controlo personaliz.], [Controlos
personalizados] ou [Contr. personalizs. (disparo)] no
manual da câmara.
—
!0
Botão de visualização
Guarde defi nições ou escolha a informação apresentada no
painel de informações na objetiva.
Consultar
B
,
C
!1
Comutador de modo de
focagem
Escolha um modo de focagem.
• A: Focagem automática
• M: Focagem manual
Note que, independentemente da defi nição escolhida, a
focagem tem de ser ajustada manualmente quando o modo
de focagem manual está selecionado utilizando os controlos
da câmara.
—
!2
Para-sol da objetiva
Os para-sóis da objetiva bloqueiam a luz dispersa que
causaria de outro modo refl exo ou efeito fantasma.
Estes servem também para proteger a objetiva.
Consultar
D
!3
Marca de bloqueio do
para-sol da objetiva
Utilize quando montar o para-sol da objetiva.
!4
Marca de alinhamento do
para-sol da objetiva
!5
Botão de desbloqueio do
para-sol da objetiva
Utilize ao remover o para-sol da objetiva.
!6
Tampa da objetiva (tampa
frontal)
——
!7
Tampa da objetiva (tampa
traseira)
——
A
Montagem e Remoção
Montagem e Remoção
Montar a Objetiva
z
Desligue a câmara, remova a tampa do corpo e retire a tampa da objetiva traseira.
x
Posicione a objetiva no corpo da câmara, mantendo a marca de montagem da
objetiva alinhada com a marca de montagem do corpo da câmara e, em seguida, rode
a objetiva no sentido contrário ao dos ponteiros do relógio até que se encaixe no lugar.
Remover a Objetiva
z
Desligue a câmara.
x
Prima continuamente o botão de disparo da objetiva enquanto roda a objetiva no
sentido dos ponteiros do relógio.
B
O Painel de Informações na Objetiva
O Painel de Informações na Objetiva
O painel de informações na objetiva acende-se quando a objetiva está montada na câmara e a
câmara está ligada.
• Prima o botão de visualização da objetiva para alternar a exibição como mostrado:
Abertura
2
Profundidade de campo
1
Distância de focagem
1 A profundidade de campo é apresentada quando a câmara está no modo A ou M.
2 A abertura é apresentada apenas quando a câmara
está no modo A ou M. O ecrã para outros modos é
mostrado na ilustração.
• O modo de focagem (AF ou MF) é exibido durante breves momentos quando escolhido utilizando
o comutador do modo de focagem.
• O painel desliga-se automaticamente quando o temporizador de espera da câmara expira ou se
não forem executadas operações na objetiva durante cerca de 10 segundos. Prima o botão de
visualização para reativar o ecrã.
A
O Painel de Informações na Objetiva
A distância de focagem, profundidade de campo e qualquer outra informação visualizada no painel de informações na
objetiva são apenas aproximações.
A
Bokeh Irregular
A velocidades rápidas do obturador e/ou aberturas amplas, poderá notar irregularidades na forma como o bokeh é formado. O
efeito pode ser atenuado escolhendo velocidades do obturador mais lentas e/ou números f mais altos.
C
Opções do Painel
Opções do Painel
Siga os passos abaixo para escolher as unidades de distância de focagem entre metros (m) ou pés
(ft) ou ajuste a luminosidade do painel de informações na objetiva.
z Prima e segure o botão de visualização para visualizar as definições.
• São exibidas as opções de seleção de unidades ou luminosidade. O item atualmente
selecionado pisca.
• Prima o botão de visualização para comutar entre ecrãs.
Unidades Luminosidade
x Escolha uma definição utilizando o anel de controlo da objetiva.
Unidades
- Rode o anel de controlo para escolher entre metros
(m) ou pés (ft).
Luminosidade
- Rode o anel de controlo na direção "+" (mais claro)
ou "−" (mais escuro).
- Escolha entre 6 níveis de luminosidade.
- Para desligar o painel de informações na objetiva,
rode o anel na direção "−" até que o ícone
mude para
.
• Prima o botão de visualização para guardar as alterações e comutar o ecrã.
• Se não forem efetuadas operações utilizando os controlos da objetiva durante cerca de
5segundos, o painel de opções deixará de ser apresentado no ecrã. Todas as alterações
serão perdidas.
c
Pressione e segure o botão de visualização para voltar ao ecrã de informações da objetiva.
• Escolher para a luminosidade desliga o painel de informações na objetiva. Para voltar
a ligar o ecrã, prima e mantenha premido o botão de visualização.
D
Montar e Remover o Para-sol da Objetiva
Montar e Remover o Para-sol da Objetiva
Montar o Para-sol da Objetiva
• Alinhe a marca de montagem do para-sol da objetiva com a marca de alinhamento do para-
sol da objetiva (
q
) e depois rode o para-sol da objetiva (
w
) até que a marca de encaixe fi que
alinhada com a marca de bloqueio do para-sol da objetiva (
e
).
Marca de bloqueio do para-sol
da objetiva
Marca de alinhamento do para-sol da objetiva
Marca de montagem do para-sol
da objetiva
• Agarrar a parte da frente com muita força difi culta a fi xação ou a remoção do para-sol da objetiva.
Ao rodar o para-sol, segure-o perto da marca de alinhamento do para-sol da objetiva (
●
) na sua
base.
• O para-sol da objetiva pode ser revertido e encaixado na objetiva quando não estiver em uso.
Remover o Para-sol da Objetiva
• Mantendo o botão de desbloqueio do para-sol da objetiva premido (
q
), rode o para-sol da
objetiva na direção indicada (
w
) e remova-o da objetiva (
e
).
Botão de desbloqueio do para-sol da objetiva
• Pode ser usado o mesmo procedimento quando o para-sol estiver invertido.
Quando a Objetiva Estiver Montada
Quando a Objetiva Estiver Montada
A posição de focagem pode alterar-se se desligar a câmara e depois a ligar novamente após focar. Se tiver
focado numa localização pré-selecionada enquanto espera que o seu motivo apareça, recomendamos que
não desligue a câmara até que a fotografi a seja tirada.
Câmaras com Iluminadores Auxiliares de AF
Câmaras com Iluminadores Auxiliares de AF
A objetiva ou o para-sol da objetiva pode bloquear a luz do iluminador auxiliar de AF da câmara.
• Para obter as informações mais recentes sobre a utilização da objetiva com câmaras que possuam
iluminadores auxiliares de AF incorporados, visite o site abaixo.
https://downloadcenter.nikonimglib.com/
Usar a Objetiva em Câmaras com Flash Incorporado
Usar a Objetiva em Câmaras com Flash Incorporado
As sombras serão visíveis nas fotografi as em que a luz do fl ash incorporado é obscurecida pela objetiva ou
pelo para-sol da objetiva. Retire o para-sol da objetiva antes de disparar. Contudo, tenha em atenção que,
consoante a distância focal da objetiva e a distância até ao motivo, podem aparecer sombras, mesmo quando
o para-sol da objetiva está removido.
• As sombras serão visíveis nas fotografi as tiradas quando esta objetiva estiver montada numa Z50.
• Para obter as informações mais recentes sobre distâncias focais e distâncias ao motivo nas quais as
sombras não aparecerão nas fotografi as tiradas com fl ash incorporado, visite o site abaixo.
https://downloadcenter.nikonimglib.com/
Precauções de Utilização
Precauções de Utilização
• Não levante nem segure a objetiva ou a câmara utilizando apenas o para-sol da objetiva ou as tampas
da objetiva.
• Mantenha os contactos CPU limpos.
• Se a junta de borracha da montagem da objetiva fi car danifi cada, cesse a utilização imediatamente e leve a
objetiva a um centro de assistência autorizado da Nikon para reparação.
• Volte a colocar a tampa da objetiva quando a objetiva não estiver a ser utilizada.
• Não deixe a objetiva em locais húmidos ou em locais onde possa estar exposta a humidade. A
ferrugem do mecanismo interno pode causar danos irreparáveis.
• Não deixe a objetiva perto de chamas ou em outros locais extremamente quentes. O calor extremo
pode danifi car ou deformar o exterior de plástico reforçado.
• Mudanças bruscas de temperatura podem causar condensação que danifi ca o interior e o exterior da objetiva.
Antes de levar a objetiva de um ambiente quente para o frio ou vice-versa, coloque-a num saco ou caixa de
plástico para retardar a mudança de temperatura.
• Recomendamos que coloque a objetiva na sua bolsa de forma a protegê-la contra riscos durante o transporte.
Cuidados com a Objetiva
Cuidados com a Objetiva
• Remover o pó é normalmente sufi ciente para limpar as superfícies de vidro da objetiva.
• Borrões, impressões digitais e outras manchas de gordura podem ser retirados da superfície da objetiva
com um pano de algodão macio e limpo ou um pano de limpeza de objetivas de outros fornecedores
ligeiramente humedecido com uma pequena quantidade de etanol ou líquido de limpeza de objetivas.
Limpe suavemente a partir do centro para fora num movimento circular, tomando cuidado para não deixar
manchas nem tocar na objetiva com os dedos.
• Nunca utilize solventes orgânicos como diluente ou benzeno para limpar as objetivas.
• Podem ser utilizados fi ltros de cor neutra (NC, Neutral Color) (disponíveis em separado) e semelhantes
para proteger o elemento frontal da objetiva.
• Não guarde com bolas de naftalina ou cânfora, nem a exponha à luz solar direta. Se a objetiva não for
utilizada durante um período prolongado, guarde-a num local fresco e seco para evitar bolor e ferrugem.
߱͐ᮢᮟٴԊŊ⦼˝₳〇⩊Ⳇˀ྆֡ȯ෨ⴒト⣬ው〇ᑨ⦦ᆙሬȯ
• ⽷ㆊ૾ͧሷଛನ Z ᭔᱿ᤀוᑨ͐ᮢȯ
• ⦼૽ᑨㅊ㋤ሩᅘ⎏ሱᅘᦹȯ͐ᮢሩᅽቅᦹᆹŊᑨר⋱ᤀᘍᷨϴᛵ⽷ㆊʈኽ
ˀԼ⋱ר⋱ᤀᘍ͐ᮢȯᑨㅊ㋤᱿ሱᅘᦹרഺ˫ʁ URL ʑ᱿ଛನʁⰶʑൔⳖ⠗ʁⰶȯ
https://downloadcenter.nikonimglib.com/
મҚㅱᵧ
મҚㅱᵧ
ᣅ〾ᔋ෨᱿⪮ᮟטံ≛෨⎊న˟ːטЛŊ߱͐ᮢᮟٴʠԊŊ⦼Қㄇ〇⩊ơમҚㅱᵧƢȯ
⦼६ۧΎᾷⳆˀમҚ྆֡Ŋ˫͵ᮟٴ᱿ሷ͐ᮢ≛רらᆹው〇ȯ
A
⨸ب: ʃⴃભᐻሷ⥿ߧḻ᱿ᘜาʶㅮŊר⋱ሳ⎐ᔘ˃ް⸅טЛȯ
A
ᘜาʶㅮ: ʃⴃભᐻሷ⥿ߧḻ᱿ᘜาʶㅮŊר⋱ሳ⎐טЛ⪮ᮟטံȯ
A
A
⨸ب
⨸ب
•
•
խ⎊⠗བྷ⤟ᄊ⡶ᮟٴȯ
խ⎊⠗བྷ⤟ᄊ⡶ᮟٴȯ
խ⤯᮫ᷤᅠၩ┛Ң˟าकʶᄑ≟कヮ᱿ҙⵒダ˴ȯ
խ⤯᮫ᷤᅠၩ┛Ң˟าकʶᄑ≟कヮ᱿ҙⵒダ˴ȯ
ʃⴃભᔍᘜาʶㅮŊר⋱ሳ⎐⤯ヅҢ˟Лેȯ
•
•
ᱹ˶̬ʃᔌ⩽ŊॖᮟٴҭᤞȮᱹᥖᯌػᾀŊ⦼Ἴ֯ᅜᑨヅȯ
ᱹ˶̬ʃᔌ⩽ŊॖᮟٴҭᤞȮᱹᥖᯌػᾀŊ⦼Ἴ֯ᅜᑨヅȯ
߱ᔍഐʁ↧↲͐ᮢŊר⋱ሳ⎐⬚ᢜȮᢣЛҢ˟Лેȯ
•
•
Ύྃʯᦱȯ
Ύྃʯᦱȯ
խᮢᠪ༆Ⳗ⠗Ⴝ̳ȯ
խᮢᠪ༆Ⳗ⠗Ⴝ̳ȯ
ʃⴃભᔍᘜาʶㅮŊר⋱ሳ⎐⬚ᢜ⤯ヅȯ
•
•
խ߱ሷʌᣤᖎȮᗋᗴᤞュԵᾀᆞᥣඖ⁆ࢴᖎ㋤᱿ࢍ͐ᮢᮟٴȯ
խ߱ሷʌᣤᖎȮᗋᗴᤞュԵᾀᆞᥣඖ⁆ࢴᖎ㋤᱿ࢍ͐ᮢᮟٴȯ
ʃⴃભᔍᘜาʶㅮŊר⋱ሳ⎐ᦓᣄᢜᢤȯ
•
•
խⲿ⳧⽷ㆊ᳅⤐᳖ठぬҢ˟ᆙˌ҆ȯ
խⲿ⳧⽷ㆊ᳅⤐᳖ठぬҢ˟ᆙˌ҆ȯ
ʃⴃભᔍᘜาʶㅮŊר⋱ሳ⎐⣶⤌ံЛȯ
•
•
խ߱Ҋὄ̖༆רדʠ⚠Ύᾷᮟٴȯ
խ߱Ҋὄ̖༆רדʠ⚠Ύᾷᮟٴȯ
ʃⴃભᔍᘜาʶㅮŊר⋱ሳ⎐טЛᮟٴᄑゃȯנकŊ⦼ᘜา₳ଅⵒ˴ሷ⎐
Ἐ᱿֭るȯҊὄ⦡؆ʴᮟٴ᱿˶̬ⵒ˴Ŋ⦼Ἴ֯ଁᖣⷪ᱗֠Հȯ
•
•
߱ᝐಙᏎ㋧Ꮞ̥᱿ࢍŊխᮢ⢇༆᳅⤯ȯ
߱ᝐಙᏎ㋧Ꮞ̥᱿ࢍŊխᮢ⢇༆᳅⤯ȯ
ʃⴃભᔍᘜาʶㅮŊר⋱ሳ⎐ᢣЛӉЛȯ
A
A
ᘜาʶㅮ
ᘜาʶㅮ
•
•
խ૽⽷ㆊଃठぬҢ˟҆ȯ
խ૽⽷ㆊଃठぬҢ˟҆ȯ
ʃⴃભᔍᘜาʶㅮŊ҆ℬר⋱ሳⲿ⳧⽷ㆊ⊌ᤄʏ೧⬚ᢜᢤံࣺᮟٴ᱿ҙⵒダ˴ȯ
ཞჶⲻ҆ʙ㋤ᆹŊ⦼ʃ⣬⩕ठぬⳖҘᐉߧߣȯߌᣅᯍठぬㄅⲖᐉߧߣᆹŊぬ҆
ר⋱ⲿ⳧⽷ㆊ⊌ᤄʏ೧⬚ᢜᢤȯ
•
•
խ૽ᮟٴᆹ⿵ᄍ⇦߱ᏎҢ㋧ᝐ᱿߸ᅞŊॖૺ᱿Ⰷҙ᳅ૼぬ҆ʁȯ
խ૽ᮟٴᆹ⿵ᄍ⇦߱ᏎҢ㋧ᝐ᱿߸ᅞŊॖૺ᱿Ⰷҙ᳅ૼぬ҆ʁȯ
ʃⴃભᔍᘜาʶㅮŊר⋱ሳ⎐⬚ᢜᮟٴᄑゃȯ
•
•
խ⳥Ⲷમ⡶ʴɿ⌳ከㆩ̙ⶪ˴᱿ᑨ⽷ㆊȯ
խ⳥Ⲷમ⡶ʴɿ⌳ከㆩ̙ⶪ˴᱿ᑨ⽷ㆊȯ
ʃⴃભᔍᘜาʶㅮŊר⋱ሳ⎐טЛᮟٴᄑゃȯ
͐ᮢ⽷ㆊ
͐ᮢ⽷ㆊ
⽷ㆊⵒ˴ŘờُԼ⋱
⽷ㆊⵒ˴ŘờُԼ⋱
⦼א⣲ㅪㄇఢⴗ᱿ߧ⠧ȯ
q
⽷ㆊ⳽҆⇡᭔ᐻ⥆
મ⡶⽷ㆊ⳽҆⇡ᆹ͐ᮢȯ
א⣲
D
w
ᑪ⍑༆ኲ
——
e
ଃᤄ᭔
ᮢᅠ༆Ւଃᤄȯ
• ͐ᮢ⎊ՒଃᤄⳖ⠗ଃᤄᆹŊ෨רⲿ⳧ᅩⱧଃ
ᤄ᭔ʏᆹ֚ྈ൬⸃ᄍྈ⼫༆Ւ⦲ᄮଃᤄř
ଃᤄരŊરҚྈʁ൬⸃ᄍྈ⼫רⳖ⠗ཞჶȯ
ƞ
r
⽷ㆊ⫏⤻ㄇኈ ው᳖ଃᤄ⭡サȮᇓᛖُҢ˟⫏⤻ȯ
א⣲
B
Ȯ
C
t
Ӽ᭔
ᅩⱧר⦲ᄮ͐ᮢᑨ྆હ᱿
[ ҆ߞ ] [ ሚ
҆⡵ѥ ] ᾀ⥑હȯሷ〦⦀Ŋ⦼א⣲ᑨ⦦
ᆙሬʑ
[ ⎊હӼ྆હ ]Ȯ[ ⎊હӼ ] [ ⎊
હӼņཞჶŇ] ᱿〦⦦ᆙȯ
ƞ
y
⽷ㆊ᭔ᐻ⥆ ૽⽷ㆊમ⡶⎏ᑨᆹ͐ᮢȯ
א⣲
A
u
ᑪ⍑⽷ㆊ᭔ૺࣆ
ƞƞ
i
CPU 㔄
ᮢᅠ૽ᄲჇЗⱚ⎏ᑨഺᑨʑЗⱚᄲჇȯ
ƞ
o
L-Fn
ྈ⼫
ྈʁרࡠ⠗͐ᮢᑨ྆હ᱿Լ⋱ȯሷ〦⦀
Ŋ⦼א⣲ᑨ⦦ᆙሬʑ [ ⎊હӼ྆હ ]Ȯ
[ ⎊હӼ ] [ ⎊હӼņཞჶŇ] ᱿〦
⦦ᆙȯ
ƞ
!0
ㆴḻྈ⼫
Ѳએ⥑હⴆႹ⽷ㆊ⫏⤻ㄇኈʑḻ᱿⫏⤻ȯ
א⣲
B
Ȯ
C
!1
ଃᤄᑁೣӡဘݽ
ⴆႹଃᤄᑁೣȯ
•
A
: ⎊Ւଃᤄ
•
M
: ༆Ւଃᤄ
⦼ᘜาŊᤀ⧄ⴆႹʴ̬Ớ⥑હŊᯍ͐ᮢᑨ
ӼⴆႹʴ༆ՒଃᤄᑁೣᆹŊଃᤄⵣൕㅱ༆
ՒⳖ⠗⦲ᄮȯ
ƞ
!2
⽷ㆊ⳽҆⇡
⽷ㆊ⳽҆⇡רぁႼר⋱⎐᳧҆㌦ഛ᱿ᄣ
ૼ҆ℬȯΩⴒרᮢᅠΎ⩂⽷ㆊȯ
א⣲
D
!3
⽷ㆊ⳽҆⇡⽁હᐻ⥆
મ⡶⽷ㆊ⳽҆⇡ᆹ͐ᮢȯ
!4
⽷ㆊ⳽҆⇡ଃ㕑ᐻ⥆
!5
⽷ㆊ⳽҆⇡⽁હ⸃
ᄍྈ⼫
חʁ⽷ㆊ⳽҆⇡ᆹ͐ᮢȯ
!6
⽷ㆊ╾ņԊ╾Ň ƞ
ƞ
!7
⽷ㆊ╾ņര╾Ň ƞ
ƞ
A
મ⡶⎞חʁ
મ⡶⎞חʁ
મ⡶⽷ㆊ
z
〦ᑨŊחʁᑨ⯿╾Ŋᤋരחʁ⽷ㆊര╾ȯ
x
૽⽷ㆊʀ᱿᭔ᐻ⥆⎞ᑨᑨ⯿ʀ᱿᭔ᐻ⥆ଃ㕑Ŋᆹ૽⽷ㆊ⇦ᅠᑨᑨ⯿
ʀŊᤋരⲻᆹ⸒ᅩⱧ⽷ㆊ᳅⎏Ң֦Ҙᔌ̤ᷨ⇦ᱹӛۣޝ⊖ȯ
חʁ⽷ㆊ
z
〦ᑨ
ȯ
x
ྈ̦⽷ㆊ⸃ᄍྈ⼫ʏᆹㅯᆹ⸒ᅩⱧ⽷ㆊ
ȯ
B
⽷ㆊ⫏⤻ㄇኈ
⽷ㆊ⫏⤻ㄇኈ
ᯍ⽷ㆊમ⡶ᅠᑨʈᑨ⚠ᅠۓᨊ๗ᆹŊ⽷ㆊ⫏⤻ㄇኈሳ㔄ˌȯ
• ྈʁ⽷ㆊㆴḻྈ⼫רॖʁḻൂ᭔ㆴḻŘ
҆ߞ
2
ᇓᛖ
1
ଃᤄ⭡サ
1 ᯍᑨ߱ᑁೣ
A
M
ʁᆹㆴḻᇓᛖȯ
2 Х
ᯍᑨ⚠ᅠᑁೣ
A
M
ᆹ҆ߞ༇ሳㆴḻȯҢ
˟ᑁೣ᱿ㆴḻॖߧḻȯ
• ⲿ⳧ଃᤄᑁೣӡဘݽⴆႹʴଃᤄᑁೣņ
AF
MF
ŇᆹŊሳᵬᇺㆴḻଃᤄᑁೣȯ
• ᯍᑨഩᑨહᆹᆹ⿵≩Ჵञ₎ 10 ấቍⳖ⠗⽷ㆊႽ̳ᆹŊㄇኈሳ⎊Ւ〦ȯྈ
ʁㆴḻྈ⼫ר⸅ᅘۓՒㆴḻȯ
A
⽷ㆊ⫏⤻ㄇኈ
⽷ㆊ⫏⤻ㄇኈʑḻ᱿ଃᤄ⭡サȮᇓᛖُҢ˟⫏⤻ХᣅⲖ̙ϊȯ
A
ʃ⣳ԅᄣᇓ
͐ᮢ㋧Ⳍ൬ُ
/ ञ҆ߞᆹŊ෨ר⋱ሳᘜาӷᄣᇓഐᨊʃ⣳ԅȯⲿ⳧ⴆႹⰱ
᱿൬Ⳍಙُ / ⰱ㋧᱿ f ϊר˫ᛧⱀⳆỚഛㅨȯ
C
ㄇኈⴆㅮ
ㄇኈⴆㅮ
ྈᤫ˫ʁᔎ㊾רഺ›ņ
m
Ňଙņ
ft
ŇʑⴆႹଃᤄ⭡サ᱿܈̤≛⦲ᄮ⽷ㆊ⫏
⤻ㄇኈ᱿ˌಙȯ
z
ྈ̦ㆴḻྈ⼫ው᳖⥑હȯ
• ➔ౡʑ૽ㆴḻ܈̤ˌಙⴆႹⴆㅮȯᲿԊⴆㅮᲿ૽ሳᦗȯ
• ྈʁㆴḻྈ⼫רӡဘㆴḻȯ
܈̤ ˌಙ
x
͐ᮢ⽷ㆊӼ᭔ⴆႹɺΤ⥑હȯ
܈̤
-
ᅩⱧӼ᭔רഺ›ņ
m
Ňଙņ
ft
ŇʑⳖ⠗
ⴆႹȯ
ˌಙ
-
ቄơ
+ƢņሩˌŇơ–ƢņሩᇯŇᅞᅩⱧ
Ӽ᭔ȯ
-
ഺˌಙ᱿ 6 Τᾀ₤ʑⳖ⠗ⴆႹȯ
-
⣬〦⽷ㆊ⫏⤻ㄇኈŊ⦼ቄơ
–ƢᅞᅩⱧ
Ӽ᭔᳅⎏ ߧḻ⩐ᣅ ȯ
• ྈʁㆴḻྈ⼫רѲએሩᄊʏӡဘㆴḻȯ
• ञ₎ 5 ấቍ͐ᮢ⽷ㆊӼࡠ⠗˶̬Ⴝ̳Ŋㄇኈⴆㅮ૽ഺㆴḻʑᚉदȯ
ሷሩᄊⵣ૽ⴈदȯ
c
ྈ̦ㆴḻྈ⼫ⲙߊ⽷ㆊ⫏⤻ㄇኈ
ȯ
• ૽ˌಙⴆᣅ ሳ〦⽷ㆊ⫏⤻ㄇኈȯ⣬ҪᓝۓㆴḻŊ⦼ྈ̦ㆴḻྈ⼫ȯ
D
મ⡶ُחʁ⽷ㆊ⳽҆⇡
મ⡶ُחʁ⽷ㆊ⳽҆⇡
મ⡶⽷ㆊ⳽҆⇡
• ૽⽷ㆊ⳽҆⇡᭔ᐻ⥆ُ⽷ㆊ⳽҆⇡ଃ㕑ᐻ⥆ņ
q
Ňଃ㕑ŊᤋരᅩⱧ⽷ㆊ⳽҆
⇡ņ
w
Ň᳅⎏᭔ᐻ⥆ُ⽷ㆊ⳽҆⇡⽁હᐻ⥆ņ
e
Ňଃ㕑ȯ
⽷ㆊ⳽҆⇡⽁હᐻ⥆
⽷ㆊ⳽҆⇡ଃ㕑ᐻ⥆
⽷ㆊ⳽҆⇡᭔ᐻ⥆
• ૽⽷ㆊ⳽҆⇡Ԋⵒဝവठℤሳ͐Ңザ˫મ⡶חʁȯᅩⱧ⽷ㆊ⳽҆⇡ᆹŊ⦼߱Ң
ࡣಚ᱿⽷ㆊ⳽҆⇡ଃ㕑ᐻ⥆ņȢŇえⲖ૽Ңဝ̦ȯ
• ʃ͐ᮢᆹŊר૽⽷ㆊ⳽҆⇡וⱧʏߗહ߱⽷ㆊʀȯ
חʁ⽷ㆊ⳽҆⇡
• ྈ̦⽷ㆊ⳽҆⇡⽁હ⸃ᄍྈ⼫ņ
q
ŇŊᆹྈᤫߧḻᅞᅩⱧ⽷ㆊ⳽҆⇡ņ
w
ŇŊᤋ
രഺ⽷ㆊ૽Ңחʁņ
e
Ňȯ
⽷ㆊ⳽҆⇡⽁હ⸃ᄍྈ⼫
• ⽷ㆊ⳽҆⇡⡕וⱧߗહᅠ⽷ㆊᆹר˫͐ᮢᔎ㊾ȯ
મ⡶⽷ㆊര
મ⡶⽷ㆊര
෨߱ଃᤄര〦ᑨʏ⸅ᅘۓŊଃᤄ̤⇦ר⋱ሳᱹᮝᄊ⩐ȯ෨߱ᾀഩʙ㋤ӛ
ቅ⿵ଃᤄᅠㅷⴆ̤⇦ŊໟΩ⩀෨߱ᤫᦸཞჶԊʃ⣬〦ᑨȯ
AF ⰿՀᤫᆙᥨ᱿ᑨ
AF ⰿՀᤫᆙᥨ᱿ᑨ
⽷ㆊ⽷ㆊ⳽҆⇡ר⋱ሳ⳽Ⴜ͗⎊ᑨ AF ⰿՀᤫᆙᥨ᱿҆ℬȯ
• ሷ〦߱ሷҙ⇦ AF ⰿՀᤫᆙᥨ᱿ᑨʀ͐ᮢ⽷ㆊ᱿ሱᅘ⫏⤻Ŋ⦼ᡕ⤍˫ʁℐἿȯ
https://downloadcenter.nikonimglib.com/
߱ⶪЈҙ⇦҆ᥨ᱿ᑨʀ͐ᮢ⽷ㆊ
߱ⶪЈҙ⇦҆ᥨ᱿ᑨʀ͐ᮢ⽷ㆊ
ᯍҙ⇦҆ᥨ᱿ᱹӛ҆ℬ⡕⽷ㆊ⽷ㆊ⳽҆⇡⳽ႼᆹŊཞᦸʑ૽ሳӛぢഛȯ⦼
߱ཞჶԊחʁ⽷ㆊ⳽҆⇡ȯ̟ᆯ⦼ᘜาŊዾჇ⽷ㆊᤄ⭡ُ⎞ʙ㋤ʠ⿵⭡サ᱿ʃŊ֯
͐חʁ⽷ㆊ⳽҆⇡ʬר⋱ሳӛぢഛȯ
• ᯍ⽷ㆊમ⡶ᅠ Z 50 ᆹŊཞᦸʑ૽ሳӛぢഛȯ
• ሷ〦͐ᮢҙ⇦҆ᥨཞᦸʑʃሳӛぢഛᆹ᱿ᤄ⭡ُʙ㋤⭡サ᱿ሱᅘ⫏⤻Ŋ⦼
ᡕ⤍˫ʁℐἿȯ
https://downloadcenter.nikonimglib.com/
͐ᮢᘜาʶㅮ
͐ᮢᘜาʶㅮ
• ཱྀ⬚ྃဝ⽷ㆊᑨᆹŊӡխХཱྀྃ⽷ㆊ╾⽷ㆊ⳽҆⇡ȯ
• Ύྃ CPU 㔄ᛤះȯ
• ᑪ⍑⽷ㆊ᭔ૺࣆံࣺŊ⦼Ἴ֯ϟᔋ͐ᮢʏ૽⽷ㆊⲶ⎏ଛನ࿙ᓏℋΔሺՖʑൔ
Ⳗ⠗ℋΔȯ
• ʃ͐ᮢ⽷ㆊᆹŊ⦼⸅ᅘ╾ʀ⽷ㆊ╾ȯ
• ⦼խ૽⽷ㆊ⇦ᅠៜᠪ᱿߸ᅞר⋱ᗹዀᠪᖎ᱿ࢍȯҙⵒᑨ⢌ᮝ⺩૽⎐ᤀᘍྤߊ᱿ံࣺȯ
• ⦼խ૽⽷ㆊㄅⲖᆙᢜ⇦ᅠҢ˟⳧ᥖ᱿ࢍȯ⳧ᥖר⋱ሳ͐ջ࢞⍑⠧ㄇטံ⩐ഐȯ
• ᝐಙ᱿Ἄ⩐ר⋱⎐⽷ㆊҙकⵒヮ˫⎐ံࣺȯ૽⽷ㆊഺᝐᇮ᱿᭔ࣀҘҽ᱿᭔ࣀ
ഺҽ᱿᭔ࣀҘᝐᇮ᱿᭔ࣀʠԊŊ⦼҅૽Ң⇦ᅠծҙ࢞⍑Წʑ˫ℷُᝐಙ᱿⩐ջȯ
• ໟΩ⩀෨߱⳥ⱚ⳧Ễʑ૽⽷ㆊ⇦ᅠ⽷ㆊ⠿ʑ˫Ύ⩂Ң҉טӶЛȯ
⽷ㆊΎ
⽷ㆊΎ
• ɺ⎷ᗼʁŊᛤះ⽷ㆊ᱿᪴ᬶ⠧ㄇᆹぜᢝࢴ֯רȯ
• ⽷ㆊ⠧ㄇ᱿ᖸ㔄Ȯ྆ₕُҢ˟ᗴឬר͐ᮢɺ࢘ʯᛍ᱿ⰖፕలὮɿᅞ⽷ㆊᛤះ₣Ệ
െᗹʀଇ⥓ʨⷑ⽷ㆊᛤះԵ͗ᛤぜȯ⦼˫ߥش⳥Ւᅞೣഺ⡹कⱀⱀჍŊᘜา
ʃ⣬ᮽʁᖸឬŊʬʃ⣬ᮢ༆྆⤯ᷤ⽷ᦸȯ
• ӡխ͐ᮢࢣᅆẽ⸃ԵᾀሷᑨԵᛤះ⽷ㆊȯ
• ʑඖ⏨ഔņNCŇᡇ⽷ņנ⠗ⴆ⫵ŇᾀרᮢᅠΎ⩂Ԋⵒ⽷ᦸȯ
• ӡʃר⎞ᵲ〉ᗴᐿ〉ʗɺ⬚એᄍŊˇʃרએᄍ߱᳅ૼぬ҆ʁȯ෨૽߱ⰱᆹ⿵
ҙʃ͐ᮢ⽷ㆊŊ⦼૽Ңએᄍ߱ぢᚥʯᦱ᱿߸ᅞ˫〾ᔋᱹハُᮝ⺩ȯ
ⶪ˴
ⶪ˴
らえⶪ˴
らえⶪ˴
• LC-82B ⽷ㆊ╾ņԊ╾Ň
• LF-N1
⽷ㆊ╾ņര╾Ň
• HB-94 ⽷ㆊ⳽҆⇡
• CL-C2 ⽷ㆊ⠿
D
͐ᮢ⽷ㆊ⠿
• ⽷ㆊ⠿ᅼ߱Ύ⩂⽷ㆊ҉טӶЛŊ≟ʃᆯΎ⩂Ң҉טߌ⭒┛Ң˟ᣊᷤ႞ⳍໞ᱿ഛㅨȯ
• ⽷ㆊ⠿ʃ〾ᖛȯ
• ⽷ㆊ⠿ᮢ᱿ቨ⫨߱⡕ၷჍೝᠪᆹר⋱ሳ⢬⏨Ȯ࿚⏨ȮཚȮᲝⅧ⩐⏨ȯ
• ⦼͐ᮢⰖӽぜᢝࢴȯ
• ⠧ㄇえ┮᱿ᖛُᖸឬר͐ᮢɺ࢘ʯ᱿ⰖలⳖ⠗ᛤぜȯ⦼խ͐ᮢⶮȮȮ
ẽ⸃ԵҢ
˟ဧᱹඖջણ⫨ȯ
• ⦼խ૽Ңએᄍ߱ぬ҆᳅ૼȮ㋧ᝐ㋧ᠪಙ᱿᭔ࣀʑȯ
• ⦼խ͐ᮢ⽷ㆊ⠿ᛤះ➔ౡ⽷ᦸȯ
• ߱⳥ⱚ⳧ỄʑŊ⦼ᘜาʃ⣬⩕⽷ㆊഺ⽷ㆊ⠿ʑ࿚ӛȯ
ቨ⫨Ř⊌ⷁ↹ℋ
ҥૌ᱿ⶪ˴
ҥૌ᱿ⶪ˴
82 mm ᅩҘೣᡇ⽷
D
ᡇ⽷
• ɺᓝХר͐ᮢɺΤᡇ⽷ȯ
• મ⡶ᡇ⽷ᅩⱧߥഐϘ҆ᡇ⽷ԊŊ⦼҅חʁ⽷ㆊ⳽҆⇡ȯ
Tc
͐ᮢ⦦ᆙሬ
Acessórios
Acessórios
Acessórios Fornecidos
Acessórios Fornecidos
• Tampa da objetiva LC-82B (tampa frontal)
• Tampa da objetiva LF-N1 (tampa traseira)
• Para-sol da objetiva HB-94
• Bolsa para objetiva CL-C2
D
Utilizar a Bolsa Para Objetiva
• A bolsa foi concebida para proteger a objetiva de riscos, não de quedas ou outros choques físicos.
• A bolsa não é à prova de água.
• O material utilizado na bolsa pode car descolorado, tingir, expandir, encolher ou mudar de cor quando esfregado ou molhado.
• Remova o pó com uma escova suave.
• Água e manchas podem ser removidas da superfície com um pano macio e seco. Não utilize álcool, benzeno, diluente ou outros
químicos voláteis.
• Não guarde em locais expostos à luz solar direta ou a temperaturas ou humidade elevadas.
• Não utilize a bolsa para limpar o monitor ou os elementos da objetiva.
• Tenha cuidado para que a objetiva não caia da bolsa durante o transporte.
Material: Poliéster
Acessórios Compatíveis
Acessórios Compatíveis
Filtros de rosca de 82 mm
D
Filtros
• Utilize apenas um ltro de cada vez.
• Retire o para-sol da objetiva antes de colocar ltros ou rodar ltros de polarização circular.
Especi cações
Especi cações
Encaixe
Encaixe Encaixe Z da Nikon
Distância focal
Distância focal 50 mm
Abertura máxima
Abertura máxima f/1.2
Construção da objetiva
Construção da objetiva 17 elementos em 15 grupos (incluindo 2 elementos ED, 3 elementos asféricos e elementos
com revestimentos de Nano Cristal e ARNEO)
Ângulo de visão
Ângulo de visão • Formato FX: 47°
• Formato DX: 31° 30’
Sistema de focagem
Sistema de focagem Sistema de focagem interna
Distância de focagem
Distância de focagem
mínima
mínima
0,45 m a partir do plano focal
Razão de reprodução
Razão de reprodução
máxima
máxima
0,15×
Lâminas do diafragma
Lâminas do diafragma 9 (abertura redonda do diafragma)
Alcance da abertura
Alcance da abertura f/1.2 – 16
Tamanho do ltro
Tamanho do ltro 82 mm (P = 0,75 mm)
Dimensões
Dimensões Aprox. 89,5 mm de diâmetro máximo × 150 mm (distância até à extremidade da
objetiva desde o rebordo de montagem da objetiva da câmara)
Peso
Peso Aprox. 1090g
A Nikon reserva-se o direito de alterar a aparência, especifi cações e desempenho deste produto a qualquer
momento e sem aviso prévio.
A
Panel Info Lensa
Jarak fokus, kedalaman bidang, dan informasi lain yang ditampilkan dalam panel info lensa adalah hanya perkiraan.
A
Bokeh Tidak Teratur
Dengan kecepatan rana yang cepat dan/atau apertur lebar, Anda mungkin menemukan ketidakteraturan bentuk bokeh. Efek
tersebut dapat diatasi dengan memilih kecepatan rana yang lebih lambat dan/atau angka- f yang lebih tinggi.
C
Opsi Panel
Opsi Panel
Ikuti langkah-langkah di bawah untuk memilih unit bagi jarak fokus dari meter (m) atau feet (ft)
atau menyetel kecerahan dari panel info lensa.
z Tekan dan tahan tombol tampilan untuk meninjau pengaturan.
• Opsi pemilihan unit atau kecerahan akan ditampilkan. Item terpilih sekarang akan berkilat.
• Tekan tombol tampilan untuk beralih antar tampilan.
Unit Kecerahan
x Pilih pengaturan menggunakan cincin kontrol lensa.
Unit
- Putar cincin kontrol untuk memilih dari meter (m)
atau feet (ft).
Kecerahan
- Putar cincin kontrol ke arah “+” (lebih cerah) atau “−”
(lebih gelap).
- Pilih dari 6 jenjang kecerahan.
- Untuk mematikan panel info lensa, putar cincin ke
arah “−” hingga ikon
berubah menjadi .
• Tekan tombol tampilan untuk menyimpan perubahan dan beralih tampilan.
• Apabila tiada pengoperasian dilakukan menggunakan kontrol lensa selama sekitar 5
detik, opsi panel akan menghilang dari tampilan. Perubahan apapun akan hilang.
c Tekan dan tahan tombol tampilan untuk kembali ke panel info lensa.
• Memilih bagi kecerahan mematikan panel info lensa. Untuk hidupkan kembali tampilan,
tekan dan tahan tombol tampilan.
D
Memasang dan Melepas Tudung Lensa
Memasang dan Melepas Tudung Lensa
Memasang Tudung Lensa
• Sejajarkan tanda pemasangan tudung lensa dengan tanda kesejajaran tudung lensa (
q
) dan lalu
putar tudung lensa (
w
) hingga tanda pemasangan sejajar dengan tanda kunci tudung lensa (
e
).
Tanda kunci tudung lensa
Tanda kesejajaran tudung lensa
Tanda pemasangan tudung lensa
• Menggenggam bagian depan terlalu kencang membuat tudung lensa sulit untuk dipasang atau
dilepas. Saat memutar tudung lensa, tahan di dekat tanda kesejajaran tudung lensa (●) di dasarnya.
• Tudung lensa dapat dibalik dan dipasang pada lensa saat tidak digunakan.
Melepas Tudung Lensa
• Sambil menekan tombol pelepas kunci tudung lensa (
q
), putar tudung lensa ke arah ditunjukkan
(
w
) dan lepaskan dari lensanya (
e
).
Tombol pelepas kunci tudung lensa
• Prosedur yang sama dapat digunakan saat tudung lensa dibalik.
Saat Lensa Dipasang
Saat Lensa Dipasang
Posisi fokus dapat berubah jika Anda mematikan kamera dan lalu menghidupkannya lagi setelah
pemfokusan. Apabila Anda telah memfokus pada lokasi terpilih sebelumnya sambil menunggu subjek
Anda muncul, kami sarankan agar Anda tidak mematikan kamera hingga gambar diambil.
Kamera dengan Iluminator Bantuan AF
Kamera dengan Iluminator Bantuan AF
Lensa atau tudung lensa dapat menghalangi cahaya dari iluminator bantuan AF kamera.
• Untuk informasi terakhir tentang menggunakan lensa dengan kamera yang memiliki iluminator
bantuan AF terpasang, kunjungi situs di bawah ini.
https://downloadcenter.nikonimglib.com/
Menggunakan Lensa pada Kamera dengan Lampu Kilat Terpasang
Menggunakan Lensa pada Kamera dengan Lampu Kilat Terpasang
Bayangan akan terlihat dalam foto di mana sinar dari lampu kilat terpasang dihalangi oleh lensa atau
tudung lensa. Lepas tudung lensa sebelum pemotretan. Catat, bagaimanapun, bahwa tergantung pada
panjang fokal lensa dan jarak ke subjeknya, bayangan dapat muncul bahkan saat tudung lensa dilepaskan.
• Bayangan akan tampak dalam foto yang diambil saat lensa ini dipasangkan pada Z50.
• Untuk informasi terbaru tentang panjang fokal dan jarak subjek pada mana bayangan tidak akan
muncul dalam foto terambil dengan lampu kilat terpasang, kunjungi situs di bawah.
https://downloadcenter.nikonimglib.com/
Petunjuk Penggunaan
Petunjuk Penggunaan
• Jangan memungut atau membawa lensa atau kamera hanya menggunakan penutup lensa atau tudung lensa.
• Jaga agar kontak CPU tetap bersih.
• Apabila gasket karet pemasangan lensa rusak, hentikan segera penggunaan dan bawalah lensa ke
pusat servis resmi Nikon untuk direparasi.
• Pasang kembali penutup lensa ketika lensa tidak sedang digunakan.
• Jangan tinggalkan lensa di lokasi lembab atau di lokasi di mana ia akan terpapar pada kelembaban.
Karat pada mekanisme internal dapat menyebabkan kerusakan yang tidak dapat diperbaiki.
• Jangan tinggalkan lensa di samping nyala api atau di lokasi panas ekstrim lainnya. Panas yang ekstrim
dapat merusak atau melengkungkan bagian luar dari plastik yang dikuatkan.
• Perubahan cepat dalam suhu dapat menimbulkan kondensasi merusak di dalam dan di luar lensa.
Sebelum membawa lensa dari lingkungan hangat ke dingin atau sebaliknya, taruhlah dalam tas atau
kotak plastik guna memperlambat perubahan suhu.
• Kami sarankan Anda meletakkan lensa dalam kotaknya untuk melindunginya dari goresan selama dipindahkan.
Perawatan Lensa
Perawatan Lensa
• Menghilangkan debu biasanya cukup membersihkan permukaan kaca dari lensa.
• Corengan, sidik jari, dan noda berminyak lainnya dapat dihilangkan dari permukaan lensa menggunakan
kain katun bersih dan lembut atau tisu pembersih lensa pihak ketiga yang sedikit dibasahi dengan sejumlah
kecil etanol atau pembersih lensa. Seka secara lembut dari tengah mengarah ke luar dengan gerakan
melingkar, sambil berhati-hati agar tidak meninggalkan noda atau menyentuh lensa dengan jari Anda.
• Jangan gunakan pelarut organik seperti tiner cat atau bensin untuk membersihkan lensa.
• Filter (NC) Warna Netral (dijual terpisah) dan sejenisnya dapat digunakan untuk melindungi elemen
lensa depan.
• Jangan menyimpan bersama kapur barus atau butir kamper atau di sinar matahari langsung. Apabila lensa tidak
akan digunakan untuk jangka panjang, simpan di lokasi sejuk serta kering untuk mencegah jamur dan karat.
Aksesori
Aksesori
Aksesori yang Disertakan
Aksesori yang Disertakan
• Penutup Lensa LC-82B (penutup depan)
• Penutup Lensa LF-N1 (penutup belakang)
• Tudung Lensa HB-94
• Kantung Lensa CL-C2
D
Menggunakan Kantung Lensa
• Kantung ini ditujukan untuk melindungi lensa dari goresan, bukan dari terjatuh atau guncangan sik lainnya.
• Kantung ini tidak kedap air.
• Bahan yang digunakan pada kantung lensa dapat memudar, merembes, meregang, menciut, atau berubah warna saat tergesek atau basah.
• Hilangkan debu dengan sikat lembut.
• Air dan noda dapat dihilangkan dari permukaan dengan kain kering dan lembut. Jangan gunakan alkohol, benzena, tiner, atau
bahan kimia mudah menguap lainnya.
• Jangan menyimpan di lokasi yang terpapar sinar surya langsung atau suhu tinggi atau kelembaban tinggi.
• Jangan gunakan kantung ini untuk membersihkan monitor atau elemen lensa.
• Hati-hati agar lensa tidak terjatuh dari kantungnya selama dipindahkan.
Bahan: Poliester
Aksesori Kompatibel
Aksesori Kompatibel
Filter ulir 82 mm
D
Filter
• Gunakan hanya satu lter pada satu waktu.
• Lepaskan tudung lensa sebelum memasang lter atau memutar lter polarisasi lingkar.
Spesi kasi
Spesi kasi
Dudukan
Dudukan Nikon dudukan Z
Panjang fokal
Panjang fokal 50 mm
Bukaan diafragma maksimal
Bukaan diafragma maksimal f/1.2
Konstruksi lensa
Konstruksi lensa 17
elemen dalam
15
grup (termasuk 2 elemen ED, 3 elemen asferik, dan elemen dengan lapisan
Nano Crystal dan ARNEO coat)
Sudut gambar
Sudut gambar • Format FX: 47°
• Format DX: 31° 30’
Sistem pemfokusan
Sistem pemfokusan
Sistem pemfokusan internal
Jarak fokus minimum
Jarak fokus minimum
0,45 m dari bidang fokal
Rasio penggandaan
Rasio penggandaan
maksimum
maksimum
0,15×
Bilah diafragma
Bilah diafragma 9 (bukaan diafragma lingkaran)
Kisaran bukaan
Kisaran bukaan f/1.2 – 16
Ukuran tambahan lter
Ukuran tambahan lter 82 mm (P = 0,75 mm)
Dimensi
Dimensi Garis tengah maksimum sekitar 89,5 mm × 150 mm (jarak ke ujung lensa dari
kelepak pemasangan lensa kamera)
Berat
Berat Sekitar 1090 g
Nikon memiliki hak untuk mengubah penampilan, spesifi kasi, dan kemampuan dari produk ini kapan saja
dan tanpa pemberitahuan terlebih dahulu.
༬⠛⣳ጁ
༬⠛⣳ጁ
᭔
᭔ ଛನ Z ᭔
ᤄ⭡
ᤄ⭡ 50 mm
ሱञ҆ߞ
ሱञ҆ߞ f/1.2
⽷ㆊᐉ
⽷ㆊᐉ 15 17 ᦸņծ 2 Τ ED ⽷ᦸȮ3 Τㄇ⽷ᦸ˫דₗ›ᇘࢣ
ଶُ ARNEO ࢣଶ᱿⽷ᦸŇ
ᯉ⤑
ᯉ⤑ • FX ጁೣŘ 47Ą
• DX ጁೣŘ31Ą 30Ƨ
ଃᤄ₇⃥
ଃᤄ₇⃥ ҙⵒଃᤄ₇⃥
ሱᵬଃᤄ⭡サ
ሱᵬଃᤄ⭡サ 0.45 mņ⎏ᤄ౹ㄇŇ
ሱञ⸅ᕗ᪓
ሱञ⸅ᕗ᪓ 0.15 Φ
҆ߞ┤ᦸ
҆ߞ┤ᦸ 9 ᦸņߥഐ҆ߞઋŇ
҆ߞߣ
҆ߞߣ
f/1.2 – 16
ᡇ⽷םञଅ
ᡇ⽷םञଅ 82 mmņP = 0.75 mmŇ
ଙ
ଙ ₎ 89.5 mmņሱञ᳅ലŇć150 mmņഺᑨ⽷ㆊ᭔ⴗℳӷ⽷ㆊ
Ὁ᱿⭡サŇ
⸅⸇
⸅⸇ ₎ 1090 g
ଛನҝΎᮽרらᆹሩᄊᮟٴ᱿क⤐Ȯ༬⠛⣳ጁُᄓ⋱᱿ᓏӴŊ≟ᤀㅱʶ҅ⳇᵧȯ
Ar
ȳNjƈƄƉƵŽȚ ǚƸŽȢ
.ǙŽnjż ȚǍƸžƾƳŽȚ ǚƸŽȢ ȜȤƾƪƄŴȚ ǙƸƴŸ ǜƸƯƄƸŴ .ǃƄƶƵŽȚ Țnjƀ ȳȚNjƈƄŴȚ ǚƃŻ ǀƁƾƶƯŮ ȝȚȢƾŵȤȁȚ ȵnjƀ ȜȔȚǍŻ ȔƾűǍŽȚ
•.ȸǍƫŲ ǚƳƪŮ Nikon Z ƿƸżǍƄŮ ǎƸƵƄů ǠƄŽȚ ȜȕǍž ǾŮ ȝȚǍƸžƾƳŽȚ Ǖž ȳȚNjƈƄŴǾŽ ǀƫƫƈž ǀŴNjƯŽȚ ȵnjƀ
• ǚƳƪŮ ǀŴNjƯŽȚ ȯƾƪƄżȚ ȚǍƸžƾƳŽȚ ǟƴŸ ȤnjƯƄƁ NjŻ .ȤȚNjǧȘ ȞNjŲȖ ǟŽȘ ȚǍƸžƾƳƴŽ ǁŮƾƅŽȚ ǃžƾſǍƃŽȚ ǂƁNjƇƄŮ ǛŻ
ȚǍƸžƾƳƴŽ ǁŮƾƅŽȚ ǃžƾſǍƃŽȚ ǜž ȤȚNjǧȘ ȞNjŲȖ ǚƁǎƶů ǜƳƵƁ .ƾƁȚǎƵŽȚ ǒƯŮ ǍźǞƄů ǽ NjŻȶ ȳNjŻLjȚ ȝȚȤȚNjǧȁȚ Ǖž ljƸƇǧ
.ǠŽƾƄŽȚ ǓŮȚǍŽȚ ǟƴŸ ȴǞƳƸƶŽ ǕŮƾƄŽȚ ǚƁǎƶƄŽȚ ǎżǍž ǜž
https://downloadcenter.nikonimglib.com/
ǙƄžǾŴ ǚűȖ ǜž
ǙƄžǾŴ ǚűȖ ǜž
Țnjƀ ȳȚNjƈƄŴȚ ǚƃŻ ǀƴžƾż "ǀžǾƉŽȚ ȝƾŶƾƸƄŲȚ" ȖǍŻȚ ȆǀŮƾǧȂŽ ǜƁǍųȃȚ ȶȖ ǙƉƱſ ǒƁǍƯů ȶȖ ȝƾƳƴƄƵƵŽȚ ȯǾůȘ ǕƶƵŽ
.ǃƄƶƵŽȚ
.ƾƷůȔȚǍŻ ǜž ǃƄƶƵŽȚ Țnjƀ ǠžNjƈƄƉž ǕƸƵű ǝŽǾų ǜž ǜƳƵƄƁ ȴƾƳž Ǡź ȵnjƀ ǀžǾƉŽȚ ȝƾƵƸƴƯƄŮ ǔƱƄŲȚ
ȶȖ ȜƾźǞŽȚ Ǡź ǚƅƵƄů ȜǍƸƃż ȜȤǞƭų ǟƴŸ ȸǞƭƶƁ ǎžǍŽȚ Țnjƀ ǟƴŸ ǀƇǤǞƵŽȚ ȝƾƷƸƃƶƄŽȚ ȜƾŸȚǍž ȳNjŸ :ǍƁnjƇů A
.ȜȢƾƇŽȚ ǀŮƾǧȁȚ
ȶȖ ȜƾźǞŽȚ Ǡź ǚƅƵƄů ȜǍƸƃż ȜȤǞƭų ǟƴŸ ȸǞƭƶƁ ǀſǞƲƁLjȚ ȵnjƀ ǟƴŸ ǀƇǤǞƵŽȚ ȝƾƷƸƃƶƄŽȚ ȜƾŸȚǍž ȳNjŸ :ǝƸƃƶů A
.ȝƾƳƴƄƵƵŽȚ Ǘƴů
A ǍƁnjƇů
•.ǃƄƶƵŽȚ Țnjƀ Ȳ
ȿ
NjƯů ȶȖ ǀƁȤƾƭƃŽȚ ǙƳƱů ǽ
.Ǎųȕ ȞȢƾŲ ƿƃƉŮ ȶȖ ȪǞƲƉŽȚ ƿƃƉŮ ǗƪƳƶů ǠƄŽȚ ǀƸƴųȚNjŽȚ ȔȚǎűLjȚ ǏƵƴů ǽ
.ȷǍųȖ ǀŮƾǧȘ ȶȖ ǀƸŮǍƷż ǀžNjǧ ȞȶNjŲ Ǡź ƿƃƉƄƁ NjŻ ȝƾŶƾƸƄŲǽȚ ȵnjƀ ȬƾƃůȚ ȳNjŸ
• ǚƫƱŮ Ț
ȹ
ȤǞź ǛƲź ȆȜȢƾƄƯž ǍƸŹ ljǣȚȶȤ ȶȖ ȜȤȚǍŲ ȶȖ ǃƄƶƵŽȚ ǜž ȴƾųȢ ȟȶǍų ǚƅž ǀƁȢƾŸ ǍƸŹ ȤǞžȖ ǀƁȖ ǁƮŲǽ ȚȣȘ
.ȚǍƸžƾƳŽƾŮ ȨƾƈŽȚ ǀŻƾƭŽȚ ȤNjƫž
.ǘƁǍŲ țǞƪſ ȶȖ ǀŮƾǧȂŽ ȩǍƯƄŽȚ ǟŽȘ ȳȚNjƈƄŴǽȚ Ǡź ȤȚǍƵƄŴǽȚ ȸȢƻƁ NjŻ
•.
ȹ
ƾźƾű ǝƸƴŸ ǔźƾŲ
.ǀƴƄƃž ȸNjƁƺŮ ǃƄƶƵŽȚ ǙƉƵů ǽ
.ǀƸŮǍƷż ǀžNjǧ ȶȖ ǘƁǍŲ țǞƪſ ǟŽȘ ȸȢƻƁ NjŻ ȝƾƷƸƃƶƄŽȚ ȵnjƀ ȬƾƃůȚ ȳNjŸ
•.ȲǞŴȶǍƁLjȚ ȶȖ ǜƸŽȶȥƾưŽȚ ȶȖ ȴƾŮȶǍƃŽȚ ǚƅž ȥƾŹ ȶȖ ȲƾƯƄŵǾŽ ǚŮƾŻ ȤƾƃŹ ȢǞűȶ Ǡź ǃƄƶƵŽȚ Țnjƀ ȳNjƈƄƉů ǽ
.ǘƁǍŲ ȶȖ ȤƾƆƱſȚ ȞȶNjŲ Ǡź ƿƃƉƄƁ NjŻ ȝƾƷƸƃƶƄŽȚ ȵnjƀ ȬƾƃůȚ ȳNjŸ
•.ǀŴNjƯŽȚ ȲǾų ǜž ǕŶƾŴ ȜȔƾǤȘ ȤNjƫž ȸȖ ȶȖ ȜǍŵƾƃž ǏƵƪŽȚ ǟŽȘ ǍƮƶů ǽ
.ǀƁǍƫŮ ǀŻƾŸȘ ǟŽȘ ȸȢƻƁ NjŻ ǝƸƃƶƄŽȚ Țnjƀ ȜƾŸȚǍž ȳNjŸ
•.ȲƾƱŶLjȚ ȲȶƾƶƄž ǜŸ NjƸƯŮ ǃƄƶƵŽȚ Țnjƀ ǔƱƇƁ
ȔȚǎűLjȚ ȴȖ ǔŲǽ ȆǙŽȣ ǟŽȘ ǀźƾǤȘ .ǃƄƶƵŽȚ ǚƭŸ Ǡź ȶȖ ǀŮƾǧȘ Ǡź ƿƃƉƄƁ NjŻ ȝƾƵƸƴƯƄŽȚ ȵnjƀ ȬƾƃůȚ ȳNjŸ
ȔƾűǍŮ ȆǃƄƶƵŽȚ Țnjƀ ȔȚǎűȖ ǜž Ȕǎű ȸȖ ǚƱŶ ȬǾƄŮȚ ǀŽƾŲ Ǡź .ȰƾƶƄųǽȚ ǍƭƈŽ ȩǍƯƄŽȚ Ǡź ƿƃƉƄů NjŻ ȜǍƸưƫŽȚ
.ȤǞƱŽȚ ǟƴŸ ƿƸƃŶ ȜȤƾƪƄŴȚ
•.Ț
ȹ
Njű ǀƬƱƈƶž ȶȖ Ț
ȹ
Njű ǀƸŽƾŸ ȜȤȚǍŲ ȝƾűȤNjŽ ǀǤǍƯƵŽȚ ǜżƾžLjȚ Ǡź ǀƁȤƾŸ ȸNjƁƺŮ ǝƉƵƴů ǽ
.ǕƸƲǧ ǀƵƬŻ ȶȖ ȝƾŻȶǍƇŮ ǀŮƾǧȁȚ ǟŽȘ ȸȢƻƁ NjŻ ǝƸƃƶƄŽȚ Țnjƀ ȬƾƃůȚ ȳNjŸ
A ǝƸƃƶů
•.ȷǍųȖ ǀƁǞŻ ȔǞǤ ȤȢƾƫž ȶȖ ǏƵƪŽȚ ǟŽȘ ǀƷűǞž ǀŴNjƯŽȚ ȱǍƄů ǽ
ȜȔƾǤȁȚ ȝȚȣ ȯȚNjƀLjȚ ǍƁǞƫů NjƶŸ .ǀƸƴųȚNjŽȚ ǃƄƶƵŽȚ ȔȚǎűLj ƾ
ȹ
Ʊƴů ȶȖ ƾ
ȹ
ƲƁǍŲ ǀŴNjƯŽȚ ǜž ǎżǍƵŽȚ ȔǞƬŽȚ ƿƃƉƁ NjŻ
ǏƵƪŽȚ ǁſƾż ȚȣȘ ȚǍƸžƾƳŽȚ ǚųȚȢ ǏƵƪŽȚ ȔǞǤ ǎƸżǍů ȸȢƻƁ NjŻ .ǍƁǞƫƄŽȚ ȤƾŶȘ ȟȤƾų ǏƵƪŽȚ ǚƯűȚ ȆǀƸƱƴƈŽȚ
.ǘƁǍŲ țǞƪſ ǟŽȘ ǍƁǞƫƄŽȚ ȤƾŶȘ ǜž ǀƃƁǍŻ ȶȖ ǚųȚȢ
• Ǡź ȶȖ ǀƲƴưž ȜȤƾƸŴ ǚƅž ȆǀƴƁǞŶ ȜǍƄƱŽ ǀƯƱůǍž ȜȤȚǍŲ ȝƾűȤNjŽ ƾƷƸź ȩǍƯƄƁ ǘŶƾƶž Ǡź ǃƄƶƵŽȚ ȱǍƄů ǽ
.ǍŵƾƃƵŽȚ ǏƵƪŽȚ ȔǞǤ
.ǃƄƶƵŽȚ ǚƭŸ ȶȖ ǘƁǍŲ Ǡź ƿƃƉƄƁ NjŻ ȝƾƵƸƴƯƄŽȚ ȵnjƀ ȬƾƃůȚ ȳNjŸ
•.ǀƷŮƾƪž ȝƾƲƇƴž ȸȖ ȶȖ ǚűȤLjȚ ǠŰǾŰ ǚžƾƇŽƾŮ ǀƃżǍž ȴǞƳů ƾžNjƶŸ ȝƾŴNjƯŽȚ ȶȖ ȝȚǍƸžƾƳŽȚ ǚƲƶŮ ǛƲů ǽ
.ǃƄƶƵŽȚ ǚƭŸ Ǡź ȶȖ ǀŮƾǧȘ Ǡź ƿƃƉƄƁ NjŻ ȝƾƵƸƴƯƄŽȚ ȵnjƀ ȬƾƃůȚ ȳNjŸ
ǀŴNjƯŽȚ ȳȚNjƈƄŴȚ
ǀŴNjƯŽȚ ȳȚNjƈƄŴȚ
ǗǣƾŷǞŽȚȶ ȔƾƵŴLjȚ :ǀŴNjƯŽȚ ȔȚǎűȖ
.ǀƇƱƫŽȚ ȵnjƀ ǜž ǍƉƁLjȚ ȯǍƭŽȚ ǟƴŸ ǠſƾƸƃŽȚ ǛŴǍŽȚ ǕűȚȤ
q
ǀŴNjƯŽȚ ǀƸŻȚȶ ƿƸżǍů ǀžǾŸ.ǀŴNjƯŽȚ ǀƸŻȚȶ ƿƸżǍů NjƶŸ ȳNjƈƄƉ
Ƚ
ů
D
ǍƮſȚ
w
ǠŶƾƭƵŽȚ ǙƃƪƵŽȚ——
e
ȸȤƻƃŽȚ ǎƸżǍƄŽȚ ǀƲƴŲ
.ȸȶNjƸŽȚ ȸȤƻƃŽȚ ǎƸżǍƄƴŽ ȳNjƈƄƉƁ
• ǎƸżǍƄŽȚ ǓƃǤ ǙƶƳƵƁ ȆǠǣƾƲƴƄŽȚ ȸȤƻƃŽȚ ǎƸżǍƄŽȚ ȔȚǍűȘ NjƶŸ
Ȥȥ ǟƴŸ ǓưƬŽȚ ȜƾŸȚǍž Ǖž ǀƲƴƇŽȚ ǍƁȶNjů ǘƁǍŶ ǜŸ ƾ
ȹ
ƁȶNjƁ
Ȥȥ ǟƴŸ ǓưǤȚ ȆǎƸżǍƄŽȚ NjƯŮ .ǗƫƄƶƵŽȚ ǟƄŲ ǘŽƾưŽȚ ǍƁǍƇů
.ȜȤǞǧ ȪƾƲƄŽǽ ǀƁƾƷƶŽȚ ǟŽȘ ǘŽƾưŽȚ ǍƁǍƇů
—
r
ǀŴNjƯŽȚ ȝƾžǞƴƯž ǀŲǞŽ
ǜž ƾƀǍƸŹȶ ȰƾƭƶŽȚ ǘƵŸȶ ȸȤƻƃŽȚ ǎƸżǍƄŽȚ ǀźƾƉž ȩǍŸ
.ȝƾžǞƴƯƵŽȚ
ȶ
B
ǍƮſȚ
C
t
ǛƳƇƄŽȚ ǀƲƴŲ
ǒƁǞƯů] ȶȖ [ǀƇƄź] ǚƅž ȝȚȢȚNjŸȁȚ ǓƃƬŽ ǀŴNjƯŽȚ ǍƁȶNjƄŮ ǛŻ
.ȚǍƸžƾƳŽȚ ȳȚNjƈƄŴƾŮ ǝƶƸƸƯů ǛƄƁ ȸnjŽȚ [ǠǣǞƬŽȚ ǒƁǍƯƄŽȚ
ǜƸƸƯů] Ǘǧȶ ǕűȚȤ ȆȝƾžǞƴƯƵŽȚ ǜž NjƁǎƵŽȚ ǟƴŸ ȲǞƫƇƴŽ
ǍǧƾƶŸ] ȶȖ [ǀƁȢƾƸƄŸǽȚ ǛƳƇƄŽȚ ǍǧƾƶŸ] ȶȖ [ȸȢƾƸƄŸǽȚ ǛƳƇƄŽȚ
.ȚǍƸžƾƳŽȚ ǚƸŽȢ Ǡź [(ǍƁǞƫƄŽȚ) ǀƁȢƾƸƄŸǽȚ ǛƳƇƄŽȚ
—
y
ǀŴNjƯŽȚ ƿƸżǍů ǀžǾŸ.ȚǍƸžƾƳŽȚ ǟƴŸ ǀŴNjƯŽȚ ƿƸżǍů NjƶŸ ȳNjƈƄƉ
Ƚ
ů
A
ǍƮſȚ
u
ƿƸżǍƄŽ ǀƸŶƾƭƵŽȚ ǀƸƪƇŽȚ
ǀŴNjƯŽȚ
——
i
CPU ȜNjŲȶ ǚƸǧǞů ȯȚǍŶȖ.ƾƷƸŽȘȶ ȚǍƸžƾƳŽȚ ǜž ȝƾſƾƸƃŽȚ ǚƲƶŽ ȳNjƈƄƉ
Ƚ
ů—
o
L-Fn ȤǎŽȚ
ȳȚNjƈƄŴƾŮ ƾƷƶƸƸƯů ǛƄƁ ǀƱƸŷȶ ȔȚǍűȁ ȤǎŽȚ Țnjƀ ǟƴŸ ǓưǤȚ
Ǘǧȶ ǕűȚȤ ȆȝƾžǞƴƯƵŽȚ ǜž NjƁǎƵŽȚ ǟƴŸ ȲǞƫƇƴŽ .ȚǍƸžƾƳŽȚ
ȶȖ [ǀƁȢƾƸƄŸǽȚ ǛƳƇƄŽȚ ǍǧƾƶŸ] ȶȖ [ȸȢƾƸƄŸǽȚ ǛƳƇƄŽȚ ǜƸƸƯů]
.ȚǍƸžƾƳŽȚ ǚƸŽȢ Ǡź [(ǍƁǞƫƄŽȚ) ǀƁȢƾƸƄŸǽȚ ǛƳƇƄŽȚ ǍǧƾƶŸ]
—
!0
ȩǍƯŽȚ Ȥȥ
ǀŲǞŽ ǟƴŸ ǀƇǤǞƵŽȚ ȝƾžǞƴƯƵŽȚ ǍƄųȚ ȶȖ ȝȚȢȚNjŸȁȚ ǔƱŲȚ
.ǀŴNjƯŽȚ ȝƾžǞƴƯž
ȶ
B
ǍƮſȚ
C
!1
ȸȤƻƃŽȚ ǎƸżǍƄŽȚ ǕǤȶ ȠƾƄƱž
.ȸȤƻƃŽȚ ǎƸżǍƄŽȚ ǕǤȶ Ǎ
ȼ
ƄųȚ
•ǠǣƾƲƴƄŽȚ ȸȤƻƃŽȚ ǎƸżǍƄŽȚ :A
•
ȸȶNjƸŽȚ ȸȤƻƃŽȚ ǎƸżǍƄŽȚ :M
ƿƆƁ ȆȵȤƾƸƄųȚ ǛƄƁ ȸnjŽȚ ȢȚNjŸȁȚ ǜŸ ǍƮƶŽȚ ǒưŮ ǝſȖ ǔŲǽ
ȸȤƻƃŽȚ ǎƸżǍƄŽȚ ǕǤȶ NjƁNjƇů NjƶŸ ƾ
ȹ
ƁȶNjƁ ȸȤƻƃŽȚ ǎƸżǍƄŽȚ ǓƃǤ
.ȚǍƸžƾƳŽƾŮ ǛƳƇƄŽȚ ǍǧƾƶŸ ȳȚNjƈƄŴƾŮ ȸȶNjƸŽȚ
—
!2
ǀŴNjƯŽȚ ǀƸŻȚȶ
ƿƃƉů NjŻ ǠƄŽȚ ȜǍŰƾƶƄƵŽȚ ȜȔƾǤȁȚ ǀŴNjƯŽȚ ȝƾƸŻȚȶ ƿƆƇů
.ǀŴNjƯƴŽ ǀƁƾƵŲ ǍźǞů ƾƵż .ȜȤǞƫŽȚ ȵǞƪů ȶȖ ǃƀǞƄŽȚ
D
ǍƮſȚ
!3
ǀŴNjƯŽȚ ǀƸŻȚȶ ǚƱŻ ǀžǾŸ
.ǀŴNjƯŽȚ ǀƸŻȚȶ ƿƸżǍů NjƶŸ ȳNjƈƄƉ
Ƚ
ů
!4
ǀŴNjƯŽȚ ǀƸŻȚȶ ǀžƾƲƄŴȚ ǀžǾŸ
!5
ǀŴNjƯŽȚ ǀƸŻȚȶ ǚƱŻ ǍƁǍƇů Ȥȥ.ǀŴNjƯŽȚ ǀƸŻȚȶ ǀŽȚȥȘ NjƶŸ ȳNjƈƄƉů
!6
(ǠžƾžȖ ȔƾƭŹ) ǀŴNjƯŽȚ ȔƾƭŹ——
!7
(ǠƱƴų ȔƾƭŹ) ǀŴNjƯŽȚ ȔƾƭŹ——
ǙƱŽȚȶ ƿƸżǍƄŽȚ
A
ǀŴNjƯŽȚ ƿƸżǍů
.ǠƱƴƈŽȚ ǀŴNjƯŽȚ ȔƾƭŹ Ǚź ǛŰ ȆǛƉƆŽȚ ȔƾƭŹ ȲȥȖȶ ȆȚǍƸžƾƳŽȚ ǚƸưƪů ȯƾƲƁƼŮ ǛŻ
z
ǀžǾŸ ȜȚȣƾƇƵŮ ǀŴNjƯŽȚ ǟƴŸ ƿƸżǍƄŽȚ ǀžǾŸ ȴǞƳů ȴȖ ȜƾŸȚǍž Ǖž ȆȚǍƸžƾƳŽȚ ǛƉű ǟƴŸ ǀŴNjƯŽȚ ǕǤ
x
Ǡź ǁƃƅů ǟƄŲ ǀŸƾƉŽȚ țȤƾƲŸ ȵƾƆůȚ ǏƳŸ ǀŴNjƯŽȚ ǍƁȶNjƄŮ ǛŻ ǛŰ ȆȚǍƸžƾƳŽȚ ǛƉű ǟƴŸ ƿƸżǍƄŽȚ
.ƾƷſƾƳž
ǀŴNjƯŽȚ Ȭǎſ
.ȚǍƸžƾƳŽȚ ǚƸưƪů ȯƾƲƁƼŮ ǛŻ
z
.ǀŸƾƉŽȚ țȤƾƲŸ ȵƾƆůȚ Ǡź ǀŴNjƯŽȚ ǍƁȶNjů Ǖž ǀŴNjƯŽȚ ǍƁǍƇů Ȥȥ ǟƴŸ ȤȚǍƵƄŴƾŮ ǓưǤȚ
x
ǀŴNjƯŽȚ ȝƾžǞƴƯž ǀŲǞŽ
B
.ǚƸưƪƄŽȚ NjƸŻ ȚǍƸžƾƳŽȚ ȴǞƳů ƾƵƶƸŮ ȚǍƸžƾƳŽȚ ǟƴŸ ǀŴNjƯŽȚ ƿƸżǍů ǛƄƁ ƾžNjƶŸ ǀŴNjƯŽȚ ȝƾžǞƴƯž ǀŲǞŽ ȔǠƬů
•:ljǤǞž Ǟƀ ƾƵż ǀŵƾƪŽȚ ǍƁǍƵƄŽ ǀŴNjƯŽȚ ȩǍŸ Ȥȥ ǟƴŸ ǓưǤȚ
2
ǀƇƄƱŽȚ
1
ȰƾƭƶŽȚ ǘƵŸ
ȸȤƻƃŽȚ ǎƸżǍƄŽȚ ǀźƾƉž
.
M
ȶȖ
A
ǕǤǞŽȚ Ǡź ȚǍƸžƾƳŽȚ ȴǞƳů ƾžNjƶŸ ȰƾƭƶŽȚ ǘƵŸ ȩǍƯ
Ƚ
Ɓ 1
.
M
ȶȖ
A
ǕǤǞŽȚ Ǡź ȚǍƸžƾƳŽȚ ȴǞƳů ƾžNjƶŸ ǽȘ ǀƇƄƱŽȚ ȩǍŸ ǛƄƁ ǽ 2
.ǠſƾƸƃŽȚ ǛŴǍŽȚ ǟƴŸ ȷǍųLjȚ ȬƾǤȶLjȚ ǀŵƾŵ
• ǎƸżǍƄŽȚ ǕǤȶ ȠƾƄƱž ȳȚNjƈƄŴƾŮ ȵȤƾƸƄųȚ ǛƄƁ ƾžNjƶŸ ȜǎűǞž ȜǍƄƱŽ (MF ȶȖ AF) ȸȤƻƃŽȚ ǎƸżǍƄŽȚ ǕǤȶ ȩǍŸ ǛƄƁ
.ȸȤƻƃŽȚ
• ȸȖ ȔȚǍűȘ ǛƄƁ ǽ ƾžNjƶŸ ȶȖ ȚǍƸžƾƳƴŽ ȢȚNjƯƄŴǽȚ ǁŻƻž ȜNjž ǠƷƄƶů ƾžNjƶŸ ƾ
ȹ
ƸǣƾƲƴů ǀŲǞƴŽȚ ǚƸưƪů ǗŻǞƄƸŴ
.ǀŵƾƪŽȚ ǓƸƪƶů ȜȢƾŸȁ ȩǍƯŽȚ Ȥȥ ǟƴŸ ǓưǤȚ .ƾ
ȹ
ƃƁǍƲů ǠſȚǞŰ 10 ȜNjƵŽ ǀŴNjƯƴŽ ǀƸƴƵŸ
A ǀŴNjƯŽȚ ȝƾžǞƴƯž ǀŲǞŽ
ǀŴNjƯŽȚ ȝƾžǞƴƯž ǀŲǞŽ ǟƴŸ ǀƇǤǞƵŽȚ ȝƾžǞƴƯƵŽȚ ǜž ƾƀǍƸŹȶ ȰƾƭƶŽȚ ǘƵŸȶ ȸȤƻƃŽȚ ǎƸżǍƄŽȚ ǀźƾƉž
.ǓƲź ǀƸƃƁǍƲů
A ǛƮƄƶž ǍƸŹ ǝƸżǞŮ
ǗƸƱƈů ǜƳƵƁ .ǀƬƁǍƯŽȚ ȝƾƇƄƱŽȚ ȶȖ/ȶ ǀƸŽƾƯŽȚ ǘŽƾưŽȚ ȝƾŸǍŴ ȷNjŽ ǝƸżǞŮ ǚƳŵ ȳƾƮƄſȚ ȳNjŸ ǔŲǾů NjŻ
.ǟƴŸȖ ǀƁȤƻŮ ȳƾŻȤȖ ȶȖ/ȶ ǟſȢȖ ǘŽƾŹ ȝƾŸǍŴ ȤƾƸƄųȚ ǘƁǍŶ ǜŸ ǍƸŰƺƄŽȚ ǙŽȣ ȜƺŶȶ
ǀŲǞƴŽȚ ȝȚȤƾƸų
C
ȸȤƻƃŽȚ ǎƸżǍƄŽȚ ǀźƾƉž ȦƾƸŻ ȝȚNjŲǞż (ft) ȳȚNjŻLjȚȶ (m) ȤƾƄžLjȚ ǜƸŮ ȤƾƸƄųǾŽ ǠƴƁ ƾƵƸź ǀƇǤǞƵŽȚ ȝȚǞƭƈŽȚ ǕƃůȚ
.ǀŴNjƯŽȚ ȝƾžǞƴƯž ǀŲǞŽ ȬǞƭŴ ǓƃǤȚ ȶȖ
.ȝȚȢȚNjŸȁȚ ȩǍƯŽ ȩǍƯŽȚ Ȥȥ ǟƴŸ ȤȚǍƵƄŴƾŮ ǓưǤȚ
z
•.ƾ
ȹ
ƸŽƾŲ ȢNjƇƵŽȚ ǍƫƶƯŽȚ ȔǠƬƁ ȯǞŴ .ȬǞƭƉŽȚ NjƁNjƇů ȝȚȤƾƸų ȶȖ ȦƾƸƲŽȚ ȜNjŲȶ ȩǍŸ ǛƄƁ ȯǞŴ
•.ȝƾŵƾƪŽȚ ǜƸŮ ǚƁNjƃƄƴŽ ȩǍƯŽȚ Ȥȥ ǟƴŸ ǓưǤȚ
ȦƾƸƲŽȚ ȝȚNjŲȶȬǞƭƉŽȚ
.ǀŴNjƯŽƾŮ ǀǧƾƈŽȚ ǛƳƇƄŽȚ ǀƲƴŲ ȳȚNjƈƄŴƾŮ Ț
ȹ
ȢȚNjŸȘ ǍƄųȚ
x
ȦƾƸƲŽȚ ȝȚNjŲȶ
- .(ft) ȳȚNjŻLjȚȶ (m) ȤƾƄžLjȚ ǜƸŮ ȤƾƸƄųǾŽ ǛƳƇƄŽȚ ǀƲƴŲ ȤȶȢ
ȬǞƭƉŽȚ
- "ʼn" ȶȖ (ƾ
ȹ
ŸǞƭŴ ǍƅżȖ) "+" ȵƾƆůǽȚ Ǡź ǛƳƇƄŽȚ ǀƲƴŲ ȤȶȢ
.(ƾ
ȹ
ŸǞƭŴ ǚŻȖ)
- .ȬǞƭƉƴŽ ȝƾƁǞƄƉž 6 ǜƸŮ ǜž ǍƄųȚ
- Ǡź ǀƲƴƇŽȚ ȤȶȢ ȆǀŴNjƯŽȚ ȝƾžǞƴƯž ǀŲǞŽ ǚƸưƪů ȯƾƲƁȁ
.
ǟŽȘ ǀſǞƲƁLjȚ ǍƸưƄů ǟƄŲ "ʼn" ȵƾƆůǽȚ
•.ȝƾŵƾƪŽȚ ǜƸŮ ǚƁNjƃƄŽȚȶ ȝȚǍƸƸưƄŽȚ ǔƱƇŽ ȩǍƯŽȚ Ȥȥ ǟƴŸ ǓưǤȚ
• ǛƄƁ ȯǞƉź Ȇƾ
ȹ
ƃƁǍƲů ǠſȚǞŰ 5 ȜNjƵŽ ǀŴNjƯŽƾŮ ǛƳƇƄŽȚ ǍǧƾƶŸ ȳȚNjƈƄŴƾŮ ǀƸƴƵŸ ȸȖ njƸƱƶů ǛƄƁ ǛŽ ȚȣȘ
.ȝȚǍƸƸưů ȸȖ ȴȚNjƲź ǛƄƸŴ .ǀŵƾƪŽȚ ǜž ǀŲǞƴŽȚ ȝȚȤƾƸų ljƉž
.ǀŴNjƯŽȚ ȝƾžǞƴƯž ǀŵƾŵ ǟŽȘ ȜȢǞƯƴŽ ȤȚǍƵƄŴǽȚ Ǖž ȩǍƯŽȚ Ȥȥ ǟƴŸ ǓưǤȚ
c
• ȆȚ
ȹ
ȢNjƆž ǀŴNjƯŽȚ ǚƸưƪƄŽ .ǀŴNjƯŽȚ ȝƾžǞƴƯž ǀŲǞŽ ǚƸưƪů ȯƾƲƁȘ ǟŽȘ ȬǞƭƉƴŽ ȤƾƸƄųȚ ȸȢƻƁ
.ȤȚǍƵƄŴǽȚ Ǖž ȩǍƯŽȚ Ȥȥ ǟƴŸ ǓưǤȚ
ǀŴNjƯŽȚ ǀƸŻȚȶ ǀŽȚȥȘȶ ƿƸżǍů
D
ǀŴNjƯŽȚ ǀƸŻȚȶ ƿƸżǍů
• ǀƸŻȚȶ ǍƁȶNjƄŮ ǛŻ ǛŰ Ȇ(
q
) ǀŴNjƯŽȚ ǀƸŻȚȶ ǀžƾƲƄŴȚ ǀžǾŸ Ǖž ǀŴNjƯŽȚ ǀƸŻȚȶ ƿƸżǍů ǀžǾŸ ȜȚȣƾƇƵŮ ǛŻ
.(
e
) ǀŴNjƯŽȚ ǀƸŻȚȶ ǚƱŻ ǀžǾŸ Ǖž ƿƸżǍƄŽȚ ǀžǾŸ ȷȣƾƇƄů ǟƄŲ (
w
) ǀŴNjƯŽȚ
ǀŴNjƯŽȚ ǀƸŻȚȶ ǚƱŻ ǀžǾŸ
ǀŴNjƯŽȚ ǀƸŻȚȶ ƿƸżǍů ǀžǾŸ
ǀžƾƲƄŴȚ ǀžǾŸ
ǀŴNjƯŽȚ ǀƸŻȚȶ
• ǀƸŻȚȶ ǍƁȶNjů NjƶŸ .ƾƷƄŽȚȥȘ ȶȖ ǀŴNjƯŽȚ ǀƸŻȚȶ ƿƸżǍů ǀŮǞƯǧ ǟŽȘ NjƁNjŵ ȳƾƳŲƼŮ ǠžƾžLjȚ ȔǎƆŽƾŮ ȱƾƉžȁȚ ȸȢƻƁ
.ƾƷůNjŸƾŻ ǟƴŸ (●) ǀŴNjƯŽȚ ǀƸŻȚȶ ǀžƾƲƄŴȚ ǀžǾŸ ǜž țǍƲŽƾŮ ƾƷŮ ǙƉžȖ ȆǀŴNjƯŽȚ
•.ȳȚNjƈƄŴǽȚ ȳNjŸ ǀŽƾŲ Ǡź ǀŴNjƯŽȚ ǟƴŸ ƾƷƃƸżǍůȶ ǀŴNjƯŽȚ ǀƸŻȚȶ ƿƴŻ ǜƳƵƁ
ǀŴNjƯŽȚ ǀƸŻȚȶ ǀŽȚȥȘ
• ȵƾƆůǽȚ Ǡź ǀŴNjƯŽȚ ǀƸŻȚȶ ǍƁȶNjƄŮ ǛŻ Ȇ(
q
) ǀŴNjƯŽȚ ǀƸŻȚȶ ǚƱŻ ǍƁǍƇů Ȥȥ ǟƴŸ ȤȚǍƵƄŴƾŮ ǓưƬŽȚ ȜƾŸȚǍž Ǖž
.(
e
) ǀŴNjƯŽȚ ǜž ƾƷƄŽȚȥƼŮ ǛŻȶ Ȇ(
w
) ljǤǞƵŽȚ
ǀŴNjƯŽȚ ǀƸŻȚȶ ǚƱŻ ǍƁǍƎ Ȥȥ
•.ǀŴǞƳƯž ǀŴNjƯŽȚ ǀƸŻȚȶ ȴǞƳů ƾžNjƶŸ ǝƉƱſ ȔȚǍűȁȚ ȬƾƃůȚ ǜƳƵƁ
ǀ
dž
ƃżǍž ǀŴNjƯŽȚ ȴǞƳů ƾžNjƶŸ
ȝǎ
dž
żȤ NjŻ ǁƶż ȚȣȘ .ǎƸżǍƄŽȚ NjƯŮ ȷǍųȖ ȜǍž ƾƷƴƸưƪů ȜȢƾŸȘ ǛŰ ȚǍƸžƾƳŽȚ ǚƸưƪů ȯƾƲƁƼŮ ǁƵŻ ȚȣȘ ȸȤƻƃŽȚ ǎƸżǍƄŽȚ ǕǤǞž Ǎ
dž
ƸưƄƁ NjŻ
.ȜȤǞƫŽȚ ǓƲƄƴů ǟƄŲ ȚǍƸžƾƳŽȚ ǚƸưƪů ȯƾƲƁȘ ȳNjƯŮ ǙƇƫƶſ ǜƇſ ȆǙźNjƀ ȤǞƷŷ ȤƾƮƄſȚ ȔƾƶŰȖ ƾ
ȹ
ƲƃƉž Ȣ
dž
NjƇž ǕŻǞž ǟƴŸ
ǠǣƾƲƴƄŽȚ ȸȤƻƃŽȚ ǎƸżǍƄŽȚ ȜNjŸƾƉž ȔǞǤ Ǖž ȝȚǍƸžƾż
.ȚǍƸžƾƳƴŽ ǠǣƾƲƴƄŽȚ ȸȤƻƃŽȚ ǎƸżǍƄŽȚ ȜNjŸƾƉž ȔǞǤ ǜž ȔǞƬŽȚ ǀŴNjƯŽȚ ǀƸŻȚȶ ȶȖ ǀŴNjƯŽȚ ƿƆƇů
• ȸȤƻƃŽȚ ǎƸżǍƄŽȚ ȜNjŸƾƉž ȔȚǞǤȖ ƾƷƁNjŽ ȝȚǍƸžƾż Ǖž ǀŴNjƯŽȚ ȳȚNjƈƄŴȚ ǜŸ ȝƾžǞƴƯƵŽȚ ȞNjŲȖ ǟƴŸ ȲǞƫƇƴŽ
.ǠŽƾƄŽȚ ǕŻǞƵŽȚ ȜȤƾƁǎŮ ǛŻ ȆǠƴųȚNjŽȚ ǠǣƾƲƴƄŽȚ
https://downloadcenter.nikonimglib.com/
ǠƴųȚȢ ȧǾƱŮ ȜȢȶǎƵŽȚ ȝȚǍƸžƾƳŽȚ Ǖž ǀŴNjƯŽȚ ȳȚNjƈƄŴȚ
ǀŴNjƯŽȚ ǀƸŻȚȶ ȲȥȖ .ǀŴNjƯŽȚ ǀƸŻȚȶ ȶȖ ǀŴNjƯŽȚ ƿƃƉŮ ǠƴųȚNjŽȚ ȧǾƱŽȚ ȔǞǤ ƿƆŲ ȲƾŲ Ǡź ȤǞƫŽȚ Ǡź ȲǾƮŽȚ ǍƷƮů
ǍƷƮů NjŻ ȆȯNjƷŽȚ ƾƷƶŸ NjƯƃƁ ǠƄŽȚ ǀźƾƉƵŽȚȶ ǀŴNjƯƴŽ ȸȤƻƃŽȚ ȲǞƭŽȚ ǟƴŸ Ț
ȹ
ȢƾƵƄŸȚ ȴȖ ǔŲǽ ǜƳŽȶ ȆǍƁǞƫƄŽȚ ǚƃŻ
.ǀŴNjƯŽȚ ǀƸŻȚȶ ǀŽȚȥȘ NjƶŸ ǟƄŲ ȲǾƮŽȚ
•.Z 50 ǟƴŸ ǀŴNjƯŽȚ ȵnjƀ ƿƸżǍů NjƶŸ ƾƷŶƾƲƄŽȚ ǛƄƁ ǠƄŽȚ ȤǞƫŽȚ Ǡź ȲǾƮŽȚ ǍƷƮů ȯǞŴ
• ǠƄŽȚ ȤǞƫŽȚ Ǡź ȲǾƮŽȚ ƾƷƸź ǍƷƮů ǽ ǠƄŽȚ ȯNjƷŽȚ ȝƾźƾƉžȶ ǀƁȤƻƃŽȚ ȲȚǞŶLjȚ ǜŸ ȝƾžǞƴƯƵŽȚ ȞNjŲȖ ǟƴŸ ȲǞƫƇƴŽ
.ǠŽƾƄŽȚ ǕŻǞƵŽȚ ȜȤƾƁǎŮ ǛŻ ȆǠƴųȚȢ ȧǾź ȳȚNjƈƄŴƾŮ ƾƷŶƾƲƄŽȚ ǛƄƁ
https://downloadcenter.nikonimglib.com/
ȳȚNjƈƄŴǽȚ ȝƾŶƾƸƄŲȚ
ȳȚNjƈƄŴǽȚ ȝƾŶƾƸƄŲȚ
•.ǓƲź ǀŴNjƯŽȚ ǀƸŻȚȶ ȶȖ ǀŴNjƯŽȚ ǀƸƭŹȖ ȳȚNjƈƄŴƾŮ ȚǍƸžƾƳŽȚ ȶȖ ǀŴNjƯŽȚ ǙƉƵů ȶȖ ǓƲƄƴů ǽ
•.CPU ȜNjŲȶ ǚƸǧǞů ȯȚǍŶȖ ǀźƾƮſ ǟƴŸ ǔźƾŲ
• ǎżǍž ǟŽȘ ǀŴNjƯŽƾŮ ǝűǞůȶ ȜǍŵƾƃž ȲƾƵƯƄŴǽȚ ǜŸ ǗŻǞů ȆǀŴNjƯŽȚ ƿƸżǍƄŽ ǀƸŶƾƭƵŽȚ ǀƸƪƇŽȚ Ǘƴů ǀŽƾŲ Ǡź
.ǀſƾƸƫƴŽ NjƵƄƯž ȴǞƳƸſ ǀžNjų
•.ǀŴNjƯŽȚ ȳȚNjƈƄŴȚ ȳNjŸ NjƶŸ ȷǍųȖ ȜǍž ǀŴNjƯŽȚ ǀƸƭŹȖ ǕǤ
• ǀƸƴųȚNjŽȚ ǚƵƯŽȚ ǀƸŽȕ ȖNjǧ ƿƃƉƄƁ NjŻ .ȜȶȚNjƶƴŽ ǀǤǍƯž ƾƷƸź ȴǞƳů ǕŻȚǞž Ǡź ȶȖ ǀƃŶȤ ǕŻȚǞž Ǡź ǀŴNjƯŽȚ ȱǍƄů ǽ
.ǝŲǾǧȘ ǜƳƵƁ ǽ Ǘƴů ȬǞŻȶ Ǡź
• ȜNjƁNjƪŽȚ ȜȤȚǍƇŽȚ ȸȢƻů NjŻ .ȜȤȚǍƇŽȚ ȜNjƁNjŵ ǕŻȚǞƵŽȚ ǜž ƾƀǍƸŹ ȶȖ ǀźǞƪƳƵŽȚ ǀƃƷŽLjȚ ƿſƾű ǟŽȘ ǀŴNjƯŽȚ ȱǍƄů ǽ
.ǝƱƴů ȶȖ ȷǞƲƵŽȚ ǙƸƄŴǾƃƴŽ ǠűȤƾƈŽȚ ȔǎƆŽȚ ȔȚǞƄŽȚ ǟŽȘ
•
ǀƂƸŮ ǜž ǀŴNjƯŽȚ ǚƲſ ǚƃŻ .ƾƷűȤƾųȶ ǀŴNjƯŽȚ ǚųȚȢ ȤƾǤ ǗƸƅƳů ǟŽȘ ȜȤȚǍƇŽȚ ȝƾűȤȢ Ǡź ǀƯƁǍƉŽȚ ȝȚǍƸưƄŽȚ ȸȢƻů NjŻ
.ȜȤȚǍƇŽȚ ǀűȤȢ Ǡź ǍƸưƄŽȚ ȔƾƭŮȁ ǙƸƄŴǾƃŽȚ ǜž ǀŸǞƶƫž ǀƃƸƲŲ Ǡź ȶȖ ǏƸż Ǡź ƾƷƯǤ ȆǏƳƯŽȚ ȶȖ ȜȢȤƾŮ ǀƂƸŮ ǟŽȘ ȜȤƾŲ
•.ƾƷƴƲſ NjƶŸ ȝƾŵNjƈŽȚ ǜž ƾƷƄƁƾƵƇŽ ƾƷƄƃƸƲŲ Ǡź ǀŴNjƯŽȚ ǕǤǞŮ ǙƇƫƶſ ǜƇſ
ǀŴNjƯŽƾŮ ǀƁƾƶƯŽȚ
ǀŴNjƯŽƾŮ ǀƁƾƶƯŽȚ
•
.ǀŴNjƯƴŽ ǀƸűƾűǎŽȚ ljƭŴLjȚ ǗƸƮƶƄŽ ƾ
ȹ
Ƹźƾż ȜȢƾŸ ȴǞƳƁ ȤƾƃưŽȚ ǀŽȚȥȘ
• ǀƯƭŻ ȳȚNjƈƄŴƾŮ ǀŴNjƯŽȚ ljƭŴ ǟƴŸ ǜž ǀƸƄƁǎŽȚ ǕƲƃŽȚ ǜž ǙŽȣ ǍƸŹȶ ǕŮƾǧLjȚ ȝƾƵƫŮȶ ȝƾƈƭ
dž
ƴŽȚ ǀŽȚȥȘ ǜƳƵƁ
ǜž ȜǍƸưǧ ǀ
dž
ƸƵƳŮ
ȹ
ǾƸƴŻ ǚ
ȿ
ƴƃž ȷǍųȖ ǀżǍŵ ȟƾƄſȘ ǜž ȝƾŴNjŸ ǗƸƮƶů ǚƁNjƶž ȶȖ ǀƱƸƮſȶ ǀƵŸƾſ ǀ
dž
ƸƶƭŻ ȧƾƵŻ
Ǖž ȆǀƁǍǣȚȢ ǀżǍŲ ȳȚNjƈƄŴƾŮ ȟȤƾƈŽȚ ǟŽȘ ǎżǍƵŽȚ ǜž
ȹ
ȔȚNjƄŮȚ ǘźǍŮ ƾƷƇƉƵŮ ǛŻ .ȝƾŴNjƯŽȚ ǗƸƮƶů ǚǣƾŴ ȶȖ ȲǞſƾƅƁȁȚ
.ǙƯŮƾǧƺŮ ǀŴNjƯŽȚ ǏƵŽ ȳNjŸȶ ȝƾƈƭŽ ȸȖ ǗƸƴƈů ȳNjŸ ȜƾŸȚǍž
•.ǀŴNjƯŽȚ ǗƸƮƶů ȩǍưŮ ǜƁǎƶƃŽȚ ȶȖ ȴƾƀNjŽȚ ǗƱƈž ǚƅž ȸǞƬŸ ƿƁnjž
ȹ
ȚNjŮȖ ȳNjƈƄƉů ǽ
•.ǀƸžƾžLjȚ ǀŴNjƯŽȚ ǍƫƶŸ ǀƁƾƵƇŽ ǝŮƾŵ ƾžȶ (NC) NjƁƾƇƵŽȚ ȴǞƴŽȚ ȝƾƇŵǍž ȳȚNjƈƄŴȚ ǜƳƵƁ
• ǀŴNjƯŽȚ ȳȚNjƈƄŴȚ ǛƄƁ ǜŽ ǀŽƾŲ Ǡź .ǍŵƾƃƵŽȚ ǏƵƪŽȚ ȔǞǤ Ǡź ȶȖ ǝƄƯŽȚ ȤǞźƾż ȝȚǍż ȶȖ ƾƄźƾƶŽȚ ȜȢƾž Ǖž ƾƷſǎƈů ǽ
.ȖNjǧ ȶȖ ǜƱŸ ȴǞƳů ƿƶƆƄŽ ȯƾűȶ ȢȤƾŮ ȴƾƳž Ǡź ƾƷŮ ǔƱƄŲȚ ȆȜNjƄƵž ȜǍƄƱŽ
ȝƾƸŽƾƵƳŽȚ
ȝƾƸŽƾƵƳŽȚ
ǀƲźǍƵŽȚ ȝƾƸŽƾƵƳŽȚ
•(ǠžƾžȖ ȔƾƭŹ) LC-82B ǀŴNjƯŽȚ ȔƾƭŹ
•(ǠƱƴų ȔƾƭŹ) LF-N1 ǀŴNjƯŽȚ ȔƾƭŹ
•HB-94 ǀŴNjƯŽȚ ǀƸŻȚȶ
•CL-C2 ǀŴNjƯŽȚ ǀƃƸƲŲ
D ǀŴNjƯŽȚ ǀƃƸƲŲ ȳȚNjƈƄŴȚ
•.ȷǍųȖ ǀƁNjƉű ȝƾžNjǧ ȸȖ ȶȖ ȬǞŻǞŽȚ ǜž ǏƸŽȶ ȆȝƾŵNjƈŽȚ ǜž ǀŴNjƯƴŽ ǀƁƾƵŲ ǍƸźǞƄŽ ǀƃƸƲƇŽȚ ȢȚNjŸȘ Ǜů
•.ȔƾƵƴŽ ǀžȶƾƲž ǁƉƸŽ ǀƃƸƲƇŽȚ
•.ƾƷƴƴƃů ȶȖ ƾƷƳŽȢ NjƶŸ ƾƷſǞŽ ǍƸưƄƁ ȶȖ ȯǎƶƄƉů ȶȖ ǀƃƸƲƇŽȚ Ǡź ǀžNjƈƄƉƵŽȚ ȢȚǞƵŽȚ ǟŵǾƄů NjŻ
•.ǀƵŸƾſ ȜƾŵǍź ȳȚNjƈƄŴƾŮ ȤƾƃưŽȚ ǀŽȚȥƼŮ ǛŻ
• ȶȖ ȲǞƇƳŽȚ ȳNjƈƄƉů ǽ .ǀźƾűȶ ǀƵŸƾſ ȧƾƵŻ ǀƯƭŻ ȳȚNjƈƄŴƾŮ ljƭƉŽȚ ǜž ȝƾƈƭ
dž
ƴŽȚȶ ȔƾƵŽȚ ǀŽȚȥȘ ǜƳƵƁ
.ȷǍųȖ ȜȤƾƸŶ ǀƸǣƾƸƵƸż ȢȚǞž ȸȖ ȶȖ ȴƾƀNjŽȚ ǗƱƈž ȶȖ ǜƁǎƶƃŽȚ
•.ǀŮǞŶǍŽȚ ȶȖ ȜȤȚǍƇŽȚ ǜž ǀƸŽƾŸ ȝƾűȤNjŽ ȶȖ ǍŵƾƃƵŽȚ ǏƵƪŽȚ ȔǞƬŽ ǀǤ
dž
ǍƯž ǜżƾžȖ Ǡź ǝƮƱƇů ǽ
•.ǀŴNjƯŽȚ ǍǧƾƶŸ ȶȖ ǀŵƾƪŽȚ ǗƸƮƶƄŽ ǀƃƸƲƇŽȚ ȳNjƈƄƉů ǽ
•.ǚ
LJ
ƲƶƄŽȚ ȔƾƶŰȖ ǀƃƸƲƇŽȚ ǜž ǀŴNjƯŽȚ ȬǞŻȶ ȳNjŸ ǟƴŸ ȨǍŲȚ
ǍƄƉƸŽǞƃŽȚ :ȧƾƵƲŽȚ
ǀƲźȚǞƄƵŽȚ ȝƾƸŽƾƵƳŽȚ
Ǜž 82 ǍƭŻ ǀƸƃŽǞŽ ǀŴNjƯƴŽ ȝƾƇŵǍž
D ȝƾƇŵǍž
• .ȜNjŲ ǟƴŸ Ț
ȹ
NjŲȚȶ ƾ
ȹ
Ƈ
Ʀ
ŵǍž ȳNjƈƄŴȚ
•.ȸǍǣȚNjŽȚ țƾƭƲƄŴǽȚ ȝƾƇŵǍž ǍƁȶNjů ȶȖ ȝƾƇŵǍƵŽȚ ƿƸżǍů ǚƃŻ ǀŴNjƯŽȚ ǀƸŻȚȶ ǀŽȚȥƼŮ ǛŻ
ȝƾƱǧȚǞƵŽȚ
ȝƾƱǧȚǞƵŽȚ
ƿƸżǍƄŽȚ
ƿƸżǍƄŽȚ Nikon Z ƿƸżǍů
ȸȤƻƃŽȚ ȲǞƭŽȚ
ȸȤƻƃŽȚ ȲǞƭŽȚ
Ǜž 50
ǀƇƄƱƴŽ ǟƫŻLjȚ NjƇŽȚ
ǀƇƄƱƴŽ ǟƫŻLjȚ NjƇŽȚ
f/1.2
ǀŴNjƯŽȚ ǜƁǞƳů
ǀŴNjƯŽȚ ǜƁǞƳů
ǝƃŵ ǍǧƾƶŸ 3ȶ ED ǀŴNjƯŮ ǍƫƶŸ 2 ǟƴŸ ǚƵƄƪů) ǀŸǞƵƆž 15 Ǡź ǍƫƶŸ 17
(ARNEO ȝƾƲƃŶȶ ǘƸŻNjŽȚ ȲƾƄƉƁǍƳŽȚ ǀƲƃƭŮ ǍǧƾƶŸȶ ǀƁȶǍż
ȜȤǞƫŽȚ ǀƁȶȚȥ
ȜȤǞƫŽȚ ǀƁȶȚȥ
•°47 :FX ǀưƸǧ
•c30 °31 :DX ǀưƸǧ
ȸȤƻƃŽȚ ǎƸżǍƄŽȚ ȳƾƮſ
ȸȤƻƃŽȚ ǎƸżǍƄŽȚ ȳƾƮſǠƴųȚNjŽȚ ȸȤƻƃŽȚ ǎƸżǍƄŽȚ ȳƾƮſ
ǎƸżǍƄŽȚ ǀźƾƉƵŽ ǟſȢLjȚ NjƇŽȚ
ǎƸżǍƄŽȚ ǀźƾƉƵŽ ǟſȢLjȚ NjƇŽȚǀƁȤƻƃŽȚ ǀźƾƉƵŽȚ ǀžǾŸ ǜž ȳ 0.45
ǟƫŻLjȚ ȟƾƄſȁȚ ȜȢƾŸȘ ȲNjƯž
ǟƫŻLjȚ ȟƾƄſȁȚ ȜȢƾŸȘ ȲNjƯž×0.15
ǀƇƄƱŽȚ ƿűƾŲ ȝȚǍƱŵ
ǀƇƄƱŽȚ ƿűƾŲ ȝȚǍƱŵ(ǀƁǍǣȚȢ ƿűƾŲ ǀƇƄź) 9
ǀƇƄƱŽȚ Ȱƾƭſ
ǀƇƄƱŽȚ Ȱƾƭſ 16 – f/1.2
ljŵǍƵŽȚ ǍƭŻ ȦƾƸŻ
ljŵǍƵŽȚ ǍƭŻ ȦƾƸŻ(Ǜž 0.75=P) Ǜž 82
ȢƾƯŮLjȚ
ȢƾƯŮLjȚ
ǜž ǀŴNjƯŽȚ ǀƁƾƷſ ǟƄŲ ǀźƾƉƵŽȚ)
ȹ
ƾƃƁǍƲů Ǜž 150 × ǍƭŻ ǟƫŻȖ Ǜž 89.5
(ȚǍƸžƾƳŽȚ ǟƴŸ ǀŴNjƯŽȚ ƿƸżǍů ǀƱŵ
ȴȥǞŽȚ
ȴȥǞŽȚ
ȹ
ƾƃƁǍƲů Ǜű 1090
.ǘƃƉž ȤƾƭųȘ ȴȶNjŮȶ ǁŻȶ ȸȖ Ǡź ǃƄƶƵŽȚ ȚnjƷŮ ȨƾƈŽȚ ȔȚȢLjȚȶ ȝƾƱǧȚǞƵŽȚȶ ǍƷƮƵŽȚ ǍƸƸưů Ǡź ǘƇŽƾŮ ȴǞƳƸſ ǔƱƄƇů
-
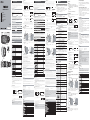 1
1
-
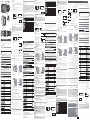 2
2


Nikon NIKKOR Z 50mm f/1.2 S Manual do usuário
- Categoria
- Lentes de câmera
- Tipo
- Manual do usuário
em outros idiomas
Artigos relacionados
-
Nikon NIKKOR Z 70-180mm f/2.8 Guia de referência
-
Nikon NIKKOR Z 50mm f/1.2 S Manual do usuário
-
-
-
Nikon AF-S NIKKOR 24-70mm f/2.8E ED VR Manual do usuário
-
Nikon NIKKOR Z 58mm f/0.95 S Noct Manual do usuário
-
-
-
-