Hamilton Beach 33365 Manual do usuário
- Categoria
- Fogões lentos
- Tipo
- Manual do usuário
Este manual também é adequado para

READ BEFORE USE
LIRE AVANT UTILISATION
LEA ANTES DE USAR
Visit www.hamiltonbeach.com for our
complete line of products and Use and
Care Guides – as well as delicious recipes,
tips, and to register your product online!
Rendez-vous sur www.hamiltonbeach.ca
pour notre liste complète de produits et de
nos manuels utilisateur – ainsi que nos
délicieuses recettes, nos conseils et pour
enregistrer votre produit en ligne !
¡Visite www.hamiltonbeach.com.mx
para obtener nuestra línea completa de
productos y las Guías de Uso y Cuidado,
además de deliciosas recetas, consejos
y para registrar su producto en línea!
Questions?
Please call us – our friendly
associates are ready to help.
USA: 1.800.851.8900
¿Preguntas?
Por favor llámenos – nuestros
amables representantes están
listos para ayudar.
MEX: 01 800 71 16 100
Le invitamos a leer cuidadosamente este
instructivo antes de usar su aparato.
Questions ?
N’hésitez pas à nous appeler –
nos associés s’empresseront
de vous aider.
CAN : 1.800.267.2826
Slow Cooker
Mijoteuse
Olla de Cocción
English ...................... 2
Français ................... 15
Español ................... 27
840219600 ENv07.indd 1840219600 ENv07.indd 1 11/9/12 8:43 AM11/9/12 8:43 AM

2
IMPORTANT SAFEGUARDS
1. Read all instructions.
2. Do not touch hot surfaces. Use handles or knobs.
3. To protect against electric shock, do not immerse cord,
plug, or base in water or other liquid.
4. Close supervision is necessary when any appliance is
used by or near children.
5. Unplug from outlet when not in use and before cleaning.
Allow to cool before putting on or taking off parts.
6. Do not operate any appliance with a damaged cord or
plug, or after the appliance malfunctions or is dropped
or damaged in any manner. Call our toll-free customer
service number for information on examination, repair,
or adjustment.
7. The use of accessory attachments not recommended by
the appliance manufacturer may cause injuries.
8. Do not use outdoors.
9. Do not let cord hang over edge of table or counter, or touch
hot surfaces, including stove.
10. Do not place on or near hot gas or an electric burner, or in
a heated oven.
11. Extreme caution must be used when moving an appliance
containing hot oil or other hot liquids.
12. To disconnect slow cooker, turn OFF; then remove plug
from wall outlet.
13. CAUTION: To prevent damage or shock hazard, do not
cook in base. Cook only in removable crock.
14. Avoid sudden temperature changes, such as adding
refrigerated foods into a heated crock.
15. Do not use appliance for other than intended use.
When using electrical appliances, basic safety precautions should always be followed to reduce the risk of fire, electric shock, and/or
injury to persons, including the following:
SAVE THESE INSTRUCTIONS!
840219600 ENv07.indd 2840219600 ENv07.indd 2 11/9/12 8:43 AM11/9/12 8:43 AM

3
CROCK AND LID: PRECAUTIONS AND INFORMATION
• Please handle crock and lid carefully to ensure long life.
• Avoid sudden, extreme temperature changes. For example,
do not place a hot lid or crock into cold water, or onto a wet
surface.
• Avoid hitting crock or lid against faucet or other hard
surfaces.
• Do not use crock or lid if chipped, cracked, or severely
scratched.
• Do not use abrasive cleansers or metal scouring pads.
• The bottom of the crock is very rough and can damage the
countertop. Use caution.
• The crock and lid can become very hot. Use caution. Do not
place directly on any unprotected surface or countertop.
• The crock is microwave-safe and oven-proof, but never heat
crock when empty. Never place lid on a burner or stove top.
Do not place lid in a microwave oven, conventional oven, or
on stove top.
REMOVING LID AND CROCK
When removing lid, tilt so that opening faces away from you
to avoid being burned by steam.
The sides of the slow cooker’s base get very warm because
the heating elements are located here. Use handles on base if
necessary. Use oven mitts to remove crock.
Other Consumer Safety Information
This product is intended for household use only.
This product is only intended for the preparation, cooking, and
serving of foods. This product is not intended for use with any
nonfood materials or products.
WARNING! Shock Hazard: This appliance has a polarized plug
(one wide blade) that reduces the risk of electric shock. The
plug fits only one way into a polarized outlet. Do not defeat the
safety purpose of the plug by modifying the plug in any way or
by using an adapter. If the plug does not fit fully into the outlet,
reverse the plug. If it still does not fit, have an electrician
replace the outlet.
The length of the cord used on this appliance was selected to
reduce the hazards of becoming tangled in or tripping over
a longer cord. If a longer cord is necessary, an approved
extension cord may be used. The electrical rating of the
extension cord must be equal to or greater than the rating of
the appliance. Care must be taken to arrange the extension
cord so that it will not drape over the countertop or tabletop
where it can be pulled on by children or accidentally tripped
over.
840219600 ENv07.indd 3840219600 ENv07.indd 3 11/9/12 8:43 AM11/9/12 8:43 AM

4
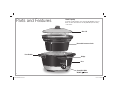
Parts and Features
Crock Capacity
For best results, fill the crock at least half full but no more
than one inch from the rim. If only half-filled, foods may
cook faster.
Glass Lid
Base
Display
Base Handles
Control Dial With
ON/OFF ( ) Button
Removable Stoneware Crock
840219600 ENv07.indd 4840219600 ENv07.indd 4 11/9/12 8:43 AM11/9/12 8:43 AM

5
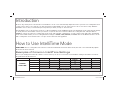
Introduction
How to Use IntelliTime Mode
No more dry, mushy slow-cooked meals. The IntelliTime™ slow cooker automatically adjusts the heat to prevent overcooking. Most slow
cooker recipes call for a 6- to 8-hour cook time, but many working families are out of the house for 10 or more hours a day. With the
IntelliTime slow cooker, food is finished precisely when you want, even up to 12 hours later.
The IntelliTime slow cooker has two modes of cooking—IntelliTime mode and Manual mode. The IntelliTime mode ramps heat up quickly
or slowly based on the number of hours you want to cook, from 4 hours to 12 hours. When the cooking time has ended, it shifts to
WARM for 4 hours. It is ideal for cooking large meats, meat and vegetable combinations, or long-cooking soups and stews. The Manual
mode is the traditional way of slow cooking with heat settings of WARM, LOW, MEDIUM, and HIGH. Choose the Manual mode for foods
with cooking times of less than 4 hours or recipes such as desserts and egg dishes.
INTELLITIME: Choose cooking time from 4 hours to 12 hours in 30-minute increments. In this mode, the slow cooker automatically adjusts
the heat to the hours selected.
Examples of Common IntelliTime Settings
Choose your starting time in the left column. Look across the top to choose a serve time. Your IntelliTime setting is the number of hours at
the point where the two intersect.
*Will switch to WARM after 12 hours.
SERVE TIME
NUMBER OF HOURS TO SET INTELLITIME
COOKING
START TIME
6:30 a.m.
7:00 a.m.
7:30 a.m.
8:00 a.m.
5:30 p.m.
11
10 1/2
10
9 1/2
6:00 p.m.
11 1/2
11
10 1/2
10
6:30 p.m.
12
11 1/2
11
10 1/2
7:00 p.m.
12*
12
11 1/2
11
7:30 p.m.
12*
12*
12
11 1/2
8:00 p.m.
12*
12*
12*
12
840219600 ENv07.indd 5840219600 ENv07.indd 5 11/9/12 8:43 AM11/9/12 8:43 AM

6
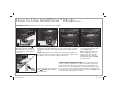
How to Use IntelliTime™ Mode (cont.)
3 4
When cooking is finished, slow
cooker will automatically switch
to the WARM setting.
MAX cooking
time is 12 hours
with an additional 4 hours of
warming time. After any time
setting, the slow cooker will
automatically switch to WARM
for up to 4 hours.
5
To turn off at any time, press and
hold (ON/OFF) button. Unplug
from wall outlet.
1
Plug in slow cooker. Press (ON/
OFF) button to turn on. Display
will flash 4:00. (Slow cooker will
start at 4:00 if no other setting is
selected.)
2
Rotate knob to the right to select cooking time from 4 to 12 hours in
30-minute increments. Push button to start or wait a few seconds and
slow cooker will start automatically. The slow cooker will beep when
it starts.
NOTE: Display flashes when setting can be changed and remains lit
after the beep and cooking starts. Once cooking starts, settings cannot
be adjusted. Turn slow cooker off and restart to reset.
BEFORE FIRST USE: Wash lid and crock in hot, soapy water. Rinse and dry.
EXAMPLE FOR SETTING INTELLITIME: Your recipe for Beef Stew
calls for cooking on LOW for 6 to 8 hours. You will be away from
home for 10 hours. Ignore the recipe time and set the dial for 10
hours. The slow cooker adjusts heat to make your Beef Stew ready
to eat, not overcooked, at 10 hours. Can’t make it home in 10 hours?
No problem, the slow cooker automatically switches to WARM for up
to 4 hours after cooking time has ended.
840219600 ENv07.indd 6840219600 ENv07.indd 6 11/9/12 8:43 AM11/9/12 8:43 AM

7
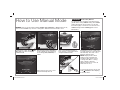
How to Use Manual Mode
1 2 43
Plug in slow cooker. Press (ON/
OFF) button to turn on. Display
will flash 4:00.
Rotate knob past the IntelliTime™
mode settings to select desired
heat setting, LOW, MEDIUM, or
HIGH.
Use a separate kitchen timer to
keep track of cooking time when
using the Manual mode.
Food Safety Hazard.
Food must be hot enough to prevent bacterial
growth before using WARM setting. The WARM
setting should only be used after a recipe has
been thoroughly cooked. Do not reheat food on
WARM setting. Visit foodsafety.gov for more
information.
MANUAL: Choose desired heat settings WARM, LOW, MEDIUM, or HIGH. In this mode,
slow cooker will NOT keep track of cooking time. A kitchen timer should be used.
w WARNING
Push button to start or wait a few
seconds and slow cooker will start
automatically. The slow cooker
will beep when it starts.
NOTE: Display flashes when
setting can be changed and
remains lit after the beep and
cooking starts. Once cooking
starts, settings cannot be
adjusted. Turn slow cooker off
and restart to reset.
5
After 14 hours, the slow cooker
will automatically turn off.
6
To turn off at any time, press and
hold (ON/OFF) button. Unplug
from wall outlet.
840219600 ENv07.indd 7840219600 ENv07.indd 7 11/9/12 8:44 AM11/9/12 8:44 AM

8
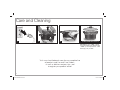
Care and Cleaning
Remove crock and let cool.
DISHWASHER-SAFE
DO NOT use the “SANI” setting
when washing in the dishwasher.
“SANI” cycle temperatures could
damage your product.
2 3
1
Visit www.hamiltonbeach.com for our complete line
of products and Use and Care Guides –
as well as delicious recipes, tips, and
to register your product online!
840219600 ENv07.indd 8840219600 ENv07.indd 8 11/9/12 8:44 AM11/9/12 8:44 AM

9
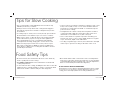
Tips for Slow Cooking
• The crock should be at least half-filled for best results. If only
half-filled, foods may cook faster.
• Stirring is not necessary when slow cooking. Removing glass
lid results in major heat loss and the cooking time may need to
be extended.
• If cooking soups or stews, leave a 1-inch (2.5-cm) space between
the lid and the food so that the recipe can come to a simmer.
• Many recipes call for cooking all day. If your morning schedule
doesn’t allow time to prepare a recipe, do it the night before.
Place all ingredients in crock, cover with lid, and refrigerate
overnight. In the morning, simply place crock in slow cooker.
• When choosing recipes for this slow cooker, look for recipes
that call for cooking time on HIGH 4 to 5 hours or LOW 6 to 8
hours. Recipes calling for less cooking time should be checked
periodically for doneness.
• Some foods are not suited for extended cooking in a slow cooker.
Pasta, seafood, milk, cream, or sour cream should be added 2
hours before serving. Evaporated milk or condensed soups are
perfect for slow cooking.
• The higher the fat content of meat, the less liquid is needed. If
cooking meat with a high fat content, place thick onion slices
underneath so meat will not sit on (and cook in) fat.
• Slow cookers allow for very little evaporation. If making your
favorite soup, stew, or sauce, reduce liquid called for in original
recipe. If too thick, liquid can be added later.
• If cooking a vegetable-type casserole, there will need to be liquid
in the recipe to prevent scorching on the sides of the crock.
Food Safety Tips
• Do not use frozen, uncooked meat in the slow cooker. Thaw any
meat or poultry before slow cooking.
• Visit www.foodsafety.gov for more information on safe internal
cooking temperatures.
• To store leftovers after cooking, do NOT place the entire crock in the
refrigerator since contents will take too long to cool. Instead, divide
leftovers into smaller containers and place into refrigerator.
• Never allow undercooked or raw meat to sit at room temperature
in the slow cooker. Once meat is placed into the crock, it should be
cooked immediately (unless prepping slow cooker the night before,
where crock should be placed into the refrigerator).
IF YOU LIVE IN A HIGH-ALTITUDE AREA:
The Extension service will have detailed information about cooking
for your area. To locate the Cooperative Extension service in your
county, please visit: http://www.csrees.usda.gov/Extension/.
840219600 ENv07.indd 9840219600 ENv07.indd 9 11/9/12 8:44 AM11/9/12 8:44 AM

10
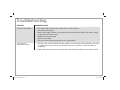
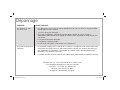
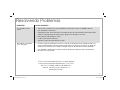
PROBLEM
Food is undercooked.
My meal was
overcooked. Why?
PROBABLE CAUSE
• Was food cooked on the Warm setting? Do not cook on Warm.
• Was power interrupted?
• Did the slow cooker cook for the complete time selected? Select HIGH or the 4-hour setting
to add more time to the recipe.
• Recipe had too much liquid.
• Crock was overfilled.
• Did you have the lid placed correctly on the slow cooker?
• Was the crock at least half full? The slow cooker has been designed to thoroughly cook food
in a filled crock. If the crock is only half-filled, foods may cook faster. Check for doneness
periodically.
• Foods will continue to increase in temperature after desired temperature has been reached.
Troubleshooting
840219600 ENv07.indd 10840219600 ENv07.indd 10 11/9/12 8:44 AM11/9/12 8:44 AM

11
Recipes
Beef Pot Roast
3–5 lb. (1.3–2.2 kg) beef pot roast
1 1/2 teaspoons (7.5 ml) salt
1 teaspoon (5 ml) pepper
4 potatoes, quartered
4 carrots, cut into 1-inch (2.5-cm) pieces
2 onions, quartered
1 envelope dry onion mix
1/2 cup (125 ml) beef broth or water
1. Season roast with salt and pepper. In skillet, over medium-
high heat, brown roast on all sides; set aside.
2. Place vegetables in crock. Place roast on top of vegetables.
3. Sprinkle with onion soup mix. Drizzle beef broth over meat
and vegetables. Cover slow cooker.
4. Choose IntelliTime™ or Manual mode for desired cooking time
OR heat setting. Slow cooker will beep and start cooking after
5 seconds.
INTELLITIME Mode: Number of hours of cooking time desired
(select from 4 to 12 hours)
MANUAL Mode: HIGH for 5 hours, MEDIUM for 7 1/2 hours, OR
LOW for 10 hours
Serves: 4 to 6
TEST KITCHEN TIP: Pot roast should cook until fork-tender. For
food safety, be sure to cook until meat thermometer registers at
least 160°F (71°C) for medium.
Whole Chicken and Vegetables
1 medium onion, sliced
5 1/2–6 lb. (2.5–2.7 kg) whole chicken
2 teaspoons (10 ml) seasoned salt
1 teaspoon (5 ml) cracked black pepper
4 medium carrots, cut into 1 1/2-inch (3.8-cm) pieces
4 small red potatoes, cut into eighths
2 celery ribs, cut into 1 1/2-inch (3.8-cm) pieces
1. Place half of sliced onion on bottom of slow cooker crock.
2. Rinse chicken and pat dry. Sprinkle all sides with seasoned salt
and pepper. Place chicken on top of sliced onions in crock.
3. Arrange remaining onion, carrots, potatoes, and celery around
chicken. Cover slow cooker.
4. Choose IntelliTime™ or Manual mode for desired cooking time
OR heat setting. Slow cooker will beep and start cooking after
5 seconds.
INTELLITIME Mode: Number of hours of cooking time desired
(select from 4 to 12 hours)
MANUAL Mode: HIGH for 4 hours, MEDIUM for 5 hours, OR
LOW for 6 to 8 hours
Serves: 4 to 6
TEST KITCHEN TIP: Chicken is done when meat temperature
registers 170°F (77°C) in the breast or 180°F (82°C) in the thickest
part of the thigh.
Visit foodsafety.gov for more safe internal cooking temperature.
840219600 ENv07.indd 11840219600 ENv07.indd 11 11/9/12 8:44 AM11/9/12 8:44 AM

12
Recipes (cont.)
Pork Roast With Carrots, Apples, and Rosemary
2 Granny Smith apples, cored and each cut into 8 wedges
1 Tablespoon (15 ml) lemon juice
4 lb. (1.8 kg) boneless loin pork roast
1 teaspoon (5 ml) salt
1/2 teaspoon (2.5 ml) fresh ground pepper
1 medium onion, cut in eighths
4 large carrots, cut into 1 1/2-inch (3.8-cm) pieces
1 fresh rosemary sprig
1. Toss apples with lemon juice; set aside.
2. Season roast with salt and pepper.
3. Place half of onions and 4 to 6 apple wedges in crock.
4. Top with seasoned roast. Surround roast with remaining apples,
onions, and carrots and top with rosemary. Cover slow cooker.
5. Choose IntelliTime™ or Manual mode for desired cooking time
OR heat setting. Slow cooker will beep and start cooking after
5 seconds.
INTELLITIME Mode: Number of hours of cooking time desired
(select from 4 to 12 hours)
MANUAL Mode: HIGH for 4 hours, MEDIUM for 5 1/2 to 6 hours,
OR LOW for 7 to 8 hours
Serves: 4 to 6
TEST KITCHEN TIP: For food safety, be sure to cook until meat
thermometer registers at least 160°F (71°C).
Butternut Squash Soup
1 large (1 1/2 lb./2 kg) butternut squash, peeled, seeded, and cut
into 2-inch (5-cm) chunks
2 medium red potatoes, peeled and cut into 1-inch (2.5-cm) chunks
1 medium onion, chopped
3 large garlic cloves, chopped
5 cups (1.2 L) chicken broth
1 1/2 teaspoons (7.5 ml) dried rubbed sage
1/2 teaspoon (2.5 ml) salt
1/4 teaspoon (1.3 ml) pepper
1. Place squash, potatoes, onion, and garlic in crock.
2. Add chicken broth, sage, salt, and pepper. Cover slow cooker.
3. Choose IntelliTime™ or Manual mode for desired cooking time
OR heat setting. Slow cooker will beep and start cooking after
5 seconds.
4. Let cool slightly; then puree soup in a blender or food processor.
INTELLITIME Mode: Number of hours of cooking time desired
(select from 4 to 12 hours)
MANUAL Mode: HIGH for 4 hours, MEDIUM for 5 hours, OR
LOW for 6 to 7 hours
Serves: 8 to 10
TEST KITCHEN TIP: For easy squash preparation, microwave for
2 minutes prior to cutting. Placing in the microwave oven will
soften the rind, making cutting in half easier.
840219600 ENv07.indd 12840219600 ENv07.indd 12 11/9/12 8:44 AM11/9/12 8:44 AM

13
Notes
840219600 ENv07.indd 13840219600 ENv07.indd 13 11/9/12 8:44 AM11/9/12 8:44 AM

14
Limited Warranty
This warranty applies to products purchased and used in the U.S. and Canada. This is the only express warranty for this product and
is in lieu of any other warranty or condition.
This product is warranted to be free from defects in material and workmanship for a period of one (1) year from the date of original
purchase. During this period, your exclusive remedy is repair or replacement of this product or any component found to be defective,
at our option; however, you are responsible for all costs associated with returning the product to us and our returning a product or
component under this warranty to you. If the product or component is no longer available, we will replace with a similar one of equal
or greater value.
This warranty does not cover glass, filters, wear from normal use, use not in conformity with the printed directions, or damage to
the product resulting from accident, alteration, abuse, or misuse. This warranty extends only to the original consumer purchaser or
gift recipient. Keep the original sales receipt, as proof of purchase is required to make a warranty claim. This warranty is void if the
product is used for other than single-family household use or subjected to any voltage and waveform other than as specified on the
rating label (e.g., 120V ~ 60 Hz).
We exclude all claims for special, incidental, and consequential damages caused by breach of express or implied warranty. All
liability is limited to the amount of the purchase price. Every implied warranty, including any statutory warranty or condition
of merchantability or fitness for a particular purpose, is disclaimed except to the extent prohibited by law, in which case such
warranty or condition is limited to the duration of this written warranty. This warranty gives you specific legal rights. You may have
other legal rights that vary depending on where you live. Some states or provinces do not allow limitations on implied warranties or
special, incidental, or consequential damages, so the foregoing limitations may not apply to you.
To make a warranty claim, do not return this appliance to the store. Please call 1.800.851.8900 in the U.S. or 1.800.267.2826 in Canada
or visit hamiltonbeach.com in the U.S. or hamiltonbeach.ca in Canada. For faster service, locate the model, type, and series numbers
on your appliance.
840219600 ENv07.indd 14840219600 ENv07.indd 14 11/9/12 8:44 AM11/9/12 8:44 AM

15
PRÉCAUTIONS IMPORTANTES
1. Lire toutes les instructions.
2. Ne pas toucher les surfaces chaudes. Utiliser les poignées
ou les boutons.
3. Pour se protéger contre le risque de choc électrique, ne
pas immerger le cordon, la fiche ou la base dans l’eau ou
tout autre liquide.
4. Une surveillance étroite est nécessaire lorsqu’un appareil
électroménager quel qu’il soit est utilisé par des enfants
ou près d’eux.
5. Débrancher l’appareil de la prise de courant électrique lorsqu’il
n’est pas utilisé et avant un nettoyage. Le laisser refroidir avant
un nettoyage et avant d’y placer ou d’y enlever des pièces.
6. Ne pas faire fonctionner un appareil électroménager dont le
cordon ou la fiche sont endommagés, ou lorsque l’appareil
ne fonctionne pas bien, ou a été échappé ou endommagé
d’une manière quelconque. Appeler notre numéro sans frais
de service à la clientèle pour des renseignements concernant
l’examen, la réparation ou l’ajustement.
7. L’utilisation d’accessoires non recommandés par le fabricant
de l’appareil peut causer des blessures.
8. Ne pas utiliser à l’extérieur.
9. Ne pas laisser le cordon pendre du bord d’une table ou d’un
comptoir, ou toucher des surfaces chaudes, y compris la
cuisinière.
10. Ne pas placer l’appareil sur ou près d’un brûleur à gaz chaud,
ou d’un élément électrique, ou dans un four chauffé.
11. Il est nécessaire de faire preuve de la plus grande prudence
en déplaçant un appareil électroménager contenant de l’huile
chaude ou d’autres liquides chauds.
12. Pour débrancher la mijoteuse, tourner à OFF (arrêt), puis
débrancher la fiche de la prise.
13. MISE EN GARDE : Afin de prévenir l’endommagement ou le
risque de choc, ne pas cuire dans la base. Cuire seulement
dans le plat amovible.
14. Éviter les changements soudains de température, tels que
l’ajout de nourriture sortant du réfrigérateur dans un plat
chauffé.
15. Ne pas utiliser l’appareil électroménager à une fin autre que
celle prévue.
Pour utiliser un appareil électroménager, vous devez toujours prendre des mesures élémentaires de sécurité pour réduire le risque
d’incendie, d’électrocution et/ou de blessure corporelle, en particulier les mesures suivantes :
CONSERVER CES INSTRUCTIONS !
840219600 FRv07.indd 15840219600 FRv07.indd 15 11/9/12 8:45 AM11/9/12 8:45 AM

16
COUVERCLE ET POT : PRÉCAUTIONS ET INFORMATION
• Veuiller manipuler le pot et le couvercle avec soin pour assurer
leur durabilité.
• Éviter des changements de température brusques et extrêmes.
Par exemple, ne placer pas un couvercle ou un pot chaud dans
l’eau froide ou sur une surface mouillée.
• Éviter de frapper le pot et le couvercle sur le robinet ou sur toute
surface rigide.
• N’utiliser pas le pot ou le couvercle si l’un ou l’autre est ébréché,
fendillé ou très écorché.
• N’utiliser pas de nettoyeurs abrasifs ou de tampon métallique à
récurer.
• La base du pot est très rugueuse et peut endommager un
revêtement de comptoir. Faites preuve de prudence.
• Le pot et son couvercle peuvent devenir très chauds. Faites
preuve de prudence. Ne les déposer pas directement sur une
surface ou un revêtement de comptoir non protégés.
• Le pot peut aller au four à micro-ondes et au four régulier.
Éviter, toutefois, de chauffer le pot lorsqu’il est vide. Ne placer
jamais le couvercle sur un rond de poêle ou directement sur le
poêle. Ne placer pas le couvercle dans le four à micro-ondes,
dans le four conventionnel ou directement sur le poêle.
SOULÈVEMENT DU COUVERCLE ET DU POT
Soulever le couvercle de façon à diriger les vapeurs loin de votre
visage pour éviter de vous brûler.
Les côtés de la base de la mijoteuse deviennent très chauds car
c’est là que se trouvent les éléments chauffants. Au besoin, utiliser
les poignées sur la base. Utiliser des gants de cuisine pour retirer
le pot.
Cet appareil ne doit servir qu’à un usage domestique.
Ce produit est uniquement destiné à préparer, cuire et servir
de la nourriture. Il n’est pas destiné à être utilisé avec d’autres
matériaux ou produits que de la nourriture.
AVERTISSEMENT ! Risque d’électrocution : Cet appareil
électroménager possède une fiche polarisée (une broche large)
qui réduit le risque d’électrocution. Cette fiche n’entre que dans un
seul sens dans une prise polarisée. Ne contrecarrez pas l’objectif
sécuritaire de cette fiche en la modifiant de quelque manière
que ce soit ou en utilisant un adaptateur. Si vous ne pouvez pas
insérer complètement la fiche dans la prise, inversez la fiche. Si
elle refuse toujours de s’insérer, faire remplacer la prise par un
électricien.
La longueur du cordon installé sur cet appareil a été sélectionnée
afin de réduire les risques d’enchevêtrement ou de faux pas
causés par un fil trop long. L’utilisation d’une rallonge approuvée
est permise si le cordon est trop court. Les caractéristiques
électriques de la rallonge doivent être équivalentes ou supérieures
aux caractéristiques de l’appareil. Prendre toutes les précautions
nécessaires pour installer la rallonge de manière à ne pas la faire
courir sur le comptoir ou sur une table pour éviter qu’un enfant
ne tire sur le cordon ou trébuche accidentellement.
Autre consigne de sécurité pour le consommateur
840219600 FRv07.indd 16840219600 FRv07.indd 16 11/9/12 8:45 AM11/9/12 8:45 AM

17
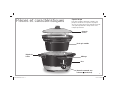
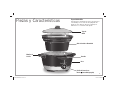
Pièces et caractéristiques
Capacité du pot
Pour des résultats optimaux, remplir le pot
jusqu’à la moitié de sa capacité ou jusqu’à
2,5 cm (1 po) du rebord. Les aliments peuvent
cuire plus rapidement si la mijoteuse n’est
remplie qu’à moitié.
Couvercle
en verre
Base
Affichage
Poignées de
la base
Bouton de commande avec
le bouton (marche/arrêt)
Pot de grès amovible
840219600 FRv07.indd 17840219600 FRv07.indd 17 11/9/12 8:45 AM11/9/12 8:45 AM

18
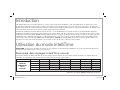
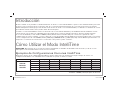
Introduction
Utilisation du mode IntelliTime
Les aliments mijotés ne seront plus jamais secs ni trop cuits. La mijoteuse IntelliTime
MC
règle automatiquement la chaleur pour éviter
de surcuire les aliments. La plupart des recettes pour mijoteuse nécessitent une durée de cuisson de 6 à 8 heures alors que plusieurs
familles s’absentent de la maison pendant 10 heures et même plus pendant la journée. Grâce à la mijoteuse IntelliTime, les aliments sont
cuits au moment précis où vous le désirez et même jusqu’à 12 heures plus tard.
La mijoteuse IntelliTime possède deux modes de cuisson — le mode IntelliTime et un mode manuel. Le mode IntelliTime augmente
rapidement ou diminue lentement le nombre d’heures de cuisson désiré, soit de 4 à 12 heures. Lorsque le temps de cuisson est écoulé,
la mijoteuse bascule au réglage WARM (chaud) pendant 4 heures. Ce réglage est idéal pour cuire les grosses pièces de viande, un repas
volumineux, une combinaison de légumes ou cuire lentement les soupes et les ragoûts. Le mode manuel est le mode traditionnel de
cuisson lente grâce aux réglages WARM (chaud), LOW (faible), MEDIUM (moyen) et HIGH (élevé). Sélectionner le mode manuel pour
des durées de cuisson de moins de 4 heures ou pour des recettes de desserts et de mets à base d’œufs.
INTELLITIME : Sélectionner une durée de cuisson de 4 à 12 heures par incréments de 30 minutes. Ce mode règle automatiquement la
chaleur de la mijoteuse selon les heures sélectionnées.
Exemples des réglages IntelliTime usuels
Sélectionner l’heure de démarrage dans la colonne gauche. Repérer l’heure de service dans la ligne supérieure. Le réglage du mode
IntelliTime est représenté par le nombre d’heures situé à l’intersection des deux chiffres.
*Basculera au réglage WARM (chaud) après 12 heures.
HEURE DU SERVICE
NOMBRE D’HEURES POUR RÉGLER LE MODE INTELLITIME
HEURE DE
DÉMARRAGE
DE LA
CUISSON
6 h 30
7 h
7 h 30
8 h
17 h 30
11
10 1/2
10
9 1/2
18 h
11 1/2
11
10 1/2
10
18 h 30
12
11 1/2
11
10 1/2
19 h
12*
12
11 1/2
11
19 h 30
12*
12*
12
11 1/2
20 h
12*
12*
12*
12
840219600 FRv07.indd 18840219600 FRv07.indd 18 11/9/12 8:45 AM11/9/12 8:45 AM

19
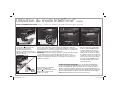
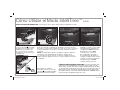
Utilisation du mode IntelliTime
MC
(suite)
3
Dès que la cuisson est terminée, la
mijoteuse basculera automatique-
ment au réglage WARM (chaud).
La durée maximale de cuisson
est de 12 heures avec une durée
additionnelle de garde au chaud
des aliments de 4 heures. Dès que
la durée de cuisson est écoulée, la
mijoteuse basculera automatique-
ment au réglage WARM (chaud)
pendant une période pouvant
atteindre 4 heures.
4
5
Pour éteindre en tout temps,
appuyer et maintenir le
bouton (marche/arrêt) enfoncé.
Débrancher la mijoteuse de
la prise de courant.
1
Brancher la mijoteuse. Appuyer
sur le bouton (marche/arrêt)
pour mettre sous tension.
L’afficheur indiquera 4:00. (La
mijoteuse se mettra en marche
au
réglage 4:00 si aucun autre réglage
n’est sélectionné.)
2
Tourner le bouton vers la droite pour sélectionner une durée de
cuisson de 4 à 12 heures par incréments de 30 minutes. Appuyer
sur le bouton pour commencer ou attendre quelques secondes pour
que la mijoteuse se mette automatiquement en marche. La mijoteuse
émettra un signal sonore lors du démarrage.
REMARQUE : L’afficheur clignote lorsque le réglage peut être modifié
et reste allumé après le signal de démarrage de la cuisson. Les
réglages ne peuvent plus être modifiés une fois que la cuisson est
commencée. Éteindre la mijoteuse et la remettre en marche pour
modifier les réglages.
AVANT LA PREMIÈRE UTILISATION : Laver le couvercle et le pot dans l’eau chaude savonneuse. Rincer et assécher.
EXEMPLE DE RÉGLAGE INTELLITIME : La recette de ragoût de bœuf demande
une cuisson au réglage LOW (faible) pendant 6 à 8 heures. Vous serez absent de
la maison pendant 10 heures. Ignorer le temps de la recette et régler le cadran à
10 heures. La mijoteuse règlera la chaleur pour que votre ragoût de bœuf soit prêt à
servir, sans être trop cuit, dans 10 heures. Vous ne pourrez pas être à la maison dans
10 heures ? Aucun problème; la mijoteuse basculera automatiquement au réglage
WARM (chaud) pendant 4 heures dès la fin du cycle de cuisson.
840219600 FRv07.indd 19840219600 FRv07.indd 19 11/9/12 8:45 AM11/9/12 8:45 AM

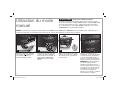
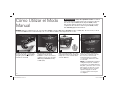
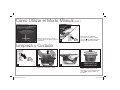
20
Utilisation du mode
manuel
1 2 43
Brancher la mijoteuse. Appuyer
sur le bouton (marche/arrêt)
pour mettre sous tension.
L’afficheur indiquera 4:00.
Tourner le bouton au-delà des
réglages du mode IntelliTime
MC
pour sélectionner le réglage de
chaleur désiré, LOW (faible),
MEDIUM (moyen) ou HIGH
(élevé).
Utiliser une minuterie de cuisine
distincte pour observer le temps
de cuisson lorsque l’on utilise le
mode manuel.
MANUEL : Sélectionner le réglage de chaleur désiré soit WARM (chaud), LOW (faible), MEDIUM (moyen) ou HIGH (élevé). L’utilisation de ce
mode pour la mijoteuse ne tient PAS compte du temps de cuisson. Une minuterie de cuisine doit être utilisée.
Appuyer sur le bouton pour
commencer ou attendre quelques
secondes pour que la mijoteuse
se mette automatiquement en
marche. La mijoteuse émettra un
signal sonore lors du démarrage.
REMARQUE : L’afficheur clignote
lorsque le réglage peut être
modifié et reste allumé après le
signal de démarrage de la cuisson.
Les réglages ne peuvent plus être
modifiés une fois que la cuisson
est commencée. Éteindre la
mijoteuse et la remettre en marche
pour modifier les réglages.
Danger pour la salubrité des aliments.
Les aliments doivent être suffisamment chauds pour prévenir toute croissance
bactérienne avant d’utiliser le réglage WARM (chaud). Le réglage WARM (chaud)
ne doit être utilisé qu’après la cuisson complète des aliments. Ne réchauffer
pas les aliments placés sous le réglage WARM (chaud). Visiter le site Internet
foodsafety.gov pour de plus amples informations.
w AVERTISSEMENT
840219600 FRv07.indd 20840219600 FRv07.indd 20 11/9/12 8:45 AM11/9/12 8:45 AM
A página está carregando...
A página está carregando...
A página está carregando...
A página está carregando...
A página está carregando...
A página está carregando...
A página está carregando...
A página está carregando...
A página está carregando...
A página está carregando...
A página está carregando...
A página está carregando...
A página está carregando...
A página está carregando...
A página está carregando...
A página está carregando...
A página está carregando...
A página está carregando...
A página está carregando...
A página está carregando...
-
 1
1
-
 2
2
-
 3
3
-
 4
4
-
 5
5
-
 6
6
-
 7
7
-
 8
8
-
 9
9
-
 10
10
-
 11
11
-
 12
12
-
 13
13
-
 14
14
-
 15
15
-
 16
16
-
 17
17
-
 18
18
-
 19
19
-
 20
20
-
 21
21
-
 22
22
-
 23
23
-
 24
24
-
 25
25
-
 26
26
-
 27
27
-
 28
28
-
 29
29
-
 30
30
-
 31
31
-
 32
32
-
 33
33
-
 34
34
-
 35
35
-
 36
36
-
 37
37
-
 38
38
-
 39
39
-
 40
40


Hamilton Beach 33365 Manual do usuário
- Categoria
- Fogões lentos
- Tipo
- Manual do usuário
- Este manual também é adequado para
em outras línguas
- español: Hamilton Beach 33365 Manual de usuario
- français: Hamilton Beach 33365 Manuel utilisateur
- English: Hamilton Beach 33365 User manual
Artigos relacionados
-
Hamilton Beach 33660 Guia de usuario
-
Hamilton Beach 33480 Manual do usuário
-
Hamilton Beach 33182 Guia de usuario
-
Hamilton Beach 33463 Guia de usuario
-
Hamilton Beach 33140V Guia de usuario
-
-
Hamilton Beach 33264 Guia de usuario
-
-
-