Weston 03-2300-W Guia de usuario
- Categoria
- Fogões lentos
- Tipo
- Guia de usuario

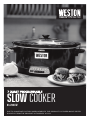
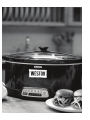
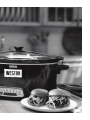
SLOW COOKER
03-2300-W
DUE TO CONSTANT FACTORY IMPROVEMENTS, THE PRODUCT PICTURED MIGHT DIFFER
SLIGHTLY FROM THE PRODUCT IN THIS BOX. 071315

TABLE OF CONTENTS / ÍNDICE / TABLE DES MATIÈRES
2
GENERAL SAFETY RULES
CROCK AND LID
COMPONENT LIST
COOKING MODE
CLEANING AND CARE
HOW TO USE LID LATCH™ STRAP
TIPS FOR SLOW COOKING
FOOD SAFETY TIPS
TROUBLESHOOTING
WARRANTY
REGLAS IMPORTANTES DE SEGURIDAD
TAPA Y OLLA
LISTA DE COMPONENTES
CÓMO USAR SU OLLA DE COCCION
LIMPIEZA Y CUIDADO
CÓMO USAR EL LID LATCH™ STRAP
CONCEJOS PARA COCINAR LENTO
CONSEJOS DE SEGURIDAD DE ALIMENTOS
RESOLVIENDO PROBLEMAS
INFORMACIÓN DE GARANTÍA WESTON
IMPORTANTES RÈGLES DE SÉCURITÉ
COUVERCLE ET POT
DESCRIPTION DE LA PIÈCE
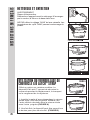
UTILISATION DE LA MIJOTEUSE
NETTOYAGE ET ENTRETIEN
UTILISATION DU VERROUILLAGE DE COUVERCLE LID LATCH™ STRAP
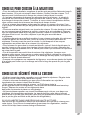
CONSEILS POUR CUISSON À LA MIJOTEUSE
CONSEILS DE SÉCURITÉ POUR LA CUISSON
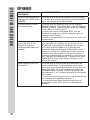
DÉPANNAGE
INFORMATION SUR LA GARANTIE
3
4
5
6
7
7
8
8
9
10
12
13
14
15
16
16
17
17
18
20
22
23
24
25
26
26
27
27
28
29

CLEANING INSTRUCTIONS
3
ENGLISH INSTRUCTIONS
1. Read all instructions.
2. Do not touch hot surfaces. Use
handles or knobs.
3. To protect against electrical shock
do not immerse cord, plug, or base
in water or other liquid.
4. Close supervision is necessary
when any appliance is used by or
near children.
5. Unplug from outlet when not in
use and before cleaning. Allow to
cool before putting on or taking off
parts.
6. Do not operate any appliance with
a damaged cord or plug, or after the
appliance malfunctions or is dropped
or damaged in any manner. Call our
toll-free customer service number for
information on examination, repair,
or adjustment.
7. The use of accessory attachments
not recommended by the appliance
manufacturer may cause injuries.
8. Do not use outdoors.
9. Do not let cord hang over edge
of table or counter, or touch hot
surfaces, including stove.
10. Do not place on or near hot gas
or an electric burner, or in a heated
oven.
11. Extreme caution must be
used when moving an appliance
containing hot oil or other hot liquids.
12. To disconnect slow cooker, turn
control knob to OFF then remove
plug from wall outlet.
GENERAL SAFETY RULES
READ AND FULLY UNDERSTAND ALL INSTRUCTIONS AND WARNINGS
PRIOR TO USING THIS UNIT. YOUR SAFETY IS MOST IMPORTANT!
FAILURE TO COMPLY WITH PROCEDURES AND SAFE GUARDS MAY
RESULT IN SERIOUS INJURY OR PROPERTY DAMAGE. REMEMBER:
YOUR PERSONAL SAFETY IS YOUR RESPONSIBILITY!
SAVE THESE INSTRUCTIONS
13. Caution: To prevent damage or
shock hazard do not cook in base.
Cook only in removable crock.
14. Avoid sudden temperature
changes, such as adding refrigerated
foods into a heated crock.
15. Do not use appliance for other
than intended use.
16. This product is intended for
household use only. This product is
only intended for the preparation,
cooking, and serving of foods. This
product is not intended for use with
any non-food materials or products.
WARNING! Shock Hazard: This
appliance has a polarized plug (one
wide blade) that reduces the risk of
electric shock. The plug ts only one
way into a polarized outlet. Do not
defeat the safety purpose of the plug
by modifying the plug in any way or
using an adaptor. If the plug does
not t, reverse the plug. If it still does
not t, have an electrician replace
the outlet. The length of the cord
used on this appliance was selected
to reduce the hazards of becoming
tangled in, or tripping over a longer
cord. If a longer cord is necessary
an approved extension cord may
be used. The electrical rating of
the extension cord must be equal
to or greater than the rating of the
appliance. Care must be taken to
arrange the extension cord so that it
will not drape over the counter- top or
tabletop where it can be pulled on by
children or accidentally tripped over.

ENGLISH INSTRUCTIONS
4
CROCK AND LID: PRECAUTIONS AND INFORMATION
• Please handle crock and lid carefully to ensure long life.
• Avoid sudden, extreme temperature changes. For example, do not place a hot lid or crock
into cold water, or onto a wet surface.
• Avoid hitting crock or lid against faucet or other hard surfaces.
• Do not use crock or lid if chipped, cracked, or severely scratched.
• Do not use abrasive cleansers or metal scouring pads.
• The bottom of crock is very rough and can damage countertop. Use caution.
• The crock and lid can become very hot. Use caution. Do not place directly on any unprotect-
ed surface or countertop.
• The crock is microwave safe and oven proof, but never heat crock when empty. Never place
lid on a burner or stove top. Do not place lid in a microwave oven, conventional oven, or on
stove top.
REMOVING LID AND CROCK
When removing lid, tilt so that opening faces away from you to avoid being burned by steam.
The sides of the slow cooker’s base get very warm because the heating elements are located
here. Use handles on base if necessary. Use hot mitts to remove crock.

5
ENGLISH INSTRUCTIONS
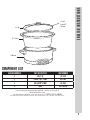
COMPONENT LIST
DIAGRAM NUMBER PART DESCRIPTION PART NUMBER
1 LID, 7 QT 03-2301
2 CROCK, 7 QT - OVAL 03-2302
3 LID LATCH™ STRAP 03-2103
4 BASE 03-2304-W
If any components of this unit are broken, the unit does not operate properly or you
need a replacement instruction manual, visit us on the web at
WestonProducts.com
Or call Weston Brands LLC Toll Free at 1-800-814-4895
Monday thru Friday 8:00am-5:00pm ET. Outside the U.S. call 001-440-638-3131
1 Lid
2 Crock
3 Lid
Latch™
Strap
4 Base

ENGLISH INSTRUCTIONS
6
COOKING MODE
BEFORE FIRST USE: Wash glass lid and
removable stoneware crock in hot, soapy
water. Rinse and dry.
1. Turn unit on by pressing ON/OFF
button. The unit will automatically default
to a cooking time of 4 hours on HIGH.
(FIGURE 1)
2. Select desired cooking temperature by
pressing the TEMP button.
NOTE: Do not use WARM setting to cook
or reheat food. (FIGURE 2)
3. Adjust cooking time by pressing the
HOURS button. 2, 4, 6, 8, or
10 hours can be selected. Cooking
time will then count down in 2-hour
increments. Visit www.foodsafety.gov for
more information on safe internal cooking
temperatures.
(FIGURE 3)
NOTES:
• The cooking temperature and selected
cooking hours function independently of
one another and either may be changed
at any time. When a new cooking time is
selected, the unit will reset to count down
from the new number of hours chosen.
• As a safety precaution, the unit will
not stay on for more than 14 hours of
continuous cooking and warming time
and will also shut off automatically.
The selected cooking time will glow for 2
hours. When the 2 hours are nished, the
next 2-hour light will glow and continue
the countdown until the cooking time is
complete.
At the end of the cooking time, the slow
cooker will automatically switch to WARM
setting. NOTE: Cook time plus warm time
cannot exceed 14 hours. When the unit
switches to WARM, the light glows to
show how much time is remaining of the
14 hours
FIGURE 1
FIGURE 2
FIGURE 3

ENGLISH INSTRUCTIONS
7
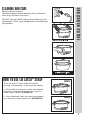
CLEANING AND CARE
Electrical Shock Hazard.
Disconnect power before cleaning. Do not immerse
cord, plug, or base in any liquid.
DO NOT use the “SANI” setting when washing in the
dishwasher. “SANI” cycle temperatures could damage
your product.
FIGURE B
FIGURE A
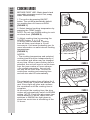
HOW TO USE LID LATCH™ STRAP
The Lid Latch™ helps secure lid while
moving, transporting, or storing slow cooker.
1. Place latch into groove under one handle.
Stretch to other side and secure in groove
under other handle. (FIGURE A)
2. Once attached, latch can also be crossed
over knob to further secure lid. (FIGURE B)

ENGLISH INSTRUCTIONS
8
TIPS FOR SLOW COOKING
• The removable stoneware crock should be at least half-lled for best results. If
only half-lled, check for doneness 1 to 2 hours earlier than recipe.
• Stirring is not necessary when slow cooking and removing glass lid results in
major heat loss and the cooking time may need to be extended. However, if
cooking on High, you may want to stir occasionally.
• If cooking soups or stews, leave a 2-inch (5-cm) space between the top of the
removable stoneware crock and the food so that the recipe can come to a simmer.
• Many recipes call for cooking all day. If your morning schedule doesn’t allow
time to prepare a recipe, do it the night before. Place all ingredients in removable
stoneware crock, cover with lid, and refrigerate overnight. In the morning, simply
place the removable stoneware crock in slow cooker.
• Some foods are not suited for extended cooking in a slow cooker. Pasta, seafood,
milk, cream, or sour cream should be added 2 hours before serving. Evaporated
milk or condensed soups are perfect for slow cooking.
• The higher the fat content of meat, the less liquid is needed. If cooking meat with
a high fat content, place thick onion slices underneath so meat will not sit on (and
cook in) fat.
• Slow cookers allow for very little evaporation. If making your favorite soup, stew,
or sauce, reduce liquid called for in original recipe. If too thick, liquid can be added
later.
• If cooking a vegetable-type casserole, there will need to be liquid in the recipe to
prevent scorching on the sides of the removable stoneware crock.
FOOD SAFETY TIPS
• Do not use frozen, uncooked meat in the slow cooker. Thaw any meat or poultry
before slow cooking.
• Visit www.foodsafety.gov for more information on safe internal cooking
temperatures.
• To store leftovers after cooking, do NOT place the entire removable stoneware
crock in the refrigerator since contents will take too long to cool. Instead, divide
leftovers into smaller containers and place into refrigerator.
• Never allow undercooked or raw meat to sit at room temperature in the slow
cooker. Once meat is placed into the removable stone- ware crock, it should be
cooked immediately (unless prepping slow cooker the night before, where crock
should be placed into the refrigerator).
IF YOU LIVE IN A HIGH-ALTITUDE AREA:
The Extension service will have detailed information about cooking for your area.
To locate the Cooperative Extension service in your county, please visit: http://
www.csrees.usda.gov/Extension/.

ENGLISH INSTRUCTIONS
9
TIPS FOR SLOW COOKING
PROBLEM THINGS TO CHECK
Cannot select TEMP
and/or HOURS settings.
• Is the unit plugged in?
• Test that the electrical outlet is working with a
lamp in known working order.
Food is undercooked. • Was food cooked on the Warm setting? Do not
cook on Warm setting; always cook on Low or
High heat settings.
• Did you select the Low heat setting, but used a
cooking time based on the High heat setting?
• Did you have the glass lid placed correctly on
the slow cooker?
The food isn’t done af-
ter cooking the amount
of time recommended in
my recipe.
• This can be due to voltage variations (which are
commonplace everywhere) or altitude. The slight
uctuations in power do not have a noticeable
effect on most appliances. However, they
can alter cooking times in the slow cooker by
extending the cooking times. Allow sufcient time
and select the appropriate heat setting. You will
learn through experience if a shorter or longer
time is needed.
My meal was
overcooked. Why?
• Was the removable stoneware crock at least
half full? The slow cooker has been designed
to thoroughly cook food in a lled removable
stoneware crock. If the removable stoneware
crock is only half-lled, check for doneness 1 to 2
hours earlier than recipe time.
• Did you select hours based on a Low heat
recipe?
• Foods will continue to increase in temperature
after desired temperature has been reached.
TROUBLESHOOTING

This warranty applies to products purchased and used in the U.S. and Canada, which have been properly
registered within 30 days of the date of original purchase. This is the only express warranty for this
product and is in lieu of any other warranty or condition. This product is warranted to be free from defects
in material and workmanship for a period of one (1) year from the date of original purchase. During this
period, your exclusive remedy is repair or replacement of this product or any component found to be
defective, at our option.
To register your product: complete the online form at www.WestonProducts.com/Warranty, or submit the
completed Warranty Card and a copy of the purchase receipt.
This warranty does not cover unregistered products, unauthorized repairs or service to products, products
sold “as-is” by retailers, glass, lters, wear from normal use, use not in conformity with the printed
directions, or damage to the product resulting from accident, alteration, abuse, or misuse. This warranty
extends only to the original consumer purchaser or gift recipient and is not transferrable. Keep the original
sales receipt, as proof of purchase is required to make a warranty claim. This warranty is void if the
product is subjected to any voltage and waveform other than as specied on the rating label (e.g., 120V ~
60 Hz).
We exclude all claims for special, incidental and consequential damages caused by breach of express
or implied warranty. All liability is limited to the amount of the purchase price. Every implied warranty,
including any statutory warranty or condition of merchantability or tness for a particular purpose, is
disclaimed except to the extent prohibited by law, in which case such warranty or condition is limited to the
duration of this written warranty. This warranty gives you specic legal rights. You may have other legal
rights that vary depending on where you live. Some states or provinces do not allow limitations on implied
warranties or special, incidental, or consequential damages, so the foregoing limitations may not apply to
you.
Before returning the product for any repair or service: it must be clean and free from any food particles or
other debris; otherwise, we will return it or impose a $50 cleaning surcharge, at our option.
To make a warranty claim: go to www.WestonProducts.com/Contact; or call 1.800.814.4895 in the U.S.
and 001.440.638.3131 outside the U.S., Monday – Friday, 8 am – 5 pm Eastern. You are responsible for
all costs associated with shipping us the product freight prepaid. If the product qualies for a warranty
repair or replacement, we will bear the cost of returning it to you. We are not responsible for shipping
damage.
For non-warranty work: call 1.800.814.4895 in the U.S. and 001.440.638.3131 outside the U.S., Monday –
Friday, 8 am – 5 pm Eastern, to obtain a Return Merchandise Authorization Number (RMA Number). We
will refuse all returns without an RMA Number. We charge US$35/hour for all diagnostic, service, repair
and processing work. We will not start any service or repair work without prior authorization. You are
responsible for all costs associated with shipping us the product freight prepaid and our returning it to you.
To use the Warranty Card to register your product, follow these instructions:
Customer Name:
Address:
City/State/Zip/Country:
Telephone Number:
E-Mail Address:
Original Date of Purchase:
Product Model #:
Serial # (if applicable):
I have read the warranty information. Initial here:
ONE-YEAR LIMITED WESTON WARRANTY
WESTON WARRANTY CARD
SEND THIS CARD ALONG WITH A COPY OF YOUR ORIGINAL PURCHASE RECEIPT TO:
WESTON BRANDS LLC / WARRANTY, 20365 PROGRESS DRIVE, STRONGSVILLE, OH 44149 USA
Copy of Receipt
Included

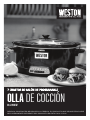
OLLA DE COCCIÓN
03-2200-W
DEBIDO A CONSTANTES MEJORAS EN LA FÁBRICA, EL PRODUCTO QUE SE MUESTRA PUEDE
SER LIGERAMENTE DIFERENTE DEL PRODUCTO EN ESTA CAJA. 071315

1. Lea todas las instrucciones.
2. Verique que el voltaje de su instalación
corresponda con el del producto.
3. No toque supercies calientes. Use los
mangos o las perillas.
4. Para protegerse contra el riesgo de
choque eléctrico, no sumerja el cordón, el
enchufe ni la base en agua ni en ningún
otro líquido.
5. Es necesario que haya buena
supervisión cuando los niños utilicen
aparatos o cuando éstos se estén
utilizando cerca de niños.
6. Desenchúfelo del tomacorriente cuando
no lo esté usando y antes de la limpieza.
Deje que se enfríe antes de colocar o
sacar alguna pieza.
7. No opere ningún aparato eléctrico si
el cordón o el enchufe están averiados,
después de un mal funcionamiento del
aparato, o si éste se ha caído o averiado
de alguna forma. Llame a nuestro
número de llamada gratis de servicio al
cliente, para obtener información sobre el
examen, la reparación o ajuste eléctrico o
mecánico.
8. El uso de accesorios no recomendados
por el fabricante de elec- trodomésticos
puede causar incendios, choques
eléctricos o lesiones.
9. No lo use al aire libre.
10. No deje que el cordón cuelgue sobre
el borde de una mesa o de un mostrador,
o que toque alguna supercie caliente,
incluyendo la supercie de una estufa.
11. No coloque el aparato sobre o cerca
de una fuente de gas caliente o de un
quemador eléctrico, ni dentro de un horno
caliente.
12. Es importante tener extremo
cuidado cuando se mueva un apara- to
electrodoméstico que contenga aceite
caliente u otros líquidos calientes.
13. Para desconectar la olla eléctrica de
cocimiento lento, coloque la perilla en la
posición apagada (OFF); saque el enchufe
del toma- corriente.
LEA Y ENTIENDA COMPLETAMENTE TODAS LAS INSTRUCCIONES Y
ADVERTENCIAS ANTES DE UTILIZAR ESTA UNIDAD. ¡SU SEGURIDAD
ES LO MÁS IMPORTANTE! NO SEGUIR LOS PROCEDIMIENTOS
Y PRECAUCIONES PUEDE PROVOCAR LESIONES GRAVES Y
DAÑOS MATERIALES. RECUERDE: ¡SU SEGURIDAD PERSONAL ES
RESPONSABILIDAD DE USTED!
¡GUARDE ESTAS INSTRUCCIONES!
14. Precaución: Para evitar daños o peligros
de choque eléctrico no cocine sobre la base.
Cocine solamente dentro del revestimiento
desmontable.
15. Evite cambios repentinos de
temperatura, como la adición de alimentos
refrigerados en una el recipiente de
cerámica caliente.
16. No use el aparato electrodoméstico para
ningún otro n que no sea el indicado.
17. Este aparato ha sido diseñado
solamente para uso doméstico.
Este producto está concebido para la
preparación, cocción y servicio de alimentos.
Este producto no está concebido para
su uso con materiales o productos no
alimenticios.
¡ADVERTENCIA! Peligro de descarga
eléctrica: Este aparato cuenta con un
enchufe polarizado (una pata más ancha)
que reduce el ries- go de una descarga
eléctrica. El enchufe embona únicamente
en una dirección dentro de un tomacorriente
polarizado. No trate de obviar el propósito
de seguridad del enchufe modicándolo de
alguna man- era o utilizando un adaptador.
Si el enchufe no embona, inviértalo.
Si aún así no embona, llame a un electricista
para que reemplace el tomacorriente.
El largo del cable que se usa en este
aparato fue seleccionado para reducir
el peligro de que alguien se enganche o
tropiece con un cable más largo. Si es
necesario usar un cable más largo, se
podrá usar un cable de extensión aprobado.
Las especicaciones eléctricas nominales
del cable de extensión debe ser igual o
mayor que la especicaciones nominal de
la cafetera. Es importante tener cuidado de
colocar el cable de extensión para que no se
pliegue sobre el mesa o la mesera en donde
niños puedan tirar del mismo o tropezarse
accidentalmente.
REGLAS IMPORTANTES DE SEGURIDAD
12
INSTRUCCIONES EN ESPAÑOL

REGLAS IMPORTANTES DE SEGURIDAD
13
INSTRUCCIONES EN ESPAÑOL
TAPA Y OLLA: PRECAUCIONES E INFORMACIÓN
• Por favor maneje la Olla y Tapa cuidadosamente para asegurarles una vida larga.
• Evite cambios repentinos y extremos de temperatura. Por ejemplo, no coloque una Tapa u
Olla caliente en agua fría o sobre una supercie húmeda.
• Evite golpear al Olla y Tapa contra el fregadero u otra supercie dura.
• No use la Olla o Tapa si está astillada, quebrada o severamente tallada.
• No use limpiadores abrasivos o estropajos de metal.
• La parte inferior de la Olla es muy áspera y puede dañar una cubeirta. Tenga precaución.
• La Olla y tapa pueden volverse muy calientes. Tenga precaución. No los ponga directa-
mente sobre ninguna supercie o cubierta desprotegida.
• La Olla puede usarse en microondas y es a prueba de hornos, pero nunca caliente la Olla
cuando esté vacía. Nunca coloque la Tapa en un quemador o sobre la estufa. No coloque la
Tapa en un horno de microondas, horno convencional o sobre la estufa.
REMUEVA LA TAPA Y OLLA
Cuando remueva la Tapa, inclínela de manera que la abertura quede hacia otro lado que no
sea hacia usted para evitar quemaduras por el vapor.
Los lados de la Base de la olla de cocimiento lento se ponen muy calientes debido a los
elementos calorícos localizados en ella. Use las manijas en la base si es necesario. Use
guantes para remover la Olla.

14
INSTRUCCIONES EN ESPAÑOL
LISTA DE COMPONENTES
NÚMERO DE DIAGRAMA DESCRIPCIÓN DE LA PIEZA NÚMERO DE PIEZA
1 TAPA, 7 QT 03-2301
2 OLLA, 7 QT - OVAL 03-2302
3 EL LID LATCH™ AYUDA 03-2103
4 BASE 03-2304-W
Si cualquier componente de esta unidad está roto, si no funciona debidamente, o si necesita
un instructivo de repuesto, visítenos en la Web en
WestonProducts.com
O llame a Weston Brands LLC larga distancia sin costo 1-800-814-4895
De lunes a viernes, de 8:00 am a 5:00 pm tiempo del ET. Fuera de Estados Unidos llame
al 001-440-638-3131
1 Tapa
2 Olla
3 El Lid
Latch™
Ayada
4 Base

15
INSTRUCCIONES EN ESPAÑOL
CÓMO USAR SU OLLA DE COCCIÓN
ANTES DE USAR POR PRIMERA VEZ: Lave
la tapa de vidrio y vasija de cerámica removible
en agua caliente jabonosa. Enjuague y seque.
1. Encienda la unidad presionando el botón de
ON/OFF/ (encendido/ apagado). La unidad
cambiará automáticamente a un tiempo de
cocción predeterminado de 4 horas en HIGH
(alto). (FIGURA 1)
2. Seleccione la temperatura de cocción
deseada presionando el botón TEMP.
NOTA: No use el ajuste de WARM (caliente)
para cocinar o recalentar el alimento. (FIGURA
2)
3. Ajuste el tiempo de cocción presionando
el botón de HOURS (horas). Se pueden
seleccionar 2, 4, 6, 8, o 10 horas. Una
vez que se ha seleccionado el tiempo, la
unidad comenzará a contar hacia atrás en
incrementos de dos horas. Para obtener más
información sobre temperaturas seguras de
cocción interna, visite www.foodsafety.gov.
(FIGURA 3)
NOTAS:
• La temperatura de cocción y las horas
de cocción seleccionadas funcionan
independientemente una de la otra y
cualquiera puede cambiarse en cualquier
momento. Cuando se seleccione un nuevo
tiempo de cocción, la unidad se reajustará para
contar hacia atrás desde el nuevo número de
horas seleccionado.
• Como precaución de seguridad, la unidad no
permanecerá encendida por más de 14 horas
de cocción continua y tiempo de calentamiento
y se apagará en forma automática.
El tiempo de cocción seleccionado se
encenderá por 2 horas. Cuando hayan
nalizado las 2 horas, se encenderá la
siguiente luz de 2 horas y continuará la cuenta
regresiva hasta nalizar el tiempo de cocción.
Al nal del tiempo de cocción, la olla de
cocción lenta cambiará de manera automática
a la conguración WARM (caliente). NOTA:
El tiempo de cocción sumado al tiempo de
mantener caliente no puede superar las 14
horas. Cuando la unidad cambia a WARM
(caliente), la luz se enciende para mostrar el
tiempo restante de las 14 horas.
FIGURA 1
FIGURA 2
FIGURA 3

16
INSTRUCCIONES EN ESPAÑOL
LIMPIEZA Y CUIDADO
Peligro de Descarga Eléctrica.
Desconecte la energía antes de limpiar. No sumerja el
cable, enchufe o base en ningún líquido.
No utilice la conguración “SANI” cuando la lave en el
lavavajillas. Las temperaturas del ciclo “SANI” pueden
dañar su producto
FIGURA B
FIGURA A
RESISTENTE AL LAVAVAJILLAS
Remueva la olla y deje enfriar.
CÓMO USAR EL LID LATCH™ STRAP
El Lid Latch™ ayuda a asegurar la tapa
mientras es movida, transportada o
almacenada la olla de cocción.
1. Coloque el broche en la ranura debajo de
una manija. Estire el otro lado y asegúrelo en
la ranura en la otra manija. (FIGURA A)
2. Una vez unido, el broche puede ser
cruzado sobre la perilla para asegurar aún
más la tapa. (FIGURE B)

17
INSTRUCCIONES EN ESPAÑOL
LIMPIEZA Y CUIDADO
Remueva la olla y deje enfriar.
CONCEJOS PARA COCINAR LENTO
• La vasija de cerámica removible debe estar por lo menos llenada a la mitad para
mejores resultados. Si sólo está llena a la mitad, revise si terminó 1 a 2 horas más
temprano que en la receta.
• No se requiere menear cuando se cocina lento y remover la tapa de vidro
resulta en una gran pérdida de calor y puede necesitar que se extienda el tiempo
de cocinado. Sin embargo, si se cocina en HIGH (alto), puede querer menear
ocasionalmente.
• Si cocina sopas o guisados, deje un espacio de 2 pulgadas (5 cm) entre la parte
superior de la vasija de cerámica removible y la comida de manera que la receta
pueda hervir.
• Muchas recetas requieren cocerse todo el día. Si su programa matutino no le
deja tiempo para preparar una receta, hágalo la noche anterior. Coloque todos
los ingredientes en la vasija de cerámica removible, cubra con la tapa y refrigere
durante la noche. En la mañana, coloque la vasija de cerámica removible en la
base.
• Algunos alimentos no se adaptan a un cocimento extendido en una olla de
cocción lenta. La pasta, mariscos, leche, crema o crema agria deben de agregarse
2 horas antes de servirse. La leche evaporada o sopas condensadas son perfectas
para el cocimiento lento.
• Entre más contenido de grasa tenga la carne, menos líquido necesita. Si cocina
carne con alto contenido de grasa, coloque rebanadas gruesas de cebolla debajo
de la carne de manera que la carne no se asiente (y cocine) en la grasa.
• Las ollas de cocción lenta permiten muy poca evaporación. Si hace su sopa,
guisado o salsa favorita, reduzca el líquido indicado en la receta original. Si está
muy espeso, se puede agregar líquido posteriormente.
• Si cocina una cacerola de tipo vegetal, necesita haber líquido en el recipiente
para prevenir que se quemen los lados de la vasija de cerámica removible.
CONSEJOS DE SEGURIDAD DE ALIMENTOS
• No use carne congelada sin cocinar en la olla de cocción lenta. Descongele todas
las carnes vacunas y de aves antes de iniciar la cocción lenta.
• Para obtener más información sobre temperaturas seguras de cocción interna,
visite www.foodsafety.gov.
• Para almacenar sobras después de la cocción, NO coloque toda la vasija de
cerámica removible en el refrigerador porque los alimentos tardarán demasiado
en enfriarse. Divida las sobras en recipientes más pequeños y colóquelos en el
refrigerador.
• Nunca permita que carne cruda o poco cocida quede a temperatura ambiente
dentro de la olla de cocción lenta. Una vez que la carne se coloca en la vasija, ésta
debe cocinarse de inmediato (a menos que se prepare la vasija de cocción lenta la
noche anterior, en cuyo caso la olla debe colocarse en el refrigerador).
SI USTED VIVE EN UNA ÁREA DE ALTITUD ELEVADA:
El servicio de extensión tendrá información detallada sobre cocción en su área.
Para ubicar el servicio de extensión cooperativa en su condado, tenga a bien visitar
la siguiente página: http://www.csrees.usda.gov/Extension/.

18
INSTRUCCIONES EN ESPAÑOL
PROBLEMA
POTENCIAL
PROBABLE CAUSA
No puedo seleccionar
los ajustes de TEMP
y/o HOURS (horas).
• ¿La unidad está enchufada?
• Verique que el tomacorriente funcione
mediante una lámpara que esté en condiciones
perfectas.
Los alimentos no están
bien cocidos.
• ¿Los alimentos fueron cocinados en la
conguración de Warm (Calentar)? No cocine
en esta conguración; hágalo siempre en las
conguraciones de calor Low (baja) o High (alta).
• ¿Eligió la conguración de calor Low (baja)
pero utilizó un tiempo de cocción basado en la
conguración de calor High (alta)?
• ¿Colocó la tapa de vidrio correctamente en la
olla de cocción lenta?
Los alimentos no
quedan cocidos
después de cocinarlos
durante el tiempo
recomendado en la
receta.
• Esto puede deberse a variaciones de voltaje
(algo común en todas partes) o altitud. Las
ligeras uctuaciones de energía no tienen
un efecto evidente en la mayoría de los
electrodomésticos. Sin embargo, puede alterar
los tiempos de cocción en la olla de cocción lenta
extendiendo los tiempos de cocción. Calcule
tiempo suciente y seleccione la conguración
de calor adecuada. A través de la experiencia,
aprenderá a darse cuenta si necesita más o
menos tiempo.
¿Mis alimentos se
cocieron de más? ¿Por
qué?
• ¿El vasija de cerámica removible se encontraba
por lo menos lleno a la mitad? La olla de
cocción lenta ha sido diseñada para cocinar los
alimentos completamente en una vasija lleno.
Si éste se encuentra sólo por la mitad, verique
el nivel de cocción 1 ó 2 horas antes del tiempo
señalado en la receta.
• ¿Eligió el tiempo en base a una receta de calor
Low (baja)?
• Los alimentos continúan subiendo la
temperatura después de que se ha alcanzado la
temperatura deseada.
RESOLVIENDO PROBLEMAS


Esta garantía aplica a los productos que se compran y usan en los EE. UU. y Canadá, y que se registraron
adecuadamente dentro de 30 días de la fecha de compra original. Esta es la única garantía expresa para este
producto y reemplaza cualquier otra garantía o condición. Este producto está garantizado contra defectos materiales
y de fabricación por un período de un (1) año a partir de la fecha de compra original. Durante este período, su único
recurso es la reparación o sustitución de este producto o de cualquier componente que se encuentre defectuoso, a
nuestra elección.
Para registrar su producto, complete el formulario en línea en www.WestonProducts.com/Warranty o envíe la tarjeta
de garantía completada y una copia del recibo de compra.
Esta garantía no cubre productos no registrados, reparaciones o servicios a productos no autorizados, productos
vendidos “tal cual” por minoristas, vidrio, ltros, desgaste por uso normal, uso que no sea conforme a las
instrucciones impresas o daño al producto como resultado de un accidente, alteración, abuso o mal uso. Esta
garantía se extiende únicamente al comprador consumidor original o quien reciba el producto como regalo y no es
transferible. Guarde el recibo de compra original ya que se requiere de un comprobante de compra para hacer un
reclamo de garantía. Esta garantía es nula si el producto es sujeto a cualquier voltaje u forma de onda que no sea la
que se indica en la etiqueta de especicaciones (p. ej., 120 V ~ 60 Hz).
Excluimos todo reclamo por daños especiales, incidentales o que resulten como consecuencia del incumplimiento
de la garantía expresa o implícita. Toda responsabilidad se limita al monto del precio de compra. Toda garantía
implícita, incluyendo cualquier garantía legal o condición de comerciabilidad o aptitud para un propósito en particular,
se niega excepto en la medida que lo prohíbe la ley, en cuyo caso dicha garantía o condición se limita a la duración
de esta garantía por escrito. Esta garantía le otorga derechos legales especícos. Puede tener otros derechos
legales que varían según donde vive. Algunos estados o provincias no permiten limitantes en garantías implícitas
o daños especiales, incidentales o consecuentes, por lo tanto, es posible que las limitaciones mencionadas
anteriormente no apliquen para usted.
Antes de devolver el producto para cualquier reparación o servicio: debe estar limpio y libre de partículas de
alimentos u otra suciedad; de otra manera, se le devolverá o aplicará un cargo de 50 USD por limpieza, a nuestra
elección.
Para reclamar una garantía, visite www.WestonProducts.com/Contact o llame al 1.800.814.4895 en los EE. UU. o al
001.440.638.3131 fuera de los EE. UU., de lunes a viernes de 8 a. m. a 5 p. m. hora del este. Usted es responsable
de todos los costos asociados con enviarnos el producto con el ete prepagado. Si el producto calica para una
reparación o un reemplazo bajo garantía, asumiremos el costo de devolverle el producto. No somos responsables
por los daños resultantes del envío.
Para trabajo fuera de garantía: llame al 1.800.814.4895 dentro de los EE. UU. o al 001.440.638.3131 fuera de
los EE. UU., de lunes a viernes de 8 a. m. a 5 p. m. hora del Este, para obtener un número de autorización de
devolución de mercancía (Return Merchandise Authorization, RMA). Rechazaremos toda devolución sin número de
RMA. Aplicaremos un cargo de 35 USD/hora por todo trabajo de diagnóstico, servicio, reparación o procesamiento.
No iniciaremos ningún servicio o trabajo de reparación sin autorización previa. Usted es responsable de todos los
costos asociados con enviarnos el producto con el ete prepagado y con nuestra devolución hacia usted.
Para usar la tarjeta de garantía para registrar su producto, siga estas instrucciones:
Nombre del Cliente:
Dirección:
Ciudad/Estado/Código Zip/País:
Número Telefónico:
Dirección de Correo Electrónico:
Fecha de Compra Original:
Modelo del Producto #:
# de Serie (Si corresponde):
UN AÑO DE GARANTÍA WESTON LIMITADA
TARJETA DE GARANTÍA WESTON
ENVÍE ESTA TARJETA JUNTO CON UNA COPIA DE SU RECIBO DE COMPRA ORIGINAL A: WESTON
BRANDS, LLC/WARRANTY, 20365 PROGRESS DRIVE. STRONGSVILLE, OH 44149 USA
Copia del recibo
incluido
A página está carregando...
A página está carregando...
A página está carregando...
A página está carregando...
A página está carregando...
A página está carregando...
A página está carregando...
A página está carregando...
A página está carregando...
A página está carregando...
A página está carregando...
A página está carregando...
-
 1
1
-
 2
2
-
 3
3
-
 4
4
-
 5
5
-
 6
6
-
 7
7
-
 8
8
-
 9
9
-
 10
10
-
 11
11
-
 12
12
-
 13
13
-
 14
14
-
 15
15
-
 16
16
-
 17
17
-
 18
18
-
 19
19
-
 20
20
-
 21
21
-
 22
22
-
 23
23
-
 24
24
-
 25
25
-
 26
26
-
 27
27
-
 28
28
-
 29
29
-
 30
30
-
 31
31
-
 32
32


Weston 03-2300-W Guia de usuario
- Categoria
- Fogões lentos
- Tipo
- Guia de usuario
em outras línguas
- español: Weston 03-2300-W Guía del usuario
- français: Weston 03-2300-W Mode d'emploi
- English: Weston 03-2300-W User guide
Artigos relacionados
Outros documentos
-
Hamilton Beach 33480 Manual do usuário
-
Hamilton Beach 33660 Guia de usuario
-
Hamilton Beach 33463 Guia de usuario
-
-
Hamilton Beach 33140V Guia de usuario
-
-
-
-
Hamilton Beach 33182 Guia de usuario