ADS Tech INSTANTFM MUSIC Manual do proprietário
- Tipo
- Manual do proprietário

Quick Guide
RDX-155- 589
Service and Warranty
Service:
If you require assistance with the installation, operation, or application of your ADS Technologies, Inc. product the best option
available to you is our website at www.adstech.com. Your primary source for information and assistance is always your computer
store or computer parts dealer. If your ADS product needs repair or replacement, contact your dealer for on-site repair service.
The ADS Technologies technical support and customer service staff can aid in solving many problems. Our technical support
department is available to repair any ADS Technologies product. You or your dealer must return products to our factory for repair or
warranty replacement.
Return/Replacement:
If you need to return your ADS Technologies product you should return the product directly to the dealer or store where you
purchased the product. Each individual computer store or dealer sets product returns policies for their customers. ADS Technologies,
Inc. cannot be responsible for the actions or policies set by our dealers. If you desire to return the product for a refund, you must get
the refund from the dealer or store you purchased the product from. If you purchased the product directly from ADS please see the
“Terms and Conditions of Sale” on the reverse side of your sales invoice.
Returns to ADS Technologies, Inc. are for repair or warranty replacement only. If you need to return product to ADS Technologies,
Inc. for repair or replacement you must follow these steps:
1. Call our Technical Support department at (562) 926-4338 in the USA or +353-61-702042 in Europe to obtain a Return
Merchandise Authorization (RMA) number.
2. The RMA number is valid for 30 days.
3. Ship the product to the ADS factory with the RMA number marked on the inside and outside of the package. If there is no RMA
number on the package or the RMA number has expired, the shipment will be refused. ADS will not be liable for lost or
mis-shipped products.
4. Replacement product cannot be shipped to you until the defective product has been received by ADS.
5. Once the product is received at the factory it will be tested and then repaired or replaced.
6. Turn around time is approximately one week. A repaired or replacement product will be shipped back to you.
Warranty:
This ADS Technologies, Inc. product comes with a One (1) year hardware warranty. ADS Technologies, Inc. (ADS) warrants this
product against defects in material and workmanship for a period of One (1) year from the date of original purchase from ADS or an
authorized ADS dealer. This warranty applies only to the original purchase of the product and is not transferable. This warranty does
not cover any incompatibilities due to the user’s computer, hardware, software or other related system configuration in which the
product interfaces. Proof of purchase will be required before any warranty consideration by ADS occurs.
This warranty does not cover any damage caused by negligence, non-authorized modifications, or parts installed without prior written
permission from ADS. This warranty does not apply if the product has been damaged by accident, abuse, or misapplication, nor as a
result of service to the product by anyone other than ADS. If your ADS product is not in working order, your only recourse is repair or
warranty replacement, as described above. UNDER NO CIRCUMSTANCES will ADS Technologies, Inc. be liable for consequential
damages, including but not limited to any lost savings, lost profits, or any other damages, caused by the use of any ADS
Technologies, Inc. product or inability to use the product, even if the dealer or ADS Technologies, Inc. has been advised of such
liability or other claims. This includes damage to property and, to the extent permitted by law, damages for personal injury.
This warranty is in lieu of all other warranties including implied warranties of merchantability and fitness for a particular purpose.
FCC Information
Federal communications Commission Radio Frequency Interference Statement
Note: This equipment has been tested and found to comply with the limits for a class B digital device, pursuant to Part 15 of the
FCC Rules. These limits are designed to provide reasonable protection against harmful interference when the equipment is
operated in a residential installation. This equipment generates, uses and can radiate radio frequency energy and if not installed
and used in accordance with the instruction manual may cause harmful interference to radio communications. However, there is no
guarantee that interference will not occur in a particular installation. If this equipment does cause harmful interference to radio or
television reception, which can be determined by turning the equipment off and on, the user is encouraged to try to correct the
interference by one or more of the following measures:
* Reorient or relocate the receiving antenna
* Increase the separation between the equipment and receiver.
* Connect the equipment into an outlet on a circuit different from that to which the receiver is connected.
* Consult the dealer or an experienced radio TV technician for help.
Notice:
(1) The changes or modifications not expressly approved by the party responsible for compliance could void the user’s authority to
operate the equipment.
(2) Shielded interface cables and AC power cord, if any, must be used in order comply with the emission limits.
© 2006 ADS Technologies. All Rights Reserved
First Edition: August, 2006
ADS is a registered trademark of ADS Technologies Inc.
ADS Technologies (ADS) makes no warranty of any kind with regard to this material, including but not limited to, the implied
warranties of merchantability and fitness for a particular purpose. The information furnished within this written document is for
information purposes only and is subject to change without notice. ADS Technologies assumes no responsibility or liability for any
errors or inaccuracies that may appear herein. ADS Technologies makes no commitment to update or to keep current information
contained within this document.
InstantFM Music Music
Personal FM and Web Radio Recorder
ADS Tech
North America Office
Cerritos, CA 90703, USA
Fax: 562.926.0518
European Office
Unit 1B, Shannon Industrial Estate
Shannon Co. Clare, Ireland
Phone:
+353.61.702042
Fax:
+353.61.702001
Southern Europe and MEA Office
51-55 rue Hoche
94200 Ivry sur Seine, France
Phone: +33 1.43.90.19.20
Fax: +33 1.46.58.67.06
English / French / German / Spanish / Portuguese
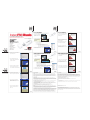
Hardware/Software Installation
1. Connect the 6 inch USB extension cable to the Instant FM Music device.
2. Plug the other end of the USB
cable to an available USB port
on your PC.
3. The system will automatically load drivers in preparation for use of this device.
4. Check your Device Manager for proper device installation.
a. Right-click “My Computer” and select “Properties.”
b. Go to the “Hardware” tab.
c. Click “Device Manager.”
d. This device adds the following components:
Human Interface Devices\HID-compliant device.
Human Interface Devices\USB Human Interface Device.
Sound, video and game controllers\USB Audio Device.
5. The device is ready to use.
6. Insert the CD and install the software provided.
Hardware Installation Software Installation
5. Remember to select your Instant FM Music
as your Recording Device.
6. For more detailed information, open the
User Guide available on the Installation CD
by clicking the Help button.
7. To start your first recording click the Record
tab and Add a New recording schedule or
tune to a radio station and click the Red Button.
1. Branchez la rallonge USB 15 cm au périphérique Instant FM Music.
2. Branchez l’autre extrémité
du câble à un port USB libre
sur votre PC.
3. Le système chargera automatiquement les pilotes permettant d’utiliser ce périphérique.
4. Vérifiez la bonne installation du périphérique en consultant le « Gestionnaire de périphériques ».
a. Faites un clic droit sur « Poste de travail » et sélectionnez « Propriétés ».
b. Cliquez sur l’onglet « Matériel ».
c. Cliquez sur « Gestionnaire de périphériques ».
d. Ce périphérique ajoute les éléments suivants :
Périphériques d’interface utilisateur\Périphérique compatible HID.
Périphériques d’interface utilisateur\Périphérique d’interface utilisateur USB.
Contrôleur audio, vidéo et jeu\Périphérique audio USB.
5. Ce périphérique est prêt à l’utilisation.
6. Insérez le CD et installez le logiciel fourni.
Guide rapide d’installation du matériel
1. Pour installer le logiciel Snaptune One,
suivez les instructions affichées sur chaque
écran d’installation.
2. Vérifiez que votre périphérique Instant FM
Music est bien branché à un port USB.
3. Une fois l’installation terminée, vous pouvez
lancer l’application Snaptune One.
4. La première fois que vous lancez Snaptune
One, un assistant apparaît pour vous guider.
Suivez les instructions affichées à l’écran.
Guide rapide d’installation du logiciel
5. N’oubliez pas de sélectionner Instant FM
Music comme périphérique d’enregistrement.
6. Pour en savoir plus, ouvrez le Guide de
l’utilisateur inclus dans le CD d’installation en
cliquant sur le bouton « Help ».
7. Pour lancer votre premier enregistrement,
sélectionnez une station et cliquez sur le
bouton rouge.
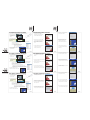
1. In the Snaptune One Software installation,
follow the instructions provided on each
installation screen.
2. Make sure your Instant FM Music device is
plugged in to a USB Port. See Step 4 of
Hardware Installation.
3. After the installation completes, you can
start the Snaptune One application.
4. The first time you run Snaptune One, a
guide will help you get started. Follow the
instructions on the screen.
English English
English Français Français
Français

1. Bei der Installation der Snaptune One
Software führen Sie die Anweisungen in den
einzelnen Installationsbildschirmen aus.
2. Stellen Sie sicher, dass Ihr Instant FM Music
Gerät an eine USB-Buchse angeschlossen ist.
3. Wenn die Installation abgeschlossen ist,
können Sie die Snaptune One Anwendung
starten.
4. Ein Leitfaden begleitet Sie beim ersten Aufruf
von Snaptune One. Führen Sie die
Anweisungen am Bildschirm aus.
Schnellanleitung Software-Installation
5. Vergessen Sie nicht, Instant FM Music als
Aufnahmegerät zu selektieren.
6. Genauere Informationen finden Sie im
Benutzerhandbuch, das sich auf der
Installations-CD befindet und durch
Anklicken der Hilfe-Taste geöffnet wird.
7. Um die erste Aufnahme zu starten, den
gewünschten Sender wählen und die rote
Taste drücken.
1. Schließen Sie das 15 cm-USB-Verlängerungskabel an das Instant FM Music Gerät an.
2. Stecken Sie das andere Ende
des USB-Kabels in eine
verfügbare USB-Buchse auf
Ihrem PC.
3. Das System lädt die Treiber für den Einsatz dieses Gerätes automatisch.
4. Überprüfen Sie die richtige Geräteinstallation im Gerätemanager.
a. Mit der rechten Maustaste „Systemsteuerung“ anklicken und „Eigenschaften“ wählen.
b. Selektieren Sie die Karteikarte „Hardware“.
c. Klicken Sie auf „Gerätemanager“.
d. Dieses Gerät fügt folgende Komponenten hinzu:
Eingabegeräte\HID konformes Gerät.
Eingabegeräte\USB Eingabegerät.
Audio-, Video- und Gamecontroller\USB Audiogerät.
5. Das Gerät ist einsatzbereit..
6. Legen Sie die CD ein und installieren Sie die
mitgelieferte Software.
Schnellanleitung Hardware-Installation
Deutsch Deutsch Deutsch
Español
Español Español
Portuguese
Portuguese Portuguese
1. Conecte el cable de extensión USB de 15 cm al dispositivo Instant FM Music
2. Enchufe el otro extremo del
cable USB a un puerto USB
disponible en el PC.
3. El sistema cargará automáticamente los controladores en preparación para el uso de este dispositivo.
4. Compruebe a través del administrador del dispositivo que el dispositivo se ha instalado correctamente.
a. Haga clic con el botón derecho del ratón en “Mi ordenador” y seleccione “Propiedades.”
b. Vaya a la pestaña “Hardware”.
c. Haga clic en “Administrador del dispositivo.”
d. Este dispositivo añade los siguientes componentes:
Dispositivos de interfaz del usuario\Dispositivo cumple HID.
Dispositivos de interfaz de usuario\Dispositivo USB de interfaz de usuario.
Controladores de sonido, vídeo y juego\Dispositivo de audio USB.
5. El dispositivo está listo para ser usado.
6. Introduzca el CD e instale el software incluido.
Guía rápida de instalación del hardware
1. Conecte o cabo de extensão USB de 15 cm ao seu dispositivo Instant FM Music.
2. Conecte o outro extremo do
cabo a uma entrada USB
disponível no seu PC.
3. O sistema instalará automaticamente os drivers para a utilização do dispositivo.
4. Confirme através do Gerenciador de Dispositivos de que o dispositivo foi instalado corretamente.
a. Clique com o botão direito do mouse em “Meu Computador”, clique “Propriedades”.
b. A seguir clique guia de “Hardware”.
c. A seguir clique na opção “Gerenciador de Dispositivos”.
d. Este dispositivo é adicionado no seguinte grupo:
Human Interface Devices\HID-compliant device.
Human Interface Devices\USB Human Interface Device.
Controladores de som, vídeo e jogo\USB Audio Device.
5. O dispositivo está pronto para uso.
6. Insira o CD e instale o software incluído.
Guía rápido de Instalação de Hardware
1. En el software de instalación Snaptune One, siga
las instrucciones que ofrece cada pantalla de
instalación.
2. Compruebe que el dispositivo Instant FM Music está
conectado al puerto USB.
3. Después de completar la instalación, puede iniciar la
aplicación Snaptune One.
4. La primera vez que ejecute Snaptune One,
encontrará una guía que le ayudará a empezar.
Siga las instrucciones que se ofrecen en pantalla.
Guía rápida de instalación del software
1. Na instalação do software Snaptune One, siga as
instrucões disponíveis em cada tela.
2. Certifique-se de que o dispositivo Instant FM Music
esta conectado corretamente na entrada USB.
3. Após completar a instalação, você pode iniciar o
software Snaptune One.
4. A primeira vez que executar o program Snaptune
One, um guía de auxílio te ajudará a fazer a
configuração. Siga as instruções em cada tela.
Guía rápido de Instalação de Software
5. Recuerde que debe seleccionar Instant FM
Music como el dispositivo de grabación.
6. Si desea información más detallada, abra la
Guía de usuario disponible en el CD de
instalación haciendo clic en el botón de ayuda.
7. Para empezar la primera grabación, sintonice
y haga clic en el botón rojo.
5. Lembre de selecionar o Instant FM Music
como Dispositivo de Gravação.
6. Se precisar de informação mais detalhada,
abra o Guía de Usuário disponível no CD de
Instalação fazendo um clic on botão “Help”.
7. Para iniciar usa primeira gravação, sintonize
e faça um clic no botão vermelho para gravar.
-
 1
1
-
 2
2


ADS Tech INSTANTFM MUSIC Manual do proprietário
- Tipo
- Manual do proprietário
em outras línguas
Artigos relacionados
Outros documentos
-
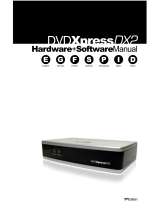 ADS Technologies DVD XPRESS DX2 Hardware And Software Manual
-
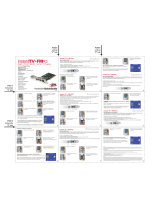 ADS Technologies PTV-352-EFG Hardware Quickmanual
-
 ADS Technologies USBAV-709-EF Software Manual
-
LG 24MT48VF-PT Manual do proprietário
-
LG 22LN4060 Manual do proprietário
-
Klipsch Roomgroove 5V Manual do usuário
-
-
Huawei Band Series User Band 4 Guia rápido
-
Quantum RDX8000 Guia rápido


