繁中
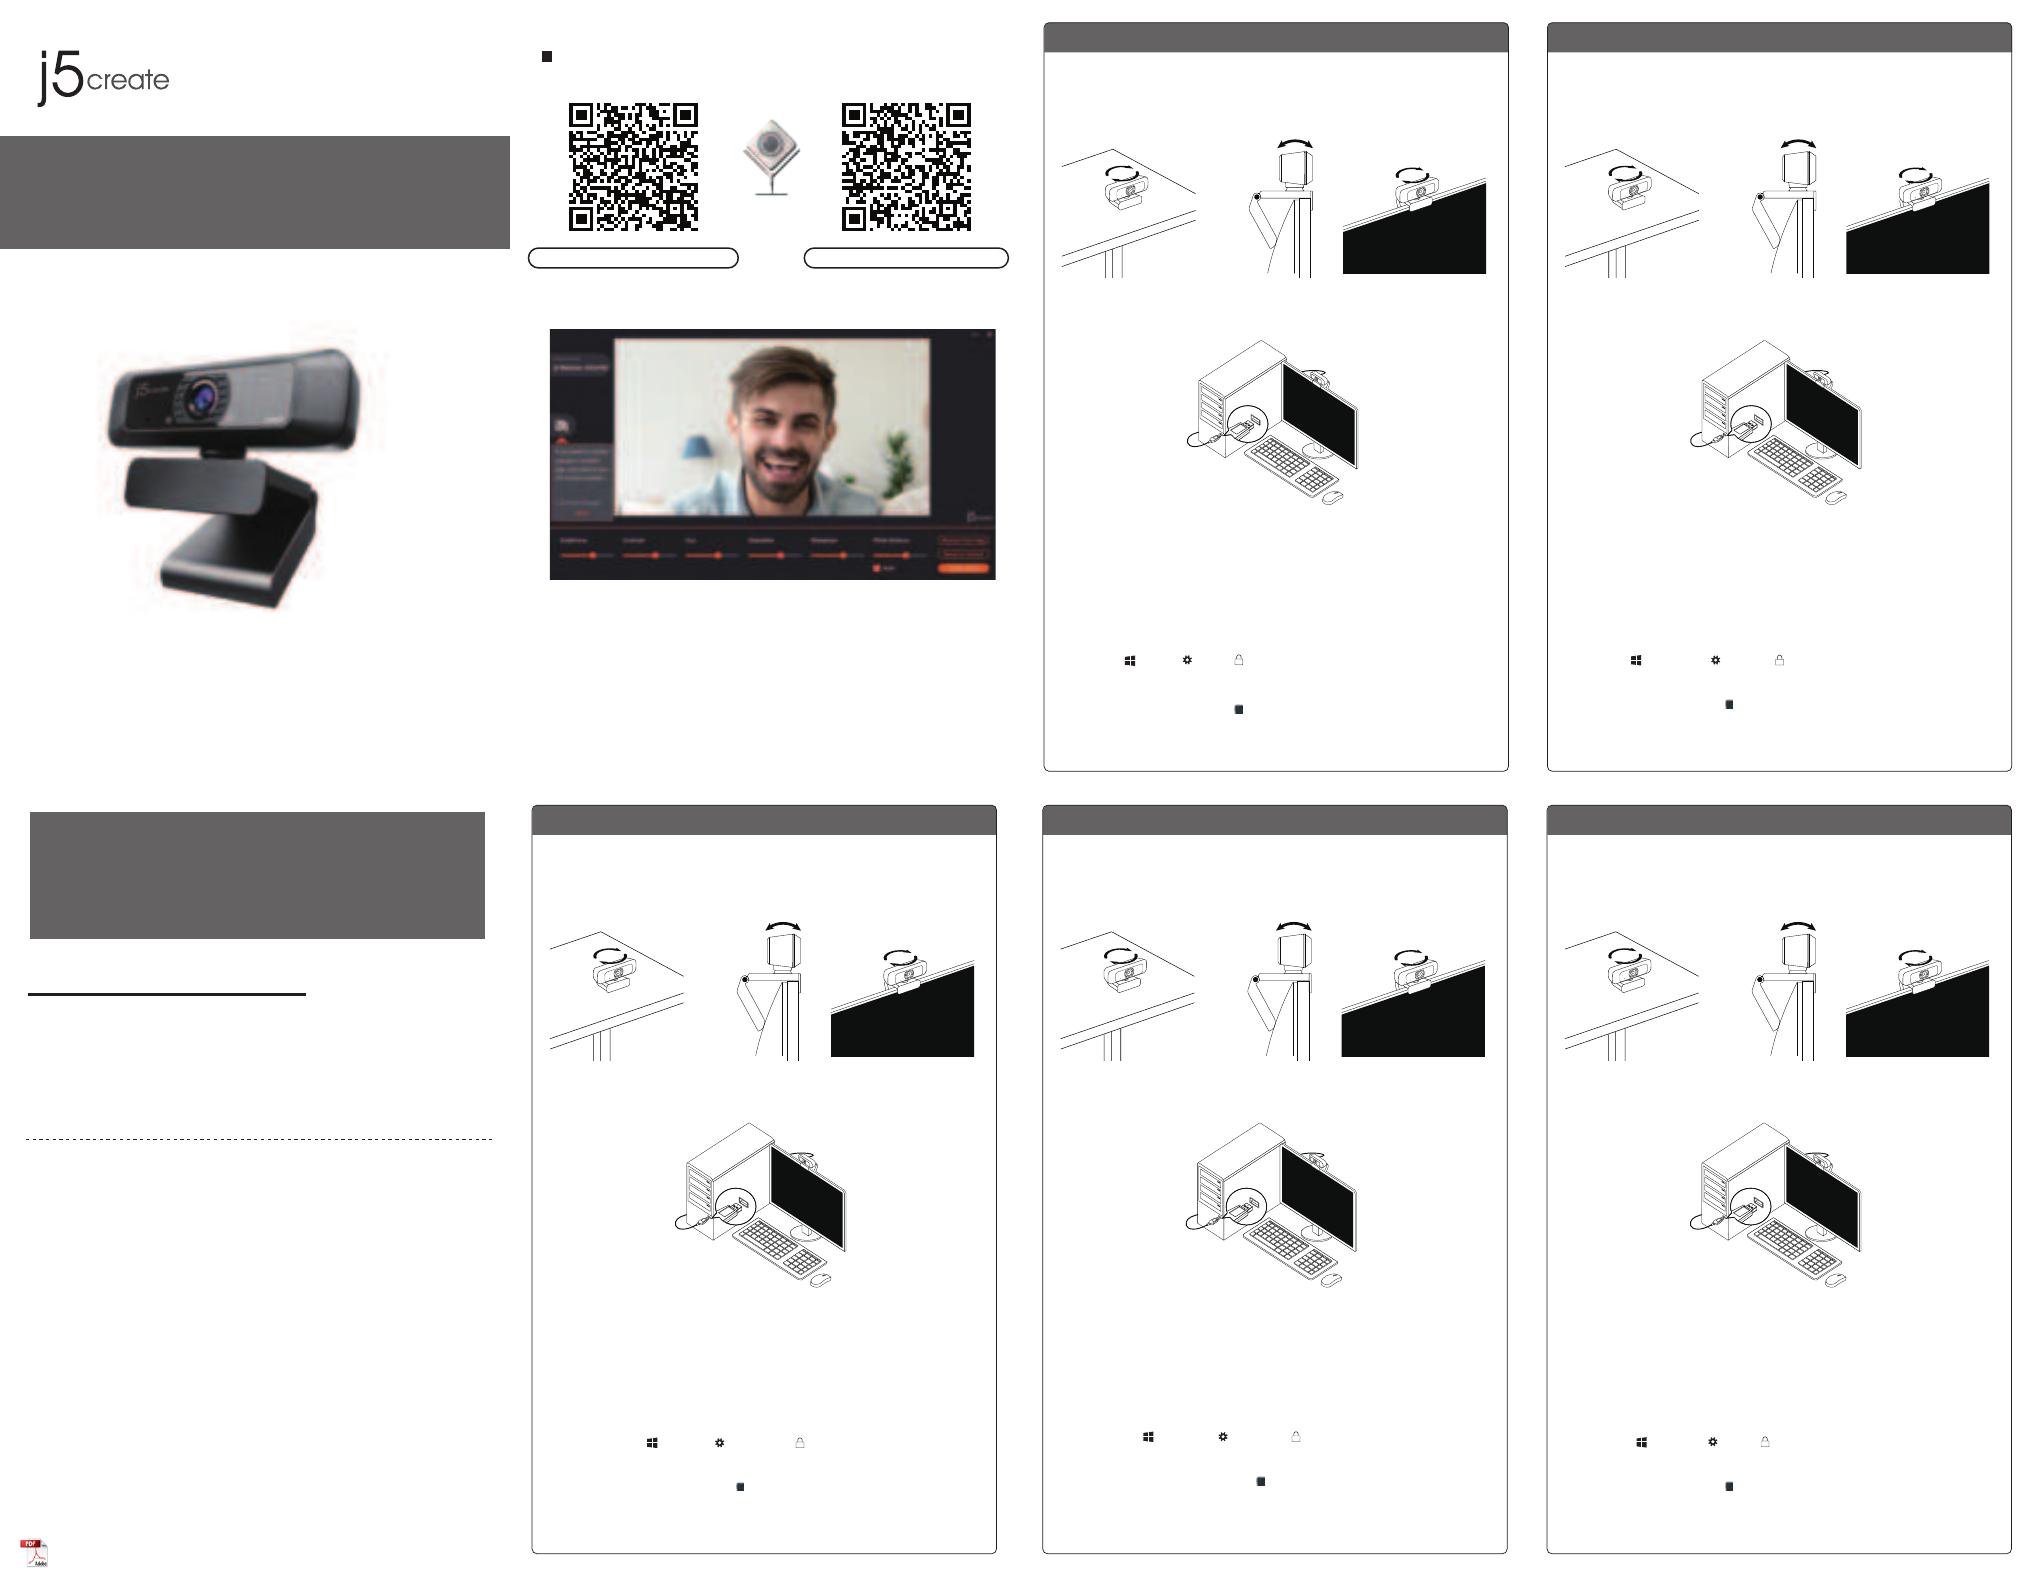
步驟1. 放置您的Model : JVCU100
將JVCU100放在平坦的桌子上或打開JVCU100支架底座將其放置於螢幕上方。您可
調整支架角度,使其穩定置於螢幕上,並獲得最佳的攝影視角。
步驟2. 連接您的Model : JVCU100
將JVCU100的USB™線連接到您的電腦。等待紅燈亮起,即可準備使用JVCU100進行
視訊通話。
步驟3. 使用Model : JVCU100 開始視訊通話
請先確認您的電腦已連接網路,您也需要事先安裝視訊通話軟體才可與他人進行視
訊通話,並在該通話軟體的設定選項中,將視訊設備和麥克風設定為JVCU100。
* JVCU100 提供高畫質1080P視頻通話,網路傳輸速度需至少2 Mbps以上。
* 通話品質可能會受到網路頻寬、CPU速度、視訊通話類型等其他外在因素影響。
* JVCU100具備廣泛的軟體相容性,可適用於 Zoom™,Facebook™ Messenger,Skype™,
Microsoft Teams™ 等多種視訊通話軟體。
簡中
2
3 Model : JVCU100
PC Mac®Chromebook™
Svenska
Steg 1. Placera din Model : JVCU100
Ställ JVCU100 på ett plant bord eller öppna basklämman för JVCU100 och montera den
på skärmen. Justera basklämman så att den är stabil på skärmen.
Justera JVCU100 till din optimala visningsvinkel.
Steg 2. Anslut din Model : JVCU100
Anslut JVCU100 USB™-kabeln till din dator, Mac® eller Chromebook™.
När den röda indikatorn är helt tänd är JVCU100 klar att använda för videosamtal.
Steg 3. Starta ett videosamtal med din Model : JVCU100
Kontrollera att dator, Mac® eller Chromebook™ har Internettjänst, och både du och
personen du ringer upp måste använda ett videosamtalsprogram.
Välj rätt videoenhet och mikrofonenhet i inställningarna i videosamtalsprogrammet.
* JVCU100 tillhandahåller fullständiga HD 1080P videosamtal, med minst 2 megabit
uppladdningshastighet.
* 1080p samtal kan påverkas av tillgänglig nätverksbandbredd, CPU-hastighet, typ av
videosamtalsprogram osv.
* Stor kompatibilitet: Zoom™, Facebook™ Messenger, Skype™, Microsoft Teams™ m.fl.
* För Windows® 10:
* Sekretessinställningar för macOS® :
1. Gå till Start > Inställningar > Sekretess > Kamera/Mikrofon
2. Välj en inställning för att tillåta att appar får tillgång till din kamera/mikrofon.
3. Starta kameran/mikrofonen för appar.
1. På din Mac® väljer du Apple®-menyn > Systempreferenser, klicka på Säkerhet och sekretess, och
klickar därefter på Sekretess.
2. Välj Kamera/Mikrofon.
3. Markera kryssrutan bredvid en app för att ge den tillstånd att komma åt kameran/mikrofonen.
Avmarkera kryssrutan för att stänga av åtkomsten till appen. Om du stänger av åtkomsten till en app
blir du ombedd att sätta på den igen nästa gång som appen försöker använda kameran/mikrofonen.
Português
Passo 1. Colocar a câmara Model : JVCU100
Coloque a câmara JVCU100 muna superfície plana ou abra a base da câmara JVCU100 e
instale no monitor. Ajuste a base para que a câmara esteja estável no monitor.
Ajuste a câmara JVCU100 para o ângulo de visualização ideal.
Passo 2. Ligar a câmara Model : JVCU100
Ligue o cabo USB™ da câmara JVCU100 ao seu PC, Mac® ou Chromebook™.
Quando o indicador vermelho estiver aceso, a sua câmara JVCU100 estará pronta a ser
utilizada para videochamadas.
Passo 3. Iniciar uma videochamada com a câmara Model : JVCU100
Certifique-se de que o seu PC, Mac
®
ou Chromebook™ tem acesso à Internet. Tanto você
como a pessoa a quem pretende ligar precisam de utilizar uma aplicação de videochamadas.
Selecione o dispositivo de vídeo e microfone corretos nas definições da aplicação de
videochamadas.
* A câmara JVCU100 permite videochamadas em full HD 1080P, com um mínimo de pelo menos 2 megabits de
velocidade de carregamento.
* As chamadas em 1080p poderão ser afetadas pela largura de banda disponível, a velocidade de CPU, o tipo
de aplicação de videochamadas, etc.
* Ampla compatibilidade: Zoom™, Facebook™ Messenger, Skype™, Microsoft Teams™, etc
* Para Windows® 10:
* Definições de privacidade para macOS®:
1. Aceda a Iniciar > Definições > Privacidade > Câmara/Microfone
2. Escolha a sua definição preferida para que todas as aplicações acedam à câmara/microfone.
3. Ative a sua câmara/microfone para aplicações.
1. No seu Mac®, escolha o menu Apple® > Preferências do sistema, clique em Segurança e Privacidade e, em
seguida, clique em Privacidade.
2. Selecione Câmara/Microfone.
3. Selecione a caixa junto a uma aplicação para permitir que a mesma aceda à câmara/microfone. Desmarque
a caixa para desativar o acesso para essa aplicação. Se desativar o acesso para uma aplicação, ser-lhe-á
pedido para ativar novamente na próxima vez que a aplicação tentar utilizar a câmara/microfone.
步骤1. 放置您的Model : JVCU100
将JVCU100放在平坦的桌子上或打开JVCU100支架底座将其放置于屏幕上方。您可
调整支架角度,使其稳定置于屏幕上,并获得最佳的摄影视角。
步骤2. 连接您的Model : JVCU10
将JVCU100的USB™线连接到您的电脑。等待红灯亮起,即可准备使用JVCU100进行
视讯通话。
步骤3. 使用Model : JVCU100 开始视讯通话
请先确认您的电脑已连接网络,您也需要事先安装视讯通话软件才可与他人进行视
讯通话,并在该通话软件的设置选项中,将摄像头和麦克风设定为JVCU100
* JVCU100 提供高清1080P视讯通话,网络传输速度需至少2 Mbps以上。
* 通话质量可能会受到网络频宽、CPU速度、视讯通话类型等其他外在因素影响。
* JVCU100具备广泛的软件相容性,可适用于 Zoom™,Facebook™ Messenger,Skype™,
Microsoft Teams™ 等多种视讯通话软件。
Italiano
Passo 1. Posizionamento di Model : JVCU100
Collocare JVCU100 su un tavolo piano o aprire la base a clip di JVCU100 e montarlo sul
monitor. Regolare la base della clip in modo che sia stabile sul monitor.
Regolare JVCU100 sull'angolo di visione ottimale.
Passo 2. Collegamento di Model : JVCU100
Collega il cavo USB™ di JVCU100 a PC, Mac® o Chromebook™.
Quando l'indicatore luminoso rosso è completamente illuminato, JVCU100 è pronto per
l'uso per le videochiamate.
Passo 3. Avvio di una videochiamata con Model : JVCU100
Assicurarsi che PC, Mac
®
o Chromebook™ disponga di un servizio Internet e che l’utente e
la persona con cui si comunica utilizzino un'applicazione di videochiamata.
Selezionare il dispositivo video e il microfono corretti nelle impostazioni dell'applicazione di
videochiamata.
* JVCU100 fornisce videochiamate Full HD 1080P, con una velocità di upload di almeno 2 megabit.
* La chiamata a 1080p può essere influenzata dalla larghezza di banda di rete disponibile, dalla velocità
della CPU, dal tipo di applicazione di videochiamata, ecc.
* Compatibilità Wide: Zoom™, Facebook™ Messenger, Skype™, Microsoft Teams™, ecc.
* Per Windows® 10:
* Impostazioni sulla privacy per macOS® :
1. Andare su Start > Impostazioni > Privacy > Videocamera/Microfono
2. Scegliere l’impostazione predefinita di Consenti app per accedere a videocamera/microfono.
3. Attivare videocamera/microfono per le app.
1. Su Mac®, selezionare il menu Apple® > Preferenze di Sistema, fare clic su Sicurezza e Privacy, quindi fare
clic su Privacy.
2. Selezionare Videocamera/Microfono.
3. Selezionare la casella di controllo accanto a un'app per consentirle di accedere a videocamera/microfono.
Deselezionare la casella di controllo per disattivare l'accesso per quell'app. Se si disattiva l'accesso per
un'app, verrà richiesto di riattivarlo la prossima volta che l'app tenta di utilizzare videocamera/microfono.
1. > > > /
2. /
3. /
1. Mac®Apple® >
2. /
3. /
/
* macOS®
* JVCU100 2 /HD 1080P
* 1080p CPU
*Zoom™ Facebook™ Messenger Skype™ Microsoft Teams™
* Windows® 10
LIMITED WARRANTY
j5create offers a limited 1-year warranty. User’s wear & tear damage is not included. The user shall call or email
j5create customer service with the defect information of the product and obtain a return authorization number. Users
are responsible for one-way return freight cost and we will take care of one-way freight back. In order to obtain a
return authorization number, users should have the following information handy when calling or emailing the service
team:
(i) a copy of the original purchase invoice to verify your warranty
(ii) a product serial number
(iii) a description of the problem
(iv) customer’s name, address, and telephone number
j5create does not warrant that the operation of the product will be uninterrupted or error-free. j5create is not
responsible for damage arising from failure to follow instructions relating to the product’s use. This warranty does not
apply to: (a) consumable parts, unless damage has occurred due to a defect in materials or workmanship; (b) cosmetic
damage, including but not limited to scratches, dents, and broken plastic on ports; (c) damage caused by use with
non-j5create products; (d) damage caused by natural disasters; (e) damage caused by human misuse (lost, accident,
abuse, misuse or other external causes); (f) damage caused by operating the product outside the permitted or
intended uses described by j5create; (g) damage caused by service (including upgrades and expansions) performed by
anyone who is not a representative of j5create or a j5create Authorized Service Provider; (h) a product or part that has
been modified to alter functionality or capability without the written permission of j5create; or (i) if any j5create serial
number on the product has been removed or defaced. If such a situation occurs, j5create will calculate the cost of
materials and repair for your reference. This warranty is given by j5create in lieu of any other warranties expressed or
implied.
LIMITATION OF WARRANTY
THIS WARRANTY GIVES YOU SPECIFIC LEGAL RIGHTS, AND YOU MAY HAVE OTHER RIGHTS THAT VARY FROM STATE TO STATE (OR BY COUNTRY OR
PROVINCE). OTHER THAN AS PERMITTED BY LAW, J5CREATE DOES NOT EXCLUDE, LIMIT OR SUSPEND OTHER RIGHTS YOU MAY HAVE, INCLUDING
THOSE THAT MAY ARISE FROM THE NONCONFORMITY OF A SALES CONTRACT. FOR A FULL UNDERSTANDING OF YOUR RIGHTS YOU SHOULD
CONSULT THE LAWS OF YOUR COUNTRY, PROVINCE OR STATE. TO THE EXTENT NOT PROHIBITED BY LAW IN YOUR STATE, PROVINCE,
JURISDICTION OR COUNTRY, THIS WARRANTY AND THE REMEDIES SET FORTH ARE EXCLUSIVE AND IN LIEU OF ALL OTHER WARRANTIES,
REMEDIES AND CONDITIONS, WHETHER ORAL, WRITTEN, STATUTORY, EXPRESS OR IMPLIED.
J5CREATE'S RESPONSIBILITY FOR MALFUNCTIONS AND DEFECTS IN HARDWARE AND/OR SOFTWARE IS LIMITED TO REPAIR OR REPLACEMENT AS
SET FORTH IN THIS WARRANTY. J5CREATE’S LIABILITY DOES NOT EXTEND BEYOND THE REMEDIES PROVIDED FOR IN THIS LIMITED WARRANTY,
AND J5CREATE DOES NOT ACCEPT LIABILITY FOR CONSEQUENTIAL OR INCIDENTAL DAMAGES, FOR THIRD-PARTY CLAIMS AGAINST YOU FOR
DAMAGES, FOR PRODUCTS NOT BEING AVAILABLE FOR USE, OR FOR LOST OR DAMAGED DATA OR SOFTWARE. J5CREATE DOES NOT WARRANT
THAT THE OPERATION OF ANY J5CREATE PRODUCT WILL BE UNINTERRUPTED OR ERROR FREE.
J5CREATE’S LIABILITY IN ANY SITUATION WILL BE NO MORE THAN THE AMOUNT YOU PAID FOR THE SPECIFIC PRODUCT THAT IS THE SUBJECT OF
A CLAIM. THIS IS THE MAXIMUM AMOUNT FOR WHICH WE ARE RESPONSIBLE.
EXCEPT FOR THE EXPRESS WARRANTIES CONTAINED IN THIS WARRANTY AND TO THE EXTENT NOT PROHIBITED BY LAW, J5CREATE DISCLAIMS
ALL OTHER WARRANTIES AND CONDITIONS, EXPRESS OR IMPLIED, STATUTORY OR OTHERWISE, INCLUDING WITHOUT LIMITATION, WARRANTIES
OF MERCHANTABILITY, MERCHANTABLE QUALITY AND FITNESS FOR A PARTICULAR PURPOSE AND WARRANTIES AND CONDITIONS AGAINST
HIDDEN OR LATENT DEFECTS. SOME STATES, PROVINCES, JURISDICTIONS OR COUNTRIES DO NOT ALLOW DISCLAIMERS OF IMPLIED WARRANTIES
AND CONDITIONS, SO THIS DISCLAIMER MAY NOT APPLY TO YOU.
TO THE EXTENT SUCH WARRANTIES AND CONDITIONS CANNOT BE DISCLAIMED UNDER THE LAWS OF THE UNITED STATES, CANADA (AND ITS
PROVINCES) OR OTHERWISE, J5CREATE LIMITS THE DURATION AND REMEDIES OF SUCH WARRANTIES AND CONDITIONS TO THE DURATION OF
THIS EXPRESS LIMITED WARRANTY AND, AT J5CREATE'S OPTION, REPAIR OR REPLACEMENT SERVICES. SOME STATES, PROVINCES, JURISDICTIONS
OR COUNTRIES MAY NOT ALLOW LIMITATIONS ON HOW LONG AN IMPLIED WARRANTY OR CONDITION MAY LAST, SO THE LIMITATION
DESCRIBED ABOVE MAY NOT APPLY TO YOU.
NO WARRANTIES OR CONDITIONS, WHETHER EXPRESS OR IMPLIED, WILL APPLY AFTER THE LIMITED WARRANTY PERIOD HAS EXPIRED. SOME
STATES, PROVINCES, JURISDICTIONS OR COUNTRIES DO NOT ALLOW LIMITATIONS ON HOW LONG AN IMPLIED WARRANTY OR CONDITION
LASTS, SO THIS LIMITATION MAY NOT APPLY TO YOU.
WARRANTY SUPPORT ONLY APPLIES WHEN THE COVERED PRODUCT IS LOCATED WITHIN THE COUNTRY IN WHICH J5CREATE ORIGINALLY SOLD
THE SYSTEM, AS REFLECTED IN J5CREATE'S RECORDS. IF YOU NEED SUPPORT FOR THE PRODUCT OUTSIDE OF THE COUNTRY OF ORIGIN (FOR
EXAMPLE, WHILE TRAVELING, OR IF THE SYSTEM HAS BEEN RELOCATED TO A NEW COUNTRY), THEN J5CREATE MAY OFFER YOU OTHER SUPPORT
OPTIONS FOR AN ADDITIONAL CHARGE.
For more information please visit our website at http://www.j5create.com
Copyright© 2021 j5create. All rights reserved. All trade names are registered trademarks of their respective owners. Features and specifications are
subject to change without notice. Product may not be exactly as shown in the diagrams.
Windows, Skype, and Microsoft Teams are trademarks of Microsoft Corp., its affiliates or its respective owners, registered or used in many
jurisdictions worldwide. macOS, Mac, and Apple are trademarks of Apple Inc., its affiliates or its respective owners, registered or used in many
jurisdictions worldwide. USB and USB-C are trademarks of USB Implementers Forum, Inc., its affiliates or its respective owners, registered or used in
many jurisdictions worldwide. Zoom is a trademark of Zoom Video Communications, Inc., its affiliates or its respective owners, registered or used in
many jurisdictions worldwide. Chromebook and Chrome OS are trademarks of Google LLC, its affiliates or its respective owners, registered or used
in many jurisdictions worldwide. Facebook is a trademark of Facebook, its affiliates or its respective owners, registered or used in many jurisdictions
worldwide. Other trademarks and trade names may be used in this document to refer to either the entities claiming the marks and/or names or
their products and are the property of their respective owners. All company, product and service names used are for identification purposes only.
Use of these names, logos, and brands does not imply endorsement. We disclaim any interest in the marks of others.