
!"#$%&#'(!)*!%*+
,-.$%'/"**!0'12'!3
!" 4(5-56-)7+('
# 8-5'-!%!3"*!+-'#%!3
$ 4*!%*+5-%"%*$'(
%& 4*!%*+5-%#'+'2*5($
$' 8$%/"*!9'"!'!3
($ :;9(5!*7(%<'#=
% !"#$%/&1*(.">%3'
$) :;9(5!* 7(%<'#'-
*& 4*!%*+-%#-!#-
!* ?@1-/'$1*
#+ 8$%3-$9-1+-5!'!3
, 8$%/"*!9'"!'!3-!

1
9
10
11
2
3
5
7
4
6
8
ĘŚČ !
"Č!#

Instruction manual
3
SAFETY
• By ignoring the safety instructions the
manufacturer cannot be held responsible for
the damage.
• If the supply cord is damaged, it must be
replaced by the manufacturer, its service
agent or similarly qualified persons in order
to avoid a hazard.
• Never move the appliance by pulling the
cord and make sure the cord cannot
become entangled.
• The appliance must be placed on a stable,
level surface.
• The user must not leave the appliance
unattended while it is connected to the
supply.
• This appliance is only to be used for
household purposes and only for the
purpose it is made for.
• This appliance can be used by children aged
from 8 years and above and persons with
reduced physical, sensory or mental
capabilities or lack of experience and
knowledge if they have been given
supervision or instructions concerning use of
the appliance in a safe way and understand
the hazards involved.
• Children shall not play with the appliance.
• Cleaning and user maintenance shall not be
made by children without supervision.
• Children of less than 3 years should be kept
away unless continuously supervised.
• Children aged from 3 years and less than 8
years shall only switch on/off the appliance
provided that it has been placed or installed
in its intended normal operating position and
they have been given supervision or
instruction concerning use of the appliance
in a safe way and understand the hazards
involved.
• Children aged from 3 years and less than 8
years shall not plug in, regulate and clean
the appliance or perform user maintenance.
• To protect yourself against an electric shock,
do not immerse the cord, plug or appliance
in the water or any other liquid.
• WARNING: Some parts of this product can
become very hot and cause burns.
Particular attention has to be given where
children and vulnerable people are present.
• Do not use this heater in the immediate
surroundings of a bath, a shower or a
swimming pool.
EN

Instruction manual
4
• Joists, beams and rafters shall not be cut or
notched to install the appliance.
• Please do not install the appliance close to
curtains and other combustible materials.
This could cause a fire.
• The appliance shall, under no
circumstances, be covered with insulating
material or similar material.
• The heater must not be located immediately
below a socket-outlet.
• Do not use this heater if it has been dropped.
• WARNING: The heater must not be used if
the glass panels are damaged.
• Use this heater on a horizontal and stable
surface, or fix it to the wall, as applicable.
• WARNING: Do not use this heater in small
rooms when they are occupied by persons
not capable of leaving the room on their own,
unless constant supervision is provided.
• WARNING: To reduce the risk of fire, keep
textiles, curtain, or any other flammable
material a minimum distance of 1m from the
air outlet.
• The heater needs to be installed so that the
switches and other controls cannot be
touched by a person in the bath or shower.
• WARNING: In order to avoid
overheating, do not cover the heater.
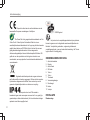
The universal recycling symbol, logo, or icon is an
internationally recognized symbol used to designate recyclable
materials. The recycling symbol is in the public domain and is not a
trademark.
This product complies with conformity requirements of
the applicable European regulations or directives.
The Green Dot is the registered trademark of Der Grüne
Punkt – Duales System Deutschland GmbH and is protected as a
trademark worldwide. The logo may only be used by customers of
DSD GmbH holding a valid trademark usage contract or by engaged
waste management companies within the Federal Republic of
Germany. This also applies to reproduction of the logo by third parties
in a dictionary, an encyclopaedia or an electronic database containing
a reference manual.

Instruction manual
5
Waste electrical products should not be disposed of with
household waste. Please recycle where facilities exist. Check with
your local Authority or local store for recycling advice.
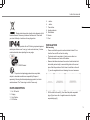
A product with an IP44 rating is protected against
solid objects that are over 1mm (e.g. tools and small wires). It is also
protected against water splashing from any angle.
SGS/GS tested
The product and packaging materials are recyclable,
subject to extended manufacturer responsibility. Dispose it
separately, following the illustrated packaging symbols, for better
waste treatment. The Triman logo is valid in France only.
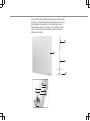
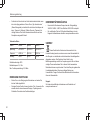
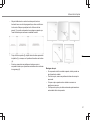
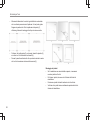
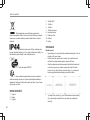
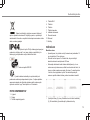
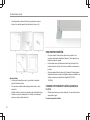
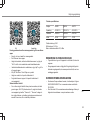
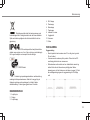
PARTS DESCRIPTION
1. On / Off switch
2. Display
3. On/off button
4. WiFi button
5. + button
6. – button
7. Timer button
8. Heating indicator
9. Wall bracket
10. Heater
11. Feet
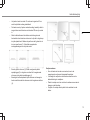
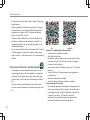
INSTALLATION
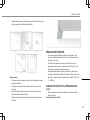
Wall mounting
• Please note that the product must be installed at least 15 cm
from the floor and 50 cm from the ceiling.
• The heater must be mounted at 4 points, ensure there is a
300mm clearance on all sides of the heater.
• Measure the distance between the centre of each bracket both
horizontally and vertically to ensure drilling holes in the correct
place. Mark the positions of the 4 holes to be drilled on the wall
(1), use the supplied wall mount drawings for correct measures.
• Drill the holes in the wall (2), then insert the plastic expanded
plugs (3) and screw the 4 supplied screws into the plastic
expanded plugs (4).
EN

Instruction manual
6
• Attached the panel heater onto the screws and move the heater
to the left so that the screws drop into the securing slots (5).
Foot assembly
• If the heater is not mounted on the wall, the supplied feet must be
fitted to the unit.
• To fix the feet, remove the bottom screws from the heater
housing.
• Place the feet and secure them by putting the screws back into
the housing.
• Take care to ensure that the feet are located correctly on the
bottom end of the heater.
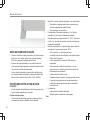
BEFORE THE FIRST USE
• When the device is turned on for the first time, a slight odour will
occur. This is normal, ensure adequate ventilation. This smell is
only temporary and will soon fade.
• During heating up and cooling down there may be some noises
caused by the heater casing expanding and contracting, this is
normal and does not indicate any fault.
• Putthepower cable intothe socket.(Note: Make surethe
voltagewhich is indicated on the devicematchesthe localvoltage
beforeconnecting the device.Voltage220V-240V~ 50/60Hz).
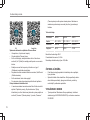
TOUCH BUTTON/DISPLAY FUNCTIONS
USE
• Push the on/off switch on the side of the heater to turn the heater
completely on or off.
Touch button functions
• Press the on/off touch button to turn the heater on, pressing it
again will set the device into stand-by mode.

Instruction manual
7
• Wi-Fi button, when device is on or in stand-by mode:
– Press and hold for 6 seconds to put the heating into paring
mode (will beep 3 times).
– Follow the instructions on your phone.
• Press 'temperature up (+)' or 'temperature down (-)' buttons to
regulate the temperature you desired. The temperature can be
set between 0°C and 37°C. Holding the + or – button will
increase or decrease target temperature continuously.
• Timer button; when the device is on, press the timer button, the
time starts blinking “00:00”.
– Use the + and – buttons to set the hours.
– No button press for 5 seconds stops the time blinking.
– Setting time to 00:00 does not enable timer.
– Press timer button again -> time starts blinking and allows the
user to change timer duration.
– The remaining time is visible at the display.
– After the set time has expired the device will power off.
– Long-press while timer is running cancels the timer mode.
• Indicator lamp;
– On when heating element is on.
– Off when heating element is off.
Display
• When the red on/off switch is off, the display screen is also off.
• When power is on (on/off switch is on), and the machine is in
stand-by mode, the display screen is off, only when the device is
already connected to Wi-Fi, the display screen is off with only the
Wi-Fi icon visible.
• Pressing the on/off touch button when the power is on will show
the Wi-Fi icon + current temperature + time (if set on the phone)
on the display screen with back ground light on.
• After 10 seconds without pressing one of the touch buttons, the
back ground light will go off. On screen you will still see: Wi-Fi
icon + current temperature + time (if set on the phone)
USING THE HEATER WITH PRINCESS HOME APP
• The heater can be used manually with its built-in controls or you
can use a smart phone or smart speaker to control it. Before you
begin, ensure the Princess Home app is downloaded. The
Princess Home app is available on Android and iOS.
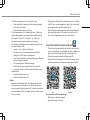
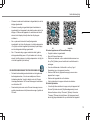
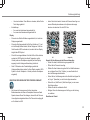
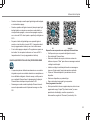
• Download the correct version of the Princess Home app via our
website princesshome.eu/nl-nl/princess-home-app or use QR:
Pair your heater to Princess Home app
• Make sure your heater is powered.
• Open the Princess Home app.
EN

Instruction manual
8
• Select your country code, enter the cell phone number and tap
“Get” to get a message containing the verification code.
• Enter the verification code in the message and tap “Log in” to log
in to the App.
• Click "Add Device" to add a new device.
• Select the device you wanted to connect.
• Follow the instructions on the app to connect the heater.
How to set local time
• It is not possible to set time on the machine itself, it has to be set
in the app. Go to "My climate devices", choose the infrared
heater, then “Timezone”. On "Timezone" choose the right time
zone, then the machine will sync the same time as set on the
phone.
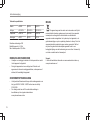
Technical Specification
Details 348035 348054 348070
Voltage 220-240V~ 220-240V~ 220-240V~
Frequency 50/60Hz 50/60Hz 50/60Hz
Power 350W 540W 700W
Wireless technology: Wi-Fi
Operating frequency: 2.4 GHz
Max. radio-frequency power: 20.5 dBm
CLEANING AND MAINTENANCE
• Before cleaning, unplug the appliance and wait for the appliance
to cool down.
• Clean the appliance with a damp cloth. Never use harsh and
abrasive cleaners, scouring pad or steel wool, which damages the
device.
DECLARATION OF CONFORMITY
• Hereby, Smartwares Europe declares that the radio equipment
type 348035 / 348054 / 348070 are in compliance with Directive
2014/53/EU
• The full text of the EU declaration of conformity is available at the
following internet address: www.princesshome.eu/doc
ENVIRONMENT
This appliance should not be put into the domestic garbage at
the end of its durability, but must be offered at a central point for the
recycling of electric and electronic domestic appliances. This symbol
on the appliance, instruction manual and packaging puts your
attention to this important issue. The materials used in this appliance
can be recycled. By recycling of used domestic appliances you
contribute an important push to the protection of our environment. Ask
your local authorities for information regarding the point of
recollection.

Instruction manual
9
Support
You can find all available information and spare parts at
www.princesshome.eu! EN

Gebruiksaanwijzing
10
VEILIGHEID
• Als u de veiligheidsinstructies negeert, kan
de fabrikant niet verantwoordelijk worden
gehouden voor de mogelijke schade.
• Als het netsnoer beschadigd is, moet het
worden vervangen door de fabrikant, de
onderhoudsmonteur van de fabrikant of door
personen met een soortgelijke kwalificatie
om gevaar te voorkomen.
• Verplaats het apparaat nooit door aan het
snoer te trekken en zorg dat het snoer niet in
de war kan raken.
• Het apparaat moet op een stabiele, vlakke
ondergrond worden geplaatst.
• De gebruiker mag het apparaat niet
onbeheerd achterlaten terwijl het op de
voeding is aangesloten.
• Dit apparaat is uitsluitend voor huishoudelijk
gebruik en voor het doel waar het voor
bestemd is.
• Dit apparaat mag door kinderen van 8jaar
en ouder en personen met verminderde
lichamelijke, zintuiglijke of verstandelijke
capaciteiten of gebrek aan kennis worden
gebruikt, mits dit gebeurt onder toezicht of zij
de juiste instructies hebben gekregen over
het gebruik van het apparaat en de gevaren
van het gebruik begrijpen.
• Kinderen mogen niet spelen met het
apparaat.
• Het apparaat mag niet zonder toezicht
worden gereinigd of onderhouden door
kinderen.
• Kinderen van 3jaar en jonger moeten uit de
buurt van het apparaat worden gehouden,
tenzij er constant toezicht is.
• Kinderen van 3 tot 8jaar mogen het
apparaat alleen in- en uitschakelen als het
op de gewenste plek is geplaatst of
geïnstalleerd, mits dit gebeurt onder toezicht
of zij de juiste instructies hebben gekregen
over het veilige gebruik van het apparaat en
de gevaren van het gebruik begrijpen.
• Kinderen van 3 tot 8jaar mogen het
apparaat niet op een stopcontact aansluiten
of het apparaat bedienen, reinigen of
onderhouden.
• Dompel het snoer, de stekker of het
apparaat niet onder in water of andere
vloeistoffen om elektrische schokken te
voorkomen.

Gebruiksaanwijzing
11
• WAARSCHUWING: Sommige onderdelen
van dit product kunnen zeer heet worden en
brandwonden veroorzaken. Wees extra
voorzichtig als u het apparaat gebruikt in de
buurt van kinderen en kwetsbare personen.
• Gebruik de verwarmer niet in de directe
omgeving van een bad, douche of
zwembad.
• Er dient niet in dwarsbalken, balken en
spanten te worden gesneden of gekerft om
het apparaat te installeren.
• Installeer het apparaat niet in de buurt van
gordijnen en andere brandbare materialen.
Dit kan brand veroorzaken.
• Het apparaat dient onder geen enkele
omstandigheden afgedekt te worden met
isolerend of soortgelijk materiaal.
• De verwarming dient niet direct onder een
stopcontact geplaatst te worden.
• Gebruik deze kachel niet nadat hij is
gevallen.
• WAARSCHUWING: Gebruik de heater niet
als de glazen panelen beschadigd zijn.
• Zet deze kachel op een horizontaal en
stabiel oppervlak of bevestig hem aan de
wand, voor zover van toepassing.
• WAARSCHUWING: Gebruik deze kachel
niet in kleine kamers waar zich personen
bevinden die niet in staat zijn de kamer
zelfstandig te verlaten, tenzij zij onder
voortdurend toezicht staan.
• WAARSCHUWING: Houd om de kans op
brand te verkleinen weefsels, gordijnen of
eventuele andere brandbare materialen op
een minimumafstand van 1m van de
luchtuitlaat.
• De kachel moet zodanig worden
gemonteerd dat de knoppen en andere
bedieningselementen niet vanuit het bad of
de douche bediend kunnen worden.
• WAARSCHUWING: Om oververhitting
te voorkomen, raden we u aan om het
apparaat niet te bedekken.
Het universele recyclingsymbool, -logo of -pictogram is een
internationaal erkend symbool dat wordt gebruikt om recyclebare
materialen aan te duiden. Het recyclingsymbool behoort tot het
publieke domein en is geen handelsmerk.
NL

Gebruiksaanwijzing
12
Dit product voldoet aan de conformiteitseisen van de
toepasselijke Europese verordeningen of richtlijnen.
The Green Dot is het geregistreerde handelsmerk van Der
Grüne Punkt - Duales System Deutschland GmbH en is een
wereldwijd beschermd handelsmerk. Het logo mag uitsluitend worden
gebruikt door klanten van DSD GmbH die in het bezit zijn van een
geldig handelsmerkgebruikscontract of door aangewezen
afvalverwerkingsbedrijven binnen de Bondsrepubliek Duitsland. Dit
geldt ook voor de reproductie van het logo door derden in een
woordenboek, een encyclopedie of een elektronische databank met
een naslagwerk.
Afgedankte elektrische producten mogen niet samen
met huishoudelijk vuil worden weggegooid. Gelieve te laten recyclen
bij de daartoe aangewezen faciliteiten. Neem contact op met uw
gemeente of plaatselijke winkel voor advies over recycling.
Een product met een IP44-waarde is
beschermd tegen vaste voorwerpen van meer dan 1 mm groot (bijv.
gereedschap en kleine stukken draad). Het is ook beschermd tegen
spatwater vanuit elke mogelijke hoek.
SGS/GS-getest
Het product en de verpakkingsmaterialen zijn recyclebaar,
binnen de grenzen van de uitgebreide verantwoordelijkheid van de
fabrikant. Verwijder het gescheiden, volgens de geïllustreerde
verpakkingssymbolen, voor een betere afvalverwerking. Het Triman-
logo is alleen in Frankrijk geldig.
ONDERDELENBESCHRIJVING
1. Aan/uit-schakelaar
2. Display
3. Aan/uit-toets
4. Wifi-toets
5. Toets +
6. Toets –
7. Timertoets
8. Verwarmingslampje
9. Muurbeugel
10. Heater
11. Voetjes
INSTALLATIE
Wandmontage

Gebruiksaanwijzing
13
• Het product moet ten minste 15cm boven de grond en 50cm
onder het plafond worden geïnstalleerd.
• De heater moet op 4 punten worden bevestigd, waarbij u dient te
zorgen dat er aan alle kanten van de heater 300mm vrije ruimte
is.
• Meet de afstand tussen het midden van elke beugel zowel
horizontaal als verticaal om er zeker van te zijn dat u de gaten op
de juiste plaats boort. Markeer de positie van de 4 gaten die u in
de muur moet boren (1). Gebruik de meegeleverde
montagetekeningen voor de juiste maten.
• Boor de gaten in de muur (2). Steek vervolgens de plastic
spreidpluggen (3) in de gaten en schroef de 4 meegeleverde
schroeven in de plastic spreidpluggen (4).
• Bevestig de het heaterpaneel op de schroeven en beweeg de
heater naar links zodat de schroeven in de borgsleuven zakken
(5).
Voetjes monteren
• Als u de heater niet aan de muur monteert, moet u de
meegeleverde voetjes aan het apparaat bevestigen.
• U bevestigt de voetjes door de onderste schroeven van de
heaterbehuizing te verwijderen.
• Plaats de voetjes en zet ze vast door de schroeven weer aan te
brengen op de behuizing.
• Zorg dat u de voetjes correct plaatst in de onderkant van de
heater.
NL

Gebruiksaanwijzing
14
VOOR HET EERSTE GEBRUIK
• Als het apparaat voor de eerste keer wordt aangezet, ontstaat
een lichte geur. Dit is normaal, zorg voor voldoende ventilatie.
Deze geur is maar tijdelijk en zal spoedig vervliegen.
• Tijdens het opwarmen en afkoelen van de heater kunnen er
geluiden uit de heater komen als gevolg van uitzetten en
samentrekken. Dit is normaal en wijst niet op een defect.
• Steek de stroomkabel in het stopcontact.(Opmerking: Controleer
of de spanning die op het apparaat staat aangegeven
overeenkomt met de plaatselijke spanning voordat je het
apparaat aansluit.Voltage220V-240V~ 50/60Hz).
FUNCTIES VAN TOETSEN/DISPLAY
GEBRUIK
• Druk op de aan/uit-schakelaar aan de zijkant van de heater om
deze volledig in of uit te schakelen.
Functies van toetsen
• Druk op de aan/uit-toets om de heater in te schakelen; druk
nogmaals op de toets om het apparaat in de stand-bymodus te
zetten.
• Wifi-toets terwijl het apparaat in de stand-bymodus staat:
– Houd 6 seconden ingedrukt om de heater in de
koppelingsmodus te zetten (er klinken 3 piepjes).
– Volg de instructies op uw telefoon.
• Stel de gewenste temperatuur in door op de knoppen voor een
hogere (+) of lagere temperatuur (–) te drukken. U kunt de
temperatuur instellen tussen 0°C en 37°C. Door de toets + of –
ingedrukt te houden laat u de temperatuur ononderbroken
oplopen.
• Timertoets terwijl het apparaat is ingeschakeld: als u op de timer-
toets drukt, begint de tijd '00:00' te knipperen.
– Gebruik de toetsen + en – om de uren in te stellen.
– Als u 5 seconden lang geen toets indrukt, stopt het knipperen
van de tijd.
– Als u de tijd instelt op 00:00, wordt de timer niet geactiveerd.
– Druk nogmaals op de timertoets -> de tijd begint te knipperen
en u kunt de duur van de timer wijzigen.
– Op het display wordt de resterende tijd weergegeven.
– Nadat de ingestelde tijd is verstreken, wordt het apparaat
uitgeschakeld.
– Als u de toets lang ingedrukt houdt terwijl de timer actief is,
annuleert u daarmee de timermodus.
• Indicatorlampje;
– Aan terwijl het verwarmingselement is ingeschakeld.
– Uit terwijl het verwarmingselement is uitgeschakeld.
Display

Gebruiksaanwijzing
15
• Wanneer de rode aan/uit-schakelaar is uitgeschakeld, is ook het
display uitgeschakeld.
• Wanneer de voeding is ingeschakeld (aan/uit-schakelaar is
ingeschakeld) en het apparaat in de stand-bymodus staat, is het
display uit. Wanneer het apparaat al is verbonden met het wifi-
netwerk, is het display uit terwijl alleen het wifi-pictogram
zichtbaar is.
• Als u op de aan/uit-toets drukt terwijl het apparaat is
ingeschakeld, ziet u het wifi-pictogram + de huidige temperatuur
+ de tijd (als u die hebt ingesteld op de telefoon) op het display
met de achtergrondverlichting ingeschakeld.
• Als u 10 seconden lang op geen enkele toets drukt, gaat de
achtergrondverlichting weer uit. Op het scherm ziet u dan nog
steeds: Het wifi-pictogram + de huidige temperatuur + de tijd (als
u die hebt ingesteld op de telefoon).
DE HEATER GEBRUIKEN MET DE PRINCESS HOME-APP
• De heater kan handmatig worden bediend met de ingebouwde
bedieningselementen, of u kunt een smartphone of slimme
luidspreker gebruiken. Voordat u begint, moet u de Princess
Home-app downloaden. De Princess Home-app is beschikbaar
voor Android en iOS.
• Download de juiste versie van de Princess Home-app via onze
website princesshome.eu/nl-nl/princess-home-app of gebruik de
QR-code:
De heater koppelen aan de Princess Home-app
• Zorg dat de heater is ingeschakeld.
• Open de Princess Home-app.
• Selecteer uw landcode, voer uw mobiele telefoonnummer in en
tik op 'Get' (Ophalen) om een bericht met de verificatiecode te
ontvangen.
• Voer de verificatiecode uit het bericht in en tik op 'Log in'
(Aanmelden) om u in de app aan te melden.
• Selecteer 'Add Device' (Apparaat toevoegen) om een nieuw
apparaat toe te voegen.
• Selecteer het apparaat dat u wilt verbinden.
• Volg de instructies in de app om de heater te verbinden.
De lokale tijd instellen
• U kunt de tijd alleen instellen in de app, niet op het apparaat zelf.
Ga naar 'My climate devices' (Mijn klimaatapparaten), kies de
infrarood-heater en druk op 'Timezone' (Tijdzone). Kies onder
'Timezone' (Tijdzone) de juiste tijdzone. Op het apparaat wordt
dan de tijd gesynchroniseerd die u op de telefoon hebt ingesteld.
NL

Gebruiksaanwijzing
16
Technische specificaties
Details 348035 348054 348070
Voltage 220-240V~ 220-240V~ 220-240V~
Frequentie 50/60Hz 50/60Hz 50/60Hz
Vermogen 350W 540W 700W
Draadloze technologie: Wifi
Bedrijfsfrequentie: 2,4GHz
Max. radiofrequentie: 20,5dBm
REINIGING EN ONDERHOUD
• Verwijder voor reiniging de stekker uit het stopcontact en wacht
tot het apparaat is afgekoeld.
• Reinig het apparaat met een vochtige doek. Gebruik nooit
agressieve of schurende reinigingsmiddelen, schuursponzen of
staalwol; dit beschadigt het apparaat.
CONFORMITEITSVERKLARING
• Hierbij verklaart Smartwares Europe dat de radioapparatuur van
het type 348035 / 348054 / 348070 voldoet aan de richtlijn
2014/53/EU
• De volledige tekst van de EU-conformiteitsverklaring is
beschikbaar op het volgende internetadres:
www.princesshome.eu/doc
MILIEU
Dit apparaat mag aan het einde van de levensduur niet bij het
normale huisafval worden gedeponeerd, maar moet bij een speciaal
inzamelpunt voor hergebruik van elektrische en elektronische
apparaten worden aangeboden. Het symbool op het apparaat, in de
gebruiksaanwijzing en op de verpakking attendeert u hierop. De in het
apparaat gebruikte materialen kunnen worden gerecycled. Met het
recyclen van gebruikte huishoudelijke apparaten levert u een
belangrijke bijdrage aan de bescherming van ons milieu. Informeer bij
uw lokale overheid naar het inzamelpunt.
Support
U kunt alle beschikbare informatie en reserveonderdelen vinden op
www.princesshome.eu!

Manuel d'instructions
17
SÉCURITÉ
• Si vous ignorez les consignes de sécurité, le
fabricant ne peut être tenu pour responsable
des dommages.
• Si le cordon d'alimentation est endommagé,
il doit être remplacé par le fabricant, son
réparateur ou des personnes qualifiées afin
d'éviter tout risque.
• Ne déplacez jamais l'appareil en tirant sur le
cordon et veillez à ce que celui-ci ne
s'enroule pas.
• L'appareil doit être posé sur une surface
stable et nivelée.
• L'utilisateur ne doit pas laisser l'appareil
sans surveillance tant qu'il est branché sur
l'alimentation électrique.
• Cet appareil est uniquement destiné à des
utilisations domestiques et seulement dans
le but pour lequel il est fabriqué.
• Cet appareil peut être utilisé par des enfants
à partir de 8 ans et par des personnes ayant
des capacités physiques, sensorielles ou
mentales réduites ou un manque
d'expérience et de connaissances si elles
bénéficient d'une supervision ou
d'instructions concernant l'utilisation de
l'appareil en toute sécurité et comprennent
les risques que cela suppose.
• Les enfants ne doivent pas jouer avec
l'appareil.
• Le nettoyage et l'entretien ne peuvent être
assurés par des enfants sans surveillance.
• Les enfants de moins de 3 ans doivent être
tenus à l'écart, sauf s'ils sont surveillés en
permanence.
• Les enfants âgés de 3 ans à moins de 8 ans
ne doivent allumer/éteindre l'appareil que s'il
a été placé ou installé dans sa position
normale de fonctionnement prévue et s'ils
ont été surveillés ou ont reçu des
instructions concernant l'utilisation de
l'appareil en toute sécurité et comprennent
les risques encourus.
• Les enfants âgés de 3 ans à moins de 8 ans
ne doivent pas brancher, régler et nettoyer
l'appareil ni procéder à l'entretien de
l'utilisateur.
• Afin de vous éviter un choc électrique,
n'immergez pas le cordon, la prise ou
l'appareil dans de l'eau ou autre liquide.
FR

Manuel d'instructions
18
• AVERTISSEMENT: Certaines parties de ce
produit peuvent devenir très chaudes et
provoquer des brûlures. Attention aux
endroits où il peut y avoir des enfants et des
personnes vulnérables.
• N’utilisez pas ce radiateur à proximité de
baignoires, de douches ou de piscine.
• Les solives, poutres et chevrons ne devront
pas être coupés ou entaillés pour installer
l’appareil.
• Veuillez ne pas placer l’appareil à proximité
de rideaux et d’autres matériaux
inflammables. Cela pourrait provoquer un
incendie.
• L’appareil ne devra, en aucunes
circonstances, être recouvert avec un
matériel isolant ou similaire.
• Le radiateur ne doit pas être positionné
directement sous une sortie de prise.
• N'utilisez pas ce chauffage s'il est tombé.
• AVERTISSEMENT: Le chauffage ne doit
pas être utilisé si les vitres sont
endommagées.
• Utilisez ce chauffage sur une surface
horizontale et stable ou fixez-le au mur,
selon le cas.
• AVERTISSEMENT: N'utilisez pas ce
radiateur dans une petite pièce, occupée par
des personnes incapables d'abandonner les
lieux d'elles-mêmes, sauf si une surveillance
constante est assurée.
• AVERTISSEMENT: Afin de réduire les
risques d'incendie, maintenez les textiles,
rideaux et autres matières inflammables à
une distance minimum de 1m de la sortie
d'air.
• Le radiateur doit être installé de manière à
ce que personne dans le bain ou la douche
ne puisse toucher les interrupteurs et les
autres commandes.
• AVERTISSEMENT: pour éviter toute
surchauffe, ne couvrez pas le chauffage.
Le symbole, le logo ou l'icône universel de recyclage est un
symbole internationalement reconnu utilisé pour désigner les
matériaux recyclables. Le symbole du recyclage relève du domaine
public et n'est pas une marque déposée.
Ce produit est conforme aux exigences de conformité
des règlements ou directives européens en vigueur.

Manuel d'instructions
19
Le Point vert est une marque déposée de Der Grüne Punkt
- Duales System Deutschland GmbH et est une marque déposée
dans le monde entier. Le logo ne peut être utilisé que par des clients
de DSD GmbH titulaires d'une licence valide d'utilisation de la
marque ou par des entreprises engagées dans la gestion des
déchets en République Fédérale Allemande. Cela s'applique
également à la reproduction du logo par des tiers dans un
dictionnaire, une encyclopédie ou une base de données électronique
contenant un manuel de référence.
Les produits électriques usagés ne doivent pas être
jetés avec les ordures ménagères. Veuillez recycler là où les
installations sont disponibles. Vérifiez auprès des autorités locales ou
du magasin le plus proche pour obtenir des conseils sur le recyclage.
Un produit ayant un indice IP44 est protégé
contre les objets solides de plus de 1 mm (par exemple, les outils et
les petits fils). Il est également protégé contre les projections d'eau,
quel que soit l'angle.
Testé SGS/GS
Le produit et les matériaux d'emballage sont recyclables,
sous réserve de la responsabilité étendue du fabricant. Par souci de
bon traitement des déchets, mettez-le au rebut séparément, en
suivant les symboles d'emballage illustrés. Le logo Triman n'est
valable qu'en France.
DESCRIPTION DES PIÈCES
1. Interrupteur Marche/Arrêt
2. Écran
3. Bouton Marche/Arrêt
4. Bouton Wi-Fi
5. Bouton +
6. Bouton -
7. Bouton de minuterie
8. Témoin de chauffe
9. Support mural
10. Radiateur
11. Pieds
INSTALLATION
Montage mural
• Veuillez noter que le produit doit être installé à au moins 15 cm
du sol et 50 cm du plafond.
• Le radiateur doit être monté en 4 points, en veillant à conserver
un espace dégagé de 300mm de tous les côtés.
FR

Manuel d'instructions
20
• Mesurez horizontalement et verticalement la distance entre le
centre de chaque support pour vous assurer de percer les trous
au bon endroit. Marquez la position des 4trous à percer sur le
mur (1), en utilisant les dessins de montage mural fournis pour
obtenir les mesures correctes.
• Percez les trous dans le mur (2), puis insérez les chevilles
expansées en plastique (3) et vissez les 4vis fournies dans les
chevilles (4).
• Placez le radiateur sur les vis et déplacez-le vers la gauche de
sorte que les vis tombent dans les fentes de fixation (5). Assemblage de pédale
• Si le radiateur n'est pas fixé à un mur, les pieds fournis doivent
être montés sur l'appareil.
• Pour fixer les pieds, retirez les vis inférieures du boîtier du
radiateur.
• Positionnez les pieds et fixez-les en remettant les vis.
• Veillez à ce qu'ils soient dûment situés à l'extrémité inférieure du
chauffage.
A página está carregando...
A página está carregando...
A página está carregando...
A página está carregando...
A página está carregando...
A página está carregando...
A página está carregando...
A página está carregando...
A página está carregando...
A página está carregando...
A página está carregando...
A página está carregando...
A página está carregando...
A página está carregando...
A página está carregando...
A página está carregando...
A página está carregando...
A página está carregando...
A página está carregando...
A página está carregando...
A página está carregando...
A página está carregando...
A página está carregando...
A página está carregando...
A página está carregando...
A página está carregando...
A página está carregando...
A página está carregando...
A página está carregando...
A página está carregando...
A página está carregando...
A página está carregando...
A página está carregando...
A página está carregando...
A página está carregando...
A página está carregando...
A página está carregando...
A página está carregando...
A página está carregando...
A página está carregando...
A página está carregando...
A página está carregando...
A página está carregando...
A página está carregando...
A página está carregando...
A página está carregando...
A página está carregando...
A página está carregando...
A página está carregando...
A página está carregando...
A página está carregando...
A página está carregando...
A página está carregando...
A página está carregando...
A página está carregando...
A página está carregando...
A página está carregando...
A página está carregando...
A página está carregando...
A página está carregando...
A página está carregando...
A página está carregando...
A página está carregando...
A página está carregando...
A página está carregando...
A página está carregando...
A página está carregando...
A página está carregando...
A página está carregando...
A página está carregando...
A página está carregando...
A página está carregando...
A página está carregando...
A página está carregando...
A página está carregando...
A página está carregando...
A página está carregando...
A página está carregando...
A página está carregando...
A página está carregando...
-
 1
1
-
 2
2
-
 3
3
-
 4
4
-
 5
5
-
 6
6
-
 7
7
-
 8
8
-
 9
9
-
 10
10
-
 11
11
-
 12
12
-
 13
13
-
 14
14
-
 15
15
-
 16
16
-
 17
17
-
 18
18
-
 19
19
-
 20
20
-
 21
21
-
 22
22
-
 23
23
-
 24
24
-
 25
25
-
 26
26
-
 27
27
-
 28
28
-
 29
29
-
 30
30
-
 31
31
-
 32
32
-
 33
33
-
 34
34
-
 35
35
-
 36
36
-
 37
37
-
 38
38
-
 39
39
-
 40
40
-
 41
41
-
 42
42
-
 43
43
-
 44
44
-
 45
45
-
 46
46
-
 47
47
-
 48
48
-
 49
49
-
 50
50
-
 51
51
-
 52
52
-
 53
53
-
 54
54
-
 55
55
-
 56
56
-
 57
57
-
 58
58
-
 59
59
-
 60
60
-
 61
61
-
 62
62
-
 63
63
-
 64
64
-
 65
65
-
 66
66
-
 67
67
-
 68
68
-
 69
69
-
 70
70
-
 71
71
-
 72
72
-
 73
73
-
 74
74
-
 75
75
-
 76
76
-
 77
77
-
 78
78
-
 79
79
-
 80
80
-
 81
81
-
 82
82
-
 83
83
-
 84
84
-
 85
85
-
 86
86
-
 87
87
-
 88
88
-
 89
89
-
 90
90
-
 91
91
-
 92
92
-
 93
93
-
 94
94
-
 95
95
-
 96
96
-
 97
97
-
 98
98
-
 99
99
-
 100
100


em outras línguas
- español: Princess 350 Manual de usuario
- italiano: Princess 350 Manuale utente
- Nederlands: Princess 350 Handleiding
- slovenčina: Princess 350 Používateľská príručka
- Deutsch: Princess 350 Benutzerhandbuch
- dansk: Princess 350 Brugermanual
- svenska: Princess 350 Användarmanual
- polski: Princess 350 Instrukcja obsługi
Artigos relacionados
-
Princess 348035 Manual do usuário
-
Princess 350 540 700 Smart Infrared Panel Heater Manual do usuário
-
Princess 350 Manual do usuário
-
Princess 01.343700.01.001 Manual do usuário
-
-
-
-
-
-
