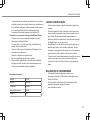
Princess 01.347000.01.001 Manual do proprietário
- Categoria
- Aquecedores de ambiente
- Tipo
- Manual do proprietário

EN Instruction manual
NL Gebruiksaanwijzing
FR Mode d’emploi
DE Bedienungsanleitung
ES Manual de usuario
PT Manual de utilizador
IT Manuale utente
SV Bruksanvisning
CS Návod na použití
PL Instrukcja obsługi
SK Návod na použitie
Smart Heating & Cooling Tower
01.347000.01.001
RU Руководство по эксплуатации

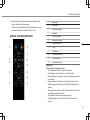
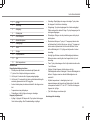
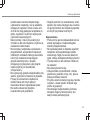
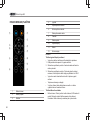
1
2
3
9
4
6
5
7
8
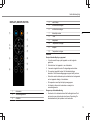
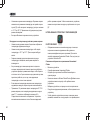
PARTS DESCRIPTION / ONDERDELENBESCHRIJVING / DESCRIPTION DES PIÈCES
/ TEILEBESCHREIBUNG / DESCRIPCIÓN DE LAS PIEZAS / DESCRIÇÃO DOS
COMPONENTES / DESCRIZIONE DELLE PARTI / BESKRIVNING AV DELAR /
OPIS CZĘŚCI / POPIS SOUČÁSTÍ / POPIS SÚČASTÍ / ОПИСАНИЕ ЗАПЧАСТИ

Instruction manual
3
SAFETY
• By ignoring the safety instructions the
manufacturer cannot be held responsible for
the damage.
• If the supply cord is damaged, it must be
replaced by the manufacturer, its service
agent or similarly qualified persons in order
to avoid a hazard.
• Never move the appliance by pulling the
cord and make sure the cord cannot
become entangled.
• The appliance must be placed on a stable,
level surface.
• The user must not leave the device
unattended while it is connected to the
supply.
• This appliance is only to be used for
household purposes and only for the
purpose it is made for.
• This appliance shall not be used by children
aged less than 8 years. This appliance can
be used by children aged from 8 years and
above and persons with reduced physical,
sensory or mental capabilities or lack of
experience and knowledge if they have been
given supervision or instruction concerning
use of the appliance in a safe way and
understand the hazards involved. Children
shall not play with the appliance. Keep the
appliance and its cord out of reach of
children aged less than 8 years. Cleaning
and user maintenance shall not be made by
children unless older than 8 and supervised.
• To protect yourself against an electric shock,
do not immerse the cord, plug or appliance
in the water or any other liquid.
• WARNING: In order to avoid
overheating, do not cover the heater.
• WARNING: Some parts of this product can
become very hot and cause burns.
Particular attention has to be given where
children and vulnerable people are present.
• Children aged from 3 years and less than 8
years shall only switch on/off the appliance
provided that it has been placed or installed
in its intended normal operating position and
they have been given supervision or
instruction concerning use of the appliance
in a safe way and understand the hazards
involved. Children aged from 3 years and
less than 8 years shall not plug in, regulate
and clean the appliance or perform user
maintenance.
EN

Instruction manual
4
• Children of less than 3 years should be kept
away unless continuously supervised.
• Do not use the appliance with a programmer,
timer, separate remote-control system or any
other device that switches the heater on
automatically, since a fire risk exists if the
heater is covered or positioned incorrectly.
• Do not use this heater in the immediate
surroundings of a bath, a shower or a
swimming pool.
• Please do not install the appliance close to
curtains and other combustible materials.
This could cause a fire.
• The heater must not be located immediately
below a socket-outlet.
• The heater needs to be installed so that the
switches and other controls cannot be
touched by a person in the bath or shower.
Safety
• The manufacturer cannot be held
responsible for damages resulting from a
failure to comply to the safety instructions.
• Do not expose the battery to high
temperatures or direct sunlight. Never throw
batteries into the fire. There is a danger of
explosion!
• Keep batteries away from children. Batteries
are not a toy!
• Do not open the batteries by force.
• Avoid contact with metallic objects.(Rings,
nails, screws et cetera) there is a danger of
short-circuiting!
• As a result of a short-circuit batteries may
heat up consider-ably or even catch fire. this
may result in burns.
• For your safety the battery poles should be
covered with adhesive strips during
transport.
• Do not touch a ruptured and/or leaking
battery. If the liquid from the battery gets into
your eyes, rinse your eyes as soon as
possible with clean water, without rubbing
your eyes. Immediately go to the hospital. If
it is not treated properly, it can cause eye
problems.

Instruction manual
5
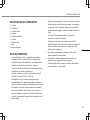
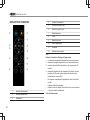
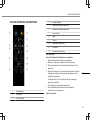
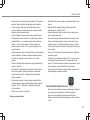
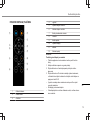
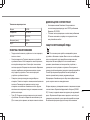
PARTS DESCRIPTION
1. Cover
2. Air outlet
3. Air duct
4. Body
5. Power button
6. Display
7. Air inlet
8. Base
9. Remote control
BEFORE THE FIRST USE
• Place the device on a flat stable surface and ensure a minimum
of 100 cm. free space around the device. This device is not
suitable for installation in a cabinet or for outside use.
• Connect the power cable to the socket. (Note: Make sure the
indicated voltage on the device matches the local voltage before
connecting the device. Voltage 220V-240V 50-60Hz.)
• This device includes an overheat protection sensor and an
automatic fail-safe that cuts power to the unit if it's accidentally
tipped over or overheat. If this sensor is triggered, unplug the
machine and allow the fan to cool down. Check and remove any
obstructions before restarting the device and be sure to place
them on a hard, flat stable surface.
• The power switch or the power button on remote will turn this fan
to standby, not complete shutdown. Use the switch on the back
of the device to turn off completely when the unit is not in use.
• When the device will not be in use for a long time, please unplug
the power cord.
• Warning: The below may sometimes occur due to the overlap of
the remote control frequencies. Please pay attention to this while
using the remote control:
1. This device may react when using a remote control for other
appliances.
2. When using the remote control of this device, other electrical
appliances may react.
• Place 2x AAA batteries into the remote control, make sure the
polarity (+ and -) is correct.
EN

Instruction manual
6
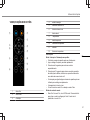
DISPLAY/BUTTON FUNCTIONS
1 Cool mode
2 Heat mode
3 Oscillation
4 Power button
5 Increase volume of air
6 Decrease volume of air
7 Natural mode
8 Timer
9 Sleep mode
10 Increase temperature
11 Mute
12 Decrease temperature
USE
Button / Switch / Display on device
• The power button on the device can be used for:
1. Turn the machine on and off, short press.
2. Long press for 6 seconds to enter pair mode.
3. Long press 15 seconds to enter factory reset which the machine
will forget all your wifi credentials.
• The on/off switch on the back of the device can be used to turn off
the device completely.
• The temperature is visible in the display.
• Display color will be blue in cool mode or orange in heat mode.

Instruction manual
7
Remote control buttons
• Cool mode: In cooling mode, the LED lamp is blue. Press this
button to activate the cooling mode. Note: The default start mode
is the cooling mode.
• Heat mode: The display number in heat mode is orange. Press
this button to activate the heat mode.
• Oscillation button: Press the Oscillation button to turn on the
oscillation function. The fan will swing from left to right. Press this
button again to stop oscillating.
• Power button: The device can be switched on and off by pressing
the power button.
• Increase/Decrease volume of air: Press the "+" button on the left
side of the remote control to increase the volume of air, press the
"-" button on the left side of the remote control to decrease the
airflow. It can be set in 1-10 fan speed in cooling mode, heat
mode can be set for 4 levels.
• Natural mode: The device show the current fan speed on screen,
the fan simulates the natural breeze, it works in both cooling and
heating mode.
• Timer: Press the timer button to select the desired range between
1 hour to 24 hours.
• Sleep mode: Sleep mode works in both heating and cooling. The
fan speed will reduce to speed 1 from whichever fan speed you
set. The display will show the current fan speed where it reduced
to.
• Increase/Decrease temperature: In heat mode, press the
temperature button on the right side of the remote control to set
the temperature between 16°C and 30°C. Note: this button does
not work in cool mode.
• Mute: This will turn off the sounds of the device.
Heating mode instructions
• Press the heat mode button and the display shows the ambient
temperature.
• Press temperature button to set the temperature, the display will
flash digitally, which can be set to 16 to 30 degrees.
• Set temperature should be higher than the ambient temperature,
so that the heating function will be turned on.
• When the ambient temperature reaches the target temperature,
the heating element will stop for a while and machine will be
fanning to vent heat, after a few seconds the fan will stop too until
the ambient temperature is below target temperature.
• If the ambient temperature is lower than the set temperature the
heating function will activate automatically.
• Note: The default setting temperature is 20 °C. In the heat mode,
when the ambient temperature is below 0 °C, the display only
shows 01, it does not display negative temperature value. When
the heat mode runs over 9 hours, the machine will automatically
stop. Restart by pressing the host power button or by using the
button on the remote control.
EN

Instruction manual
8
USING THE DEVICE WITH CLIMATE APP
• The heater can be used manually with its built-in controls or you
can use a smart phone or smart speaker to control it. Before you
begin, ensure the Homewizard Climate app is downloaded. The
Homewizard Climate app is available on Android and iOS.
Pair your heater to HomeWizard Climate app
• Make sure your device is powered.
• Open HomeWizard Climate APP.
• Create an account or if you already have a HomeWizard account,
please log in using those details.
• Click "Add new Climate Device" to add a new device.
• Select the device you wanted to connect.
• Follow the instructions on the app to connect the device.
• To control your device with voice using a smart speaker please
refer to the manufacturer's instructions on how to enable a skill
through your device.
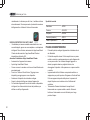
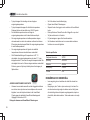
Technical Specification
Details 347000
Voltage 220-240V
Frequency 50/60Hz
Power (maximum) 2000W
IP Code IP24
CLEANING AND MAINTENANCE
• Before cleaning, unplug the device and wait for the device to cool
down.
• Surface cleaning: Wipe the surface with a soft, dry cloth, if
extremely dirty clean the appliance with a damp cloth. Never use
harsh and abrasive cleaners, scouring pad or steel wool, which
damages the device. Then wipe with a dry soft cloth.
• Air inlet/outlet: Use a soft brush or a vacuum cleaner to clean the
dust at the air inlet and outlet. Make sure to clean it when there is
less dust. Too much dust is not healthy and will reduce fan
efficiency.
• Remote control: Gently wipe the surface of the remote control
with a soft, dry cloth. Remove the batteries if the remote control
will not be used for a long time.
DECLARATION OF CONFORMITY
• Hereby, Smartwares Europe declares that the radio equipment
type 347000 is in compliance with Directive 2014/53/EU
• The full text of the EU declaration of conformity is available at the
following internet address: www.princesshome.eu/doc

Instruction manual
9
ENVIRONMENT
This appliance should not be put into the domestic garbage at
the end of its durability, but must be offered at a central point for the
recycling of electric and electronic domestic appliances. This symbol
on the appliance, instruction manual and packaging puts your
attention to this important issue. The materials used in this appliance
can be recycled. By recycling of used domestic appliances you
contribute an important push to the protection of our environment.
Ask your local authorities for information regarding the point of
recollection.
The European directive for batteries (2006/66/EC) states that it is not
permitted to throw batteries away with the household waste. They
may contain substances which are harmful to the environment.
Empty batteries can be handed over to a local, public collection point
or a local recycling centre. To avoid overheating as a result of a short
circuit, lithium batteries must be removed from the product and the
poles must be protected using insulation tape or some other means
against short-circuiting.
Support
You can find all available information and spare parts at
www.princesshome.eu!
EN

Gebruiksaanwijzing
10
VEILIGHEID
• Als u de veiligheidsinstructies negeert, kan
de fabrikant niet verantwoordelijk worden
gehouden voor de mogelijke schade.
• Als het netsnoer beschadigd is, moet het
worden vervangen door de fabrikant, de
onderhoudsmonteur van de fabrikant of door
personen met een soortgelijke kwalificatie
om gevaar te voorkomen.
• Verplaats het apparaat nooit door aan het
snoer te trekken en zorg dat het snoer niet in
de war kan raken.
• Het apparaat moet op een stabiele, vlakke
ondergrond worden geplaatst.
• De gebruiker mag het apparaat niet
onbeheerd achterlaten wanneer de stekker
zich in het stopcontact bevindt.
• Dit apparaat is uitsluitend voor huishoudelijk
gebruik en voor het doel waar het voor
bestemd is.
• Dit apparaat mag niet worden gebruikt door
kinderen jonger dan 8 jaar. Dit apparaat kan
worden gebruikt door kinderen vanaf 8 jaar
en door personen met verminderde
lichamelijke, zintuiglijke of geestelijke
vermogens of gebrek aan de benodigde
ervaring en kennis indien ze onder toezicht
staan of instructies krijgen over hoe het
apparaat op een veilige manier kan worden
gebruikt alsook de gevaren begrijpen die met
het gebruik samenhangen. Kinderen mogen
niet met het apparaat spelen. Houd het
apparaat en het netsnoer buiten bereik van
kinderen jonger dan 8 jaar. Laat reiniging en
onderhoud niet door kinderen uitvoeren,
tenzij ze ouder zijn dan 8 jaar en onder
toezicht staan.
• Dompel het snoer, de stekker of het
apparaat niet onder in water of andere
vloeistoffen om elektrische schokken te
voorkomen.
• WAARSCHUWING: Dek de verwarming
niet af, om oververhitting te voorkomen.
• WAARSCHUWING: Sommige onderdelen
van dit product kunnen zeer heet worden en
brandwonden veroorzaken. Wees extra
voorzichtig als u het apparaat gebruikt in de
buurt van kinderen en kwetsbare personen.
• Kinderen tussen de 3 jaar en 8 jaar mogen
het apparaat alleen in-/uitschakelen mits het
in zijn normale gebruikspositie is geplaatst of
geïnstalleerd en mits zij onder toezicht staan
en na instructies m.b.t. tot het veilige gebruik

Gebruiksaanwijzing
11
van het apparaat de risico's die samengaan
met het gebruik van het apparaat begrijpen.
Kinderen tussen de 3 jaar en 8 jaar mogen
niet de stekker in het stopcontact plaatsen,
het apparaat bedienen en reinigen of
onderhoud aan het apparaat uitvoeren.
• Kinderen jonger dan 3 jaar dienen uit de
buurt te worden gehouden, tenzij onder
constante toezicht.
• Gebruik het apparaat niet met een
programmeringseenheid, timer, afzonderlijk
afstandsbedieningssysteem of andere
apparaten die het verwarmingssysteem
automatisch inschakelen, omdat er
brandgevaar heerst als het
verwarmingssysteem op onjuiste wijze is
afgedekt of gepositioneerd.
• Gebruik de verwarmer niet in de directe
omgeving van een bad, douche of
zwembad.
• Installeer het apparaat niet in de buurt van
gordijnen en andere brandbare materialen.
Dit kan brand veroorzaken.
• De verwarming dient niet direct onder een
stopcontact geplaatst te worden.
• De kachel moet zodanig worden
gemonteerd dat de knoppen en andere
bedieningselementen niet vanuit het bad of
de douche bediend kunnen worden.
Veiligheid
• De fabrikant is niet aansprakelijk voor
schade die ontstaat door het niet opvolgen
van de veiligheidsinstructies.
• Stel de batterijen NOOIT bloot aan hoge
temperaturen of direct zonlicht. Gooi
batterijen NOOIT in open vuur.
Explosiegevaar!
• Houd batterijen uit de buurt van kinderen.
Batterijen zijn geen speelgoed!
• Open de batterijen niet met kracht.
• Vermijd contact met metalen voorwerpen
(ringen, spijkers, schroeven, etc.) om gevaar
van kortsluiting te voorkomen!
• Door kortsluiting kunnen batterijen heet
worden of zelfs ontbranden. Dit kan
brandwonden veroorzaken.
• Voor uw veiligheid moeten de contactpunten
tijdens vervoer met plakstrips worden
afgedekt.
NL

Gebruiksaanwijzing
12
• Raak een gescheurde en/of lekkende batterij
niet aan! Spoel als de vloeistof uit de batterij
in uw ogen komt uw ogen dan zo snel
mogelijk uit met schoon water en wrijf niet in
uw ogen. Ga onmiddellijk naar het
ziekenhuis. Als dit niet wordt behandeld, kan
dit oogproblemen veroorzaken.
ONDERDELENBESCHRIJVING
1. Deksel
2. Luchtuitlaat
3. Luchtbuis
4. Hoofdgedeelte
5. Aan/uit-knop
6. Display
7. Luchtinlaat
8. Basis
9. Afstandsbediening
VOOR HET EERSTE GEBRUIK
• Plaats het apparaat op een vlakke, stabiele ondergrond. Houd
minimaal 100cm ruimte vrij rond het apparaat. Dit apparaat is
niet geschikt voor installatie in een kast of voor gebruik
buitenshuis.
• Sluit de voedingskabel aan op het stopcontact. (Opmerking:
Controleer of het voltage op het apparaat overeenkomt met de
plaatselijke netspanning voordat u het apparaat aansluit. Voltage
220-240V, 50-60Hz)
• Dit apparaat is voorzien van een sensor voor
oververhittingsbeveiliging en automatische failsafe waarmee de
stroom naar het apparaat wordt onderbroken als het per ongeluk
omvalt of oververhit raakt. Als de sensor wordt geactiveerd,
verwijdert u de stekker uit het stopcontact en laat u de ventilator
afkoelen. Controleer op blokkerende objecten en verwijder deze
voordat u het apparaat opnieuw start. Zorg er ook voor dat u het
apparaat op een harde, vlakke en stabiele ondergrond plaatst.
• De aan/uit-schakelaar of aan/uit-knop op de afstandsbediening
zetten het apparaat in de stand-bystand; het apparaat wordt niet
volledig uitgeschakeld. Gebruik de schakelaar op de achterzijde
van het apparaat om het volledig uit te schakelen wanneer u het
apparaat niet gebruikt.
• Wanneer u het apparaat langere tijd niet gaat gebruiken, haalt u
de stekker uit het stopcontact.
• Waarschuwing: Het onderstaande kan zich soms voordoen als er
overlap bestaat in de frequenties van afstandsbedieningen. Let
op het volgende bij het gebruik van de afstandsbediening:
1. Dit apparaat kan reageren als u afstandsbedieningen van andere
apparaten gebruikt.
2. Wanneer u de afstandsbediening van dit apparaat gebruikt,
kunnen andere elektrische apparaten hierop reageren.
• Plaats 2AAA-batterijen in de afstandsbediening. Controleer of de
batterijpolen (+ en -) de juiste kant op zijn gericht.

Gebruiksaanwijzing
13
DISPLAY-/KNOPFUNCTIES
1 Koelmodus
2 Verwarmingsmodus
3 Oscillatie
4 Aan/uit-knop
5 Luchtvolume verhogen
6 Luchtvolume verlagen
7 Natuurlijke modus
8 Timer
9 Slaapstand
10 Temperatuur verhogen
11 Dempen
12 Temperatuur verlagen
GEBRUIK
Knop/schakelaar/display op apparaat
• U kunt de aan/uit-knop op het apparaat voor het volgende
gebruiken:
1. Kort indrukken: Het apparaat in- en uitschakelen.
2. 6seconden ingedrukt houden: De koppelingsmodus starten.
3. 15seconden ingedrukt houden: De fabrieksinstellingen
herstellen. Alle wifi-aanmeldingsgegevens gaan hierbij verloren.
• Gebruik de aan/uit-schakelaar op de achterkant van het apparaat
om het apparaat volledig uit te schakelen.
• De temperatuur wordt op het display weergegeven.
• Het display is blauw in de koelmodus en oranje in de
verwarmingsmodus.
Knoppen op afstandsbediening
• Koelmodus: In de koelmodus brandt het ledlampje blauw. Druk
op deze knop om de koelmodus te activeren. Opmerking: De
standaardmodus bij het opstarten is de koelmodus.
NL

Gebruiksaanwijzing
14
• Verwarmingsmodus: In de verwarmingsmodus is het display
oranje. Druk op deze knop om de verwarmingsmodus te
activeren.
• Oscillatieknop: Druk op de oscillatieknop om de oscillatiefunctie in
te schakelen. De ventilator zwenkt van links naar rechts. Druk
opnieuw op deze knop om de oscillatie te stoppen.
• Aan/uit-knop: Schakel het apparaat in en uit door op de aan/uit-
knop te drukken.
• Luchtvolume verhogen/verlagen: Druk op de knop + aan de
linkerkant van de afstandsbediening om het luchtvolume te
verhogen. Druk op de knop - aan de linkerkant van de
afstandsbediening om de luchtstroom te verlagen. In de
koelmodus kan de ventilatorsnelheid op stand 1-10 worden gezet.
Voor de verwarmingsmodus zijn er 4 niveaus.
• Natuurlijke modus: Op het scherm van het apparaat wordt de
huidige ventilatorsnelheid weergegeven. De ventilator simuleert
een natuurlijke bries. De natuurlijke modus werkt in zowel de
koelmodus als de verwarmingsmodus.
• Timer: Druk op de timerknop om het gewenste bereik tussen 1 en
24 uur te selecteren.
• Slaapstand: De slaapstand werkt in zowel de koelmodus als de
verwarmingsmodus. De ventilatorsnelheid neemt af tot niveau 1
vanaf de ingestelde snelheid. Op het display wordt de huidige
ventilatorsnelheid weergegeven.
• Temperatuur verhogen verlagen: In de verwarmingsmodus drukt
u op de temperatuurknop aan de rechterkant van de
afstandsbediening om de temperatuur tussen 16°C en 30°C in te
stellen. Opmerking: deze knop werkt niet in de koelmodus.
• Dempen: Hiermee worden de geluiden van het apparaat
uitgeschakeld.
Instructies voor verwarmingsmodus
• Druk op de knop voor de verwarmingsmodus. Op het display
wordt de omgevingstemperatuur weergegeven.
• Druk op de temperatuurknop om de temperatuur in te stellen. Het
display knippert en u kunt een waarde tussen 16 en 30°C
instellen.
• De ingestelde temperatuur moet hoger zijn dan de
omgevingstemperatuur, zodat de verwarmingsfunctie wordt
ingeschakeld.
• Wanneer de omgevingstemperatuur de doeltemperatuur bereikt,
wordt het verwarmingselement enige tijd uitgeschakeld. De
ventilator draait om de warmte te verspreiden. Na enkele
seconden stopt ook de ventilator tot de omgevingstemperatuur
weer onder de doeltemperatuur is.
• Als de omgevingstemperatuur lager is dan de ingestelde
temperatuur, wordt de verwarmingsfunctie automatisch weer
geactiveerd.
• Opmerking: De standaard ingestelde temperatuur is 20°C. In de
verwarmingsmodus wordt bij een omgevingstemperatuur van
minder dan 0°C op het display '01' weergegeven. Negatieve
temperatuurwaarden worden niet weergegeven. Wanneer de
verwarmingsmodus meer dan 9uur actief is, wordt het apparaat
automatisch gestopt. Druk op de aan/uit-knop op het apparaat of
op de knop op de afstandsbediening om het apparaat opnieuw te
starten.

Gebruiksaanwijzing
15
HET APPARAAT GEBRUIKEN MET DE CLIMATE-APP
• De heater kan handmatig worden bediend met de ingebouwde
bedieningselementen, of u kunt een smartphone of slimme
luidspreker gebruiken. Voordat u begint, moet u de HomeWizard
Climate-app downloaden. De HomeWizard Climate-app is
beschikbaar voor Android en iOS.
De heater koppelen aan de HomeWizard Climate-app
• Controleer of het apparaat is ingeschakeld.
• Open de HomeWizard Climate-app.
• Maak een account aan. Als u al een HomeWizard-account hebt,
meldt u zich aan met uw gegevens.
• Klik op 'Add New Climate Device' (Nieuw klimaatapparaat
toevoegen) om een nieuw apparaat toe te voegen.
• Selecteer het apparaat dat u wilt verbinden.
• Volg de instructies in de app om het apparaat te verbinden.
• Als u het apparaat met uw stem wilt bedienen via een slimme
luidspreker, raadpleegt u de instructies van de fabrikant over het
toevoegen van acties via uw apparaat.
Technische specificaties
Details 347000
Voltage 220-240V
Frequentie 50/60Hz
Vermogen (maximum) 2000W
IP-classificatie IP24
REINIGING EN ONDERHOUD
• Voordat u het apparaat gaat reinigen, haalt u de stekker uit het
stopcontact en wacht u tot het apparaat is afgekoeld.
• Het oppervlak reinigen: Veeg het oppervlak schoon met een
zachte, droge doek. Als het apparaat erg vies is, reinigt u het met
een vochtige doek. Gebruik nooit krassende en schurende
schoonmaakmiddelen, schuursponzen of staalwol, aangezien
deze het apparaat kunnen beschadigen. Veeg het apparaat
daarna af met een droge, zachte doek.
• Luchtinlaat/-uitlaat: Gebruik een zachte borstel of stofzuiger om
stof uit de luchtinlaat en -uitlaat te verwijderen. Reinig het
apparaat op een locatie die niet te stoffig is. Een te stoffige
omgeving is ongezond en beperkt de efficiëntie van de ventilator.
• Afstandsbediening: Veeg het oppervlak van de
afstandsbediening voorzichtig af met een zachte, droge doek.
Verwijder de batterijen als u de afstandsbediening gedurende
langere tijd niet gaat gebruiken.
CONFORMITEITSVERKLARING
• Hierbij verklaart Smartwares Europe dat de radioapparatuur van
het type 347000 voldoet aan de richtlijn 2014/53/EU
• De volledige tekst van de EU-conformiteitsverklaring is
beschikbaar op het volgende internetadres:
www.princesshome.eu/doc
NL

Gebruiksaanwijzing
16
MILIEU
Dit apparaat mag aan het einde van de levensduur niet bij het
normale huisafval worden gedeponeerd, maar moet bij een speciaal
inzamelpunt voor hergebruik van elektrische en elektronische
apparaten worden aangeboden. Het symbool op het apparaat, in de
gebruiksaanwijzing en op de verpakking attendeert u hierop. De in het
apparaat gebruikte materialen kunnen worden gerecycled. Met het
recyclen van gebruikte huishoudelijke apparaten levert u een
belangrijke bijdrage aan de bescherming van ons milieu. Informeer bij
uw lokale overheid naar het inzamelpunt.
Volgens de Europese richtlijn voor batterijen (2006/66/EC) is het niet
toegestaan om batterijen weg te gooien als huishoudelijk afval. Ze
kunnen stoffen bevatten die schadelijk zijn voor het milieu. U kunt
lege batterijen inleveren bij een lokaal openbaar inzamelpunt of een
lokaal recyclingpunt. Om oververhitting als gevolg van kortsluiting te
voorkomen moeten lithiumbatterijen uit het product worden verwijderd
en moeten de polen met isolatietape of een ander materiaal worden
afgeschermd.
Support
Alle beschikbare informatie en gegevens over reserveonderdelen zijn
te vinden op www.princesshome.eu!

Manuel d'instructions
17
SÉCURITÉ
• Si vous ignorez les consignes de sécurité, le
fabricant ne peut être tenu pour responsable
des dommages.
• Si le cordon d'alimentation est endommagé,
il doit être remplacé par le fabricant, son
réparateur ou des personnes qualifiées afin
d'éviter tout risque.
• Ne déplacez jamais l'appareil en tirant sur le
cordon et veillez à ce que celui-ci ne
s'enroule pas.
• L'appareil doit être posé sur une surface
stable et nivelée.
• Ne laissez jamais le dispositif sans
surveillance s'il est connecté à l'alimentation.
• Cet appareil est uniquement destiné à des
utilisations domestiques et seulement dans
le but pour lequel il est fabriqué.
• Cet appareil ne doit pas être utilisé par des
enfants de moins de 8 ans. Cet appareil
peut être utilisé par des enfants de 8 ans ou
plus et des personnes présentant un
handicap physique, sensoriel ou mental
voire ne disposant pas des connaissances
et de l'expérience nécessaires en cas de
surveillance ou d'instructions sur l'usage de
cet appareil en toute sécurité et de
compréhension des risques impliqués. Les
enfants ne doivent pas jouer avec l'appareil.
Maintenez l'appareil et son cordon
d'alimentation hors de portée des enfants de
moins de 8 ans. Le nettoyage et la
maintenance utilisateur ne doivent pas être
confiés à des enfants sauf s'ils ont 8 ans ou
plus et sont sous surveillance.
• Afin de vous éviter un choc électrique,
n'immergez pas le cordon, la prise ou
l'appareil dans de l'eau ou autre liquide.
• AVERTISSEMENT: Afin d’éviter toute
surchauffe, ne recouvrez pas le radiateur.
• AVERTISSEMENT: Certaines parties de ce
produit peuvent devenir très chaudes et
provoquer des brûlures. Attention aux
endroits où il peut y avoir des enfants et des
personnes vulnérables.
• Les enfants âgés de 3 ans et de moins de 8
ans n’allumeront/éteindront (On/Off)
l’appareil que s'il est placé ou installé dans
l’emplacement destiné à son utilisation
normale et qu’ils sont responsabilisés ou
informés sur l’utilisation de l’appareil de
manière sécurisée et qu’ils comprennent les
risques encourus. Les enfants âgés de 3
FR

Manuel d'instructions
18
ans et de moins de 8 ans ne brancheront,
règleront et nettoieront pas l’appareil ou
n’effectueront pas l’entretien de l’utilisateur.
• Les enfants de moins de 3 ans devraient
être gardés hors de proximité à moins d’être
continuellement surveillés.
• Ne pas utiliser l'appareil avec un
programmateur, minuteur, un dispositif
indépendant de télécommande ou tout autre
appareil qui allume automatiquement le
radiateur, car il y a un risque d’incendie si le
radiateur est recouvert ou mal placé.
• N’utilisez pas ce radiateur à proximité de
baignoires, de douches ou de piscine.
• Veuillez ne pas placer l’appareil à proximité
de rideaux et d’autres matériaux
inflammables. Cela pourrait provoquer un
incendie.
• Le radiateur ne doit pas être positionné
directement sous une sortie de prise.
• Le radiateur doit être installé de manière à
ce que personne dans le bain ou la douche
ne puisse toucher les interrupteurs et les
autres commandes.
Sécurité
• Le fabricant décline toute responsabilité pour
les dommages résultant du non-respect des
instructions de sécurité.
• N'exposez pas les batteries et piles à des
températures élevées ou à la lumière directe
du soleil. Ne jetez pas les batteries et piles
dans le feu. Vous risquez une explosion !
• Maintenez les batteries et piles hors de
portée des enfants. Les batteries et piles ne
sont pas des jouets !
• Ne forcez pas l’ouverture des batteries et
piles.
• Évitez tout contact avec des objets
métalliques (Bagues, clous, vis, etc.). Ils
risquent de provoquer un court-circuit !
• Suite à un court-circuit, les batteries et piles
peuvent chauffer excessivement, voire
s’enflammer, ce qui peut entraîner des
brûlures.
• Pour votre sécurité, les pôles de batteries
devraient être recouverts par des languettes
adhésives pendant le transport.
• Ne touchez pas les batteries et piles percées
ou présentant une fuite. Si du liquide de
batterie ou de pile entre en contact avec vos
yeux, rincez-les dès que possible à l'eau

Manuel d'instructions
19
claire, sans frotter les yeux. Rendez-vous
immédiatement à l'hôpital. En l'absence de
traitement approprié, des lésions oculaires
sont possibles.
DESCRIPTION DES PIÈCES
1. Couvercle
2. Sortie d'air
3. Conduit d'air
4. Structure
5. Bouton marche/arrêt
6. Écran
7. Entrée d'air
8. Base
9. Télécommande
AVANT LA PREMIÈRE UTILISATION
• Posez l'appareil sur une surface stable et plane, et veillez à
réserver un espace libre minimum de 100 cm tout autour. Cet
appareil n'est pas approprié pour une installation dans une
armoire, ou pour un usage extérieur.
• Connectez le câble d'alimentation à la prise. (Remarque:
Assurez-vous que la tension indiquée sur l'appareil correspond à
la tension locale avant de brancher l'appareil. Voltage 220 V-240
V, 50-60 Hz.)
• Cet appareil comprend un capteur de protection contre la
surchauffe et une sécurité automatique qui coupe l'alimentation
en cas de renversement accidentel ou de surchauffe. Si ce
capteur est déclenché, débranchez l'appareil et laissez le
ventilateur refroidir. Vérifiez et retirez tout obstacle avant de
redémarrer l'appareil et assurez-vous de le placer sur une
surface dure, plane et stable.
• L'interrupteur ou le bouton de mise en marche de la
télécommande mettra ce ventilateur en veille, et non en arrêt
complet. Servez-vous de l'interrupteur situé à l'arrière de
l'appareil pour l'éteindre complètement quand il n'est pas utilisé.
• Si l'appareil n'est pas utilisé pendant une longue période, veuillez
débrancher le cordon d'alimentation.
• Avertissement: Ce qui suit peut parfois se produire en raison du
chevauchement des fréquences de commande à distance.
Veuillez y être attentif lorsque vous utilisez la télécommande:
1. Cet appareil peut réagir lorsqu'on utilise une télécommande pour
d'autres appareils.
2. Lorsque vous utilisez la télécommande de cet appareil, d'autres
appareils électriques peuvent réagir.
• Mettez 2x piles AAA dans la télécommande, assurez-vous que la
polarité (+ et -) est correcte.
FR

Manuel d'instructions
20
FONCTIONS DE L'ÉCRAN/BOUTONS
1 Mode refroidissement
2 Mode chauffage
3 Oscillation
4 Bouton marche/arrêt
5 Augmenter le volume d'air
6 Diminuer le volume d'air
7 Mode naturel
8 Minuterie
9 Mode veille
10 Augmenter la température
11 Mute
12 Diminuer la température
UTILISATION
Bouton / Interrupteur / Affichage sur l'appareil
• Le bouton de marche de l'appareil peut être utilisé pour:
1. Allumer et éteindre la machine, appuyer brièvement.
2. Appuyer longuement pendant 6 secondes pour entrer en mode
de jumelage.
3. Une pression longue de 15 secondes permet d'entrer dans la
réinitialisation d'usine, ce qui fait que la machine oublie toutes vos
références wifi.
• Le bouton marche/arrêt situé à l'arrière de l'appareil peut être
utilisé pour éteindre complètement l'appareil.
• La température est visible sur l'écran.
• La couleur d'affichage sera bleue en mode refroidissement ou
orange en mode chauffage.
A página está carregando...
A página está carregando...
A página está carregando...
A página está carregando...
A página está carregando...
A página está carregando...
A página está carregando...
A página está carregando...
A página está carregando...
A página está carregando...
A página está carregando...
A página está carregando...
A página está carregando...
A página está carregando...
A página está carregando...
A página está carregando...
A página está carregando...
A página está carregando...
A página está carregando...
A página está carregando...
A página está carregando...
A página está carregando...
A página está carregando...
A página está carregando...
A página está carregando...
A página está carregando...
A página está carregando...
A página está carregando...
A página está carregando...
A página está carregando...
A página está carregando...
A página está carregando...
A página está carregando...
A página está carregando...
A página está carregando...
A página está carregando...
A página está carregando...
A página está carregando...
A página está carregando...
A página está carregando...
A página está carregando...
A página está carregando...
A página está carregando...
A página está carregando...
A página está carregando...
A página está carregando...
A página está carregando...
A página está carregando...
A página está carregando...
A página está carregando...
A página está carregando...
A página está carregando...
A página está carregando...
A página está carregando...
A página está carregando...
A página está carregando...
A página está carregando...
A página está carregando...
A página está carregando...
A página está carregando...
A página está carregando...
A página está carregando...
A página está carregando...
A página está carregando...
A página está carregando...
A página está carregando...
A página está carregando...
A página está carregando...
-
 1
1
-
 2
2
-
 3
3
-
 4
4
-
 5
5
-
 6
6
-
 7
7
-
 8
8
-
 9
9
-
 10
10
-
 11
11
-
 12
12
-
 13
13
-
 14
14
-
 15
15
-
 16
16
-
 17
17
-
 18
18
-
 19
19
-
 20
20
-
 21
21
-
 22
22
-
 23
23
-
 24
24
-
 25
25
-
 26
26
-
 27
27
-
 28
28
-
 29
29
-
 30
30
-
 31
31
-
 32
32
-
 33
33
-
 34
34
-
 35
35
-
 36
36
-
 37
37
-
 38
38
-
 39
39
-
 40
40
-
 41
41
-
 42
42
-
 43
43
-
 44
44
-
 45
45
-
 46
46
-
 47
47
-
 48
48
-
 49
49
-
 50
50
-
 51
51
-
 52
52
-
 53
53
-
 54
54
-
 55
55
-
 56
56
-
 57
57
-
 58
58
-
 59
59
-
 60
60
-
 61
61
-
 62
62
-
 63
63
-
 64
64
-
 65
65
-
 66
66
-
 67
67
-
 68
68
-
 69
69
-
 70
70
-
 71
71
-
 72
72
-
 73
73
-
 74
74
-
 75
75
-
 76
76
-
 77
77
-
 78
78
-
 79
79
-
 80
80
-
 81
81
-
 82
82
-
 83
83
-
 84
84
-
 85
85
-
 86
86
-
 87
87
-
 88
88


Princess 01.347000.01.001 Manual do proprietário
- Categoria
- Aquecedores de ambiente
- Tipo
- Manual do proprietário
em outras línguas
- español: Princess 01.347000.01.001 El manual del propietario
- français: Princess 01.347000.01.001 Le manuel du propriétaire
- italiano: Princess 01.347000.01.001 Manuale del proprietario
- slovenčina: Princess 01.347000.01.001 Návod na obsluhu
- Deutsch: Princess 01.347000.01.001 Bedienungsanleitung
- polski: Princess 01.347000.01.001 Instrukcja obsługi
Artigos relacionados
-
Princess 01.347000.01.001 Manual do usuário
-
Princess 350 540 700 Smart Infrared Panel Heater Manual do usuário
-
-
-
Princess 350 Manual do usuário
-
Princess SMART WIFI CONNECTED TOWER FAN Manual do usuário
-
-
-
Princess 348035 Manual do usuário
-
Outros documentos
-
Vonroc EH519AC Electric Bladeless PtC Heater Instruções de operação
-
LG UV42H.NL1 Manual do usuário
-
LG CV18 Manual do usuário
-
Panasonic KITF24DTE5 Manual do proprietário
-
-
Rowenta Eclipse QU506 Air Purifier Instruções de operação
-
Panasonic CSE18HB4EA Manual do proprietário
-
-
LG F12MT Manual do usuário
-