Valex 1429541 Manual do proprietário
- Categoria
- Brocas combi sem fio
- Tipo
- Manual do proprietário
Este manual também é adequado para

MTraBat
26.03.2012
Trapano avvitatore a batteria
ISTRUZIONI PER L’USO E ISTRUZIONI DI SICUREZZA
Istruzioni originali
Battery-driven screwdriver drill
INSTRUCTION MANUAL AND SAFETY INSTRUCTIONS
Original instructions
Perceuse visseuse à batterie
INSTRUCTIONS POUR L’UTILISATION ET CONSIGNES DE SÉCURITÉ
Instructions d’origine
Taladro atornillador a batería
INSTRUCCIONES PARA EL USO E INSTRUCCIONES DE SEGURIDAD
Instrucciones originales
ÄñÜðáíïâéäùôéêüìðáôáñßáò
ÅÃ×ÅÉÑÉÄÉÏ ÏÄÇÃÉÙÍ ×ÑÇÓÇÓ ÊÁÉ ÏÄÇÃÉÙÍ ÁÓÖÁËÅÉÁÓ
Ðñùôüôõðåòïäçãßåò
ATTENZIONE! Prima di usare la macchina, leggete attentamente le istruzioni per l’uso
CAUTION! Before starting the machine, read the operating instructions carefully
ATTENTION! Avant la mise en service de la machine, lire scrupuleusement le mode d’emploi
ATENCIÓN! Antes de usar la máqiuna, leer atentamente las instrucciones de empleo
ÐÑÏÓÏ×Ç!Ðñéí÷ñçóìïðïéÞóåôåôïìç÷ÜíçìáäéáâÜóôåðñïóåêôéêÜôéòïäçãßåò÷ñÞóçò

- 2 -
i
AVVERTENZE DI SICUREZZA GENERALE
PER L’UTENSILE
!ATTENZIONE! Leggere tutte le avvertenze e tutte le
istruzioni.
La mancata ottemperanza alle avvertenze e alle istruzioni
può dare luogo a scosse elettriche, incendio e/o lesioni serie.
La scrupolosa osservanza di queste avvertenze con l’utilizzo
dei mezzi di protezione individuale, minimizzano i rischi di
incidente ma non li eliminano completamente.
Conservare tutte le avvertenze e le istruzioni per riferimenti
futuri.
Il termine “utensile elettrico” delle avvertenze si riferisce agli
utensili elettrici azionati mediante collegamento alla rete (con
cavo) o azionati a batteria (senza cavo).
Queste istruzioni si riferiscono ad un utensile elettrico fabbricato
in più modelli e versioni; leggete attentamente le istruzioni ed
applicatele all’utensile elettrico in vostro possesso.
1) Sicurezza dell’area di lavoro
a) Tenere pulita e ben illuminata l’area di lavoro. Le aree
ingombre e/o poco illuminate possono provocare incidenti.
b) Non far funzionare utensili elettrici in atmosfere esplosive,
ad esempio in presenza di liquidi, gas, o polveri infiammabili.
Gli utensili elettrici creano scintille che possono provocare
l’accensione di polveri o fumi.
c) Tenere i bambini e i passanti a distanza durante il funzio-
namento di un utensile elettrico. Le distrazioni possono far
perdere il controllo dell’utensile.
d) Mantenete in un luogo sicuro i sacchi di nylon presenti
nell’imballaggio. I sacchi possono provocare il soffocamento
e i bambini non devono entrarne in possesso.
e) Usate l’utensile in un luogo con un sufficiente ricambio
d’aria. L’areazione è necessaria per il raffreddamento dell’uten-
sile e per eliminare impurità nell’aria provocate dalla lavorazione.
f) Non far funzionare utensili elettrici all’aperto in presenza
di pioggia, nebbia, temporale, alte e basse temperature, o
in ambienti bagnati o umidi. L’utilizzo in queste condizioni può
provocare la folgorazione.
2) Sicurezza elettrica
a) La spina dell’utensile elettrico deve corrispondere alla
presa. Mai modificare la spina in alcun modo. Non utilizzare
adattatori con utensili elettrici dotati di messa a terra (a
massa). Spine non modificate e prese corrispondenti riducono
il rischio di scossa elettrica.
b) Evitare il contatto del corpo con superfici messe a terra o
a massa quali tubi, radiatori, cucine e frigoriferi. Se il vostro
corpo è a terra o a massa, il rischio di scossa elettrica aumenta.
c) Non esporre gli utensili elettrici alla pioggia e non utilizzarli
in luoghi umidi. L’ingresso di acqua in un utensile elettrico
aumenta il rischio di scossa elettrica.
d) Non usurare il cavo. Non utilizzare mai il cavo per trasportare,
tirare o scollegare dalla presa di rete l’utensile elettrico. Tenere il
cavo distante da calore, olio, bordi affilati o parti in movimento.
Cavi danneggiati o attorcigliati aumentano il rischio di scossa elettrica.
e) Quando si aziona un utensile elettrico all’esterno, usare
un cavo di prolunga adeguato per l’uso in esterni. L’uso di un
cavo adeguato riduce il rischio di scossa elettrica.
f) Utilizzare un’alimentazione elettrica protetta da un interrut-
tore differenziale (RCD). L’utilizzo di un interruttore differenziale
(RCD) riduce il rischio di scossa elettrica.
g) L’alimentazione elettrica deve corrispondere a quella
indicata sull’utensile elettrico. Una alimentazione elettrica non
idonea genera malfunzionamenti ed incidenti.
h) Verificate periodicamente il cavo di alimentazione elettrica.
Non schiacciate o calpestate il cavo di alimentazione elettrica.
Un cavo danneggiato è fonte di scosse elettriche. Se danneggiato
estraete la spina e non usate l’utensile elettrico.
i) In caso di dubbio in campo elettrico affidatevi ad tecnico
specializzato di comprovata esperienza. L’utilizzo dell’elettricità
in modo non sicuro è molto pericoloso per la vostra ed altrui
incolumità.
3) Sicurezza personale
a) Non distrarsi mai, controllare quello che si sta facendo
e usare il buon senso quando si azionano utensili elettrici.
Non azionare l’utensile quando si è stanchi o sotto l’influsso
di droghe, alcol o medicinali. Un momento di disattenzione
durante l’azionamento di utensili elettrici può dare luogo a serie
lesioni personali.
b) Usare un’apparecchiatura di protezione personale. In-
dossare sempre protezioni per gli occhi. Le apparecchiature
di protezione quali maschere antipolvere, calzature di sicurezza
antiscivolo, casco di sicurezza, guanti di sicurezza o protezioni
per l’udito riducono la possibilità di subire lesioni personali.
c) Prevenire le accensioni accidentali. Assicurarsi che
l’interruttore sia in posizione di spento prima di collegare
l’utensile alla rete elettrica e/o ai gruppi di batterie, prima
di prenderlo o di trasportarlo. Trasportare utensili elettrici con
il dito sull’interruttore o collegarli in rete con l’interruttore in
posizione di accensione può provocare incidenti.
d) Rimuovere qualsiasi chiave di regolazione prima di ac-
cendere l’utensile elettrico. Una chiave lasciata attaccata ad
una parte rotante dell’utensile elettrico può provocare lesioni
personali.
e) Non sbilanciarsi. Mantenere sempre la posizione e l’equili-
brio appropriati. Questo permette di controllare meglio l’utensile
elettrico in situazioni impreviste.
f) Vestirsi in modo appropriato. Non indossare vestiti larghi o
gioielli. Tenere capelli, indumenti e guanti distanti dalle parti
in movimento. Vestiti larghi, gioielli o capelli lunghi possono
impigliarsi nelle parti in movimento.
g) Se sono previsti dispositivi da collegare ad impianti per
l’estrazione e la raccolta di polvere, accertarsi che siano col-
legati e usati in maniera appropriata. L’uso di questi dispositivi
può ridurre i rischi correlati alla polvere.
h) L’utilizzatore è responsabile verso terzi di eventuali in-
cidenti o danni a persone o cose. Un uso improprio provoca
incidenti e danni.
i) E’ vietato l’utilizzo a piedi nudi o con piedi e/o mani
bagnati/e. L’utilizzo in queste condizioni può provocare la
folgorazione.
l) La lavorazione di materiali nocivi alla salute deve avvenire
nel rispetto delle leggi vigenti. Alcuni tipi di polveri e materiali
come metalli, legni, vernici ecc. sono molto dannosi alla salute.
Salvaguardare la propria ed altrui salute adottando protezioni ed
accorgimenti idonei.
m) Non avvicinarsi alle feritoie di espulsione dell’aria di
raffreddamento. L’aria generata può contenere residui di lavora-
zione, piccole parti dannose per le vie respiratorie e per gli occhi.
n) Non coprire e non infilare cose sulle feritoie di raffred-
damento. La mancata ventilazione dell’utensile elettrico può
generare un incendio. Accedere a parti interne può danneggiare
l’utensile e provocare la folgorazione.
o) Non utilizzare l’utensile elettrico se le protezioni (schermi,
pannelli, sportelli ecc.) sono aperti, danneggiati o mancanti.
Le protezioni correttamente installate salvaguardano la vostra
salute e consentono un utilizzo in sicurezza.

- 3 -
p) Per utensili elettrici dotati di indicatore laser: non fissare il
fascio luminoso, non puntare il fascio contro persone animali
e veicoli, non puntare il fascio sugli occhi e sulla pelle. L’uso
improprio del laser provoca gravi danni alla vista e alla pelle.
4) Uso e manutenzione degli utensili elettrici
a) Non forzare l’utensile elettrico. Usare l’utensile adatto
per l’operazione da eseguire. L’utensile elettrico appropriato
permette di eseguire il lavoro con maggiore efficienza e sicurezza
senza essere costretti a superare i parametri d’uso previsti.
b) Non usare l’utensile elettrico se l’interruttore di accensione
e spegnimento non si aziona correttamente. Qualsiasi utensile
elettrico che non può essere controllato con l’interruttore è
pericoloso e deve essere sottoposto a riparazioni.
c) Scollegare la spina dalla rete di alimentazione e/o il gruppo
di batterie dall’utensile elettrico prima di effettuare qualsiasi
regolazione, cambiare accessori o riporre gli utensili elettrici.
Tali misure di sicurezza preventiva riducono il rischio di avvio
accidentale dell’utensile elettrico.
d) Riporre utensili elettrici inutilizzati fuori della portata dei
bambini e non permetterne l’uso a persone inesperte dell’u-
tensile o che non conoscano queste istruzioni. Gli utensili
elettrici sono pericolosi se utilizzati da persone inesperte.
e) Effettuare la manutenzione necessaria sugli utensili elet-
trici. Verificare il possibile errato allineamento o bloccaggio
delle parti in movimento, la rottura delle parti e qualsiasi
altra condizione che possa influenzare il funzionamento degli
utensili elettrici. Se è danneggiato, far riparare l’utensile
elettrico prima di utilizzarlo. Numerosi incidenti sono provocati
proprio dal cattivo stato di manutenzione degli utensili elettrici.
f) Mantenere puliti e affilati gli strumenti di taglio (se pre-
senti). Strumenti di taglio in buone condizioni di manutenzione
e con bordi di taglio affilati sono meno suscettibili di bloccarsi
e sono più facili da controllare.
g) Usare l’utensile elettrico, gli accessori e le punte ecc.,
in conformità con queste istruzioni, tenendo conto delle
condizioni di lavorazione e dell’operazione da eseguire. L’uso
dell’utensile elettrico per operazioni diverse da quelle previste
può dare luogo a situazioni pericolose.
h) Sostenere l’utensile con le impugnature isolate, quando si
effettua un’operazione nel corso della quale l’organo di lavoro
può venire in contatto con dei cavi nascosti.
Gli organi di lavoro venendo in contatto con un conduttore “in
tensione” possono mettere “in tensione” le parti metalliche
dell’utensile elettrico e provocare una scossa elettrica (elettro-
cuzione) all’operatore.
i) Mantenete una distanza di sicurezza dalle parti in movimen-
to. Toccare parti in movimento provoca lesioni serie.
l) Non modificate l’utensile elettrico. Togliere, sostituire o
aggiungere componenti non previsti dalle istruzioni, è vietato
ed annulla la garanzia.
m) Non abbandonare l’utensile elettrico in funzione. Spegne-
telo prima di lasciarlo incustodito per evitare possibili incidenti.
n) L’utensile elettrico non deve mai venire a contatto con
l’acqua o altri liquidi. L’utilizzo in queste condizioni può pro-
vocare la folgorazione.
5) Uso e precauzioni d’uso degli utensili a batteria
a) Ricaricare soltanto con il caricabatterie specificato dal
costruttore. Un caricabatterie che è adeguato per un tipo di
gruppo di batterie può creare un rischio di incendio quando
viene utilizzato con altri gruppi di batterie.
b) Usare utensili elettrici solo con i gruppi di batterie specifi-
catamente designati. L’uso di qualsiasi altro gruppo di batterie
può creare il rischio di lesioni e incendi.
c) Quando il gruppo di batterie non è in uso, tenerlo lontano
da altri oggetti di metallo quali graffette, monete, chiavi,
viti, o altri piccoli oggetti metallici che possono creare un
collegamento tra i due morsetti. Cortocircuitare i morsetti della
batteria può provocare ustioni o incendi.
d) Se la batteria è in cattive condizioni, può fuoriuscire del
liquido; evitare ogni contatto. Se si verifica un contatto acci-
dentale, sciacquare immediatamente con acqua. Se il liquido
entra negli occhi, cercare immediato aiuto medico. Il liquido
fuoriuscito dalla batteria può provocare irritazioni o ustioni.
e) Mantenete l’apparecchio e le batterie lontano da fonti di ca-
lore e dal fuoco. Non esporre a temperature superiori a 50°C.
Alte temperature possono provocare l’esplosione delle batterie.
6) Assistenza
a) Fare effettuare le operazioni di manutenzione sugli utensili
elettrici da parte di personale tecnico qualificato che utilizza
soltanto ricambi originali. Questo permetterà di mantenere la
sicurezza dell’utensile elettrico.
b) Non tentare di riparare l’utensile elettrico o di accedere ad
organi interni. Interventi effettuati da personale non qualificato e
non autorizzato dalla Ditta costruttrice può generare seri pericoli
ed annulla la garanzia.
c) Richiedete solo ricambi originali. L’utilizzo di ricambi non
originali può compromettere la sicurezza dell’utensile elettrico.
AVVERTENZE DI SICUREZZA DEL TRAPANO/AVVI-
TATORE A BATTERIA
1) Sicurezza
a) Indossare delle protezioni per le orecchie quando si usa il
trapano a percussione. L’esposizione ai rumori può provocare
una perdita dell’udito.
b) Utilizzare la/le impugnatura/e fornita con l’utensile. La
perdita di controllo può provocare delle ferite.
c) Sostenere l’utensile con le impugnature isolate, quando si
effettua un’operazione nel corso della quale l’organo di lavoro
può venire in contatto con dei cavi nascosti. Gli organi di lavoro
venendo in contatto con un conduttore “in tensione” possono
mettere “in tensione” le parti metalliche dell’utensile elettrico e
provocare una scossa elettrica (elettrocuzione) all’operatore.
d) Prima di inserire o togliere le punte di foratura, staccare
la batteria dall’utensile. Ogni manutenzione deve avvenire in
sicurezza per evitare incidenti provocati da un avvio improvviso.
e) Le lavorazioni a soffitto, con utensile rivolto verso l’alto, è
fonte di maggior pericolo per l’utilizzatore. Utilizzate un casco
a protezione del capo per eventuali cadute di materiale. Indossate
occhiali a protezione della vista.
f) Nel caso di lavorazioni su edifici o strutture portanti, tu-
bazioni o recipienti chiusi è importante verificare, mediante
rilevatori, che all’interno non siano presenti: cavi elettrici
o telefonici, liquidi o gas in pressione (che possono essere
infiammabili e corrosivi), tubature ecc. Il taglio anche parziale
di opere murarie può indebolire la struttura dell’intero edificio
fino al crollo. La fuoriuscita di liquidi o gas può provocare uno
scoppio, un incendio, un allagamento.
g) Se l’utensile si blocca durante l’utilizzo, spegnerlo subito.
Non forzate con operazioni gravose per l’utensile.
h) Mantenete ben saldo l’utensile. Gli sforzi provocati dalla
lavorazione provocano sollecitazioni che è necessario contra-
stare con la vostra forza.
i) Assicurate il pezzo in lavorazione con una morsa o altro. Un
pezzo trattenuto con la mano può improvvisamente provocare
un incidente.
l) Attendete l’arresto completo dell’utensile elettrico prima di
posarlo. Le parti in movimento possono provocarne la caduta.
m) Se l’utensile si arresta non continuate a premere il pulsan-
te di avvio. La batteria potrebbe irrimediabilmente danneggiarsi.

- 4 -
AVVERTENZE DI SICUREZZA DELLA BATTERIA
E DEL CARICABATTERIA
a) Non smontare o lacerare l’involucro della batteria. Non
colpirla e non lasciarla cadere a terra. Batterie danneggiate
possono provocare seri pericoli.
b) Non esporre la batteria al calore o al fuoco. Non esporre
alla luce solare diretta. Non lasciarla all’interno di veicoli. Non
esporre a temperatura maggiore di 50°C. Pericolo di esplosione.
c) Una batteria usata impropriamente può provocare la fuo-
riuscita di vapori. Arieggiare il locale e consultare un medico
in caso di necessità.
d) Mettere le batterie e gli apparecchi elettrici fuori dalla
portata dei bambini. E’ buona norma mantenere i bambini
lontano dagli apparecchi elettrici.
e) Non inserite alcun oggetto metallico nel vano porta
batteria. Non depositate la batteria assieme ad alti oggetti
metalli (come la cassetta attrezzi) o assieme ad altre batterie.
Pericolo di generare un corto circuito elettrico.
f) Utilizzare il caricabatterie in ambienti chiusi al riparo dalla
pioggia e dall’umidità. Prevenite possibili folgorazioni elettriche.
g) Mantenete il caricabatterie sempre pulito. Polvere e spor-
cizia impediscono la corretta ricarica.
h) Prima di ogni impiego controllare il caricabatterie, il cavo
e la spina. Non utilizzatelo in caso di danni o guasti. Non aprire
mai il caricabatterie e ripararlo soltanto da personale qualificato
e soltanto con pezzi di ricambio originali.
i) Non utilizzare il caricabatterie su basi facilmente infiammabili
(come carta, tessuti, legno ecc.) oppure in ambienti infiammabili o
esplodenti. Prevenite possibili incendi a seguito di surriscaldamenti.
l) Ricaricate la batteria con temperatura ambiente compresa
tra 10°C e 35°C. Temperature inferiori o superiori possono
danneggiare la batteria e non permettere la normale ricarica.
m) Scollegate il caricabatterie dalla rete rete elettrica quando
non lo usate. Non lasciate il caricabatterie acceso con la
batteria completamente carica. Prevenite possibili incidenti.
n) È normale che il caricabatterie e la batteria si riscaldino durante
la fase di carica. E’ però necessario lasciarli raffreddare entrambi,
fino a temperatura ambiente, tra due ricariche consecutive. Tem-
perature elevate possono provocare guasti o esplosione della batteria.
o) Sostituite le batterie che hanno terminato il loro ciclo di
utilizzo. Se la batteria si scarica molto velocemente e/o i cicli
di ricarica sono molto corti, è il segnale che si sta esaurendo
e va pertanto sostituita.
p) Utilizzate esclusivamente batterie di ricambio originali,
del tipo e con caratteristiche uguali a quella fornita con
l’utensile. L’uso di batterie di tipo o con voltaggio diverso
possono danneggiare l’utensile e generare pericoli. Acquistate
esclusivamente ricambi originali.
q) Alcune batterie sono dotate di protezione termica autori-
pristinante che inibisce la ricarica nel caso si raggiungano
temperature troppo elevate; in questo caso il caricabatterie
emetterà una luce lampeggiante rossa. Rimuovere la batteria
dal proprio alloggiamento per alcuni minuti prima di reinserirla
nel caricabatterie. La carica riprenderà automaticamente quando
la temperatura sarà rientrata entro valori di sicurezza.
r) La tensione di alimentazione del caricabatterie deve cor-
rispondere a quella dichiarata sulla targa dati dello stesso.
Non utilizzate nessun altro tipo di alimentazione.
s) È consigliato l’uso di un apparecchio salvavita sulla linea di
alimentazione elettrica. Consultate il vostro elettricista di fiducia.
t) Non danneggiare o calpestare il cavo di alimentazione. Non
trascinate il caricabatterie tirando il cavo. Non tirate il cavo
per estrarre la spina dalla rete di alimentazione.
u) Un eventuali cavo di prolunga deve avere una sezione
superiore a quella del cavo del caricabatteria e dimensionato
in base alla sua lunghezza.
v) Se l’utensile elettrico si blocca perchè la batteria si scari-
ca, non insistere a premere il pulsante di avvio altrimenti la
batteria si guasta irrimediabilmente.
AVVERTENZE DI SICUREZZA PER
LA RUMOROSITA’ E PER LE VIBRAZIONI
Il livello di rumorosità e di vibrazioni riportate nel foglio allegato,
sono valori medi di utilizzo dell’elettroutensile. L’impiego di
elementi di taglio diversi, materiali diversi, l’utilizzo o meno
della percussione, assenza di manutenzione all’elettroutensile
influiscono in modo significativo nelle emissioni sonore e nelle
vibrazioni. Di conseguenza adottate tutte le misure preventive in
modo da eliminare possibili danni dovuti ad un rumore elevato e
alle sollecitazioni da vibrazioni; indossate cuffie antirumore, guanti
antivibrazioni, effettuate delle pause durante la lavorazione, man-
tenete efficiente l’elettroutensile e gli accessori (punte, bit ecc.).
RISCHI RESIDUI
Queste illustrazioni mostrano i rischi principali nell’uso della mac-
china. Leggete attentamente il libretto istruzioni della macchina.
Temperature elevate provocano
l’esplosione delle batterie.
Non esponetele ai raggi diretti
del sole, non lasciatele dentro
i veicoli, non bruciatele.
Rumore elevato generato du-
rante la foratura. Indossate
cuffie a protezione dell’udito.
Rischio di folgorazione o
esplosione a causa di forature
di canalette elettriche o tuba-
zioni con fluidi in pressione
(acqua, gas...).
Impugnare con entrambe le
mani le 2 impugnature isolate
del trapano.
Utilizzare un rilevatore di parti
metalliche nascoste.
Rischio di scossa elettrica con
pericolo di morte. Non toccate
le parti in tensione elettrica
e mantenete una distanza di
sicurezza. Prima di ogni ma-
nutenzione scollegate la spina
dalla presa di alimentazione.

- 5 -
SIMBOLOGIA
Osservate con attenzione la simbologia della fig.B e memorizzate
il rispettivo significato. Una corretta interpretazione dei simboli
consente un uso più sicuro della macchina.
1 Modello e dati tecnici
2 Attenzione!
3 Leggete con attenzione tutte le istruzioni prima dell’uso
5 Solo per uso interno e in ambienti asciutti.
6 Caricabatteria con trasformatore di sicurezza (se presente)
7 Fusibile di protezione (se presente)
8 Doppio isolamento elettrico
10 I rifiuti elettrici ed elettronici possono contenere sostanze
pericolose per l’ambiente e per la salute umana; non devono
pertanto essere smaltiti con quelli domestici ma mediante
una raccolta separata negli appositi centri di raccolta o
riconsegnati al venditore nel caso di acquisto di una ap-
parecchiatura nuova analoga. Lo smaltimento abusivo dei
rifiuti comporta l’applicazione di sanzioni amministrative.
11 Pericolo di esplosione. Mantenete l’apparecchio e le bat-
terie lontano da fonti di calore e dal fuoco. Non esporre a
temperature superiori a 50°C.
12 Interruttore termico autoripristinabile (se presente)
13 Le batterie incluse nell’apparecchio possono essere
smaltite assieme ad esso. Non gettate nel fuoco e non di-
sperdete nell’ambiente le batterie esauste ma consegnatele
agli appositi centri per il loro smaltimento. Non smaltire
assieme ai rifiuti domestici.
14 Contenuto di cadmio Cd superiore allo 0,002% in peso (se
presente)
15 Pericolo lancio materiale. Indossare occhiali a protezione
degli occhi.
16 Pericolo parti taglienti. Indossare guanti a protezione delle mani.
V Volts
Hz Hertz
~ corrente alternata
corrente continua
A Ampere
W Watts
kg chilogrammi
nO velocità a vuoto
mm millimetri
s secondi
h ore
min-1 giri al minuto
dB decibel
°C gradi centigradi
Ni-Cd Nichel-Cadmio
Li-Ion Ioni di Litio
_______________________________________________
Vi ringraziamo per averci preferito nella scelta di questo utensile
elettrico, di seguito chiamato “trapano – avvitatore a batteria”.
!ATTENZIONE! Il trapano – avvitatore a batteria è idoneo alla
foratura di metallo, legno, plastica, laterizio e al serraggio –
svitamento di viteria. E’ vietato l’utilizzo di materiali pericolosi
e in ambienti con pericolo di incendio/esplosione.
Il trapano – avvitatore a batteria è destinato ad un utilizzo
hobbystico e non professionale.
Questo istruzioni riportano le informazioni e quanto ritenuto
necessario per il buon uso, la conoscenza e la normale manu-
tenzione dell’utensile. Esse non riportano le informazioni sulle
tecniche di foratura ed avvitamento; l’utilizzatore troverà maggiori
notizie su libri e pubblicazioni specifiche o partecipando a corsi
di specializzazione.
COMPONENTI
Fare riferimento alla fig. A e seguenti, allegate alle presenti
istruzioni.
1 Interruttore di avvio/arresto e modulatore elettronico velocità
(se presente)
2 Selettore senso di rotazione e blocco accensione (se
presente)
3 Batteria ricaricabile
4 Pulsanti di sblocco batteria
5 Ghiera per variazione coppia di serraggio
6 Mandrino
7 Inserto per avvitare “bit” (se presente)
8 Caricabatteria
9 Ghiera per selezione funzione di percussione, foratura,
serraggio (se presente)
10 Maniglia laterale (se presente)
11 Spia di carica in corso (se presente)
12 Spia di carica completa (se presente)
13 Interruttore di inizio della carica alla batteria (se presente)
14 Selettore delle velocità meccaniche (se presente)
15 Indicatore dello stato di carica della batteria (se presente)
16 Cinturino per aggancio al polso (se presente)
17 Aggancio per cintura in vita (se presente)
18 Luce di illuminazione area di lavoro (se presente)
19 Impugnatura principale
20 Regolatore velocità minima/massima (se presente)
21 Pulsante di blocco per funzionamento continuo (se presen-
te)
22 Feritoie di ventilazione
23 Astina di profondità (se presente)
24 Spia di carica esaurita (se presente)
25 Spina e cavo del caricabatterie
INSTALLAZIONE
!ATTENZIONE! La Ditta costruttrice declina ogni respon-
sabilità per gli eventuali danni diretti e/o indiretti causati da
un errato allacciamento.
!ATTENZIONE! Prima di effettuare le seguenti operazioni
assicuratevi che la spina sia scollegata dalla rete elettrica.
TRASPORTO
Per trasportare l’utensile utilizzate sempre il suo imballo o
la sua valigetta (se presente); questo lo preserverà da urti,
polvere e umidità che ne possono compromettere il regolare
funzionamento.

- 6 -
Durante il trasporto sganciate la batteria dall’utensile.
MOVIMENTAZIONE
Posizionate il commutatore del senso di rotazione nella posizione
di mezzo in modo da impedire avviamenti accidentali.
Afferrate l’utensile per l’impugnatura e dopo l’uso appoggiatelo
in piedi senza battere utilizzando la base della batteria.
MESSA IN SERVIZIO
Nel luogo che utilizzerete l’utensile elettrico è opportuno
considerare:
-che la zona non sia umida e sia al riparo dagli agenti atmosferici.
-che attorno sia prevista un’ampia zona operativa libera da
impedimenti.
-che vi sia una buona illuminazione.
-che sia utilizzata in vicinanza dell’interruttore generale con
differenziale (per il caricabatterie).
-che l’impianto di alimentazione sia dotato di messa a terra
conforme alle norme (solo se l’utensile elettrico è di classe I,
cioè dotato di spina con cavo di terra).
-che la temperatura ambiente sia compresa tra 10° e 35° C.
-che l’ambiente non sia in atmosfera infiammabile/esplosiva.
Estraete la macchina ed i componenti e verificate visivamente
la loro perfetta integrità; a questo punto procedete ad una
accurata pulizia per togliere gli eventuali oli protettivi utilizzati
per il trasporto.
MONTAGGIO MANIGLIA LATERALE (se presente)
Avvitate a fondo la maniglia laterale (pos.10) al corpo del
trapano.
CARICA DELLA BATTERIA (fig.E)
!ATTENZIONE! Prima di utilizzare il trapano è necessario
effettuare una carica completa della batteria.
!ATTENZIONE! Ricaricare soltanto con il caricabatterie
specificato dal costruttore. Un caricabatterie che è adeguato
per un tipo di gruppo di batterie può creare un rischio di
incendio quando viene utilizzato con altri gruppi di batterie.
Estraete la batteria dalla sede dell’utensile agendo sui dispo-
sitivi di bloccaggio (pos.4) e inseritela a fondo nel vano del
caricabatterie facendo corrispondere le rispettive polarità. Il vano
può essere sagomato asimmetricamente in modo da impedire
l’inserimento della batteria con polarità errata.
Il caricabatterie può inoltre essere fornito con alimentatore
separato, in questo caso eseguite il reciproco collegamento
mediante il cavo in dotazione.
Inserite la spina del caricabatterie in una presa di corrente
e, se presente, premete il pulsante di inizio carica (pos.13).
L’accensione della luce di carica (pos.11), se presente, segnala
l’inizio della carica della batteria. La durata della carica per una
batteria completamente scarica è indicata nei dati tecnici allegati
alle presenti istruzioni.
A seconda del tipo di caricabatterie in vostro possesso, la spia
di carica rimane permanentemente accesa, oppure la fine della
carica può essere segnalata dall’accensione della apposita spia
(pos.12) o da una spia di colore diverso.
È possibile inoltre che il caricabatterie sia equipaggiato con
un dispositivo di sicurezza che lo spegne a carica completata.
Per mantenere efficiente la batteria non effettuate cariche o
scariche parziali. Scaricate a fondo la batteria e poi ricari-
catela completamente.
Scaricate totalmente la batteria ed eseguite una successiva
ricarica completa:
- Dopo di un lungo periodo di utilizzo.
- Almeno ogni 4 mesi, anche in caso di inutilizzo.
- Se durante il lavoro notate un calo evidente delle prestazioni
del trapano.
A carica ultimata staccate la spina del caricabatterie, sganciate
la batteria ed inseritela nell’alloggiamento del trapano, fino a
sentire il “click” di innesto.
Rammentate sempre che la batteria dopo un certo periodo è
necessario sostituirla. I fattori che influiscono sulla sua durata
sono: numero dei cicli di carica/scarica, stress da utilizzo gra-
voso, tempo dalla sua fabbricazione, assenza di manutenzione.
MONTAGGIO UTENSILE DI TAGLIO (fig.C)
!ATTENZIONE! Durante il montaggio e lo smontaggio di
punte e inserti, posizionate centralmente il selettore del senso
di rotazione (pos.2) in modo che sia impedito l’azionamento
dell’interruttore e quindi l’avvio inatteso.
A seconda del tipo di mandrino in dotazione osservate le seguenti
istruzioni e la fig.C:
Mandrino autorserrante, tipo a doppia ghiera senza blocco (se
presente)
Ruotate la ghiera pos.1 per aprire e chiudere le griffe pos.3,
trattenendo la ghiera pos.2.
In alcuni modelli di mandrino avvertirete degli scatti che
segnalano l’avvenuto completo serraggio.
Mandrino autoserrante, tipo a doppia ghiera con blocco antisvi-
tamento (se presente)
ATTENZIONE! Per fissare l’utensile al mandrino assicurarsi
di aver sbloccato la ghiera.
1)Sbloccate il mandrino allontanando la ghiera pos.2 dalla
ghiera pos.1
2)Ruotate la ghiera pos.1 per aprire e chiudere le griffe pos.3,
trattenendo la ghiera pos.2.
3)Fissata la punta, spingere la ghiera pos.2 verso la ghiera
pos.1 fino a sentire lo scatto. Questa operazione eviterà che il
mandrino si apra a causa delle vibrazioni prodotte in modalità
percussione.
Mandrino autoserrante, tipo a ghiera singola (se presente)
Il mandrino autoserrante offre maggiore comodità e velocità
nella sostituzione dell’utensile accessorio.
Ruotate la ghiera per aprire e chiudere le griffe come indicato
in figura.
Controllate che la punta o l’inserto sia ben centrato e ben serrato
dalle griffe del mandrino.
AVVIAMENTO E ARRESTO
!ATTENZIONE! Prima di avviare l’utensile elettrico è obbli-
gatorio indossare occhiali, guanti, cuffie di protezione (non
in dotazione).
!ATTENZIONE! Durante l’utilizzo fate in modo che nessuno
si avvicini alla vostra zona di lavoro.
Avviamento
1) Inserite la batteria carica nel trapano
2) Posizionate il selettore del senso di rotazione (pos.2) in una
delle due posizioni operative (non al centro)
3) Afferrate saldamente l’impugnatura (pos.19) con la mano
4) Per avviare premete il pulsante (pos.1)
L’interruttore è del tipo ad “azione mantenuta”; pertanto l’utensile
elettrico rimarrà acceso per il tempo che voi mantenete premuto
l’interruttore.
Arresto
Per arrestare il trapano rilasciate l’interruttore (pos.1).

- 7 -
Funzionamento continuo (se presente)
Per un funzionamento continuo è necessario, dopo le fasi di
“avviamento”, premere il pulsante (pos.21) in modo da bloccare
l’interruttore.
Successivamente per arrestare la macchina premere l’interrut-
tore (pos.1) e poi rilasciarlo subito.
ATTENZIONE! Quando lavorate con l’ interruttore in servizio
continuo, non abbandonate mai la presa sull’impugnatura
principale in modo che, in caso di pericolo, potete arrestare
la macchina immediatamente.
Vi consigliamo di ripetere queste operazioni alcune volte prima
di iniziare il lavoro in modo da familiarizzare il più possibile con
i comandi.
Se osservate delle anomalie di funzionamento spegnete l’utensile
elettrico e consultate il capitolo “Problemi, cause e rimedi”.
Quando non lavorate spegnete e staccate la spina dalla presa.
CONSIGLI D’USO
Dopo aver letto attentamente i capitoli precedenti, seguite scru-
polosamente questi consigli che vi permetteranno di ottenere il
massimo delle prestazioni.
Procedete con calma in modo da prendere familiarità con tutti
i comandi; solo dopo aver acquisito una buona esperienza riu-
scirete a sfruttarne a fondo tutte le potenzialità.
REGOLAZIONE ELETTRONICA DELLA VELOCITÀ MANDRINO
(se presente)
Premere gradualmente l’interruttore (pos.1) fino al raggiungi-
mento della velocità desiderata. Con una minor pressione si
otterranno velocità basse, mentre con una maggior pressione
si otterranno velocità alte.
REGOLAZIONE MECCANICA VELOCITÀ MANDRINO (se pre-
sente)
ATTENZIONE! L’operazione di inversione del senso di rotazione
deve essere eseguita con l’utensile spento ed il mandrino
fermo.
Muovendo il selettore (pos.14) è possibile selezionare mecca-
nicamente la velocità desiderata.
Velocità 1: numero di giri basso e coppia elevata (per fori con
diametro elevato o avvitamento di viti grosse su materiale duro).
Velocità 2: numero di giri elevato e bassa coppia.
REGOLAZIONE CAMPO DELLA VELOCITA’ MANDRINO (se
presente)
Ruotate la rotellina zigrinata (pos.20) posta sull’interruttore:
verso + per aumentare
verso - per diminuire.
REGOLAZIONE SENSO DI ROTAZIONE DEL MANDRINO (fig.C)
ATTENZIONE! L’operazione di inversione del senso di rotazione
deve essere eseguita con l’utensile spento ed il mandrino
fermo.
Per operazioni di foratura e avvitamento viti a filetto destro
(rotazione oraria) spostate il selettore senso di rotazione
(pos.2) su ‘R’.
Per operazioni di svitamento, rimozione di punte incastrate e
avvitamento viti con filetto sinistro (rotazione antioraria) spostate
il selettore senso di rotazione su ‘L’.
REGOLAZIONE DELLA FRIZIONE
La frizione è regolabile dal valore ‘1’ al valore massimo e
normalmente è da regolare solo per le operazioni di avvitatura.
Agendo sulla ghiera per variazione coppia di serraggio (pos.5),
fate combaciare uno dei valori indicati col riferimento posto sulla
sommità del corpo trapano, ricordando che:
- al valore ‘1’ corrisponde una coppia minima, da utilizzare per
avvitare piccole viti su materiale tenero
- la coppia aumenta all’aumentare del numero indicato sulla
ghiera fino al raggiungimento del massimo valore , da utiliz-
zare per forare.
In alcuni modelli per regolare la coppia torcente è necessario
che sulla ghiera di percussione (pos.9) sia contemporaneamente
selezionato il simbolo avvitatura ; è inoltre possibile che la
posizione di massima coppia torcente sia dislocata sulla
stessa ghiera percussione invece che su quella di regolazione
della coppia.
INSERIMENTO E DISINSERIMENTO PERCUSSIONE (se presente)
Ruotare la ghiera (pos.9) sul simbolo per inserire la percus-
sione, oppure in un’altra posizione qualsiasi per disinserirla.
ILLUMINAZIONE ZONA DI LAVORO (se presente)
La luce di illuminazione (pos.18) si accende/spegne automati-
camente all’azionamento dell’interruttore dell’utensile.
INDICATORE CARICA DELLA BATTERIA (fig.F, se presente)
A seconda del modello in vostro possesso, può essere presente
l’indicazione dello stato di carica della batteria (pos.15), incor-
porato nell’utensile o nella batteria stessa. Fate riferimento alla
fig.F (se presente) e se necessario premete il pulsante presente
nell’indicatore stesso.
CAMBIO UTENSILE DI TAGLIO E INSERTO
Vedere capitolo “MESSA IN SERVIZIO”.
PUNTE DA FORARE (non presenti)
Acquistate delle punte di qualità, con attacco idoneo alle
caratteristiche del mandrino del trapano e adatte al materiale
da forare. Rivolgetevi al vostro rivenditore di fiducia che potrà
consigliarvi al meglio.
La nostra azienda produce un’ampia gamma di punte adatte ai
più svariati impieghi (metallo, legno, laterizio ecc.).
OPERAZIONE DI FORATURA
Fissate sempre il pezzo con una morsa durante la foratura. Usate
un punteruolo per marcare il punto di inizio foratura. Mantenete
le punte da foratura ben affilate. Per l’esecuzione di fori di
diametro elevato, eseguite prima dei fori più piccoli per evitare
il bloccaggio della punta nel foro e di sovraccaricare l’utensile.
Quando siete in prossimità dell’uscita della punta dal pezzo,
riducete la pressione di foratura.
Fate attenzione ai trucioli prodotti che oltre ad essere molto
caldi sono anche moto taglienti. Indossate occhiali e guanti
di protezione!
Foratura su metallo
Utilizzate punte in acciaio super rapido HSS. Se il pezzo è una
lamiera sottile, ponete un blocco di legno sotto la lamiera per
evitare che la punta si blocchi.
Per forare un pezzo di ghisa, utilizzate punte idonee a questo
materiale.
Con pezzi in acciaio utilizzate liquido refrigerante apposito, con
l’alluminio usate paraffina come refrigerante, mentre con ottone
e ghisa non usate liquidi ma ritirate frequentemente la punta dal
foro per raffreddarla.
Foratura su legno e plastica
Usate sempre punte da forare idonee per legno e plastica. Tenete
a mente che sono materiali fragili ed è possibile che durante la
foratura si inneschino cricche nel pezzo.

- 8 -
Foratura su laterizi
Usate sempre punte con inserti in metallo duro (tipo widia ecc.)
e che siano sempre in buone condizioni. Applicate una pressione
costante durante la foratura. Ritirate frequentemente la punta dal
foro per estrarre la polvere.
Se presente, impostate la funzione percussione (pos.9), per
agevolare l’azione della punta. Per forare piastrelle escludete
la funzione percussione, per evitare che la piastrella si crepi
improvvisamente.
INSERTI DI AVVITAMENTO “BIT” (non presenti)
Acquistate degli inserti di qualità, con attacco idoneo alle caratte-
ristiche di questo avvitatore e con puntale di avvitamento adatto
alla viteria usata. Rivolgetevi al vostro rivenditore di fiducia che
potrà consigliarvi al meglio.
La nostra azienda produce un’ampia gamma di inserti adatti ai
più svariati impieghi.
VITERIA (non presente)
Come per gli inserti è indispensabile che anche la viteria sia di
qualità, in modo da ottenere il miglior risultato finale. Per ogni
tipo di materiale da fissare esiste a commercio la viteria adatta,
acquistatela quindi secondo bisogno; se necessario interponete
delle rondelle per aumentare la superficie di tenuta.
OPERAZIONE DI AVVITAMENTO
Posizionate la vite sul pannello da fissare e con un martello
piantatela leggermente in posizione perpendicolare.
Per alcuni materiali è necessario eseguire un preforo, questo per
facilitare l’avvitamento e per evitare che il pannello si spacchi
(in modo particolare con il legno e la plastica).
Impugnate saldamente l’avvitatore con una mano e infilate la
punta dell’inserto nella testa della vite. Premete leggermente sulla
vite ed avviate l’avvitatore, azionando gradualmente l’interruttore
per modulare la velocità di rotazione e conseguentemente la
velocità di penetrazione della vite.
Al termine dell’operazione, che in genere dura alcuni secondi,
estrarre l’avvitatore e spegnetelo rilasciando l’interruttore.
La velocità di rotazione può essere modulata elettronicamente
da un valore nullo fino a un valore max mediante la minore o
maggiore pressione sull’interruttore. Tramite la rotellina zigrinata
(pos.20, se presente) è possibile preimpostare meccanicamente
la corsa dell’interruttore e quindi la velocità max raggiungibile.
La velocità di avvitamento dipende da alcuni fattori: materiale del
pannello, dimensioni della vite, passo della filettatura, presenza
o meno di un preforo ecc.
Al termine dell’avvitamento il giunto di rotazione interno all’av-
vitatore si disaccoppierà e l’utensile elettrico diverrà molto
rumoroso e vibrerà maggiormente; questo e il momento di
togliere l’avvitatore e spegnerlo.
Insistere con l’avvitamento può provocare: la rottura dell’inserto, rovi-
nare la testa della vite, un guasto all’utensile elettrico (in questo caso
non coperto dalla garanzia). In questo caso svitate la vite, eseguite
un preforo con un trapano e riavvitate modificando le regolazioni.
Non insistete su viti che non si avvitano!
MANUTENZIONE
!ATTENZIONE! Prima di ogni controllo o regolazione stacca-
te la batteria dall’utensile e staccate l’alimentazione elettrica
del caricabatterie scollegando la spina.
!ATTENZIONE! Non manomettete o tentate di riparare
l’utensile elettrico.
La durata e il costo d’esercizio dipendono anche da una costante
e scrupolosa manutenzione.
Pulite regolarmente ed abbiate cura del vostro utensile elettrico, vi
garantirete una perfetta efficienza ed una lunga durata dello stesso.
- Rimuovete la polvere e i residui di lavorazione con un pennello
a setole morbide.
- Non spruzzate o bagnate d’acqua l’utensile elettrico, pericolo
di infiltrazioni interne.
- Non usate infiammabili, detergenti o solventi vari.
- Le parti in plastica sono aggredibili da agenti chimici.
- Non utilizzate un getto d’aria compressa per la pulizia: pericolo
lancio materiale!
- Prestate particolare attenzione alla pulizia dell’interruttore, alle
feritoie di ventilazione del motore, al mandrino, alla batteria
e caricabatteria.
L’utensile non richiede particolari manutenzioni in quanto è
lubrificato con grasso permanente all’interno dello stesso. Una
eventuale revisione interna deve essere effettuata solo da un
centro assistenza autorizzato.
SOSTITUZIONE MANDRINO (fig. D)
1) Aprite completamente le ganasce del mandrino.
2) Inserite un cacciavite nella parte anteriore del mandrino fino
a raggiungere la vite di sicurezza.
3) Svitate la vite di sicurezza ruotando in senso orario (filetto sinistro).
4) Posizionate la frizione su una coppia alta (numero alto).
5) Sbloccate ora il mandrino con un colpo deciso in senso
antiorario e svitatelo poi manualmente.
Per il montaggio del nuovo mandrino eseguite le operazioni
precedenti in senso inverso.
Effettuate una prova di funzionamento a vuoto.
IMMAGAZZINAMENTO
Effettuate una accurata pulizia di tutto l’utensile e sue parti ac-
cessorie (vedi paragrafo Manutenzione). Proteggete le parti non
verniciate con un olio protettivo ed utilizzate l’imballo originale
o la valigetta (se presente) per proteggerla.
Riponete la macchina lontano dalla portata dei bambini, in
posizione stabile e sicura. Il luogo dovrà essere asciutto, privo
da polveri, temperato e protetto dai raggi solari diretti.
Al locale di rimessaggio non devono avere accesso i bambini
e gli estranei.
SMALTIMENTO
Per la salvaguardia ambientale procedete secondo le leggi vigenti
del Paese in cui vi trovate. Rivolgetevi alle autorità competenti
per maggiori notizie in merito.
Quando la macchina non è più utilizzabile né riparabile, conse-
gnatela con l’imballo ad un punto di raccolta per il riciclaggio.
Estraete le batterie (se presenti) e smaltitele in modo separato.
I rifiuti elettrici ed elettronici possono contenere sostanze
pericolose per l’ambiente e per la salute umana; non devono
pertanto essere smaltiti con quelli domestici ma mediante una
raccolta separata negli appositi centri di raccolta o riconse-
gnati al venditore nel caso di acquisto di una apparecchiatura
nuova anologa. Lo smaltimento abusivo dei rifiuti comporta
l’applicazione di sanzioni amministative.
Smaltimento batterie: Le batterie incluse nell’apparec-
chio possono essere smaltite assieme ad esso.
Non gettate nel fuoco e non disperdete nell’ambiente le
batterie esauste ma consegnatele agli appositi centri per il
loro smaltimento. Non smaltire assieme ai rifiuti domestici.

- 9 -
PROBLEMI, CAUSE E RIMEDI
PROBLEMA CAUSE RIMEDI
L’utensile elettrico
non si avvia Batteria scarica Effettuare una ricarica completa alla batteria
Batteria non inserita correttamente nell’alloggia-
mento dell’utensile Sganciate la batteria e inseritela correttamente
Selettore del senso di rotazione inserito in posi-
zione centrale di blocco Spostate il selettore in una delle due posizioni R o L
La batteria è surriscaldata ed è intervenuta la
protezione interna autoripristinabile Attendere che la batteria si raffreddi
Utensile elettrico o batteria guasti Sostituite la batteria o/e rivolgetevi ad un centro di
assistenza autorizzato
La batteria non si
ricarica Batteria non inserita correttamente nell’alloggia-
mento del caricabatterie Sganciate la batteria e inseritela correttamente
Caricabatterie non pronto per la ricarica Inserire la spina nella presa di alimentazione elettrica.
Premere il pulsante di avvio carica (se presente).
Caricabatterie o batteria guasti Sostituite la batteria o/e rivolgetevi ad un centro di
assistenza autorizzato
Il trapano si arresta
durante una fase di
foratura
Batteria scarica Se disponibile inserire un nuova batteria carica,
oppure sganciare la batteria ed effettuare una
ricarica completa.
La batteria è surriscaldata ed è intervenuta la
protezione interna autoripristinabile Attendere che la batteria si raffreddi
!ATTENZIONE! Se dopo aver eseguito gli interventi sopra
descritti l’utensile elettrico non funziona correttamente o in
caso di anomalie diverse da quelle indicate, portatelo presso
un centro di assistenza autorizzato esibendo la prova di acqui-
sto e richiedendo ricambi originali. Fate sempre riferimento
alle informazioni riportate sull’etichetta dati tecnici.
GARANZIA
Il prodotto è tutelato a norma di legge contro ogni non conformità
rispetto alle caratteristiche dichiarate purché sia stato utilizzato
esclusivamente nel modo descritto nel presente manuale d’uso,
non sia stato manomesso in alcun modo, non sia stato riparato
da personale non autorizzato e, ove previsto, siano utilizzati
solamente ricambi originali. Sono comunque esclusi materiali
di consumo e/o componenti soggetti a particolare usura come
ad esempio batterie, lampadine, elementi di taglio e finitura etc.
Consegnate il prodotto al rivenditore o ad un centro di assistenza
autorizzato, esibendo la prova d’acquisto.
MODIFICHE
Testi, figure e dati corrispondono allo standard aggiornato
all’epoca della stampa delle presenti istruzioni. Il costruttore si
riserva la facoltà di aggiornare la documentazione qualora ve-
nissero apportate delle variazioni alla macchina, senza incorrere
per questo in alcun obbligo.
©
Nessuna parte di questa pubblicazione e della documentazione
allegata alla macchina può essere riprodotta senza un permesso
scritto.

- 10 -
g
TOOL GENERAL SAFETY WARNINGS
!IMPORTANT! Read all the warnings and instructions.
Failure to comply with the warnings and instructions may
cause electric shock, fire and/or serious injuries.
Strict observance of these warnings with the use of personal
protective equipment minimizes risks of accidents but does
not completely rule them out.
Keep all the warnings and instructions for future reference.
The term “electrical tool” in the warnings refers to the machine
tools operated by means of (wired) connection to the electric
power supply or battery (wireless).
These instructions refer to an electrical tool manufactured in
numerous models and versions; read the instructions carefully
and apply them to your electric tool.
1) Safety in the work area
a) Keep the work area clean and well lit. Overcrowded and/or
badly lit areas may cause accidents.
b) Do not operate electrical tools in explosive atmospheres,
e.g. in the presence of inflammable liquids, gases or powders.
Electrical tools create sparks that may ignite powders or fumes.
c) Keep children and passers-by at a distance when operating
an electrical tool. Distractions may cause you to lose control
of the tool.
d) Keep the nylon packaging bags in a safe place. Bags can
cause suffocation and must be kept out of the reach of children.
e) Use the tool in a well-ventilated place. Ventilation is ne-
cessary for cooling the tool and for eliminating air impurities
produced when working.
f) Do not operate electrical tools outdoors in the presence of
rain, fog, storms, high or low temperatures, or in damp or wet
environments. Use in these conditions may cause electrocution.
2) Electrical safety
a) The electrical tool plug must correspond to the socket.
Never modify the plug in any way. Do not use adaptors with
earthed electrical tools. Unmodified plugs and suitable sockets
reduce the risk of electric shock.
b) Do not allow the body of the tool to come into contact
with earthed surfaces such as pipes, radiators, cookers
and refrigerators. If your body is earthed, the risk of electric
shock increases.
c) Do not expose electrical tools to rain and do not use them
in wet environments. Water permeating into an electrical tool
increases the risk of electric shock.
d) Do not let the cable become worn. Never use the cable to
transport, pull or disconnect the electrical tool from the power
supply socket. Keep the cable away from heat, oil, sharp
edges or moving parts. Damaged or twisted cables increase
the risk of electric shock.
e) When using an electrical tool outdoors, use an extension
cable suitable for outdoor use. The use of a suitable cable
reduces the risk of electric shock.
f) Use an electric power supply protected by a differential
switch (RCD). The use of a suitable residual current device
(RCD) reduces the risk of electric shock.
g) The power supply must correspond to that indicated on
the electrical tool. An unsuitable power supply generates
malfunctioning and accidents.
h) Frequently check the power supply cable. Do not crush or
tread on the power supply cable. A damaged cable causes
electric shock. If it is damaged, unplug the electrical tool and
do not use it.
i) For any doubts in the electrical field please contact a qua-
lified and experienced technician. The unsafe use of electricity
is very dangerous for yours and other people’s safety.
3) Personal safety
a) Never allow yourself to be distracted. Control what you are
doing and use your common sense when using electrical tools.
Never use the tool when you are tired or under the influence of
drugs, alcohol or medicines. A moment of distraction when using
electrical tools could cause serious personal injuries.
b) Use personal safety equipment. Always wear eye pro-
tection. Protection equipment such as dust repelling masks,
anti-slip safety shoes, safety helmets, gloves or ear protections,
reduces the possibility of personal injuries.
c) Prevent switching the tool on accidentally. Make sure that
the switch is in the off position before connecting the tool to
the electric power supply and/or to battery units and before
taking or transporting it. Carrying electrical tools with your
finger on the switch or connecting them to the electric power
supply with the switch in the on position can cause accidents.
d) Remove any adjustment wrench before switching on the
electrical tool. Any key or spanner left attached to a rotating part
of the electrical tool may cause personal injuries.
e) Do not lose your balance. Always keep an appropriate
position and balance. This allows better control of the electrical
tool in unexpected situations.
f) Wear appropriate clothing. Do not wear loose clothing or
jewellery. Keep hair, clothing and gloves away from moving
parts. Loose clothing, jewellery or long hair may get entangled
in the moving parts.
g) If any devices to be connected to dust extraction and
collection systems are provided, make sure that they are
connected and used appropriately. The use of these devices
may reduce the risks connected with dust.
h) The user is responsible for other people as far as accidents
or damage to people or property are concerned. Improper use
causes accidents and damages.
i) Never use with bare or wet feet/hands. Use in these condi-
tions may cause electrocution.
l) Processing of harmful materials must be performed in
compliance with the laws in force. Some types of dust and
materials such as metals, wood, paints, etc. are very harmful
to health. Protect yours and other people’s health using suitable
protections and devices.
m) Do not approach the cooling air ejection slots. The air
generated may contain machining residuals and small parts that
are harmful for your respiratory tracts and eyes.
n) Do not cover or insert things in the cooling slots. Unsuitable
ventilation of the electrical tool may start a fire. Accessing the
internal parts may damage the tool and cause electrocution.
o) Do not use the electrical tool if the guards (screens, panels,
doors etc) are open, damaged or missing. Correctly installed
guards protect your health and allow safe use.
p) For electrical tools equipped with a laser indicator: do
not stare at the light beam, do not point the beam at people,
animals or vehicles and do not point the beam at eyes or
skin. Improper use of the laser causes serious damage to
sight and skin.
4) Use and maintenance of electrical tools
a) Do not force the electrical tool. Use a suitable tool for the
operation to be carried out. An appropriate electrical tool can
perform the work with higher efficiency and safety without having
to exceed the parameters intended for its use.
b) Do not use the electrical tool if the on/off switch is not
activated properly. Any electrical tool that cannot be controlled
by its switch is dangerous and must be repaired before use.
c) Disconnect the plug from the power supply and/or from

- 11 -
the electrical tool battery unit before any adjustment, replace
the accessories or store the electrical tools. These preven-
tive safety measures reduce the risk of accidental start of the
electrical tool.
d) Store unused electrical tools out of reach of children and do
not allow them to be used by any unskilled people or who are
not aware of these instructions. Electrical tools are dangerous
if used by unskilled people.
e) Carry out the required maintenance on electrical tools.
Check any possible misalignment or locking of the moving parts,
any breakage of the parts and any other condition that may
affect the operation of electrical tools. If there is any damage,
the electrical tool must be fixed before use. Numerous accidents
are caused by improper maintenance of electrical tools.
f) Keep the cutting elements, where fitted, clean and sharpe-
ned. Cutting elements in good conditions and with sharp edges
are less likely to get blocked and can be controlled more easily.
g) Use the electrical tool, accessories and bits etc. according
to these instructions, considering the work conditions and the
operation to be performed. The use of the electrical tool for
operations other than those for which it is intended may cause
dangerous situations.
h) Support the tool with the insulated handles, when perfor-
ming an operation during which the work device could come
into contact with hidden cables.
If the work devices come into contact with a “live” conductor the
metal parts of the electrical tool could become “live” and cause
an electric shock (electrocution) to the operator.
i) Keep a safe distance from moving parts. Touching moving
parts causes serious injuries.
l) Do not modify the electrical tool. Taking off, replacing or
adding components not included in the instructions is prohibited
and causes the warranty to become null and void.
m) Do not leave the electrical tool running unattended. Turn it
off before leaving it unattended in order to prevent any accidents.
n) The electrical tool must never come into contact with
water or other liquids. Use in these conditions may cause
electrocution.
5) Use and precautions for use of battery-operated tools
a) Recharge only with the battery charger indicated by the
manufacturer. An inappropriate battery charger can cause a fire
hazard when used with other battery units.
b) Use electrical tools only with specifically designated
battery units. The use of any other battery unit can cause a
risk of injury or fire hazard.
c) When the battery unit is not in use, keep away from other
metal objects such as, paper clips, coins, keys, screws or other
small metal objects which could create a connection between
the two terminals. Short-circuiting the battery terminals can
cause burns or fires.
d) If it is in poor condition, the battery liquid may leak. In
such case, avoid any contact. In case of accidental contact,
rinse immediately with water. If case of contact with eyes,
immediately contact a doctor. The liquid leaking out of the
battery can cause irritations or burns.
e) Keep the equipment and the batteries far from heat sources
and fire. Do not expose them to temperatures over 50°C. High
temperatures can cause the batteries to explode.
6) Support
a) Have maintenance operations on electrical tools carried out
by qualified technical staff only using original spare parts. This
allows the constant safety of the electrical tool to be maintained.
b) Do not attempt to repair the electrical tool or to access
internal parts. Interventions by unqualified personnel and
unauthorised by the manufacturer could create serious risks
and will cause the warranty to be null and void.
c) Request only original spare parts. The use of non-original
spare parts may compromise the safety of the electrical tool.
SAFETY WARNINGS OF THE BATTERY-OPERA-
TED DRILL/SCREWDRIVER
a) Wear ear protection when using the drill with the percussion
function. Exposure to noise can cause loss of hearing.
b) Use the hand grip(s) provided with the tool. Loss of control
can cause injuries.
c) Support the tool with the insulated hand grips, when
performing an operation during which the work device could
come into contact with hidden cables. If the work devices
come into contact with a “live” conductor the metal parts of the
electrical tool could become “live” and cause an electric shock
(electrocution) to the operator.
d) Before inserting or removing drill bits, take the battery out
of the tool. Any maintenance must be performed safely in order
to prevent accidents caused by an unexpected start.
e) Working on the ceiling with the tool upwards can be more
dangerous for the operator. Use a protection helmet in case any
material falls down. Wear eye protection goggles.
f) For work on buildings or load-bearing structures, closed
pipes or containers it is important to check, by means of
detectors, that inside there are not any: electric or telephone
cables, pressurised liquids or gases (that may be flammable
and corrosive), piping, etc. Even partially cutting masonry work
can weaken the structure of the whole building, causing it to
collapse. Leaking of liquids or gases may cause explosions,
fire and flooding.
g) If the tool stops during use, switch it off immediately. Do
not force difficult operations for the tool.
h) Hold the tool firmly. The strains caused by working lead to
stress which must be contrasted with your force.
i) Fasten the item you are working on with a vice or another
device. An item held by hand can suddenly cause an accident.
l) Wait for the electrical tool to stop completely before putting
it down. The moving parts could cause falling.
m) If the tool stops do not continue to press the start button.
The battery could be irreparably damaged.
SAFETY WARNINGS OF THE BATTERY AND
BATTERY CHARGER
a) Do not disassemble or tear the battery case. Do not hit it or
drop it. Damaged batteries can cause serious danger.
b) Do not expose the battery to heat or fire. Do not expose it to
direct sunlight. Do not leave it inside vehicles. Do not expose
it to temperatures over 50°C. Risk of explosion.
c) A battery used incorrectly can cause vapours to leak out.
Ventilate the room and consult a doctor if necessary.
d) Keep batteries and electrical equipment out of the reach
of children. It is good practice to keep children away from
electrical equipment.
e) Do not put any metal objects into the battery compartment.
Do not put the battery away with other metal objects (like
the tool box) or with other batteries. Risk of generating a
short circuit.
f) Use the battery charger in closed rooms sheltered from rain
and humidity. Prevent possible electric shocks.
g) Always keep the battery charger clean. Dust and dirt prevent
correct charging.
h) Before use, always check the battery charger, cable and
plug. Do not use it in the event of damage or faults. Never open
the battery charger and only have it repaired by qualified staff

- 12 -
and only with original spare parts.
i) Do not use the battery charger on easily flammable surfaces
(e.g. paper, fabric, wood, etc.) or in flammable or explosive
environments. Prevent any fires due to overheating.
l) Charge the battery at room temperature between 10°C and
35°C. Lower or higher temperatures can damage the battery and
inhibit normal charging.
m) Unplug the battery charger when not in use. Do not leave
the battery charger switched on with the battery completely
charged. Prevent possible accidents.
n) It is normal for the battery charger and the battery to heat
up while being charged. However, both must be left to cool
down to room temperature between consecutive charging.
High temperatures can cause damage or explosion of the battery.
o) Replace batteries that have come to the end of their use
cycle. If the battery looses its charge very quickly and/or the
charging cycles are very short, it means that it is nearly dead
and therefore needs replacing.
p) Only replace it with original batteries, of the same type
and characteristics as the one supplied with the tool. The use
of batteries of different types and voltages can damage the tool
and cause danger. Only buy original spare parts.
q) Some batteries have auto reset thermal protection, which
prevents charging should the temperature be too high; in
this case the battery charger will emit a flashing red light.
Remove the battery from its housing for a few minutes before
putting it back in the battery charger. The charging will start
again automatically when the temperature has returned within
the safe range of values.
r) The power supply voltage of the battery charger must match
that indicated on the technical data nameplate. Do not use
any other type of power supply.
s) It is advisable to install a trip switch on the electrical power
supply line. Consult your electrician.
t) Do not damage or tread on the power supply cable. Do not
pull the battery charger by the cable. Do not pull the cable in
order to unplug it from the power supply.
u) Any extension cable must have a higher section than that
of the battery charger cable and correctly sized according
to its length.
v) If the power tool is blocked because the battery runs out,
do not continue to press the start button, otherwise the battery
fails hopelessly.
SAFETY WARNINGS FOR NOISE AND VIBRA-
TIONS
The level of noise and vibrations shown on the attached sheet
are average values for the use of the electrical tool. The use of
different cutting elements, different materials, the use or not of
the percussion function and lack of maintenance on the electrical
tool significantly affect the sound emissions and vibrations. The-
refore, adopt all the preventive measures in order to eliminate any
possible damage due to loud noises and strain from vibrations;
wear ear phones, anti-vibration gloves, take breaks while working
and keep the electrical tool and accessories (bits, etc.) efficient.
REMAINING RISKS
These illustrations show the main risks involved with using the
machine. Read the machine instruction manual carefully.
High temperatures cause the
batteries to explode. Do not
expose them to direct sunlight,
do not leave them inside vehi-
cles and do not burn them.
Loud noise generated while
drilling. Use ear protection.
Risk of electrocution or explo-
sion due to drilling through
electric cable trays or piping
with pressurised fluids (water,
gas…).
Grip the 2 insulated hand grips
of the drill with both hands.
Use a detector for hidden
metal parts
.
Risk of electric shock and
danger of death. Do not touch
the electrically live parts and
keep a safe distance. Before
any maintenance operations,
unplug the machine from the
power supply.
SYMBOLS
Carefully observe the symbols in fig.B and memorise the re-
spective meaning. Correct interpretation of the symbols allows
safer use of the machine.
1 Machine model and technical specifications
2 Important!
3 Carefully read the instructions before use.
5 Only for internal use
6 Battery charger with safety transformer (if fitted)
7 Protection fuse (if fitted)
8 Double electric insulation
10 Electric and electronic waste may contain potentially
hazardous substances for the environment and human health.
It should therefore not be disposed of with domestic waste,
but by means of differentiated collection at specific centres

- 13 -
or returned to the vendor in the event of purchasing a new
identical tool. The illegal disposal of such equipment may
result in prosecution to the full extent of the law.
11 Risk of explosion. Keep the equipment and the batteries far
from heat sources and fire. Do not expose them to tempe-
ratures over 50°C.
12 Auto reset thermal switch (if fitted)
13 The batteries included in the equipment can be disposed
of along with it. Do not throw the used batteries on the fire
and do not dispose of them in the environment, but take
them to special disposal centres. Do not dispose of them
with domestic waste.
14 Cadmium Cd content over 0.002% in weight (if fitted).
15 Risk of material ejection. Wear goggles to protect your eyes.
16 Risk of sharp parts. Wear protective gloves.
V volts
Hz hertz
~ alternating current
direct current
A Ampere
W watts
kg kilograms
nO no-load speed
mm millimetres
s second
h hour
min-1 R.P.M.
dB decibel
double electric insulation
°C Celsius degree
Ni-Cd Nichel-Cadmio
Li-Ion Lithium Ion
_______________________________________________
We thank you for having purchased this electrical tool that
will hereafter also be referred to as “battery-operated drill -
screwdriver”.
!IMPORTANT! The battery-operated drill - screwdriver is
suitable for drilling metal, wood, plastic and brick and for
tightening - loosening screws. It is prohibited to use dange-
rous materials in environments with risk of fire/explosion.
The battery-operated drill - screwdriver is intended for DIY
and not professional use.
These instructions contain information deemed necessary for
proper use, knowledge and standard tool maintenance. They
do not include information on drilling and screwing techniques;
the user can find additional information in specific books or
publications or by attending special training courses.
COMPONENTS
Refer to fig. A and the following figures, attached to these
instructions.
1 Start/stop switch and electronic speed modulator (if fitted)
2 Rotation direction and start lock switch (if fitted)
3 Rechargeable battery
4 Battery release buttons
5 Ring nut for tightening torque variation
6 Chuck
7 Insert for screwing bits (if fitted)
8 Battery charger
9 Ring nut for selecting percussion, drilling or screwing function
(if fitted)
10 Side handle (if fitted)
11 Charging in progress light (if fitted)
12 Charging complete light (if fitted)
13 Battery charge start switch (if fitted)
14 Mechanical speed switch (if fitted)
15 Battery charge status indicator (if fitted)
16 Strap for attaching to wrist (if fitted)
17 Clasp for waist strap (if fitted)
18 Light for work area (if fitted)
19 Main handle
20 Minimum/maximum speed regulator (if fitted)
21 Lock button for continual use (if fitted)
22 Air vents
23 Depth rod (if fitted)
24 Battery empty light (if fitted)
25 Battery charger plug and cable
INSTALLATION
!IMPORTANT! The manufacturer is not liable for any direct
and/or indirect damage caused by incorrect connections.
!IMPORTANT! Before carrying out the following operations,
make sure that the plug is disconnected from the mains.
TRANSPORT
Always use the packaging or case (when provided) when
transporting the tool; this will protect it from impact, dust and
humidity which can compromise normal operation.
When transporting the tool remove the battery.
MOVING
Position the rotation direction switch in the middle position in
order to prevent accidental start-up.
Grip the tool by its handle and after use put it down upright

- 14 -
without banging using the base of the battery.
STARTING UP
When choosing where to use the electrical tool, the following
should be considered:
- that the place is not damp and is protected from the elements.
- that there should be a large operational area free from ob-
stacles.
- that there is good lighting.
- that it needs to be used close to the general differential switch
(for the battery charger).
- that the power supply system is earthed and conforms to the
standards (only if the electrical tool is class 1, which is equipped
with a plug with earth cable).
- that the room temperature should be between 10° and 35° C.
- that the environment is not in a flammable/explosive atmo-
sphere.
Take out the machine and components and visually check that
they are perfectly intact; then proceed to thoroughly clean them
in order to remove any protective oils used for transport.
SIDE HANDLE ASSEMBLY (if fitted)
Screw the side handle (pos.10) tightly to the drill body.
BATTERY CHARGING (fig.E)
!IMPORTANT! Before using the drill it is necessary to fully
charge the battery.
!IMPORTANT! Recharge only with the battery charger indi-
cated by the manufacturer. An inappropriate battery charger
can cause a fire hazard when used with other battery units.
Take the battery out of the tool housing using the locking devices
(pos.4) and push it in fully to the battery charger compartment
making sure polarity is respected. The compartment may have
an asymmetrical shape in order to prevent the battery being
inserted the wrong way round.
The battery charger may also be provided with a separate
power supply; if so, make the reciprocal connection using the
cable supplied.
Plug in the battery charger to the mains and, if fitted, press the
start charging button (pos.13). The charging light (pos.11), if
fitted, comes on when the battery starts being charged. The
charging time for a completely empty battery is indicated in the
technical data attached to these instructions.
According to the type of battery charger in your possession,
the charging light stays on permanently, or the end of charging
may be indicated by the relevant light (pos.12) coming on or a
different coloured light.
It is also possible that the battery charger is equipped with a
safety device that switches it off when it is fully charged.
In order to keep the battery efficient do not partially charge
or partially empty the battery. Empty the battery completely
and then fully charge it.
Totally empty the battery before fully charging it:
- After a long period of disuse.
- At least every 4 months, even in cases of disuse.
- If while working you notice a clear drop in the performance
of the drill.
After charging unplug the battery charger, take out the battery
and insert it in the drill housing until you hear it click into place.
Always remember that after a certain amount of time the bat-
tery needs replacing. The factors that influence its lifetime are:
number of charge/empty cycles, stress from heavy use, time
since it was manufactured, lack of maintenance.
CUTTING TOOL ASSEMBLY (fig.C)
!IMPORTANT! During the assembly and disassembly of the
bits and inserts, place the rotation direction switch in the
central position (pos.2) to prevent activation of the switch
and therefore accidental start-up.
According to the type of chuck supplied, observe the following
instructions and fig.C:
Self-locking chuck with double ring nut without lock (if fitted)
Turn the ring nut pos.1 to open and close the jaws pos.3,
holding back the ring nut pos.2.
In some chuck models you will hear a click which shows it
has been fully tightened.
Self-locking chuck with double ring nut with anti-unscrewing
lock (if fitted)
IMPORTANT! To attach the tool to the chuck, make sure the
ring nut is unlocked.
1) Unlock the chuck by moving the ring nut pos.2 away from
the ring nut pos.1
2) Turn the ring nut pos.1 to open and close the jaws pos.3,
holding back the ring nut pos.2.
3) Fix the bit, push the ring nut pos.2 towards the ring nut pos.1
until you hear the click. This operation prevents the chuck
opening due to vibration produced by percussion.
Self-locking chuck with single ring nut (if fitted)
The self-locking chuck offers increased convenience and
speed when changing the accessory tool.
Turn the ring nut to open and close the jaws as indicated
in the figure.
Check that the bit or insert is properly centred and firmly held by
the jaws of the chuck.
STARTING AND STOPPING
!IMPORTANT! Before starting the electrical tool it is com-
pulsory to wear protection goggles, gloves and headphones
(not provided).
!IMPORTANT! Make sure nobody is approaching the working
area while the tool is running.
Starting
1) Insert the charged battery in the drill
2) Position the rotation direction switch (pos.2) in one of the
two operating positions (not in the centre)
3) Firmly grasp the hand grip (pos.19) in your hand
4) To start press the button (pos.1).
The switch is a ‘maintained action’ switch so the electrical tool
will stay on when you keep the switch pressed.
Stopping
To stop the drill release the switch (pos.1).
Continuous operation (if fitted)
For continuous operation it is necessary to press the button
(pos. 21) so as to lock the switch after the start-up phases.
Then to stop the machine tool press the switch (pos. 1) and
release it immediately.
IMPORTANT! When working with the switch in continuous
mode, never let go of the grip on the main handle so that,
in the event of danger, you can immediately stop the tool.
We recommend repeating these operations several times before
starting work, in order to familiarise yourself with the controls
as far as possible.
If you notice any working defects, switch off the electrical tool
and consult the chapter “Problems, causes and solutions”.
When not using the tool, turn it off.

- 15 -
OPERATIONAL TIPS
After reading the previous chapters carefully, apply these tips
scrupulously to obtain maximum performance.
Proceed calmly so as to become familiar with all the controls;
after having gained sufficient experience you will be able to make
full use of its potential.
ELECTRONIC CHUCK SPEED ADJUSTMENT (if fitted)
Press the switch (pos.1) gradually until the desired speed is
reached. With less pressure low speeds are obtained, whereas
with more pressure high speeds are obtained.
MECHANICAL CHUCK SPEED ADJUSTMENT (if fitted)
IMPORTANT! The rotation direction inversion operation must be
performed with the tool off and the chuck stationary.
By moving the switch (pos.14) it is possible to mechanically
select the desired speed.
Speed 1: low number of revolutions and high torque (for holes with
a large diameter or screwing large screws into a hard material).
Speed 2: high number of revolutions and low torque.
CHUCK SPEED RANGE ADJUSTMENT (if fitted)
Rotate the grain roller (pos.20) situated on the switch:
direction + to increase
direction – to decrease.
CHUCK ROTATION DIRECTION REGULATION (fig. C)
IMPORTANT! The rotation direction inversion operation must
be performed with the tool off and the chuck stationary.
For drilling operations and tightening right thread screws
(clockwise), move the rotation direction switch (pos.2) to ‘R’.
For unscrewing operations, or removal of embedded bits and
tightening left thread screws (anti-clockwise), move the rotation
direction switch to ‘L’.
FRICTION REGULATION
The friction can be adjusted from ‘1’ to the maximum setting
and normally only needs adjusting for screwing operations.
Using the ring nut to vary the tightening torque (pos.5), match
up one of the values indicated with the reference on the top of
the drill body, remembering that:
- ‘1 ’ corresponds to minimum torque, to use for screw small
screws in soft material.
- the torque increases with the number indicated on the ring
nut until the maximum value is reached , to use for drilling.
In some models to adjust the torque it is necessary for the
screwing symbol to be selected on the percussion ring nut
(pos.9) at the same time; it is also possible that the maximum
torque position is dislocated on the same percussion ring nut
instead of on the torque adjustment one.
PERCUSSION ACTIVATION / DEACTIVATION (if fitted)
Turn the ring nut (pos.9) to the symbol for activating the
percussion function, or to any other position to deactivate it.
LIGHTING FOR WORK AREA (if fitted)
The light (pos.18) comes on or off automatically when the tool
is switched on.
BATTERY CHARGING INDICATOR (fig.F, if fitted)
According to the model in your possession, there may be an
indication of the battery charging status (pos.15), as part of the
tool or in the battery itself. Refer to fig.F (if fitted) and if necessary
press the button in the indicator itself.
CHANGING THE CUTTING TOOL AND INSERT
See chapter “STARTING UP”.
DRILL BITS (not supplied)
Buy good quality bits, with a suitable connection for the cha-
racteristics of the chuck and suitable for the material to be drilled.
Contact your retailer who will be able to give you the best advice.
Our company produces a wide range of bits suitable for the
various uses (metal, wood, brick, etc.).
DRILLING OPERATION
Always secure items in a vice when drilling. Use a punch to mark
the initial drilling point. Keep the drill bits sharp. To drill large
holes first drill a number of small holes to avoid the bit jamming
in the hole and thus overloading the tool.
Reduce the drilling pressure when the bit is nearly out of the item.
Be cautious with the sawdust produced which is very hot and
also very sharp. Wear goggles and protective gloves!
Drilling metal
Use HSS bits. If the item is a thin metal sheet, place a block
of wood under the metal sheet to prevent the bit getting stuck.
To drill a cast iron item, use bits suitable for this material.
With steel items, use special liquid coolant; with aluminium use
paraffin as a coolant, whereas with brass and cast iron do not
use liquids but take the bit out of the hole frequently to allow
it to cool down.
Drilling wood and plastic
Always use bits that are suitable for drilling wood and plastic.
Keep in mind that they are fragile materials and it is possible
that the item can crack during drilling.
Drilling bricks
Always use bits with hard metal inserts (such as Widia etc.)
that must always be in good condition. Apply a constant drilling
pressure throughout the job. Frequently take the bit out of the
hole to remove dust.
If fitted, set the percussion function (pos.9) to facilitate the action
of the bit. For drilling tiles deactivate the percussion function, to
prevent the tile cracking unexpectedly.
SCREWING INSERTS (BITS) (not supplied)
Buy only high quality inserts with connection suitable for the
characteristics of this screwdriver and with a push rod suitable
for the screws in use. Contact your retailer who will be able to
give you the best advice.
Our company produces a wide range of inserts suitable for the
various uses.
SCREWS (not supplied)
It is important to use high quality bolts and screws so as to
obtain the best possible final result. For each kind of material to
be fixed there is a suitable type of bolts and screws; therefore,
buy it according to necessity. If necessary, use washers to
increase the surface area.
SCREWING OPERATION
Place the screw on the panel to be fixed and with a hammer tap
it lightly in a perpendicular position.
For some materials it is necessary to make a pre-hole in order
to facilitate the screwing and to prevent the panel breaking
(especially with wood and plastic).
Grip the screwdriver firmly with one hand and insert the tip
of the bit in the screw head. Lightly press on the screw and
run the screwdriver, activating the switch gradually so as to
modulate the rotating speed and, consequently, the speed of
screw penetration.
At the end of this operation, which usually lasts a few seconds,
remove the screwdriver and turn it off by releasing the switch.

- 16 -
The speed rotation may be modulated electronically from a null
value up to a max value through smaller or greater pressure on
the switch. By means of the grain roller (pos.20, if fitted) it is
possible to mechanically pre-set the stroke of the switch and
therefore the max speed allowed. The screwing speed depends
on the following factors: panel material, screw size, thread,
presence or absence of a pre-hole, etc.
After the screwing phase, the internal rotation joint will be
uncoupled, the electrical tool will become very noisy and will
vibrate; now, remove the screwdriver and turn it off.
Continuing to screw may cause: the breakage of the insert,
damage to the screw head, and failure of the electrical tool (in
this case not covered by the warranty). In this case, unscrew the
screw, perform a pre-hole with a driller and re-screw modifying
the adjustments.
Do not force screws that do not screw!
MAINTENANCE
!IMPORTANT! Before any checks or adjustments take the
battery out of the tool and unplug the battery charger from
the mains.
!IMPORTANT! Do not tamper or attempt to repair the
electrical tool.
The working life and costs also depend on constant and meti-
culous maintenance.
Take good care of your electrical tool and clean it regularly. In
this way its efficiency will be ensured and its lifespan extended.
- Remove dust and machining residuals with a brush with soft
bristles.
- Do not wet or spray water over the electrical tool - risk of
internal infiltrations.
- Do not use any inflammables, detergents or solvents.
- The plastic parts can easily be damaged by chemical agents.
- Do not use compressed air for cleaning: Risk of material
ejection!
- Be careful when cleaning the switch, motor fan slots, chuck,
battery and battery charger.
The tool does not require any special maintenance inasmuch as
it is lubricated with permanent grease inside. Any internal servi-
cing must only be performed by an authorised service centre.
CHUCK REPLACEMENT (fig.D)
1) Open the chuck jaws completely.
2) Insert a screwdriver in the front part of the chuck until reaching
the safety screw.
3) Loosen the safety screw by turning it clockwise (left thread).
4) Position the friction on high torque (high number).
5) Now unlock the chuck with a sharp hit in an anti-clockwise
direction and unscrew it manually.
To assemble the new chuck, follow the previous operations in
the reverse order.
Carry out a trial run.
STORAGE
Clean the tool and all its accessories thoroughly (see Maintenan-
ce section). Protect the unpainted parts with protective oil and
use the original packaging or case (where fitted) to protect it.
Keep the machine out of reach of children, in a stable and safe
position. The place must be dry, free from dust, temperate and
protected from direct sunlight.
Keep children and unauthorised personnel out of the storage
room.
DISPOSAL
In order to protect the environment, proceed according to the
local laws in force. Contact the relevant authorities for more
information.
When the machine is not longer useable or repairable, deliver
the machine and packaging to a recycling centre. Take out the
batteries (where fitted) and dispose of them separately.
Electric and electronic waste may contain substances that
are dangerous for the environment and for human health. For this
reason they must never be disposed of together with domestic
waste, but collected separately in specific collection centres or
returned to the retailer when similar new equipment has been
purchased. The illegal disposal of such equipment may result
in prosecution to the full extent of the law.
Battery disposal: The batteries included in the equipment
can be disposed of along with it.
Do not throw the used batteries on the fire and do not dispose
of them in the environment, but take them to special disposal
centres. Do not dispose of them with domestic waste.

- 17 -
PROBLEMS, CAUSES AND SOLUTIONS
PROBLEM CAUSES SOLUTIONS
The electrical tool fails to
start Battery empty Fully charge the battery
Battery not correctly inserted in the tool
housing Take out the battery and insert it correctly
Rotation direction switch in central lock
position Move the switch to one of the two positions R or L
The battery has overheated and the internal
auto reset protection has cut in Wait for the battery to cool down
Electrical tool or battery faulty Replace the battery and/or contact an authorised
service centre
The battery does not charge Battery not correctly inserted in the battery
charger housing Take out the battery and insert it correctly
Battery charger not ready for charging Plug it into the electric power supply.
Press the start charging button (if fitted)
Battery charger or battery faulty Replace the battery and/or contact an authorised
service centre
The drill stops while drilling Battery empty If available insert a new charged battery, or take
out the battery and fully charge it.
The battery has overheated and the internal
auto reset protection has cut in Wait for the battery to cool down
!IMPORTANT! If the electrical tool still fails to operate cor-
rectly after you have carried out the above operations, or in
the event of anomalies other than those described above, take
it to an authorised service centre with proof of purchase and
ask for original spare parts. Always provide the information
shown on the technical data label.
WARRANTY
This product is guaranteed by law against non conformities with
regards to the characteristics declared, provided that is has been
used exclusively as described in this operator’s manual, has not
been tampered with in any way, has not been repaired by unau-
thorised persons, and, only if original replacement parts were
installed as needed. In any case, consumable materials and/or
components subject to wear, like batteries, light bulbs, cutting
and finishing components, etc. are excluded from this warranty.
Return the product to a retailer or an authorised customer service
centre together with proof of purchase.
AMENDMENTS
The text, figures and data correspond to the standards in place
on the date of printing the instructions contained herein. The
manufacturer reserves the right to update the documentation
if changes are made to the appliance, without being bound by
any obligations.
©
No part of this publication and the documentation enclosed with
the machine may be reproduced without written permission
from the manufacturer.

- 18 -
f
AVERTISSEMENTS GÉNÉRAUX DE SÉCURITÉ
POUR L’OUTIL
!ATTENTION ! Lire tous les avertissements et toutes les
instructions.
L’inobservance des avertissements et des instructions peut
provoquer l’électrisation, des incendies et/ou des lésions
graves.
Le respect scrupuleux de ces avertissements et l’utilisation
des équipements de protection individuelle réduisent au
minimum les risques d’accident, mais ne peuvent pas les
éliminer complètement.
Conservez tous les avertissements et les instructions afin de
pouvoir les consulter ultérieurement.
Le terme « outil électrique » utilisé dans les avertissements se
réfère aux outils électroportatifs actionnés soit par branchement
au réseau électrique (avec fil) soit par batterie (sans fil).
Ces instructions se réfèrent à un outil électrique fabriqué en
plusieurs modèles et versions ; lisez avec attention les instruc-
tions et appliquez-les relativement à l’outil électrique que vous
possédez.
1) Sécurité de la zone de travail
a) Maintenez la zone de travail propre et correctement éclai-
rée. Travailler dans une zone encombrée et/ou sombre entraîne
des risques d’accidents.
b) N’utilisez pas des outils électriques dans des atmosphères
explosives, par exemple en présence de liquides, gaz ou
poussières inflammables. Les outils électriques produisent
des étincelles qui peuvent provoquer l’ignition des poussières
ou des gaz.
c) Tenez les enfants et les passants à distance quand vous
travaillez avec un outil électrique. L’inattention peut faire perdre
le contrôle de l’outil.
d) Conservez les sacs en plastique présents dans l’emballage
dans un endroit sûr. Les sacs peuvent provoquer l’asphyxie et
il faut les tenir hors de la portée des enfants.
e) Utilisez l’outil dans un endroit ayant un rechange d’air
adéquat. La ventilation est nécessaire pour le refroidissement
de l’outil et pour éliminer les impuretés entraînées dans l’air par
le travail exécuté.
f) Ne faites pas fonctionner des outils électriques à l’extérieur
en cas de pluie, brouillard, orage, haute ou basse température
ni dans des endroits mouillés ou humides. L’utilisation dans les
conditions susmentionnées peut provoquer une électrocution.
2) Sécurité électrique
a) La fiche de l’outil électrique doit être adaptée à la prise
utilisée. Ne modifiez en aucune façon la fiche. N’utilisez
pas d’adaptateur quand vous utilisez des outils électriques
dotés de mise à la terre (à la masse). L’utilisation de fiches
non modifiées dans les prises correspondantes réduit le risque
d’électrocution.
b) Évitez que le corps entre en contact avec des surfaces
connectées à la terre ou à la masse comme des tuyaux, ra-
diateurs, cuisinières et réfrigérateurs. Si le corps est connecté
à la terre ou à la masse, le risque d’électrocution est accru.
c) N’exposez pas les outils électriques à la pluie, ne les utilisez
pas dans des endroits humides. La pénétration d’eau dans un
outil électrique augmente le risque d’électrisation.
d) N’endommagez pas le cordon. Ne transportez jamais l’outil
électrique par le cordon d’alimentation et ne tirez pas sur
celui-ci pour débrancher l’outil du réseau électrique. Tenez
le cordon d’alimentation à l’écart des sources de chaleur,
de l’huile, des bords tranchants et des organes mobiles. Un
cordon d’alimentation endommagé ou entortillé augmente les
risques d’électrisation.
e) Quand vous utilisez un outil électrique à l’extérieur avec
un câble de rallonge, celui-ci doit être prévu pour l’utilisation
à l’extérieur. L’utilisation de câbles adéquats réduit le risque
d’électrocution.
f) Branchez l’outil électrique à une installation électrique pro-
tégée par un interrupteur différentiel (DDR). L’utilisation d’un
interrupteur différentiel (DDR) réduit le risque d’électrocution.
g) L’alimentation électrique doit correspondre aux valeurs
indiquées sur l’outil électrique. Une alimentation électrique
incorrecte peut provoquer des anomalies de fonctionnement
et des accidents.
h) Contrôlez périodiquement le cordon d’alimentation. Ne
marchez pas sur le cordon d’alimentation et ne l’écrasez
pas. Un cordon endommagé peut provoquer l’électrisation;
dans ce cas, débranchez la fiche de la prise et n’utilisez pas
l’outil électrique.
i) En cas de doutes relatifs au domaine électrique, adressez-
vous à un électricien qualifié. Une utilisation incorrecte de
l’électricité entraîne des risques élevés pour la sécurité, que ce
soit la vôtre ou celle des autres personnes.
3) Sécurité personnelle
a) Ne soyez jamais distraits et contrôlez ce que vous faites :
les outils électriques doivent être utilisés avec bon sens.
N’actionnez pas l’outil quand vous êtes fatigués ou sous l’effet
de drogues, alcool ou médicaments. Un moment d’inattention
pendant l’utilisation d‘un outil électrique peut provoquer des
lésions physiques graves.
b) Utilisez les équipements de protection individuelle. Portez
toujours une protection pour les yeux. Des équipements de
protection comme un masque anti-poussière, des chaussures
de sécurité antidérapantes, un casque de sécurité, des gants
de protection ou des protections auditives réduisent le risque
de subir des lésions personnelles.
c) Veillez à éviter les démarrages accidentels. Avant de bran-
cher l’outil au réseau électrique et/ou à la batterie et avant de
le saisir ou de le transporter, assurez-vous que l’interrupteur
du moteur est sur la position d’arrêt. Transporter les outils
électriques avec le doigt sur l’interrupteur ou les brancher à
l’alimentation électrique avec l’interrupteur en position de marche
peut provoquer des accidents.
d) Enlevez toute éventuelle clé de réglage avant de mettre en
fonction l’outil électrique. L’oubli d’une clé sur un organe mobile
de l’outil électrique peut entraîner des lésions personnelles.
e) Restez en position stable, en maintenant toujours une
position et un équilibre adéquats. Cela vous permettra de
mieux contrôler l’outil électrique en cas de situations imprévues.
f) Habillez-vous de façon appropriée. Ne mettez pas des
vêtements larges ni des bijoux. Gardez les cheveux, les
vêtements et les gants à l’écart des parties en mouvement.
Les vêtements larges, les bijoux ou les cheveux longs peuvent
se prendre dans les parties en mouvement.
g) En cas d’utilisation de dispositifs à raccorder à des
systèmes d’extraction et collecte de la poussière, assurez-
vous que ces dispositifs sont raccordés et utilisés correcte-
ment. L’utilisation de ces dispositifs peut réduire les risques
liés à la poussière.
h) L’opérateur est responsable vis-à-vis des tiers pour les
éventuels dommages aux personnes et aux choses. Une utili-
sation incorrecte peut provoquer des accidents et des dommages.
i) Il est interdit d’utiliser l’outil électrique quand on est
pieds nus ou que l’on a les pieds et/ou les mains mouillés.
L’utilisation dans les conditions susmentionnées peut provoquer
une électrocution.

- 19 -
l) L’usinage de matériaux nocifs pour la santé doit être ef-
fectué dans le respect des normes en vigueur. Certains types
de poussières et des matériaux comme les métaux, le bois, les
peintures, etc., sont très dangereux pour la santé. Adoptez des
protections et mesures adaptées pour protéger votre santé et
celle des autres personnes.
m) Ne vous approchez pas des fentes d’expulsion de l’air
de refroidissement. L’air qui sort peut contenir des résidus
d’usinage et des petits éléments dangereux pour les voies
respiratoires et les yeux.
n) Ne couvrez pas les fentes de refroidissement et n’insérez
rien dedans. Une ventilation incorrecte de l’outil électrique
peut provoquer un incendie. L’accès aux parties internes peut
endommager l’outil et provoquer l’électrisation.
o) N’utilisez pas l’outil électrique quand ses protections
(écrans, panneaux, volets, etc.) sont ouvertes, endom-
magées ou absentes. Des protections correctement installées
assurent votre sécurité et vous permettent d’utiliser l’outil en
toute sécurité.
p) Pour outils électriques équipés de visée laser : ne regardez
pas le faisceau lumineux, ne pointez pas le faisceau contre
des personnes, des animaux ou des véhicules, ne pointez
pas le faisceau sur les yeux ou sur la peau. Une utilisation
incorrecte du laser peut provoquer des dommages graves à la
vue et à la peau.
4) Utilisation et entretien des outils électriques
a) Ne surchargez pas l’outil électrique. Utilisez un outil adapté
à l’opération à exécuter. Un outil électrique approprié permet
d’exécuter le travail plus efficacement et de manière sûre, sans
dépasser les paramètres d’utilisation prévus.
b) N’utilisez pas l’outil électrique si l’interrupteur de marche/
arrêt ne fonctionne pas correctement. Quand un outil électrique
ne peut pas être contrôlé avec l’interrupteur, son utilisation
devient dangereuse, c’est pourquoi il faut le réparer.
c) Avant de procéder à tout réglage, changement d’acces-
soires ou de ranger l’outil électrique, débranchez la fiche du
réseau d’alimentation et/ou le groupe batterie. Ces mesures
de sécurité évitent le risque de démarrage accidentel de l’outil
électrique.
d) Quand vous ne l’utilisez pas, rangez l’outil électrique hors
de la portée des enfants. Ne permettez pas à des personnes
inexpertes ou n’ayant pas pris connaissance de ces instruc-
tions de l’utiliser. Les outils électriques sont dangereux s’ils
sont utilisés par des personnes inexpertes.
e) Entretenez correctement l’outil électrique. Contrôlez que
les organes mobiles sont alignés correctement et qu’ils ne
sont pas bloqués, qu’il n’y a pas de pièces endommagées
ni de conditions pouvant compromettre le fonctionnement
correct de l’outil. S’il est endommagé, faites-le réparer avant
de l’utiliser. De nombreux accidents sont provoqués par un
entretien incorrect des outils électriques.
f) Les outils de coupe, si présents, doivent être propres
et affûtés. Des outils de coupe bien entretenus et avec des
tranchants affûtés se bloquent plus difficilement et sont plus
faciles à contrôler.
g) Utilisez l’outil électrique, les accessoires, les embouts, etc.
conformément aux indications de ces instructions, en tenant
compte des conditions de travail et de l’opération à exécuter.
L’utilisation de l’outil électrique pour des opérations autres que
celles prévues peut entraîner des situations dangereuses.
h) Quand vous effectuez une opération au cours de laquelle
l’organe de travail peut entrer en contact avec des câbles
cachés, saisissez l’outil par les poignées isolées. Si les
organes de travail entrent en contact avec un conducteur «
sous tension », ils peuvent « mettre sous tension » les parties
métalliques de l’outil électrique et entraîner l’électrisation (voire
l’électrocution) de l’opérateur.
i) Maintenez une distance de sécurité des organes en
mouvement. Le contact avec des parties en mouvement peut
provoquer des lésions graves.
l) N’apportez pas de modifications à l’outil électrique. Il est
interdit d’enlever, remplacer ou ajouter des composants non
prévus par les instructions, sous peine de perte de la garantie.
m) Ne vous éloignez pas de l’outil électrique quand il est
en fonction. Afin d’éviter des accidents, arrêtez-le avant de le
laisser sans surveillance.
n) L’outil électrique ne doit jamais entrer en contact avec
de l’eau ou d’autres liquides. L’utilisation dans les conditions
susmentionnées peut provoquer une électrocution.
5) Utilisation et précautions d’emploi pour les outils à batterie
a) Chargez les batteries exclusivement avec le chargeur
spécifié par le fabricant. Un chargeur de batterie prévu pour un
certain type de bloc batterie peut entraîner des risques d’incendie
s’il est utilisé avec des blocs batteries différents.
b) Utilisez les outils électriques uniquement avec leurs blocs
batteries spécifiques. L’utilisation d’autres blocs batteries peut
entraîner des risques de lésions graves ou d’incendie.
c) Quand vous n’utilisez pas le bloc batteries, tenez-le à
l’écart des objets en métal comme les agrafes, les pièces de
monnaie, les clés, les vis et tout autre petit objet métallique
pouvant créer un contact entre les deux bornes. Un court-
circuit entre les bornes de la batterie entraîne des risques de
brûlures ou d’incendie.
d) Une batterie en mauvais état peut perdre du liquide : évi-
tez tout contact avec celui-ci. En cas de contact accidentel,
rincez-vous immédiatement avec de l’eau. En cas de contact
avec les yeux, faites immédiatement appel à un médecin.
Le liquide qui fuit de la batterie peut provoquer des irritations
et des brûlures.
e) Tenez l’outil et les batteries à l’écart des sources de chaleur
et des flammes nues. Ne les exposez pas à des températures
supérieures à 50°C. Des températures élevées peuvent provo-
quer l’explosion des batteries.
6) Service d’assistance
a) Faites effectuer les opérations d’entretien sur les outils
électriques par du personnel technique qualifié qui utilise
uniquement des pièces de rechange d’origine. Cela permet
d’assurer la sécurité de l’outil électrique.
b) N’essayez pas de réparer l’outil électrique ou d’accéder à
des composants internes. Toute intervention effectuée par du
personnel non qualifié et non autorisé par le Fabricant entraîne
la perte de la garantie et peut être à l’origine de risques graves.
c) Demandez exclusivement des pièces de rechange d’origine.
L’utilisation de pièces de rechange non d’origine peut compro-
mettre la sécurité de l’outil électrique.
CONSIGNES DE SÉCURITÉ POUR LA
PERCEUSE-VISSEUSE À BATTERIE
1) Sécurité
a) Utilisez des protections auditives quand vous utilisez la
perceuse avec la percussion activée. L’exposition au bruit
peut nuire à l’ouïe.
b) Utilisez la/les poignée/s fournie/s avec l’outil. La perte de
contrôle de l’outil peut provoquer des blessures.
c) Quand vous effectuez une opération au cours de laquelle
l’organe de travail peut entrer en contact avec des câbles
cachés, saisissez l’outil par les poignées isolées. Si les
organes de travail entrent en contact avec un conducteur «
sous tension », ils peuvent « mettre sous tension » les parties
métalliques de l’outil électrique et entraîner l’électrisation (voire
l’électrocution) de l’opérateur.

- 20 -
d) Avant d’insérer ou enlever les forets de perçage, séparez
la batterie de l’outil. Cela permet d’effectuer les interventions
d’entretien en sécurité, en évitant les accidents provoqués par
un démarrage accidentel.
e) Les travaux sur le plafond, avec l’outil orienté vers le
haut, comportent plus de risques pour l’utilisateur. Utilisez
un casque de protection contre l’éventuelle chute de matériel.
Mettez des lunettes de protection.
f) Quand on travaille sur des murs porteurs, des structu-
res porteuses, des tuyaux ou des récipients fermés, il est
important de contrôler avec des détecteurs qu’il n’y a pas,
à l’intérieur, des câbles électriques ou téléphoniques, des
liquides ou des gaz sous pression et/ou inflammables et/ou
corrosifs, des tuyauteries, etc. La coupe, même partielle, de
parties de maçonnerie peut affaiblir la structure d’un bâtiment
jusqu’à son écroulement. La fuite de liquides ou de gaz peut
provoquer des explosions, incendies, inondations.
g) Si l’outil électrique se bloque pendant l’utilisation, arrêtez-
le immédiatement. Évitez d’exécuter des opérations pour
lesquelles il faut forcer sur l’outil.
h) Retenez fermement l’outil. Les efforts déterminés par le
perçage provoquent des sollicitations que vous devez contraster
avec votre force.
i) Bloquez la pièce à percer à l’aide d’un étau ou autres. Retenir
une pièce avec la main peut provoquer des accidents imprévus.
l) Attendez que l’outil électrique s’arrête complètement avant
de le poser. Les parties encore en mouvement pourraient le
faire tomber.
m) Si l’outil s’arrête, ne continuez pas à appuyer sur le bouton
de marche, la batterie pourrait s’endommager irrémédiablement.
CONSIGNES DE SÉCURITÉ POUR LA BATTERIE
ET LE CHARGEUR DE BATTERIE
a) Ne démontez pas et ne percez pas l’enveloppe de la bat-
terie. Ne donnez pas de coups sur la batterie et ne la faites
pas tomber. Des batteries endommagées peuvent entraîner
des risques graves.
b) N’exposez pas la batterie à la chaleur ou aux flammes nues,
ne l’exposez pas aux rayons directs du soleil, ne la laissez
pas dans des véhicules, ne l’exposez pas à des températures
supérieures à 50°C : risque d’explosion.
c) Si elle est utilisée incorrectement, une batterie peut produ-
ire une fuite de vapeurs. Ventilez le local ; en cas de nécessité,
consultez un médecin.
d) Tenez les batteries et les appareils électriques hors de
la portée des enfants : il est conseillé de respecter cette
précaution.
e) N’insérez aucun objet métallique dans le compartiment
de la batterie. Ne rangez pas la batterie avec d’autres objets
métalliques (comme la boîte à outils) ni avec d’autres batte-
ries. Risque de court-circuit électrique.
f) Utilisez le chargeur de batterie dans des endroits fermés, à
l’abri de la pluie et de l’humidité, afin de prévenir des risques
d’électrisation.
g) Maintenez le chargeur de batterie toujours propre, la pous-
sière et les salissures peuvent empêcher une charge correcte.
h) Avant l’utilisation, contrôlez toujours le chargeur de
batterie, son cordon et sa fiche. N’utilisez pas le chargeur en
cas de dommages ou de pannes. N’ouvrez jamais le chargeur
de batterie et faites-le réparer exclusivement par du personnel
qualifié, en utilisant des pièces de rechange d’origine.
i) Afin de prévenir tout risque d’incendie provoqué par une
surchauffe, n’utilisez pas le chargeur de batterie sur des
plans d’appui facilement inflammables (papier, tissus, bois,
etc.) ni dans des lieux avec une atmosphère inflammable
ou explosive.
l) Chargez la batterie à une température ambiante comprise
entre 10°C et 35°C. Des températures inférieures ou supérieu-
res peuvent endommager la batterie et empêcher une charge
correcte.
m) Débranchez le chargeur de batterie du réseau électrique
d’alimentation quand vous ne l’utilisez pas. Ne laissez pas le
chargeur de batterie en marche avec la batterie complètement
chargée, afin de prévenir les risques d’accidents.
n) Il est normal que le chargeur de batterie et la batterie
chauffent pendant la phase de charge ; cependant, il faut
qu’ils refroidissent jusqu’à température ambiante entre deux
charges consécutives. Des températures élevées peuvent
provoquer des pannes ou l’explosion de la batterie.
o) Remplacez les batteries qui ont terminé leur durée de vie.
Quand la batterie se décharge très rapidement ou que les cycles
de charge sont très courts, cela signifie qu’elle est usagée et
qu’il faut la remplacer.
p) Utilisez exclusivement des batteries de rechange d’origine,
du même type et ayant les mêmes caractéristiques que la
batterie fournie avec l’outil. L’utilisation de batteries du type ou
de tension différente peut endommager l’outil et entraîner des ri-
sques. Achetez exclusivement des pièces de rechange d’origine.
q) Certaines batteries sont munies d’une protection thermique
à réenclenchement automatique qui interrompt la charge en
cas de température trop élevée ; dans ce cas, le chargeur
de batterie émet une signalisation lumineuse clignotante
rouge. Enlevez la batterie de son logement pendant quelques
minutes, puis remettez-la dans le chargeur de batterie. La charge
reprend automatiquement quand la température revient dans les
limites de sécurité.
r) La tension d’alimentation du chargeur de batterie doit
correspondre à la tension déclarée sur la plaque des données
de celui-ci. N’utilisez aucun autre type d’alimentation.
s) Il est conseillé de prévoir un disjoncteur différentiel sur
la ligne d’alimentation électrique. Consultez votre électricien.
t) N’endommagez pas et ne marchez pas sur le cordon d’a-
limentation. Ne déplacez pas le chargeur en le tirant par le
câble. Ne tirez pas sur le cordon d’alimentation du chargeur
pour extraire la fiche du réseau d’alimentation.
u) Si vous utilisez une rallonge, sa section doit être supérieure
à celle du cordon du chargeur de batterie et doit être dimen-
sionnée en fonction de sa longueur.
v) Si l’outil est bloqué parce que la batterie s’épuise, ne
continuez pas à appuyer sur le bouton de démarrage, sinon
la batterie ne désespérément.
CONSIGNES DE SÉCURITÉ RELATIVES AU
BRUIT ET AUX VIBRATIONS
Le niveau de bruit et de vibrations indiqué sur la feuille ci-jointe
représente une valeur moyenne d’utilisation de l’outil électrique.
L’utilisation d’accessoires de perçage différents, de matériaux
différents, l’utilisation ou non de la percussion et l’entretien
insuffisant de l’outil électrique influencent de façon significative
l’émission de bruit et les vibrations. Vous devez donc adopter les
mesures préventives nécessaires afin d’éliminer les risques de
dommages dus à un bruit élevé et aux sollicitations des vibrations
: utilisez des protections auditives, des gants antivibrations, effec-
tuez des pauses pendant le travail, maintenez l’outil électrique et les
accessoires (forets, mèches, etc.) en bon état de fonctionnement.
A página está carregando...
A página está carregando...
A página está carregando...
A página está carregando...
A página está carregando...
A página está carregando...
A página está carregando...
A página está carregando...
A página está carregando...
A página está carregando...
A página está carregando...
A página está carregando...
A página está carregando...
A página está carregando...
A página está carregando...
A página está carregando...
A página está carregando...
A página está carregando...
A página está carregando...
A página está carregando...
A página está carregando...
A página está carregando...
A página está carregando...
A página está carregando...
-
 1
1
-
 2
2
-
 3
3
-
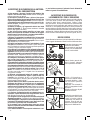 4
4
-
 5
5
-
 6
6
-
 7
7
-
 8
8
-
 9
9
-
 10
10
-
 11
11
-
 12
12
-
 13
13
-
 14
14
-
 15
15
-
 16
16
-
 17
17
-
 18
18
-
 19
19
-
 20
20
-
 21
21
-
 22
22
-
 23
23
-
 24
24
-
 25
25
-
 26
26
-
 27
27
-
 28
28
-
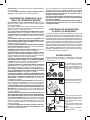 29
29
-
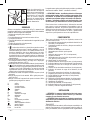 30
30
-
 31
31
-
 32
32
-
 33
33
-
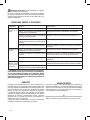 34
34
-
 35
35
-
 36
36
-
 37
37
-
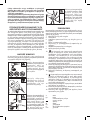 38
38
-
 39
39
-
 40
40
-
 41
41
-
 42
42
-
 43
43
-
 44
44


Valex 1429541 Manual do proprietário
- Categoria
- Brocas combi sem fio
- Tipo
- Manual do proprietário
- Este manual também é adequado para
em outras línguas
- español: Valex 1429541 El manual del propietario
- français: Valex 1429541 Le manuel du propriétaire
- italiano: Valex 1429541 Manuale del proprietario
- slovenčina: Valex 1429541 Návod na obsluhu
Artigos relacionados
-
 Valex 1421367 Manual do proprietário
-
 Valex 1422532 Manual do proprietário
-
 Valex 1429200 Manual do proprietário
-
 Valex 1429363 Manual do proprietário
-
 Valex 1467017 Manual do proprietário
-
 Valex 1410219 Manual do proprietário
-
 Valex 1401611 Manual do proprietário
-
 Valex 1552009 Manual do proprietário
-
 Valex 1105020 Manual do proprietário
-
 Valex 1410308 Manual do proprietário


Outros documentos
-
Parkside PABS 20-Li A1 Instruções de operação
-
Parkside PBSA 20-Li A1 Translation Of The Original Instructions
-
Parkside PBHA 12 A1 Translation Of The Original Instructions
-
Parkside PABS 14.4 A1 Operation and Safety Notes
-
-
-
Parkside PAS 3.6 A1 Operation and Safety Notes
-
Hitachi DV14DL2 Manual do proprietário
-
-