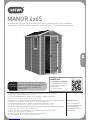
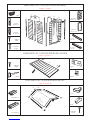
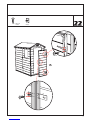
Keter MANOR 4x6S Assembly Instructions Manual
- Tipo
- Assembly Instructions Manual

WWW.KETER.COM
ASSEMBLY INSTRUCTIONS | INSTRUCCIONES DE MONTAJE | MONTAGEANLEITUNG | CONSIGNES
DE MONTAGE | SAMLEVEJLEDNING | MONTAGE-VOORSCHRIFTEN | ISTRUZIONI D’ASSEMBLAGGIO
MANOR 4x6S
A-1265-2 55????
MANOR 4x6S
2 easy steps to use a QR-code:
1. Download a FREE QR-Code
reader from your smartphone
application site.
2. Scan the QR-Code.
SKU:
17197126 | 17194155
Thank you for your purchase of the Keter shed,
In order to activate your warranty, please enter
www.keter.com, under storage buildings
category and fill in the sheds warranty
activation form.
WARRANTY
ACTIVATION
WWW.KETER.COM
US: # 1-888-374-4262
Canada: # 1-800-661-6721
UK: # 0121-5060008
Other European Countries:
# 31-1612-28301
BRINGEN SIE IHR PRODUKT NICHT GLEICH ZUM LADEN ZURÜCK, FALLS TEILE FEHLEN ODER DEFEKT SIND.
VAN ONTBREKENDE OF GEBROKEN ONDERDELEN NIET HET PRODUCT NAAR DE WINKEL RETOURNEREN.
DI PARTI MANCANTI O DANNEGGIATE, EVITARE DI RESTITUIRE IL PRODOTTO AL NEGOZIO.
PEÇAS EM FALTA OU PARTIDAS, NÃO DEVOLVA O PRODUTO À LOJA.
IF THERE ARE MISSING OR BROKEN PARTS, PLEASE DO NOT RETURN THE PRODUCT TO THE STORE
Please log onto our website, or contact Customer Service at:
S’IL Y A DES PIÈCES MANQUANTES OU CASSÉES, NE RETOURNEZ PAS LE PRODUIT AU MAGASIN
Veuillez visiter notre site Internet, ou contacter notre Service Clientèle:
BITTE
Bitte loggen Sie in unsere Website ein oder wenden Sie sich an unseren Kundenservice:
SI HUBIERA ALGUNA PARTE FALTANTE O DAÑADA, NO DEVUELVA EL PRODUCTO A LA TIENDA
Inicie sesión en nuestro sitio en Internet o contáctese con nuestro servicio de atención al cliente:
IN GEVAL
Ga naar onze website of neem contact op met de Klantenservice:
IN CASO
Accedere al nostro sito o contattare il Servizio Clienti:
SE HOUVER
Entre na nossa página de Internet ou contacte o Serviço de Clientes:

2
CUSTOMER SERVICE | SERVICE CLIENTÈLE | KUNDENSERVICE | SERVICIO AL CLIENTE |
KLANTENSERVICE | SERVIZIO CLIENTI | ASSISTÊNCIA AO CLIENTE
REQUIRED TOOLS | OUTILS EXIGÉS | HERRAMIENTAS NECESARIAS | BENÖTIGTE WERKZEUGE
BENODIGD GEREEDSCHAP | ATTREZZATURA OCCORRENTE | FERRAMENTAS NECESSÁRIAS
LEVEL THE GROUND | NIVELLEMENT DU SOL | NIVELE EL SUELO | SORGEN SIE FÜR EINE EBENE
GRUNDFLÄCHE MAAK DE GROND WATERPAS | METTERE IL TERRENO A LIVELLO | NIVELAR O SOLO
IMPORTANT: For assistance with assembly or to request missing parts, please log onto our web site at www.keter.com or contact Customer Service.
IMPORTANT : Pour toute assistance lors du montage ou pour obtenir des pièces manquantes, veuillez visiter notre site Internet : www.keter.com
ou contacter notre Service Clientèle.
WICHTIG: Sollten Sie bei der Montage Hilfe benötigen oder fehlende Teile anfordern müssen,
besuchen Sie bitte unsere Internet-Seite www.keter.com oder wenden Sie sich an unseren Kundenservice.
IMPORTANTE: Para asistencia con el armado o para solicitar partes que puedan faltar,
por favor, entre a nuestro sitio en Internet: www.keter.com, o contáctese con nuestro servicio al cliente.
BELANGRIJK:
Voor hulp bij het monteren of het aanvragen van missende onderdelen, kunt u op onze website inloggen: www.keter.com of contact
opnemen met de klantenservice.
IMPORTANTE:
Per ricevere assistenza sul montaggio o per richiedere parti mancanti, accedere al nostro sito web all'indirizzo www.keter.com
oppure contattare il Servizio clienti.
IMPORTANTE: Para obter assistência ou pedir peças que estejam em falta, aceda ao nosso site www.keter.com ou contacte a assistência a clientes.
US:
Call Toll Free Number
: 1-(888)-374-4262
Fax:
317-575-4502 11495 North Pennsylvania Suite 110,
Carmel, Indiana 46032, U.S.A
Canada:
Appel gratuit:
1-(800)-661-6721
Call Toll Free Number:
1-(800)-661-6721
United Kingdom:
Keter (UK) Ltd.
Unit 4, Woodgate Business Park, Clapgate Lane,
Birmingham, B32 - 3DB, United Kingdom.
Tel: 0121-5060008, Fax: 0121-4220808
Other European Countries:
Keter Europe Gardening
Ericssonstraat 17, Postbus 224, 5120 AE Rijen,
the Netherlands. Tel: 31-1612-28301,
Fax: 31-1612-28322
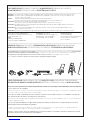
The following tools are required for shed assembly | Pour construire votre remise, vous aurez besoin des outils suivants | Für die Montage
des Gartenschuppens benötigen Sie folgende Werkzeuge | Las siguientes herramientas son necesarias para armar el cobertizo |
De volgende gereedschappen worden vereist voor het monteren van het schuurtje | Il montaggio richiede i seguenti
utensili | São necessárias as seguintes ferramentas para a montagem do abrigo de jardim:
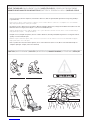
Please select your construction site carefully | The ground surface must be level | it is highly recommended that you construct a wooden or
concrete | base to use as a foundation.
Veuillez sélectionner le site de votre construction avec précaution. La surface du sol doit être plane | il est fortement recommandé de constru-
ire une base en bois ou solide afin de l'utiliser comme fondation.
Seleccione con cuidado el lugar donde colocará su cobertizo | la superficie del suelo debe ser pareja | le recomendamos especialmente
que construya una base de madera o cemento para usar como cimiento.
Bitte wählen sie ihren montagestandort sorgfältig aus | die bodenfläche muss eben sein. Es wird empfohlen, dass sie eine holz-oder betonun-
terlage als fundament anlegen.
Selecteer met zorg uw bouwplaats | het oppervlak van de grond moet vlak zijn | het wordt ten zeerste aangeraden dat u een houten of
betonnen basis maakt om als fundament te gebruiken.
Scegliere con cura la posizione ove montare la casetta | la superficie del terreno deve essere ben livellata | si raccomanda vivamente di
costruire un basamento in legno o in calcestruzzo, da utilizzare come fondamenta.
Por favor, escolha o local de construção cuidadosamente | a superfície do solo deve ser nivelada | recomenda-se vivamente que construa
uma base de madeira ou de cimento para usar como fundações.

3
Clear area of stones | Remove all plants, roots and other obstacles | Rake the ground | Make ground level using a long, flat object
(e.g. wood beam)
Retirez toutes les pierres | Arrachez toutes les plantes, racines et autres obstacles | Ratissez le sol | Aplanissez le sol à l'aide d'un
objet long et plat (une planche en bois par exemple)
Beseitigen Sie Steine | Entfernen Sie alle Pflanzen, Wurzeln und andere Hindernisse | Pflügen Sie den Boden durch | Ebenen Sie den
Boden mit Hilfe eines langen, flachen Objektes (wie z.B. eines Holzbalken) aus.
Saque las piedras del área | Retire todas las plantas, raíces y otros obstáculos | Rastrille la tierra | Nivele el suelo usando un objeto
largo y plano (por ejemplo, una viga de madera).
Verwijder stenen | Verwijder alle planten, wortels en andere obstakels | Hark de grond | Maak de grond met een lang, vlak onderw-
erp (bijv. een houten balk) waterpas
Eliminare le pietre | Rimuovere piante, radici e altri ostacoli | Livellare il terreno | Mettere a livello il terreno utilizzando un oggetto
lungo e piatto (ad es. un asse di legno)
Retire as pedras do local | Retire todas as plantas, raízes e outros obstáculos | Alise o local | Nivele o solo utilizando um objecto
comprido e plano (por exemplo, uma trave de madeira)
LEVEL THE GROUND | NIVELLEMENT DU SOL | NIVELE EL SUELO | SORGEN SIE FÜR EINE EBENE
GRUNDFLÄCHE MAAK DE GROND WATERPAS | METTERE IL TERRENO A LIVELLO | NIVELAR O SOLO
CAUTION | AVERTISSEMENT | WICHTIG | ADVERTENCIA | WAARSCHUWING | ATTENZIONE | ATENÇÃO

4
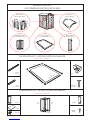
GENERAL PARTS LIST
LISTE GÉNÉRALE DES PIÈCES DÉTACHÉES
door parts
pièces des portes
floor parts
Pièces du plancher
roof parts
pièces du toit
walls parts
pièces des murs
f1a
177x111 cm
fc1
fc1
t
t
t
t
c1z
c1z
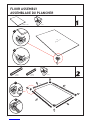
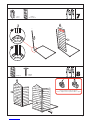
FLOOR PARTS LIST | LISTE DES PIÈCES DU PLANCHER
go to stage 1 | étape 1
fc1(x2)
172 cm
c1z(x2)
106 cm s26b (x12)
26 mm
t (x4)
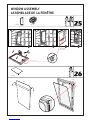
WINDOW PARTS LIST | LISTE DES PIÈCES DE LA FENÊTRE
stage 25 | étape 25
f-out
(x1) f-in
(x1)
acw (x1)
pls (x1)
f - out (x1)
acw (x1)
sc15 (X7)
18mm
f-in (x1)
window parts
pièces de la fenêtre

5
s13b (x21)
12mm dl (x1)
rc
rc
rc
rc
kc
kc
rc1
rc1
e1d
e1d
e1d
e1d
r1m
121 cm X195 cm
s1d
w1d
w1d
w1d
v
v
h1c
h1c
cc
cc
cc
cc
fu1b
bu1b
dh
dh
d
dl
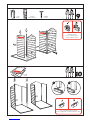
WALL PARTS LIST | LISTE DES PIÈCES DES MURS
stage 6 | étape 6
DOOR PARTS LIST | LISTE DES PIÈCES DE LA PORTE
stage 22 | étape 22
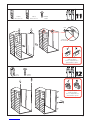
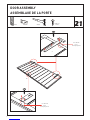
ROOF PARTS LIST | LISTE DES PIÈCES DU TOIT
stage 15 | étape 15
v (x2)
s1d (x1)
88x172 cm
w1d (x3)
88x172 cm
s26b (x61)
26 mm h1c (x2)
165 cm
cc (x4)
168 cm
fu1b (x1)
190x111 cm
bu1b (x1)
190x111 cm
rc(x4)
kc(x2)
s26b (x52)
26 mm
rc1 (x2)172cm
e1d (x4)56 cm
dh(x2) dl (x1)
s13b (x4)
12mm


13
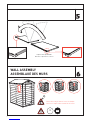
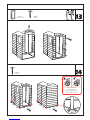
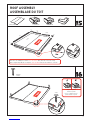
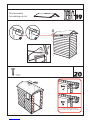
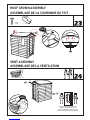
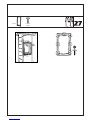
ROOF ASSEMBLY
ASSEMBLAGE DU TOIT
s26b(x8)
26mm
s26b
r1m(x1)folded rc1(x2)172cm e1d(x4) 56cm rc(x4)
2
1
UF
Uc
rc
rc
e1d
e1d
rc1
rc1
e1d
e1d
r1m
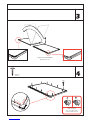
Note: The roof folding line, and the “This side Down” label, must be seen at this stage.
Note: La ligne de pli du toit et l'étiquette "This side down" doivent être visibles à ce niveau.
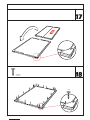
Fully fit the panel
inside the porfile
Insérer complètement le
panneau dans le profil


A página está carregando...
A página está carregando...
A página está carregando...
A página está carregando...
-
 1
1
-
 2
2
-
 3
3
-
 4
4
-
 5
5
-
 6
6
-
 7
7
-
 8
8
-
 9
9
-
 10
10
-
 11
11
-
 12
12
-
 13
13
-
 14
14
-
 15
15
-
 16
16
-
 17
17
-
 18
18
-
 19
19
-
 20
20
-
 21
21
-
 22
22
-
 23
23
-
 24
24


Keter MANOR 4x6S Assembly Instructions Manual
- Tipo
- Assembly Instructions Manual
em outras línguas
- español: Keter MANOR 4x6S
- français: Keter MANOR 4x6S
- Nederlands: Keter MANOR 4x6S
Artigos relacionados
-
tepro Kunststoff Gerätehaus MANOR 46 S - Farbe grau/weiß Instruções de operação
-
Keter Manor 46S Assembly Instructions
-
-
-
Keter 1612 Guia de instalação
-
-
-
-
-